
Having a summer cottage in your possession, you want to arrange it with the highest comfort. For many, the gazebo is a place for relaxing tea and gathering guests. Well, a table made of wood will perfectly fulfill its intended purpose, and will fit perfectly into the given space. This article will talk about how to make wooden tables and benches for a gazebo.
Making something with your own hands means not only saving on the purchase of a finished product, but also delighting your soul with the result. In addition, this approach allows you to design wooden furniture for gazebos according to the area of the building, thereby solving the issue of arrangement with maximum efficiency.
The tabletop can have a completely different shape (round, oval, square, octagonal, etc.), the main thing is that the skills of a home craftsman are sufficient. Anyone familiar with carpentry can skip the lectures on the purpose of a particular tool and safety rules when working with them.
Wooden tables for gazebo photo

Wood for garden furniture
- When selecting material, special attention is paid to its quality. Wooden parts should not be damaged by insects or fungi. The most even lumber will allow assembly to be carried out easily and quickly. In addition, this will reduce wood consumption (no large scraps).
- Conifers have a natural softness, they can be easily processed and have an aesthetically attractive appearance. However, the resins released will ruin both the clothes of the people sitting at the table and the festive tablecloth.
- Wooden tables and benches made from hardwood are the most profitable option. The table will be strong and durable. The most preferred lumber is obtained from pear, cherry, larch, birch, and ash. It should be remembered that wood changes its original shade over time.

Wood processing
- Protective compounds must be applied both before and after installation. Such measures will help preserve the rich texture and increase the service life of the finished structure.
- The treatment will ensure the moisture resistance of the wood and preserve the natural vapor permeability of the natural material. Protection is especially important for this piece of furniture, given its permanent location outdoors.
- It should be remembered that if during the assembly process the components of the structure are adjusted, the sawed areas are also processed.
DIY wooden tables for the gazebo
- Before starting work, do not neglect such a stage as preparation. The table is a structure consisting of two main elements - a tabletop and support legs. The first step is to draw up a sketch of the future creation, in which all the details will be noted, as well as their size and location.
- Think over and prepare wood, tools, painting materials and fasteners in advance, so that at the most crucial moment you don’t have to run around the neighbors in search of the necessary things or go to the nearest hardware store.
Material. Tool. Fasteners
- Procurement of all components of the structure is carried out on the basis of the drawn up project. When choosing the size and shape of a table, it is important to rely not only on personal preferences, but also take into account similar indicators of the gazebo.
- This item should not interfere with the free passage of people; here we mean the distance between the table top and the seating areas. Round and oval tables look great in polygonal gazebos. But many, choosing between aesthetics and practicality, prefer standard square or rectangular tables.

- If the geometry of the tabletop may be futuristic, then the height of the table must be treated more rationally. The optimal indicator is considered to be 70-75 cm. In this case, the height of the seating areas should be in the range of 42-47 cm.
- The thickness of the boards for the tabletop is 3 cm. This parameter will allow you to assemble a durable surface, without deflection, even under high loads. The width of the lumber can be from 15 to 20 cm. Ready-made panels, which are sold in some hardware stores or carpentry shops, will help simplify assembly work.
- For the legs, 5x5 cm bars are taken. If you want to make a table with a hint of a masterpiece, then you can purchase figured balusters.
You will also need the following construction tools:
- screwdriver;
- drill;
- saw, jigsaw;
- sanding machine, sandpaper of different grain sizes;
- level, square;
- marker, pencil;
- glue, screws (6x30 mm and 4.8x50 mm).
The first stage of assembling a table into a wooden gazebo
- All wooden elements are processed with a plane. The surface is brought to an ideal state using a grinding machine. For hard-to-reach places, sheet sandpaper is used. Thus, all irregularities, scratches, and burrs are removed.
- As a result, the components of the future structure should be smooth and even. All sides of the lumber need to be processed; the ends and corners are not ignored.
- To create a higher quality countertop, it is better to buy tongue and groove boards. They will allow you to assemble the shield without gaps, while eliminating the labor-intensive work of adjusting individual parts.
- It is recommended to chamfer the edges of the bars used as support legs.
Assembling the tabletop
- The frame gives strength and stability to the entire product. The boards for the frame should be approximately 30 cm shorter in length and width relative to the same parameters of the tabletop.

- The outer frame is formed by 4 boards (2 short and 2 long). Using a square, first place a short board for the frame on the edge at an angle of 90 degrees, attach a leg to it and fasten it with self-tapping screws. Next, connect the second support from the other edge of the board.
- The second pair of legs is fastened in the same way. Then long frame boards are attached to the blanks. Fastening can be done directly with self-tapping screws or using metal corners that securely fasten the entire structure.
- To avoid possible splitting of the material, you can pre-drill guide holes into which the screws are screwed. The heads of the fasteners must be completely recessed into the wood.
- Along the length of the frame, points for attaching crossbars are marked in the boards. Particular attention is paid to the perpendicular arrangement of the planks relative to the frame. You may need from 4 to 6 pieces depending on the length of the table.
- The boards for the tabletop are laid on a flat surface with the outer side down. They need to be temporarily fixed for easier operation. You can achieve reliable fastening to each other by first coating the ends of the boards with glue.

- Next, place the crossbars in at least three places (at the edges and in the middle). Select the optimal length of the screws so that their ends do not “crawl out” from the front surface of the tabletop.
- We turn the tabletop face down and fix the previously prepared frame with legs.
Wood furniture finishing
- At the end of assembly, depending on the design, the corners are cut or rounded with an electric jigsaw. Chamfers are cut from the edges of the tabletop. All screws are tightened as necessary. The structure is polished. Scratches that appear during the work are repaired with wood putty.

- Dust and chips are removed after finishing sanding. The table is vacuumed or blown, and then wiped with a slightly damp cloth. The product is covered with stain or several layers of transparent varnish. The latter option will highlight the natural beauty of wood.
- An excellent decoration for a country table would be decoupage or a single painting. But hiding the rich texture under a layer of oil paint is simply a crime. The necessary protection can be perfectly provided by special impregnations and modern paints and varnishes.
Tables and benches for gazebos made of stumps
- An interesting option for making a table for a round gazebo, where a stump is used instead of standard legs, will help to emphasize the country mood. In this case, the tabletop should be round or oval.
- The thickness of boards with such support can be 20 mm. It is important to follow the rule here: the larger the tabletop, the thicker the board.
- An old, well-dried stump without rot (the type of wood does not matter) is coated with clear varnish. This approach will best emphasize the texture and other advantages of natural material.
- If the stump has been cut recently, it must be thoroughly dried. You can use a warm, dry room or take advantage of sunny weather and leave it in an open, well-ventilated area. The drying process takes about 2 months.
- The base for the future table is cleared of bark using a chisel, chisel or chisel. The work is carried out carefully, trying not to damage the wood itself. Protruding rhizomes and other unsightly parts are cut off with a hacksaw.

- Next, the stump is leveled horizontally. The construction level will help at this stage; all defects can be eliminated with a regular plane. Here you need an absolutely flat surface, because it serves as the basis for installing the countertop.
- The stump is sanded mechanically, inaccessible areas are cleaned manually using coarse sandpaper. You should have a lot of patience. A “tricky” foundation will take a lot of time, but the resulting result will exceed all expectations.
- If the width of the stump allows, then in its upper part you can make two recesses to match the parameters of two perpendicularly located boards. The latter will serve for more reliable fixation of the tabletop and stability of the entire structure as a whole.
- The boards that form the tabletop are held together with glue and crossbars. A circle or oval is drawn on the outside. It is given its final shape using an electric jigsaw. The surface and cuts are sanded and treated with impregnations, varnishes, etc.
- The tabletop is attached using nails or self-tapping screws carefully selected in length. Fixation is carried out from the outside, so the caps must be recessed in the wood. The resulting dots can be hidden with putty that matches the shade of the wood as closely as possible.
- To prevent peeling of the varnish and ensure better application of subsequent layers, it is recommended that after the first layer the product is thoroughly dried and then treated with fine sandpaper.
Transformable table-bench
When folded, such a product looks like a narrow table, but when unfolded it can accommodate a large number of people. Its manufacture will require a more professional approach.

- It is impossible to do without a preliminary plan and careful calculation. Here the location of the support legs in the assembled and unfolded state is calculated. The drawing marks the places where parts are attached, fold lines and other important points that facilitate subsequent assembly.
- A responsible approach to each stage of work will allow you to achieve the desired result, which will bring both benefits and aesthetic pleasure. Even from trash that has been stored in a utility room for many years, you can create beautiful furniture for wooden gazebos. The main thing is that it doesn’t turn out exactly the opposite.
You can demonstrate your creative abilities by starting with simple designs. Models in the minimalist style are always in trend. In addition, such products are perfectly used as a piece of furniture for any needs of a country house. Having gained experience, masters can move on to more complex ideas. Carved legs, a tabletop of non-standard geometry, inserts made of various materials and other decorative elements will help you fully express and reveal your creative potential.
With friends and family, just sit over a cup of coffee or Mark any celebration.
And in order for there to be enough space for all those invited, a large one should be placed in the gazebo. table, which by the way you can do on one's own.
For manufacturing you don't need any special table materials and tools, and everything you need most likely there will be on your site.
What types of tables are there?
To begin, decide on shape table, focusing on the size and shape of the gazebo itself.
Tables rectangular the shapes are considered classics, but they do not look good in round gazebos. Advantage similar shape is that they can be installed as in center room, in a corner or against a wall.
Also for a rectangular table you can make benches.
Round table more compact, and if necessary, you can seat him more number of guests than originally expected. However, the shape of the tabletop itself uncomfortable and does not imply the presence benches(only chairs that are placed around the table).
Legs tables can be either stationary or portable. And their quantity depends on the reference you choose models table:
- one leg (central);
- two parallel legs (in the shape of an inverted T, often connected by a crossbar);
- three legs (for round and small tables);
- four legs (classic version).
Note! If you are not often at the dacha, the best choice for a gazebo would be folding furniture, which can be displayed if necessary and removed during your absence.
What are tables made of?
The following are most often used to make tables: materials:
- Tree
The most beautiful and organically fits into the atmosphere suburban home material. Wooden tables are durable and durable, however the surface will need to be protect from exposure to the external environment (coat with varnish). - Chipboard
This is perhaps the most cheap, but at the same time short-lived material. But if you plan to use the table for occasional gatherings under a canopy or in closed gazebo, chipboard will cope with its function quite well.
The exception is laminated Chipboard: it is more expensive and stronger, not afraid of water and exposure to the external environment. - Plastic
Plastic tables are quite popular. They don’t get dirty, they don’t demand special care, are not afraid of moisture. In addition, plastic is very light, which means the table will be extremely easy to move.
Disadvantage of plastic tables - fragility and fear of direct sunlight, as well as their small size (the material cannot withstand loads, and therefore the countertop area is often minimal). - Metal
Metal tables are the most durable, but at the same time uncomfortable. The heavy structure is difficult to move, the table itself heats up under the sun and cools in cold weather.
There are also other materials that are used in the manufacture of tables, but the options listed above are found more often the rest.
Materials and tools
If you decide do table in the gazebo with your own hands, then you will be needed following:
- hammer;
- saw;
- axe;
- nails(bolts);
- sandpaper;
- impregnation
- varnish
Helpful advice: If you do not plan to varnish the wooden table, leave a small gap between the boards of the tabletop. This way the water will flow between the boards and not remain on the table, causing it to rot.
Wooden table
 On one's own make the table is the simplest of tree.
To begin, decide on size future table and make a drawing. According to prepared drawing cut out the details.
The manufacture of the table should begin with countertops. It is collected from boards or bars of suitable length. Lateral ends should be leveled so that the boards tight adjoined each other and no gaps formed in the tabletop.
The boards are fastened together with self-tapping screws or dowels. Finished countertop surface level out and polished.
If you want to do classical table option, then make from two longitudinal and two transverse boards box, to which the tabletop and legs will be attached. It is important that angles the boxes were not warped.
Legs are attached to the box with self-tapping screws or bolts. To give the design more rigidity Additional boards can be attached to the sides.
The last stage of assembly is attaching to frame countertops.
Wooden table assembly diagram 
An interesting solution for dachas – in which the table and benches represent single design. Table-bench option – transformer: An ordinary-looking bench with a backrest turns into a cozy dining nook in one movement.
Log table
 Making such a table is quite difficult, since before manufacturing parts, it is necessary to process logs
If they are enough even and long, they can be used directly as legs. And here table top you will have to cut it out separately.
General assembly principle log table is the same as for a wooden table.
Assembling a table from solid logs (logs)
Step 1. Plan the logs and give them the desired shape view.
Step 2. Give the corners more streamlined shape (to avoid injury later).
Step 3. For structural stability, “plant” the logs on fittings(based on the table architecture you have chosen), having previously drilled holes in the solid wood. Distance between the holes should be at least 30 centimeters.
Step 4. File down the part of the reinforcement sticking out of the logs exactly along edge drilled hole, then pull it out and shorten she's still on 5 mm.
Step 5. During final assembly fill the drilled holes glue, to ensure reliable fixation of the reinforcement.

Helpful advice: Use logs that are approximately the same size. This will make it much easier for you to fit the parts together.
Product finishing
 After the table is ready, surface must be treated with sandpaper, processed antiseptic and cover with 2-3 layers of varnish.
you also can improve it using various decorative techniques such as:
- painting on wood;
- burning;
- artificial aging;
- cladding tiles;
- mosaic.
How to make a table and a bench for a summer house from one log and without a single nail, see video:
Free time is worth its weight in gold for many summer residents. As soon as it's the weekend, they rush to their plot to weed the beds, water the tomatoes and cucumbers and sit with the family for a meal in the fresh air. Taking into account the lack of time, I want to make the table and benches, if not for centuries, then at least for decades. With proper processing, wood can adequately cope with this task, although it is considered far from the most durable material.
At least, that was what was believed, but with the advent of all kinds of impregnations and primers that will protect wood from rotting, getting wet and burning, this opinion is not so relevant. However, treatment with impregnations is the final stage, and at the start we need to decide on the basic design and materials. In search of new ones, look around you - they may be, as they say, right under your nose!
The easiest way to build a strong table is to use a thick log, which is cut horizontally to obtain the desired height, processed with a plane, sanded and, if desired, varnished. There are only two flaws in this scheme - firstly, where to get such a thick log, and secondly, where to get a chainsaw that can handle it? It won’t be possible to build a table, but at least for chairs you will find plenty of necessary logs, and there will be no problems with a chainsaw.
By the way, you don’t have to chop anything to get a base for furniture. A living tree can serve as an excellent base for constructing a circular bench, on which you can relax with great pleasure during the harvest. For legs, you can use ordinary thick branches, dug or driven a third into the ground around the tree. When hammering, carefully measure the level of each leg so that you end up with a level bench. When they are hammered in, nail or tie horizontal branches to the end with a rope, so that one end of the branch rests against the tree. When all the horizontal branches are ready, make a dense wattle fence from willow twigs prepared in advance. Once the branches are dry, your bench is ready!
What else should a table in a gazebo be made of wood, if not wooden? However, not everyone will be able to put together a table from boards, and the necessary tools may not be available. But you can get out of this situation with the help of timber - reliable, strong and extremely simple tables and can be made from them in a matter of hours!
The most important thing in the design is that the bars are even and adjusted to each other.
In total you will need from three to five bars, depending on the length and height of the table. To begin with, we will make the legs - for this we measure two pieces of timber from half a meter to a meter (depending on the desired width of the table) and two more pieces of smaller width. The long beam will form the basis of the lower part of the legs, the shorter beams will lie on top of them. If the table stands constantly in one place, and the beams are adjusted to each other as carefully as possible, then it will be enough to fasten the wood with wood glue. Or on the inside, for reliability, fasten the bars with slats.
When the beams are adjusted and fastened, we place another beam on top across them - its length should be equal to the length of the tabletop. Beams of similar sizes are laid on top of it, only those that are smaller go first, and then those that are larger. Having fastened the parts with wood glue and making sure that everything is perfectly level, we lay wide, rough boards on the very top row, which can either be nailed or placed on the same wood glue. Only in the latter case a heavy load needs to be placed on top of the structure for several days, for example, several bags of cement to help the wood grip more firmly.
When the wood has set properly, the tabletop needs to be processed with a plane, rounding off all sharp corners and sanding the tabletop with sandpaper. Your table is almost ready - you just need to cover it with water-repellent compounds and parquet varnish that repels insects. Such furniture will certainly last for decades, while ordinary wooden tables will long ago fall into disrepair.
The table represents one of the most fundamental elements in any relaxation area. This is especially true for country gazebos. You can gather a large group at the table, have fun and eat delicious food. You can easily assemble it yourself. Many homemade wooden tables for gazebos are not much different from purchased models. Often they even surpass store-bought analogues in terms of design ideas.
To save on construction, you should know a few basic rules for its construction. It is also necessary to understand the features of such a design and possible installation errors. You should also consider the variety of types of gazebo tables.
Design differences
A tabletop for a wooden gazebo can have many original shapes. What the building will be like depends on the owner of the site. To decide on the type of future wooden gazebo table, you should look at several interesting photos.

There are several main types of countertops. The most common are rectangular options. This product is a very simple design that can be found in most traditional gazebos. This table is usually made of wood. Advantages of a rectangular design:
- It is easy to fit into any interior and is perfectly complemented by various decorative elements.
- Large capacity. Typically, rectangular products are made for 8 people to relax at the same time, however, it can be made larger.
- Benches are located on both sides of the table. They are equal in length to it.

A round table is also one of the popular options. It is placed in the center of the gazebo. Benches are usually arranged in a circle. Often chairs are prepared for guests. This design is quite convenient in that you can increase the number of seats.
You can place benches around the perimeter of the gazebo. With a small number of places, a simple folding table will be enough. With a hexagonal gazebo, it is better to place benches around the entire perimeter.

The table can also be made of metal. However, if you lack the necessary skills and experience, you should entrust the work to professionals. You can also make a combined version - the frame is made of metal elements, and the part on which they will sit is made of wood.
If you have no desire to buy a ready-made structure, it is better to opt for a wooden product. Such a gazebo table will be affordable and easy to implement, and its appearance will be very attractive.
In the process of choosing a design, take a closer look at the numerous photos of finished products. This will help you choose the most suitable option for yourself.
Tools and materials
As for the choice of materials, it is best to pay attention to new, thick boards. They should not show signs of rot or fungus. You should also check their strength. A structure made of soft wood will quickly lose its original appearance. This is due to the fact that regular mechanical impact will affect the condition of the surface.
The boards must be thick, because bars of greater thickness will be nailed to them from below. The table supports are made of massive bars. All elements are attached to nails or self-tapping screws. The thickness of each part is determined at the drawing stage.
Once all the tools and materials are prepared, you can begin building the gazebo table. Before starting work, it is important to familiarize yourself with the main stages of construction.

Construction stages
How to make a table in a gazebo? First you need to draw a diagram. The drawing indicates the dimensions, as well as the materials that will be used. In addition, each fastening must be reflected in the diagram. Before this, you need to find out the dimensions of the gazebo. This will allow you to build a table taking into account the required number of people for whom the building will be designed. Correctly chosen dimensions will allow you to leave enough space to place benches. They can also be moved without problems.

Execution of the drawing
In addition, the drawing should reflect the shape of the table, as well as the benches. It is better to make the bench at least 0.4 m wide. The edge of the product should be at a distance of 10 cm from it. The optimal height is 80 cm.
When planning a round product, it should be taken into account that such designs are suitable for large gazebos. Products with round geometry take up quite a lot of space. From the exact drawing you can understand how much area will be allocated for the table. Based on these parameters, it is worth choosing the type and size of the product.
Legs
After creating the drawing, you can begin work. An elementary option is to build a plank tabletop. However, first you should think about its supports. There are several options. One of the most common is one-legged designs. Also, a table often has 3 or 4 supports. It is often installed on 8 faces.
Products with 4 legs are highly stable. They are easy to install and therefore are used in most cases. Before creating supports, guide bars should be secured to the back of the beams. This will increase the stability of the table.
The bars for the legs must be aligned in length as much as possible. In this case, the table will not wobble. Also, the legs must be thick enough to cope with heavy loads. Fastenings are carried out with self-tapping screws or nails.

When performing work, it is worth looking at the drawing so that all elements have the dimensions indicated in the drawing. If the gazebo floor is not planned, the legs must first be securely concreted in the ground. Only after this the countertop is installed.
If the floor is level, there is no need to fix the legs. The table can also be portable. In this case, the ease of use increases many times over.

Tabletop
It would be logical to make the table round if the gazebo has such geometry. If the tabletop is square, the space of the round gazebo will be used irrationally. It is better to build a small structure.
Advice! The easiest way is to make a round table supported by one beam. It should be placed strictly in the center.

Sometimes when making a round table, the support is first made, then the tabletop. Then the parts are connected, and all excess sides of the tabletop are cut off. The beam for support should not be chosen too thin, since it will not be able to withstand the weight of the table and the load that the structure will experience during operation.
Other features of constructing a gazebo table:
- If the holiday house does not have a floor yet, or is not planned at all. You can use a single support for both the benches and the table.
- When constructing an open-type gazebo, the legs for the table and benches are usually welded directly to the frame.
- When creating a structure, you first need to prepare the frame. Metal pipes are used for it.
- When creating a tabletop with 4 legs, you should pre-weld the corners on which the tabletop will be attached.

Once the work is completed, you can begin finishing. It is designed to decorate the structure and make the gazebo more attractive.
Finishing
An excellent solution for decorating a table is carving. It is usually done along the edges of the tabletop. It can also be covered with thick glass. This will preserve the aesthetic appearance of the wood. When creating tables for a gazebo, the stages of constructing structures of different types are largely the same.

As you can see, building a table for a gazebo with your own hands is quite simple. This will require several hours of free time, as well as an accurate drawing and correctly selected materials. You should also become familiar with several features of the construction of the tabletop and the legs under it.
A special place in the process of constructing a table is occupied by its decorative finishing. Depending on the tastes of the owner of the site, it can be equipped with various elements. It is better to choose varnish to cover wooden elements. It will preserve the wood texture.
Having your own dacha plot, you want to arrange it with the greatest comfort. Many consider a gazebo to be a place for gathering guests or having a relaxing tea party. Well, a table for a gazebo made of wood with your own hands will perfectly fulfill its intended purpose, and will fit perfectly into the given space. This article will talk about how to make such a table with your own hands.
Is it worth making garden furniture with your own hands?
Making something yourself means not only saving money on buying a finished product, but also enjoying the result. In addition, this approach will make it possible to design furniture according to the area of the building, thereby solving the issue of arranging a gazebo with maximum efficiency.
The tabletop can be of absolutely any shape - round, oval, square, octagonal, the main thing is that you have enough strength and skill for this. Anyone familiar with carpentry may well miss lectures on the purpose of tools and safety rules when working with them.
Types of tables for gazebos
According to the shape of the tabletops, gazebo tables are divided into three main types:
- Round.
- Square.
- Polygonal.
Important! The most convenient and popular are round tables. Their correct shape makes such products an ideal option for any type of gazebo.
In the process of making a table, several different materials can be used - wood, plastic, metal, as well as their combinations. Each option has its pros and cons:
- Metal tables are durable, but quite expensive and get too hot in hot weather.
- Plastic products are relatively inexpensive, but they will not last as long.
- Wood is considered the most affordable material for making gazebo furniture. Wood is easy to process, environmentally friendly, and also has an affordable price. A wooden table can be purchased at any of the specialized outlets, but the owner will be especially proud of the furniture, made, of course, with his own hands.
Important! Combinations of seats or tabletops made of wood with brick bases look interesting, especially if the same materials were used in the construction of the gazebo.
Wood for garden furniture
When choosing a material to make a gazebo table with your own hands, special attention should be paid to its quality:
- Wood parts must not have defects caused by insects or fungus.
- The most even lumber will make it possible to assemble quickly and easily. In addition, this will reduce material consumption - there will be no large scraps.
Needles
Conifers have a natural softness, they are easy to process and have an aesthetically attractive appearance. However, the resins released by this type of wood can ruin both the festive tablecloth and the clothes of people sitting at the table.
Hardwood
Wooden benches and tables made of hardwood are the most profitable option. The table made from them will be durable and strong. The most preferred material is that obtained from ash, birch, larch, cherry or pear.
Important! Remember that over time, wood can change its original shade.
Preliminary preparation
Before you start making a wooden gazebo table with your own hands, you need to carefully consider several points:
- The size of the table must correspond to the design of the gazebo. If there is not much space in your gazebo, then it is better to opt for the classic version - a tabletop, which is fixed on a durable stand. If there is enough space, you can install the table on two supports.
- It is desirable that the shape of the tabletop be in harmony with the configuration of the gazebo. For example, round or polygonal tables are considered good options for hexagonal structures.
- The optimal table height is considered to be approximately 80 cm. But here it is better to focus on the average height of family members.
- It is better to immediately think about whether the table will be stationary or portable, and also decide on the number of legs.
- The placement and size of furniture should not interfere with movement inside the room.
Important! Portable furniture is a great option for small gazebos. If necessary, it can be removed or moved to another location.
Tools
In order to make wooden gazebo furniture with your own hands, you will need the following set of tools:
- Chisel.
- Hacksaw.
- Hammer.
- Axe.
- Roulette.
- Electric cutter.
- Sandpaper.
Having basic carpentry skills, you can easily make a table of any shape, however, you need to take into account some nuances of the installation process:
- Fasteners must be made of stainless materials.
- Over time, nails can become loose, so assembly is best done using anodized wood screws.
- In order to extend the life of wooden parts, they should be treated with a special antiseptic.
- If the work ahead is new to the master, then it is advisable to practice on unnecessary parts in advance.
Portable wooden table
A portable wooden table is a stable, durable, lightweight and reliable design. It is necessary that the dimensions of the tabletop correspond to the dimensions of the gazebo itself.
Table top:
- Mark the length of the boards.
- Cut the material.
- Secure the boards.
- Using self-tapping screws, install several guide bars on the back side of the structure.

Legs:
- The lower part of the table is made of the same material as the tabletop.
- The number of supports will depend on the shape and size of the table.
- The legs of the structure must be stable.
- When installing supports, it is necessary to take into account the floor level. The slope of the surface should be compensated by different lengths of the legs.
Important! Each of the elements of the future table must be thoroughly polished and also treated with an antiseptic. And at the end of the assembly, the product should be coated with two layers of varnish.
Timber table
To make a table from timber with your own hands, you will need 3-5 beams. A reliable and strong table can only be obtained from even beams that are well fitted to each other.
Legs:
- Measure 4 pieces of timber, two of which are 0.5-1 m wide, two of which are slightly smaller.
- The long beam will be the base of the legs, and the one that is slightly shorter will lie on top.
- Adjust the material to each other, connect with wood glue or self-tapping screws. For greater reliability, you can secure the bottom side with slats.
- Cut another beam the same length as the tabletop.
- Lay it across the assembled structure.
- Next, the collection proceeds in the same way as in points 1-3, only first lay the timber shorter, and then longer.
- Attach the parts with wood glue.
- Lay and secure thick wide boards on top.
Important! In order for the wood to grip more firmly, it is advisable for the table to stand under heavy pressure for several days (for example, you can put a couple of bags of mortar on top).
- At the end, all sharp corners should be processed, and the surface should be sanded using sandpaper.
Important! Don't forget about sun protection: parquet varnish and water-repellent compounds that can extend the life of the table.
Table on foundation
A DIY wooden gazebo table will become much more reliable if you install it on a foundation.
Assembly steps:
- Make the legs and tabletop, but don't connect them yet.
- Dig as many holes in the ground as there are planned legs for the table.
- Install the stands.
- Check the verticality of the legs.
- Fill the recesses with concrete.
- Wait until the solution dries completely and secure the countertop.
- Cover the resulting structure with several layers of varnish.
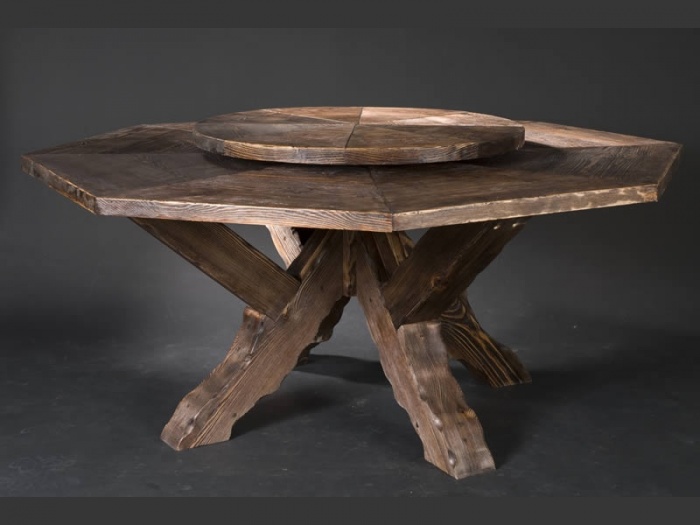
Round table
Making a round table for a gazebo with your own hands is one of the most popular solutions. If your gazebo is not the largest size, then you can install a round table on one leg in it.
Leg:
- In order to make a support, you should take a beam with a cross-section of at least 10 by 10 cm.
- Drill a hole in the bottom of the future leg.
- Clean the recess from dust.
- Coat it with epoxy glue.
- Insert a pin made of metal or wood into the hole - it will help keep the table on the floor.
- Drill a hole in the floor.
- Make four sawn spacers and secure them to the support using self-tapping screws or glue.
Table top:
- Take a tongue and groove board and assemble it into a square or rectangular board.
- Drive one small nail into the middle of the structure.
- Build a homemade compass. To do this, take a long thread, tie one end to a nail and the other to a pencil. Stretch the thread and draw a circle on the tabletop.
- Cut the workpiece.
- Nail 3-5 cross members to the underside of the structure.
- Connect the tabletop and support.
- Fix the structure to the floor.
Stump table
You can also make a table for a gazebo with your own hands from a tree stump. This will be a very original, and also environmentally friendly design, which will definitely appeal to all lovers of something unusual.
Assembly steps:
- To work you will need a wide stump. If you don’t have anything suitable at your dacha, then you can look for such material in the nearest forest.
- Dry the workpiece.
- Using a chisel and chisel, remove the bark from the stump.
- Level the surface with a plane.
- Sand it with sandpaper.
- Clean from dust and cracks.
- Cover the structure with wood paint or varnish.
- This version of the table in itself will be a very interesting decoration for the gazebo, but in order to further decorate it, you can complement it with mosaics or pieces of tiles.
Important! To avoid damaging the floor of the gazebo, you should use a stand or furniture wheels to install such a table.
Hexagon table
A DIY hexagonal gazebo table will be a wonderful choice for a small gazebo.
Before you start making it, it is necessary to carry out preparatory work. It is necessary to draw up an accurate drawing of the future table, make all the calculations, and also cut and process the material.
Build process:
- Draw a circle on the ground and mark the corners of the future tabletop.
- Use self-tapping screws to secure the outer row of boards.
- Take six boards, fix them to each other in the longitudinal direction according to this pattern: attach one end in the center, the other in the corners.
- Lay out cross rows of boards, starting with the outer row.
- Make legs and secure them on the inside.
Mobile table
The advantage of movable furniture for a gazebo is that it can be removed for the winter, which can extend its service life. In addition, during gatherings, it is possible to remove the table from the gazebo, freeing up space for dancing or any other purposes.
Installing a mobile structure is not too different from installing stationary products:
- Take two beams 8-10 cm long less than the length of the tabletop.
- Secure the boards with self-tapping screws, making sure that there is a little free distance left to their ends - up to 5 cm.
- Screw the longitudinal bars to the tabletop.
Important! Longitudinal and transverse bars must be fixed at right angles.
- Make four square legs and secure them with spacers.
Benches for gazebos
Making a table and bench for a gazebo with your own hands is a very exciting process. If you follow the standard dimensions, then three people can fit on the bench.
Assembly steps:
- Take boards 3.5 cm thick and 15 cm wide - you need the length of the material to match the length of the wall along which the bench will stand.
- Process the workpieces with an electric planer.
- Round and sand sharp corners.
- Cut a piece of timber along the length of the boards 5 by 5 cm.
- Also, prepare two pieces of timber, each 40 cm long.
- Take five bars measuring 50 by 30 mm and cut off the corners of each on one side - you will get supports under the seat.
- Saw off five pieces of 50-centimeter bars and cut the corners on both sides.
- Paint and varnish every part.
Making a table and bench for a gazebo with your own hands is an excellent chance to demonstrate your skills, as well as save your family budget. When working, do not forget about observing safety rules and selecting good, durable materials. Then every minute spent in the gazebo will delight and give you pleasure.


")


