
First you need to prepare the site where construction will take place. You need to plan the construction of the site well - install fencing, lighting and prepare scaffolding.
You can involve specialists who can carry out geodetic measurements, determine the position of the center of the building, as well as the height of the floor of the first floor. All external means of communication and communication must be brought to the allocated area.
Foundation
At the second stage, you need to choose a good foundation so that the walls are held firmly. It is better not to skimp on such things, because over time cracks may appear. If you want to build a truly durable house, abandon the idea of making a foundation out of aerated concrete. The base of the structure must be made of a harder building material. A reinforced concrete slab is ideal for its construction. As experts advise, it is better to use a strip or column foundation with reinforced concrete lining.

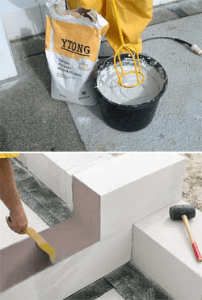
What you need to know about adhesive for aerated blocks
Construction with aerated concrete blocks involves the use of not only special glue, but also a solution of sand and cement. Such a solution will be cheaper, but will reduce strength. In addition, this can cause uneven block laying. As for the glue, it may cost you a little more than the solution, but at the same time you will need much less of it per block.
According to the builders of aerated concrete blocks, the use of a solution can be destructive and is a violation of construction methodology. They advise using only glue that makes the masonry smooth and strong.
Next, we proceed to laying the glue, the thickness of which should be equal to the consistency of dry sour cream. Usually the adhesive mixture is applied with a special ladle with a curved edge and leveled with a comb. Once the glue has hardened, it is no longer possible to separate the blocks; they can only be demolished.

Wall installation
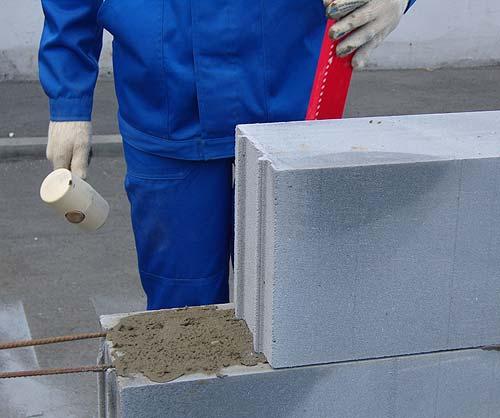
The construction of a garage from aerated concrete has become very popular. Any structure can be built from this material. Regardless of the type of building, construction technologies must be strictly followed. Aerated concrete can be laid immediately without stopping, since it is lightweight and does not have the property of squeezing out the adhesive mixture. If you are laying a brick, for example, in this case it is necessary to take certain pauses. There are special standards for the correct installation of walls. The thickness of external walls should be from 375 to 400 mm, and indoor walls up to 250 mm. If you build a decorative partition, the thickness should be no more than 100 mm.
Particular attention should be paid to laying the first line of blocks. If you start with high-quality masonry from the first block, you will ensure the durability and safety of the future structure. There is an opportunity to build a building yourself or entrust this work to professionals and order the construction of houses from aerated concrete, the price of which will suit you.

Before laying the first line of blocks, you need to prepare the base well. To do this you need to isolate. The substance can be a cement liquid based on dry components, as well as roofing felt, rolled bitumen or polymer material. The insulation is leveled from above using a cement-sand mixture.
After the first laying line, you need to level the plane with a special plane for aerated concrete. The remaining dust is removed with a brush. After laying all the rows, leveling is required again to prevent differences between the blocks. The second row of blocks starts from the corner. To ensure that all rows are even, it is necessary to install special wooden slats. If the glue protrudes onto the surface, there is no need to rub it in; it is better to simply remove it with a trowel.
The construction of cottages from aerated concrete often involves reinforcement. All buildings are subject to constant stress, which can lead to negative consequences. The appearance of the walls may deteriorate due to uneven laying, temperature changes, subsidence of the earth or strong wind exposure.
The reinforcement protects walls from cracks and protects aerated concrete blocks.
If you initially follow all technologies according to the rules, you can avoid the occurrence of cracks in the future. Therefore, with a high-quality reinforcement design, the house will be reliably protected even from external influences. It is necessary to pay special attention to walls that experience constant wind loads.
The reinforcement is placed in special armored belts. Moreover, only the first installation line, which lies on the base, the areas where the lintels are supported, parts subject to heavy loads, every fourth line of walls, as well as the walls located at the bottom of the windows are reinforced.
The reinforcement under the windows lies 900 mm in each direction. To put it into a strip of blocks, you need to cut the grooves using a special wall cutter. After removing dust and sand from the grooves, the adhesive mixture and reinforcement are placed in the blocks. If the walls are thicker than 200 mm, it is better to use two rods with a diameter of 8 mm.
If already at this stage you are confused about the work that needs to be done, order construction from aerated concrete, the cost of which will suit you.
Expansion joints
These seams protect the walls from cracks. They can be placed in certain places. As a rule, such seams are applied between walls with different temperatures (cold and warm), in places where walls touch other objects (for example, columns), in unprotected fields, in places where long walls intersect. Such seams are usually sealed with polyethylene foam or mineral wool. They are treated with a weather-resistant composition on the outside and vapor-proof on the inside.
External wall covering
The construction of country houses from aerated concrete almost always goes through the stage of external wall decoration. Buildings or structures made of aerated concrete can be plastered and then covered with special paint or faced with brick. You can do without cladding, because moisture penetrates only the first layers of blocks, but then the external appearance of the building will be disturbed. If you plan to cover it with brick, you need to think about it in advance and plan to build a foundation in such a way that brickwork can be laid in the future. Below are photographs showing houses built from aerated concrete. When constructing houses from aerated concrete, as seen in the photo, you don’t have to worry about the appearance of the house. Aerated concrete blocks are only the basis, and you can clad the house with any material that suits you.

It should also be remembered that continuous cladding can disrupt the movement of vapor exchange through the walls, so if this type of coating is planned, the walls should be protected with insulating materials. The brick covering is attached to the walls on one side, and on the other is placed in the seam between the bricks.
To cover external walls, you can use siding, suitable paint, decorative boards, etc. As for ordinary plaster, over time it can take on a tousled appearance under the influence of steam. Today you can find plaster mixtures that are used specifically for aerated concrete blocks.
Professionals do not advise covering walls with paint that does not allow steam and air to pass through. It is also not recommended to use plaster made from polymer mixtures.

Remember that covering external walls is more a matter of style and decoration, rather than an urgent necessity. It's all about appearance; without finishing, dark spots can form on the building.
Internal wall covering
For interior wall coverings, you can use vapor-proof materials. In this way, the external walls will be able to maintain a pleasant appearance, but air will simply stop penetrating into the building, so it will not be entirely comfortable to be in it.
If you use vapor-permeable materials, the building will allow steam to pass through, and fresh air will pass inside.
Remember that under no circumstances should you cover internal walls with materials that allow steam to pass through, and external ones, vice versa.
When carrying out the internal coating, it is necessary to rub down the places that protrude forward, and fill all uneven areas on the walls with glue or a cement-sand mixture. Don't forget to clean the surface from sand, dust and other debris. Two to three hours after applying a special primer, you can proceed to plastering the walls. When covering residential buildings, essences that are not resistant to moisture are used.

Wet rooms are usually treated with insulating agents and plastered with moisture-resistant cement-based solutions. Only an hour after applying the consistency, the surface is leveled and subsequently smoothed. To obtain a perfectly flat surface after applying the plaster, you can smooth it a second time, first moistening it with water. Such a wall can be painted using paint for aerated concrete blocks that allows steam to pass through.
You can also use drywall, but in this case the surface must be treated with a primer. After this, plasterboard sheets are glued to the walls. If the place has a high level of moisture, it is better to cover it with tiles.


The effect of moisture on aerated concrete
The aerated concrete blocks themselves are resistant to rain or snow. But if precipitation stagnates near the masonry for too long, it can have a bad effect on the structure. This problem can be solved by using different spillway devices, window sill drains, a solid roof and awnings.

Remember that high-quality houses made of aerated concrete are a construction technology at the highest level. If you want to get a durable building, you must strictly follow all the instructions.
Today, many people prefer to order the construction of buildings. Prices for building houses made of aerated concrete can be completely different. It all depends on what you want to see in the end.
You can order the construction of a house from aerated concrete, the price of which will suit you; you just need to decide on a company that will fit all your requirements.
Construction time
It takes two to three weeks to build a foundation, it depends on the type of soil and foundation, waterproofing, and depth. It will take two to five weeks to install the walls. It takes three to six weeks to assemble the roofing system and complete roof threshold. Plastering and cleaning work will take approximately ten weeks. It will take another week to install the windows and doors. The interior and exterior finishing of the house will take approximately ten weeks. Installation of electricity, water, sewerage, and heating will take another five weeks. Some work can be carried out in parallel so as not to waste extra time.
In total, building a house from an aerated block will take approximately twenty-six to thirty weeks. You shouldn’t rely too much on these numbers, because everything depends on the type of base, the complexity of the roof, engineering systems, as well as the territory and decoration of the house.
conclusions
Today, the construction of houses from aerated concrete blocks is used on almost all continents, and the demand is constantly growing. This popularity is due to the thermal insulation effect of the material, as well as its low cost. The advantages of aerated concrete allow you to quickly and efficiently build any structure at affordable prices. Therefore, many make their choice in favor of this particular material. It involves the rapid construction of buildings, and is also strong, reliable and durable. The emergence of such a material as aerated concrete allowed construction to reach a completely new level.
Recently, building a house from aerated concrete has become quite popular. After signing all the necessary documents and choosing a suitable location, it will be possible to plan the construction site. You will need to install a fence, mount lighting fixtures, and prepare scaffolding. Specialists must carry out geodetic measurements and determine the location of the axes of the building. You should also determine the level of the ground floor base. After this, external communications will need to be brought to the place where the building was manufactured.
Elements that will be needed for the construction of private houses from aerated concrete:
- sand;
- gas blocks;
- reinforcement bars;
- jack;
- bolts;
- adhesive mixture;
- metal corners;
- Bulgarian;
- acrylic based sealant;
- putty knife;
- plane;
- brush;
- Master OK;
- building level;
- dowels;
- nails.
Technology for building a house foundation from aerated concrete

Building a house always starts with the foundation. Some believe that aerated concrete is a lightweight material, and therefore can save money. You should know that a quality foundation is one that can provide a permanent shape to the house. The loads from the weight of a private house that are transferred to the ground are small, so they cannot become the main criterion for choosing a foundation. If you try to save on the foundation, this will result in the formation of cracks on the walls of the structure. The base should not be made of aerated concrete; more durable materials will need to be used.
The best foundation in this case would be a structure made of a reinforced concrete slab, which can ensure uniform deformation due to shrinkage. As a foundation for a private house, you can also use a strip foundation on a sand bed. You can also make a columnar base, which is tied with a reinforced concrete belt.
Aerated concrete is not resistant to bending loads. A monolithic base can minimize such loads. The structure is reinforced with reinforcement bars with a diameter of 12 mm or more. The structure can be installed on any type of soil.
Return to contents
Technology for constructing a solid base from a reinforced concrete slab

The slab, which forms a single structure with the formwork, is laid under the entire area of a private house. To make such a foundation, you should use at least 2 layers of reinforcement mesh. The large area of the reinforced concrete base plate can reduce the pressure on the ground. In the event of soil vibrations, the slab will move along with the ground, as a result the safety of the building will be ensured.
The thickness of the reinforced concrete slab should be approximately 40 cm. Such a structure will not need to be deepened to the freezing depth. Be sure to arrange drainage around the base and lay waterproofing material in two layers. After laying such material, you will need to reinforce and fill the foundation slab. When the concrete mixture hardens, you will need to tie a frame of reinforcement and build a wall frame. The formwork is constructed as a solid structure that covers the blind area. The distance between the reinforcing bars should be less than 30 cm. To prevent swelling of the walls, the formwork will need to be securely fixed with leveling beams, a jack and screed bolts. To avoid leakage of the concrete solution, a plastic film will need to be attached to the inside of the frame.
Concreting is carried out in layers of a maximum of 15 cm. The concrete solution will need to be leveled with a shovel and compacted by bayonet. In order for the mixture to fill all the voids between the frame and the reinforcement, the frame must be tapped from the outside. Reinforced structures are concreted in one go. An unreinforced base can be poured intermittently. The formwork will need to be dismantled after the concrete mixture has dried and gained strength. The cavities that form between the walls of the pit and the base must be filled with soil.
Return to contents
Step-by-step construction of a strip foundation for a house made of aerated concrete

A strip of reinforced concrete that runs along the perimeter of the structure forms a strong frame that can ensure the stability of the building. To install a shallow strip foundation, you do not need to pour a concrete slab. Instead of a pit, you need to dig a trench 0.5 m deep around the perimeter of a private house. A sand cushion 0.4 m deep is placed in the trench, after which it is compacted. Next, a wooden frame is installed into which the reinforcement is laid. The rods are fastened together, after which the concrete solution is poured.
Concrete mixture cannot be poured onto a frozen surface. All work should be carried out during a warm period. If the structure is constructed at sub-zero temperatures, then pouring must be carried out continuously. In this case, you will need to insulate the frame with heaters and heat the poured concrete mixture until the material sets. You can pour preheated concrete mortar. In this case, concreting should be done using special additives and the concrete mixture should be heated with a heat gun.
Aerated blocks have a small specific gravity, so the depth of the foundation should be at least 0.5 m. If you plan to build a basement under the building, then a recessed strip base should be made.
Return to contents
Step-by-step construction of the walls of a house made of aerated concrete: technology

Aerated concrete is a lightweight material, so it will not squeeze out the adhesive mixture. The walls of the structure can be laid out without technological interruptions. For laying external walls, blocks with a thickness of 37.5-40 cm should be used. Interior walls are constructed from gas blocks with a thickness of 25 cm or more. Gas blocks 10 cm thick are suitable for interior partitions.
Before laying out the first row of gas blocks, you will need to prepare the surface. Cut-off horizontal waterproofing should be performed. The suitable material in this case is roofing felt or other material in rolls. You can also use a polymer-cement mixture based on dry materials. To level the base with a trowel, you will need to apply a solution of cement and sand to the layer of waterproofing material. The evenness of the surface can be assessed by using a building level.
Particular attention must be paid to laying out the initial row of gas blocks.
The convenience of further construction work and the quality of the entire structure will depend on it. You can control the evenness of the installation by using a cord and a level. Leveling the blocks horizontally is done with a rubber mallet.

If there is a gap in the first row of masonry, an additional block should be installed. Cutting aerated concrete can be done with a special hacksaw, hand or electric saw. The sawn base can be leveled with a plane. The end parts of the additional blocks will need to be completely coated with the adhesive mixture.
To lay the blocks, you must use an adhesive solution with the consistency of thick sour cream. The adhesive mixture is applied with a trowel or a ladle with curved edges.
After application, the solution will need to be leveled with a spatula. After laying the initial row of gas blocks, you need to level the base of the masonry with a special plane. Dust and other contaminants can be removed with a brush.
The alignment of the masonry is repeated after laying out each row of gas blocks. Changes in the level of blocks can lead to the formation of local areas of high voltage, as a result of which cracks may begin to appear. Once the adhesive solution has dried, it will not be possible to dismantle the wall - it can only be damaged.
Return to contents
Construction of subsequent rows of gas blocks
Each row of masonry should begin from one of the corners. To make the row even, you will need to install wooden planks. If the wall is long, then it is additionally necessary to mount intermediate beacons from gas blocks. Laying rows must be done with ligation of blocks - displacement of subsequent rows in relation to the previous ones. The displacement should be at least 8 cm. The adhesive mixture that protrudes from the seams should not be rubbed down, but removed using a trowel.
If necessary, aerated blocks can be freed from the film so as not to be exposed to precipitation. The laid out wall elements can be protected with the film left over from the unpacked gas blocks.
Return to contents
How to make openings for the windows of a house made of aerated concrete?

Window openings can be made in various ways.
- To build such a structure, you can use metal corners. These devices must be selected depending on the width of the opening. If the opening dimensions are less than 1.2 m, then you can use corners 4x4 cm or 5x5 cm. If the opening is more than 1.2 m, then corners 7.5x7.5 cm and 10x10 cm are suitable. To lay the corners, in the upper part of the last row gas blocks need to be cut out with special grooves using a grinder. The corners will be installed in these grooves; an adhesive mixture must be used in the process. Blocks are installed on the corners, in which special grooves should be cut.
- Another method should be used if the opening width is more than 1.2 m. In this case, blocks without a load-bearing part or belt gas blocks will be used. The thermal efficiency of the material will remain the same; the load-bearing part will be made of a cast reinforced concrete beam. The decorative part of the material will need to be laid in advance on a reinforced steel square.
It is recommended to use grout to seal joints. In most cases, during the process of laying blocks, gaps will form between them that were not covered with an adhesive mixture. These gaps will need to be sealed both on the outside of the house and on the inside.
The outside of the wall should be embroidered with masonry glue or acrylic-based sealant using a construction gun. Trying to fill the gaps between the laid material as much as possible is pointless. Excess sealant can be removed with a rag or spatula. The frozen elements are embroidered with a special semicircular device. To grout the joints on the inner base of the wall, you will need to use an adhesive solution. Grouting should be done with a spatula. During the grouting process, you also need to putty the window slopes. The outer base of the wall is prepared for painting. Before this, all chips and unevenness of the masonry must be removed.
Cellular concrete has been increasingly used in construction in recent years, and of all varieties, aerated concrete is the most popular. Its characteristics, cost and durability are optimal for the construction of private residential buildings and new high-rise buildings.
Aerated concrete blocks are an inexpensive building material; construction from them is much cheaper than from other materials. A reliable house made of aerated concrete has been in use for decades, and the planned period of use is at least one hundred years. Buildings are strong and reliable if they are erected in accordance with norms, standards and technology.
How to build a house from aerated concrete
You can build from aerated blocks without having any experience in construction work. The main thing is to work according to instructions developed taking into account real experience. We provide all the necessary materials and recommendations, including if you contact us to develop a project.
How quickly can you build a house from aerated concrete?
On average, the construction of an aerated concrete cottage takes six months. A team of experienced builders will build a house of average complexity in two months. The longest stage is usually the construction of the box and the installation of the roof.
The price of construction depends on the complexity of the project, the size of the house, the price of materials and the cost of renting equipment.
In general, construction using aerated concrete is economical, cost-effective and time-efficient. With proper preparation, you can handle it yourself.
Today there are many materials for building walls. In addition, construction technology is always being improved, which ultimately leads to the emergence of new building materials with more favorable prices and performance characteristics. Thus, society has gradually reached the aerated block, which really has a lot to please.
The first advantages of this material are noticeable even at the design stage. We’ll talk about all the pros and cons, as well as how to build a structure from aerated concrete blocks with your own hands in this article.
Advantages and disadvantages
Aerated concrete blocks have a number of their own characteristics, both positive and not so good. The thing is that the material is affordable, anyone can buy it, and you need to work well with it so that the house can stand freely for many years.

Photos of houses made of aerated concrete can often be seen on social networks, as this material is truly in great demand. It's all about its advantages, and these include:
- strength;
- easy to use;
- durability;
- economy;
- thermal insulation qualities.


Many people doubt the strength of the aerated block, but there is no reason to doubt it at all. The material resembles brick in appearance, only in larger sizes. It is a dense structure, which, with proper care, does not collapse for a long time, the guaranteed service life is from thirty years.
Most often, the material is used for the construction of temporary buildings, as well as commercial premises. Many people wonder what is better than a foam block or a gas block for a home, but as practice shows, in terms of quality there are no complaints about either option.

But this does not mean that the material is not suitable for the construction of residential buildings. It's all about maintenance and proper construction, but it is not recommended to build a multi-storey building from aerated block.

The material does not crumble, which makes it really convenient to work with; it is also lightweight, you can freely lift it with your hands and build walls. Building a house from aerated block is a pleasure, according to experienced builders.

As for durability, the gas block is truly durable with proper care. It all depends on the weather conditions where the building is planned to be built. Without protection from water, a house will serve faithfully for decades, but if you protect the structure from moisture, it can last for centuries. It is recommended to carry out the procedure during the construction stage.

Gozoblok is distinguished by its economy both in the purchase of material and in its further use. This material is considered one of the cheapest, since its production uses less complex technology.

In addition, there are many suppliers of material on the market who compete well with each other, which ultimately leads to low cost of the material. In addition, you can save a lot on heating costs. Practice has shown that owners of houses built from other materials pay much more for heating.

This is because the gas block has excellent heat-insulating qualities. It works on both sides - it does not let out warm air from the inside and lets the cold in from the outside.

A wall made of aerated block must be improved, since under the influence of weather conditions all the thermal insulation benefits will disappear over time. Experts recommend thinking about this at the design stage.


Stage-by-stage construction of a house from aerated concrete blocks
As already mentioned, building a house from an aerated block is not difficult, and basic construction skills are quite enough. When building yourself, it is recommended to use the aerated concrete block calculator for your home.

The design of such a building is not very different from buildings made of other materials and includes the following stages of work:
- site selection;
- design;
- foundation laying;
- walling;
- finishing.

When choosing a site, it is important to pay attention to the soil. In general, aerated block walls themselves are not heavy, so there are no special requirements for the soil.


However, we should not forget that this is still a house and a plot of land that must be selected suitable for construction. Most often, such houses are built on dacha areas, but they can also be found in cities - in both cases this is acceptable.

At the design stage, you need to figure out the area of the house and decide how many rooms there will be. It is not recommended to build huge buildings, although the foundation allows this.

Maintaining a building in the required condition is much more difficult, and this also complicates communications, which are also considered at the design stage. It is also better to immediately calculate how many gas blocks are needed for the house.

It is better to take this stage seriously, as you can easily calculate the amount of the option used, as well as consider various saving options or choose ready-made options for aerated block house designs.

Laying the foundation will require a little more knowledge as well as effort. This stage is considered the most difficult and is no exception when working with gas-block houses.


It is recommended to seek help from professionals who will help you build a truly reliable foundation that can support the structure for many years, or immediately order a turnkey house made of aerated concrete blocks.

Building walls is not difficult. A one-story house made of aerated concrete can be built in a matter of time. It is important to maintain the evenness of the masonry so that there are no inclinations. Since aerated concrete blocks themselves are lightweight, putting them into one structure is not a difficult task.

Basic construction skills will be required to complete these steps. Be sure to take into account the connectors in the walls for windows and doors, ventilation and communications, so that later you do not have to destroy the newly built wall.

Finishing work is considered the most expensive task imaginable in the construction of aerated block houses. Interior decoration can be made of any materials, but it is important to remember the fear of water blocks. Moisture can come not only from the street, but also from inside the room, so you need to think about protection from moisture at the finishing stage.

In summing up, it is important to note the latter - you need to understand which is the best aerated block for construction. Today there are many manufacturers who can offer many options for the same building material. Therefore, be sure to contact the manufacturer to find out the differences, as well as all the advantages of one block from another.


Photos of aerated block houses


Aerated concrete blocks are an excellent material for the construction of a low-rise private cottage. The blocks are quite light and have increased thermal conductivity, which makes the finished building warm and structurally light. That is why a shallow foundation can be installed under it, which makes construction economically profitable. On how to build a house from aerated concrete with your own hands and at the same time achieve excellent, long-lasting results, see our material below with detailed instructions.
Initial stages of work
It is necessary to start building a house from aerated concrete with design. Moreover, design work must be carried out exclusively with the help of a specialist. A professional will take into account the soil characteristics of the site and the climatic conditions of the development area. Thanks to these parameters, it is possible to correctly select the optimal building materials (number, type, density of blocks), as well as calculate the bearing capacity of the foundation.
Important: it is not worth saving at this stage of the work, since there is a risk of making incorrect calculations and getting cracks along the entire perimeter of the house as a result of its operation.
And when performing design work, it is advisable to carefully calculate the thickness of the wall blocks. Because they are the ones who make it possible to provide warmth and an optimal microclimate in the cottage. This is why building houses from aerated concrete with your own hands is so important in Russia.
Foundation and site preparation

Two types of foundations are most often used as the foundation for a gas-block house:
- Tape shallow. This base has a thickness of 40-70 cm and copes well with the load-bearing load of the finished house, since aerated concrete is light in weight. The foundation can be made of monolithic strip, which is less expensive, or rubble concrete. The second option requires more time and human labor. However, both types of foundations are durable and reliable. The price of a strip frame will be significantly lower than the cost of a slab base.
- If the soil on the site is heaving, then they arrange it for an aerated concrete house. monolithic slab foundation. This concrete pad is also called a floating foundation. Its peculiarity is that it can maneuver in the soil of the site along with the building, not succumbing to the force of soil pressure during heaving seasons. Thus, the house with your own hands remains safe and sound, regardless of changes in the structure of the soil. A monolithic slab foundation is poured with a concrete mixture over the entire area of the future house and must be reinforced.
Important: all communications must be installed under the slab foundation before pouring it. Otherwise, you will then have to install sewer and water pipes into the walls, and raise the floor using additional joists.
Ground work for the installation of a foundation of one type or another includes digging a trench or pit, thoroughly compacting the soil and the mandatory laying of a sand and gravel cushion. The concrete mixture is poured exclusively into wooden formwork, covered from the inside with sheets of roofing material.
In dry and warm seasons, the foundation takes three to four weeks to dry. The finished foundation must be carefully waterproofed on all sides in order to subsequently begin laying waterproofing material. This will protect the aerated concrete from the penetration of moisture into it from the ground.
After completing all the work, you can begin building the walls of the house.
Let's start laying the walls

For high-quality and correct construction of a house made of aerated concrete with your own hands, you need to prepare tools and the building material itself.
Tip: during production, aerated blocks are placed in batches on wooden pallets and carefully wrapped with film to prevent moisture from accumulating in the material. The gas block is sold in the same form from the warehouse. Therefore, when transporting aerated concrete to a construction site, it is advisable to place the blocks in such a way that they occupy a certain place under the awning. However, it is not recommended to unpack pallets with blocks all at once. It is better to remove the film as blocks are needed.
Important: pallets with building material can be stacked on top of each other, but no more than two in a row.
For construction work you will need the following tools and materials:
- The gas block itself is in the right quantity;
- Adhesive mixture for laying aerated concrete (it is worth knowing that aerated concrete material can also be laid on cement mortar, but glue is still better);
- Reinforcing rods with a cross section of 8-10 mm (the quantity is calculated when designing the house);
- Tools for masonry (trowel, mallet, level, cords, etc.).
So, first we prepare the adhesive mixture. It is diluted with water according to the instructions until a homogeneous mass is obtained, reminiscent of thick sour cream in consistency. Subsequently, glue must be applied using a special carriage.
Important: if the house will be built in the cold season, then it is necessary to use a special winter mixture. You can find it in construction stores.
Laying the first row of aerated concrete, like all other rows, begins from the corners of the foundation. This way, it will be possible to set the level for the entire subsequent row of blocks. It is worth knowing that the first row of blocks is always, without exception, produced only with a cement-sand mixture. A control cord is pulled between the laid corner gas blocks and its evenness is leveled by using a building level and adjusting the already installed blocks.
Now you can begin laying the entire row of material until a closed contour is obtained. If at the last point of the belt the parameters of the whole aerated concrete do not fit into the remaining cell, then it can be cut with a hacksaw to the desired parameter and the finishing filling of the first row can be made.
Subsequent rows of gas blocks are laid on the adhesive mixture according to the dressing principle. That is, the upper blocks are displaced relative to the seam of the two lower blocks by about 8-10 cm (example - brickwork). This method of laying is called laying with dressing. A layer of glue is applied to the block, leveled with a carriage and the aerated concrete is mounted in the designated area. At the same time, the building material is pressed well, controlling the level of the masonry.
DIY aerated concrete house video:
Important: if subsequent external finishing of the walls of the house will not be carried out, then you need to take care of the attractiveness of the external seam. To do this, the adhesive mass is simply selected in the seam area using a special gutter. In this case, the finished and dried seams will have to be additionally treated with sealant both outside and inside.
Advice: all rows of walls of the house should be laid out strictly from the corners. This will allow you to achieve ideal evenness of the masonry. The internal walls are laid out parallel to the external ones. For them, you can use blocks up to 20 cm thick.
Reinforcement of aerated concrete walls is a prerequisite for a strong and durable structure. The reinforcement bars are laid in special grooves made in blocks. At the same time, it is worth knowing that the armored belt must be laid on the first row of masonry, then on every fourth row, in places of window and door openings, as well as in places of increased loads.
Important: in the last or penultimate row of masonry in the area of window and door openings, it is necessary to lay a special reinforced ring beam.
Now all that remains is to mount the concrete reinforced belt, which will become a support for the floor slabs. It is installed on external and internal walls. Floor slabs are laid on the dried reinforced belt, which serve as the floor for the second floor (if a two-story house is being built) or the floor of the attic. If you plan to build a second floor, then laying aerated concrete blocks is carried out similarly to the above.
Important: a reinforced concrete belt is not as capable of retaining heat as aerated concrete blocks. Therefore, care should be taken to insulate it. The same armored belt is also erected under the roof of the house. Later, a building system is attached to it.
Roof installation

In order for a house made of aerated concrete to have a finished look with your own hands, all that remains is to mount the roof. Therefore, you should prepare all the rafters, timber for sheathing, waterproofing and thermal insulation material and roofing. For an aerated concrete house, professionals recommend using ondulin, as it is resistant to various mechanical damage and tolerates moisture and temperature changes well.
- So, first you should install the outer rafters of the roof, which are connected to the ridge beam. After this, all other rafters are installed.
- A sheet of rough boards is attached to the formed frame, which is covered with heat and on top with waterproofing materials.
- Roofing material is installed on top of both types of insulation.
Final works
If there is a desire or need (the house is being built in frost-resistant regions), then you can additionally insulate the walls of the building. Insulation will also be relevant if the blocks were laid not with an adhesive mixture, but with a cement-sand mixture.
A built aerated concrete house is usually insulated with sheets of foam plastic or mineral slabs. The final finishing is done with vapor-permeable plaster and water-based paint.
Important: if a decision is made to cover the façade of an aerated block building with bricks, then in order to avoid dampening of the blocks, ventilation gaps should be left in the brickwork. The inside of a house made of aerated concrete blocks is decorated with special plaster, which will not interfere with the breathing of the walls.
Thus, we build a house from aerated concrete with our own hands step by step, following all the recommendations and using the advice of experienced people.
Nuances and interesting solutions for building a house from aerated concrete video:


