
Having barely learned to hold objects in his hands, the little man shows a craving for creativity. Over time, he will have the opportunity to try himself in various types of crafts: needlework, modeling, origami, wood carving, drawing. Of course, certain skills that the child acquired in early childhood will be useful for this. Sometimes a simple hobby gradually turns into a hobby, and then becomes the work of a lifetime. So many centuries ago in Rus', one of the main types of creativity was wood carving. And in the 21st century it still arouses genuine interest among people.
Popular types of intricate art
 For a long time, people decorated their homes with wooden carvings. Various kinds of paintings, kitchen utensils, religious objects, and children's toys were considered valuable things for any family. Perhaps this is why various types of wood carvings appeared. The most popular options are:
- geometric;
- flat-notched;
- slotted;
- sculptural;
- embossed;
- openwork;
- invoice.
Fortunately, the list does not end there, because this type of creativity is widespread throughout our vast country. Let's look at just a few of them.
 Geometric wood carving involves the use of various figures in the work. These are triangles, circles, squares and polyhedra. It is used for the manufacture of furniture elements, household utensils, and wall crafts. The oldest type of such carving is triangular-notched carving. This is one of the simplest methods, since it is performed with only one tool - a knife with a blunt. For such wood carving you will need a simple set of items:
- lime board;
- special knife-jamb;
- ruler;
- pencil.
First, sketches of geometric shapes or a finished ornament are applied to the board. It is better for novice amateurs not to use complex drawings so that the work turns out flawless. For the first work, material made from deciduous trees is suitable, since it is more convenient to draw straight lines on it with a sharp knife.
The wooden surface should be as smooth as possible. This is achieved by planing the board. At the same time, it does not need to be sanded with sandpaper. Otherwise, the carving will not turn out clear and neat, and the tool will quickly become dull.
The flat-pit method is used to cut out depressions of various sizes and shapes on a plane. These can be oval contours and all kinds of convexities.
 The slotted type of carving is also considered quite simple. It is performed using a jigsaw. A sketch of any figure applied to a wooden plane is cut out along the contour. The result is some cute crafts. Slotted threads are used to make background objects through which other planes are visible. It is often called openwork carving, and is used to decorate furniture in the Baroque style. These can also be elements of cupboards, window frames, doors, and sometimes decorative screens. If crafts are attached to a special base, then this type of carving is considered overhead.
The process of working with the slotting method begins with a sketch, which is applied to a pre-polished workpiece. It is transferred to the surface using a special template or transparent white paper. Then holes are made on the contours and cut out on the work table using a thin jigsaw file.
 Relief carving includes two main methods: flat and blind. In addition, the blind option implies a low or convex relief. The bottom line is that the pattern is formed due to the main background of the surface.
 The flat-relief method is performed in such a way that the pattern and the surrounding background are made at the same depth over the entire area of the base. Blind carving is characterized by a convex pattern that does not have flat outlines. Such products are valued for their high decorativeness and richness of composition. After all, a unique miniature landscape with hills, depressions and depressions is created on the plane. To create such masterpieces, craftsmen use elements of almost all types of wood carving. Therefore, beginners should master each method separately in order to apply the skills with more.
The first steps on the path to mastery
 History shows that wood was traditionally used to decorate living spaces. Nowadays, various photographs, drawings and sketches of wood carvings are exhibited in local history museums or printed publications. This suggests that smart people who are willing to learn can master this art form. Wood is a wonderful natural material from which you can create decorative compositions, paintings, furniture elements and kitchen utensils. Having mastered the basics of the ancient art, some became real masters of wood carving, devoting their entire lives to it.
Popular wisdom says: “The hardest trouble is the beginning.” This is how it is if you do nothing. Practical wood carving tips for beginners open the door for brave people to the world of magnificent DIY crafts. First you need to prepare your tools and understand the basic nuances of the craft.
It is advisable for beginners to choose high-quality and durable equipment for work in order to acquire valuable craftsmanship skills.
 For wood carving you need to prepare the following tools:
- sharp knife;
- chisel;
- jigsaw;
- bit;
- drill;
- needle files;
- spoon cutter;
- bars;
- milling machine.
Of course, for beginners it will be enough to purchase a special set of tools for wood carving, which includes a knife, a jigsaw and an awl. With their help it is very convenient to master the skills of ancient craftsmanship.
The next step is the selection of raw materials. The quality of the product depends on this. There are two types of wood in nature: hard and soft. The first group includes mahogany, oak and beech. For the second - aspen, pine, spruce, birch. Of course, it is easier to work with soft wood, but with one wrong move it quickly deteriorates. Despite this, it is considered the most suitable raw material for beginners.
Hardwoods are used by professionals because they are very expensive.
In addition to the strength of the material, the color of the wood also plays a key role. A suitable raw material for learning the skill is birch. It lends itself wonderfully to cutting and drilling in any direction. When choosing patterns for wood carving, you should keep in mind that birch wood darkens over time. Despite this, she is very easy to work with. 
When the pattern is selected, it must be transferred to a wooden blank. In the age of technology, you can use ready-made photographs or drawings provided by specialists. The subjects of the images are very different, but each has its own unique beauty. When everything is ready, you can start creating your own masterpieces. Thematic wood carving lessons are an invaluable aid for beginners.
Master class on simple crafts
 When you look at the finished crafts, you get the impression that making them is not at all difficult. Therefore, many lovers of folk crafts took the instrument into their hands and got to work. To cut an ordinary flower you need to prepare the following set of items:
- wood blank;
- double soft pencil;
- tracing paper;
- chisels.
Please note that only special chisels for wood carving are suitable. They should be v-shaped, narrow and semicircular. The next stage is drawing. It can be taken from the Internet. To do this, apply a sheet of paper to the screen, redraw the diagram, and then apply it to a wooden plane. 
Start working from the central part of the sketch, carefully cutting out a circle. Then, using a v-shaped chisel, cut out the petals along the contour. Wood waste between them is removed as work progresses. If you don’t have such a chisel, professional knives for wood carving will do, as they are just as good to use in this craft. 
Using a semicircular chisel, cut out the outer part of the petal. It looks like the outline of a heart, but it's not scary. Then cuts are made in the inner part of the petal, connecting it to the center of the flower. All that remains is to round it off and the flower is ready. Now you can admire the first creation of your own hands. An invaluable aid for beginners is a themed woodcarving video that encourages them to get started immediately.
Modern technology for experienced craftsmen
In the modern world, many works have long been performed mechanically. Applied crafts are not lagging behind in this. The use of technology allows craftsmen to save their energy and precious time. Wood carving machines make it possible to quickly and efficiently prepare the raw material for work. The only drawback of such devices is their high cost, but people for whom carving is not just a hobby are ready to purchase them.
Pantograph
 The device is designed to work with any wooden surfaces. It performs operations of various kinds, both volumetric and on a plane. The pantograph is used to process arched, bent or rotating parts. So, with the help of a machine, various elements of furniture, statues or panels are cut out.
Drill
 An excellent device for working with hardwood. It is important to take into account the properties and arrangement of the fibers of the natural material. Using a drill, craftsmen sharpen tools, polish wood, and, if necessary, polish it.
Tree species with dense wood that do not have a tendency to chip are suitable for working with a drill.
CNC milling machine
 This technique is mainly used for the production of wooden furniture with carved decoration. The machine is designed to work with any type of plywood and wood. It is distinguished by high functionality and technical capabilities. When working on such equipment, it is important to use special protective equipment - goggles and gloves. Also follow the operating instructions for the device.
 As practice shows, such machines simplify the process of wood carving. They make it possible to create a huge number of products in a short time. The devices are used not only in industry, but also for personal workshops.
In any case, handmade products bring true satisfaction to a person. They create a pleasant atmosphere in the house, help express the master’s feelings for his loved ones, and serve for the benefit of the household for a long time. Wooden crafts retain their natural beauty for a long time and never go out of fashion. Wood carving is an art that is passed down from generation to generation. It is available to anyone who wishes to master this craft. The main thing is not to be afraid of failures, but to be willing to learn, pick up tools and create masterpieces.
Wood carving video tutorial for beginners
Geometric wood carving consists of different elements that have a geometric shape and is done with one cutter. maybe: lines, squares, triangular and tetrahedral recesses, etc. This technique will even allow you to make carved works of such shapes as leaves, flowers, berries, ears of corn. If you develop the skill, it will turn into the form of contour carving.
Original box made with geometric carvings
You can search the Internet or come up with it yourself. Geometric cutting is quite simple to perform; for this you will need: a cutter, a pair of semicircular chisels. Geometric carving lessons will show how you can play with chiaroscuro and unusual patterns. It is especially beautiful in different triangles, nail-shaped cutting and triangular-notched shape. This cutting allows for polishing and matte finishes.
For triangular notched carving, you only need a jamb knife, it has a beveled blade. In addition, the following tools are needed:
- flat chisel, 2 cm wide;
- semicircular chisel;
- hacksaw;
- files: round, square, semicircular;
- ruler;
- simple pencil;
- compass;
- eraser.
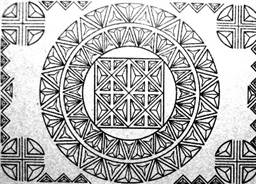
 Elements and patterns for making geometric wood carvings
 The cutting technology is simple, but each component plays its role in the work.
Wood
Wood comes in the following types: hard, very hard and soft. For beginners, it is better to use soft wood, it is easier to work with (linden, pine or aspen).
Linden is more difficult to obtain than other types, as it is often used by professionals. Pine has a disadvantage - it splits when cut.
Aspen is a good option for work. There are many visual photos of what kind of wood it should be, and what the longitudinal fibers look like along which you need to work.
Preparing for work
For the first lesson, you need a board measuring 170 by 110 mm and 2 cm thick. Sketches for this work will be given below. The surface of the board must be sanded with sandpaper. Now, using a ruler and a simple pencil, draw out the entire surface of the tree in 5 cm cells.
 Wood carving patterns
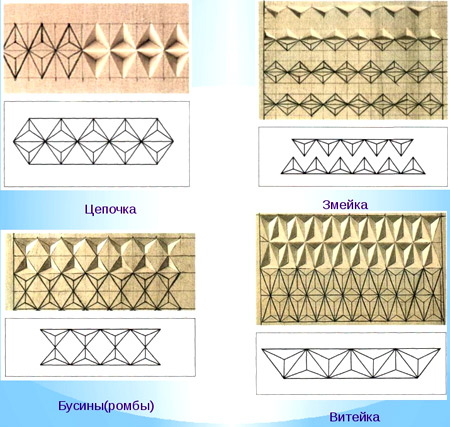
 Then we draw all the figures, as shown in the figure below. There were 7 figures in total: pegs, diamonds, a twist, a pyramid, stars, squares and a rosette. From these figures you can then create new patterns. A photograph that shows what compositions can be made from just elements, and how the composition looks after processing and painting the wood.
Pegs - the first figure
In triangular-notched carving, the entire process consists of two operations - pricking and trimming. These are simple movements that are easy to do in practice. We take the knife in our hand, the thumb rests on the beveled part of the handle.
Press the cutter vertically to deepen it a few mm, then lower the blade at an angle to intersect the line of the side knife in accordance with the markings. In the same way, a prick is made on the left side of the triangle. 
For pruning you need:
- attach the cutting part of the knife to the left side of the triangle, so it connects to the top with its bevel;
- we move the handle of the knife back, maintaining a parallel between the right side of the pattern and the cutting blade (this movement is done with the hand, as if we were pulling a bow);
- press on the knife, returning to the first position of the hand; so the nose of the knife is on the top, and the cutting part is on the right side of the triangle.
Read also
How to make wood carving with your own hands
The trimmed triangle will eventually break off, hence the name “peg”. This movement is called "shooting". When doing it, try to keep the angle at 45 degrees. The drawing comes out simple with this figure, but this is the basis of geometry.
Security measures
All movements should come from the hand, this simplifies the work and takes the load off the shoulder. 
The working hand (in which the cutter is located) is pressed tightly against the work table to free the movement of the hand. When you hold the workpiece with your free hand, you need to ensure that your fingers are positioned so that they are not on the working part when the cutting process is in progress.
Diamond - second figure
Ornaments for geometric carvings consist of simple details such as pegs and diamonds. A rhombus consists of two triangles connected by their bases.
The technology is the same, only you first need to cut out the top row, and then turn the board and make the bottom one.
Viteika – third figure
It consists of mastering basic carving techniques and basic shapes. Viteyka is the same type of chips. They are simply shifted to the side in relation to each other.
 Shapes for geometric carving
 The result will be a winding path. To do this, you need to cut out and pin the lower triangles, and turn the board - the upper ones. So we will see that there remains a “snake” in the middle.
Pyramid – fourth figure
The first patterns were the simplest. And you can deal with them without difficulty. The following ones will be more difficult to complete, since they consist of several triangles and are located in a certain order in relation to each other.
So the pyramid consists of three triangles, it has in the center the point of contact of all the corners. Therefore, when cutting a given figure, each element, when pricked, comes into contact with the same point several times. The most important thing is that pruning is done in the direction of the wood layer. 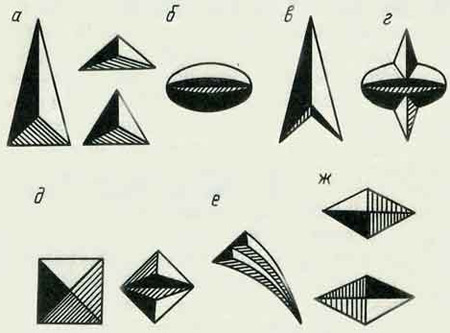
If you cut across, you will get unwanted chips that will ruin the patterns.
Asterisk – fifth figure
Geometric cutting patterns can be varied, but basically consist of the same elements that are arranged together. Same with the star shape. It consists of four pyramids, and this figure will not be difficult to make. You just need to sequentially cut out four pyramids one after another.
Artistic wood carving always looks very impressive. Most people have no idea how such products can be made. It seems that this requires enormous physical strength, and in addition, artistic taste and education. However, cutting out a beautiful ornament is not as difficult as it seems, you just need to learn a little technique and, as they say, get better at it. We will show popular drawings for learning wood carving techniques that will be useful for beginners and masters!
It's no secret that for manual creative work it is necessary not only to master the skills of this art, but also to have inspiration, desire and, of course, time. In order for all these parameters to come together, the master can use drawings to study simple wood carving. Not only drawings help to generate an idea, but also photographs of the work of other craftsmen.
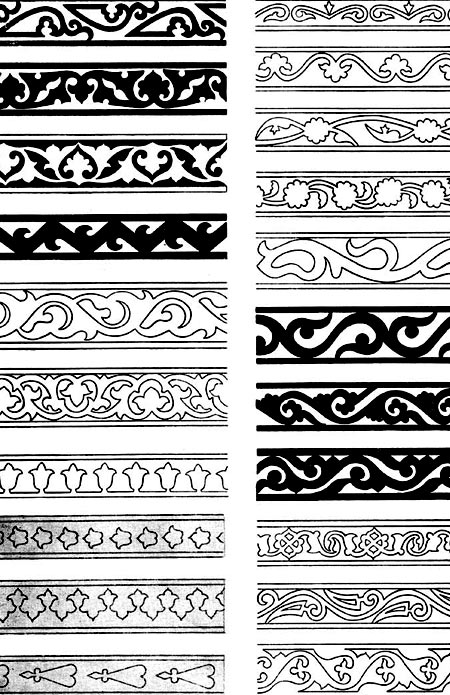
There are sketches for different types of wood carving, and here you can find a suitable sketch for yourself completely free of charge.
We analyze drawings for wood carving: sketches for geometry
Drawings for geometric carving are well suited for beginning craftsmen. This is an easy and effective type of wood carving. To do this, you just need to determine for yourself which areas are convex and which are concave, in which case the correct picture on the tree will come out.
Boards in geometric and flat-relief techniques.
Stencil.

Stencils can be changed - for example, reducing the number of elements, or, conversely, adding details for a more interesting result.
Stencils for slotted carving.There are other types of artistic carving. One of the simple cutting techniques, provided you have the right tool, such as a router, is slotting. It is also called openwork because the finished product, made precisely and accurately, looks like lace. It has no background - it is cut out of the pattern. Hence the name. To practice this type of wood carving, you need to have a steady hand and cut clearly along the contour of the stencil. A contrasting color of fabric or foil is placed under a product made using this technique with a router or jigsaw. The photo shows examples of finished work, as well as sketches suitable for this technique.

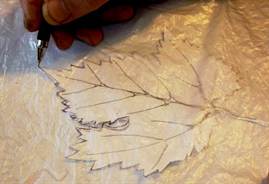
Contour carving is different in that a contour pattern is cut out on the wood. You can make a lot of different paintings using this technique; it is not necessary to take a ready-made stencil for carving. To decorate a nursery, you can outline the coloring book and use it as a sketch. Also, if you don’t know how to draw, you can take any sketch made in pencil and transfer it to wood. This technique produces good images of animals, birds, as well as landscapes and still lifes. The images clearly show examples of what can be carved on wood using this technique.

Black varnish carving is a type of contour carving, where a light contour is cut out on painted wood.
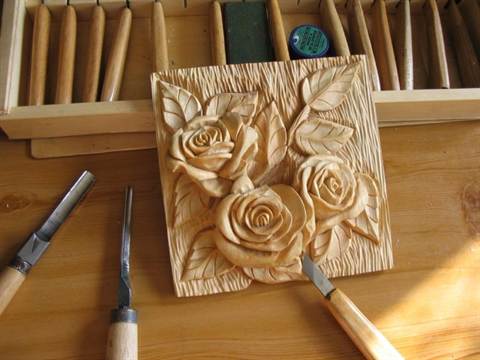
Examples and stencils for flat-relief wood carving.This type is different in that the drawing is above the background. In this case, the pattern has the same height. The background can be textured or smooth. The edges of the cut out pattern are usually rolled over, that is, it is carefully sanded so that they are smooth, as if oval. This technique requires a little more skill than others, but the products made this way look amazing. The photo shows examples and sketches for carving in this style.

Drawings for boxes can be distinguished as a special type. They can be made using various techniques: slotted carving, placing a base of fabric, foil or noble types of wood of a suitable color under the design; flat carving, which includes geometric and contour, or another subspecies. It differs in that indentations of the same depth are made in a flat background. In the case of geometric techniques, the recesses, as a rule, have the shape of triangles or quadrangles. In addition, there is also a staple carving, which is also a type of flat carving and is well suited for decorating boxes. In the images you can see boxes made in various styles.
Wood carving for beginners is an interesting and exciting activity that is not particularly difficult. It is not necessary to have artistic skills to create ornaments and patterns. Now ready-made sketches and video tutorials come to the aid of a beginner.


Most even accomplished masters are inspired by the work of other people, so be sure to carefully look at the stencils, diagrams and drawings of other amateurs.
Types of techniques
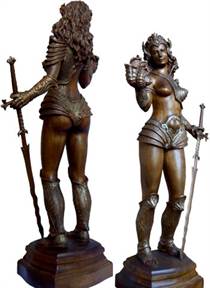
Sculptural carving is the most complex, requiring certain skills. There are many books on this technique.
The incised carving features a fully processed background and beautiful ornamentation. It is performed with a jigsaw, knife, and finishing can be done with a chainsaw.
Geometric carving will help you learn the technique.
In order to perform artistic carving, it is easier to copy a ready-made sketch than to create your own.

But most ready-made patterns are distinguished by a certain intricacy, so a novice master can try his hand at creating his own simple sketch.

Creating a Sketch
When designing a sketch you need to perform the following sequence of steps:
- The workpiece for work is selected;
- The sketch indicates the main elements and places where the thread will be applied;

- Using drawing supplies, the picture is redrawn onto graph paper or tracing paper with scale markings;
- If any elements are repeated, then creating a single stencil is enough.
If you have the skills to work in the simplest graphic editors (for example, Paint), you can create a sketch there, and then simply print it on paper to the required scale.
Stencils are usually used repeatedly, so it is advisable to make them from a relatively dense material (cardboard, plywood).
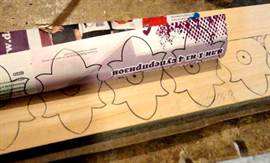
Here are some details of transferring the design from the template to the tree:
- The sample is fixed directly to the base with a milling cutter, cutting is carried out directly along its contour;
- The contours of the stencils are transferred to the wood with a simple pencil;
- You can transfer a sketch from paper to a board by placing tracing paper underneath it. After drawing the outline of the sketch, a trace from the carbon paper will remain on the wood;

- The simplest patterns can be transferred using pricking (with a needle, knife or awl).
Stages of work
When the sketch is transferred to the base, the most interesting process begins - the actual processing of the wood.
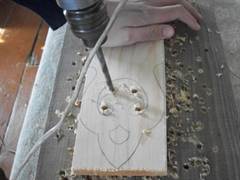
If you are working using the through-thread technique, the first step is to make starting holes in each element. This is usually done using an electric drill. A saw is then inserted into the holes and part of the wood is sawed out. Next, the edges are aligned and the decoration begins.
Flat-relief and volumetric carvings are performed a little differently.

First, the contours of future patterns are made with a knife. Next, the cutter cuts through the deepest central part. All other recesses are formed from it.
Small details are made using a chisel.
Sometimes additional tools may be required (such as a mallet for harder woods).

Deep relief is made with a chisel with a curved blade. Upon completion of the work, all edges are processed to eliminate roughness and chips.


Wood carving is a very ancient art. was and remains the most affordable and attractive way to decorate your home and everyday life. The simplest symbols over time turned into beautiful ornaments, striking with their elegance and extraordinary living warmth.
A selection of carved ornaments for wood carving
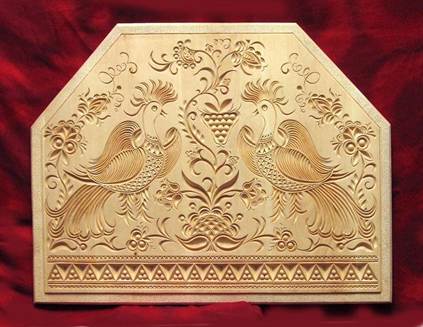
Carved ornaments have been used to decorate wooden products since ancient times. The ornament is a pattern characterized by a rhythmic arrangement of details made in the form of various visual elements.
There are many different ornaments: geometric and floral patterns, images of animals, humans and birds. Often complex carving elements are simplified and stylized into parts that are more accessible to visual perception and manufacturing.
Geometric patterns consist of simple details, the combination of which can sometimes create fantasy pictures of amazing beauty. and the compositions are usually presented in the form of ornamental stripes, rosettes, stars or borders. Individual elements can also be used independently: 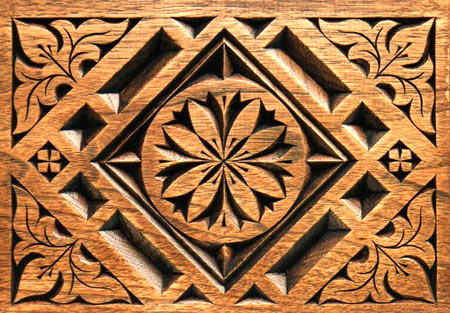
- Dot. Rarely used as an independent element, but when repeated it acquires a decorative effect.
- Lines. A frequently used element, most often used to distinguish individual motifs.
- Broken line. Zigzag is a symbolic sign of water.
- Square and rhombus. Often serves to limit the space filled with motifs.
- Hexagons and octagons. Traditional element in oriental motifs.
- Crosses. Ancient symbols of various structures.
- Spirals and twisted cords. Beautiful elements with a curvilinear geometric structure.
- Circle. It contains a pattern or is an independent part of the composition.
Geometric patterns are used in various types of wood carving, but especially in geometric and contour techniques.
Floral ornaments
A plant or foliage pattern can be made in the form of a border or a stripe of an ornament with repeating elements, or it can be a separate composition depicting trees, fruit-bearing plants, flowers, and so on. Representatives of the flora are either depicted very naturalistically or stylized and simplified.
Image of a person in an ornament
A schematic or realistic representation of a person is often used in wood carving art. For example, the human face is used to decorate decorative elements such as mascarons. Man is often present in ornaments with plant or animal motifs.
Complex ornaments
There are also carved elements that carry both decorative and symbolic meaning:
- inscriptions, hieroglyphs, Arabic script, etc.;
- heraldry - emblems, family coats of arms and different countries;
- symbolic motifs - they are very diverse, for example, a cross, a yin-yang sign, a lotus, solar signs and so on.
Basic forms of carved ornaments
Depending on the nature of the composition, location and shape, the following types of ornaments are distinguished:
 Carved ornaments for wood carving
 - Ribbon ornament and border. A carved detail that borders a product or runs along its edge.
- Garland. Wave-shaped pattern with plant motifs.
- Socket. A separate symmetrical type of ornament of regular shape: circle, polygon, oval.
- Palmetta. It is a fan-shaped carved decor.
- Arabesque. It makes up a complex ornate pattern of geometric or floral patterns.
- Wreath. Carving element with plant motif.
- Network. A pattern with interlacing elements - stems, ribbons, stripes, etc.
- Panel. A pattern enclosed in a carved frame or ribbon.
- Openwork ornament. It is made using the saw-cut carving technique, the peculiarity of which is the creation of a through background of the pattern.


