
floor slabs
Factory floor slabs are a very popular option for floors in IZHS, because. an alternative - a monolithic concrete floor - is a much more time-consuming thing, difficult for inexperienced private developers. Unlike a monolith, the plates come with a factory-guaranteed maximum load, which is more than enough in a private house.
When creating an incremental or integral structure, it is largely a factor in the construction of codes. There are three main measurements used for floor spacing. There are also several sizes and types of floor coverings. The correct interval depends on the requirements of the code, as well as on the type of structure and on the weight. In this article, you will begin to understand what full beams are and why they are used. From there, size and distance options will be discussed.
Why can water seep through the seams between the plates and what to do about it?
Floor beams are horizontally oriented beams that create a frame on which a raised floor can be built. Raised floors are superior to slab-built floors, mainly because they provide space for other components to be installed. Electrical and water lines, as well as the area for insulation, are easier to place with a raised floor. Raised floors are also better able to withstand constant wear and tear on the floor.
Description
There are two GOSTs for floor slabs in Russia:- GOST 9561-91 “Reinforced concrete multi-hollow floor slabs for buildings and structures. Specifications.»
- GOST 26434-85 “Reinforced concrete floor slabs for residential buildings. Types and basic parameters.»
- 1pc - 220 mm thick with round voids with a diameter of 159 mm, designed to be supported on two sides;
- 1PKT - the same, for support on three sides;
- 1PKK - the same, for support on four sides;
- 2pcs - 220 mm thick with round voids 140 mm in diameter, designed to be supported on two sides;
- 2PKT - the same, for support on three sides;
- 2PKK - the same, for support on four sides;
- 3PC - 220 mm thick with round voids with a diameter of 127 mm, designed to be supported on two sides;
- 3PKT - the same, for support on three sides;
- 3PKK - the same, for support on four sides;
- 4PK - 260 mm thick with round voids with a diameter of 159 mm and cutouts in the upper zone along the contour, designed to be supported on two sides;
- 5PK - 260 mm thick with round voids 180 mm in diameter, designed to be supported on two sides;
- 6PK - 300 mm thick with round voids 203 mm in diameter, designed to be supported on two sides;
- 7PK - 160 mm thick with round voids with a diameter of 114 mm, designed to be supported on two sides;
- PG - 260 mm thick with pear-shaped voids, designed to be supported on two sides;
- PB - 220 mm thick, manufactured by continuous molding on long stands and designed to be supported on two sides.
This list does not include floor slabs of the PNO type, which are found in reinforced concrete manufacturers. In general, as far as I understand, board manufacturers are not required to comply with GOST (Government Decree No. 982 of December 1, 2009), although many produce and label boards in accordance with GOST.
Manufacturers produce plates of different sizes, you can almost always find the size you need.
The designs are built to carry a huge amount of weight. Floor beams, especially on the ground floor, and properly spaced to function effectively. Although they do not support the full weight of a house or other structure, beams play an important role in making a building sound. Floor beams installed at the second or third level double as ceiling beams for the level below. In buildings with basements, the first level of floor beams serves the same purpose.
This size is no longer acceptable when creating a structure. The exact size needed can be determined by the building code needed for the particular structure. The larger the structure, the more durable the floor beams are. They are more reminiscent of the beams used to create the largest buildings. Like the beam size, the building code for your structure will provide the proper spacing between floor slabs. The code itself is determined by the engineering requirements of a particular building. As a rule, floor beams are located 16 inches from the center.
Floor slabs in most cases are made prestressed (paragraph 1.2.7 of GOST 9561-91). Those. the reinforcement in the slabs is stretched (thermally or mechanically), and after the concrete has hardened, it is released back. Compression forces are transferred to concrete, the slab becomes stronger.
The ends of the slabs that are involved in the support, manufacturers can reinforce: fill the round voids with concrete or narrow the cross section of the voids in this place. If they are not filled by the manufacturer and the house turns out to be heavy (the load of the walls on the ends increases accordingly), then the voids in the area of the ends can be filled with concrete yourself.
Sealing joints between reinforced concrete slabs
This means from the center of one vertical beam to the center of the next. With some designs, floor slabs need to be 12" or 24" apart in the center. To find the actual distance between the inside edges of each adjacent floor, subtract 1-¾ inches from 12 or 24 inches. Concrete provides one of the most stable work platforms in the world and is the preferred foundation for ceramic or porcelain tiles. The tinset cement mortar used with porcelain tile installations is simply modified concrete containing additives for flexibility and additional adhesion.
Plates usually have special loops on the outside, for which they are lifted by a crane. Sometimes reinforcing loops are inside the slab in open cavities located closer to the four corners.
Floor slabs according to paragraph 1.2.13 of GOST 9561-91 are designated as: type of slab - length and width in decimeters - design load on the slab in kilopascals (kilogram-force per square meter). The steel class of the reinforcement and other characteristics may also be indicated.
The general installation protocols are the same as for any other artificial slab floor, although the layout and exact specifications vary by project. Once you're done, install ceramic tiles over concrete will last generations, ensuring your investment will exceed the one to five year warranty on some floor finishes.
Apply a layer of coloring, anti-slip and waterproofing membrane material to the top of the concrete. Use a brush for the corners and perimeter and a roller for the center. Lay several porcelain tiles in a row, using spacers to simulate joints. Measure a 2-foot section of tile. Check the distance between the plates and note the location of the grout joint closest to the 2 foot mark on the tape measure.
Manufacturers do not bother with the designation of the types of plates and in the price lists they usually write the type of plate only PK or PB (without any 1PK, 2PK, etc.). For example, the designation "PK 54-15-8" means a slab 1PK 5.4 m long and 1.5 m wide and with a maximum allowable distributed load of approximately 800 kg / m 2 (8 kilopascals \u003d 815.77 kilogram-force / m 2 ).
Floor slabs have a lower (ceiling) and an upper (floor) side.
Choose the longest, most visible wall or doorway for your area. Mark two pencil lines parallel to this wall as measured from your dried pieces. Tie a chalk line between these two marks. Repeat the process for the opposite wall to give you a chalk crosshair.
Place the frame square in the center of the two chalk lines to make sure the intersecting lines are square. Mark the adjustments with a pencil and pin a new line to accommodate these marks if needed. Use the 2-foot grout line measurement to then mark and tie additional parallel chalk lines at additional distances from your two control joints, giving you a grid of 2-foot boxes across the floor to help with installation.
According to paragraph 4.3 of GOST 9561-91, plates can be stored in a stack with a height of no more than 2.5 m. Linings for the bottom row of plates and gaskets between them in a stack should be located near the mounting loops.
Slab support
Floor slabs have a support zone. According to paragraph 6.16 "Manuals for the design of residential buildings Vol. 3 (to SNiP 2.08.01-85)":The depth of support of prefabricated slabs on the walls, depending on the nature of their support, is recommended to be taken at least, mm: when supported along the contour, as well as on two long and one short sides - 40; when supported on two sides and a span of slabs of 4.2 m or less, as well as on two short and one long sides - 50; when supported on two sides and the span of plates is more than 4.2 m - 70.
Mix tinset in a bucket using a drill and paddle. Follow the manufacturer's instructions for turning on the water as it varies by manufacturer. Use only cold water and let the tinset sit for 5-10 minutes or as per manufacturer's instructions.
Termination: preparation of seams
Use slow, even pressure and ensure overall coverage of all but the tiniest segment of the chalk line. The tinset will cover the line when you press the tiles into the mortar, but remain visible to guide the joints and the squareness of the mortar. Push each tile into the mortar layer and press down on it. Move the plate slightly from side to side to ensure its connection. Align each tile with pencil lines and adjacent tiles. Use tile shims if you need additional joint advice.
The plates also have a series of working drawings, for example, "series 1.241-1, issue 22". These series also indicate the minimum support depth (it may vary). In general, the minimum support depth of the slab must be checked with the manufacturer.
But with the maximum depth of support of the plates there are questions. In different sources are given completely different meanings, somewhere it is written that 16 cm, somewhere 22 or 25. One comrade on Youtube assures that a maximum of 30 cm. Psychologically, it seems to a person that the deeper the plate is pushed into the wall, the more reliable it will be. However, there is definitely a limit to the maximum depth, because if the slab goes too deep into the wall, then bending loads “work” differently for it. The deeper the slab goes into the wall, the lower the allowable stresses from loads on the supporting ends of the slab usually become. Therefore, it is also better to find out the value of the maximum support from the manufacturer.
Cut the edge tiles using a tile cutting board or mosaic saw. Let the unit dry for 24 hours. Mix the solution in a ladle according to the manufacturer's instructions. Use a spatula around the edge to avoid whipping air into the mixture, causing holes.
Apply the mortar to the floor using a mortar float. Smear the solution on top of the joints and press down on it with the edge of the float. Fill all but the perimeter joints with grout. Hold the solution floating at a 90 degree angle and pull it diagonally across the joints to clear excess solution. Let the unit sit for 20 minutes.
Similarly, it is impossible to support the slabs not in the support zones. Example: On one side, the slab lies correctly, while the other side hangs down, resting on the middle load-bearing wall. Below I have drawn this:
If the wall is built from "weak" wall materials like aerated concrete or foam concrete, then you will need to build an armored belt in order to remove the load from the edge of the wall and distribute it over the entire area of the wall blocks. For warm ceramics, an armored belt is also desirable, although several rows of ordinary solid solid bricks can be laid instead, which does not have such support problems. With the help of an armo-belt, it is also possible to ensure that the plates together form a flat plane, so expensive ceiling plastering is not required.
B) The slabs rest on the inner wall
Fill the bucket with clean water. Dampen the sponge and wipe the installation surface. Use circular and diagonal motions to clean and smooth the joints without pulling out the grout. Repeat until your surface is clean. Let the solution dry for 24 hours.
Bend visible edges against, for example, tubs and cabinets. Leave the perimeter joints empty so they can expand with the weather and support pressure from the floor. Protective goggles Rubber gloves Anti-slip material Brush Paint roller Tape measure Square frame Fine line Modified mortar mixer Drill with mixing paddle Tile pads Notched trowel Marginal trowel Ground float Trowels Sponge tiles. Larger tiles will require more excavation; smaller tiles require a smaller size. The installer's preference is to place full tiles along the most visible points and cut in the least visible areas. If you want to center it or change it in any way, you can adjust the start point as needed and repeat the grid pattern to guide your setup. For example, 2ft sieves are easy to work with, but you can make them 3ft by 4ft, 2ft by 4ft or however big or small you want to accommodate your work area. Any measurements can be set using your dry tile at the start. If your concrete floor has an expansion joint, you must fit it to the joint, which is then filled with a soak, not a mortar. This will require either centering your rig off the joint, or running a saw cutting the length to leave clearance for the seal. You can increase the grid size as you wish. . There isn't a wood floor installer in the business who can't take a shortcut or two to the job site from time to time.
Slab laying
The slabs are placed on the wall / armored belt on a cement-sand mortar 1-2 cm thick, no more. Quote from SP 70.13330.2012 (updated version of SNiP 3.03.01-87) "Bearing and enclosing structures", paragraph 6.4.4:Floor slabs must be laid on a layer of mortar with a thickness of not more than 20 mm, combining the surfaces of adjacent slabs along the seam from the side of the ceiling.
The good news is that laying wood floors is not rocket science. The bad news is that when you make shortcuts, there are a lot of things that can go wrong. Fortunately, most problems can be easily prevented with a little diligence on the part of the installer. Below are five of the most common mistakes contractors make when installing wood floors.
See if you are guilty of any of these installation sins and learn how to reform your ways. Moisture is undeniably the #1 cause of parquet problems. Moisture in and of itself doesn't always have to be a problem - if the wood floor installer takes the right steps to deal with it.
Those. the slabs are leveled to create a level ceiling, and an uneven floor can then be leveled with a screed.
During installation, the plates are placed only on those sides that are provided for support. In most cases, these are only two sides (for PB and 1PK slabs), therefore it is impossible to “pinch” a third side with a wall that is not intended for support. Otherwise, the slab clamped from a third side will not correctly take up the loads from above, cracks may form.
The use of dry mixes for grouting
Unfortunately, many installers do not. A typical scenario might look like this: A contractor in Michigan has a continuous strip floor delivered to the job site in the middle of winter. It came from a respected distributor who kept the floor in a climate controlled vault. Due to delays in the workplace, the floors sit in the workplace, where the heat works, for a month. The contractor installs it, the floor looks great, and he gets paid. The following winter, he receives a phone call from an unfortunate client: the floor has large gaps between the boards.
Laying of floor slabs must be done before the construction of interior partitions, the slabs should not initially rely on them. Those. first you need to let the slab "sag", and only then build non-bearing interior walls (partitions).
The gap between the plates (the distance between the sides) can be different. They can be laid closely, or with a gap of 1-5 cm. The gap space between the floor slabs is then sealed with mortar. Usually the gap width is obtained "by itself" when calculating the right amount slabs, their size and the distance to be covered.
The likely reason is that, while in the workplace, the floor adapts to the extreme dry conditions of winter. When he then acclimatized to another extreme, a particularly humid Michigan summer, he swelled up, crushing the edges of the boards. The following winter, when the floor dried again, the gaps were larger than typical seasonal gaps.
How to score rusty correctly
How can this be prevented? Whenever possible, the goal should be to install a floor covering with a moisture content between the two extremes. Not having this, allowing some expansion, not nailing the floors as tightly as possible, and also perhaps including the occasional "rows of washers" where the washers help clear the rows would give that floor a little more room to expand.
Floor slabs after laying can be tied together using, for example, welding. This is done in seismically hazardous regions (Ekaterinburg, Sochi, etc.), in ordinary regions this is not necessary.
In places where it is difficult to pick up a floor slab or it is not possible to mount it correctly, a monolithic floor should be poured. You need to fill it after installing the factory plates in order to correctly set the thickness of the monolith. You need to make sure the installation is firm. monolithic floor, especially if a ladder will rest on it. The space created between the floor slabs is not always trapezoidal or with ledges of the slabs to lean on. If the monolith turns out to be rectangular and is not held on the beveled edges of adjacent plates, then it can simply fall out.
Fixing a hole in the ceiling
There are other examples as well. Perhaps the floor was installed over a slab that did not heal and the boards closed. Moisture issues are too varied to cover in detail here, but following some basic steps to avoid the cardinal sins of moisture.
They must be in "normal living conditions" or regardless of living conditions in your particular area. Look at the exterior of the house to make sure that the gutters and downspouts are in place and that the sorting around the house is diverting water away from the base. Use the recommended moisture-retaining material for the floor you are installing. When you're concerned about moisture, engineered parquet is the smart choice - it's impervious to moisture, but it's much more stable. Perhaps the most important step in this direction is to inform the client that wood is natural material.
Warming
The ends of the floor slabs lying on the outer walls must be insulated, because. reinforced concrete has a high thermal conductivity and the slab in this place becomes a cold bridge. Extruded polystyrene foam can be used as insulation. I drew an example: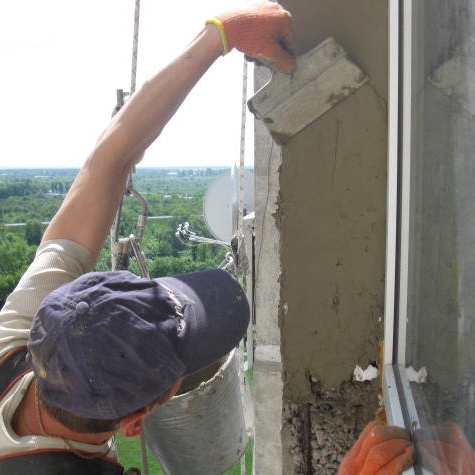
To carrier outer wall 50 cm thick, a slab with a support of 12 cm is included, which is insulated from the end with EPPS (orange color) 5 cm thick.
To increase the operational life of structures and buildings, only one measure can be carried out: to equip the waterproofing of the entire structure and each individual seam. Only waterproofing can protect the building from premature wear and extend the life of the structure.
During construction, floors and concrete are protected in places where it often comes into contact with high humidity (in the presence of certain waterproofing materials). The waterproofing of concrete of sea piers and moorings, hydraulic structures and buildings of hydroelectric power plants is especially popular. However, a house for each of us is no less important building than the same pier or power plant. Therefore, to maintain warmth and comfort in the house, you need to know how to close the gap between the plates. We will talk about this with you.
If the seams of panel and block buildings are not properly sealed, then the walls are not able to protect anything that is inside the building. Neither people, nor equipment, nor furniture are isolated from water getting inside, drafts walking around the room, an unpleasant smell of dampness appearing and covering the walls. Quite often in winter, the question of how to close the cracks is more acute than ever. Many people do not even know how to close the gap between the plates or panels. bearing walls. In the absence of waterproofing seams in the building, heating bills will be much more significant. But this still does not contribute to the preservation of heat in the room.
All the negative consequences of poor-quality sealing of seams were given above. If you no longer want to face such problems, then you should eliminate the defects in the seams and properly seal them. In the case when the primary sealing of the seams, made during the construction of the building, was carried out by laying insulation in the cavity of the interpanel seams and applying a sealant on top of it, secondary sealing can be carried out in two ways.
If the person performing the repair work is sure that the old insulation has retained its original properties, he simply applies a new layer of sealant on top of the already laid material. This work is completed. If the building has been in operation for more than twenty years, then it is recommended to replace the old insulation. To do this, the seams are opened, they fit new material then they are resealed.
Companies involved in this type of repair work select the material for waterproofing on their own. Joints are sealed using mounting joint sealing foam and one or two-component sealant (it should include polyurethane or acrylic resins). Instructions on how to seal the gap with foam, I think, should not be given, anyone who has at least slightly straight arms can handle this simple matter. Insulation are special rubber-like materials, characterized by durability and elasticity.
Currently the most effective way sealing joints between building panels is the so-called "warm joint" technology. It represents the following:
- the joint that was damaged is opened;
- then the old insulation is removed from it;
This type of work, as a rule, is carried out by industrial climbers.
- the field of this, the specialist carefully and carefully fills the cavity with foam sealant;
- a heater is laid on it;
- after all the materials have hardened (the control of this process is carried out manually), a sealant is applied to the resulting surface.
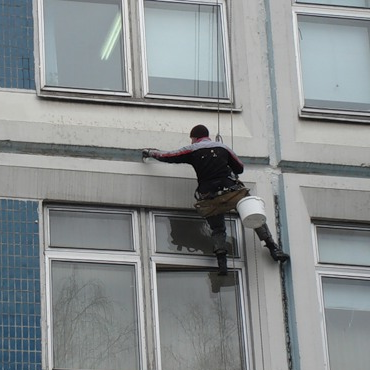
Since the above works are carried out at height, the customer does not have the ability to control them. Therefore, first of all, you should take an interest in the reviews of those people for whom this company has already performed similar work.
The customer, for his part, before the start of work on sealing the seams, must provide workers with free access to the roof of the house, since the contractor will install special equipment on it. In addition, it is necessary to provide a free connection to electricity sources. The area under the work site should be cleared of various vehicles and bystanders.


