
It is worth showing a little resourcefulness and diligence, and a glass vessel will become an original gift or an interior accessory. Decorating bottles with your own hands is a separate topic for home creativity and scope for the materialization of fantasy.
There are many ways to decorate, but among them there are adapted techniques that have become classics of the genre. One of them is the art of decoupage. Depending on the purpose, ordinary glass can be decorated according to the idea of the event. For a wedding ceremony, a colorful design with white doves, rings or a kissing couple will come in handy. It is not difficult to make decoration of wedding bottles with your own hands if you follow the step-by-step technology.
We clean the surface from the factory sticker. To do this, you will have to lower the container with the contents into the water and wait half an hour to effortlessly remove the label. White spirit will help to finally remove the remaining glue. Degrease the glass with acetone for perfect adhesion. It is not necessary to prime the surface, but the perception of the composition depends on the expressiveness of the background. Therefore, with a sponge or brush, successively apply acrylic paint in several layers. We make thematic preparations. The ideal option is to use three-layer decoupage napkins. Only the top layer will do. Fragments cut out of paper are also suitable for decoration. Tip: if the application is too thick, apply acrylic varnish in several layers, and soak the dried picture for 5-10 minutes in water. Now, on the wrong side, carefully separate the unnecessary volume and glue the illustration. The drawings are attached with PVA glue. Motives can be placed in a wide part or distributed in a circle. After drying, they are repeatedly varnished. DIY bottle decoration looks unfinished if you ignore the inside of the vessel. Let's try to lay out the pattern with threads. The scheme is simple: Alternative solution: squeeze out the putty with a syringe. Perhaps it will be circles or other geometric shapes. Abstractions can be painted with nail polish or general protection can be dispensed with. We wrap the neck with tape and spray white paint. Then we apply PVA and sprinkle the vessel with semolina. Let the particles dry. From above we add a plot drawing and cover everything with varnish. We form shadows with crushed colored crayons, and fix the small crumbs with a repeated varnish film. We repeat the process 2 times with an interval of 3 hours. Egg craquelure is a separate chapter in decoupage. Spread the glue generously over the smooth glass, and literally drown the shell in the hardening mass. The basis of fragile puzzles is ready. To make the decoration of wedding bottles with your own hands elegant, apply acrylic paint or a motif according to the decoupage technique on the dried fragments. Combine textures and feel free to experiment with bright spots. For example, add a bronze pigment to white and decorate the neck and bottom in the same tone. Decoration of bottles for a wedding cannot be imagined without colored satin stripes, threads and cords of different diameters. A little patience, and the unique design will surprise you with a luxurious look. To get an oriental-style decor, take glitter threads, gold braid and beads. We tie the first loop on the neck or bottom, apply transparent glue to the vessel, give it time to dry and wrap it with threads. The decor in the ethnic concept will look completely different. Thick linen threads and coarse braid will do. We take an elastic bandage and wrap it unevenly on dark glass in order to obtain a “striped” effect. The dried fabric will turn yellow, and will be an excellent background for dried flowers glued on top. When using sewing threads, a thinly smeared base is sufficient. Advice! The thickness of the adhesive primer must match the diameter of the rope. Decorating the bottles with ribbons starts with choosing a champagne with a gold sticker. We apply a satin blue fragment to the neck of the vessel and measure the length according to the diameter. We apply drops of glue and loosely close the shiny foil on the glass with a strip. At this stage, you will have to try to eliminate uneven distribution of tissue. We cut off the second segment, which noticeably exceeds the initial length parameter. We repeat the action similarly to the previous one. The anchor points must match. In the same order, alternately glue the next 2 strips. Now we are nearing the middle. Here we need a golden fabric (brocade). The principle is the same: we measure and attach to the glass in 2 rows. An accent strip should also be fixed near the bottom. We continue to decorate the bottles with our own hands with a blue ribbon. We glue it down so that the connecting seam is on the back side. We duplicate the process for another 6-7 tissue fragments. After the end of the decor, an unaesthetic seam is striking at the back. A slit is formed with a clerical knife, where uneven ends with an additionally applied composition are pushed into. We look at the middle of the bottle - there are uncovered segments. We will correct the shortcomings with a brilliant cut of brocade. It remains to add lace, beads and fantasy. We continue decorating wedding bottles with our own hands with a description of the construction of a “pattern” for a dress: We wrap the upper part with continuous even strips to the border with the braid.
Threads 15-20 cm long are soaked in water, then dipped in glue. With the help of a marker, a pattern is drawn, and a toothpick is responsible for its artistic execution.egg craquelure
Decorating bottles with cloth
Decoration of bottles with ribbons
Champagne clothes
prepare a silver ribbon for the top of the outfit. We wrap the champagne closer to the narrow part of the vessel. The idea is to perform 2 tight loopson a slightly smeared glass, we fasten a pink ribbon obliquely and, under a slope, we twist the circle to the middle. Glue a belt from a shiny cord onto a satin ribbon, leaving a few centimeters at your discretion for the future bow.
How to please and surprise guests during a big holiday, how to decorate your own chest of drawers, which stores dishes for festive feasts, without spending a lot of time and effort? It is enough just to show imagination and decorate an object familiar to everyone - a bottle. You can choose it from under any liquid, the main thing is an interesting appearance and no damage.

The decor of the bottles will help even an ordinary holiday to become unforgettable.
Step-by-step instruction:
- Work starts from the bottom of the bottle. You need to follow in a circle. Spread the entire lower part of the glass product with a thick layer of Moment glue.
- Glue twine to the very edge and start winding it sequentially from the outermost line of the bottle.
- Attach twine tightly to previous layers while adding some glue. It should not be applied to the threads themselves or to the entire surface. It is enough to regularly add 2-4 drops to the base at the place of subsequent wrapping of the thread. Do not immediately pour the glue over a long distance, as it dries quickly.
- When protrusions or recesses begin, as well as when moving to a tapering element of the base, it is necessary to smear the surface with a sufficiently thick layer and try to twist the thread in these places as quickly as possible. It is advisable not to damage the quality at the speed of work, as an inhomogeneous coating can spoil the appearance of the finished product. Absolutely all parts, even when overlapping each other, must be wrapped with this material. If you need to place the threads inside large recesses, you need to carefully push the material into them with a stick or hands.
- The neck or other particularly thin parts are wrapped a little tighter than other elements of the bottle, as there is a risk of delamination of the fasteners.
- Crochet a pigtail separately from twine. It is done by applying the basic technique by threading each new loop into the previous one. If the master does not know this knitting technique, you can simply divide the threads into three parts and tie the usual pigtail. When this line is made, it is necessary to periodically put it against the edge of the bottle to see if it fits the exact size of the circle. It is necessary to make an exact detail in size, since the stability of the entire structure depends on it.
- Glue the resulting pigtail to the bottom, slightly going to the base of the structure.
- Bottle decoration in progress. You can use any available materials that have an aesthetic appearance and are suitable for twine. Most often, masters make curls. To do this, ordinary twine threads are taken, wrapped in several layers and twisted in a chaotic manner or form a circle.
- It is desirable to decorate the central part of the obtained elements with some kind of bead or decorative flower..
- If the resulting product seems too dull, it can be easily refreshed. picking up a bright one, if you use old jewelry or any transparent elements from clothes wisely. You can see children's and already unnecessary sets for creativity. They also help to create a great look for the product.
Such decorated bottles fit perfectly into or.
Twine is not a bright material, so it is desirable to give it a brilliant and original appearance by adding something shiny or stylish. To finish in a simple style, just add a coffee bean or a soft button inside. It is advisable to add exactly the same circle to the very top of the bottle so that it looks finished.
Decor of bottles with twine, watch the video master class:
cereals
Cereals are very easy to decorate - just pick up a few varieties of cereals
One of the interesting and original is decor with cereals.
In addition to a variety of cereals, you will need special corrugated paper, two types of glue: PVA and hot. For a beautiful bottle decor, you need paint with a dispenser. The standard procedure for gluing a bottle looks like this:

- is chosen beautiful bottle and cleared of fat;
- croup is glued in the form of clearly defined zones, patterns or protrusions;
- from corrugated paper roses are made by twisting. It is advisable to form them in different sizes;
- when all the elements are glued, you need to let them dry;
- the bottle is covered with paint. It should be applied evenly and everywhere.
Flat semolina, buckwheat, rice, millet can be supplemented with curly pasta. Additionally, you can cut out various curly elements and add various decorations.
Ribbons
Would need:
- satin ribbons;
- brocade ribbons (with the addition of shiny inclusions);
- glue "Moment";
- additional decorative embellishments.
In order for the decoration to be successful and the bottle to become an excellent souvenir, it is advisable to take a product with gold foil without adding any inscriptions. The amount of ribbon used depends on the width of the media. To make the decoration of the bottle easy, and the result turned out to be excellent, you need to decorate according to the scheme:
- To implement each layer, you must first apply the tape to the desired location without gluing, and then cut off the excess.
- Dots are made on the surface of the bottle with glue. It is not necessary to use a lot of this substance.
- The tape is glued close to the surface, stretched. Each subsequent layer is adjusted in length.
- During the gluing of the tape, a kind of pigtail forms at the joints. You should always cross the edges of the material in one direction so that the pattern is even.
- When narrowing the tape to the neck, make sure that it is absolutely even..
- After completing the gluing of the bottle with the base decorative layer you can decorate it with any additional elements.
How to decorate a bottle with ribbons for a wedding:
The even (wide) part of the bottle must be sealed with even strips. You get a messy seam. It is closed with a ribbon threaded across.
lace

Lace can decorate not only bottles. Here are interesting lace lamps

Bottle painting is a great decor option

Children will especially like this decor.
Decoupage. You will need special napkins, which, after being applied to the bottle, are painted with heterogeneous patterns, decorated with floral motifs. At the end of the work, you need to give the surface the effect of aging. It can be done by applying a light, non-uniform paint to the folds of napkins or by coating with a special varnish.

Decoupage is one of the most beautiful options decor

Great gift for any occasion

So you can decorate not only bottles, but also vases, jars and anything
Interior decoration. Can be poured into a bottle of various cereals, creating colorful patterns. For convenience, you need a funnel. It is also allowed to deposit pieces of fruit or vegetables, however, this requires the use of a preservative. You can use not only alcohol, but also saline solution, gelatin. You do not need to use vinegar, as it will give the products a white tint over time. First, fruits or vegetables are stacked in a row, forming decorative combinations, then they are poured with a preservative and sealed.

Here is also a decor option, with canned fruit
Festive table setting at home.

This decor will turn an ordinary dinner into a romantic date.

Beaded decor option - beautiful and unusual
And here is an option on how to make a real designer thing from an ordinary shell:
In order for the resulting design to bring only positive emotions, it is necessary to choose an aesthetic bottle and use high-quality, preferably new materials. When the work is done taking into account the harmony of the color palette, and the whole drawing is coordinated not only with the details among themselves, but also with the surrounding interior, the result will be excellent.
Sometimes the most ordinary household items in just a couple of hours can be turned into a real highlight for a home interior or an exclusive gift for work colleagues and loved ones. One of these ideas is the decoration of bottles. From one very ordinary glass bottle, you can make a lot of products that are completely different in style, texture and functionality.
We already have an article about . Today we propose to consider a few more equally interesting ways of decor.
You can work both with empty bottles and with unopened bottles. An empty bottle after decoration can serve as an excellent addition to the interiors of any room in the apartment or become an original vase for a live or artificial bouquet. Full bottles are most often decorated in order to present them as a gift.

In addition to glass bottles, you can use plastic ones. By the way, all the methods listed below are also suitable for decorating cans and, in general, any containers that are at hand.
Bottle decor with twine, thread and cloth
Before starting work, the bottles need to be prepared. If you decide to decorate an empty bottle, wash it thoroughly with dish soap and dry thoroughly inside and out. If the bottle is corked, then it remains only to remove the label from the outside and wipe the surface.

Materials:
- bottles;
- jute twine or colored thread;
- lace, decorative laces, fabric, braid;
- beads, buttons, flowers or other decorations;
- scissors;
- glue gun and PVA glue.

Progress:
The main task when decorating bottles with jute twine or yarn is to wind the threads so that they lie exactly relative to each other in one layer, and at the same time there would be no gaps between adjacent turns.
To do this, the surface of the bottle is smeared with glue (you can apply PVA not completely on the entire bottle, but make “glue” strips from the neck to the bottom at a distance of 2-3 cm from each other). After applying the glue, we begin to wind the threads. It is desirable to do this quickly enough, until the glue has frozen.

After the entire surface of the bottle is already tightly wrapped, you can begin to attach the jewelry. It can be beads, a button pattern, flowers made of fabric or crocheted, etc.

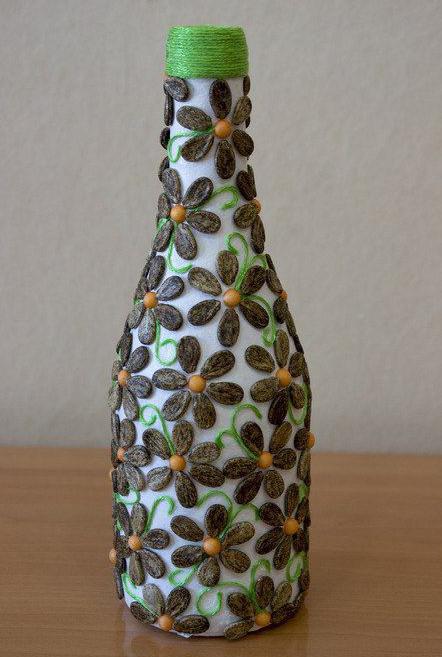
Natural twine looks great in combination with wildflowers. Put bluebells, cornflowers or chamomiles in a new vase and your room will immediately be filled with freshness and summer aroma.

Bottles decorated using this technique are well suited for additions in country or Provence style.

You can not wrap the bottle to the very top. Complete the twine decor with other textured elements. For example, the classic combination of twine with delicate lace looks very beautiful.

Remember that you have a piece of matting left somewhere. After all, this is also a great way to decorate empty bottles. This decor brings warmth and comfort, because since ancient times, natural fabrics have been used by our grandmothers in everyday life. Add bows, artificial flowers, and you will get a very delicate and original product.

Don't forget your knitting skills. These skills will also come in handy if you need to decorate the bottle.

Using lace ribbons or fabric, you can create a “shirt” for a bottle without twine. These elements are very beautiful in and of themselves. Gently glue the decorations with a hot gun. Such bottles will be a great addition to interiors in style.

Against the background of thick threads, artificial flowers or bunches of grapes look very elegant.

Decorating bottles with paints
As in the first case, the bottle may not be empty.
Materials:
- glass bottle of any shape;
- acrylic paints;
- brushes;
- glass for water;
- varnish, preferably water-based.
Work process
First of all, you need to wash the bottle well and dry it.
When you decide on the design, you can proceed to apply the first background coat of paint. Apply acrylic paint evenly with a brush to the entire glass surface. Now you need to have a little patience. Wait until the base is completely dry. Only after that you can proceed to the further drawing of the selected motifs. It can be landscape, abstraction, geometric patterns, etc. Carefully draw each element with brushes of different shapes and thicknesses.
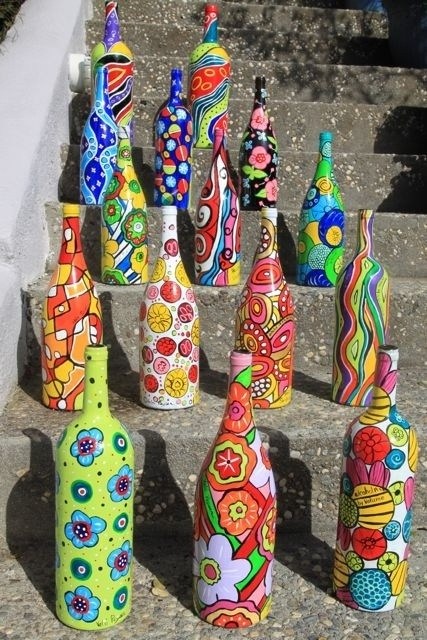
If you don't have experience with bottle painting yet, start with the simplest option. Paint a plastic or glass bottle with plain paint. You can use spray paints, then the process will be even easier and faster. After the surface is dry,
glue strips of decorative tape

or stick a butterfly or flower cut out of a piece of newspaper.

And in order to create such a relief pattern, glue pieces of lace, strips of thin cardboard, paper flowers or a thin stencil to the surface of the bottle before staining. After the glue dries and the elements are firmly attached to the bottle, it remains only to paint in the desired shade.

And here is an example of when a decorative bottle vase does not need any additional decorations. It is enough to choose a shade of paint that suits your interior:

If it’s difficult for you to come up with and bring to life a drawing on your own, use ready-made stencils. After applying and drying the base, attach the stencil to the bottle and apply paint in a contrasting color with a sponge (sponge) or brush.

Fans of working with polymer clay will also find the use of their abilities in decorating interior bottles.

Bottle decoration. Decoupage
The site already has an article on how to work. From it you can learn the main points of the process and the sequence of actions. When decorating bottles, the technique is no different, so here are just a few examples of how you can decorate ordinary bottles with patterned napkins or a decoupage card.


![]()
Bottle decor with stained glass paints

Materials:
- glass bottle of any size;
- matte stained glass paint in two shades;
- pencil and paper;
- double sided tape;
- scissors;
- sponge and brush;
- beads, cords, braid or other decorative elements.
Progress:
- draw pictures on paper that we want to see as a pattern on the finished vase;

- glue them to double-sided tape and cut along the contour;

- tear off protective layer adhesive tape on the other side and glue the resulting pictures to the surface of the bottle. Next, using a sponge, paint the bottle from all sides;

- turn the bottle over and paint the bottom in the same way. We are waiting for the paint to dry well;

- peel off drawings;
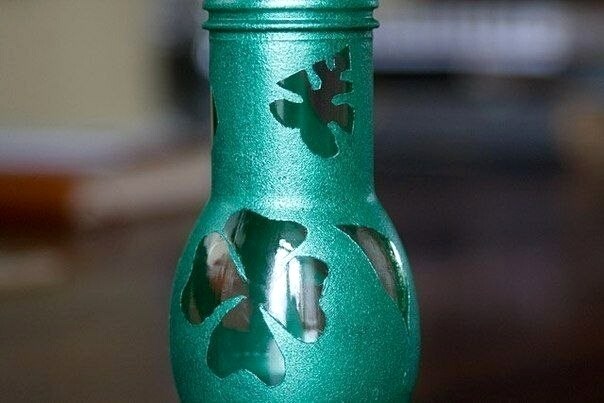
- using a thin brush, draw the contours with golden stained glass paint;

- decorate the top and bottom of the bottle with braid and beads;

The new vase will be a great interior decoration!


