
As a rule, we buy a lot of different toys for our children (dolls, cars, soft, educational, and so on). As a result, they are all scattered in different corners of the apartment. To prevent this from happening, we suggest you find out how and from what you can make a toy box with your own hands. At the same time, it will be possible to accustom the child to order.
Using an unused cardboard box
Big shoe boxes household appliances and so on can be reused. Just decorate them - and you will get a convenient place to store children's dolls and cars.
Smooth building blocks are especially suitable for the little ones as they can make their first experience with smooth material, lay it down and safely discard existing buildings. Often wood block sets are found in buckets with molded hole lids. In addition to ordinary buildings, the little ones can also practice sorting stones and figure out which shape of the stone fits in which shape of the hole.
Plastic building blocks are usually provided with an insert mechanism so that the blocks can be securely attached to each other. In this way, stable structures can be created where children can enjoy longer and with whom they can play. Therefore, the little ones experience that they can also use what they themselves have built. The sense of achievement is especially great with plastic building blocks.
A master class on how to make a toy box with your own hands is described below.
- You will need a cardboard box, a large piece of fabric.
- Coat the bottom of the box around the perimeter with glue from a gun.
- Unfold the fabric and line the bottom of the box with the middle, gently spreading the flap and pressing it to the glue.
- Coat all the walls from the inside, stretch the fabric and glue it to the sides.
- Wrap the fabric over the outside of the box and glue it to the bottom of the walls.
- Turn the box over and wrap the fabric at the bottom. The patch should be evenly pressed against the wall. Glue the fabric, and cut off the excess.
- To strengthen the bottom, coat the fabric with glue around the perimeter of the box and glue cardboard on top.
- Flip the box.
- Pin clothespins on top, and put something heavy inside so that the fabric sticks well to the box.
The box is ready!
In addition, prefabricated attachment kits are commercially available. They are either focused on a specific theme or product, or are completely free-form. They either contain exactly the materials needed to make the product, or all sorts of materials that kids can try. Craft kits are especially suitable for older children who have already practiced working with scissors and glue.
Find creative ideas and game ideas
Even adults can enjoy great ideas. Numerous traders provide many tips and tricks for simple craft kits and games that increase the weight again. These are general packages that typically use the main product of the additional products.
Box with handles
Instructions on how to make a box for children's toys with handles will help you in this matter.

- Take two types of fabric, thick tape or rope, glue, glue gun.
- Cut off a strip of fabric. In width, it should be greater than the height of the box (it is necessary that the flap can close the bottom and wrap itself a little inside the box). The length of the fabric should completely wrap around the perimeter of the box.
- Glue the cut out rectangle of fabric to the sides of the box.
- Wrap the excess fabric on one side inside the box, and on the other, glue it to the bottom.
- Measure out a piece of fabric in a different color. It should cover the bottom and walls inside the box.
- Lubricate the bottom inside with glue and glue the fabric.
- Coat the walls inside and also glue the fabric. Make folds around the edges.
- Glue the folds at the intersection of the two types of fabric.
- Measure the tape and glue it to the bottom, around the perimeter of the box, using a hot glue gun.
- Measure out two identical pieces of tape. Handles will be made from them.
- Glue two tapes to the walls on the sides of the box.
- On top of the box, glue another tape around the perimeter. It should cover the bottom of the handles.
The toy box is ready!
Box for toys from a ready-made cardboard box
Bundles are usually offered at a special discounted price and often provide interesting ideas for a significant expansion of the main product. It is important for children to discover and realize their creativity. With craft ideas and creative games for toddlers, it's easy to enjoy creative work. This makes it easier for committed parents to lead their children in a responsible and active life. Another option is to use the boxes we have at home and make our own homemade cardboard toys with our kids.
Pasted box
The easiest way for this purpose is to take self-adhesive wallpaper. Then you do not have to mess with glue and wait until all the walls dry.

But, regardless of whether you will paste over the future toy box with self-adhesive or paper wallpaper, the principle of operation is the same:
Materials for making a toy cash register. The materials for the manufacture of this toy cash register are. Tutorial to make a toy cash register. The first step in making this fun cardboard toy is to cut out the sides of the kitchen paper roll so that it is the same size as the box you are going to use. And cut out two cardboard circles for each side of the roll.
Cut out 12 pieces of cardboard for the numbers 0 to 9, the dollar sign, or the euro sign. Then make a cut on the roll of paper to place the prices in the cash register. Cut out two cardboard circles for each side of the roll. The second step measures the size of the calculator keys on the paper, cuts it to the size of the hole to be made in the box. When you decide where you want to place the calculator, cut the cardboard in half with a cutter.
- Cut off a piece of wallpaper so that it can wrap around the perimeter of the box.
- If necessary, coat the walls with PVA glue.
- Glue wallpaper around the perimeter of the box.
- Make cuts at the top and bottom of the protruding parts of the wallpaper.
- Wrap the protruding pieces inward and to the bottom.
The box is ready!
Using a tree
Do-it-yourself wooden toy box is quite difficult. But such an item turns out to be very reliable and will last much longer than a cardboard box.
Square basket
We will continue with the third step, which is to make a sliding box at the bottom of the box. Cut out the cardboard so you can place the plastic container for the money. Cut out a cardboard rectangle the size of a cash register to create a new background that will prevent the calculator from falling when you press the keys, to do this, measure your box on a piece of cardboard, cut it out and paste it under the calculator.
summer vegetable cake
We also made a small box that we put under the calculator in order to have more stable support. The fourth step is optional if you want to play with credit cards as well as money, for this you can cut two extra pieces of cardboard the same length as the roll of kitchen paper to serve as a reader credit cards and extra buttons.

Also, it can not only be used in the interior as a decorative element. Such a box can become a functional part of the room.
For example, if you put a box under the wall, put a blanket and sofa cushions on top, then there will be an additional seating area.
Step 5 Paint the pieces and dry to assemble. The fifth step is to draw the details of the cash register and let it dry to assemble it. Insert the interior and other details. In the sixth step, insert the calculator into the bottom of the cash register so that the buttons are visible through the rectangular hole at the top.
And the seventh and last step- use a glue gun to glue outside the cash register and each part of it. We can also use hot glue on the bottom of the cash register to make it more durable. With this craft, toddlers will entertain themselves while playing with them.
How to make a box?
For convenience, here is a guide on how to make a wooden box for storing toys with your own hands.

- Create a sketch of the future box (picture 1). Consider its dimensions, what will be the height, depth and width. Will he be on legs or stand upside down on the floor? Will there be handles and where should they be located?
- Prepare all the necessary materials and tools (picture 2). To get started, you will need plywood or MDF board. They are sold at a hardware store. But if you have old furniture (for example, a table, chest of drawers, wardrobe), then you can disassemble it and get the necessary materials. You will also need screws and corners, hinges, PVA glue or carpentry. Of the tools you need a simple saw or a circular saw.
- If you buy materials in a store, you can ask them to cut the boards to the desired dimensions. If this is not possible or you are using improvised material, then do everything yourself (picture 3). To do this, draw the board into pieces and saw it. As a result, you should get the following number of parts: four walls (all the same or two different), a bottom and a lid.
- Start assembling the box. For this place of the joints of the walls, coat with glue (picture 4).
- Then connect the two parts with corners (picture 5).
- Attach the lid to the box with hinges (picture 6).
- Wipe off excess glue with a cloth and leave the box to dry.
- Decorate the box. For example, sand it and paint it (picture 7).
- Attach the handle and legs as desired (picture 8).
Storage box is ready!
It is also a good gift to surprise them. Put in all the imagination you want them to look like yours and they'll love it. What materials are needed to make a wooden box for toys and tools? Necessary materials and tools.
How to make a toy box and tools with wood? Draw the tools on the tree. You can also use tool templates. Make a hole in the center of the drawing. You can paint it or leave the wood in natural state. After these steps you will have your saw.
A box of boards
A wooden toy box can be made from planks. There are two ways to collect.

- Take plywood for the bottom and nail four blocks in the corners. Then nail planks to them with thin carnations. You can make gaps between the tree, so ventilation will be better.
- Nail plywood to the bottom of the box on both sides. And nail planks to it. Thus, the sides of the box will be solid, and the sides will be with slots.

Soon New Year! The most impatient draw calendars with a countdown to the last day of December, the most far-sighted have already bought gifts, the smartest in conversations with loved ones very dodgy build sentences with transparent hints of the desired gift, the smallest are not yet quite oriented in time, but by elusive signs, according to to the mysterious glances of mom and dad, to the strange questions of grandmothers whether they behaved well all year, they already feel that the favorite holiday of children and adults is coming soon.
Draw, cut and sand the piece as in the previous step. Make a hole to put some in. With a drill and wood and opens the hole, the drill, so you enter the drill, if the child is very small put a thin strip that makes the drill, if the child is older can put a little actually.
Toy box made of chipboard or solid wood
Write down the sign of the pyrograph. You can place a drill mark or whatever your imagination wants, you can also use a permanent marker or draw on it. If you want, you can draw it and give it a more personal touch. When you're done, you'll end your workout.
And since a holiday is planned, then there will be gifts. Gifts will be different, and it is possible that you want to give jewelry on Christmas tree. And now, smoothly, as a skater glides across the ice in well-sharpened skates, we approached the topic of this master class: the lesson will tell you about the method of making a gift box for especially valuable toys. The possibility of giving only a box is also being considered, shifting the responsibility for filling to the recipient of such a gift.
Do it to the extent you want and throw it away. Enter the bubble from the old level. To make this mark on the tree where you want to place it. Empty the hole with the chisel so you can enter the bubble. If you wish, you can personalize it by writing down the child's name. You have now completed the tunnel.
Take two round rods of different thickness, cut to the size you want, with a screwdriver and let them go. Take the thinnest ribbon and use a chisel to make a flat tip shape. Take a thicker strip and use a drill and a wooden drill to make a hole in the center so you can go into the thin strip.
Before proceeding, read the short thoughts of the author of the master class about the described process:
* the master class is divided into chapters. Such a division allows you to interrupt work at some completed stage in order to start it at another time;
*list necessary materials printed at the beginning of the chapter in which these materials are used. Let's jump ahead a bit - you don't need to buy a special cardboard bending machine or a ruler with a markup of 0.001 mm - everything that we used, you probably have at home or is sold in the nearest stationery stall;
Draw it and decorate it to complete your screwdriver. In many of our homes, we have a big problem with where to store small children's toys, mostly made up of small pieces that can get lost if left on the floor. This time we're going to show you a simple, simple and tough enough way to get us out of trouble.
DIY box for storing toys
Once you've made the toy box, you can decorate it however you like, either with your child's favorite cartoon, or with the cover of newspapers, comics, etc. Materials needed to make toy boxes. Plywood board for sides, base and cover, thickness will be 12mm if we use a light weight or 18mm if we need a box for bigger toys.
- Saw for wood Square.
- Coarse grain and medium sandpaper.
*for the best result you will need patience and accuracy;
* photo and description of the process are focused on right-handers, "grand sorry" for those who are gifted with the ability to write only with their left hand;
You can start.
Chapter first.
Materials: scissors, stationery knife, metal ruler, pencil, needle file or nail file, pva glue, dry glue stick, masking tape, gloves, sprayer, thin sheet of A4 paper, cardboard 2 mm, cardboard 1 mm. Dimensions of 2 mm thick cardboard: two pieces 19x26 cm and two strips 4x85 cm and 2x85 cm. Dimensions of 1 mm thick cardboard: two pieces 19x26 cm.
Pay Special attention on the dimensions of all modules, since they must be the same. In the first case, once the holes are marked, you will need a drill with a wooden crown with a diameter of 2.5 centimeters, once you make the holes, with a jigsaw that you will cut along the lines to get a hole in the handles. In the second case, it will be enough to make two holes with a diameter of 10 mm and skip some ropes to which you will tie the edge, and which will serve as handles for transporting the box.
Insert three nails 5 cm to 9 mm from the edges on the sides of the caps, not all the way. Apply wood glue around the edges of the lids and join both sides. Once you've joined both sides at right angles, simply nail the nails down. Using the square, place all sides of the box according to the instructions in steps three and four.
Based on the recommendation above, cut out four identical sides from the binding board. Perfection is the main task for the next 10 minutes. To do this, take a thin sheet of paper measuring 18x25 cm, fold in half and in half again. From the corner of the open cut of the folded paper, step back 4 cm in two directions. Make a round according to the marks. Smooth and beautiful. Cut off the corner, unfold the origami. Glue a simple template onto cardboard 1 mm thick.
Position the base of the wooden box so that it is perfect on all sides. Apply glue to all edges of the box and clean off the excess with a cloth dampened with water. Using a punch and a hammer, nail all the nails until they are inserted under the surface of the wood and fill the holes with putty, when it dries, fill these particles with fine sandpaper.
Place the lid on the box and cut out four squares in the shape of a triangle, which you will place in the corners as shown. Use adhesive glue to attach the brackets to the cover. Make a hole as in step number two to lift the lid.

Exactly along the edge of the template, carefully and diligently cut out the first reference part. On the part, find the center and mark "top-left". Circle this part to get the other three sides. On each side, put the same arrows before cutting out the details. The scheme is as follows: they circled the part, put arrows, cut it out, circled the part .. and so on three times.
Once you've finished the toy box, you can decorate it however you like, whether it's wood paint, varnish, or lined with newspaper, comics, wrapping paper, etc. With such a big toy these days, it's easy to get lost and run out of ideas of what we can give our kids to play with.
For this reason, today we are going to teach you how to make toys with cardboard boxes so that the little ones have a good time in both building and playing. Listen! Increase your imagination and ask him to make a model of your room. With a shoebox as the base, cut and fold other pieces of cardboard to make furniture. You can also paint lamps and paintings on the walls.

The top indicates the long side of the figure. This side will later be the back wall of the box.
The four sides have the same directions, and if you fold them with a cake or a stack of pancakes (a matter of taste), then the edges will match perfectly. Not quite enough? The perfectionist advises gluing the parts together with paper tape and sanding with a file or nail file.
Try to make it look like a real room or let your imagination fly and create something completely new. Both options can be very interesting. You only need three boxes for your son to play the role of a robot perfectly. The first thing you need to do is cut some holes to get your head and arms out into a box big enough to cover your body. Then break through another smaller box with which you will cover your head.
Lastly, you will need to cut out pieces of cardboard from the shoe box to create decorative buttons and panels. With a little imagination, a box can become a racing car. You just need to decorate it a bit, with markers or paint, and stick some plastic plates on the wheels.

When collecting "cakes", follow the direction of the arrows.
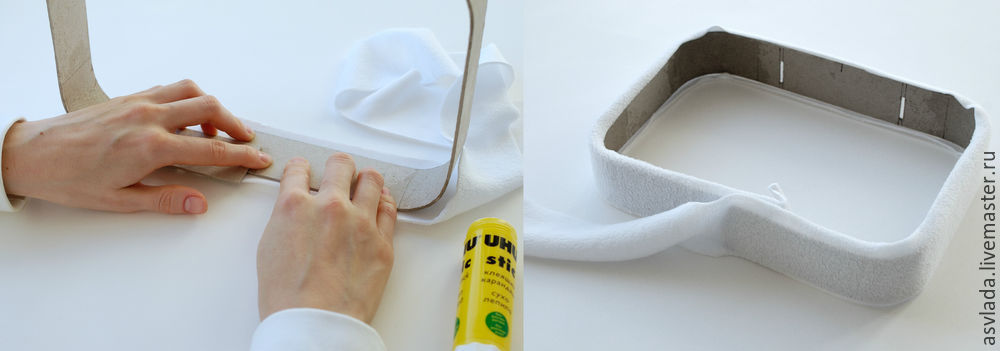
The next step requires preparation. Put a cardboard 2 mm thick and a strip of cardboard 90x4 cm in front of you. Make marks on the strip of cardboard, setting aside the distances: 8 - 16 - 25 - 32 - 50 - 58 - 67 - 75 cm. Mark sections of 8 cm with a cross, a tick or a fluffy snowflake are the rounded corners. Also indicate the beginning and bottom of the cardboard strip. Cut long strips of paper tape, thirteen centimeters each, place a 1:1 solution of pva glue with water, cover the table with paper or newspapers, put on gloves.

With the help of a sprayer, in fact, spray the solution onto the area marked in a special way. Wet the cardboard should be moderate and on both sides. Everyone will understand the word "moderate" in their own way. Here's how to explain? The cardboard should not exfoliate or swell, but at the same time it should bend well and be plastic. A couple of "zilch", if I may say so, for each section on the one hand will be enough. In any case, you can pre-practice on scraps of cardboard and reveal your "moderate".
Find the "beginning-bottom" mark and connect to the middle of the cardboard side. Holding the side with your thumbs, go around the corners with a strip of moistened cardboard.

Thoroughly crease the cardboard so that creases do not form.

This is a preliminary wrapping operation, so when you have formed one corner, move on to another without fixing the previous one.
After all the corners have taken on a semicircular shape, repeat the operation, but already gluing the strip to the side with tape.
![]()
Pull the strip well over the edge of the cardboard so that gaps or so-called holes do not form.
Additional heading "Note for a perfectionist". To make the shape of the box even more perfect, take care of the beautiful rounding of the upper edges of the rim. To do this, put a book in a box, slightly less than the height of the side, on the second cardboard side of the book, press the upper edges of the sides to the edges of the side and fix with tape until the glue is completely dry.

Repeat all steps for the second strip of cardboard. This time it will be easier for you, because it is already the previous one, a skill and dexterity have appeared - your hands will deftly cope with this task.
When the glue dries, remove the tape and sides. Now you have these two details. And you should be happy about it.

Chapter two.
Materials: elegant fabric 25x60 cm (dimensions with a margin for neat cutting of fabric), fleece, stationery knife, self-disappearing marker, ruler, scissors, dry glue stick, glue that quickly sets, a piece of thick paper.
First of all, prepare the holes for the handle of the box. To do this, lay the side on the side so that the long sides match. Using the arrows, it is easy to find the middle on the side.

Make a mark on the inside of the side, and not on the outside, as in the photo.
Set aside 5.3 cm from the mark to the right and left.

From each new mark, set aside 3 mm to the center. From the bottom of the side 1.3 cm, the hole itself is 2 cm in size, then 0.7 mm remains to the top edge.

The result of the calculations must be carefully cut with a clerical knife.

The walls and sides will be soft and cozy, like freshly fallen snow, thanks to the fleece. First glue the sides onto a piece of fleece, and when the glue dries, cut it out to fit the shape of the workpiece.

For the sides, it is more convenient to first cut off a strip of fleece with allowances of one centimeter on each side, and then glue and cut off the excess.
When you're done, use fine scissors to cut off the excess fleece and cut out the holes for the handle. In both cases, try to cut exactly along the edge so that there are no "drifts".

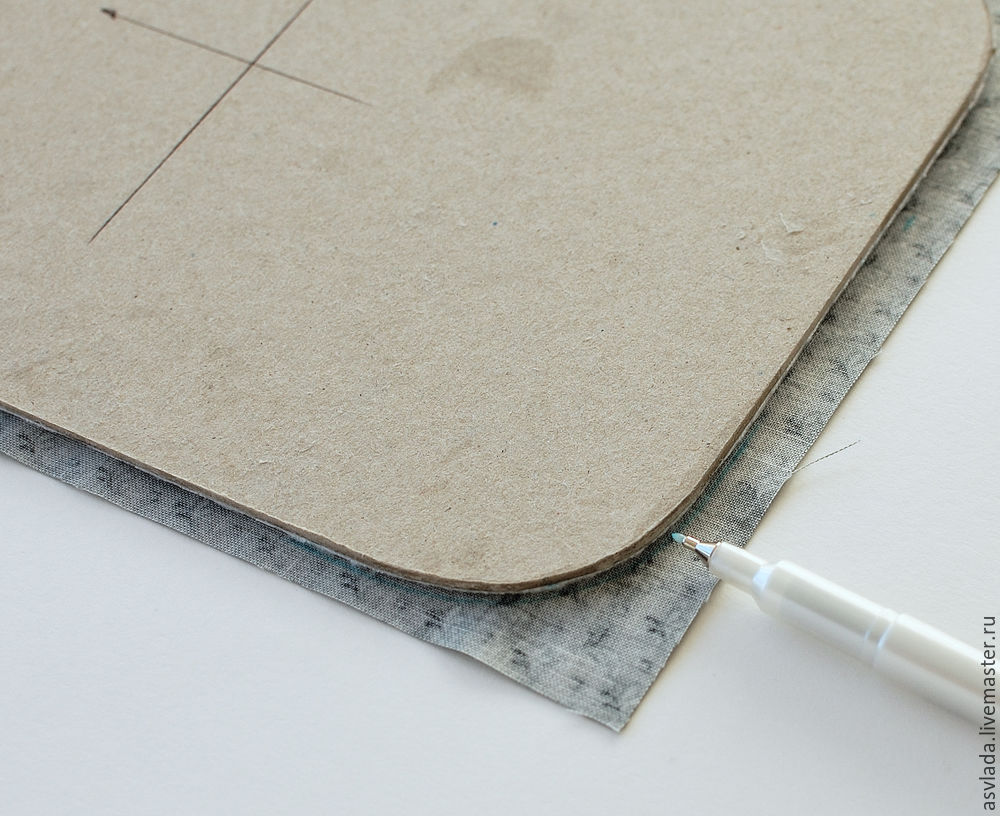
Pre-iron the selected fabric and place it face down according to the direction of the pattern. Place the cardboard on top of the fabric with the soft fleece facing down. Step back 0.8 mm from the edge of the cardboard and mark.

On the marks, draw a rectangle with rounded corners, moving the cardboard to the marks and tracing the corners.
Cut out the resulting shape with scissors. If you have scalloped scissors - lucky if you don't, spend a little time cutting out tiny triangles at the corners of the figure.

Start gluing the fabric allowances from the long sides, then the short sides, and after that - each corner in turn.

Despite the fact that the allowances are small, it does not take much time to glue them.

Thanks to the triangles, the fabric at rounded corners will not wrinkle, it will lie neatly and beautifully.
Wrap the second piece of cardboard in the same way.
Now you need to glue the side to the side of the box. Do not confuse: glue the bottom of the box with a high side. Before gluing, cut off the excess edge along the length. To do this, stretch a strip of cardboard well around the perimeter of the side and put a mark where the edges converge.

Mark a little more than necessary, literally 2-3 mm - when you start gluing, the cardboard strip will "run away" a little further from the mark.
It is better to glue with glue, which sets quickly. Apply a strip of glue 2-3 mm wide on the bottom of the side and immediately press against the edge of the side.

![]()
Firmly press the strip to the edge of the side and the side itself to the surface of the table.
Reinforce the walls of the box with strips of thick paper punched in the middle.

Chapter three.
Materials: one meter of fabric for bias binding, tailor's pins, thin needle, threads to match the fabric, adhesive doubler, dekovil or hard felt, self-disappearing marker, scissors, ruler.
And here you have two parts: the lid and the bottom of the box. The details on the top are covered with elegant fabric, and the sides are pasted over with fleece.
You can leave it like that - the work has been done a lot, it looks good, and the fleece is very comfortable to hold in your hands. But no. Work a little more and close the fleece sides and the junction of the wall with the side with an oblique trim. For both parts, you will need a 79.5 cm long inlay - no more, no less. The cuts should be directed exactly as shown in the photo, and the length is measured from the extreme points along one straight inlay. Fold the inlay with the right sides with an allowance of 5 mm, pin it off with pins and lay a line on the typewriter. Iron the seam, cut off the protruding corners.

Stretch the ring of bias binding over one of the parts of the box, leave an allowance of 1.8 cm. Tuck the open cut inward and pin it off with a pin.

Twist and cleave around the entire perimeter of the part, slightly fit the fabric at the corners.

Then sew the trim with a hidden seam.

Iron the binding well, paying particular attention to the rounded corners. After that, glue the excess tape of the bottom of the box onto the inner wall, and carefully lay the rest of the fabric on the lid, cutting out triangles in the places of rounded corners.

It's time to make a suitcase handle. Cut out a piece of fabric 6x20 cm in size, a thin glue doubler 4x20 cm in size, dekovil or hard felt 2x10.5 cm in size. On the fabric, step back 1 cm from the long cut and fix the doubler with an iron at this distance. Bend allowances on inside and lightly press down with an iron, but do not make a sharp fold - in the process it will be corrected. Then find the middle on a piece of fabric and on a piece of dekovil, connect the middle, iron the dekovil. Fold the part in half and finally iron the allowances inwards. Stitch along both long sides of the handle.

Before inserting the handle into the bottom side of the box, cut the fabric with sharp, thin scissors at the holes for the handles. With these millimeters of the resulting allowances, carefully wrap the walls of the hole, previously smeared with a thin layer of glue.

Pass the handle through the hole, and glue the protruding tails to the walls with reliable quick-drying glue.

Part four.
Materials: a strip of binding cardboard 1 mm thick, 4.3x85 cm in size, stationery clips, fabric for the interior design of the box 30x90 cm, glue, dry glue stick, fleece, any long tape, not for beauty, but for business.
We think that you have repeatedly applied the lid to the bottom of the box to make sure that it fits perfectly - a reward for accuracy and accuracy. There remains a small detail with which the lid and bottom of the box will be friends for real.
To make such a detail, you will need a strip of thin cardboard 4.3 mm wide and 85 cm long. First, try on: repeat the shape of the walls of the bottom of the box with a strip of cardboard. Press the cardboard especially tightly in the corners and fix it with clerical clips along the way. How well you press the strip of cardboard will determine whether the slices will converge. When you reach the end, make a mark where you need to cut off the excess cardboard, and add one more millimeter to this mark.


