
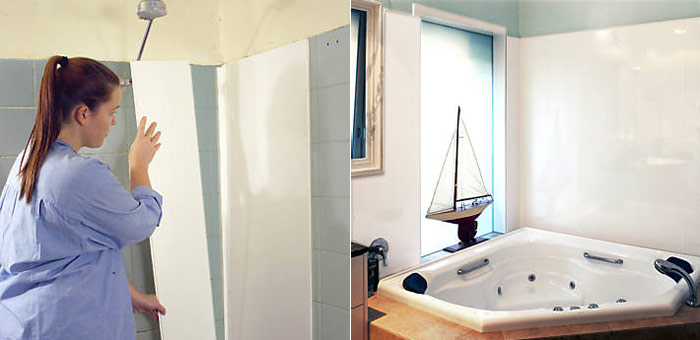
PVC panels are a practical and durable material, and therefore are widely used in decorative trim walls. They are suitable for any room, and a variety of textures, shapes and colors allows you to make the interior not only cozy, but also very stylish. The fastening technology is quite simple, so decorating the walls with plastic panels is a great option for a novice master.
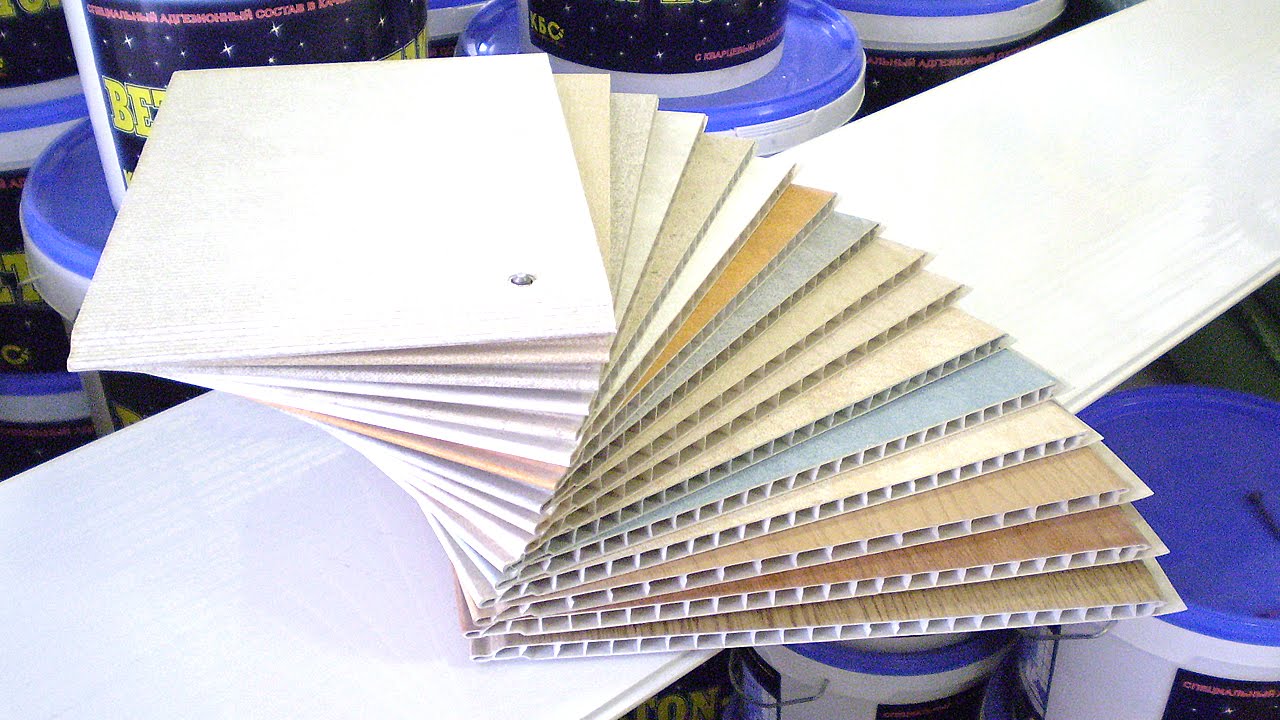
The range of plastic panels is so large that it is very difficult for an inexperienced buyer to figure it out. To avoid mistakes, you should familiarize yourself with the characteristics of this material and its varieties in advance. It is worth considering only certified material, because low-quality panels do not have the required strength and quickly burn out.
The main advantages of plastic panels:
The disadvantage of this material is its low impact resistance, so the panels should be handled with care during transportation and installation. Depending on the coating, the panels are divided into matte and glossy, and according to the drawing technology, they are divided into film and printed.
Standard sizes:
- width from 200 to 350 mm;
- length from 2700 to 3000 mm;
- thickness from 8 to 10 mm.
The strength of the material depends not only on the wall thickness, but also on the number of stiffeners located inside the panel. To check how durable the material is, you need to press your finger on the surface - if the plastic is bent, the panel will not last long.
Besides, you should not buy panels if:
Comparative table of characteristics of PVC panels (for comparison, taken plastic panels with the type of coating flexo printing, 0.25 m wide and 3 m long)
| Indicator / Panel | PVC panel ТМ Decomax | Average Chinese panel | Average European Panel |
|---|---|---|---|
| Front surface thickness, mm | 2,5 | 1,5 | 2,0 |
| Number of stiffeners, pcs | 29 | 20 | 29 |
| State of the stiffeners | smooth, without deformation | smooth, there are minor deformations | smooth, without deformation |
| PVC panel weight, kg/sq.m | 2,2 | 1,7 | 2,0 |
| Appearance | The coating is even, but with pronounced gaps in the stiffening ribs, there are slight deformations | The coating is smooth, without manifestations of stiffening ribs | |
| Raw material | after a slight pressure, the panel is deformed, which proves the high content of chalk | after a slight pressing, the panel returns to its original form, which indicates a low content of chalk |
Preparatory stage
preliminary calculations
You need to start by calculating the amount of finishing material so that you do not have to overpay or go to the store for an additional batch. Panels can be mounted both vertically and horizontally, depending on the desire of the owners of the apartment. With vertical fastening, the number of panels is calculated as follows: measure the length of the perimeter of the room, subtract the width of the openings and divide by the width of one panel. 2-3 lamellas are added to the resulting number in reserve.
For horizontal installation, the area of the room is measured minus the door and window openings and divided by the area of \u200b\u200bone panel. Here, the margin should be at least 10%, since the consumption of material for trimming increases. Additionally, you need to calculate the number of rails for the crate and fasteners. First, the height of the walls is divided by the step of the crate, which is usually 0.5 m, and multiplied by the perimeter of the room. The resulting number indicates the length of the rails in linear meters. By measuring the height of the corners and multiplying it by their number, we get the total footage of the corner profiles; to this number you need to add the perimeter of window and door openings.
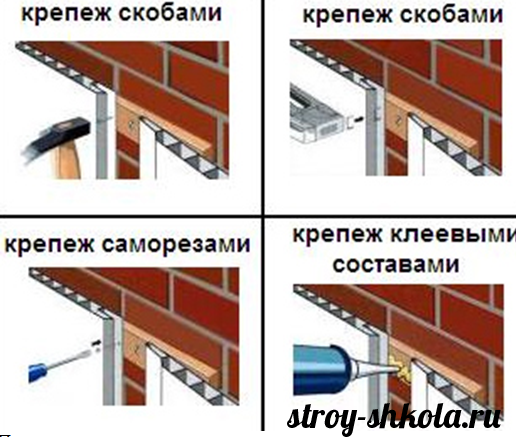
Methods for attaching lamellas
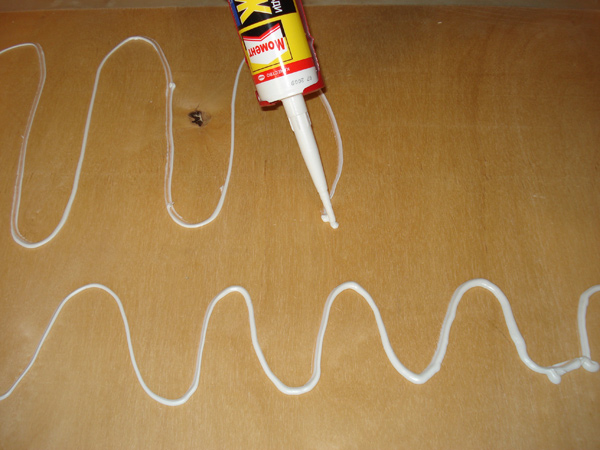
There are three ways to fix the panels on the wall - with glue, self-tapping screws and clamps. The first method is suitable for very even and smooth walls; glue is used special for PVC, universal "Moment-mounting" or "liquid nails".
The use of this method facilitates and reduces the cost of the installation process, since there is no need to fix the crate. Disadvantages: it is impossible to replace a damaged panel, it is difficult to remove the coating from the wall during subsequent repairs.
Self-tapping screws are a reliable and convenient option that does not require a perfectly flat surface. To screw in the screws, you definitely need a screwdriver, otherwise the installation process will be delayed for a long time. Disadvantages of the method: a wooden frame is better suited for self-tapping screws, therefore, additional time is spent on sawing the timber and treating it with an antiseptic.
The third option is the most optimal. Kleimers are conveniently and quickly attached to the crate and securely fix the panels on the wall. The crate is mounted from a metal profile, the assembly of the coating is effortless. A damaged lamella is easy to replace with a new one, and the dismantling of the finish also does not take much time.
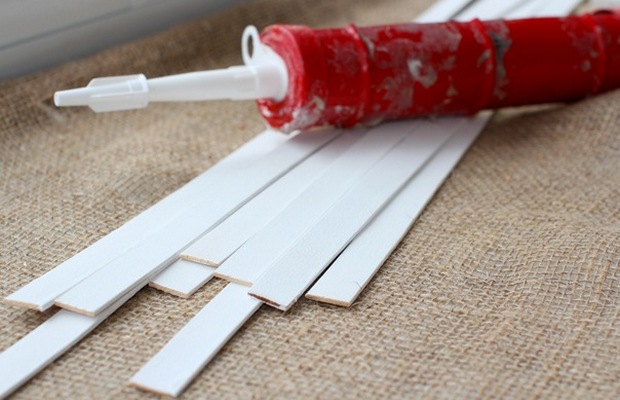
Tools and necessary materials
In the process of work, everything should be at hand, so materials and tools for installation are prepared in advance. You will need:
- fine-toothed hacksaw;
- pencil and tape measure;
- level;
- square;
- plastic panels;
- rails or plastic profile;
- dowel-nails, self-tapping screws or kleimers;
- screwdriver;
- perforator;
- antiseptic composition;
- sealant;
- ceiling plinth.
Wall preparation
Before paneling, the walls must be cleaned of the old coating, repaired to one crack, even out noticeable defects and treat the surface with an antifungal agent. Due to this, dust will not accumulate under the plastic and mold will not develop, which negatively affects the microclimate in the room. If the installation will be carried out on the frame, it is not necessary to additionally level the surface.
Installation of plastic panels
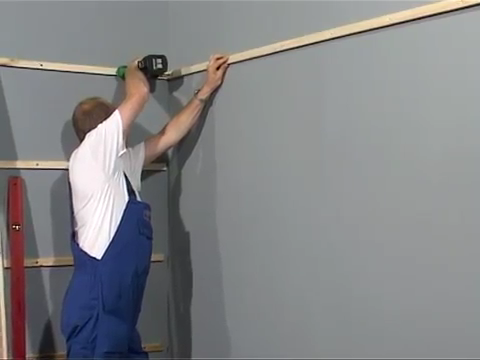
Step 1. Marking the walls
The crate should be fixed strictly according to the level, this will help to avoid distortions. In order not to measure each rail, you should make markings on the walls. The bottom row of the crate should be located 1-2 cm above the floor, so a point is marked on the wall with a pencil at this height, and then a horizontal line is drawn along the entire perimeter using a level. Exactly the same line is drawn under the ceiling or along the edge of the finish, if the walls are not sheathed to the full height. Further, 40-50 cm are measured upwards from the bottom line, a beacon is placed, and so on to the very top. Strictly parallel lines are drawn through the beacons along the perimeter of the walls. The markup is ready.
The panels must be attached to the crate perpendicularly, so the horizontal frame is sheathed vertically, and vice versa. To make markings for a vertical crate, the first line is drawn in the corner from ceiling to floor using a plumb line. Next, mark the second corner, and then draw the rest of the lines in increments of 50 cm.
Step 2. Mounting the crate
* square, electric drill, drills from Pobedit, jigsaw, water level, screwdriver, stapler (brackets 10 mm or more), pliers, tape measure, hammer, CD-pen, ladder;
* dowels \ carnations, plastic material, starting strips, corners and connecting elements, lathing rail and bars, ceiling and floor skirting boards, a bank of liquid nails.
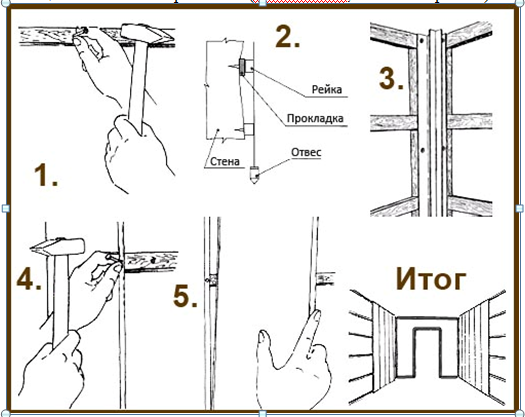
Installation process of plastic cladding step by step:
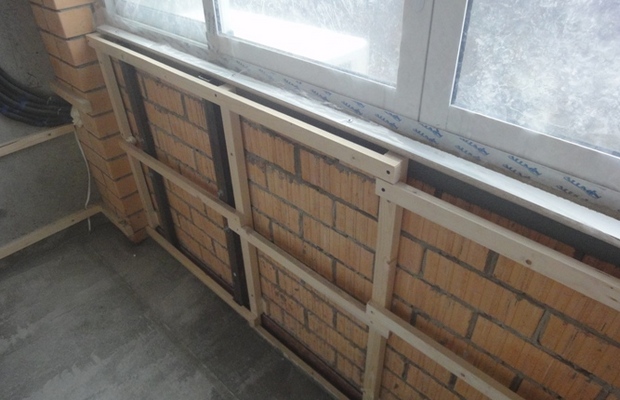
1. We carry out a lattice base so that it serves frame structure to secure panels. The size of the bars for the crate is 30 * 40, 30 * 50, 50 * 50 mm, but not less than "twenty". We recommend treating the wood with antifungal impregnation if the dampness in the room is high, and maybe even choosing a galvanized profile.
The bars are attached to concrete with dowel-nails (6 mm in diameter, length from 60 mm), and to wood - with self-tapping screws. The crate must be leveled at the time of fixing to the surface with plywood linings. The distance between the rails should be up to 500 mm. It is necessary that the slats be perpendicular to the panels and must be located at the beginning and end of the surfaces to be lined (floor-ceiling, window openings).
We make a crate for mounting panels
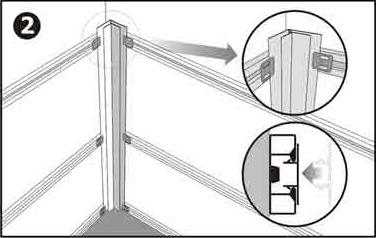
2. On the prepared crate at the junction of the walls, from where the installation of the panels will begin, the starting bar is strengthened with the help of a furniture stapler / clips / self-tapping screws / nails (this is a rail with an “L”- and “P”-shaped section). If the wall is longer than the length of the panel, connecting elements - "H" will be required.
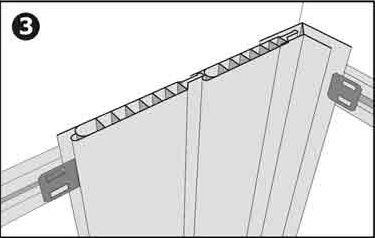
3. We insert the first PVC panel into the profile groove, making sure that the connection is tight, there are no gaps between the panels. Be sure to check the location of the first panel with a level. Then we attach the wide shelf to the crate with brackets.
4. We install the subsequent panels in the same way, inserting a narrow shelf into the fixed groove. The sequence of work is as follows: we insert a narrow shelf into the groove, snap it in, check it with a plumb line, fix the panel with a stapler on the crate. We fix the last panel in the corner profile. It is desirable to cut it so as not to wrinkle the corner bar.
5. The gaps formed during the joining of plastic elements are sealed with special slats with corners (there are external and internal ones, we select them in place). You can apply a starting bar, which looks like a cross section English letter F, that is, F-shaped, when a joint with a window, a corner surface or a doorway is finished. Bringing the bar to the floor, we close the cracks with a plinth. End strips, plinth finish will help to give the surface a finished look.
Requirements for working with PVC materials
* constant temperature in the room, if there is a difference, then within 20°C;
* installation only in the warm season, so that the environment is warmed up to at least +10 degrees, the need to "lay down" plastic materials in heat before installation;
* you need holes in the slatted sheathing, if there is a lot of humidity, for ventilation of the space;
* transverse installation (horizontal) means that the edge on the facade must be at the bottom so that water does not flow;
* plastic changes in length, "growing" by one tenth of a percent with every ten degrees, leave gaps.
Pros and cons of using PVC panels
Many colors, ease of installation, good sound and heat insulation are the advantages of the material. And the disadvantages include the fire hazard of PVC and the need to disassemble the entire coating if one element is damaged.
Video - installation of plastic panels
Wall decoration with plastic panels is a popular way to decorate a variety of rooms. This material, which is popular today, allows you to create unusual interiors that meet the needs of people with different tastes.
1
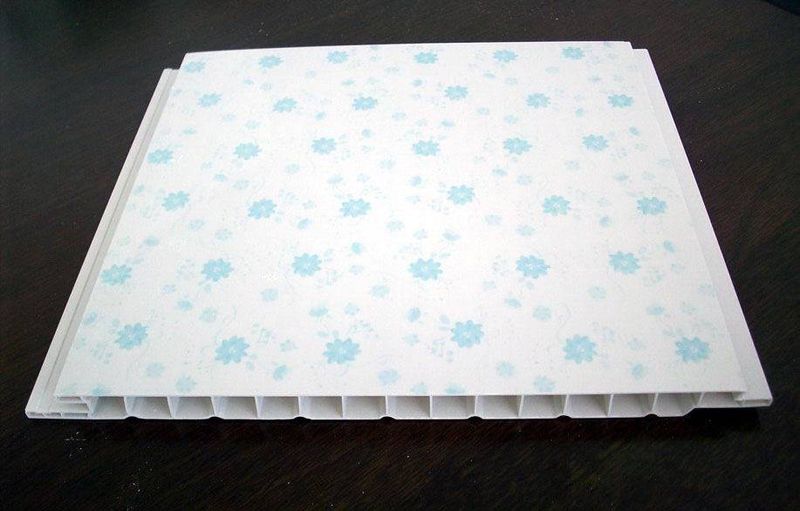
The products in question are a universal finishing material, which is made from polyvinyl chloride using extrusion technology. Its essence is simple. On special units, a thick molten mass of feedstock is squeezed out through special holes. The latter are completely identical in form to the manufactured panel. The products obtained in this way are cooled and then cut to the desired dimensions.
The geometric parameters of PVC panels are standardized. Their height is 26, 27 and 30 cm, the width is in the range of 20-37 cm. By thickness, such products are divided into two categories - 8-10 mm and 5 mm. Wall decoration with plastic panels is characterized by many advantages:
- a wide choice of decor options;
- long service life;
- easy do-it-yourself installation using conventional tools;
- absence of dirt and dust during the installation of products;
- the possibility of mounting on any surface due to the arrangement of the crate;
- affordable cost of panels;
- good thermal insulation qualities provided by the cellular internal structure of PVC products (in addition, it is possible to additionally insulate the surface to be trimmed by mounting a layer of the appropriate material under the panels);
- simple care, which does not involve the use of any special detergents.
Plastic wall panels
It is also worth noting that PVC panels are resistant to abrasion and other types of mechanical stress. They are characterized by increased sound insulation, fire and moisture resistance, the absence of substances harmful to humans in the composition of products. The described operational advantages explain why wall decoration with PVC panels is so popular these days. Installation of plastic sheathing is not recommended in places that are intended for people to leave houses from buildings in case of fire (stairwells and openings). This limitation is due to the fact that polyvinyl chloride, when burned, emits strong suffocating smoke and caustic compounds into the atmosphere.
2
The panels we are interested in can have special properties, which makes it possible to choose the optimal finishing material for different rooms in the house. Experts advise installing plastic panels on balconies and loggias of residential buildings, which have increased resistance to mechanical stress and seasonal temperature fluctuations. And here the bathrooms are characterized high level moisture resistance, they have a minimum of protruding elements (sometimes their complete absence) and at the same time have high strength.
Balcony with pvc panels
These rooms, as a rule, have a small area, which increases the risk of a person colliding with the cladding details. If it is not strong enough, you will have to constantly repair or replace the panels. Described materials for carrying out finishing works differ from each other in the type of their coverage. From this point of view, the panels are:
- With offset printing on the surface. Such products are resistant to chemicals and physical impact, as well as to moisture. On offset panels, some kind of ornament or pattern is first applied using paints, and then they are treated with a special varnish with antistatic properties.
- Laminated. In this case, the surface facing material stick a special protective film. In most cases, it imitates natural leather, stone, wood. Such plastic panels not only have a chic appearance, but also have a long service life, due to the special qualities of the film used (it is resistant to abrasion, is not afraid of sunlight and water).
- With thermal printing on the surface. These products are manufactured using complex technology, therefore they have a rather high cost. First, a pattern is applied to the surface of the blanks - a thermal film is applied and pressed down with a silicone press heated to 170-180 ° C. As a result of such an impact, the paint passes to the panels, which are wound on coils in a continuous roll. Products with thermal printing have an unusual decor and a very rich color. They are UV resistant. Note that such products are not subjected to additional varnishing. That is unnecessary. They look great as it is.
High-quality PVC products a priori cannot be cheap. Do not try to save on finishing material. If you buy cheap panels, you will absolutely have to change the skin after a couple of years of its operation.
3
Sheathing of walls with plastic panels is carried out either directly on the surface to be faced (in this case, a special adhesive is used) or on a pre-mounted crate. The second method is more commonly used. It allows you to do-it-yourself installation of PVC products even on very uneven surfaces. We will describe in detail the process of installing PVC panels using both methods. But first, let's talk about how to correctly calculate the required number of plastic products, fasteners and profiles for assembling the crate. With proper calculations, you do not have to buy extra materials.

Installation of PVC panels
Determining the number of racks is easy. Here you need to know that the lathing slats are always installed perpendicular to the products used for wall decoration. With a vertical arrangement of PVC panels, the rails are mounted horizontally, with a horizontal one, vice versa. The recommended distance between individual profiles is 0.3-0.5 m. Having decided how you will mount the panels, you can proceed to the calculation. Let's say you are satisfied with the vertical installation of the crate. You need to know the number of racks needed to equip it. Measure the length of the wall to be lined and divide this value by the distance between the individual posts, and then add another supporting element to the result (for the outermost profile).
If the wall has a length of 400 cm and a height of 300 cm, you divide 400 by 50 (the maximum distance between the supports), add one and get the number 9. It says that in order to equip the crate, you need to buy 9 racks in the hardware store (their length will be 300 cm). You also need to add two more guides. This is due to the fact that the crate is installed around the entire perimeter of the wall surface. The length of the guides should be equal to the dimensions of the wall to be lined. If you want to position the crate horizontally, the principle of calculation will remain the same. But in this case, you need to focus not on the length of the wall, but on the height of the ceilings.
The number of panels is determined as follows. Measure the length of the surface and divide this value by the width of the PVC panel used. If you purchased planks 20 cm wide, you will need 20 plastic products to finish the wall. At the same time, their height must be the same as the height of the ceiling in the room. When installing the products in question without a crate, it will be correct to calculate the required number of them according to square meters. Calculate the quadrature of the wall and decide on the right number panels. The calculation of fasteners also does not cause any particular problems for home craftsmen who are accustomed to doing different types DIY repair. Remember - for every half meter of the length of the surface to be lined, 1 dowel-nail should be mounted. This is quite enough for reliable fastening of the crate.
In cases where installation is carried out with clamps, pay attention to the following advice. The batten will hold firmly if you use about 20 fasteners for every square of surface.
4
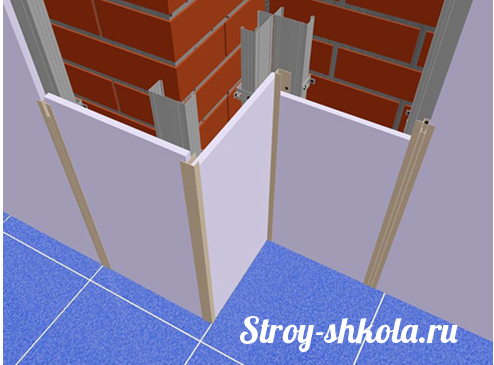
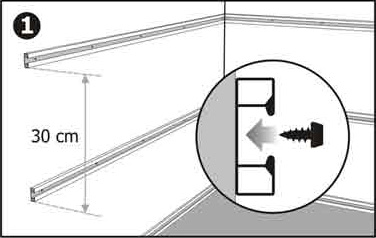
The frame for the installation of the finishing material is equipped on surfaces that have significant irregularities and height differences. In addition, what is important, under the crate it is possible to lay a layer of insulation. The frame can be made with your own hands from metal or plastic guides (profiles) or from wooden slats. There is no significant difference between them. These products differ only in the method of attaching the panels to the created crate. If you are making a metal skeleton (using aluminum guides), you first need to put a starting U-shaped profile. It is mounted under the ceiling.
Crate for installing panels
The second step is to install the same profile at the floor surface. After that, rails are placed in the mounted profiles. The latter serve directly for fixing plastic panels. The profiles are fastened to the base with self-tapping screws or dowels. The step of their installation is 0.8-0.9 m. Wooden guides are made of bars with a section of 2.5-4x4 cm. The left and right guides (vertical) are installed first. And then between them it will be necessary to mount additional horizontal rails. The fastening of wood elements is most often done with universal self-tapping screws, stainless screws or staples.
Plastic frames are considered the most modern. Fungus does not appear on them, they do not rot. But the crate made of plastic can be mounted on relatively flat walls. If the surface has significant elevation differences, it is better to equip an aluminum or wooden skeleton. Plastic profiles have special fasteners. With their help, you can quickly fix the panel without using screws, dowels, self-tapping screws. This is very convenient, especially when the home master does the wall cladding with his own hands. If necessary, the panels on the fasteners can be easily dismantled. However, they do not have any defects. This means that the design can be reused.
Directly the process of installing PVC panels on the crate is as follows:
- Place the very first plastic product in the corner on the finishing profile or on the corner special element. The panel should be well fixed (with self-tapping screws, brackets, screws, depending on the type of frame).
- Take the second panel, connect the tongue and groove, install it.
- Similarly, dock all other PVC products.
You made your own handicraft! Now you need to take care of giving the finish a completely finished look. For these purposes, floor and ceiling plinths are used, which are usually supplied with decorative caps, and moldings. Sometimes the joints between individual plastic strips are treated with a sealant.
5
If the walls in your home are even, you can not equip the crate. In such cases, the cladding is mounted immediately on the surface to be trimmed using liquid nails or another special one. Important point! Choose an adhesive that does not contain solvents.
Using adhesive to install panels
Wall decoration without frame construction is carried out according to the following scheme:
- Thoroughly clean the wall surface. Remove leftovers old paint, wallpaper, other materials. Putty the wall, treat it with a primer. It is desirable that it contains antifungal additives.
- After drying the surface, proceed to the installation of panels. Dilute the adhesive, apply it with a notched trowel, paint brush or roller to a small area of the wall.
- Put the corner panel first, press it as tightly as possible and wait for a while until the glue grabs well.
- In the same way, mount the rest of the plastic products.
Do not forget to install decorative parts and additionally process the gaps between the panels with sealant.
To date, polyvinyl chloride has managed to establish itself as a reliable and high-quality material that deserves to be used in various repair and construction areas. This is confirmed by PVC application panels not only for outdoor, but also for interior decoration premises, which, as you know, implies a much more rigorous selection of suitable material.
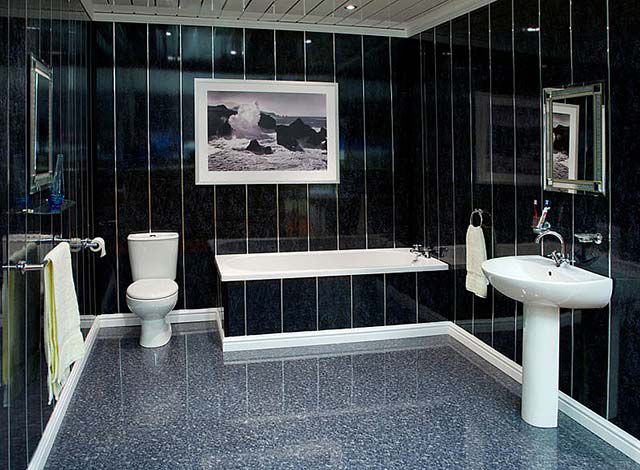
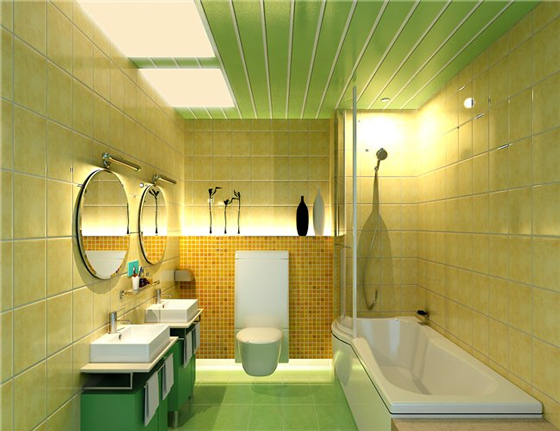
In such cases, great attention is paid not only to technical specifications raw materials used, but also its aesthetic features. From this point of view, plastic panels turn out to be a suitable option for various purposes. Among other things, bathroom PVC paneling is gaining popularity.

Plastic lining for finishing the surface of the walls in the bathroom is considered the most optimal solution for a number of reasons. The material has a wide range of possibilities and a long list of advantages.
Disadvantages of plastic lining

PVC paneling tools
In order for the renovation of the bathroom to do without unpleasant surprises, you must immediately stock up on the necessary set of suitable tools and accessories, which include:
- moldings;
- crate;
- self-tapping screws (alternative - glue);
- ruler and level;
- drill;
- screwdriver;
- pencil;
- roulette;
- square;
- hacksaw;
- nails (dowel-nails);
- joint sealant.
Step-by-step instructions for finishing with PVC panels
In order to completely change the appearance of the bathroom and make the room comfortable and functional, you need to make quite a lot of effort, but all of them will be rewarded with a long service life of PVC panels and pleasant emotions that you get from being in the room.
Mounting panels with self-tapping screws
Usually, craftsmen are invited to finish the surface of the walls with plastic clapboard, however, the ease of installation makes it possible to try your hand and make repairs yourself.
First of all, you should choose the method of fastening. There are two main options - glue and self-tapping screws. The disadvantages of the "glue" method are that, if necessary, "tear off" the panels from the walls, it will be extremely difficult to implement the idea, but installation will be quick and hassle-free.
Self-tapping screws eliminate the difficulty of dismantling, however, to install them, you will need to drill a large number of holes in the wall. This is reflected in the amount of time spent on repairs. In this case, you need to make a decision based on your personal considerations.
Stage 1. In the event that the choice is on the frame method, you must first take care of creating a special metal structure. In order to make a frame from a metal profile, you should first mark the surface of the wall with a level and mark the top and bottom points.
Stage 2. The profiles that belong to the main frame are fixed perpendicular to the plastic panels. Further actions depend on how the PVC panels will be attached. If the elements are arranged vertically, then the next step will be the direct installation of the plastic lining. Horizontal arrangement, on the contrary, requires additional efforts, since you will have to make jumpers in metal frame. For this method of fastening, among other things, you will have to make additional profiles to secure the inner corner.
The fastening clip is snapped into the “grooved” part of the profile, pressing the wide part of the clip with the “baiting” of the panel
Stage 3. In some cases, a decision is made to use the so-called combined technology, in which plastic panels are attached both vertically and horizontally. In this case, the vertical panels must be attached to the horizontal frame, and the remaining elements - due to the jumper. This is especially true for the seam line.
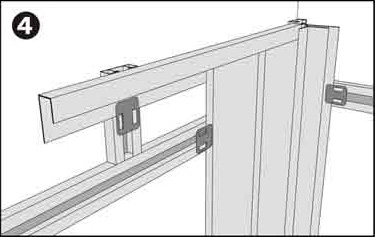
The following panels are inserted into the groove of the previous one and snap into place with a fixing clip in the same way PVC panels - trim strips (moldings)
Stage 5. We fix the panel on the frame by using self-tapping screws. They are screwed in from the side of the wide mounting shelf.
Stage 6. We prepare a new panel, we fasten it by inserting a narrow shelf of the element into the groove of the previous one until there is no joint, we fix it by analogy with the previous step.
Step 7. The last panel must be cut in such a way that the size of the part matches the size of the resulting gap. The width of the panel should be about 1 centimeter less than the distance from the last plastic lining to the inner corner. We insert the PVC panel in such a way that it is securely fixed between the final element and the previous panel.


Mounting by gluing
For gluing PVC panels, liquid nails are most often used. However, this option is relevant only if the surface of the wall does not differ in numerous defects and irregularities.

Step 1. We prepare the wall before finishing - we remove old plaster, paint, wallpaper and other residual materials from the surface.
Step 2 After that, we prime the wall with a special adhesive primer.
Step 3. We use the technology described for the frame method, however, instead of self-tapping screws, we use liquid nails to secure the elements.
If you perform the work with due attention, then there should not be any problems during operation. Plastic panels are a great opportunity to quickly and effectively transform the aesthetic and functional parameters of the bathroom, making it high-tech, comfortable and enjoyable. PVC panels are also used for finishing loggias and balconies. The technology for finishing these rooms is actually no different from the basic installation algorithm presented above.
Also read about installing PVC windows with your own hands.
Video - Finishing the bathroom with PVC panels
Video - All about PVC panels in the bathroom
PVC panels are a convenient, very beautiful and practical way of finishing. No wonder today this finishing material is so popular. Easy installation and affordable price make PVC panels the most attractive option. Also, do not forget about the large selection of preferred colors and sizes. They are suitable for any room. Typically, wall panels are used for wall cladding in bathrooms, as well as ceilings in non-residential premises. Perform installation wall panels even beginners can.
Let's talk about the pros and cons
Undoubted advantages
To choose panels that are ideal for repair, you should clearly understand all their pros and cons. PVC panels have the following advantages:
- Easy to wash.
- Incapable of absorbing moisture. If water gets on them, deformation does not occur.
- Durability.
- Even in rooms with high humidity, deformation and cracking do not occur.
- The base can not be pre-levelled.
- No harmful substances are emitted.
- It's easy to process them. Cut very easily.
- The durability is good enough. But at the same time, the material weighs little.
There are also a number of disadvantages
The first negative is that plastic panels can be damaged with a strong impact. This is explained by the very structure of the material. These are voids with partitions. They serve as a framework for this material.
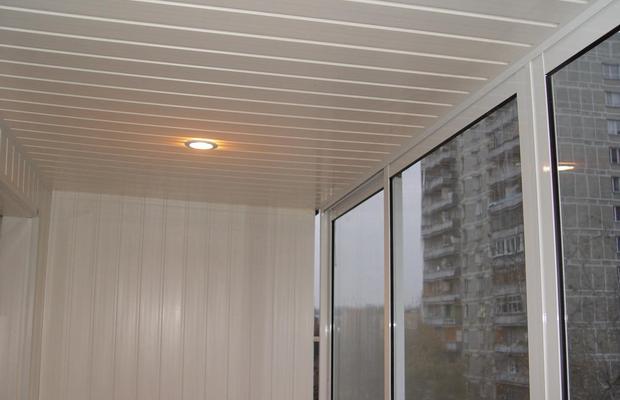
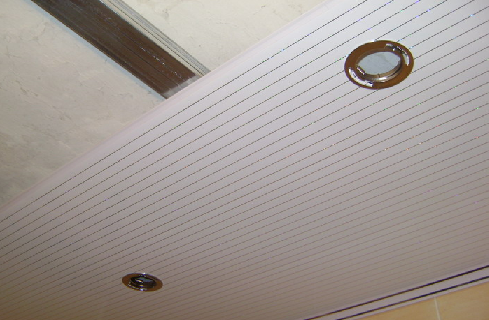
The best option is to place the panels in places where you will not touch them. You can also use them for finishing the ceiling.
Another disadvantage is that PVC panels melt, and harmful substances are released. That is why it is forbidden to use them as a finishing material for evacuation routes.
The right choice of panels
When choosing PVC panels, you should pay attention to weight. If it is very small, this indicates low-quality material.
On the facing side there should not be any cracks, inclusions of a heterogeneous nature and cracks.
Excellent ribbing inside gives the panels rigidity and excellent strength.
When choosing color designs, it is necessary to review the packaging, paying attention to the release date. It happens that the same color, released in different time, is different.
If PVC panels of smaller width are used for finishing, more time will be required. In this case, there will be much less waste. Cutting errors will cost you less.
Mounting large width panels is much easier. It takes a lot of time to work. But, if a mistake is made in the process of fitting the material, a large amount of waste is likely to appear.
That is why you should definitely pay attention to the dimensions of the panels. They play a very important role.
How to prepare the walls
The surface does not need to be levelled. To correct any irregularities, a crate is used. It is on it that the panels are fastened. The installation of this material is similar to laying a roof on a rafter system.
The material on which the fastening will be carried out is completely unimportant. It can be stone, concrete, wood or brick. Only important. So that they can withstand the weight of the crate and panels.
The surface of the base is not painted, but simply primed with a special composition, which contains components from mold and fungus. If the base is made of wood, it must be treated with flame retardants. So it will better resist fire.
Let's talk about crating
To mount wall panels to the ceiling or walls. It is necessary to perform the crate first. These are bars that are parallel to each other at a certain distance. Also, these are profiles made of metal or plastic. Choose a material based on a certain level of humidity in the room. If the room is dry. You can use wood. Metal and plastic are good for showers and bathrooms.
The fastening of the crate is carried out perpendicular to the direction in which the panels will be installed. There are no windows on the ceiling. That is why it does not matter at all the direction in which the laying will be performed. If the rooms have windows, it is best to place them perpendicular to the wall on which there is a window opening. Most often, the panels are placed vertically on the walls. But sometimes a horizontal type of installation is also used.
 The distance between the bars of the crate should not be more than 50 cm. The outer bars are placed 3 cm from the edge. It is better to work with panels if the elements of the crate are made with one step. To select a distance:
- Measure the length or width of the room (it all depends on the direction chosen for installation). Measurements are in centimeters
- From the resulting figure subtract the distance remaining to the extreme bars.
- The result is divided by 50 cm.
- The resulting number is rounded up.
- The distance that was obtained during the second action is divided by the number that was rounded. The resulting number is the crate step.
How to calculate the crate
At doors and windows, the crate is fixed around the perimeter of these openings. This will give the edges of the panels the necessary strength and optimal rigidity. During the installation of the battens, it is important to check the verticality for the walls, and the horizontal plane for the ceiling.
How to calculate the required number of panels
Before proceeding to the direct installation of PVC panels, you need to calculate the amount of material that will be needed. To do this, measure the length of the wall. This figure is divided by the width of the panel. Example - 5000 mm is divided by 250 mm. As a result, it turns out that 20 pieces are needed per wall. This calculation is performed for each wall. When required amount panels for the room is calculated, it is necessary to measure the height of the room. If PVC panels are installed vertically, the height of the room should be measured.
Do not forget about window and doorways. From the length of the walls, their value must be subtracted. For fastening above and below windows, as well as above the door, it is necessary to separately calculate the required amount of material. 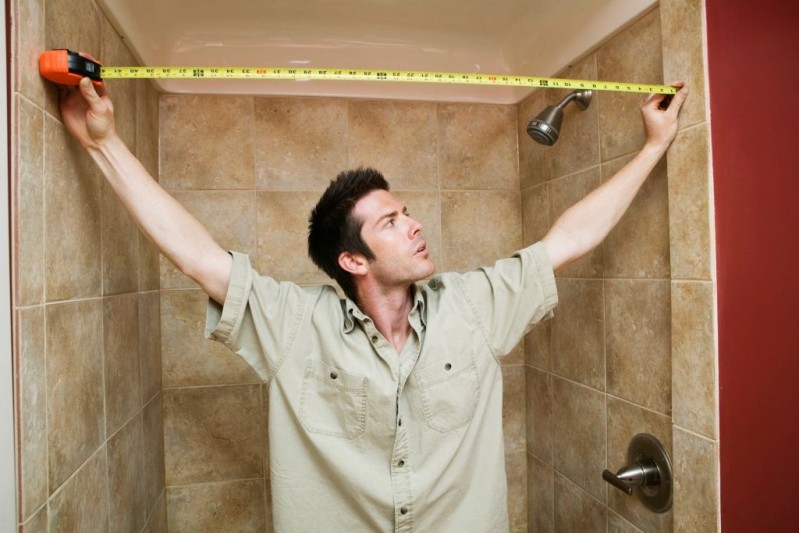
A few simple installation rules
- It is important to install the first panel as accurately as possible. The correct installation of the rest will depend on this. .
- It is important to carry out the installation so that the panels fit perfectly together.
- To shorten the panels to the desired length, you should use a file with small teeth or a jigsaw.
Let's talk about the intricacies of installation
Wall PVC panels weigh a little. Their size is ideal for self-assembly. If the work is done with ceiling panels, you will have to use the services of an assistant.
The crate is fixed to the ceiling or wall. For this, dowel-nails or self-tapping screws are used. Then, along the perimeter of the entire room, profiles are fixed - corner or end. They are equipped with grooves for panels.
For a tighter joint with the profile, it is worth cutting off the comb on the first panel.
PVC panel is cut to the desired length. Then insert it in the right place. In this case, the sections are hidden in the profile.
The panel is fixed. For this, a construction stapler is used.
If the final panel must fit into the corner profile, its lower part should first be fixed to the battens. After that, insert it into place and snap the profile on top. If installation is carried out in the end profile, you need to very carefully bend the panel from above. To do this, use a knife or screwdriver. Then it is inserted into the groove. To make the process much easier, you can cut 3 millimeters less than the distance that remains to the end type profile.
Careful installation of PVC wall panels should be carried out and gradually approach the final corner. Usually the end panel is not the right size. It has to be cut off. This is done with a ruler and a clerical knife. Cutting the panel is very easy. It's quite easy to cut it open. You just need to make the right measurements.
It happens that when finishing a bathroom, optimal sealing is required. To do this, the joints of the joints are treated with silicone sealant. It is evenly distributed throughout the joint inside. Such sealing will save the walls from fungus and moisture.

If you perform the installation of PVC panels correctly, it will not take much time. No special equipment is required for installation. You just need to be patient and follow the above simple rules. With the correct observance of the stages of work, you will succeed. You can create the desired interior quite easily.


