
Bathroom remodeling is a black hole for homeowners' time, money, and effort. According to the estimates of experienced craftsmen, the decoration of this room, due to the high requirements for materials, makes up most of the costs, despite the small area.
However, if instead of the traditional ceramic tiles glue plastic panels on the wall, you can significantly reduce the repair budget. Bathroom finishing PVC panels is not inferior to tiles in terms of practicality, durability and beauty, therefore it is often used in commercial and public buildings. In this article we will tell you how to finish the bathtub with plastic with your own hands.
Plastic finish
Tile is a traditional material for finishing bathrooms, as it is highly resistant to moisture, long service life and beautiful appearance. The only drawback of ceramic tiles is the high price. PVC bathroom panels have become a real alternative to this finishing material in a more affordable price category.
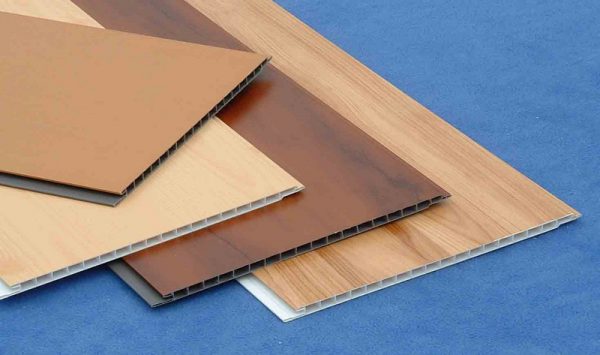
This term refers to rectangular plastic sheets with a cellular structure formed by internal stiffeners. For their manufacture, polyvinyl chloride is used - a thermoplastic polymer that is resistant to external influences. The dimensions of the plastic wall panels with which the bathroom is lined are standard:
- Web width depending on the design plastic panels for the ceiling and walls of the bathroom is 25-50 cm. This size allows you to finish the room quickly enough.
- The length of the wall panels is 2-3 meters, which allows you to attach the elements in one row. because of convenient size material corresponding to the standard ceiling height, the installation of PVC panels in the bathroom is cost-effective and simple.
- The thickness of PVC bathroom panel is usually 6-8mm. The thicker the plastic sheet, the more stiffeners it has, the stronger and more durable it is.
Important! Many inexperienced finishers are wondering how to sheathe a bathroom with plastic, and is it easy to do it yourself. According to experienced craftsmen, plastic wall tiles are the most practical and easy-to-use finishing material that does not require the use of complex tools or special building skills. PVC plastic is used for finishing the bathroom, as they allow you to quickly repair the room without careful preliminary preparation of the walls.
Material advantages
PVC panels for the bathroom are considered a relatively new finishing material that can successfully replace traditional expensive tiles. It is difficult for conservative-minded people to understand that inexpensive plastic panels in the bathroom are much more practical than ceramic tiles. However, manufacturers and professional finishers claim that this simple and easy-to-do-it-yourself material is in no way inferior to it in terms of performance. Finishing the bathroom with PVC panels has the following advantages:

Note! Before attaching plastic panels, you need to make sure of their quality. A sign of a cheap material that does not decorate the bathroom interior is considered to be an incomplete fit of the sheets at the joints, as well as a thin top layer that does not hide the internal stiffeners.
Fastening methods
Novice finishers often do not know how to sheathe a bathtub with plastic panels quickly and efficiently, so they make a lot of flaws, because of which the bathroom looks “handicraft”, untidy. The way in which PVC panels are fastened depends on the condition of the walls in the room, the area of \u200b\u200bthe bathroom and the skills of the master. There are two methods for fixing PVC plastic panels to the wall:

Please note that do-it-yourself wall decoration with PVC panels using the frame method is contraindicated for cramped rooms with a small area, as this technology will steal a few very useful square meters due to the thickness of the crate.
With a shortage of free space, experienced craftsmen recommend carefully leveling the surface of the walls before gluing plastic panels for the bathroom. If there are bumps or bumps on it with a height of more than 0.5 cm, the PVC panel for the bathroom will stand unevenly, inaccurately.
Installation instructions
If you do not understand how to sheathe a bathroom with plastic panels yourself, you need an instruction that will describe the installation process step by step. Manufacturers claim that PVC panels for tiles, plain or patterned, can be easily attached with their own hands with basic building skills and basic tools.

Repair of a bathroom with plastic panels is carried out using a hacksaw, a screwdriver, a building level, a ruler and a marker. Also, for work, you will need guides for assembling the frame, an adhesive if the installation is carried out by gluing, or fasteners. Installation is carried out in the following sequence:

Please note that plastic panels for bathroom tiles, mounted taking into account thermal expansion, unlike ceramic tiles, do not crack when shrinking at home.
PVC panels for the bathroom are recommended for use in new buildings in the first 3 years from commissioning. After the end of the shrinkage process of the structure, at the request of the homeowner, you can tile the walls of the bathroom with tiles or leave everything as it is, because the operational potential of plastic will last for decades.
Video instruction
Plastic Wall panels differ in practicality, durability and aesthetics. But the main advantage of this material is ease of installation, due to which it can be made by almost any person who is only superficially familiar with painting work. This material, also called plastic clapboard, is often used to decorate the bathroom, and if you decide to diversify the interior of the bathroom with such a finishing material, it will probably be interesting and useful for you to learn how to install wall panels with your own hands.
First of all, you need to choose the right materials. Wall panels may differ in their width, and this characteristic is very important during installation:
- Finishing plastic panels of a smaller width, say 10 centimeters, will take more time, but there will be less waste from them, and possible errors in taking measurements and cutting material will be cheaper for your budget.
- Wide panels are easier to install, do not take much time, but if you make a mistake when fitting the material, more waste will appear. Thus, the dimensions of the products play an important role. As for the color and design of the panels, this moment depends on your taste and preferences.
Video: choosing wall panels
After the suitable materials are selected, you can proceed to the installation work.
Lathing installation

wooden crate
If the walls in the bathroom are perfectly smooth, and all corners are even and do not require modification, then the installation of PVC panels can be done directly on the concrete base of the walls using special glue. But, given that in most cases the walls of the bathroom have all sorts of defects, it will be necessary to manufacture a wooden crate, on which plastic will be attached.
The crate is made of wooden beams with a section of 10x30 mm or from a special metal profile. The crossbars of the crate should be located at a distance of 30 cm from each other, but the lowest crossbar must necessarily be in contact with the floor, and the upper one should border on the edge of the panel - this is necessary to stiffen it.
Before mounting the transverse rails, it is necessary to mark the wall with a building level in order to avoid distortions and irregularities. If the wall is uneven, small pieces of wood can be placed under the rail in order to achieve the most even result. When choosing wooden slats, you can fasten the crate to the wall with nails or self-tapping screws, if a metal profile is selected, self-tapping screws are used for fastening.
Installation of moldings and corners
After the crate is ready, the fittings and guides necessary to hide the corner joints of the panels are installed. The joint with the floor is closed with a PVC plinth, if desired, you can choose a model with a box for electrical wiring. To fasten the guides, you can use nails, mounting clips, self-tapping screws. If fastening is carried out on a crate made of a metal profile, only self-tapping screws are suitable.

types of moldings and corners for plastic lining
Panel installation
The installation technology is quite simple. Facing with plastic panels starts from the corner of the room. The whole process comes down to the fact that you cut the panel with a regular hacksaw to the desired height and insert it into the guides, after which the side ledge of the panel is attached to the crate with nails or self-tapping screws. Having fixed one element, it is necessary to mount the next one, due to the presence of locking fasteners, there is no need to adjust the panels. Before finally fixing the PVC panels, it is necessary to check once again how evenly the panel is relative to the vertical line using a plumb line.

Thus, mounting and attaching one panel after another, we get to the corner of the opposite wall and, as a rule, the last panel does not fit in its size and needs to be cut. To do this, you need a clerical knife and a metal ruler or corner. The panel is very easy to cut and it will not be difficult to cut it, the main thing is to correctly measure the part that will go to waste.
Sometimes, bathroom finishing requires maximum wall sealing, and in this case, the joints of the lock joints between the panels can be treated with a small amount of silicone sealant, distributing it evenly throughout the inside of the joint. Sealing will help protect the walls from excessive moisture and the appearance of fungus.
Whether you use PVC or sandwich panels, all work with the right approach will be done quickly and efficiently, because for its installation with your own hands you will not need any complex high-tech equipment, but only your patience and this short instruction that allows you to follow the correct sequence of work.
Video: do-it-yourself installation of plastic panels on walls
One of the main advantages of PVC panels is their ease of installation. Even a person who is far from construction and repair work can easily cope with it. The main thing is to follow the algorithm of actions and a few simple rules.
Adhesive mount

Mounting on the frame
Installation of plastic panels in the bathroom can be done in two different ways. Firstly, they can be directly on the wall, and secondly, they can be attached to a pre-prepared frame.
In the first case, you will first have to carefully prepare the wall surface in order to ensure the tightest possible fit of the panel sheets. If the surface of the wall has significant irregularities, then preference is given to the second option. The disadvantage of this method is the reduction usable area, but it makes it possible to improve heat and sound insulation, hide all communications.
Preparation for work
To finish the bathroom with PVC panels with your own hands, depending on the installation option, you will need chipboard or fiberboard, slats, bars or metal profiles, moldings. It is also worth preparing sealant and insulating materials.

The quality and durability of the lining to a large extent depend on the correctness and clarity of measurements. Therefore, when installation work indispensable without:
- roulettes;
- level;
- rulers;
- pencil.
To fix the crate and sheets, an adhesive, self-tapping screws, kleimers or nails, a hammer, a screwdriver, a hacksaw (with a fine tooth), a construction stapler, a puncher and a screwdriver are used.
Calculations
To determine the amount of material, a series of simple calculations are preliminarily carried out.

When calculating the number and length of the profile, take into account that:
- the elements of the crate must be perpendicular to the panels. So, if the panels are planned to be mounted vertically, then the parts of the crate are placed horizontally. And vice versa;
- the distance between the planks should be from 30 to 50 cm;
- additional rails are mounted around the door opening;
- installation is carried out around the perimeter;
- in addition to the crate, guides are also needed;
- all non-integer numbers in calculations are rounded up;
- the number of fasteners required in the bathroom on their own depends on the length of the wall surface, at the rate of 1 element for every 50 cm. In the case of using kleimers, 20 fasteners will be needed per 1 m2.
The number of base material is also calculated depending on the length of the wall. To do this, the total length is divided by the width of the panels. In the case of using PVC sheets or tiles, their number is calculated per m2. Calculations near the doors are done separately.
It is equally important to properly prepare all the component parts (accessories). When using corner profiles, they are purchased according to the number of corners in the bathroom. The number of internal and external corners for the baseboard also depends on this indicator. The length of the floor plinth and ceiling fillet is calculated in accordance with the perimeter of the room.
5-10% is added to all calculation results (for an unsuccessful cut, overlap, etc.), so that in an emergency you do not have to run to the store.
Adhesive installation method
Installation of PVC panels on glue is considered the most simple and fast way. However, for its high-quality implementation, the surface on which PVC plates will be installed must be as even as possible.

How to properly fix plastic panels in the bathroom with glue?
- To begin with, the walls are cleaned of the old cladding (wallpaper is removed, paint is removed, etc.). If there are bumps and depressions, it must be leveled with a putty containing antibacterial substances.
- After the putty dries, a primer is applied over it. For each surface, the primers will be different: for walls covered with oil paint, one, and for "clean" concrete - completely different.
- Particular attention in the preparation of materials should be given to glue. The usual adhesive composition for the bathroom is not suitable, because due to high humidity and temperature changes, it will quickly soften and cease to hold the finish.
- A good option here can be liquid nails, which are highly moisture resistant and reliably glue any materials.
- If a preparatory work for leveling and processing the walls was done correctly, but sticking the sheets with your own hands, without the help of professional craftsmen, will not be difficult.
- Begin installation from one of the corners.
Important! Before installation, do not forget to attach the connection for the inner corners to the PVC sheet, fixing it on the end on the side of the spike.
Glue is diluted strictly following the instructions on the package. It is applied to the wall and to the panel itself with a roller, notched trowel or brush. At the same time, it is not worth smearing a large section of the wall at once. After applying the adhesive composition, you must wait for some time (it is usually indicated on the package), and fix the element in the right place.
All subsequent elements are attached in the same way. Between themselves, they must be tightly connected by means of tenon-groove elements.
If, when approaching the opposite corner, the sheet cannot be completely installed, then it must be cut off with a construction or ordinary clerical knife. The corner connection is attached to it from the cut side.
The installation of PVC panels on the adjoining wall surface begins with the already installed corner connection of the adjacent wall.
Frame installation
Now in more detail about how to fix plastic panels in the bathroom using the frame method.
Base assembly

Wall frame

For bathroom

For ceiling
With this installation option for PVC panels, there is no need to carefully level and clean the wall. But if there are traces of mold or fungus on its surface, then the wall must be cleaned and treated with special means that will prevent the further appearance and spread of negative factors.
The frame for installing PVC strips and sheets can be made of wood, metal parts or PVC.
To begin with, how to install plastic panels on a wooden base, which is the most common. Before starting work, all parts of the wood frame must be treated with antibacterial compounds.
To assemble a wooden frame, you will need bars with a section size of 4x4 or 4x2.5. Installation begins with fixing the guides. Then the crossbars are attached (depending on the cladding option, either horizontally or vertically). To increase the rigidity of the frame, you can add additional supports. A prerequisite for this is the same distance between them.
Video: Step-by-step assembly of a wooden frame for PVC panels
The first row is attached at a distance of 30-40 cm from the floor. All subsequent rows are attached with the same step. The top one is installed at the level of the future ceiling. In this case, all rows are placed perpendicular to the panel fasteners. It should be ensured that all elements are located evenly and in the same plane.
A metal crate will cost more, but will last much longer. The material used for it is aluminum profile. First, U-shaped profiles are installed above and below (under the ceiling and near the floor). Between them with a step not exceeding 0.9 m - guides. Subsequently, PVC lamellas are mounted on them.
In order to save money, a combination of the first and second types of frames is also allowed. In this case, its perimeter is made of metal, and the racks are made of wooden parts.
Another version of the frame is a plastic base. This is the most "young" way, but no less fast and effective. PVC guides are equipped with special locks that snap plastic sheets or rails into place. A huge advantage of this option is that such panels can be dismantled and reassembled. Also, this frame does not require additional processing, is not subject to rotting or the effects of fungi and mold.
Panel installation

Attaching sheets to finished wooden base produced by means of self-tapping screws with press washers or kleimers. You can also use a furniture stapler. They are attached to the metal frame exclusively with self-tapping screws with press washers.
After preparing the core, but before installing the panels themselves, the wires are removed between the wall and the frame, and sound and heat insulating materials are laid. And only after that they begin to fix the main elements in the bathroom.
The installation algorithm is approximately the same as with the adhesive method. Start from the corner. The starting sheet is fixed with a stapler or screws, in the lower corner of which a mounting shelf is inserted (its wide part should “look” towards the next element). In the same way, other panels are installed sequentially.
If even small joints are formed between individual trim sheets, they must be treated with silicone sealant. However, if all work is done consistently and correctly, there should be no unplanned gaps.
Answering the question of how to install plastic panels, experts or those who have already done it on their own advise.
The use of decorative plastic panels is an excellent alternative to modern finishing materials, whether it be tiles or marble. Their use in interior design has become a very relevant solution today. Decorative panels can be used for the purpose of covering ceilings and walls. They are moisture resistant, so they are best suited for rooms in which there is elevated level humidity: bathrooms, showers, pools.
Advantages of wall panels
Plastic is the only material that will not deteriorate if exposed to direct water. All other wall panels are more or less resistant to moisture, so this must be taken into account when choosing a material for finishing a bathroom. The success of PVC wall panels for the bathroom lies in the cost-effectiveness and speed of working with this material. Let's look at the rest of the advantages of plastic panels:
- The panels are joined to each other without much effort, without requiring preliminary surface preparation.
- The panel has a lot of transverse baffles and this guarantees a good strength of the final coating.
- PVC wall panels for bathrooms are able to hide any irregularities, while giving the surface the desired decor.
- Hollow channels in panels are great for hiding electrical wiring.
- Such panels are covered with a specialized varnish, which further protects them from mechanical damage and ultraviolet radiation.
- Each plastic panel consists of insulated cells, which gives the material soundproofing properties.
- Plastic panels are distinguished by good thermal insulation performance, and are also non-combustible and self-extinguishing.
- In addition to moisture resistance, wall panels can easily withstand significant temperature changes, which is also important for bathrooms.
- Dirt and dust do not linger on them, and any dirt can be removed without difficulty with a damp cloth.
- The collection of wall panel colors includes hundreds of colors.
- The low price of wall panels for the bathroom is also a plus, which, along with indicators High Quality products allows wall panels to firmly gain a foothold in the Russian building materials market.
- When fastening the panels, they are mounted closely, which gives the room integrity and completeness of the decor.
- The only drawback can be considered a slightly truncated useful surface, which is summed up from wall rails and panels. But after all, you can choose slats as thin as possible. In addition, panels of the smallest thickness can be selected.

The right choice of material
To choose wall panels for installation in the bathroom, you first need to understand their classification and existing colors. Slatted panels are outwardly similar to lining and come in the following types of fastening system: tenon-groove, tenon-thorn and groove-groove. The dimensions of the rack panels vary within the following limits: length 0.9 - 3 meters, width 13.5-30 centimeters, thickness 8 - 12 millimeters. If you install such panels in a horizontal direction, you can make the walls visually wider. Installing wall panels vertically will create the feeling of higher walls.
Sheet wall panels for the bathroom are outwardly similar to plywood, their front part imitates precious woods, leather and a natural stone. The most common overall dimensions are as follows: thickness 3 - 6 millimeters, size 1.22 by 2.44 meters. Due to the large size of the sheets, the installation of plastic panels of this type is carried out quite quickly. Finishing with plastic panels is performed using jointing or sealing seams.
Tiled panels are made in the form of a square, the size range mainly ranges from 30 by 30 to 90 by 90 centimeters. Finishing with tiled panels allows you to recreate a kind of mosaic.

The color of the wall panels should be in harmony with the surrounding interior. Therefore, it is best to choose light-colored panels for the bathroom, in particular if the room has small dimensions. The fact is that gloss is able to visually enlarge the space, make it wider and larger. The following shades will be most suitable: light pink, peach, blue, golden yellow, pale blue.
It is better to choose medium-width panels, although the installation will be faster with wide panels, but it is more difficult to fit in problem areas, and there is more waste. Narrow panels fit easily, but it will take longer to get going. When buying, check the bathroom wall panel for dents, chips, holes and unpainted areas on the front side. The surface of the product along the entire width must be even and without waves. And finally, try to connect two panels in the store, along the entire length the joint should turn out to be neat and inconspicuous.
Preparatory work
Installation of PVC panels in the bathroom is within the power of an ordinary person who does not have special skills. To do this, you will need very ordinary tools that are available in every home - a hammer, a screwdriver and a drill. First, prepare the material that you will use to finish the bathroom.
To create a crate, take wooden planks that are impregnated with a waterproof compound, or special plastic planks that are sold at the same outlets as PVC wall panels. Before installation, it is required that the wall panels lie down for about forty minutes at room temperature. Make sure their joints are dry and clean.
Creating a wooden crate
If the walls in the bathroom are perfectly smooth, and all corners do not require any modifications and are even, then the installation of wall panels in the bathroom can be carried out directly on the concrete base of the walls using a special adhesive. But this is not always advisable, because the walls of the bathroom in most cases have various defects, which is why it is required to make a crate made of wood, on which you will mount the PVC panels.
First, measure the surface and calculate the dimensions of the vertical beams that make up the wooden frame. The crate is made of wooden bars, which have a cross section of 10 by 30 millimeters or from a metal profile.

Before installing the transverse rails, it is necessary to mark the wall using a building level to avoid bumps and distortions. If the walls are uneven, place small pieces of wood under the rail to achieve a perfectly even result. The crossbars should be placed at a distance of 30 centimeters from each other, while the lowest crossbar must necessarily be in contact with the floor, the topmost bar must border the edge of the panel.
Fasten the crate to the wall with self-tapping screws or nails; when choosing a metal profile for fastening, you need to use self-tapping screws. After installing the crate, install the fittings and guides that are necessary to hide the corner joints of the panels. Close the joint with the floor with a PVC plinth, if desired, choose a model with a wiring box.
Installation of wall panels
Before the final fixing of the PVC panels, it is necessary to check once again with a plumb line that the panel is level with respect to the vertical. Finishing the bathroom with plastic panels starts from the corner of the room. The whole procedure comes down to cutting the panels to the required height level and installing them in the rails.
It is best to start fastening wall panels from the door. Fasten the first panel with the joint outward and towards the next with a groove. This technology is the most convenient. Panels are fastened with self-tapping screws or screws. You can also use a construction stapler, so the staples will be almost invisible. After fixing one panel, you need to install the next one. Interestingly, thanks to the locking fasteners, there is no need to adjust the panels.
When installing wall panels, you will gradually get to the corner of the opposite wall. The last panel, as a rule, does not fit in size and needs to be trimmed. To do this, cut the panel using a clerical knife and a metal ruler or corner. The panel is cut very easily, and it will not be difficult to cut it, the main thing is to correctly measure out the part that will go to waste.
As you approach a corner, measure the top and bottom distances from the corners to the nearest panel. On the panel that will lie in this place, also make 2 marks below and above. Draw a line between the marks with a ruler or straight rail, and cut the panel along this line.
For cutting, you can also use a hacksaw with a tooth pitch of 1 millimeter. When cutting plastic bathroom wall panels, try to keep the protective film to the end. Then the marketable appearance will be preserved, and the appearance of the finish in the bathroom will always keep you in high level your professionalism.

The bathroom has such peculiar features as the presence of water pipes, sewers and other obstacles that need to be bypassed. To do this, attach the panel to the problem area and outline the approximate cut point with a marker. You should never overdraw because you can cut out too much material. It is better to apply the panel several times and cut off one millimeter. Only then the panel without gaps and beautifully falls into place.
Finishing the bathroom often needs maximum sealing of the walls, and therefore it is recommended to treat the joints between the wall panels with silicone sealant, evenly distributing it over the entire inner surface of the joint. Sealing will help protect the walls from excessive moisture and the occurrence of fungus.
Final stage
After finishing the bathroom with wall panels, you can do the final work. They are in decoration. doorway and corners. For such purposes, special plastic ebbs and corners are intended. Drains must be installed in the opening.
The junction of the panels and the ebb is hidden by a decorative corner, which is pre-coated with waterproof glue and placed in place after 15-20 minutes. Do not press the corner too hard, after all, it is made of plastic. The same corners can smooth the joints of the panels in the corners of the room.

Another touch lies in the following - for the processing of joints of the type "wall-ceiling" and "wall-floor" it is customary to use skirting boards. The plinth can be taken plastic or wooden with varnish impregnation. Polystyrene skirting boards are also suitable. The transition between the wall and the floor is not recommended to be made with polystyrene, because there is a high risk of damage to it.
They snap into place with simple movements in the resulting gaps between the frame or panel. If during the installation of wall panels you did not follow the level, then in some places the plinth will pop out.
When installing plastic wall panels in the bathroom, you need to remember some things that you can’t do:
- It is impossible to rip off the protective film from the wall panels to the bathroom in advance, if any.
- It is not recommended to strongly crush and bend the panels, because they will get a very unattractive look.
- When fixing wall panels, it is not recommended to use a hammer and nails. One slip - and the plastic panel will be damaged.
- It is not advisable to make marks on the panels with a sharp object, because if you put the mark by mistake, then it cannot be removed. You should mark with a carpenter's pencil or a special marker, because they can be relatively easily removed with a damp cloth.
- PVC panels can be sawn with an ordinary wood saw, but this can only be done with a tool with a tooth pitch of no more than one millimeter. If you take a hacksaw with a large pitch, you can tear the edges of the panels.
- Do not cut the panels from the back. They need to be cut only from the front decorative side, as shown in the photo of bathroom wall panels. From the cut in this case, no burrs will be visible on the installed product.
- When cleaning wallboards, it is not recommended to use chemicals that are not indicated in the instructions for the manual. Otherwise, stains may appear on the product that cannot be washed off.

As you understand, when working with plastic panels, you do not need any special skills, but you need to competently approach the choice of material, strictly follow the installation instructions for wall panels in the bathroom and remember our recommendations.
24 October, 2016Specialization: master in the construction of plasterboard structures, finishing works oh and laying floor coverings. Installation of door and window blocks, facade finishing, installation of electrics, plumbing and heating - I can give detailed advice on all types of work.
Finishing a bathroom with PVC panels is one of the most budgetary types of work, which is good because it is inexpensive and can be implemented ordinary person. An additional plus can be considered the fact that you can literally transform the room in a day and make it usable. Of course, the appearance of such a repair looks simple and unpretentious, but if you need to save money, then best solution just can't be found.
Description of the workflow
When I am asked the question whether it is possible to finish the bathroom with plastic panels, then in response I am interested in what can be finished with this material if it is not suitable for a bath? This material is ideal for such purposes - it is not afraid of moisture, does not absorb dirt and odors and is very easy to care for.
But in order to enjoy the beauty and quality of the repair, it is worth choosing high-quality materials, and it is from this aspect that I will begin the consideration of the process.

Necessary materials
I will say right away - only you decide which panels it is better to finish the bathroom with, it all depends on personal preferences, on what is planned to be done indoors, and on the assortment of material in retail chains. But when choosing everything you need, I recommend considering a few important recommendations. For simplicity and clarity, the information is presented in the form of a table.

| Material | Selection Guide |
| PVC panels | The main element of our decoration, from quality and appearance which determines the final result of the work. Give preference famous brands with a good reputation, it is easy to check the quality: squeeze the panel near the cut at the end with your fingers, after you remove your fingers, a small dent should remain on the panel, if it is broken or strongly concave, then it is better to look for another option. The price of quality products is from 200 rubles per piece (250 cm long and 25 cm wide) |
| Accessories for panels | The diagram above shows all the elements that may be needed when working. You must select the range and quantity of necessary components based on the characteristics of your premises. Below I will dwell on this aspect in detail, since it requires special attention. |
| Frame materials | For the construction of the supporting structure, you can use a metal profile or a wooden block. The first option is stronger and more durable, and the second is much cheaper. The final decision is yours, but on my own I will say that if you can afford a profile, then do not hesitate to choose it, as you will save yourself a lot of problems in the future. |
| fasteners | To put all the components together, we need a lot of fasteners: dowels for mounting the frame, self-tapping screws for assembling it, and as for fastening the panels, you can use both self-tapping screws and staples for this. Staples are good because installation is quick, but for work you will need to purchase a special construction stapler |

For sealing joints and gluing decorative elements, it is easiest and most reliable to use liquid nails. The compositions of this group are the best suited for the bathroom, as they securely fix the plastic and protect all connections from moisture penetration.

Work tool
In order for the installation to go quickly and efficiently, you cannot do without using a certain set of tools, the list of the most necessary is as follows:
- For fastening to walls, you can not do without a puncher with a drill of the desired diameter and length. I have already said many times, and I will repeat here - it is easier to rent a tool, you need it literally for 1-2 days, and it is at least unreasonable to buy a rotary hammer specifically for this work, especially since we are talking about economical option finishes. If you find it with friends, it’s even better, because in this case you only need to buy a couple of drills for work;

- The frame is assembled using self-tapping screws, and in order to quickly get the job done, you will need a screwdriver with a set of nozzles of the desired configuration. With it, you can carry out other work, for example, drilling wood and thin profile. It is better to have this tool in your arsenal, it will come in handy more than once;

- Cutting panels and components can be done either with an electric jigsaw with a special blade for plastic, or with a conventional hacksaw for metal. Personally, I prefer the second option for its simplicity and affordability, and the cutting quality meets the highest requirements. Don't worry about fatigue when sawing - plastic cuts very well and the work does not take much effort;

- Concerning measuring tool, then the set consists of several components: a tape measure with a length of at least 3, and preferably all 5 meters; building level about 120 cm long, you can use two - short and long; square for precise marking of panels before cutting; pencil for marking work. This set is used for most finishing work, so it is also advisable to purchase it for yourself;

If you will fasten the panels with brackets, then you will additionally need a construction stapler. It can be bought at any specialized store, do not forget to purchase staples, for our purposes the 8 mm long option is best suited, this is quite enough for reliable fastening of the panels.
Preparatory stage
- To get started, take a tape measure and measure all the surfaces that will get off. You should not believe the project documentation, in fact the numbers may differ, and the presence of any finish changes the parameters of the room. Take measurements of all parts of the room and write down the numbers on a piece of paper, you should not rely on memory, you can confuse and miss something, and as a result, the calculations will be distorted;

- When all sizes are at hand, it will not be difficult to calculate the required amount of PVC lining. At the same time, do not forget to take into account the waste (if any) and the dimensions of the door and window openings. As for the components, they are considered in linear meters, the elements are sold in pieces of 3 meters, in order for you to understand them even better, below is a hint diagram for using the elements when finishing the ceiling;

- As for the frame, it is calculated as follows: a guide profile or bar is attached around the perimeter, and in the middle the main racks with an arrangement step of 40-50 cm (preferably 40 and below, I will explain why). As for the direction of fastening the racks, it depends on the location of the panels, the frame is always perpendicular to the finishing material, everything is very simple.

When all calculations are made and the material is purchased, you can begin to prepare the premises. The list of works at this stage is as follows:
- First you need to free the room from everything superfluous, you must have unhindered access to all surfaces to be trimmed. In extreme cases, it is necessary to take out the largest items for the duration of work, and then bring them back;
- If there are old coatings, it is advisable to remove their residues, although if this is difficult to do and they do not interfere, then unsightly surfaces can be covered. Inspect all bases: if they have damage and areas with poorly adhering plaster, then it must be removed and all such places repaired with cement mortar;
- Next, it is worth checking the plane with a level, it is important for us to determine the most protruding section and make the structure in such a way that the crate is located behind the ledge. If your level is as in the photo below, then the walls are even and you can work without any restrictions;

- Since the air humidity in the bathroom is constantly above the normal level, you need to take care of additional surface protection against fungus and mold. To do this, an antiseptic strengthening composition is applied to the walls, which will increase the moisture resistance of the surface and protect the bases from the spread of mold. The composition is applied in any way convenient for you.

If there are pockets of fungus on the walls or ceiling, be sure to eliminate them. Otherwise, the problem will be aggravated under the PVC panels and, in the end, it will come out, only its scale will be much larger.
Frame construction
Now let's figure out how to properly build a frame for our future finishes. I will briefly talk about two options and start with a design that is made from a metal profile for drywall:

- First you need to mark the lines along which the guide profile will be attached. If the ceiling is finished, then horizontal lines are drawn on the walls, and when constructing a structure, vertical lines must be drawn on the walls, this can be done both using a level and using a plumb line. If you have or can borrow a laser level for a while, then markup is even more simplified;

- Measure the length of all surfaces on which the guide profile will be attached. After that, cut the elements of the desired length, the work is done using ordinary metal scissors. On each side there should be a mounting hole at a distance of no more than 50 mm from the edge, it can be done with a screwdriver and a metal drill with a diameter of 7 mm;
- The profile is applied to the wall, and the attachment points are marked on it with a pencil. After that, drilling is carried out to the desired depth, the process is quite noisy, so it is better to work during the daytime in order to disturb the neighbors less. The drilling depth should be 5 mm more than the length of the dowel, set the depth gauge if available, or wind the tape around the drill as a guide;

- The profile is attached very simply: it is attached to the wall, the holes are checked to match, after which a dowel is inserted directly through the metal element, and an impact screw is hammered into it. It is not necessary to tighten the fasteners, it is much easier and faster to hammer it with a hammer, especially since the fixation strength does not suffer from this in any way;

- Every 40 cm in the direction perpendicular to the location of the PVC panels, we need to draw reference lines along which straight suspensions are attached in 50 cm increments. They are fixed using all the same quick-mount dowels and are located perpendicular to the previously drawn lines or marks;

- The load-bearing elements are inserted into the guide profile and fixed in place with short self-tapping screws called bed bugs. Next, you need to set the position of the profile using a level and fix it through the desired holes in the hangers. The result is a very strong and very even frame that can withstand even significant loads.

If there are various communications, it is easiest to hide them behind the frame, the main thing is to make frames from the profile according to the size of the inspection hatches, which are easiest to install later.

Now let's figure out how to build a frame from a wooden bar with our own hands, this type of work has its own characteristic features:
- First you need to mark up in the same way as in the case above, and then cut the bar into pieces of the size you need. The work is carried out using an electric jigsaw or a hacksaw for wood;
- Next, you need to drill holes in the bar through which the dowel will pass. Use a wood or metal drill with a diameter of 7 mm to make fasteners easier to pass through the material. Drilling pitch - 40 cm, extreme holes should be located no further than 100 mm from the end, this is necessary for rigid fastening;

- The bar is attached to the place of attachment, and marks are made on the wall at the places where the holes are drilled. After that, drilling is carried out using a perforator, everything is the same as in the case above. The only difference is that the dowels must be longer by the thickness of the bar and they must be deepened into the base at a distance of at least 30 mm, this is the only way to ensure reliable fastening;
- Then the dowel is inserted through the bar into the wall, after which the element is fixed with an impact screw. Most often, in this case, a bar with a section of 30x50 mm and a dowel of 6x60 mm are used. If the thickness is greater, then the fasteners are needed longer, in the end you will get such a result as in the photo below, it clearly shows how the fastening is made and due to which the structure is held;

- Next, the elements of the crate are attached, they are located at a distance of 40 cm from each other. When leveling, pieces of wood, plastic plates, pieces of plywood and any other suitable lining are placed under the bars. It is important to set the structure straight, so do not fix it to the wall until you are sure that everything is level;

- If you have a sewer riser, then you can also close it by building a box from a bar. Its design can be arbitrary, the main thing is that the frame is rigid and convenient for attaching PVC panels. The bar is interconnected by means of self-tapping screws, the length of which must be such as to ensure reliable fastening of the elements.

Now I will explain why I recommended making a distance of 40 cm between the frame elements. The fact is that if you later decide to remove the panels and fix drywall in their place, you can work on the same frame, and often you don’t need to redo almost anything, just remove the old finish and attach a new one.
Installation of PVC panels on the crate
Now let's figure out how to finish the walls, if you have made an even and durable frame, then this part of the work will be quite simple, the main thing is to do everything right:
- To begin with, guide elements are attached around the perimeter, and this can be either start profile, and plinth for PVC panels. As for the walls, the guides must be fixed from above and below along the floor and ceiling, and on the ceiling this part of the structure is attached to the bottom of the guide profile or bar, if used. It is important here to fix the elements carefully so that they fit snugly against the walls;

- If both the ceiling and the walls are finished, then it is best to fix the inner corner at the place of their joining, it will act as a guide and ensure the attractiveness of the corner joint. Again, an outer corner is placed on the outer corners, and an F-profile must be placed along the perimeter of openings and slopes. Only after fixing all the frames, you can proceed to the main installation;
- Next, it is necessary to measure the length of the panels, 5 mm must be subtracted from the result, so that it does not happen that due to minor deviations and curvature, the element will warp and bend. Cutting is done with a hacksaw, to mark the cutting line accurately and evenly, use a construction square. When cutting, do not press hard on the hacksaw, drive with moderate effort, the material lends itself well and so;

- The panel is carefully inserted into the guides and moves all the way so that the element stands as it should on three sides, after which you can mount it. Most often, self-tapping screws with flat caps are used, they are twisted into the protrusion of the element on each of the edges of the frame, due to this, surface rigidity is achieved;

The panel can be fastened to the wooden crate with a stapler. To do this, you just need to put the tool in the right place and hammer in the bracket.
- All subsequent elements are attached in the same way. The most difficult part of the work is the installation of the last panel, you can either carefully tuck it in, bending the guides with a spatula, or do it easier: do not attach the end plinth or corner. In this case, you simply screw the PVC element with self-tapping screws along the very edge, and then apply the adhesive composition to the surface in the corner and glue the decor.

Conclusion
Decorating a bath with plastic panels with your own hands is much easier than you think, mastering the work is not difficult for any person, and the savings will be simply huge, because for installation square meter PVC panels experts take 450-500 rubles. The video in this article will help you understand the workflow even better, and if you still don’t understand something, then write all the questions in the comments below.


