
F pvc profile for slopes. Plastic windows in our time are installed in every apartment or private house. They securely fixed their presence in the construction market and have become indispensable in the life of any person. For an impeccable appearance, it is necessary not only to install the windows correctly, but also to process the slopes with high quality. At first glance, everything is quite simple, but when it came time to finish them, I ran into some subtleties. I decided to use the f profile for slopes and I want to tell you about the technology for using this bar. However, there are several other ways to trim window slopes.
Ways to finish slopes

Slopes are internal and external, and both of these types require the right finish. Of course, their design is aesthetic in nature, because appearance plays an important role. However, this is necessary not only for beauty. The foam that fills the space between the window and the wall of the house must be protected from adverse conditions. Everyone knows that she is afraid of moisture and tends to absorb it, after which she swells and deforms the plastic window.
There are several ways to improve the appearance of the window space:
- Plastering is an old way of finishing, which takes a lot of time and effort. Unfortunately, it does not have the property of heat and sound insulation and over time it can move away from the surface due to shrinkage of the house. Since the finishing work takes place in several stages and requires subsequent staining, I decided that I would not bother using this option.
- Plasterboard - this option is better than the first, and if such slopes are insulated, they will last longer and keep heat in the house. But one significant disadvantage made me stop using drywall - this is the fear of moisture. A prerequisite for a long service life is a dry room in which there is a low level of humidity. Yes, and the installation of such slopes is not far from plaster, and I have already said that I would not want to bother.
- From pvc panels - a simple and affordable way that I immediately liked. Long service life and quick installation prompted me to choose plastic slopes, and most importantly, they are not afraid of moisture.
Important! The use of pvc panels is very appropriate for plastic windows, this combination will look quite harmonious and besides, there are pvc profiles that will help complete and make the finishing process convenient and fast.
When I decided which method I would use, it remained to get acquainted with additional accessories for pvc, and find out the installation technology.
fprofile and its scope

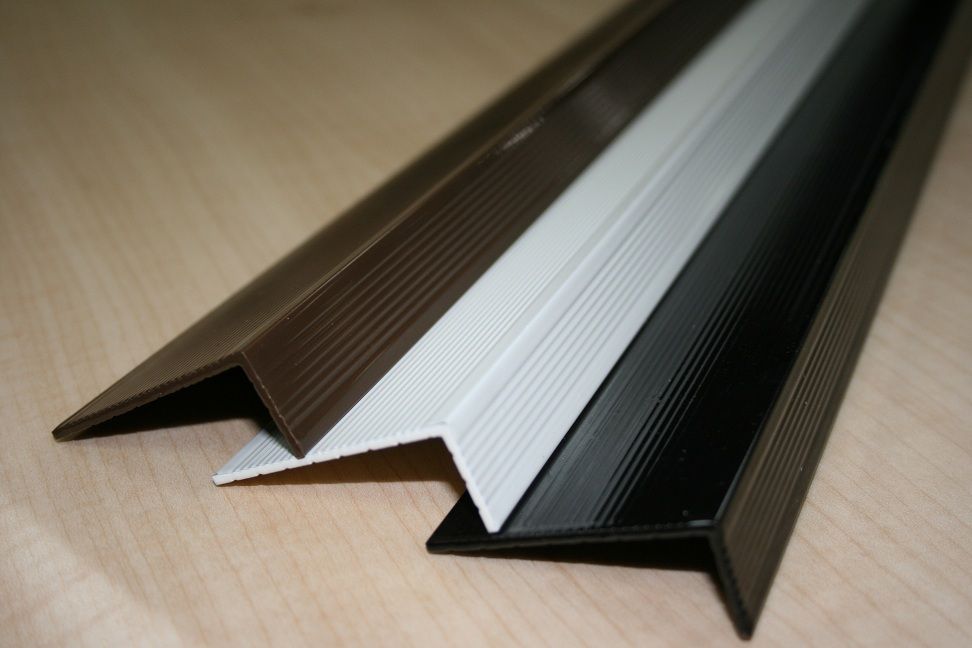
For complete cladding with PVC panels, various additional elements are used, which help to perform the installation efficiently and correctly. fprofile is one of
these elements, which looks like a plank, the cut of which resembles the letter "F". The ends of the plate, during the installation, are securely fixed in the grooves of the profile. The F profile serves two functions:
The f-shaped profile is the finishing lining of the window space, which accompanies a good adjunction of PVC panels to the walls. It can also be used for doorways. The ease of use of the f strip is due to the fact that its installation does not require the use of an adhesive solution, as is the case with an eraser corner. That is, when I glue the wallpaper, I just need to remove the f bar from the slope, and after pasting it, insert it into place. With the help of the f profile, not only pvc panels are joined, but also the planes of unequal materials. If you use it as a starting profile, then one side of it will be pressed against the wall, and the other against the slope. During the do-it-yourself finishing, the f-shaped profile is easy to cut into the desired strips. To do this, you can use a hacksaw for metal, a grinder or a paper knife. I have highlighted a sufficient number of advantages of pvc profile f: I liked that you can use the profile for both pvc and sandwich panels. Being universal, it is able to serve for a long time.
Important! It happens that f the bar is put on glue - this is an unacceptable action, because after some time cracks may form through which cold will enter the house. In addition, the profile is known for the fact that it does not need to be fixed with the help of auxiliary means.

 Double sash window with vent panel house from 5 chamber profiles
We install pvc panels and profiles
![]()
To begin with, I will give advice that you do not need to save on pvc panels. This material will last far from one year and therefore you should not spare money for a high-quality plastic sheet. Cheap pvc fabrics are very soft and one careless movement can make a hole in them.
What do we need to finish the slopes:
- 6 meters of high quality pvc fabric. If the thought worries: why exactly 6 meters? - the answer is simple. Panels are made with a length of 3 and 6 meters - a three-meter canvas may not be enough, but 6 meters is just with a margin.
- Start and f profile.
- Thermal insulation material for processing window openings, mineral wool is suitable.
- Self-tapping screws for metal - in the folk language "bugs", "fleas", "texes". With their help, the starting profile is attached.
- Screwdriver and construction knife.
 After the foam dries, we fix the F-shaped profile on the “liquid nails”
First of all, we fix the starting profile. The process will not cause inconvenience, because the windows are installed strictly according to the level - so it is not needed for the starting profile. With the back side using self-tapping screws, fix it along the edge of the window frame. The main thing is to trim the profile correctly so that there are no flaws in the corners at the joints. After that, we proceed to the installation of pvc canvas. First of all, we block the side slopes by inserting the eraser into the starting bar. Do not forget to lay a layer of insulation! At this stage, the work also turns out to be simple and does not pose any difficulties.
 The use of PVC panels and F-profile for finishing the outer slope
We are slowly approaching the end of the “difficult” process and launching our f profile. Carefully cut the strips to the desired length and fasten them to the plastic with grooves. Some still resort to using liquid glue and firmly glue the f strips to the wall, but I did not consider that this was the right action and refused this advice. If you have small gaps somewhere, then white silicone will help with masking.
First of all, it is necessary to understand what slopes are, what they are actually needed for. Slopes - this is the inner wall of the niche, which is located in the window opening. The installation of the window will not be completed if additional manipulations are not carried out, which include finishing the slopes. Recent times Sandwich paneling is gaining popularity.
During the repair, the issue of finishing window openings remains open. It is necessary that they look aesthetically pleasing, be resistant to moisture and various temperature changes. All this can allow a sandwich panel for window slopes. The sandwich panel has a three-layer structure. The first layer is rigid, the second layer consists of foam, the third layer is protective. Panels can be single sided or double sided. Double-sided are made specifically for window openings.
In order to perform high-quality installation of windows, for sandwich panels you need to purchase a starting and F-profile for slopes. It's relatively new construction material, which is very often used in the construction of residential buildings and industrial structures. It has a large margin of safety and low weight, due to this the material has many advantages over many other similar building materials.
Advantages of sandwich panels
First, I would like to note that this is a highly economical material. Its price makes it possible to reduce the overall costs during the construction of the facility, reduces the costs associated with loading, transportation, and installation of structures. Among other things, the small weight of the panel gives a small load on the foundation.
In order to produce competent cladding of window or door openings with panels, they use a variety of elements that make it possible to correctly, and most importantly, perform installation with high quality. For this question, you will need a starter profile and an F-profile.
The starting profile is a fixture that holds the panels together. With it, you can fasten plastic slopes, slopes from sandwich panels, plastic windows, slopes from various decorative materials, as well as slopes from drywall. Material such as starting and F profile for sandwich panels is one of such elements. This profile primarily performs a very decorative function, and also compares the overall plane.
The starting and F profile for sandwich panels is already the finishing window cladding, it corresponds to a good adjoining of the panel to the walls. It is also used for doorways. Installation of the profile does not require an adhesive solution, as, for example, in the case of a plastic corner. With its help, not only panels are joined, but also planes of unequal materials. When carrying out the installation, the profiles for the sandwich panel can be easily cut into the desired strips.
Such profiles have the ability not to turn yellow for many years, are very elastic in composition, not at all fragile, have a minimum of chalk in their composition, due to which chips and cracks do not appear. And also the main advantage of sandwich panels is that they are easy to install with their help.
It is not necessary to insulate the sandwich panels, the material does not let the cold through at all. If you have to insulate sandwich panels, then in most cases this is only to immobilize and strengthen the structure on the window.
Keeping the sandwich panels clean is not difficult, they can be very easily cleaned with a regular cloth dipped in soap. If this does not help, then you can clean the panel with dishwashing detergent, but most importantly, without the presence of any abrasive substances in their composition.
Installation of a sandwich panel is very simple and straightforward, even a beginner in the construction business can cope with the installation.
Sandwich panel slope device
It is worth examining the device inside the structure. This makes it possible to see that the slopes are very similar to the usual plastic ones. Them specifications almost identical.
After installing new plastic windows, the question arises of how to install PVC window slopes without involving specialists. Our today's article will help you choose the material and carry out the work.
1 What role do window slopes play?
The installation of PVC windows is over, but you notice that something is missing, and the window itself looks sloppy and even rude? The reason is the lack of slopes, which must be installed. The main problem when installing new windows is that it will not be possible to carry out the installation without removing the old slopes and part of the wall, no matter what professionals do the work. So it turns out that the window block after installation looks like it was after the bombing. To create complete harmony and merge windows with the interior of the apartment, you will have to restore the slopes.
Today, there are various ways to finish a window opening: the use of plaster and paint (traditional) and application (modern).

Undoubtedly, the first option will allow you to enjoy a beautiful appearance for a long time, but only if you carry out restoration work every couple of years. At the same time, the complexity of the work is high level. But PVC can be carried out even by a beginner in the construction business. Yes, and it will take an order of magnitude less time to complete this work. If you decide that you can live without slopes, this will not only spoil the appearance, but can cause strong drafts in the house, which will lead to heat loss.
2 Why choose plastic slopes for PVC windows?
To answer this question, it is worth exploring all the possible materials that can be used to create slopes. This will allow you to evaluate all their advantages and disadvantages, compare with each other.
Types of slopes:

True, there are some disadvantages. So, for example, such slopes have a low level of resistance to mechanical damage, and therefore they should be treated carefully, using an ordinary damp cloth for cleaning. Also, be careful when installing PVC panels for window slopes. As follows from the well-known saying, it is better to measure seven times and only then cut. If, however, there was some kind of oversight, use ordinary silicone putty to seal the PVC.
3 Do-it-yourself PVC slope installation
According to all the rules, it will allow window openings to look at 100%, the windows will not be afraid of moisture, you will forget about possible cracks on the surface. But this is only possible if the installation work is carried out in compliance with all norms and rules. We will talk about this.
How to install PVC slopes with your own hands - step by step diagram
Step 1: Prepare the Surface
You can start installation literally a day after the installation of the window block. Approaching the window, you will find a large amount of mounting foam that appears at the joints between the profiles and the wall. It must be cut off, for which use a sharp clerical knife. After that, the surface of the slopes is cleaned of dust and dirt.
The installation of plastic windows or the installation of a new entrance group is always accompanied by accompanying finishing works. First of all, this is the sealing of joints between the window frame or door frame and the wall.
One of the simplest and effective ways decorative design of door and window openings is their decoration with plastic slopes.
For this, special sets of polyvinyl chloride were created, including various structural elements. One of the most important among them is a plastic profile for slopes.
 Starting shapes are classified according to the shape of the section
Structurally, the installation of plastic slopes is in many ways similar to the assembly of the designer. This is achieved by the maximum unification of all parts, as a result, the whole design becomes very technological and functional.
Each of its elements is intended for strictly defined purposes and performs a specific function. For fastening plastic panels to the bearing base and for joining them together, a starting profile for slopes is used.
 Produce profiles in both metal and PVC
 Today, there are several types of starting profiles, which greatly expands the scope of their use. Depending on their design, they can be used for fastening elements. decorative finishes in different ways in different places of the opening.
They are classified according to the shape of their section. Profiles are designated in Latin and Russian letters, with which the pattern of their section is similar. On the modern market of finishing materials, there are the following types of starting PVC profiles:
- I-profiles.
- F-profiles.
- L-profiles.
- P-profiles.
This starting profile has a section in the form of a capital English letter I: one wide central shelf and two short side ones. An I-shaped profile is installed directly on the wall and is intended for attaching plastic or plasterboard slopes to it. 
The special shape of the part allows you to attach it to the opening in almost any position. The main condition is that it should be located with a long shelf perpendicular to the bearing surface, that is, it “stood” on short shelves.
 This model is most commonly used
 One of the most requested types plastic profiles. This PVC profile is made in the form of the letter F - it has one long shelf and two short ones adjacent to the long one on one side. With the help of F-profiles, slopes are installed from a wide variety of materials:
- PVC.
- Sandwich panels.
- Composite materials based on wood (MDF, HDF, laminate, etc.).
- Gypsum board.
Due to its design, the F-shaped profile immediately performs two functions - fixing and decorative. The presence of a second narrow shelf allows you to close the joint cladding panel with an F-profile without the use of any additional elements in the form of decorative corners or putty.
 Fasten this profile perpendicular to the window
 With the help of such a starting profile, standard slopes made of plastic or plasterboard sheets with a thickness of 10 mm are installed. Its cross section consists of three shelves: one wide and two narrow.
An L-shaped profile is attached perpendicular to the plane of the window: a wide shelf at the same time adjoins the wall of the opening, a narrow shelf adjacent to it - to the window frame, and a narrow shelf, opposite to the long one, serves to mask the joint at the place where the finishing panel fits.
 It is similar in design and scope to the L-profile. The only difference is that this part has two wide shelves connected by one narrow one.
The installation scheme of the U-shaped element is similar to the installation of the L-profile, only the outer plastic plate, designed to hide the joint with the slope, is wider. This makes it possible to close wider or uneven seams.
Advantages of plastic profiles
Profiled plastic elements have whole line pluses that make the installation of window and door slopes much easier and more technologically advanced. For more information about the advantages of plastic models, see this video:
Such manufacturability is achieved due to the unique physical properties of polyvinyl chloride.

Installation of slopes on the window opening
In order to clearly show how starting PVC profiles are used, we will briefly consider the entire process of decorative finishing of slopes. For more information about installation, see this video:
Preparatory work
 Seal all the gaps between the window and the opening with foam
 Before starting work on decorative design window openings, prepare the wall surface accordingly. As a rule, when installing plastic windows, a gap is formed between the wall and the window frame, which should be sealed with mounting foam.
There are two main types of foam on sale - “amateur” and “professional”. The first modification is easier to use, as it is equipped with a special nozzle for extruding foam.
"Professional" foam has a collet mount for installation on a mounting gun. Foam the gap should be from the bottom up, slowly filling the gap. After the foam has hardened, the excess should be cut flush with the window frame with a sharp knife.
These two varieties differ from each other also in price and quality. When carrying out repair work, it is recommended to use "professional" foam, despite the higher cost.
 Cut the edges of the profiles at an angle of 45 degrees
 Immediately after the joint between the window and the wall has been foamed and the foam has hardened, you can proceed with the installation of start profiles. This is one of the main advantages of the starting elements - they allow you to do without such traditional steps as the removal of old finishing materials, putty, primer, etc.
Using a tape measure, we measure the width and height of the window opening, after which we measure and cut the profiles of the desired length. In this case, the edges-joints of the profiles should be cut at an angle of 45 degrees for better joining them together. Installation of profiles should start from the top of the opening, then install plastic elements on the side parts, at the very end - at the bottom of the window.
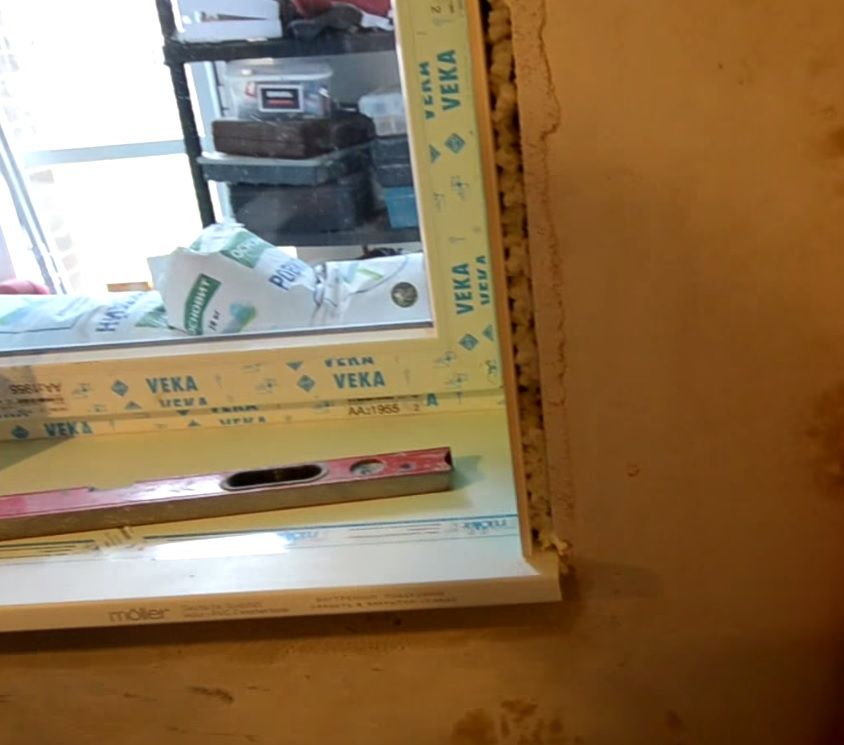 In order for the profiles to be installed as evenly as possible, it is necessary to draw a strip on the window frame using the building level, along which the installation of the plastic part should be carried out. PVC profiles should be fixed along the very edge of the window frame, using self-tapping screws with a drill, or “liquid nails”.
Self-tapping screws should be screwed every 15 - 20 cm, along the entire length of the profile. Liquid nails are also applied in a thin wavy strip along its entire length, after which the profile is pressed against the upper edge of the window frame with strong movements.
Speaking from under the profile adhesive solution should be removed immediately from the frame surface with a dry cloth. After it dries, cleaning the frame will be quite problematic.
 It is not recommended to install the profile on glue
 However, some finishers do not recommend using glue when installing starting profiles. Over time, under the influence of temperature changes, as well as dampness, it can peel off from the window surface, which will lead to the need to dismantle the entire structure for repairs.
Each type of PVC profile has its own small installation features in the window opening. For example, an F-profile is often attached to the outer ends of plastic panels or drywall sheets using mounting adhesive. However, professionals recommend doing without it.
The PVC profile is firmly held on the slope panels without glue, and if necessary, it can be easily removed and then put back. For example, if you suddenly decide to change the wallpaper or paint the wall.
Lathing installation
 The next step is to mount a crate in the window opening, which will play the role of a frame for plastic panels. To create a crate, bars with a section of 2 x 4 cm are usually used, but metal profiles for plasterboards can also be used. It all depends on how suitable this or that material is in specific conditions.
The bars intended for mounting the frame must be thoroughly dried. Otherwise, during the drying process, they may begin to bend and twist, which will lead to deformation of the entire structure.
Also, wood must be treated with special antiseptic compounds, since the space under the slopes is subject to increased dampness.
Frame bars are fastened along the outer edge of the window opening, along its junction with the wall with the help of dowel-nails with a step between them of 30 - 40 cm.
Installation of cladding panels
The last step is to install the slope panels. Start installing slope panels from the top of the opening. We measure the length and depth of the opening, and then cut PVC panel the right size. Next, we install one of its edges into the groove formed by the shelves of the starting profile. We attach the other, outer, edge to the bars of the crate using self-tapping screws or mounting glue.
 Install the top panel first.
 If self-tapping screws are used as a fastener, they should be screwed into the end at an angle of 45 degrees. With this, you can hide their hats under the casing.
After installing the top panel, two side slopes are installed in exactly the same way. The final touch of the whole work is the installation of decorative platbands. They can also be used as an F-shaped starting profile, put on the outer end of the slopes.
The starting profile is used to protect the end faces of PVC panels from damage. It is also used for finishing window and door frames, slopes in places where panels adjoin to them. The starting profile for PVC panels has elasticity and a curved shape. Thanks to this, it is securely fastened without the use of additional materials.
Using the starting profile allows you to significantly save time and materials for finishing and installation work. Consider how the starting profile is used for finishing the facade with PVC panels.
Preparatory work
Before installing the start profile, you should preparatory work. It is necessary to clean the surfaces of various contaminants and level them.
We begin to prepare the surface of the facade.
- Thoroughly clean the walls of plants, branches and various fasteners.
- Remove all decorative elements, wind boards and platbands, as well as other types of protruding parts from the wall surface.
- Using a level, check the evenness of the walls.
- Check window openings and frames, and, in case of errors, eliminate defects.

General rules for finishing the facade with PVC panels
PVC panels can expand and contract with changes in temperature. Therefore, when installing such panels, a gap should be left. If the installation is carried out with high temperature, then the gap should be smaller, at low temperatures - more.
However, it is not recommended to install PVC panels at temperatures below +10°C. The fact is that during installation at low temperatures they can break. It is also recommended to use anti-corrosion fasteners, the head diameter of which does not exceed 8 mm. A wooden crate about 4 cm long should be used.
Panels must not be overlapped under or above a window. And various communications should not interfere with the possibility of thermal expansion of the panels. Therefore, there must also be a thermal gap between the panels and the external object.

Installation of the start profile
For high-quality facade cladding, a starter profile for PVC panels should be used. The starting profile is set along the contour of the building. And the upper edge of such a profile should be installed along the bottom line of the building cladding.
You should also install vinyl sills. They will help create beautiful joints, as well as protect the base. Vinyl ebbs are attached strictly under the starting profile.
After that, internal and external corners, framing for door and window openings are attached. Lastly, the finishing profile is used. You can also replace the finish profile with a molding.

Finishing the facade with PVC profile
After installing the starting profiles, the internal and external corners are fixed. After that, door and window openings, docking profiles are mounted. performed with staples, screws and nails. You can also use special mixtures or adhesive solution.
However, such mixtures should be used only at certain temperature indicators, and you also need to focus on air humidity and other adverse factors that can reduce the quality of the profile fastening.
Installation starts from the bottom. The panels are attached to the start profile. It is recommended to start facing the facade from the left corner, gradually moving to the right. However, if the panels have the same color and shade, then you can start from any angle.
It is not recommended to use PVC profile for facing the facades of houses located in regions where the temperature often drops below -10C °. Such a temperature indicator negatively affects the durability of the material, because at low temperatures the panels become very brittle and can crack.

The starting profile for PVC panels is used for high-quality finishing of structures made of various materials. The use of PVC panels is not only an inexpensive and simple solution to the problem of facade insulation. The use of this material allows you to protect the structure from moisture and dampness, as well as other negative environmental influences.
In addition, PVC panels allow you to qualitatively, quickly and inexpensively update the facade and hide any shortcomings that could arise during operation or during construction.
With proper installation and use of high-quality material, PVC panels for facade decoration can last for decades. However, for this it is necessary to strictly follow all the recommendations during their installation and be sure to use the starting profile to protect the end faces of the panels from damage.
Sip panels are used in the construction of buildings with a small number of floors and premises for household, public and residential purposes. For example, most often SIP panels are built ...
Ventilated panels come to us from Japanese craftsmen, famous for their quality, reliability and durability. The composition of the panels is cement and sand, which are held together with cellulose fibers (fiber)....
In the mid-90s, the usual nails and screws were replaced by a new tool - liquid nails. One drop of this product is enough to fix...


