
How to change the wiring in a panel house? This is the question many face during the repair. It would seem, what could be easier?
Just replace the old one with the new one and that's it. But here the question arises: if you change the wiring, then you should add a few sockets and switches. And since there will be new switching devices, then we should think about new automatic devices. Once the load increases, then the cross section of the wires should be reviewed.
We will try to understand all these issues in our article.
The stage of planning and calculating the future electrical network at home
The stage of planning and calculations for many seems to be the most difficult. After all, if everything is correctly calculated and planned, then you will get a reliable and durable network, and the most time-consuming stage of wiring installation will not be complicated by a variety of unforeseen situations.
Selecting the number of power supply points

This is the most important and most crucial stage that will have to be completed before replacing the wiring in a panel house. After all, all our future calculations and the final cost of our power grid depend on it. Therefore, logically, we must find a healthy compromise between the convenience of using electricity anywhere in the room and the final cost of an overly extensive network.
So:
- According to paragraph 12.27 of VSN59-88, our apartment must have at least 3 outlets in the kitchen and one outlet for every full 6m 2 of living rooms. This is clearly an outdated standard and in modern realities we need much more outlets. Therefore, first we draw up a new plan for the location of outlets in each room.
- To draw up such a plan, we need to know the number of electrical appliances in each room. In addition, they should be conditionally divided into temporary and permanently included in the network. This will significantly reduce required amount sockets, as well as allow them to be placed economically and expediently.
- For example, to connect video, audio and other household appliances that are constantly connected to the network, a separate outlet should be provided. But to connect a hair dryer, iron or mobile charger, one conveniently located socket should be provided. In general, we proceed from your habits and wishes.
- We do the same with switches. Indeed, now the zoning of lighting zones, the creation of additional lighting and other pleasant nuances that can create an atmosphere in your apartment are becoming increasingly popular. Based on this, the number of switches may also change, as well as their location. For each room, it is worth making a rough plan.
Calculation of the rated currents of each electric point
Next milestone, which determines how to change the wiring in a panel house, is the calculation of the rated current of each outlet and switch. Based on these data, we will subsequently make further calculations, on which the final cost of our electrical network will largely depend.
So:
- First of all, you should pay attention to sockets. After all, it is to this wiring device that the most energy-intensive electrical appliances are connected. The best option are sockets designed for a particular electrical appliance. In this case, it is enough for us to look at the rated current in the passport of this device, and we will know the rated current of this outlet.
- If for some reason it is impossible to open the passport, or the socket is designed for various electrical appliances, we should choose the most powerful of them. To determine the rated current of such devices, you can use our approximate device load map or perform the calculation yourself.

- In order to perform the calculation, it is enough to recall Ohm's law, where the rated current is I \u003d P / U, where P is the rated (or at least approximate) power of our electrical appliances, and U is the voltage of our electrical network, which for a single-phase network is 220V.
Note! In general, when calculating, we need to take into account a lot of parameters, or at least cosα, but we are doing a simplified calculation. Therefore, all unaccounted parameters will go as a certain margin of safety for our power grid. Yes, and for low-power networks, which is an apartment electrical network, the deviations will not be so fundamental.
- The calculation of the rated current of the switches is made according to the same formula. To obtain the rated power of the lighting network, it is enough for us to sum up the power of all the lamps. If the chandelier is turned on, then usually in its passport you can find the rated power.
Note! Based on our calculations of the currents of each individual socket or switch, we should also select the appropriate wiring devices. That is, if the rated current of the outlet you got, for example, 7A, then you should choose an outlet with a rated current of 10A. The same applies to switches. In general, we have already devoted more than one article to this issue, so we will not dwell on this in more detail.
Distribution of loads by groups
Before you change the wiring in a panel house, you should decide on the number of lighting groups. According to paragraph 7.2 of VSN 59 - 88, apartments in residential buildings must be fed by at least two groups.
In this case, the nature of the loads does not matter. That is, in one group, a lighting network and sockets can be combined. Although quite often they make separate socket groups and lighting groups.
- The determining factor for us is clause 3.1.19 of the PUE, which allows you to power household appliances from circuit breakers with a rated current of not more than 25A. Based on this, we distribute our electrical network into groups.
- To do this, we sum up the rated current of all electrical points located in one or two rooms until we get a value close to 25A. At the same time, as we said above, it is possible to divide electric points according to the nature of the loads. But the main thing is their compact arrangement, which will save some money on the price of the wire.
Note! Clause 7.2 of VSN 59 - 88 recommends combining sockets installed in the hallway and in the kitchen. At the same time, sockets installed in living rooms are recommended to be powered by a separate group.
- As a result, depending on the number of electrical appliances, you should get from two to 5 groups.
Wire size selection
At the next stage, our instruction advises to determine the cross section of the wire (see). This question scares many, but in fact there is nothing complicated here.
Knowing the method of wiring, and for panel houses it is usually hidden wiring, as well as the load of each individual group, which we calculated above, the choice is made simply according to the tables.
- For copper conductors, the choice is made according to Table 1.3.4 of the PUE, and for aluminum according to Table. 1.3.5 PUE. To make a choice, it is enough for us to know the number of wire cores, the laying method and the rated current.
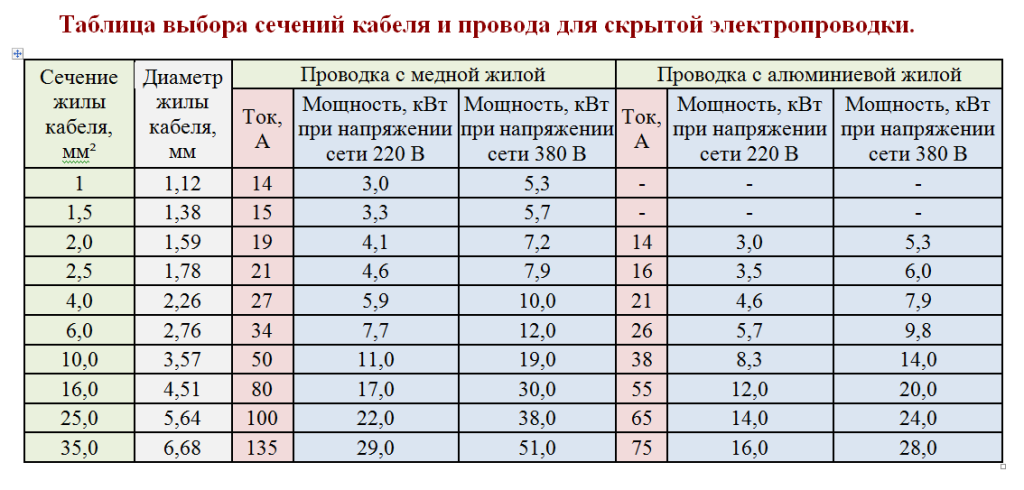
- Whatever wire section you get for group lines, in any case it cannot be less than 1.5 mm 2 of copper wire. This follows from Table 7.1.1 of the PUE, which indicates the minimum values of the cross sections of the copper wire.
- In addition, when choosing, you must decide on the number of wires to be laid in one section. If this number exceeds 4, then when selecting from the tables, a correction factor of 0.68 must be entered. If there are more than 7 of them, then 0.63, well, and if there are more than 10 wires laid together, then the coefficient will be 0.6 at all.
- In addition, when choosing, one should take into account the ambient temperature, possible overloads and some other nuances. But all this is designed for large-scale lighting networks. For an ordinary apartment, it will be quite enough to fulfill the first two points of this section.
Installation of wiring in a panel house
Having finished with the planning stage, you can proceed directly to the installation. In general, in panel houses, even at the planning stage of the slabs, special seams are provided for wiring. But often it is almost impossible to get to them. Therefore, we will consider the option with the use of these channels and without them.
Laying wiring in mounting seams
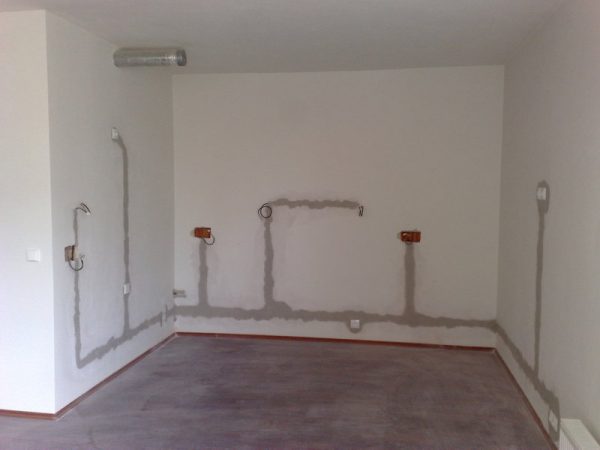
This is perhaps the most successful option, and in my practice I was able to use it only sometimes and only for part of the network being mounted. As you know, there are voids in the panels of houses, which, according to the project, are provided for laying wires, pipes and other engineering networks. We will try to use them.
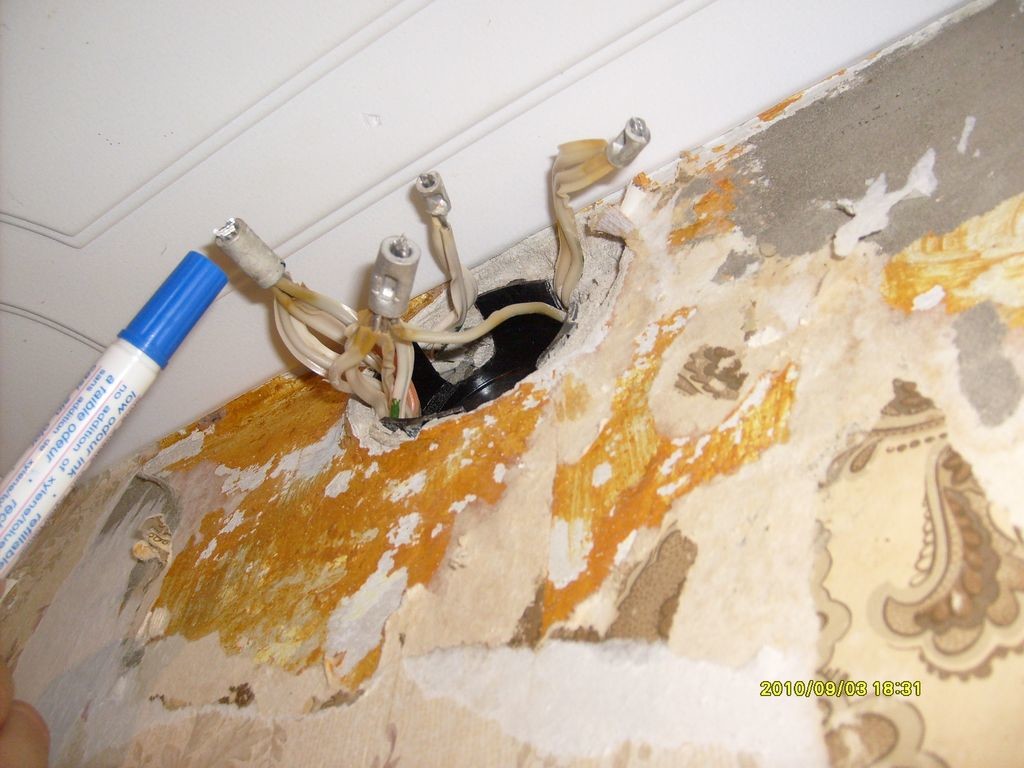
- In order for your electrical wiring to get under the wall panels, you first need to determine the places where the old wiring penetrates into it. If you already have bare walls, then at the locations of the electrical outlets you should see wires that go into the walls. If these wires come out of the wall somewhere between the seam of the panel and the ceiling, you have a chance to take advantage of them.
- If the old electrical wiring is found only at the switchboard, then it has several bends and it is practically impossible to stretch a new wire in the same place and not even damage it.
- If we see the beginning and end of the wire, then we can try to lay our new wire in the same channel. To do this, securely fasten the end of the old and new wires. As far as possible, we expand the hole into which the wire goes, and try to stretch a new one, pulling out the other end of the old wire.
- When using this method, new internal electrical wiring enters the wall panels through the old channels. It doesn't always come out. Sometimes the wire in the process of pulling is damaged so much that it is no longer suitable for further use. Although sometimes this procedure is very simple and convenient. Here's how lucky.
Laying wires by chasing walls
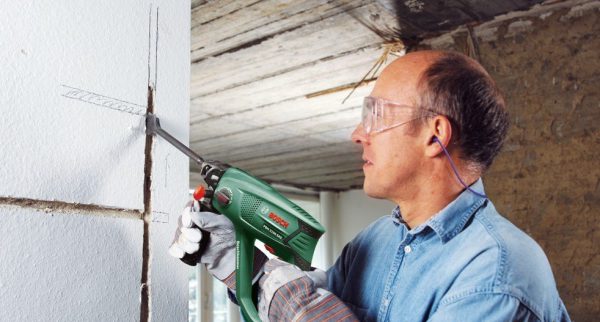
Perhaps the most time-consuming process during the replacement of electrical wiring. Of course, there are now wall chasers that can make beautiful and deep chasing in just a few minutes. Moreover, do it without dust and dirt. But the price this instrument, to put it mildly, bites.
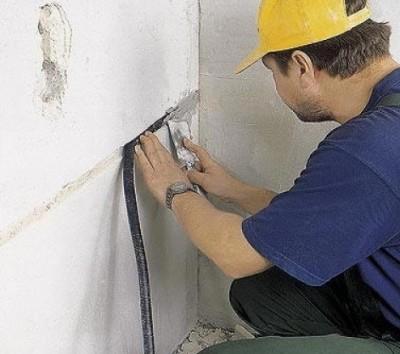
- Usually you have to use a good old hammer drill and bite into the wall inch by inch. In order to simplify this task at least a little, you can use a grinder, but the amount of dust will increase significantly.
- In order to simplify the process of chasing, we recommend using seams between the plates. Usually they do not have such a dense structure and are quite easy to give up even under a perforator.
- Quite often, even in panel houses, old wiring is laid by chasing. To simplify your task as much as possible, we advise you to use these places to the maximum for laying new wiring.
- To fix the wire in the strobes, you can use alabaster or special dowel-clamps. The latter method is more convenient, although it will require holes in the wall for attaching such clamps.
- Of course, laying wires in a screed, under skirting boards and other methods is now gaining popularity, but it is almost impossible to describe all of them in one article. Moreover, we have already analyzed most of them in sufficient detail in previous articles on our site.
Conclusion
As you can see, installing wiring in a panel house from scratch is not such a difficult task. It is enough to approach this issue in a balanced and deliberate way. And this applies not only to the planning and wiring phase. Connecting all electrical outlets will also not cause you any special problems, especially since the articles on our website will always help you deal with all the questions.
Replacing wiring in a panel house may be required if
- - You live in an old house where aluminum wiring was installed. Its service life has exceeded the 25-year threshold.
- - Are you planning to produce overhaul Full construction
- - Old wiring overheats or fails due to a large number of electrical appliances
Replacing electrical wiring in a panel house is a difficult job even for experienced electricians. The difficulty lies in the design features of the house, where the main element is the panel (for walls and ceilings). Most of the walls in such houses are load-bearing. Therefore, any work with the walls requires a careful approach, otherwise the structure may collapse. A competent electrician will not ditch bearing walls, ceilings. Only a specialist knows how deep strobes can be laid. If the depth is greater than prescribed (should not exceed 10 mm), then it is possible to touch the reinforcement, which must not be touched.
Our master electricians have great experience work with electrical wiring in panel houses:
- They will correctly calculate the cross section of the wire for wiring.
- Provide convenient operation and maintenance
- Maximize access to the main elements of the chain
Replacing the wiring begins a major overhaul of the premises. Dismantling the old and laying new wiring in a panel house is considered a difficult stage of work. However, if you know the nuances of this process, then you can safely count on a positive result.
Reasons to replace wiring
It is customary to start replacing electrical wires in a panel house apartment in some cases:
- when the old circuit runs the risk of failing to withstand the voltage from the simultaneous operation of the refrigerator and other household appliances with high energy costs;
- with a long service life of aluminum wires that have already worn out;
- in the absence of a ground wire;
- when they are going to redevelop the apartment, why is it necessary to switch to supply electric shock on a three-wire or five-wire system;
- in case of damage to the insulating material, which tends to crack, burn and break at the ends after a long service life;
- in the situation of installing new sockets and switches, which can also wear out and almost always change along with the wiring.
Differences in laying wires in a panel house
Panel houses may vary in configuration, but in most of these buildings the role of the supporting element is taken over by Wall panel. This must be taken into account when starting to lay wires in a panel house. The main thing is to refuse to create vertical grooves in the walls that can weaken the structure responsible for the stability of the building. The cable should only be laid in special channels created by factory workers.
Location of wiring in a panel building
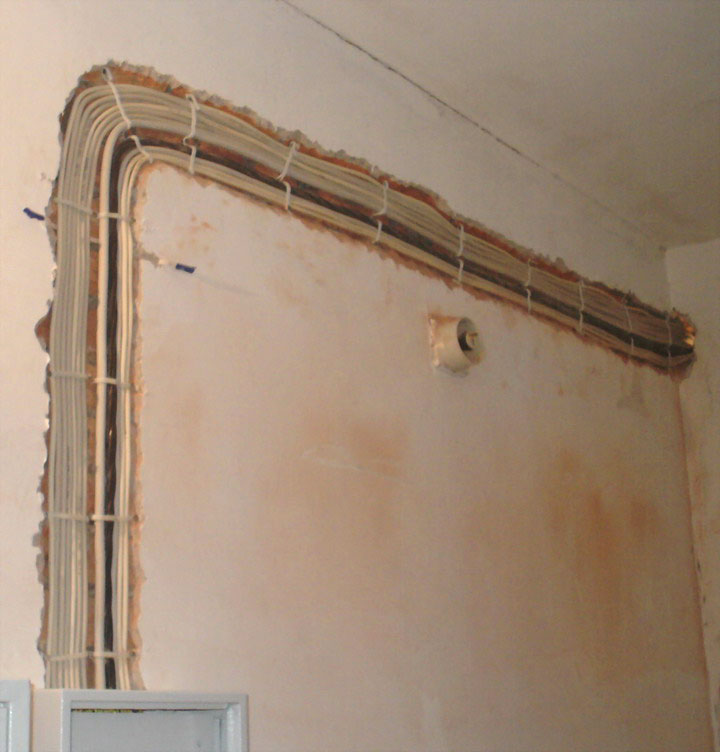
Usually in panel houses, electrical wires are hidden in the materials of the ceiling or walls. It happens that the owners of the apartment find wiring in the area where the wall and ceiling are combined. This place is suitable for laying electrical wires, as it is not deprived of free space. Cables can easily be hidden between the wall and ceiling panels.
 Being laid between the wall and the ceiling, the wires will not become a reason for major repairs
 But despite the fact that factory gates are made in the plates, it is not always possible to quickly find wires in the wall. There are such incidents that electrical circuits do not match even on adjacent floors in apartments with an identical layout.
In addition to the walls that serve as a support, in multi-storey buildings there are also partitions that are built from wooden or plasterboard slabs. It is stupid to lay electrical wires in these structures, since it is impossible to hide cable products in the thickness of the partition.
The place of installation of devices for connecting electrical wires to the network in multi-apartment buildings is not chosen by chance. According to the rules, the socket should be fixed at a distance of 70–90 cm from the floor. And the switches are fixed on the wall, stepping back from the floor covering at least one and a half meters.
 Positioning outlets higher is not aesthetically pleasing
 In old buildings, electrical wires are often laid in 2 lines: to the outlet and lighting devices. By the way, if not a gas, but an electric stove is installed in the apartment, then a separate cable is mounted. But it is advised to abandon such a scheme in favor of wiring, which provides for separate products for conducting current, which feed groups of devices that consume electricity and ground the wire.
Necessary tools and materials
To lay a new wiring, you will need the following tools:
- perforator and grinder;
- a hammer;
- pliers;
- device for making grooves in the wall;
- ladder;
- "nippers" for wires;
- screwdrivers;
- extension;
- putty knife;
- indicator screwdriver or multimeter;
- roulette;
- soldering iron 60 W;
- bit.
 Corrugated hoses and socket boxes are useful in any case
 When dismantling the old and laying new wiring, there will be a need for certain materials:
- sockets and switches;
- dowel-clamps 6 mm;
- electrical insulating tape;
- steel wire with a diameter of 1.5 mm;
- mounting boxes with protrusions on the outside;
- alabaster;
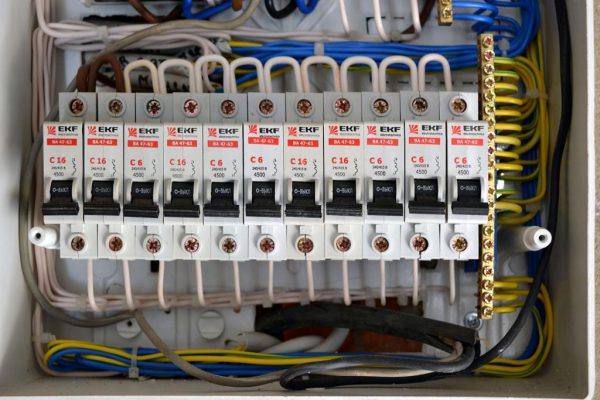
- an introductory shield, the size of which will accommodate 4 machines, 4 RCDs, 4 terminal blocks and the ends of electrical wires.
In a panel house apartment, it is best to lay copper wires. Aluminum products are inferior to them in quality. It is desirable to process the ends of the wires with a soldering iron and thereby protect them from the oxidation reaction.
When installing new wiring, you will need 3-4 sections of terminal blocks that connect the wires in the same way as the inlet shield. In the process of laying the wiring, you can use terminal blocks made of any material, but the worst option is polyethylene wiring accessories. It is desirable that rectangular holes be made in the terminal blocks, allowing the wires to be clamped not with a screw, but with a special plate.
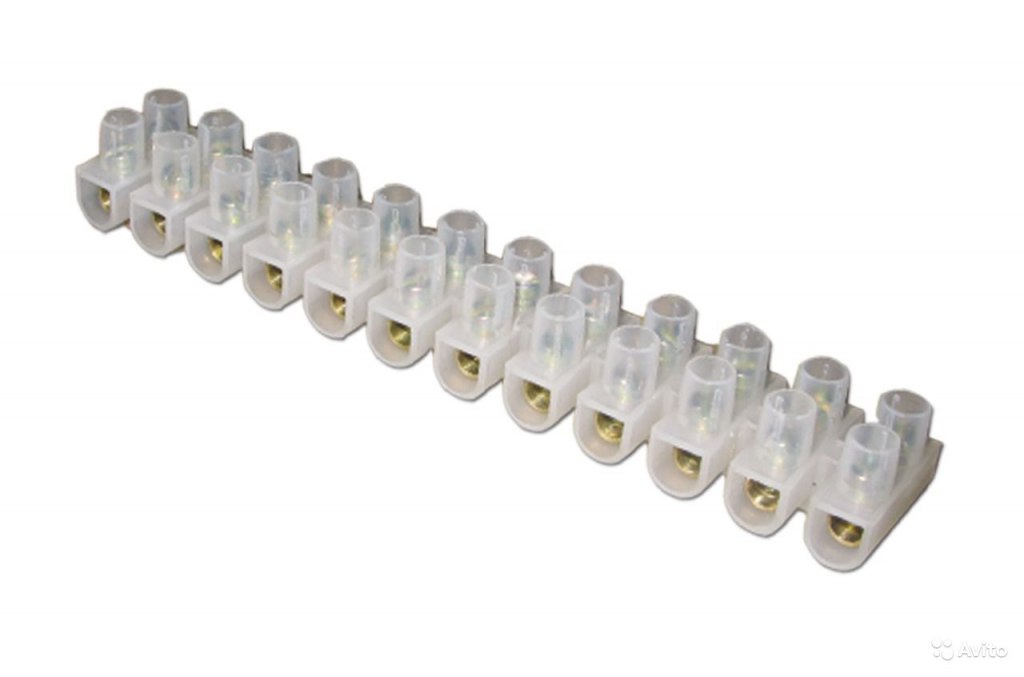 Needed to clamp wires
 To install the wires, you should purchase a new corrugation. Old pipes, which are probably flattened, are recommended to be disposed of, as they are unlikely to fit a double-insulated cable. Under the cables, it is better to take new metal corrugated hoses, and not polyvinyl chloride, which emit poisons in the event of an accident.
Types of wiring in panel houses
The wiring in the apartment may be partially or completely replaced. If absolutely all electrical wires are no longer suitable for fulfilling their task, then it is imperative to draw up a new scheme for laying the electrical network inside the walls. To do this, you will have to restore the location of the old wiring on paper.
Usually, most of the wires are hidden in the kitchen, where 3 sockets are mounted on an area of 6 m 2. And in the bedroom and other rooms in this space, as a rule, there is only one outlet. A separate connector for connecting to the mains is required for the stove, and only a cable with a cross section of 4 to 6 mm is suitable for this household appliance. In the bathroom, where the humidity level is high, it is supposed to install a socket with a distribution transformer.
Wiring is not always made open, although this is the best option that allows you to carry out repairs without touching the electrical network. Some people prefer to conduct hidden wiring in a panel house, hiding it under a layer of plaster, in the floor or in the ceiling.
 In this case, the wires are hidden with plastic covers.
 Video "replacing wiring in a panel house"
Laying under plaster
When the electrical wires are hidden behind the finish, channels are first created in the wall under the box for the cable to be inserted. After that, the wire is fixed with metal brackets and covered with a layer of plaster. Under a layer of mortar, you can hide many cables that are connected to sockets, lighting fixtures, air conditioning, electronic equipment, a washing machine and other equipment.
 To hide these wires, it is supposed to put a 1 cm layer of plaster on them.
 True, in a building made of panels there is no plaster in the wall, which is why the building mixture has to be applied to channels with laid wires in an extremely thin layer. Therefore, the masters are advised to increase the depth of the strobe or finish the walls with drywall sheets, the installation of which is not burdensome.
Floor and ceiling mounting
If they decide to hide the cables behind the floor covering, then they use corrugations and make a concrete screed. In this case, the wires are allowed to be connected directly to appliances and sockets. At the same time, the floor can be made warm, heated using cables placed in the screed.
 This way of laying wires will bring double benefits.
 If the owners of the panel house plan to make suspended ceiling, then the main cables are not forbidden to be placed on it. This way of laying wires can seem complicated, as it involves creating channels in the wall for hidden wiring that goes to switches and sockets. These vertical strobes, where the electrical network will be hidden, should be drilled with a puncher or wall chaser.
It must be borne in mind that due to the creation of channels, the structure is weakened. Therefore, in order not to harm the reinforcement that supports the ceiling and walls, the wires cannot be placed at a depth of more than 1 cm. To prevent the wiring from falling out of the groove, alabaster or dowel clamps are used that require small holes to be made.
 Channels in the ceiling should be made small
 The work of dismantling old wiring hidden in the ceiling will be less dusty and of better quality if you first drill about 10 holes around the perimeter and then knock out the concrete with a chisel. You just need to pull out the old wiring, and retract the new wiring with steel wire.
Step by step instructions for laying wiring in the apartment
Before dismantling the old wiring, you need to take care of providing electric shock to the puncher. We are talking about attaching a triple socket and a 16 A machine with a 4 mm 2 cable section to a thick board. In addition, it is necessary to prepare an extension cord for work that can reach any area in the room.
Sequence of work
In order for a new electrical wiring to appear in the apartment, you will have to perform the following tasks in turn:
- de-energize the house and remove furniture from the room;
- remove old wires;
- create grooves and fix the wires in them;
- install distribution boxes;
- bring wires to the electrical panel and lighting devices;
- test the power supply.
There are usually no problems with the first stage of work. The absence of electricity in the apartment must be checked with a multimeter. Sockets and switches are temporarily removed. And the second stage, that is, the dismantling of the old cable, involves the removal of wires from the junction box.
 When dismantling the wire, remove the brackets-holders
 Chasing and excavation
The gates, regardless of whether they are vertical or horizontal, must be even. Curved grooves are a common cause of failure in walls and ceilings. Channels made in the vertical direction should be carried out 50 cm from the ceiling. Therefore, in this case, you can not do without a stepladder with side stops.
 The boundaries of the channel are drawn in pencil
 The limits for the channels are first indicated by a grinder, the disk of which is immersed to a depth equal to the diameter of the corrugation, and to the width of the perforator bit. After that, using a chisel, a strobe is made. In the corners, a cutting machine creates an oblique cut and knocks out a hole. This will help make the bending of the corrugation smooth.
The holes where the socket boxes will be inserted are pierced in concrete with a chisel, and in brickwork- crown. And the notch for the introductory shield is created exclusively with a chisel. By the way, a double channel should not be made under the switches. It is wiser to purchase a corrugation and place several cables in it.
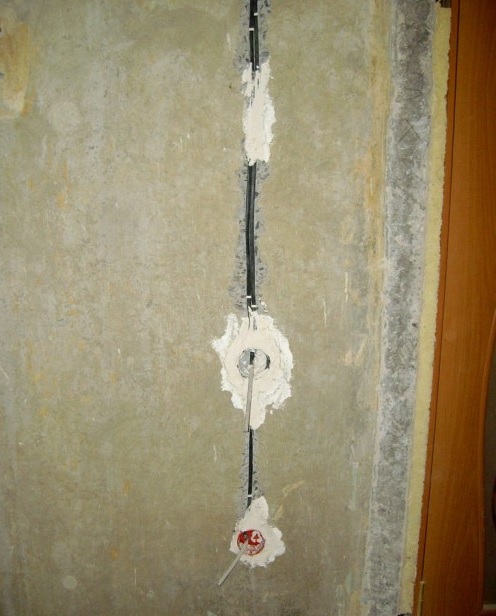
Immediately after the above work, you should start installing the distribution boxes. To fix them in place, cement mortar is usually used. In this case, the cable is supposed to be laid from the shield to the distribution boxes.
 A special solution is carefully applied around the sockets
 Video "How to ditch walls for wiring"
Laying the wiring in the channel
Before installing new electrical wires, the necessary lengths of cable and corrugation are measured. It is more convenient to tighten the wires inside the corrugation on the floor. After completing this task, socket boxes are inserted into the holes on the alabaster pillow, and a corrugation with a cable is inserted into the strobes made. In this case, the edges of the wires are directed to the sockets, which are covered with alabaster to the surface of the wall. The building mixture is applied to grooves with corrugation every 50 cm.
 Laying corrugations on top of the finishing material is also a good option.
 If it is necessary to install single-pole switches, the ends of the zero (blue) wire are immediately twisted, treated with a soldering iron and sealed with insulating tape in 3 layers so that the first layer goes on 20 mm of the wire. Wrapping the cable with electrical tape, one layer overlaps the other by 50%.
Wiring for devices and for lighting
The laying of wires ends with the introduction of the ends of the corrugations into the introductory shield and their lubrication with conductive paste. The edges of the profiles are grasped with a tin clamp on a screw connected by means of a PE wire cut to the ground terminal of the input shield.
When entering the electrical panel, the wires are divided into separate lines, which require their own switches. This rule cannot be ignored, since this is fraught with the fact that the wires cannot cope with the transfer of current to household appliances that consumes a lot of electricity.
 Work is carried out during a power outage
 The electrical panel is applied to the attachment point on the wall in order to mark and drill holes for the dowels. Then, having completely de-energized the apartment, wires are inserted into the shield that has not yet been fixed. After that, the VSC is put in place, fixing with dowels.
After making sure that the electrical network is in good condition, they begin to cover the strobes with building mixture, install sockets, switches and lighting fixtures. Before plastering the channels, it is advised to stuff foam rubber or plain paper into the sockets, and the inlet shield and counter with plastic wrap.
 To avoid bumps, the dried plaster is leveled with sandpaper
 As a result of plastering and painting and gluing wallpaper on the walls, the socket boxes and the inlet shield will be invisible. You just need to feel them with your hands and open them by cutting out the wallpaper along the contour. The socket boxes should be cleaned of sand that has got into them and closed with rosettes. In addition, at this stage of work, switches and lamps are mounted.
Video "Laying hidden wiring"
Replacing the wiring in a panel house without hiring electricians is real. To do this, you need to take development seriously. electrical circuit and lay the wires as required by the instructions.
Hello experts! They did a redevelopment here in a 4-room apartment of the II-49 series house, cutting through an arch in the wall between the kitchen and the living room. The width of the arch is 70 cm, the height is 230 cm. Distance from outer wall 1m. At the bottom of the slab, they found a bundle of four armatures running along. Thickness 15mm approx. They didn’t cut it, they poured it under the screed. The arch was not strengthened with anything, at first they cut through as much as it was enough with a grinder with a diamond disk on both sides, then they pierced it through with a perforator, the insides were gouged with a chipper. Floor - FIRST. Attention, the question is: how bad is everything? Is it correct to keep the reinforcement at the bottom? How necessary is the strengthening of the arch opening, if only a few thin rebars about 5 mm thick were found in the piece taken out, i.e. there is nothing to cook the strapping, in fact, and the vertical reinforcement was not found at all? How much did the stiffness of the structure decrease? At first, they just thought that the wall was not load-bearing, but it turned out that it was ... Dispel your fears, please, or tell me what to do, otherwise 8 floors above your head do not give you peace ...
- Well, what can I say, you have a northern fur-bearing animal ... It may well come up ... And you can strengthen it here, but very cunningly, because the 1st floor ...
— If it is possible, in more detail about strengthening. What are the options? What is the binding attached to? As for the animal, I know. But you can't go back. And what about the reinforcement at the bottom of the plate?
- We need to frame it. What - you need to look, how - you need to look. The most correct for you is to contact MNIITEP.
- Thank you ... and if it's not a secret, what kind of money are we talking about?
Survey and project - about 70 tr. Approval - from 100 and beyond, this is if MNIITEP gives the go-ahead. Then - the actual installation of the frame is in the region of 25-50 tr ... Finishing work is what you do there ...
The II-49 series is very similar to the P44: all the interior walls are load-bearing, but also much more frail than in the P44, and it is not advisable to touch them. But they already write to me on soap:
Good afternoon!
Help, please, with malicious advice, if you have time.
There is a house 1-515 / 9Sh, a kopeck piece on the 4th floor, you need to drown the heating risers into the external load-bearing walls, including drowning the horizontal outlets to the radiator. Moreover, in a room with a balcony, you need to cut a niche for a radiator in an external load-bearing wall adjacent to this same balcony.
Question for conscience: how criminal are these intentions? A niche is hollowed out only in one of the walls, in others there are only strobes for pipes, but a horizontal strobe is present everywhere. With the window sill itself, the threshold there, and so on. nothing will be done, they are not broken out.
A question about technology: can't you cook porridge with one perforator? You have to hammer kilometers of holes at a distance of a couple of centimeters from each other, and hammer between them, right? Is a hammer drill plus a grinder already better for concrete? Mark the boundaries of the strobes, cut with a grinder, hammer between them.
I read the forum, your site, watched the video. On my own, I can answer my questions like this - dolby, if your conscience allows, and take the grinder. But I decided to find out the opinion of a specialist until I broke the wood.
By the way, I need an electrician. The apartment is empty, exotic is not necessary. When we finish the drawing, I would like to invite you to take a look.
Thanks in advance for your reply.
515th - on the contrary: the external walls (in which there are windows) are load-bearing. You don't need to explain further, do you?
That is, if you try to sum up, you can say this: if you took an apartment in a panel house, forget about redevelopment. I would probably call the panel house in some way budget option due to the fact that it is being built very quickly, from standard structures. But the price for this is the impossibility of global redevelopment and changes in the walls. Do you want perversions? Take a studio apartment and act.
Zapadlo second. Place for communications. The fact is that in a typical socket, communications such as electricians are already made almost at the factory, and are laid in the regular channels of the plates. Channels? Hm, okay. But we will now take and pull the light from the chandelier with a new cable. He's probably walking diagonally over there to that light switch over there. And above the switch should be a box. Now we're going to gouge the wall a little. *humming puncher* Damn. I don't understand anything. There is something missing from the box. Where is she? And if you look at the wire from the chandelier ... oh. And why does he go not in the direction of the switch, but somewhere to the side? What to do now?
And it's one thing when a person makes repairs himself, on his own. He might like to pick out regular channels for half a month. We do not do this and, by default, we believe that these channels simply do not exist. Why? Now I will explain. Firstly, practice goes against theory, and should provide for a universal option that always works, regardless of whether there are channels or they are clogged. not available, etc. Secondly, if there is such an option and it works, then why waste time searching for channels when you can immediately start working productively? I will write about this option a little later, but now we will continue the session of nightmares and disappointments.
So here it is! Our electrics start with lighting cables that have to go all the way to the chandelier on the ceiling and end, in the right case, with huge bundles of cables that have to somehow go to the shield. And here success depends on the hired team of craftsmen and their knowledge of building structures. Of course, you understand what I mean - about chasing what cannot be chased. Namely ceilings and ceilings. Here are some cute photos for you.
As reading the forums (and heated debates) has shown, the average comrade thinks this way. A. Wiring. What do the masters say? Cable under plaster on the ceiling? Yes, yopt - this is an extra 10 bags of a rotband! Nah, it's expensive one case from mastercity)! Well, fuck it - I'll gently scratch the ceiling with a grinder, just 5 millimeters, nothing will be done to him! He's so fat. Only then it turns out that a scratch 5 millimeters deep is knocked out with a perforator quite hard and inconveniently. And to make it easier to knock out, you need to cut deeper.
Then the comrade faces the same obstacle, but even more unpleasant. When he, after reading the forums, realizes that he really needs a normal electrician. With a normal division of lines into groups by premises, and not two machines for the whole apartment. Excellent! Hooray! But…. Well, these are huge bundles of cables up to the shield (pieces 15-20). Proper electricians say: “Well, so, what's the question? Fill the screed - and everything will be as it should. " Screed ... This is a few more sleepless nights and counting your hard-earned money in terms of bags cement-sand mixture! And then it suddenly turns out that it dries for a long time, and even steals 10 centimeters from the height of the ceilings. Nah, what the hell is this thing: my floor is already even, I’ll scratch it a little, and then I’ll cover it with alabaster and put a laminate!
The worst thing is when people hire a team to carry out all the work in a turnkey complex. The brigade says: “Kazyain! Don't worry! Everything will be! Let's do it! Don’t stsy! ”, The owner or hostess believes, thinks that the people are quite competent specialists, and they know what they are doing. But in reality it ends either in laughter or in big trouble.
With the permission of one of the participants in our forum, I publish and describe (briefly) his situation.
House series II-49, the brigade worked. The general concept of the electrician was correct: vertical strobes, all corrugated, separate lines to the rooms for lighting and sockets (though again; but now it doesn’t matter). Apparently, this bribed the customer. The turnkey team promised to do everything in at its best. And in order to save money for the owners and not to make an expensive screed (and not to steal the height of the ceilings), they offered to go into the floor slab (to the floor). Naturally, people thought that the masters knew what they were doing.
In fact, everything ended rather badly, but on time. The people drilled a floor slab 140 mm thick to a depth of 50-60 millimeters and got to the working fittings, under which they slipped corrugations with cables. The result of this was a great discussion on the forum, the appeal of the neighbors from below to the court, the completely dismantled (and mostly discarded) wiring, and the prohibition of pouring the screed as such, so as not to overload the weakened ceilings.
I'm posting more photos. These are strobes for future socket boxes. Question: what were they made of? Campaign it was SDS-MAX. And, most importantly, why the hell are such huge strobes?! I have one that fits my shield!
The inter-panel seams were opened up to a heap, because the workers were trying to find channels for pulling lighting, approximately as I described above: Didn't find it here? Let's break it down there. Not? Well, let's go over there!
And here is another case, and again, very well and on time, a person got to the MISIS forum (and it’s lucky that he corrected himself, and didn’t do it his own way!). Here, again, the question of a screed arose, and it seemed that a solution was found: to open all the interpanel seams around the perimeter, dig them deeper and lay cables there. Again, the complete dismantling of the cables, sealing the strobe with mortar and subsequent pouring of the screed.
Actually the house is a fresh new building P44, the third floor. What else is needed for happiness? And potentially there were cases when, after mega-chasing, a fresh new building was recognized as emergency. That's it.
Well, now I'll try to draw conclusions. I'm using a quote from the forum:
Anyone who is going to ditch the walls, but has not yet decided to do it. Think again and use the best option - drown the electrical wiring in the plaster. Simple and safe for the bearing capacity of the building. Very often, builders convince to take risks with the words “Yes, everyone does it!” Don't believe not one word. If you do not give a report on how to properly ditch the wall with minimal risk - do not mess around. Stop right away and make you do it right. How? Much has been written about this on the forum threads. As a result, your investment in repairs will pay off with interest. A pokotsanny apartment on the market is cheaper. Think about it...
- In prefabricated houses, all walls that are “solid” (they are not poked with a screwdriver and do not screw a self-tapping screw there) are BEARING. You can only touch them with vertical strobes using a grinder or a strobe cutter;
- Overlappings - ceilings, floors - do not ditch at all!
- Do you want normal wiring? Plaster ceilings, walls, pour screed. Otherwise, no way.
Now let's talk in more detail about the last point. I just finished one object (draft stage) and I have pictures :)
1. Laying lighting cables. The most competent option: take a flat cable VVG-ng-LS (and its modifications), fasten it to a bare floor slab with anything (wire, dowel clamps, mounting tape) and then plaster it. The opposite option is possible: put a layer of plaster of at least 10 mm on the ceiling, and then make a strobe there with a wall chaser, where to strengthen the cable.
2. Laying power cables. The most competent option is a screed. A suspended / stretch ceiling option is possible, but think about the fact that you will have to make long drops from the ceiling to each block of outlets, and all the walls will be cut so that then it will be a problem to nail something on them. Isn't it better to spend money on a screed once?
3. Strobes in load-bearing walls. There is one more zapadlo, no one is particularly described. This is the hell of concrete. In the legendary P44 (new and old), for example, it is such that the disks of the wall chaser are on fire, and it does not cut a damn thing. There are several options here. You can raise the price for the work, and throw away a third of the amount on disks. This is if the client does not want to spend money on a rotband at all. The second option is to throw at least 15-20 mm of rotband on the walls and live completely calmly. You can even horizontally ditch as much as you like. Well, variations are possible: for example, first, by analogy with the ceiling, fix the cables along the walls with a mounting tape, and then give it to the plasterers.
That is, very briefly: cheap and correct repairs will not work, especially in a panel house. Be prepared for this, do not make mistakes that can later turn out to be very deplorable. For example, a person who did not want to plaster the ceiling had in mind an extra 4,000 rubles for a rotband. Only now he did not know that one bag of repair compound has a price range of 3000-6000 rubles.
Bagels - panel version
I’ll add the rest based on my article about bagels (). Let's see how it will look in the panel. Even I will say this. Panel houses set the highest requirements for the preparation of walls and places for laying wiring. In houses of other types, some points will be simpler (non-load-bearing walls, round-hollow floor slabs and the like).
The requirements that I set before starting work are as follows:
- Break and build whatever needs to be broken and built. Walls (except load-bearing and stiffening diaphragms), partitions (made of gypsum blocks), sanitary ware and the like. Someone, it happens, is building a dressing room in his room - that's something like that.
- All walls shall be plastered with a rough layer of at least 15-20 mm. Usually this is a rotband. This is the most important part. This is necessary to solve two problems: do not ditch the concrete (the speed of work is greater, the structures of the house and the tool are less damaged) and evenly insert the sockets flush with the level of the plaster. The more layer of plaster, the better.
By agreement (for example, the plasterers got drunk, got sick, cannot), it is possible that the cables will immediately be attached to the walls on a mounting tape, and the plasterers will cover them with a layer of plaster after the fact. - Do not touch ceilings (ceilings and floors), leave them bare concrete slabs.
We cut the strobes with a chasing cutter to a depth of about 20-25 mm, remembering that a strobe accurately cut to the desired depth will break out by about 60-70 percent due to the structure of the concrete. Below I have given additional pictures of such a strobe and show the amount of plaster, which is LITTLE for normal cable laying.
The gate for the shields in this photo was cut to a depth of about 30-35 mm (where it was forgotten). House series P3. I didn’t reach the working reinforcement, it was first cut with a wall chaser (to reduce the amount of dust), it was cut deeper with a grinder with a disc diameter of 230 mm. The horizontal tail in the upper part of the strobe has a length of 250-300 mm and was already cut with a strictly chasing cutter to a depth of no more than 30 mm (the maximum depth of the chasing cutter). Such horizontality is not good, but in some cases (and with the right cutting method) they can be considered as a couple of socket boxes installed in a row.
Well, here is an example of the correct layer of plaster and the correct strobe. Again we work with a wall chaser, but only on plaster. And in this case, we can ditch as we please: vertically, horizontally, to the diagonal (the latter is not recommended). Well, similarly - a photo of a cable on the ceiling in a layer of plaster. Here I was a little late with my work, and I had to gouge along the already made layer of plaster, which was of different thicknesses.
The result is again a large cable ktuhlu:
And finally, a small surprise from a related specialty - plumbing.
It would seem, what could it be, related to the electrician, in these very pipes? But it turns out - it can! Look closely at the photo on the left. Here, the taps and narrowing for connecting the heated towel rail were made with cross-linked polyethylene, which in general is not good: before the stopcocks, all structures should be made strictly with the material that was according to the project! In this case, it should have been similar to the one I did at home.
But let's leave the plumbing and get back to the electrics. After all, all the risers in the basement are connected to the house EPS (Potential Equalization System), the task of which is to protect a person from the transfer of voltage through the pipes of the riser from the accident site to other apartments. If a plain language, then these pipes in the basement are grounded. And, having put such plastic here, we deprived all the apartments on the floors above grounding. Hello! In this case, DSUP was made and the broken connection was restored using a jumper.
So. The article turned out to be chaotic, but the general conclusions are not particularly joyful. If you have bought an apartment in a panel house and are going to make repairs there, then do not expect that it will be simple and convenient. The number of "no" and "forbidden" will be very large. If you took an apartment with decoration, then in order to make a normal electrician there, you will have to say goodbye forever to all the decoration. If your apartment is unfinished, and you are happy with 2.55 (or even 2.60) ceilings, then you will have to be upset and resign yourself to the fact that part of this wonderful height will be stolen by the thickness of the screed and plaster on the ceiling, which you will always have to do, even if the ceiling is quite even without it.
You may also be very surprised that the deadlines for electrical work will be delayed from the promised “week and a half” to two, or even three, due to the mega-hellish strength of concrete, when it takes about a day per room to hollow out the sockets. But there are still strobes!
When hiring a team, check their tools, the way they work, and their understanding of WHAT they are doing. Perhaps I will share my “project”, which was drawn up for the installation supervision of electricians by hired workers. The document, of course, is pompously called "Project", although it is sketched in Visio and without a single scale, but it clearly describes how to properly do electrical work in a panel house, using the principle of "do no harm" and "do not do too much."
Replacing wiring in a panel house cost produced in several stages. The very first of these is drawing up a diagram. This scheme is also recommended to be officially registered. Methods for installing cables in a panel house are as follows:
1) Installation under plaster, which is often used due to its simplicity. For this purpose, holes are made for power cables and special fasteners are installed. When the cabling has been carried out, with the help of plaster close up all the irregularities and close the holes.
2) With the use of strobes. For panel houses, only vertical chasing is allowed. Channels should also be carefully made, since the wall slabs are load-bearing. Deep channels can damage the building structure. It is also not allowed to use dowels for the purpose of fasteners. Professionals use alabaster as a solution for covering holes.
3) open way installation, which is suitable when one of the methods described above cannot be applied. To hide the wires, special boxes or channels for cables are used.
Stages of work
All work on the replacement of electrical wiring in a panel house can be divided into several stages:
1) Preparatory, during which specialists draw up a wiring diagram depending on the number of rooms in the apartment and the number of consumers (devices).
2) Creation of a source of electricity for appliances that will be used for dismantling and when installing new wiring. This is necessary because the dismantling of the old wiring is possible only after disconnecting it from the building's electrical network.
3) Removal of old wiring (dismantling). Specialists dismantle old cables, switches and sockets.
4) Creation of channels in the walls with the help of strobzers (for closed type wiring).
5) Installation of new wires, sockets and switches.
What is not included in the price?
The price indicated in the price list does not include the cost of fittings, consumables, components. Our employees can purchase all additional parts in advance and bring them to the site. If you already have the necessary components, we can use them in our work.
6 reasons to contact us
By cooperating with the Stroy-Proekt company, you will be able to enjoy the following benefits:
1. Our electricians have all the tools, equipment needed for the job.
2. We use only modern high-quality equipment.
3. We are pathologically punctual. We will arrive on time, we will complete all the work within the agreed time.
4. Stroy-Proekt employs only experienced professionals who know how to deal with electrical wiring.
5. All specialists look intelligent, neat and without bad habits. It's a pleasure to do business with them.
6. As a result of the work performed, the client receives an act of work performed with a guarantee.


