
Cement-sand floor screed is a traditional and time-tested way to level floors, make a new base for tiles, laminate, carpet.
Acquaintance with the technology of organizing a new floor in the room, let's start with the basics.
Cement-sand screed is universal, and it can be used on any surface: concrete, stone floor or floor on a brick base.
Composition of the mixture
Additional components are rarely used to prepare a solution: two are enough, mentioned in the very name of the method. The standard solution is prepared in the proportion: one share of cement M 300 and 2.5-3 shares of sand. The third essential ingredient is water. To increase the density of the cement-sand screed, it is recommended to add plasticizers to the solution.
IMPORTANT! If a cement-sand screed is used to organize the floor in a room with a high intensity of mechanical stress, the screed is made with iron (reinforced screed).
Figure 1 - The proportions of the components for the preparation of a cement-sand mixture and concrete (solutions M 150 and M 200)
With strict adherence to technology, a cement-sand screed is able to withstand a specific pressure from point loads of about 500 N / cm2, suitable for use in in public places and premises with high traffic intensity (pedestrian, car zone).
Cement-sand screed: material consumption
Conducting the calculation before the purchase building materials, keep in mind that to organize a traditional 4-centimeter screed, about 7 bags of cement are needed (it will be enough for a room of 13 m²).
Based on the ratio of 1:3, three times more sand is needed, i.e. 21 bags (note that sand is often only sold in 50 kg bags, while cement is sold in 25 and 50 kg bags).
Weight of cement-sand screed
Before you start a big commotion in your home or office, make sure that the floor of the room can support the weight of the screed: it may be better to choose a lighter option - for example, make a dry screed instead of a wet screed, a semi-dry fiber screed will also work.
Let's take, for example, reinforced concrete structures in frame-monolithic construction. Such according to SNiP can withstand about 400 kg / m² as a constant load and another 150 kg / m² as a temporary one. A screed 5 cm thick will give an additional load on the floor of 90 kg / m². Not every building is designed to exceed the bearing capacity of almost 25% of the floor.
Before starting work, it is better to consult with specialists or, even better, approve the restructuring plan in the relevant local authorities.
When calculating the weight of the screed, it is important to take into account that the very concept of “weight” cannot be considered one-sidedly: there are two subspecies - specific weight and volumetric weight, i.e. the weight of an absolutely dense material and the weight of the material in its usual state. So, for example, according to GOST 8736-77 (Sand for construction work), the volumetric weight of 1 m3 of sand should contain 1,600 kg, and the specific gravity of sand, according to the same GOST, can vary between 1,550 and 1,700 kg / m3.
Figure 2 - Types of screeds as such and the way they are organized
additional characteristics
When choosing ready-made mixtures, it is important to take into account such an indicator as the density of the dry composition. There are light and heavy cement-sand screeds: light has a density of up to 1,500 kg / m, and heavy - from 1,500 kg / m and more. The strength of the composition itself, as well as the indicators of soundproofing and frost resistance, depend on the screed density indicator.
For apartments and quiet offices, the first group is suitable.
The thermal conductivity of the composition should also be taken into account when purchasing materials for organizing the screed. Mostly, cement-sand mortar has a thermal conductivity of 1.2 W / m per K. This is not always enough to maintain a comfortable room temperature, therefore it is recommended to use Additional materials for warming.
IMPORTANT! To organize the floor in wet rooms, as well as in rooms that are often in contact with the external environment, the so-called “floating” floor screed is applicable (the walls and floor are separated from the screed by a special gasket), the technology of work with which, in addition to laying the gasket layer, is nothing special from the standard is not different.
Cement-sand screed device
Preparatory stage
The screed can be laid in any room, the base temperature of which does not fall below +5 °C.
After cleaning the floor from old floor coverings and construction debris, mark the top edge of the screed.
To do this, use a hydraulic level and a chopping cord. For accuracy of measurements, some masters draw a control line at a height of 1 m above the horizon (!), And from it perpendiculars are lowered to the height of the screed.
Figure 3 - Layout of the room
The thickness of the cement screed from the floor should not exceed 5 cm. At the same time, laying the screed less than 3 cm is also impractical.
IMPORTANT! To repair screeds, as well as small cracks in the old subfloor, mix M 100 can be used.
A layer of waterproofing is laid on the cleaned and prepared base - a polyethylene film with a thickness of 8 microns or more overlapping (15-20 cm each), if one cut of the film sheet is not enough to cover the entire floor surface. The film should go onto the walls: the height of the allowance is determined based on the height of the final level of the screed - the film should be 5-7 cm higher than it.
Figure 4 - Laying a waterproofing layer
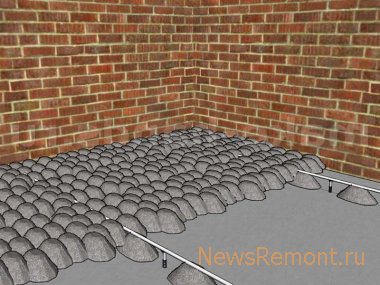
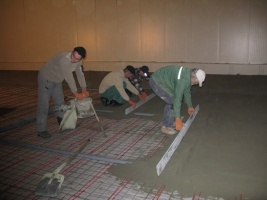
The screed is laid on beacons, you can also use beacon rails or a ceiling metal profile up to 3 m long (60 mm by 27 mm).
Lighthouses are mounted on alabaster in increments of 15-20 cm or on a cement-sand mortar prepared in the proportion: one share of M 400 cement to three shares of sand. Gypsum diluted in water can also be used as a fixing solution. plaster mixture"VOLMA-Sloy" (the consumption of materials of this group is one bag of material per 13 m²).
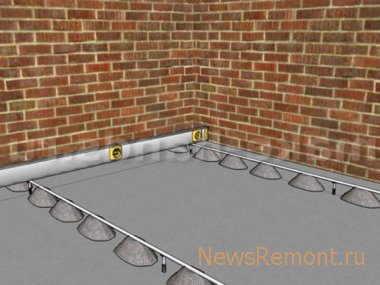
Beacons must be placed in parallel rows with a step of up to 2 m (the step length is determined by the length of the rule, it is more convenient to work, especially for a beginner, with a rule of 1.5 m). The extreme beacons are set according to the marks on the walls of the room, and the intermediate ones are arbitrarily, adhering to the length of the rule.
It is necessary to wait about 1.5 hours until the fastening composition hardens on the lighthouses.
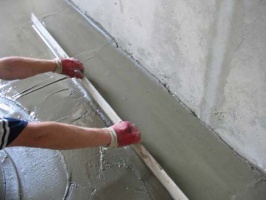
Figure 5 - Checking the level of the first beacons before applying the cement-sand screed to the subfloor
Beginning of work
The base of the floor is abundantly moistened with water.
The screed is laid in strips along the beacons, preparing the solution in portions.
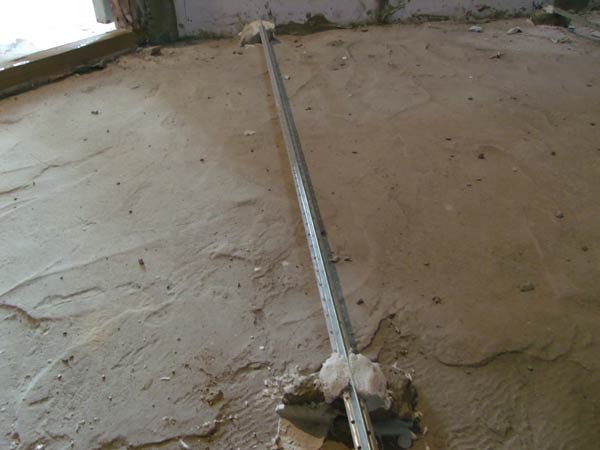
The screed is aligned with the rule.
The second strip is not poured until the first is completed (direction of work: from the far corner of the room to the front door).
The evenness of the screed is checked with a level.
Upon completion of pouring the entire floor, it is desirable to cover the screed with plastic wrap.
Figure 6 - Leveling the applied composition using the rule
It is necessary to wait at least 12 hours for the screed to harden to an average degree.
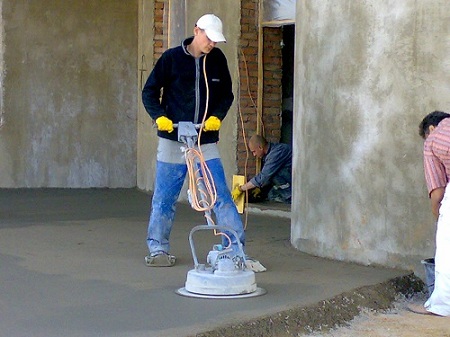
Bringing it to shine!
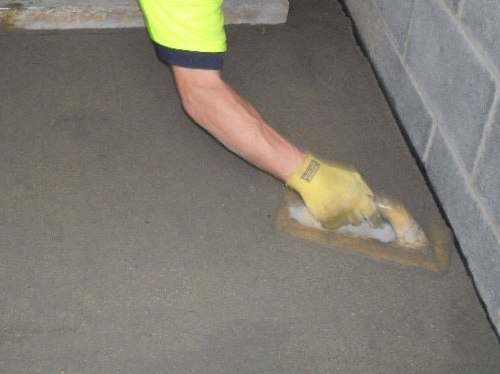
If there are bumps on the surface of the screed or to eliminate roughness, you can use a metal spatula and a wooden grater.
You must wait at least another 12 hours.
IMPORTANT! The screed will fully harden after approximately 28 days.
Figure 7 - Grouting irregularities
Many craftsmen also recommend priming the floor surface before starting work, and some do not favor the waterproofing layer under the screed, they say, in the event of flooding, the plastic film will only block the natural path of water escape.
Repair with a delay of 28 days is not always convenient, therefore, before making a “wet” screed, consider an alternative, no less reliable option: organizing a “dry” screed in the room - in two days the leveled floor surface will be ready for further use !
$ Cement-sand screed: issue price
If you can pay for construction work to craftsmen and take care of the issue of screeding only upon delivery of the order, then only owners of apartments and renovated premises are often burdened with the purchase of materials for screeding.
When purchasing building materials with your own hands
You should expect the following prices:
- floor primer Ceresit CT 17 (10 l) - from $ 10.1 / pack .;
- lighthouse (3 m) - from $ 0.7 / piece;
- alabaster for fastening beacons (20 kg) - from $ 5.2 / bag;
- building river sand (50 kg) - from $ 8.2 / bag;
- cement M 400 (25 kg) - from $ 3 / bag.
Hiring price
When organizing a screed up to 40 mm thick :
- in Moscow − 180 rubles/m²
- in Kyiv - 45 UAH/m².
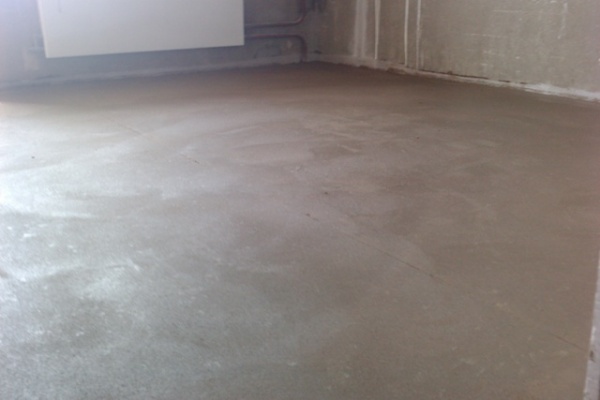
The cement-sand floor screed device is the most proven and reliable way to level the surface. With its help, the floor is not only leveled, but also additionally gives the necessary rigidity, which will be required in the future. You can buy a ready-made mixture for arranging a screed in hardware stores, or you can cook it yourself.

The composition and proportions of the cement-sand screed.
The composition of the cement-sand screed includes, as the name implies, cement, sand and water. For plasticity, you can add a plasticizer. For a conventional screed, a solution of grade M 150 is used. Proportions to obtain the required grade of cement-sand mixture: for 1 bag of cement (50 kg.) You need to take 150 kg of sand (about 10 buckets with a volume of 10 liters) and about 25-27 liters of water. The amount of water largely depends on the moisture content of the sand. The more moisture the sand, the less water is required.

Consumption, weight and density of the cement-sand screed.
The density of the cement-sand screed directly depends on the choice of materials used. They are divided into light and heavy. Light screed - density up to 1400 kg / m3, heavy - more than 1400 kg / m3. The greater the density of the composition, the higher the strength and frost resistance. When used compositions of any kind. The consumption of a cement-sand screed is not difficult to calculate based on the manufacturer's data (see the back of the bag). The consumption of a cement-sand floor screed is approximately 20 kg per 1 m2, with a layer thickness of 10 mm. In this case, the weight of the cement-sand screed will be approximately 15-20 kg. for every centimeter of thickness.
The minimum and maximum thickness of the cement-sand screed.
The recommended minimum thickness of the cement-sand screed is 30 mm. If the minimum thickness of the screed is less, then small cracks will certainly appear in it. The maximum thickness of the cement-sand screed is limited only by the bearing capacity of the floor and the increased overspending of the material. With a thickness of 80-100 mm, the weight of the screed will reach 150-200 kg per square meter, which is not always acceptable. The optimal thickness recommended by experts is 30-50 mm.
Installation of cement-sand floor screed.
The installation of a cement-sand floor screed begins with filling the space between the previously installed beacons with a mixture with a shovel. The laying of the cement-sand screed must be done quickly so that the solution does not freeze prematurely. If the work is done alone, then you need to fill in one lane. After filling, the solution is stretched as a rule. When small holes and dips appear, it is necessary to throw a solution there. The screed is pulled together by the rule several times until a flat surface is obtained. The tie is ready. It remains only to wait until it dries. During the drying process, in order to prevent cracking, it is recommended to water it with a small amount of water.Cement-sand screed (DSP) is used to level stone and concrete floors and create a base for finishing. At the same time, it improves the sound and heat insulation properties of the base.
The use of this method of alignment is limited by the large specific gravity of the CPS. With a screed thickness of 10 mm, its weight square meter can reach 20 kg. Taking into account the fact that its minimum thickness cannot be less than 30 mm (this thickness avoids cracking of the screed and its crumbling), as well as taking into account the weight of the thermal insulation and the finishing coating, one square meter of the floor will weigh about 70-75 kg. This is the weight of the floor at the minimum allowable DSP thickness. A layer of 50 mm thick with tiles as a finishing coat will increase this value to 130-140 kg. Therefore, cement-sand screeds are used for leveling floors in buildings where the structure of load-bearing floors is designed for a payload of 300-400 kg / m².
The large weight of the DSP design is, to a certain extent, its main disadvantage. Another disadvantage of the cement-sand screed is the significant time required for its complete drying. DSP 40 mm thick dries in 7 days, but each subsequent 10 mm thickness requires an additional 15 days to dry each of them.
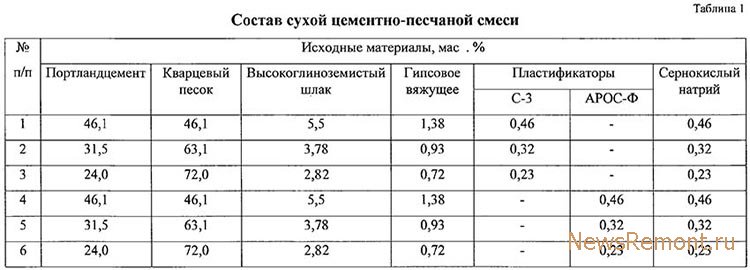
Cement-sand screed: composition, methods of implementation
According to its composition, DSP can be a conventional cement-sand mortar or be made from dry mixes. The composition of these ready mixes varies for various kinds screeds.
The solution for the DSP is kneaded from a mixture of cement (1 part) and sand (2.5-3 parts) with the addition of water (0.5 liters per 1 kg of cement). Plasticizers, modifiers and fillers are added to such a solution. The addition of these components to the cement-sand mortar eliminates the risk of cracking, increases the plasticity of the screed and promotes rapid strength development compared to a mortar mixed without additives.

In construction, for the preparation of mortar, mainly ready-made dry mixes are used. The packaging of the finished mixture indicates the volume of water that is needed to prepare the solution, and the consumption of the mixture per unit area for different thicknesses of the screed.
Requirements for the composition of mortars are determined by GOST 28013-98 "Construction mortars".
The following DSP methods are available:
- Wet. For screed, a ready-made mixture is used.
- Semi-dry. The mixture is mixed on site.
- Dry. Dry backfill is used, followed by coating it with sheet materials.
The popularity of semi-dry DSP is due to the ability to significantly reduce the surface hardening time. Usually this time is several hours. The use of a semi-dry screed minimizes the risk of its subsequent cracking and avoids leakage of water from the solution through the floors.
Features of semi-dry DSP with fiberglass
We have a relatively new method of arranging a cement-sand screed. In addition to plasticizers and modifiers, fiber is added to the composition of the mixture to cement (in this case, Portland cement is used) and fine quartz sand. As a result, the structure is reinforced with this mortar component and traditional mesh reinforcement becomes unnecessary.
This technology (also called German) provides additional benefits:
- The cost of installing a cement-sand screed with fiberglass is less than the cost of installing a screed with conventional reinforcement.
- The device of such a screed takes much less time due to the reduction of the drying time of the surface. This is achieved by reducing the volume of water used in mixing the solution. The screed is ready for laying the finish coat after 4 days.
- The DSP device with fiberglass results in a completely flat base surface. This is achieved using a trowel, which eliminates all microdefects on the surface of the screed.
- In terms of impact resistance, such a screed fully complies with SNiP 22.03.13-88.
Cement-sand screed device
To obtain a high-quality screed, compliance with the technology of its device is required.
Surface preparation
The surface under the screed device is thoroughly cleaned beforehand, pieces are removed that exfoliate when tapped. The surface to be prepared should be swept and, if possible, cleaned with a vacuum cleaner. Technological holes in the base and potholes are sealed with mortar and leveled.
Then the surface is primed. The use of a primer will increase the adhesion between the screed and the base. The primer eliminates the possibility of displacement of the lower layers of the screed during operation. The primer is applied in two layers, the second layer should be applied after the first has dried.
The damping tape is laid around the perimeter of the room after the applied primer has dried. The tape serves to seal the room and to protect the screed.
Screed level marking
Marking is faster and more convenient to do with a laser level. Do not forget that the thickness of the cement-sand screed cannot be less than 30 mm, otherwise the screed will crumble and crack. The thickness of the screed in a particular room is determined by the project or, in its absence, by the need to solve specific problems (hide communications, level the base with a large slope, etc.). The laser level is installed on the base in the center of the room and marks are made on the walls at the desired height. The point where the laser level is set should have the maximum height in the room.
Installation of beacons
Beacons are called guides, along which the surface of the screed is leveled. Accordingly, the quality of the cement-sand screed device directly depends on the correct placement of the beacons.
For the screed device, ready-made metal or mortar beacons are used. The use of ready-made metal beacons greatly simplifies the work process.
Lighthouses are laid out strictly parallel on the surface. The width between the beacons depends on the length of the rule used and should be 200 millimeters shorter. If the rule has a length of 2000 mm, the beacons are laid out at a distance of 1800 mm from each other.
After marking the level, the beacons rise to the required height and are fixed with the help of a solution from which the screed will be arranged, building gypsum or alabaster. Important! Lighthouses should not have deflections along their entire length. In places of deflections, gaskets are installed so that they are at the right height, and the beacons are fixed.
Very important ! If a door is not installed in the room, the level of the screed being arranged should not overlap the level of the future door. This can be avoided by starting work from the doorway.
Mixing mortar and screed device
After the solution has dried under the beacons, the surface of the base is wetted with water. An ordinary cement-sand mortar is mixed based on the proportion of 1 part of cement to 3 parts of sand with the addition of water at the rate of 0.5 liters per 1 kg of cement. The solution is mixed with a mixer or nozzle on a drill.
The solution from ready-made dry mixes is kneaded according to the instructions on the package. Plasticizers and modifiers are also added according to the instructions.
Important ! Work on the screed device begins with the most inaccessible places in the room from the wall opposite the entrance, and is carried out towards the door to the room.
The solution is thrown (poured) onto the base and pulled out by the rule.
Leveling the surface of the screed can be done with a trowel or manually. In the second case, a grout mixture is prepared (in the ratio of 1 part of cement to 1 part of sand). The result should be a smooth surface of the cement-sand screed.
Important ! The horizontality of the screed is checked after completion of work on its device. You can use a laser or regular building level.
After completing the screed device, its surface should be moistened with a wet roller and covered with plastic wrap for a day. In a day, repeat the procedure. The drying time of a cement-sand screed is determined based on the thickness of its layer: 7 days for complete drying of a 40 mm thick layer, plus 15 additional days for drying each next 10 mm screed layer.
The addition of modifiers and plasticizers to the solution will significantly reduce the time between the completion of the screed device and the start of work on finishing the floor in the room. In addition, the screed will not crack.
The cost of cement-sand screed
The cost of the DSP device consists of the cost of the materials used and the cost of the work. In Moscow, the cost of installing one square meter of the central heating system starts from 400-430 rubles. True, we are talking about large volumes.
Ready-made dry mixes are usually packed in kraft bags weighing 25-50 kg. Manufacturers claim that the dry mix consumption is about 20 kg per 1 m² of screed with a thickness of 10 mm. The cost of the bag varies depending on the composition of the mixture. Prices start from 130 rubles / bag (sand concrete).
The preferred method of preparing the base substrate for any coating is a cement-sand screed. This method requires considerable effort, both from beginners and from professional construction teams. Efficient quality work will help to create a monolithic pour with an aqueous solution that provides the necessary angle of inclination for drain drains. The disadvantage is cost and time.
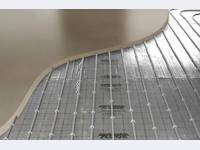
A mixture of cement and sand creates a perfectly even, dense surface that does not require further facing operations. In addition, it creates a protective barrier for harmful and dangerous substances - alkalis, fats, mineral oils, organic solvents, acids and excess liquid. The screed has a good level of heat conduction and is therefore excellent for installing internal underfloor heating. Another advantage is impact strength, which does not allow the base to crack.
Features of the technological process, when pouring a monolith
For creating right foundation the weight of the material must be taken into account. So, the rough base weighs within 90 kg / m² - i.e. has a significant mass. At the beginning of work, it is important to analyze the bearing capacity of the structure. The most suitable would be a concrete and stone base.
The process of creating a monolith provides for mandatory technological features: layer thickness - from 3cm to 7cm. If the first condition is not met, the structure will crack. Increasing the thickness is not effective for economic reasons and is characterized by high material consumption. The approximate weight of 1 m2 of cement screed is 22 kg. The table below shows the weight depending on the thickness of the screed.
| The thickness of the cement-sand screed | Weight m2 of sand screed (kg) |
| 1 cm | 22 |
| 2 cm | 44 |
| 3 cm | 66 |
| 4 cm | 88 |
| 5 cm | 110 |
| 6 cm | 132 |
| 7 cm | 154 |
| 8 cm | 176 |
| 9 cm | 198 |
| 10 cm | 220 |
| 11 cm | 242 |
| 12 cm | 264 |
| 13 cm | 286 |
| 14 cm | 308 |
| 15 cm | 330 |
The base fill has the following shapes:
When performing work, each form of cement-sand filling has technological differences and requires careful preparation of the base. Common workflow steps include:
Calculation of material need
In preparation for the start of work, it is important to calculate the material need. So, volume weight cement-sand screed in dry form, is 1800kg / m³. Usually, the mortar is mixed in a ratio of 1:4, so the weight of a 1m3 cement screed will consist of 0.25m³ of cement and 1m³ of sand.
Among other things, various components are mixed into the composition of the screed. To improve adhesion and moisture resistance - methylcellulose additives (culminals, tylose and natrasols). Accordingly, the specific gravity of the cement screed varies from the amount of impurities.


