In this article, we will consider outer skin window and door openings in two ways. Window siding is done according to different technology depending on the width of the slopes. After studying the instructions, you will be able to correctly do all the work with your own hands.
Framing narrow slopes
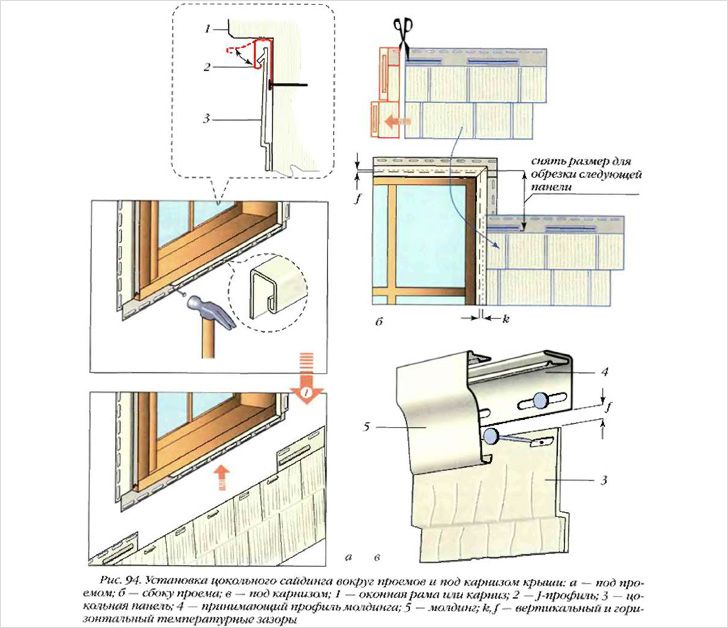
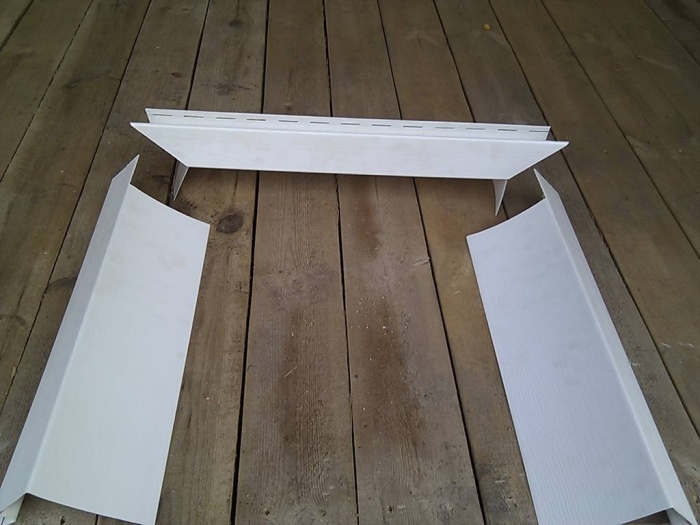
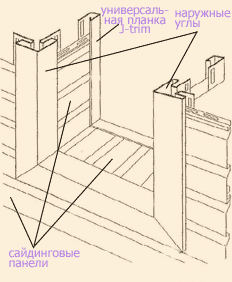
If the distance from the window frame to the wall plane is 23 cm or less, then the slopes are ennobled using special corner profiles with a wide shelf. The element shown in the diagram is called the window trim and refers to the fittings for installing vinyl siding.
For self-finishing you will also need a different kind of profile and additional materials:
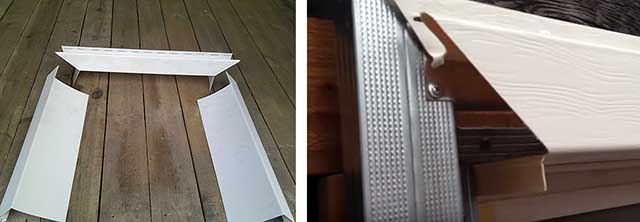
- finishing J-bar;
- finished ebb of painted or galvanized steel;
- self-tapping screws with a press washer and anodized or zinc coated (black is not recommended).
Advice. The color of the edging of windows and doors is better to choose in contrast to the main color of the walls of the house.
J-profile (left) and multi-colored ebbs (right)
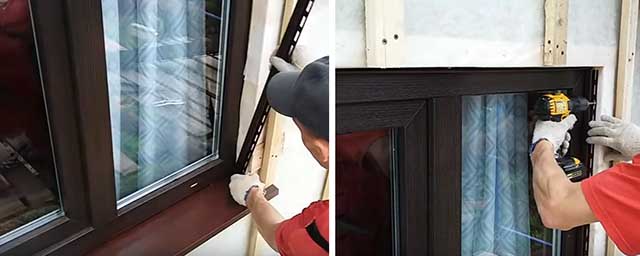
In order to evenly and beautifully finish the slopes outside with siding elements, you need to prepare measuring devices - a square, a tape measure and a building level. A highly specialized tool is not required, it is enough to have sharp metal scissors and a screwdriver.
Preparing for sheathing
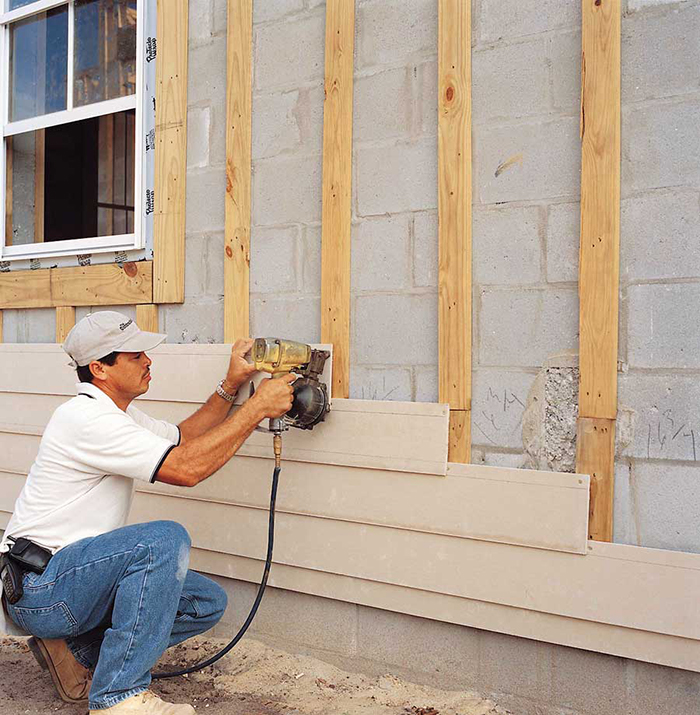
Before sheathing the side walls around the window opening, it is necessary to perform two preparatory operations: mount the subsystem (frame) and install a metal tide. As a rule, a frame made of wooden beams or steel profiles is assembled at the stage of wall cladding with siding. How this is done correctly is described.
The installation of the tide is carried out as follows:
- Measure the width of the framed opening and the size of the front (facade) shelf of the window trim.
- Multiply the width of the shelf by 2, and add the result to the size of the opening. Set aside the resulting value at low tide and cut it to length with scissors (not a grinder!).
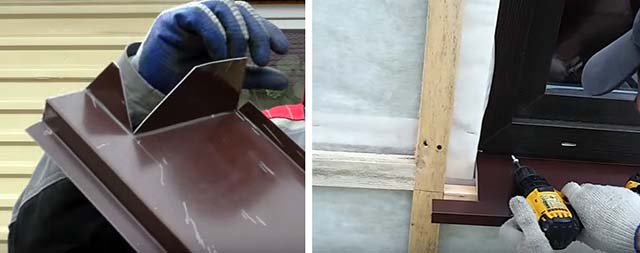
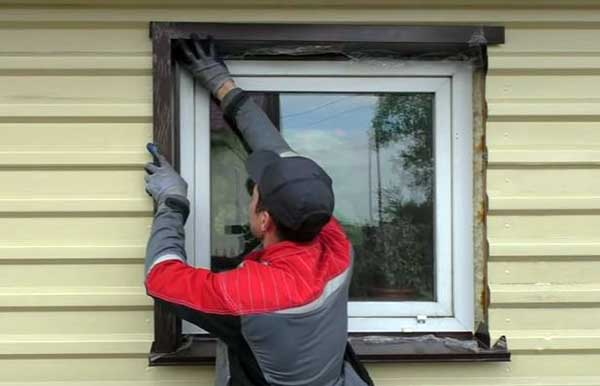
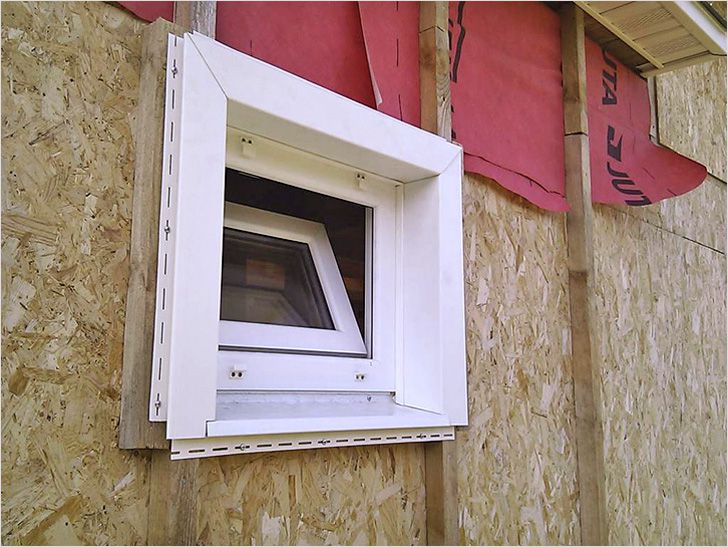
- Cut the edges of the tide to the previously measured width of the window part, and then bend the ledge up, as shown in the photo.
- Install the drain element in the design position and attach to the frame with self-tapping screws in increments of 30-40 cm.
Note. A curved ledge is made to drain water from the side decorative strips during rain. But street ebbs can also be installed in the old way, cutting the edges to fit the window.
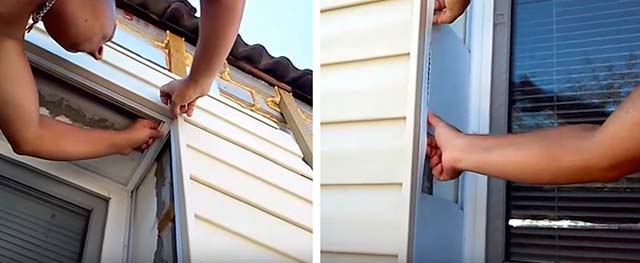
Cladding instructions
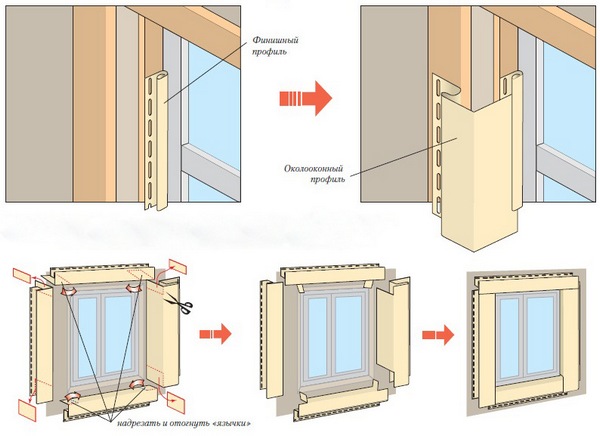
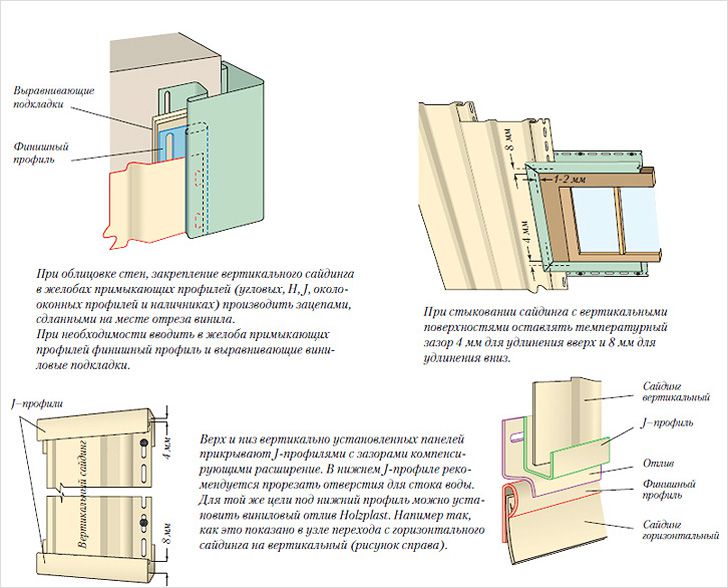
Vinyl siding for house cladding is mounted on window slopes in accordance with the diagram below. The flat inner edges of the window slats are inserted into the J-profiles fixed on the frame, and the outer edges are fastened with self-tapping screws to the elements of the subsystem.

It is important to properly cut and fit each part tightly, following the following algorithm:
- Measure and cut the upper J-profile along the width of the opening, making it shorter by 1 cm. Screw the strip to the frame with self-tapping screws in increments of 30 cm, not reaching them all the way.
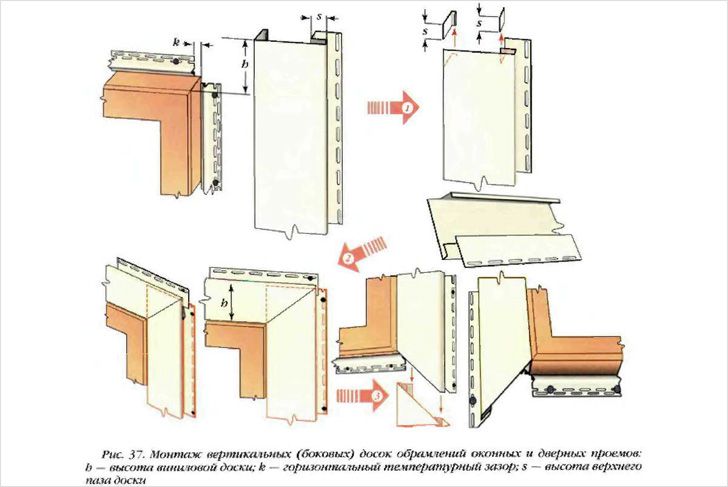
- Repeat the operation with the side profiles, only adjust them from the bottom to the low tide slope, and make cuts from the top for joining with the bolted bar.
- Trim the window corners according to the diagram.
- Inserting the edges of the planks inside the fixed J-profiles, screw them from the outside to the frame.
Reference. Frame elements can be joined in two ways - overlapping and with cutting at 45 °. The diagram shows the first option, the execution of the second is shown in the photo. In any case, the upper end of the side element must be run under the horizontal bar.
When installing the window trims with your own hands, carefully fit the ends to each other and the rest of the details, cutting them to the required angle and checking the position with a building level. The technology for mounting metal siding on slopes is somewhat simpler - the edging is made from finished parts, bent in size. How to independently sheathe a window opening with narrow slopes, look at the video from a professional:
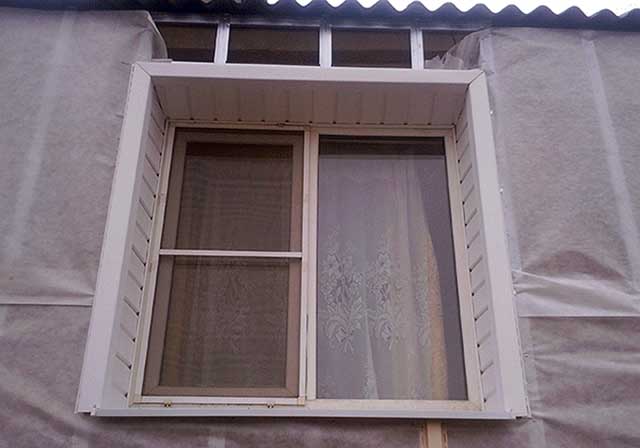
We cut wide slopes
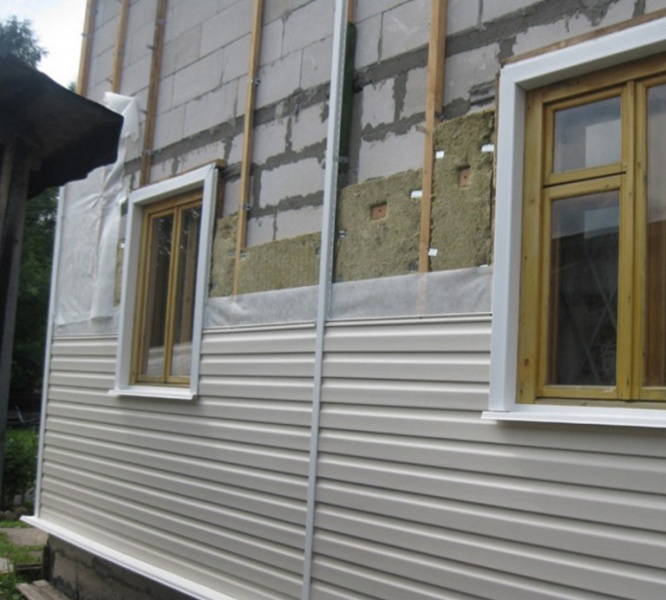
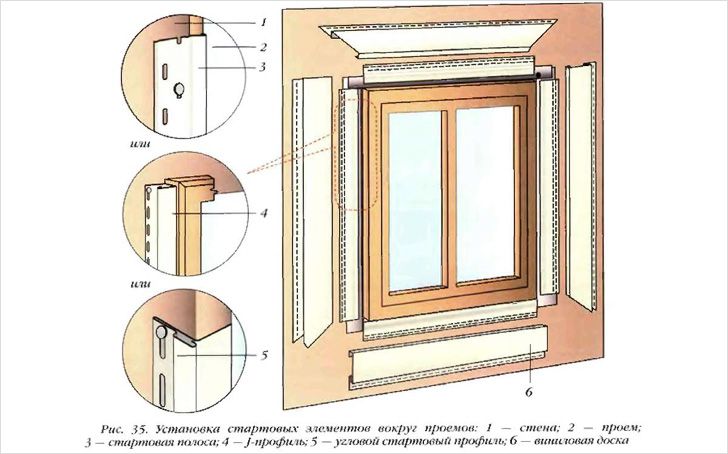
As in the previous case, before mounting the siding on the windows, it is necessary to assemble the frame and install a metal tide. The technology of sheathing wide slopes completely repeats the technique of wall cladding, only on a small area: a starting bar is attached to the side of the window frame, and a finishing J-profile is attached to the frame elements.
Advice. Siding with a large profile, used for wall upholstery, does not look very attractive on slopes. Therefore, it is customary to trim them flat plastic panels or stripes used for spotlights.
To veneer the wide end of the wall near the window, you will need the following fittings:
- starting L-shaped bar;
- J-profile;
- inner corner;
- fixture.
Note. If the subsystem is assembled from wooden blocks, then it is allowed to use a large construction stapler with brackets instead of a screwdriver and self-tapping screws to fasten plastic elements.

The plating order is as follows:
- Install J-profiles by attaching them to the frame around the perimeter of the opening (except for the bottom, where the ebb should be).
- Determine the desired angle of inclination of future slopes and mark the lines on the frame where they should end. Draw lines strictly vertically and horizontally.
- Install the starting strips along the markings, cutting them at the corners. Screw them to the frame.
- Now connect the outer and inner frames with two profiles in the form of corners, as shown in the photo. These parts are attached to the frame later, after the siding is installed.
- Fill in the space between the start and finish rails with plastic panels cut to length. The bottom and top panel is adjusted to the slope of the ebb and joint.
Advice. To insert the strips, use a narrow metal spatula, as the master does in the video.
To eliminate the void between the panels and the wall, blow a small amount of polyurethane foam into it during installation (otherwise the plastic will stick out). If you need to upholster an arched opening with siding, then the guide profiles will have to be cut in several places in order to bend and attach to the frame. Otherwise, the technology does not change.
About metal finishing of openings
Siding elements made of galvanized steel and coated with powder paint have a number of advantages over plastic "brothers":
- able to withstand mechanical damage and shock loads;
- do not crack in the cold;
- last 5-10 years longer.
Regarding appearance it should be noted that both finishing materials lose it over the years of operation: vinyl turns yellow and darkens, and the polymer coating burns out in the sun. But the metal has an additional advantage - it is easier to install it on slopes. Installation consists of the following steps:
- Measuring the opening and ordering the manufacture of 4 shaped elements - 3 architraves and ebb. Details will be made to you in size in any organization selling corrugated board.
- Fitting and trimming of iron flashings in place.
- Fastening to the window frame and subsystem with self-tapping screws in the following order: ebb, upper trim, side elements.
How to sheathe slopes with metal painted siding, see the next video:
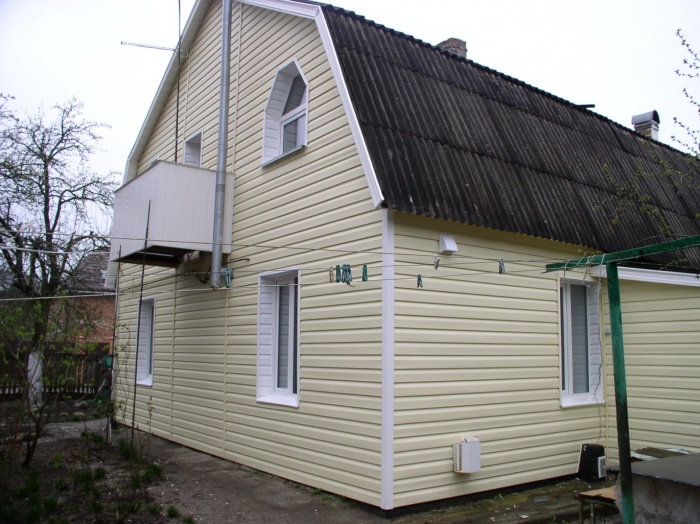
Conclusion
As a rule, window cladding is done after installing vinyl or steel siding on the walls, although the opposite can be done. But the first task is to assemble the subsystem, and then distribute the order of work at your discretion. If you managed to cope with the wall sheathing yourself, windows and doors will not be a big problem.
It is quite simple to sheathe a house with siding on your own. For such work, you do not need to master special skills. It is necessary to carefully prepare in advance. The quality of the result depends on how well all the subtleties of the process are thought out. The work includes not only the installation of panels, but also the lining of the basement and windows. That is why a beginner, if necessary, to perform such work often gets into a dead end. To understand the lining process, you will need to familiarize yourself with step by step instructions DIY window siding.
Ways to finish openings
When creating an attractive window finish, type is of great importance. installed window. It depends on it which technology will be chosen for the installation of siding panels. There are several types of installation of double-glazed windows:
In each of these cases, finishing is performed even before fixing. wall panels, which will be located around the window. In this case, the edges of these elements simply need to be inserted into the groove on the edge of the profile. When finishing after installing the panels, the work will cause certain difficulties.
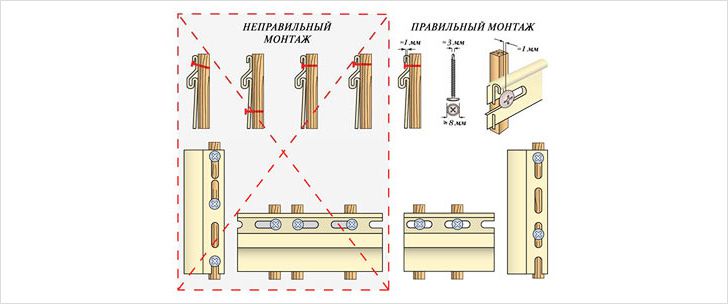
Installation technology is common for all siding panels. Screws should be screwed in the center of the mounting holes. In this case, a gap of 1 mm should be left for cases where thermal expansion will occur. So the panels will move freely without deforming. Subject to this rule, it will be much easier to install siding panels on a window.
Features of finishing the window with siding can be found in the video:
Attention! According to the instructions, during installation, you can fix the elements in arbitrary places.
Bars of the crate must be fixed around the perimeter of the window. Small planks are installed on the slope. This will make it easier to install the finish profile. The bars must be the same size. This will make the surface of the wall more even. All work is carried out with a level.
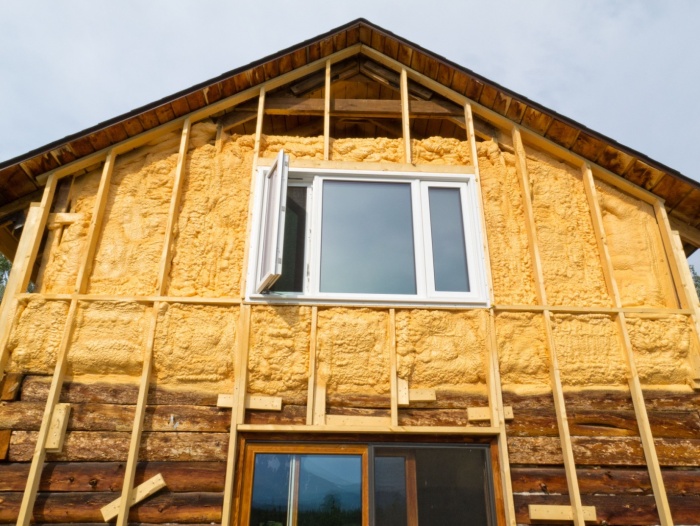
Preparatory stage
High-quality finishing of a window outside assumes performance of a certain preparation. Such works include:
- removal of decorative elements;
- cleaning the surface of old plaster;
- elimination of old wooden parts;
- dismantling communications.
In addition, technical devices and devices - antennas and air conditioners - are also removed. The surface is cleaned and dried. Such preparation is best done if it is planned to clad the entire facade of the building.
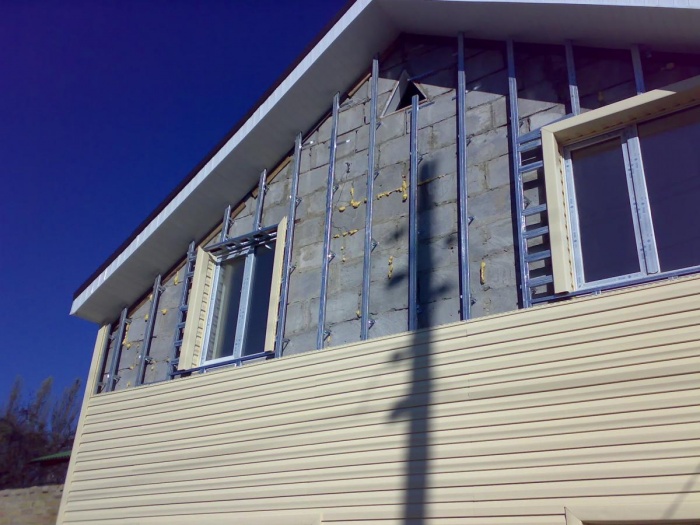
Frame installation
When deciding to decorate a window opening with siding, it is worth considering that before such work, a crate should be completed. It will be needed for the following reasons:
- that the material is securely fixed;
- lining will be much easier;
- to level the surface of the wall.
![]()
To perform the crate, the following options are suitable:
- wooden beam with a section of 4x6 cm.
- metallic profile.
Advice! When using a wooden beam, before starting the lining, it is necessary to treat the elements with an antiseptic. This will help prevent rotting of the tree and its damage by insects.
Frame parts are fixed at a distance of 20 cm from each other. This step is optimal. If it is more or less, the strength or aesthetics of the structure will decrease.
![]()
Warming
Finishing windows during the installation of siding involves the creation of an insulating layer that will protect the window frame and the room behind it from the effects of cold. Warming is best done with polystyrene foam plates. It is attached to dowels with wide caps.
Advice! To protect the insulation from moisture, a film should be laid on top.
Since cracks cannot be avoided during the installation of the window frame, it is necessary to prepare the sealant in advance. Thanks to the use of this material, it is possible to improve the hydro- and thermal insulation properties of the structure as a whole.
window finishing technology
For each of these cases, the actions may have a different order. Separately, you should familiarize yourself with the decoration of windows without slopes. Sheathing with siding in this case includes the use of special trim.
Advice! For greater reliability, the elements are fastened with a sealant.
Panels are cut at the top and bottom of the window structure. The slot should be slightly narrower than the width of the window trim. You can learn more about the technology of cladding window structures with siding from the video:
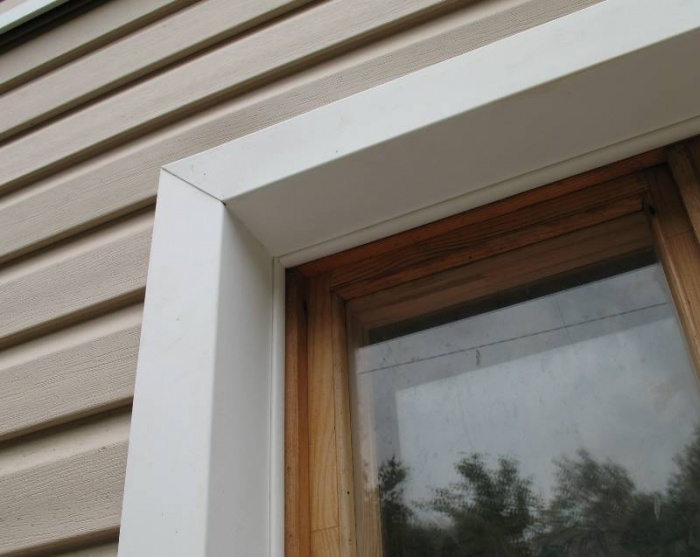
Structures recessed into the wall
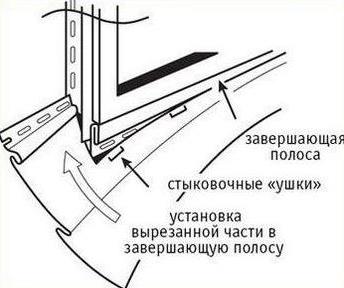
Window slats are great in cases where the window is not too deep recessed into the wall. Thanks to the use of slats, the slopes are closed.
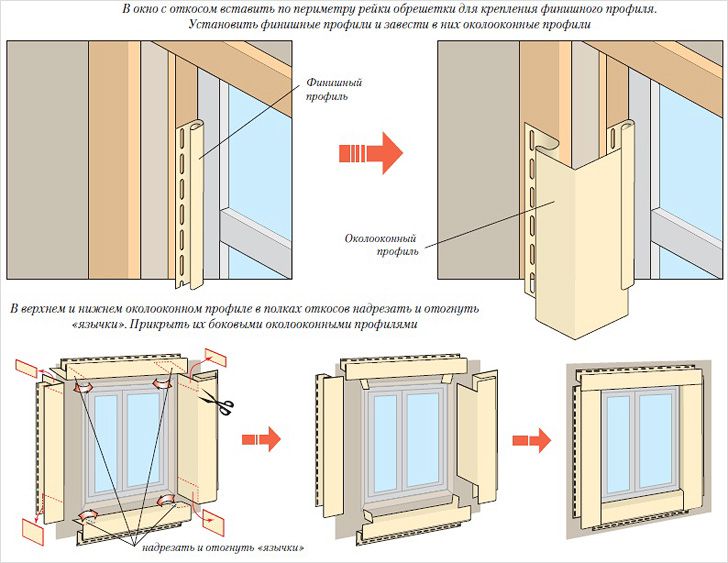
Then the window strip is placed in the hole of the finishing profile. During the docking of the planks on the vertical elements that are joined to the slope, it is necessary to make special cutouts. Horizontal elements are cut and bent.

If the window is recessed deep enough, the use of window slats is not required. For such structures, small trimmings of wall panels are used. During installation, a corner is used.
Installation can be carried out using a special ebb. Its edges must be cut and bent under the vertical elements. To increase the reliability of fastening the ebb, a sealant is used.
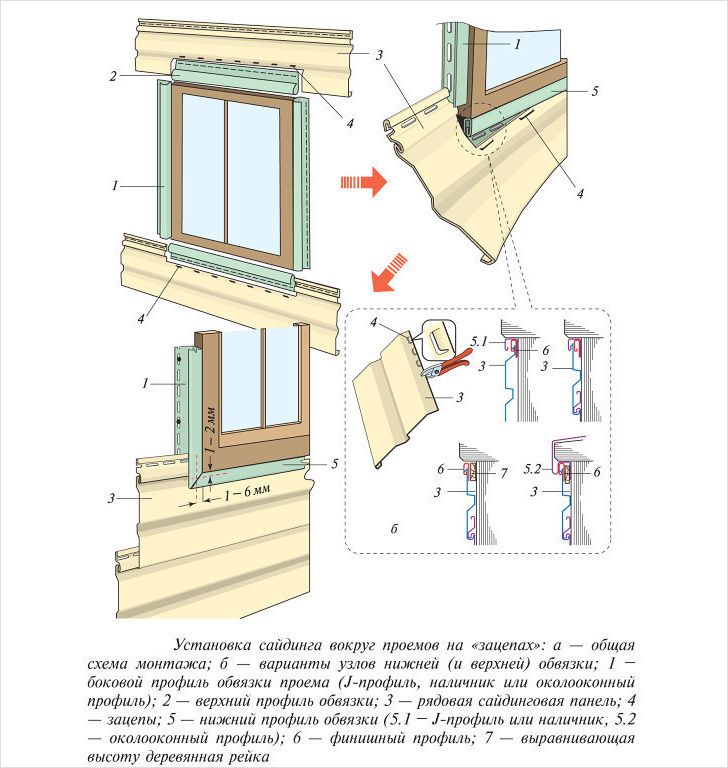
Installation of siding on windows is carried out in the following order:
- first, a J-profile is attached around the perimeter of the structure;
- then the installation of pre-prepared elements of the frame panels is carried out;
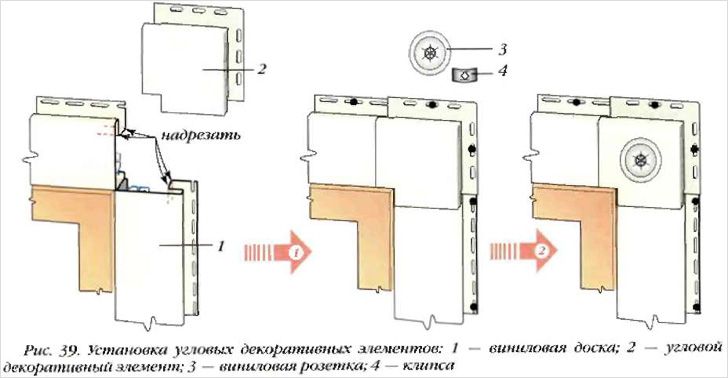
- at the final stage, an angular profile is installed.
During installation, you must follow the same rules as for the general installation of siding panels. Each connection should be made with a 5 mm gap.
Attention! When performing work in autumn or winter, the gaps should be increased to 10-12 mm.
arched windows
Such designs look great, but finishing them is fraught with some difficulties. Installation of siding on arched windows is complicated by the presence of a curved part in the upper part of the structure.
For finishing, a J-profile is usually chosen, which is characterized by sufficient flexibility. However, its cost is significantly higher than that of the usual one. For this reason, its standard counterpart is often chosen. To do this, in a regular profile, several cuts should be made, which are made on the mounting part. Then it is bent to give the required radius of curvature.
Attention! In some cases, incisions are created on the front side of the product. With careful execution of the operation, such a solution will become an effective design technique.
As an alternative, you can replace the arch opening with a polygonal opening. The design of such a window is performed using the same technology. However, the profile cutting will be large.
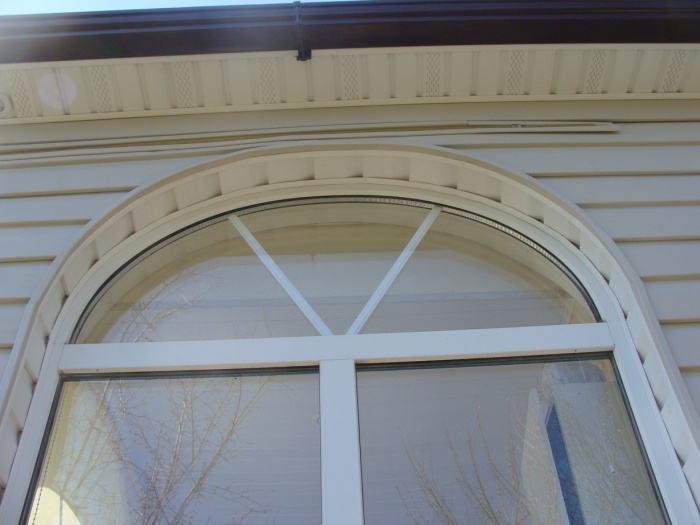
The ease of bending a conventional J-profile will depend on the material from which it is made. In the case of metal, it will succumb much harder than plastic. To create an arc of the required radius of curvature, you should choose vinyl siding. To facilitate the bend, it should be well warmed up. However, do not abuse it - plastic can easily melt.
conclusions
It depends on how well the windows will be finished general impression from the front of the house. That is why such work should be treated with the utmost caution. The installation technology is determined by the shape of the window, as well as the degree of its recession in the wall. Such work will be simple even for a novice builder.
If you follow the suggested tips, finishing the window with siding will not be difficult, and the result will be pleasing to the eye.
Before facing, it is better to take care of the proper preparation of the opening. It should be thoroughly cleaned. To protect the interior from the cold, it is necessary to create a heat-insulating layer. It is made from polystyrene boards.
With the correct execution of window cladding with siding, decorative elements will not be deformed under the influence of temperature changes and weather conditions. The process of finishing the window with siding can be found in the video:
Such facing material, as siding, is often used in the decoration of industrial buildings and private houses. If in the first case they turn to specialists, then in the second, do-it-yourself window siding is welcome - as a way to save money and carry out all the work as soon as possible.
The popularity of siding is ensured by both ease of installation and low structural weight, as well as low cost.
Advantages of siding in the design of slopes
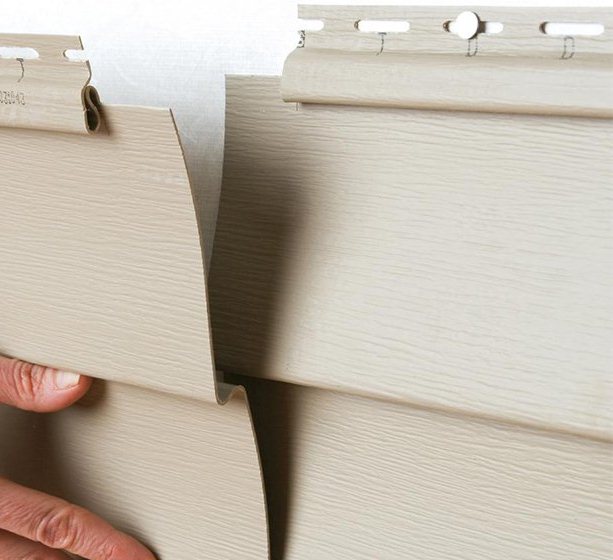
Siding is a ribbed coating with a corrugated surface - a material that is very decorative and interesting in appearance, as well as qualitatively protecting the sheathed surface from external influences.
Most often, metal is used for sheathing the entire house and window slopes, either. steel sheets heavier, more demanding and more expensive. Therefore, the palm can be given vinyl siding because it:
- resistant to aggressive external influences and unfavorable microclimate (frost, moisture, excess heat);
- easy to care for and does not accumulate dust and dirt on its surface;
- durable, practically not subject to aging and throughout the entire operational period retains wear resistance.
Work on window cladding with these two types of material is carried out almost identically.
Choosing the necessary tools and accessories
Before starting work, the necessary fittings and tools are prepared. Since finishing window slopes from the outside involves cutting siding panels, you will need the appropriate tool (any of the suggested ones that is convenient for you):
Siding around a window with a slope less than 19 cm - scissors for working on metal for cutting on top of the panel, with their help they make figured cutting of siding for finishing arched openings;
- a hacksaw with a fine tooth or an electric saw for woodworking or metalworking;
- knife-cutter - they draw a strip along the siding panel, and then the panel bends / unbends.
During the installation process, you will also need:
- screwdriver;
- a hammer;
- a square with which the correct mounting angle will be marked on slopes and around windows;
- building (1.5 m) and water levels;
- twine and chalk to mark the assembly lines.
As for fittings and accessories, the use of siding for window slopes will require right amount self-tapping screws and certain accessories. It is better when all the components and the siding itself are purchased from the same manufacturer This guarantees the quality and durability of the structure. Fasteners must be original - this will make the cladding perfect. Since the original components may seem too expensive for you, make a preliminary drawing - it will help to accurately carry out all the calculations.
Do you know where else siding is used? Read our article, where the whole technology of work is presented.
A popular option is. Read more about this and other methods in a separate article.
Need to raise the floor on the balcony? This is written in this article. and how to do it yourself.
Components and self-tapping screws are purchased according to a pre-calculation - this will save you the trouble of finding the right colors or sizes in the process. So, the number of fastening strips is calculated according to a certain algorithm:
- The window opening is measured around the perimeter. From the obtained value, the distance under the window is minus - if it is planned to install window sills or ebbs here.
- 10% is added to this value - they take into account trimming and various inaccuracies in the process of work.
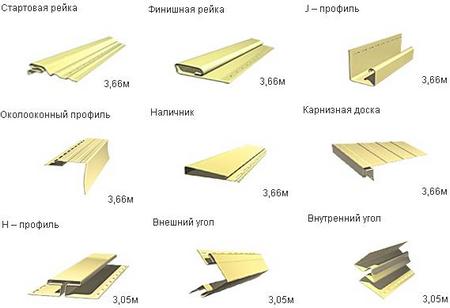
The main components required for framing windows with siding are:
- H- and J-profile;
- external and internal corners for decorating panel joints;
- low tides;
- chamfers;
- window and finish strips.
Basic rules for work
Do-it-yourself window siding will be done a little differently depending on the design of the window opening. As a rule, windows in our houses are made according to several standards:
For fastening siding around window openings, it is recommended to use standard metal profiles.
Important! In some cases, the use of wood - special bars is also allowed. This is done for reasons of economy. However, wooden beams will be too susceptible to elevated level humidity - to prevent this from happening, a completely dry timber is used, and a special water-repellent impregnation is also applied to it.
The process of designing a window opening begins with the installation of the starting strip. After that, serial installation is carried out, with each row carefully adjusted to the grooves already installed. If plank standard size cannot be installed in a slope, the sheet is cut to the desired dimensions.
Important! What the markup will be, you will see only during the installation process, so cutting sheets is not carried out in advance.
 Scheme of installing window profiles for siding
 After the entire area of \u200b\u200bthe slopes is sheathed, additional accessories are installed. However, these elements are completely optional - all their functions are performed by standard siding.
Sheathing works are carried out in a special way arched window opening. This will require a special elastic profile. It is fixed on nails or self-tapping screws around the perimeter of the window opening. Next, sheathing is carried out - always in compliance with the 15-cm step. Where the siding will touch the carrier profile, the most durable fastening is provided - no expansion gaps are left in the arched windows.
If the emphasis is on window openings in the design of the facade, then the trim is performed with platbands 6.2 cm wide. If the design of the slopes implies “invisibility”, then a narrow J-profile is preferred. However, you can independently choose the option that best suits you in terms of decor and price.
Features of the work - we do everything faultlessly
In order for the slopes of the siding to please you with beauty and strength, you should use fasteners correctly:
- they are not screwed tightly, so that there is a millimeter gap for the expansion of the material;
- fasteners are screwed only straight, not at an angle;
- the place of attachment of the self-tapping screw is clearly in the middle of the mounting hole (violation of this requirement will cause the fittings or panel to deform or crack).
To increase the durability of the structure, it is best to use galvanized fasteners which are immune to corrosion. Do not forget that the fastening should not be too tight.
Pay attention to our article about. Many neglect this element, but in vain, because in addition to decorative, it also carries other useful functions.
About the characteristics of window seals.
What to look for when choosing curtains for balcony door can be read on this page
The corners in the panels are cut at 45°. That part of the fittings that is adjacent is cut at an angle on one side of the docking bar, and on the other, it is wrapped. This ensures that there are no gaps when fastening. Under the window, the final bar must be mounted - this gives the whole structure additional reliability.
Finishing with siding of external window openings requires tight fitting of elements- this is important, because otherwise the structure will not be airtight and will be exposed to external adverse factors - wind, rain, snow, and so on.
Properly installed siding around windows will be very easy to maintain. You can clean it from surface contaminants with ordinary water. If there are persistent stains, then you can use a brush or rag. If these methods do not help, then you will have to use a special washing solution: trisodium phosphate with detergent in a ratio of 2: 1 per 4 liters of water.
In areas where there is often high humidity, outdoor decoration windows can get moldy. It is eliminated with 5% sodium hydrochloride diluted in 1 liter of water. Keep in mind that siding sheathing is susceptible to organic and chlorine-containing substances. Their use can significantly damage the panels - so choose your detergents with special care.
Finishing windows outside with siding video
This section presents a video tutorial on the topic of our article "How to sheathe a window with siding with your own hands." We recommend watching the video, as it contains all the details of the work. Starting from the middle of the video, you will see an example of mounting near-window profiles and platbands.
Increasingly, when carrying out repair and construction work, facade cladding with siding panels is used. This material is very convenient: it is quite simple to install and has acceptable cost. During the work, difficulties may arise in the design of door and window openings. In most cases, they are also sheathed with siding panels.
Siding
Siding is a popular material for exterior decoration of building facades. It first began to be used in America in the middle of the 19th century. To date, many of its modifications are known. Various materials that make up the panels make it possible to achieve its high strength, endurance, and resistance to sudden temperature changes.
There are several types of siding panels, depending on the composition used for manufacturing:
- Wood. The main part of it is treated wood.
- Woody. It is made from pressed and glued together wood fibers.
- Vinyl. One of the most popular types of material. Made from polyvinyl chloride. This allows you to achieve its maximum endurance and durability.
- Metal. Its main component is sheet steel. It is most often used when facing the facades of industrial buildings;
- Cement. For its manufacture, cement and cellulose fiber are used. Its distinctive feature is the inability to burn. However, during installation, many difficulties arise. This is due to the high weight of the material and its properties.
Siding Properties
Siding is the most commonly used material for exterior decoration of building facades. This is due to its main features:
- acceptable price;
- easy installation technology;
- long service life;
- resistance to external damage;
- resistance to moisture;
- resistance to temperature extremes;
- resistance to dirt and dust;
- big variety colors and material modifications.
The nuances of work
Before you start covering the window with siding panels with your own hands, you need to study the basic nuances of the work.
Installation technology depends on the type of window construction. It can be made with or without slopes.
If the window opening is made without slopes and has a lower level of recess, it is necessary to use a special siding bar. For sheathing windows with slopes, ordinary siding panels are used.
Preparatory work
How to properly clad windows with siding panels? To do this, you must first make accurate calculations of the amount of material and basic measurements.
To do this, measure each side of the window. To the results obtained, it is necessary to add 6 cm for the margin. It is necessary for the corner trimming procedure.
In order for measurements to be made most accurately, it is necessary to fix the crate around the window. Trimming of materials is carried out with an additional allowance of 5 mm.
Surface preparation
Before starting work, it is necessary to carefully prepare the work surface. It should be cleaned of the remnants of the old crate. Remove accumulated dust, dirt, paint and oil stains.
Note! There should be no cracks or crevices on the surface of the walls. They must be sealed with cement mortar or mounting foam.
The work surface must be level. It should be sanded and all protruding parts removed.
To prevent the spread of pathogenic bacteria and microorganisms, the surface is treated with a special antiseptic solution.
Required Tools
To carry out the procedure for sheathing windows with siding panels, you will need the following tools:
- a hammer;
- building level. It is necessary to control the evenness of the work performed;
- square;
- marking tools (tape measure, cord, chalk);
- ordinary hacksaw;
- hacksaw for metal;
- self-tapping screws;
- screws;
- screwdriver
Stages of work
Before sheathing a window with siding on your own, you must first study the main stages of the work:
- Surface preparation.
- Window insulation.
- Waterproofing.
- Launchpad installation.
- Window siding.
- Finishing.
Finishing Features
Sheathing windows with siding is carried out according to two main technologies. Their choice depends on the type of window construction:
- in-depth window profile with slopes;
- window with a low level of recess without slopes.
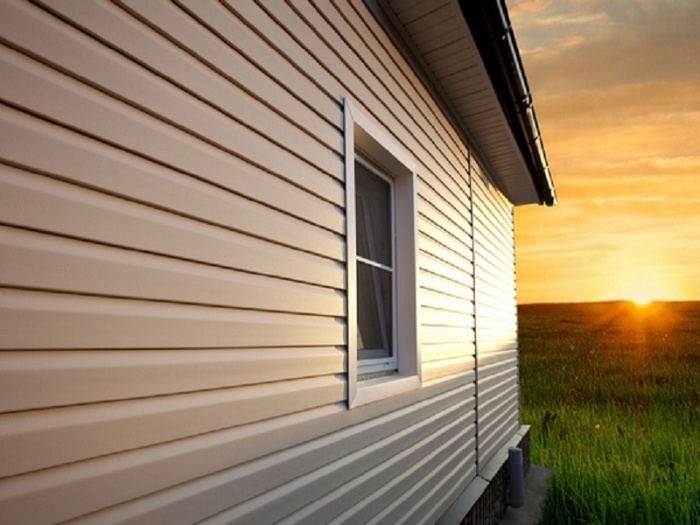
Sheathing of a window opening without slopes
Work should begin with the window insulation procedure. To do this, you can use a roll insulation. It is installed around the perimeter of the window opening. The insulation should be glued to the window surface with adhesive mastic. You can also use dowels to secure it.
If the depth of the window opening allows, full thermal insulation of the openings can be carried out. It consists of several layers:
- Insulation material.
- Air bag. Its thickness should be up to 5 cm.
- Siding panels.
Waterproofing

After completion of thermal insulation work, it is necessary to proceed with the waterproofing procedure. To do this, you need to install a special protective apron. It will protect the window from the penetration of rain and snow.
To work, you will need the following tools:
- Foil. You can also use galvanized iron.
- Silicone sealant.
- Dowels or nails.
- Aluminum tape.
- Perforator.
- A hammer.

Waterproofing a window opening is carried out in several stages:
- The installation of the apron should begin from the bottom of the window. To do this, apply a layer of silicone sealant.
- Then the installation and fixing of the material is carried out.
- After completing the installation in the lower part of the window, it is necessary to proceed to the sheathing of the right and left sides of the window opening. To do this, the surface is also treated with a layer of mastic, then a sheet of material is installed and fixed.
- Lastly, the upper part of the opening is sheathed.
- After completing the installation of the apron, it is necessary to strengthen the upper part. For this purpose, it is glued with aluminum tape.
Sheathing options
Sheathing window siding without slopes is carried out in the following ways:
- sheathing with siding boards;
- way of working "overlap";
- corner method.
The installation process of each of them should be considered separately.
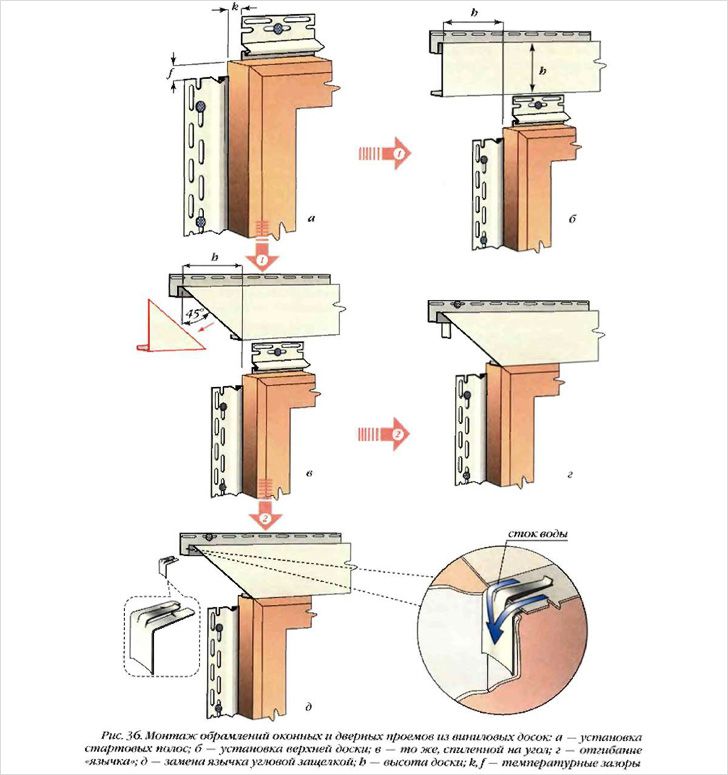
Window siding boards
Stages of work:
- The installation process should begin with the installation of the central corner profile. It can be plastic or metal. In some cases, you can use the J rail.
- Rail preparation. Corner cuts should be made on the top rail. This is necessary to ensure the flow of water.
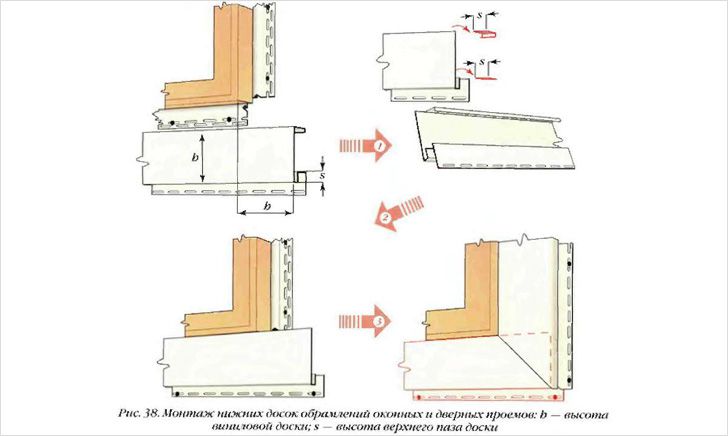
- The siding board is fixed on the central corner profile. To make joints on the bottom and top boards, it is necessary to cut corners of 45 °.
- Fixing boards with a joining profile.
- Ebb installation for sewage on the bottom board.
- Installation of plugs on the side profiles.
Work "overlap"
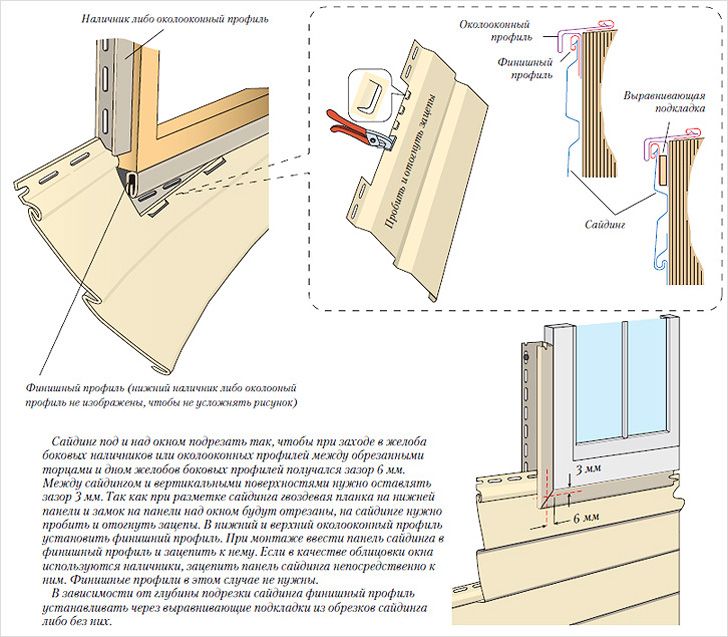
Sheathing is carried out using siding J rails. They should be selected and cut to the size of the window profile.
- Installation and fixing of the upper profile. Installation of a hole for draining wastewater. To do this, it is necessary to make an incision on the profile and bend it.
- Installation of side profiles. They must be connected to the bent upper profile.
- It is worth remembering that there should be an empty space of about 5 mm between the side and top profiles.
- Installation of the lower profile. It is also necessary to maintain an empty space between it and the side profiles of approximately 3 mm.
- Installation of siding strips.
Way of working "on the corner"
- Installation of the upper fixing profile. Its ends must be cut at an angle of 45 °.
- Installation of side profiles. They are cut from the bottom. A gap of 3–5 mm is established between the profiles.
- The lower profile is installed without gaps.
- Installation of siding panels.
The process of sheathing windows with slopes
feature of this type windows is its in-depth location. Here they can accumulate wastewater. To eliminate this, it is necessary to mount the ebb structure in the lower profile. The drain is cut to the required length. Along the edges it is necessary to install a border that prevents the penetration of water into the profile. To do this, the structure should be bent from the edge.
Note! It is worth remembering that the drainage should have a small protrusion from the wall. The best option is to mount the device with a protrusion of 5 to 10 cm, depending on the size of the window.
The drainage is attached to the window surface with mounting foam and fixed with screwdrivers. The structure should be located at a slight angle. This will help drain the water.
To prevent the structure from skewing, it is necessary to install a load on the drainage system for the period of drying of the mounting foam.
After installing the ebb, you can go directly to the finishing procedure. To do this, it is necessary to install finishing strips around the perimeter of the window. If it is not possible to fix them (for example, when working on metal profiles using body kits), then you can attach corners mounted from start profile and fix the finishing strips on them.
Installation and fixing of the upper slope. To do this, you can take a profile or a thin siding panel. An overlap of 5 cm must be made on the side wall.
Installation of side slopes. They should be brought to the top profile. To carry out the joining of profiles, the slopes should be cut at an angle of 45 °. The lower end of the side slope can be connected to the drainage or installed below its level.
After completion of work, the joints should be treated with a layer of sealant.
Finishing windows with siding is an excellent solution for obtaining an aesthetic window opening. At observance of the specified recommendations of work the siding profile will serve some tens of years.
Video
You can learn more about the technology of window sheathing from the following video:
Scheme