
Building a garage from metal structures requires relatively small financial costs. And most importantly - the owner of the car can perform such an operation with his own hands, providing the "iron friend" with an excellent home.
1
Modern building materials make it possible to build motorhomes of any size and level of complexity. Garages are built from cinder blocks and bricks, metal and wood, they are temporary and stationary, monolithic and collapsible. Each owner of the car can decide for himself which storage room for the vehicle suits him best. If you are planning to build a garage with your own hands with minimal money, we recommend that you pay attention to pre-fabricated metal structures.
Bonnet doors or lift doors are the most ideal for use in small houses, since it does not require an open area, which saves space and guarantees day in and day out. In addition, swing doors can be automated, making them even more ideal for garage doors.
For those who have the required side space, usually close to a wall, a sliding garage door is a very effective and easy solution to use. In addition, sliding gates can be used both manually and automatically, the opening mechanism in such cases is easily adapted.
Steel structure garage
Such car hangars are built from profile pipe, which performs the function of a solid frame, and corrugated board or thin sheets of steel (the walls and roof of the building are sheathed with them). Garages made of metal structures are characterized by the following advantages:
- Long service life. Subject to the technology of erecting such a structure, it will serve you up to 50-70 years.
- The possibility of building a garage with the desired geometric parameters and architectural features. It is easy to develop a project for a motorhome on your own. And with a complete lack of design skills, drawings for building a garage from metal structures can be found on the Internet.
- High installation speed. A home craftsman with minimal building skills will spend no more than a month building a metal motorhome (if desired, the work time can be halved).
- High strength and reliability of construction, provided by the special properties of the metal and fasteners used for assembly.
We add that the metal storage room for the machine is built by hand without the use of special equipment. This is of great importance to many home craftsmen.
The wood used in the construction of the gate offers opportunities in regards to adopting more rustic and rural styles. With the help of trained professionals, beautiful and innovative designs can be achieved, bringing a unique style to your residence and delivering everything you need to choose your garage door.
The double leaf shutter consists of the conventional aperture method, where the shutter requires the arc to be in or out of it. The advantage of this type of gate is its simplicity, however, if placed incorrectly, it can lead to uncomfortable results. The tip should always hold the hole to save space in the room.
2
A metal frame garage is considered a lightweight structure. For this reason, the base under it may be the simplest. If the soil on the site where the motorhome is planned to be built does not have any problems (there are no subsidences and soil shifts), it is allowed to equip the elementary. During its construction, you only need to install supports from a profile pipe at the corners of the structure. The length of such columns should be equal to the height of the wall surfaces of the garage being built. After arranging the foundation, you have to sheathe the support pipes with a profiled sheet and get at your disposal an excellent motorhome.
Garage Door Selection Tips
In addition to representing a significant part of its façade, the gate also requires a significant amount of space to open it and therefore, evaluating the space required or the space available for installation is important when choosing a good gate. On the market, you can buy garage doors in two ways, ready-made directly from the factory or made specifically for the order. The advantage of a prefabricated gate is the more affordable price given that in the tailgate it adds to the labor cost for the project. However, with a custom gate, you will have more creative freedom to choose your garage door style. Another important factor when choosing the best garage doors for your property is the installation of quality material and very well suited for the function. Iron, wood, and aluminum are the most common materials used in this feature, each with their own specific features and benefits that should be evaluated by a qualified professional looking for the best one for your garage door. The choice between a closed garage door or an open garage door can affect your life. different ways and therefore is a slightly more difficult choice than it looks. If you don't give up on any of these concepts, the recommended option is a project that guarantees them in a complementary way. The type of opening makes a difference in choosing a garage door as they cooperate with factors such as space enhancement, daily conveniences and even gate functionality. For example, a garage door will require extra space to open, but an arched opening gate will not. the best choice for places with little space. Garage door automation. And one last element to consider when choosing a garage door is automating it to guarantee comfort, practicality and convenience for the locals. Openness and automation must be considered together because the systems are complementary. Did you know that a wooden pergola or pergola is high in decoration?
Laying the foundation for a garage
notice, that columnar bases suitable for garages that are not planned to be used for too long. If necessary, such a frame car hangar made of pipes and profiled sheets is easily dismantled, disassembled by hand and transported to a new location. In cases where the construction of a garage is carried out for centuries, the issue of arranging the foundation for it must be approached more responsibly. Professionals advise to build it in the form of a concrete monolithic slab, taking into account the following requirements:
Video: garage insulation with sprayed polyurethane foam
Pergolas are decorative structures made with parallel beams supported on columns. These structures usually support plants or create a more inviting space for relaxation. Parts of this collection are inspired by the coexistence of past and present intertwined in New York Village. A consists of tiles for use on floors and walls. A compact solution with a multi-color option, in addition, which allows you to create compositions with all the tones of the map.
- the surface of the foundation is made strictly horizontal and perfectly flat;
- the upper part of the base should protrude 20-25 centimeters above the ground surface (in this case, water will not get under the building during precipitation;
- reinforcing bars or sections of a profile pipe must be mounted at the corners of the base for the garage (they must be well concreted so that they can withstand the weight of the metal structures with which the hangar for the car will be sheathed).
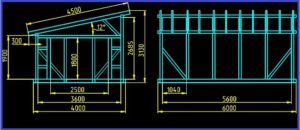
The site for arranging the foundation should be cleared of tree roots in advance, leveled by backfilling and compacting gravel. After that, you need to mark up the future building using reinforcing pegs and twine. A metal frame garage for one car usually has standard sizes- 3.5 x 6 m. You can focus on these parameters when marking the foundation. If you subsequently insulate the caravan, add 20 cm to the planned dimensions of the building. L extra centimeters will be needed for laying and fastening heat-insulating material . It is advisable to fill the base for the car hangar entirely in one go. Then you will have a solid monolithic slab. When it hardens, be sure to lay sheets of roofing material on it (they will play the role of excellent waterproofing), and process the joints between them with bitumen-based mastic.
What is worth disassembling and assembling a garage with your own hands, the secrets of collapsible structures
With various forms between parts and parts, they can be applied to the floor and walls of the pergolado and still act as a complement to decorate niches and furniture. Shades that vary depending on the origin of the clay, sometimes intense, with orange hues, sometimes soft beige or even almost white, are one of the characteristics that stand out in this material.
From the hands of designers come proposals made for individuals. The very complex resources of relief, design and composition between the pieces make this line a high-tech version of the English tradition. Ideal for outdoor areas and more rustic environments such as pergolas. How about breakfast in these wooden bundles?
Do not forget to concrete the pieces of the profile pipe at the corners of the poured base. Without them, building a frame garage will be problematic.
3
It is best to assemble the garage skeleton from metal structures with your own hands directly at the construction site of the motorhome. The sequence of assembling a frame from a pipe (profile) is as follows:
Before building a wooden gazebo
For outdoor use, care should be taken not to leave the pergola posts touching the floor. It is recommended to run on concrete or fix it with metal joints. Thus, the wood is protected. Speaking of wood, it's important that it gets a sealer or varnish to provide protection and greater durability.
When a wooden gazebo is covered, it must comply with a minimum 5% glass or polycarbonate finish. It is also necessary to pay attention to the support of this coating so that rainwater does not form puddles. Hiring a professional is ideal, as the size and location of the gazebo should be considered with care. In addition to integrating with the architecture, so that it does not have the character of a little.
- Weld the lower frame (it is often called a strapping), and then fasten the structure made to the segments of the profile pipe protruding from the concrete base. Pieces of reinforcement must remain inside the future garage.
- At the corners of the lower frame, weld supports (vertical).
- In front of the structure, mount two more supports. They will serve as the door jambs of the car hangar.
- The supports fixed in the upper part of the frame are connected into one structure with a second frame.
For more support for the pergola, it is still possible to build concrete beams and cover them. decorative effect similar to natural wood, but the structure will be much stronger and more stable. You will not find numerous lines of porcelain tiles that reproduce all the beauty and liveliness of wood. And then, ready to take advantage of the warmth and sophistication wooden gazebo in your garden?
Architectural design is strictly a specialization of a standardized technical design focused on the execution and presentation of architectural designs. However, in a broader perspective, architectural design can be viewed as the entire set of graphic records created by architects or other professionals during or without architectural design. Thus, architectural design appears as a code for a language established between sender and receiver. For this reason, this type of drawing is often an important discipline in the early periods of architecture departments. It also tends to be its own profession, with technical developers common in project offices. With the Industrial Revolution, machine designs began to demand greater rigor and precision, and so the various designers now needed a common means of communication, and with such efficiency that they avoided blunders in the execution of their products. Despite this, until now there was no systematized knowledge of descriptive geometry, which made the process more free and without any standardization. For this reason, the technical design at that time was considered a technological resource necessary for economic and industrial development. The graphical representation of the design itself complies with the international standard. To ensure that the reality of the project is well represented, the various tools available in traditional drawing, Euclidean geometry and descriptive geometry are used. Basically, architectural design manifests itself mainly through lines and filled surfaces. Two objects are usually distinguished: one is the drawing itself, and the other is a set of symbols, signs, measurements and texts that complement it. The main categories of architectural design are: plants, sections and cuts and heights. Line masses and categories Usually the line hierarchy is derived from the diameter of the pen used to draw it. Used to represent elements just before the cutting line. Thick Line - Pen 6. Used to represent special features such as cutting lines. These indications can be made using the following conventions: obs. In addition to a thicker line, these elements are usually filled with a specific hatch. Each material is represented by a different hatch. The sheets must meet the same standards as the technical drawing. This is usually due to the fact that any sheet obtained from the module can be folded and installed into a folder of this size, usually required by government design approval agencies. It is recommended to use the edge marker in the lower right corner. This placement is necessary to ensure good visibility when archiving drawings. Due to widespread diffusion computer design the list of materials traditionally used to carry out architectural projects is becoming increasingly outdated. However, some of these materials are still used to test some problems with printed designs or in the training of future technical designers. It is noteworthy, however, that many of these materials are becoming rare in architectural firms given their computerization. Drawing board. Tools for drawing straight and perpendicular lines to be used in conjunction with a couple of squares. A pair of squares. Elements that help draw lines with pre-drawn angles such as 30º, 45º, 60º and 90º. Scaler. A special type of ruler, usually with a triangular section, with which various scales can be measured. Pencils or pencils. Suitable for desired thickness. ink pens. Making the final drawing. Kill the cat. A tool that helps to use rubber in certain places in a drawing. Rubber. It can be general or electric. A set of normographic and calligraphic rules. Helps to write standardized text blocks with technical calligraphy. Blade and sandblasting. They allow you to correct erroneous drawings applied to the ink. Templates. Small plastic plates that have molded features pre-drawn to aid their layout, such as sanitary wares, circles, etc. French curve. A special type of jig consisting only of curves. Typically, the complexity and amount of information in a drawing will vary depending on the design stage. Preliminary research. The client must communicate the goals he intends to achieve with his design, provide a program or list of needs, establish the time he will spend on construction and the maximum cost of the work. Problems and solutions arise in the client-engineer dialogue. At the same time, the engineer will do his research and notes to guide his first ideas. From location land plot a preliminary consultation is held at the mayor's office, which is a mandatory document for project approval. Shortly thereafter, the project is formed in sketches. The preliminary study, which includes an analysis of the various design constraints, is usually implemented in a series of sketches and sketches that do not have to follow traditional architectural design rules. A draft will appear from the last sketch. At this stage, when the various characteristics of the project have already been defined, the design already covers more than high level rigor and detail. However, it is generally not required to report very large or very difficult amounts of structural detail. After discussing the project with the client and making the necessary changes, the project is part of the final design, which corresponds to a set of drawings that is sent to the state building inspection authorities. For this reason, it has its own submission rules, which vary from city to city. This stage corresponds to the drawing of the drawings that are sent to the work, and, therefore, the most processed. All details of the building must be designed with a level of complexity appropriate to the structure. The complete construction must be accompanied structural details and material specifications. With these data, a material budget is prepared, as well as additional projects such as: structural, electrical, telephone, hydrosanitary, fire fighting and other projects. All of these designs, called originals, come to the design as copies, usually made from heliographic paper or sulfite. Place all required dimensions for each floor, roof, building to be assembled, modified or enlarged. Permanent project quotas should be written in clear and legible characters. Indicate where the longitudinal and transverse cuts are and the direction of observation by placing letters or numbers corresponding to the cuts. You can create unique design with location and coverage plan. The rental plan is not limited to the house or building. To find a job, you must specify the exact location that the site will occupy. To do this, it is necessary to obtain all the data characterizing the landscape, the city hall, its dimensions, deviations from all the main elements, the reentrant, districts and wells, in addition to all the elements that exist on the border walk; It must show walls, gates, poles, existing or planted trees, pavement or pavement, and, if necessary, neighboring buildings. An object can be clearly represented by a single view or projection. Others will be much better represented by three projections or presentations. There will be houses or objects that will only be identified using more views. In the large half of the court, it is obligatory to present at least one façade. In the case of a corner lot, the presentation of at least two facades with a corresponding indication of the materials used is mandatory. Note. Descriptive geometry orthogonal projections are used in architectural drawing only by changing technical terms. In contrast to the cut, the facade is the details of doors and windows with a thin trace. Next, the location of the four facades of the building associated with the plan. Note the application of the convention for traces on facades. The parts closest to the observer are drawn with a thick line. If we draw a view of a building located in a vertical plane, we will have a demonstrative design of various heights of window sills, windows, doors, shipyards and thicknesses of floor slabs, cladding, cover details and foundations. A vertical section cuts the building from its base to its roof, as shown in the figure: almost always one section is not enough to show all the details of the interior of the building, requiring at least two cuts. It is always necessary to pass one of the cuts through one of the tiled compartments, the walls of which are covered with tiles. We indicate sections in plants with thick strokes, interrupted by dots and ending with arrows indicating the position of the observer relative to the section plane. We mark abbreviations in capital letters. Sectional walls should be presented as they appear on plants. Presentation and indication of lining. Only the specified batch is listed. The design of the object is considered two-dimensionally, i.e. in projections onto two orthogonal vertical planes. At least two incisions are made, passing mainly where it provides more detailed information contractor of the work or additional projects. If there are existing buildings, also indicate the relevant area with the corresponding approval protocol number. These are the numbers corresponding to the measurements. The dimensions must be written horizontally so that they can be read with the drawing in the normal position by placing the reader on the right side of the board. Both call lines and dimension lines are drawn using thin continuous tracing. Call lines should, in principle, be perpendicular to the element to be specified, but in exceptional cases there may be convenience in which they are designed obliquely, with preference being given to 60 or 75; Dimension lines should not be written too close to the contour lines, depending on the distance at which the drawing dimensions are located and the size of the dimension numbers. Angles will be measured in degrees, except for pavements and ramps, which are in percentages. Parallel dimension lines must be equally spaced. Place guide lines, preferably outside the figure. All required dimensions will be listed. Quotas take precedence over the measures calculated on the drawing. The dimensions of the drawing must be expressed in the same unit. The height of the figures even in the same drawing. Usually used 5 to 3 mm. In case of discrepancy between sizes different designs the drawing scale quota prevails on a larger scale. In these cases, we use reduction scales; When we need to get larger graphic images than objects, we use magnification scales. In architectural design, only reduction scales are used, except in detail where the actual scale sometimes appears. The choice of scale should be: The size of the object to be represented. To solve scale issues, the measurements must be in the same block. What is the true measure of a window? The building, 50 m wide by 15 m wide, was designed to be 12.5 cm high and 3.75 cm wide. What is the scale of the drawing? 6. The refrigerator truck is 1.50m high and 0.60m wide was designed with 15cm and 10cm respectively. What is the consequence of this? Now correctly draw the refrigerator on a scale of 1:8. Architectural design, because it is done on a small scale and because it covers relatively large areas, must use graphic characters. On exterior walls, 20 cm thick walls are recommended, but not required. However, 20 cm thick walls must be used if located between two neighbors. Recommended for continuous solid marks on high walls and for walls at half height with a continuous medium indicating the appropriate height. Internal port. Usually the relationship between two environments is no different from the level, that is, they are in the same plane or they have the same quota. external port. The connection between the two media has different sizes, i.e. outer floor below. For this reason, the doors of the toilets are pulled, as if the outer doors. For windows where the horizontal plane does not cut it, the representation is done with hidden lines. The choice of coating solution determines the balance in the set, saving material and labor. With regard to the building system, it is classified as: covering with supported elements - tiles and the like; Covered with structured elements - slabs. Depending on the shape of the coating, they can have: only one slope, two, three, four; polygonal shape; Special shape. Additional information on coatings should be obtained from manufacturer's catalogues. Cover elements are based on wood, reinforced concrete, aluminum or concrete structures. We have parts 1 and 2 working in compression and parts 3 and 4 working in clutch. The forces that act on each part of the scissors can be determined using the Cremona diagram and Euler's formula. Wind pressure, given the direction of a slope of 10° with respect to the horizontal, can be allowed as an additional load on a constant load, which is allowed for small slopes, and since the roof waters in the cases of French and colonial tiles have slight slopes. The roof of a gable roof has two gables or odes, i.e. a supporting surface at the end of the roof and forming part of the façade. When designing a roof, we must remember some rules of thumb: Attics form 45-degree corners with wall ledges and leave interior corners. Similarly, in the figure below we have an irregular cover where the bisectors of the horizontal angles are the five spikes of the roof. The floor is the horizontal part of the step. The mirror is the vertical part of the step, perpendicular to the floor. Blondell, a French architect, created an empirical formula that allows you to calculate the width of the floor depending on the height of the mirror and vice versa. Code of Buildings and Regulations of the Municipality of Montes Claros. In stair structures, it is necessary to check a clear margin. This is the distance, measured vertically, between the step floor and the ceiling. That is, an intermediate slab between one floor and another. Its dimensions depend on the development of the stairs and therefore on the right side of the building. It should be well lit with direct light from the outside through vertical windows. Upper floor Lower floor 2, 20 Schematic plan No scale below and always indicate at the factory with an arrow the direction of going up the stairs. Also present in the floor plan is a staircase of only four or five steps with a full footprint, as the plant is obtained by a section made about one meter from the floor. The steps above the section should be broken. An inclined surface that forms a vertical circulation element inside or outside the building. However, replacing the traditional staircase requires much more space for its development. For pedestrians, its maximum allowable slope is 15%. Larger slopes are possible when accessing the garages. Ramps according to their inclination are divided into: Ramps with a slight slope, up to 6º, which do not require a special anti-slip floor; Medium sloping ramps from 6º to 12º that require a rough floor that prevents slipping; Inclined ramps from 12º to 25º that require a floor with cross arms or subdivision of the ramp plane in wide slopes. The separation between the transverse shoulders must be constant along the ramp and equal to the length of the normal stride. To design an elevator shaft and engine rooms, it is first necessary to determine the power and speed of the elevators. Lift suppliers should also be consulted. For physical handicap access to the floor of the first floor, which is at a level of 20 m in relation to the street with a slope of 10%. For car access to the lower floor, which is at a level of -40 m with respect to the street with a slope of 20%. The answer to this question: From the first floor to the 1st floor Number of steps: Mirror step: Floor step: From 1st to 2nd floor Number of steps: Mirror step: Floor step: 3rd. This is the space in which the pavement type will be designed. These openings must be equipped with shutters or air intakes. In dormitories, the use of translucent material will not be allowed, since this compartment must be provided with both shade and ventilation. The areas of these openings should be proportional to the areas of the compartments that should be lit and ventilated, and vary depending on the purpose of the premises. The minimization of the fractions representing the relationship between the floor areas and the squares we will present is minimal. Therefore, whenever affordability is available, spans should have the largest possible areas. Similarly, points that are more than 2 times the value of the right leg when it opens in a closed area, and two and a half times for other cases, will not be considered illuminated and ventilated. - Windows should, if possible, be located in the center of the walls in order to balance the internal composition. - If there is more than one window on the same wall, the recommended distance between them should be less than or equal to 1/4 of the window width so that the lighting becomes uniform. - With tall windows, you can lighten the parts farthest from the opening. - Lighting and ventilation through skylights is allowed in compartments intended for stairs, sheds, pantry, workshop and warehouse, provided that the effective area of lighting and ventilation is half total area corps. - When the illumination of a compartment is checked on only one of its sides, there shall be no wall fabric on the front side whose width is greater than 2.5 times the width of the aperture or the sum of the holes. - Stairs should be lit on each floor with windows or stained glass as high as possible and may be partially fixed. - Well-lit workshops usually have tall, low-height windows and tall, studded windows. Dictionary of Brazilian Architecture. So your understanding assumes a certain level of learning. . Do you want to sell your apartment or house?
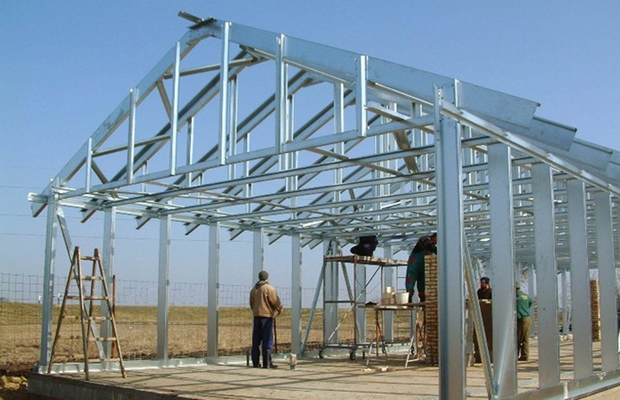
Frame for the future garage
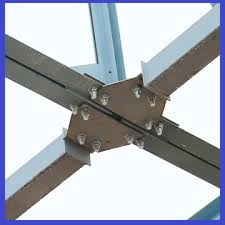
The connection of metal pipes and other elements of the created frame is carried out using high-strength bolts. To increase the strength of the garage from pipes, intermediate supports should be mounted along the walls of the building. They are installed at the same distance from each other. Pipes are fastened by welding. The next step is the formation of the supporting parts of the roof of the motorhome, which you are building with your own hands. The roof of the garage from pipes is made single-pitched or double-pitched. The choice of a particular design depends on your preferences.
In the first case, you need to bring the supports of the front of the building a little higher than the rest of the support pipes, thereby ensuring the slope of the garage ceiling towards its back wall. With construction gable roof with your own hands you will have to tinker longer. You will need to first weld the triangular truss structures, and then fix them to the top trim of the building using rivets or bolts. The construction of a standard frame motorhome is usually made of square pipes. Their optimal size is 10x10 cm (frames and main supports) and 6x6 cm (intermediate racks). It is also allowed to use a profile pipe with a rectangular section.
4
The outer skin of the frame hangar is made with corrugated board or sheet steel with a thickness of 1.2-1.8 mm. In the latter case, both ordinary steel sheets and galvanized ones can be used. Products with anti-corrosion zinc coating are characterized by good weather resistance. It is clear that the construction of them will be more durable.
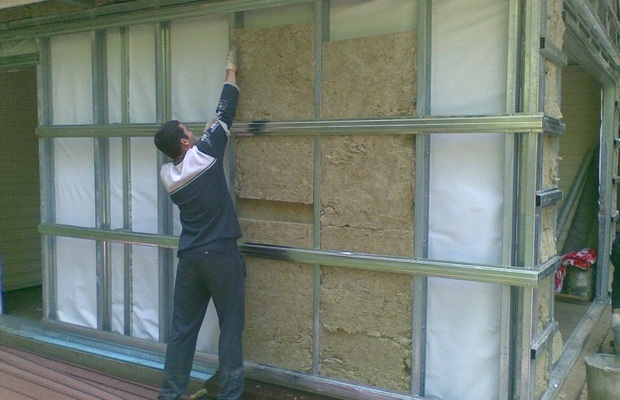
Garage wall insulation
It is easier to sheathe a garage with profiled sheets with your own hands. They are attached to the frame with metal screws, bolts with nuts or welding. The choice of mounting technology is yours. If you use self-tapping screws (this is exactly what many self-taught craftsmen do), make sure that the fasteners enter the profiled sheets clearly perpendicularly. Sheathing and wall insulation is performed as follows:
- Mount the first profiled sheet on the corner of the structure. Draw a second panel butt with it, then a third, a fourth, and so on.
- Places of butt joints of sheets are treated from the inside with mounting foam.
- Paste with a vapor barrier (you can use Megaizol, Alufom or any other material) the inside of the skin.
- You make a crate inside the caravan, using drywall and aluminum slats, place the selected insulation in the created structure (expanded polystyrene,.
- Paste the surface of the heat-insulating material with another layer of vapor barrier.
Now you can clad the walls with any suitable material, for example, clapboard. If the garage that you built with your own hands will be used exclusively in the warm season (perhaps you are building it in a country house where you do not visit in winter), it is not necessary to insulate the building. With the constant operation of a car hangar from a profile pipe and profiled sheets, laying thermal insulation is a mandatory procedure. Otherwise, it will be cold and damp in your garage with the onset of cold weather.
Gates for a homemade metal motorhome are recommended to be made from 4-5 mm thick steel sheets. Thinner products are undesirable. Gates are usually made swinging (double). Last tip. Painting a steel garage is best done acrylic paints. They perfectly protect pipes and corrugated sheets from corrosion and do not fade.
If you regularly leave the car in the parking lot, regardless of the time of year, this will reduce the operational life of its body. Being exposed to negative weather factors, the paintwork on its surface will begin to crack and moisture penetrating the metal through the cracks will begin the oxidation process. To avoid this, you need, at a minimum, to build a metal garage with your own hands. Unlike its brick counterpart, it is built many times faster and its cost is low. In addition, at any time it can be transported using special equipment to another place, if it becomes possible to install it closer to home or in case of relocation to another area.
How to build a metal garage with your own hands
Any building made of metal must have a foundation and a frame. Therefore, in order to build do-it-yourself metal garage, you will need drawings to know what foundation to make, what materials to make the frame and, in fact, the skin. It should immediately be said that due to the low weight of such iron buildings it will be enough strip foundation along the perimeter buried in the ground by only 20-25 centimeters. If you make it a solid slab, then it will also act as a subfloor inside. In both cases, it is necessary that the foundation rises 15-20 centimeters above the ground level, this will prevent water from entering during precipitation and spring snowmelt. 
When thinking about building a metal garage with your own hands, you should choose projects in which
it is planned to use a corner with a section of at least 50x50 for the manufacture of the frame. Products with a smaller cross section will reduce the strength qualities of the structure as a whole. First you need to make the bottom frame and weld it to the corner pins, which were used as mounting metal tabs in the foundation structure. Now that the bottom frame is securely fastened to the concrete base, the frame can be built. There are two mounting methods:
Considering that such a garage can be transported using special equipment, it is better to choose welding for connecting iron parts. First, vertical corners and posts for future gates are installed, and then horizontal corners and the upper frame are attached.
Wall construction
After completing the frame, you can proceed to the sheathing, for which stamped sheets or 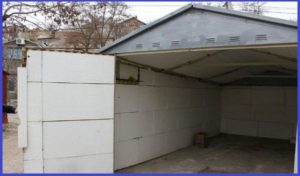 corrugated board. Sheets can be either ordinary or galvanized, and their thickness must be at least 1.2 mm. If a welding machine was originally used, then the sheets should also be fastened by welding. As for the entrance gate, you can install any: from hinged to automatic. However, the most popular are swing because of the ease of manufacture. You can make them right on the spot, first making a frame and then sheathing with metal.
Knowing how to make a metal garage with your own hands, not everyone thinks about its insulation. ![]() However, this technical nuance should not be overlooked, since when the ambient temperature changes, condensation will appear on the iron walls. The easiest way to insulate is to finish the internal walls with foam boards. Their installation is very simple, since the material is easily glued to the walls, but given that it is combustible, it is better to give preference mineral wool. Its installation requires more time and materials, since it is required to cover this insulation with additional sheet material, such as OSB or MDF. It will be more expensive, but much safer, and due to the absence of condensation, the garage will last much longer.
However, this technical nuance should not be overlooked, since when the ambient temperature changes, condensation will appear on the iron walls. The easiest way to insulate is to finish the internal walls with foam boards. Their installation is very simple, since the material is easily glued to the walls, but given that it is combustible, it is better to give preference mineral wool. Its installation requires more time and materials, since it is required to cover this insulation with additional sheet material, such as OSB or MDF. It will be more expensive, but much safer, and due to the absence of condensation, the garage will last much longer.


