
Proper insulation of the attic of a private house will allow you to use this room as a living space. In addition, cold air will not enter the lower tiers through the ceiling, which will significantly reduce energy costs. Next, consider the main canons of this procedure.
Thermal insulation of the attic of a private house with the help of backfill materials is the most ancient method. Since ancient times, sawdust has been used as a heater, contributing to a good preservation of a comfortable temperature in the room. Until now, this technology finds its application, because it is implemented by hand without problems. We will talk about it and other options below.
Backfill insulation is used mainly for floors of interfloor ceilings. Of course, it is possible to use them for thermal insulation of the ceiling, but such a procedure will be difficult, because it will be necessary to build a frame. Therefore, it is better to use this category of materials for their intended purpose.
Before starting the main work, you will need to prepare the surface, namely:
- Remove old floors (if any).
- Clear everything from debris and dirt.
- Create a crate. To do this, you can use bars 4 × 4 in size. They should be placed in increments of no more than 50 cm for the floor, and within 1 m for other parts.
"Grandfather's method" - sawdust
Let's start with the most ancient insulation - sawdust. This material has a lot of disadvantages - low moisture resistance, poor thermal conductivity, etc. However, even today people insulate attics with it. The reason is simple - it's the cheapest (sometimes even free) option. This method can be safely recommended for residents of the southern regions, where there are no frosts. For such a climate, there is no need for high-quality insulation of floors.
Tip: sawdust can be taken for free (or for a symbolic price) at any large sawmill.
Thermal insulation with sawdust is carried out in the following sequence:
- We make a thorough revision of the floors for the presence of cracks and cracks. To prevent cold air from entering the main room through the attic, they must be sealed. Previously, clay was used for this, but today you can use more advanced compounds: sealant, cement-sand mortar, etc.
Important! If the gaps between the floors are more than 2 cm, it is required to re-lay the boards.
- Then we sprinkle the entire space with slaked lime with carbide. There are several functions of this layer, but one of the main ones is protection from mice. It's no secret that rodents appear in many private houses (especially in attics). However, this composition will effectively scare them away.
- Now we fill the niche with sawdust - they must be dry and without debris. The recommended layer thickness is 20 cm.
- Then it is necessary to process sawdust so that they cease to be combustible: we spill it with slag mining, or we process it with flame retardants.
- We close the logs of the attic with boards or plywood.
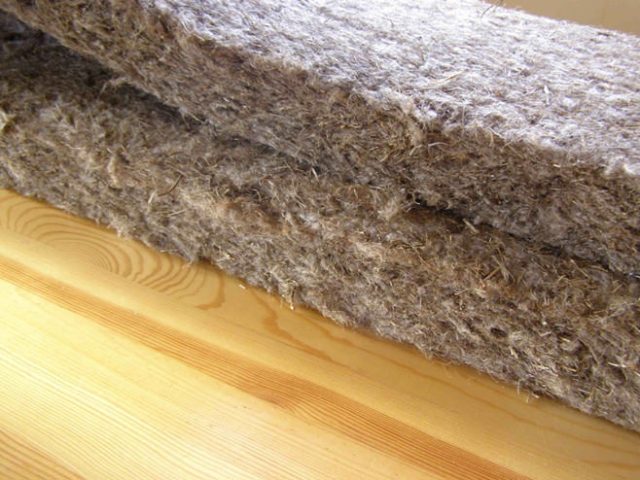
Linen
This is another insulation from the old days. However, now you can find improved analogues that have many advantages:
- Ecological cleanliness - only natural ingredients are used in its production. Working with your own hands, a person does not risk getting skin irritation (unlike using, for example, glass wool).
- High efficiency. Excellent technical characteristics make it possible to make the house as protected from the penetration of cold air as possible.
- Easy to use.
- Variety of forms - factors. Flax is not only loose, but also in the form of rolls or slabs. This allows you to use it to finish the house from all sides (floor, ceiling, walls).
The process of attic insulation with flax is practically no different from the use of sawdust. The only difference is that the prepared surface must be covered with kraft paper. Such a measure will increase performance and protect against the influence of natural factors (mold, fungus, etc.). If you do not intend to completely insulate the roof, then you will need to close the logs with a vapor barrier layer (for example, a membrane). For fastening, we use liquid nails glue or a construction stapler.
The most effective technique - expanded clay
Above were considered budget options that can be recommended only for residents of warm regions. To reliably protect the attic of a house in areas with a harsh Russian climate, it is necessary to use better and effective methods. Among backfill materials, expanded clay is the best. This is a porous material that is obtained by firing clay (or its shale). It is lightweight and has an oval shape. Regarding the form of release, fractions are distinguished: 5-10 sand, 10-20 crushed stone, 20-40 gravel.
Important! Expanded clay implies the use of a screed, which promises a significant weighting of the structure. Therefore, this technology can be used only if the floors are strong enough.
Expanded clay is laid as follows:
- Align the rough base (if necessary). Height differences of more than 1 cm are not allowed.
- We lay the film, of any thickness, the main thing is that there are no holes.
- Pour a pillow (no more than 10 mm) of gravel.
- We scatter expanded clay over the entire area and level it. It is very important to achieve uniformity. For convenience, you can use a laser level.
- To avoid shifts of expanded clay to the side when pouring the mixture, first pour the liquid solution.
- If you are going to use the attic as a full-fledged living space in the house, it is necessary to provide additional strength to the screed using a reinforcing mesh. We lay it on a liquid solution.
- We install beacons to determine the evenness of the future coverage.
- Pour a thick solution and level it with a rule. Our coating will be ready for full operation in 7-10 days. Until this time, it is undesirable to bring any heavy objects into the room.
The described technique is the most effective in its class. However, it is characterized by impressive spending. In addition, a serious load is created on the floors ( wooden houses may not be able to handle it). Therefore, it should be used only if the attic is planned to be used as a living space.

We analyze roll and tile options
This type of material can be used to decorate the house from all sides. However, we will consider the roof (in our case, the ceiling) and walls. Preparation of the rough surface is the same as for the floor. That is, it is necessary to remove old materials, clean and create guides.
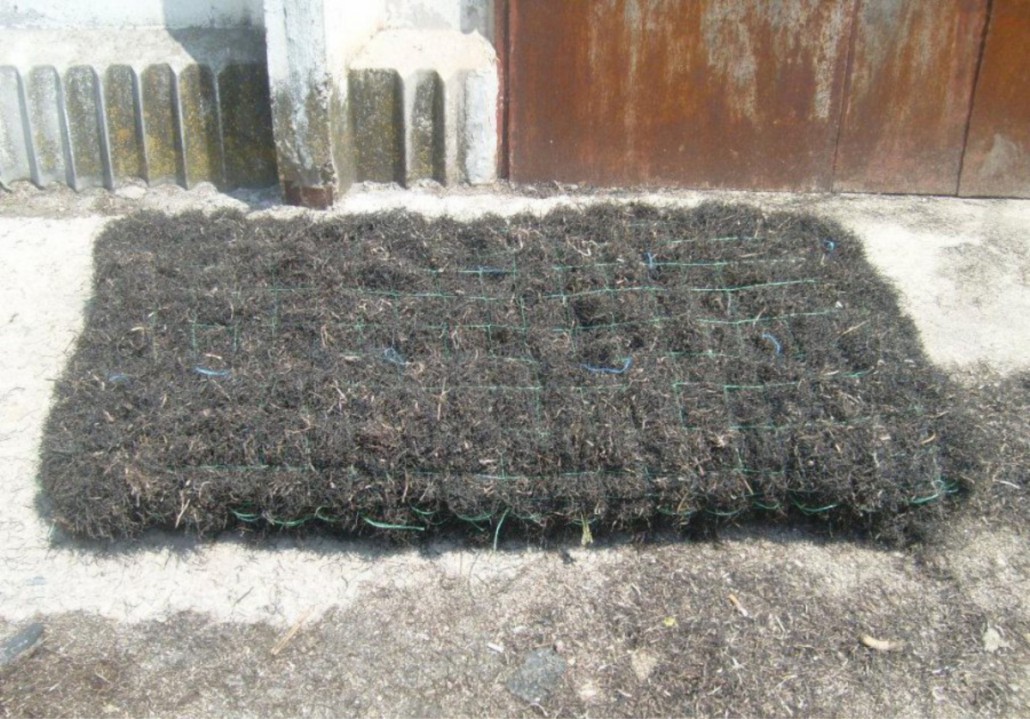
For lovers of environmental friendliness - ladders made of algae
This is a unique material, because it is the most environmentally friendly in its segment. Due to the presence of iodine, mice do not start in it. In addition, it is not subject to biological factors (mold, fungus, etc.) and does not rot. In terms of their performance, the ladders are not inferior to their synthetic "brothers" in anything. They are not afraid of water at all, so there is no need to create a moisture protective layer. Installation is carried out in the following sequence:
- We evaluate the ceiling and walls (if any) for the presence of cracks and close them up. If they are small, we use sealant or similar materials. In more serious cases, you will have to add corrugated board.
- We attach ladders and fix them on large building brackets. Even the smallest cracks should not be allowed to form, otherwise the ceiling will let cold air through.
- We close the attic structure with boards or plywood.
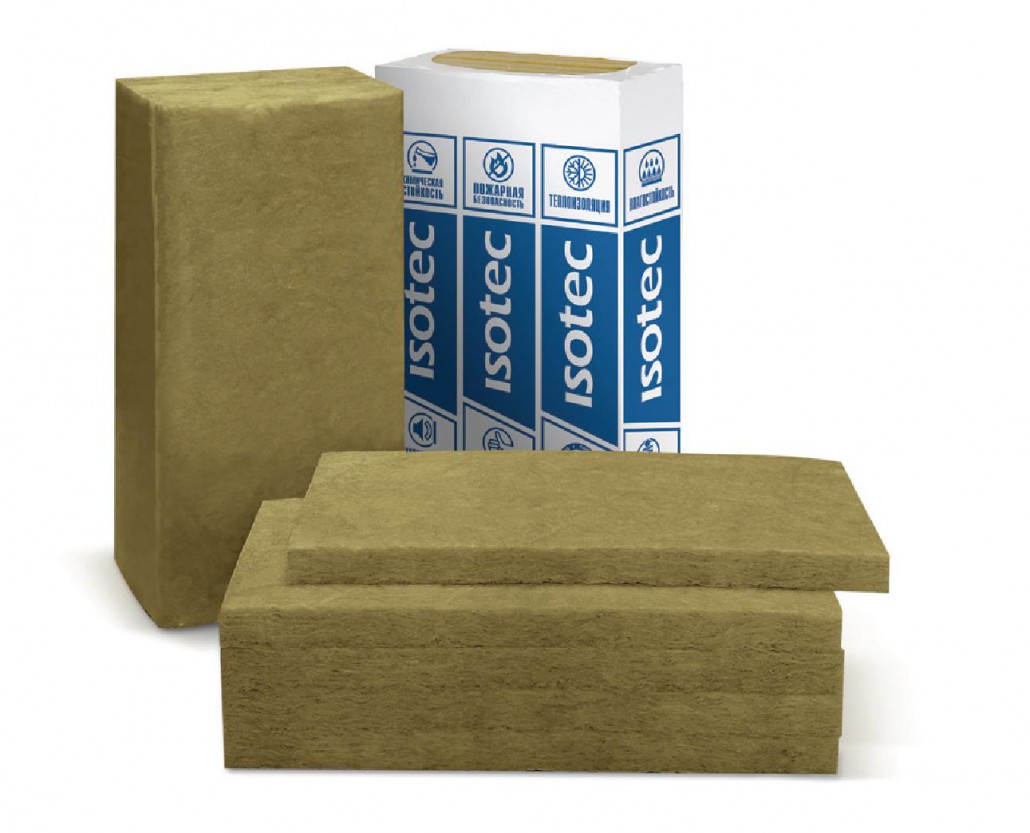
The most common material is stone wool
This is a more advanced analogue of mineral wool, with improved technical characteristics. Today it is most often used to protect houses from the cold. The installation method is practically the same as described above. However, there are some nuances:
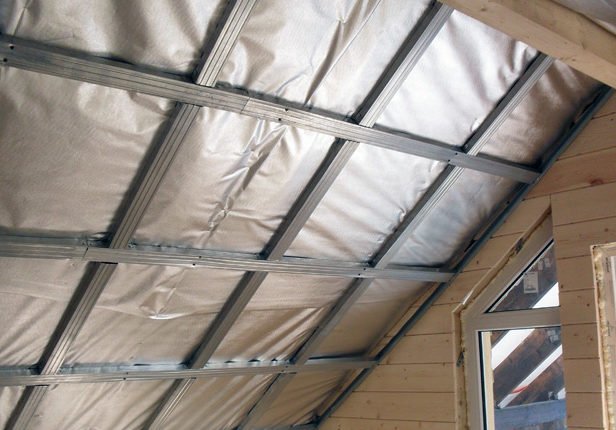
- Cotton wool on both sides must be covered with a vapor barrier film. We fix it to the ceiling with brackets or glue. We fix the closing part on the logs.
- If during the preparatory operations you will fill the bars (acting as guides for the ceiling and walls), we recommend that you first purchase a heater and make the distance between them the same as the width of the roll.
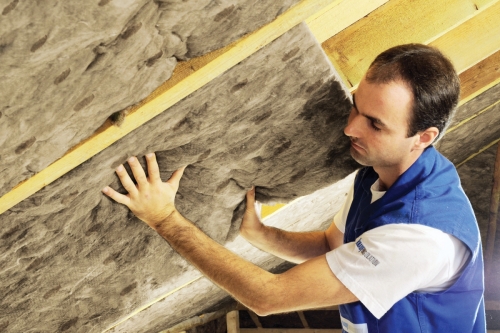
- Laying must be done joint to joint or even with a slight excess. The malleability of stone wool allows this to be done.
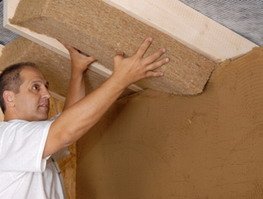
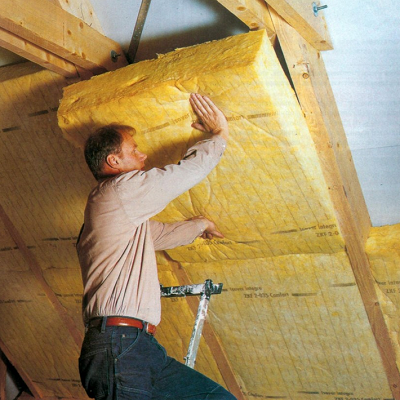
To mount on the ceiling, you will need an assistant who will support the roll.
Modern and high-quality method - foamed polyurethane foam
This is a complex polymer that has excellent technical characteristics. With their own hands, such technology is implemented quite rarely, however, it needs lighting. In this case, a similar mounting foam is poured. The foamed substance sets quite quickly, as a result, a monolithic structure is created.
In addition to high thermal insulation characteristics, polyurethane foam gives high sound absorption, as a result, rain drops on the roof will not be heard.
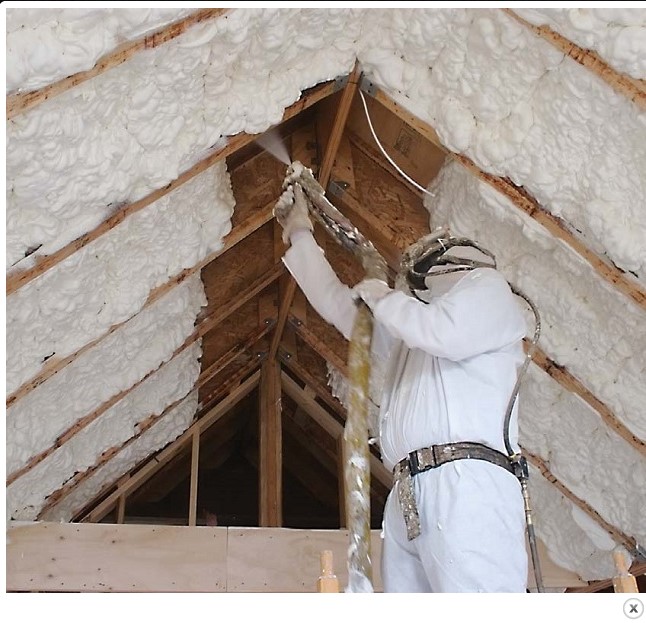
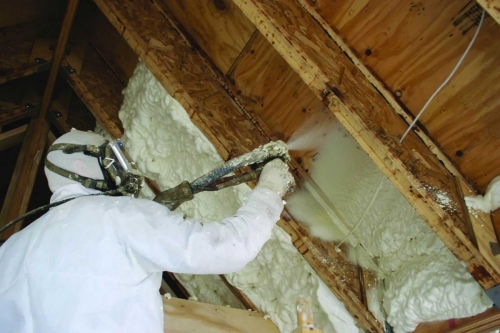
For application, you will need a special spray installation (it is because of this that few decide to use polyurethane foam with their own hands). However, it can be rented. So, the work is done in the following sequence:
- We clean the ceiling and walls from dust and dirt. Otherwise, the sprayed substance will not adhere well.
- We cover all wooden elements first with an antiseptic (if possible, then on both sides), and then with a deep penetration primer (only for wood).
Important! When working with a sprayer, do not forget to use a respirator and gloves
- After waiting for the complete drying of the protective compounds, we spray the foamed substance with our own hands. We do this slowly from the bottom up.
- After waiting for complete drying, we cut off the excess with our own hands (if any) and close the ceiling and walls with any sheet material (plywood, drywall, etc.).
To achieve maximum protection from the cold at home, we recommend combining the methods described above.
Roof insulation from the inside is a must, even if the attic space is not used as an additional room. Attic insulation reduces heat loss - heating does not work to heat the environment.
Insulation options are quite simple, not requiring special qualifications from the performer. Therefore, thermal insulation work can be done independently. The main thing is to choose the optimal type of insulation and follow the technological process.
The need for attic insulation
Comfort and coziness in any living space largely depend on the feeling of warmth. Maintaining the optimum temperature with minimum consumption for heating important point maintenance of a private house. In order to minimize the heat loss of a dwelling, at the stage of building a house, it is necessary to insulate not only the walls, but also the ceiling between the attic and the upper floor. However, insulation of a cold attic can also be performed in an already operated house.
Attic insulation prevents condensation on the ceiling in living rooms. As you know, the humidity content in a warm room is greater than in a cold one. With insufficient insulation of the attic space, warm air in contact with the ceiling forms condensate. Over time, accumulations of moisture will appear on the ceiling and the joints of the floors, mold may form.
Basic requirements for roof insulation
Various materials are used as insulation. Choosing the right one is not difficult - the construction market is filled with similar heat insulators. It is important that the insulation complies with the following technical specifications:
Attic insulation: mandatory preparatory measures
The order of arrangement of the heat-insulating layer depends on the selected material. However, in any case, before insulating the attic, a number of mandatory measures should be performed:
Technical and operational features of thermal insulation materials for the attic
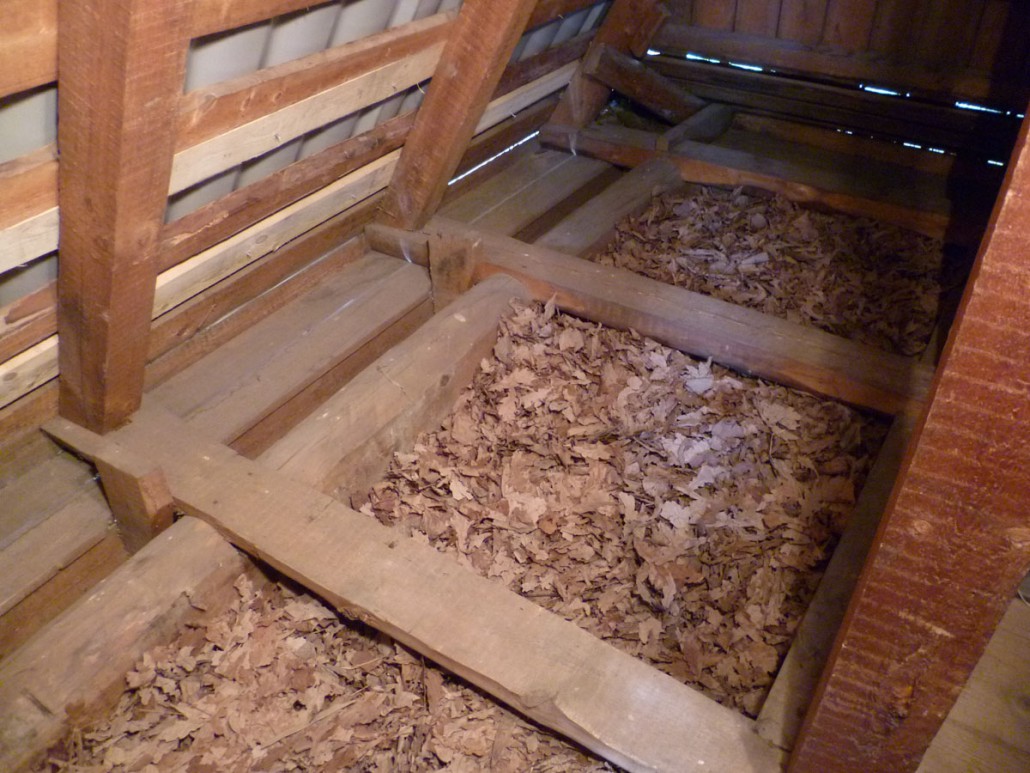
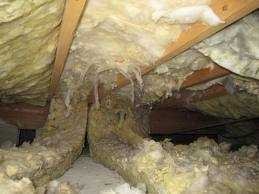
Previously, rural houses were insulated with natural materials. Hay, straw, shavings, sawdust or dry leaves were laid out on the floor of the attic. Mice settled in such heat insulators. In addition, the materials could catch fire when the chimney was overheated. Subsequently, natural heaters were replaced with roofing material, expanded clay and glass wool.
Modern heat insulators are selected taking into account the functional use of the attic, the technical parameters of the material and the climatic conditions of the region.
Consider the technical characteristics and features of laying the most common insulation materials for the attic.
Attic insulation with mineral wool
Glass wool and mineral wool mats absorb water well, but the material is highly permeable to steam. Given the structure of the heat insulator, it is necessary to protect it with a hydro- and pao-insulating layer.
Characteristics of mineral wool:
- non-combustible material - do not melt even at a temperature of +1000°C;
- resistance to biological influences - microorganisms do not develop in mineral wool;
- low thermal conductivity;
- the material is produced in the form of rolls and mats;
- mineral wool is characterized by high weight and increases the load on the load-bearing structural elements - before insulating, you need to make sure that the roof is reliable or provide for the use of insulation at the design stage of the house.
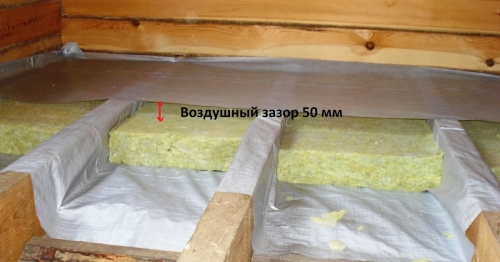
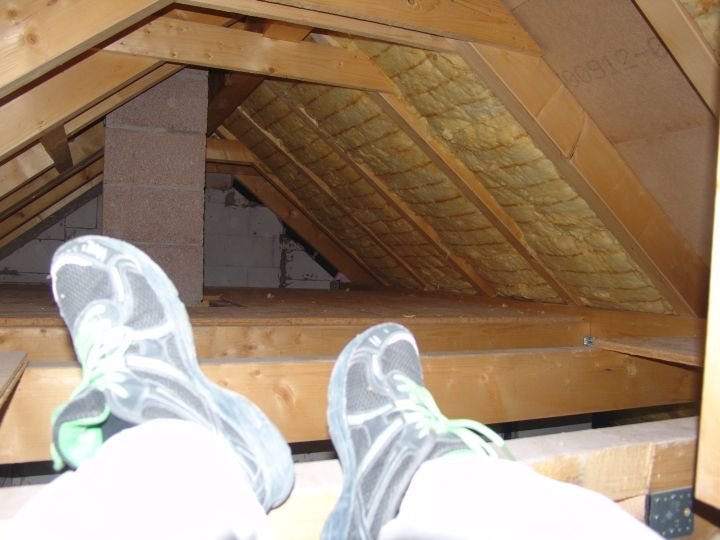
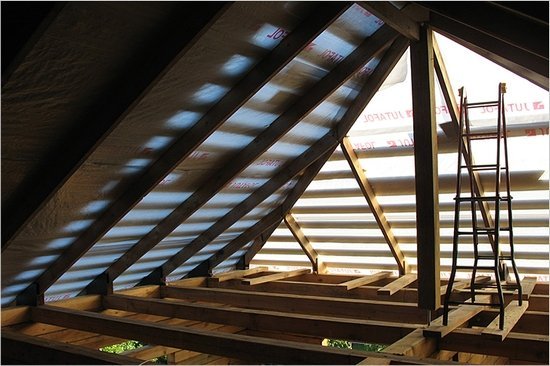
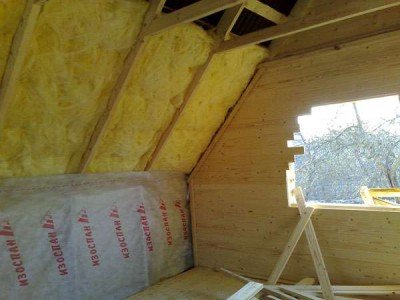
The recommended layer of mineral wool for attic insulation is 20-25 cm. The insulation is placed between the rafters. This material requires a ventilation gap (at least 3 cm) and a vapor barrier from the attic space.
Important! Wetting of mineral wool adversely affects the thermal properties of the material
Attic insulation with expanded clay
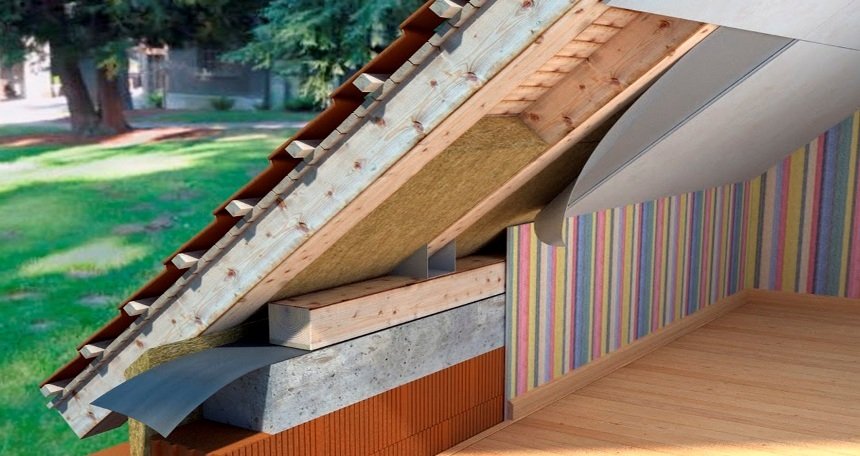
Expanded clay is the easiest way to insulate the attic floor. This option is usually used for concrete bases, as wooden structures may not be able to support the heavy weight of the heat insulator. Expanded clay is environmentally friendly, fireproof, moisture resistant and durable. The material is resistant to temperature fluctuations. The disadvantage of insulation is the difficulty of application on an inclined surface.
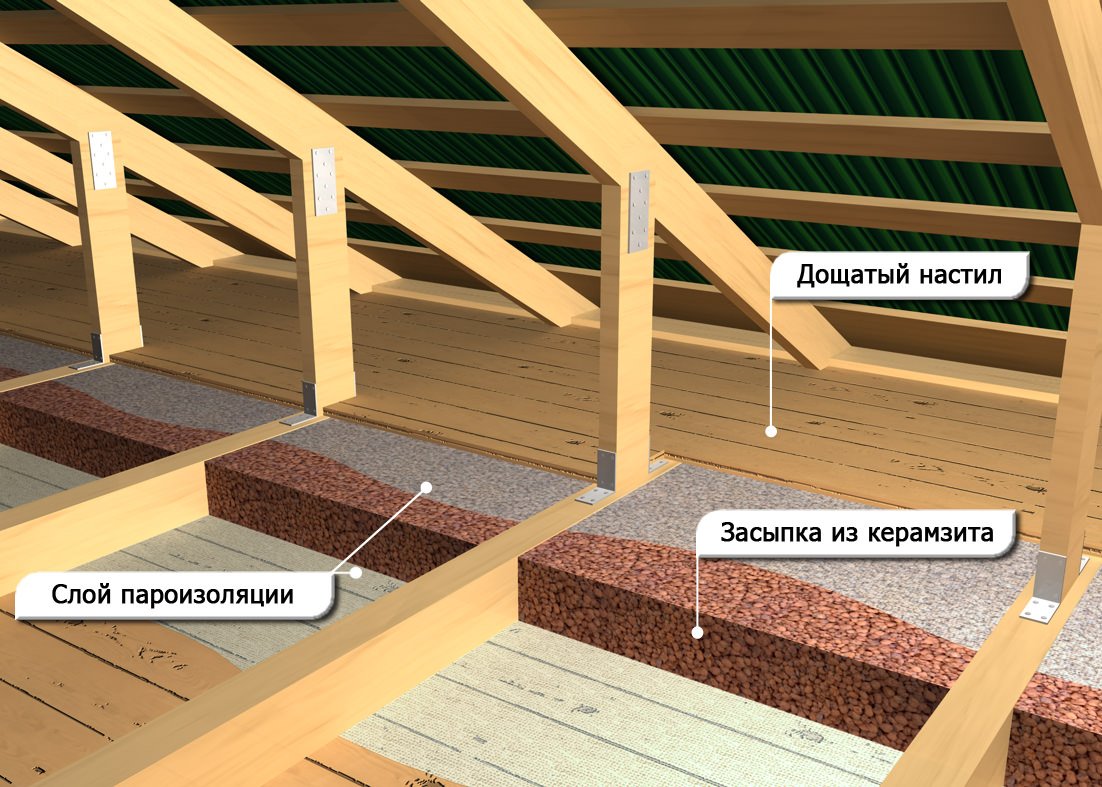
Insulation of a cold attic with expanded clay is carried out according to the standard scheme:
- the first layer is a vapor barrier;
- the second layer is an expanded clay mound (15-60 cm); insulation granules are poured into the created "frame";
- the third layer is windproofing;
- fourth layer - chipboard flooring, wooden floor.
To insulate the attic, a layer of expanded clay from above can be poured cement screed dense in texture.
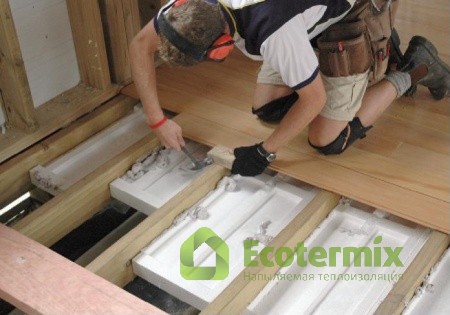
Insulation of the attic with polystyrene foam or polystyrene foam
Styrofoam and expanded polystyrene are economical types of insulation produced in the form of pressed boards from foam granules. The thermoplastic is 98% air and 2% polystyrene. The strength of expanded polystyrene is higher than that of polystyrene.
Advantages of foam:
- resistance to fungi, decay;
- light weight of the material;
- ease of processing and installation.
The disadvantages of polystyrene include:
- the presence of cold bridges - the foam is a rigid material and it is difficult to lay hermetically end-to-end with the rafters;
- when leaking and getting wet, the insulation may fail;
- combustibility of the material - harmful toxic substances are released during combustion.
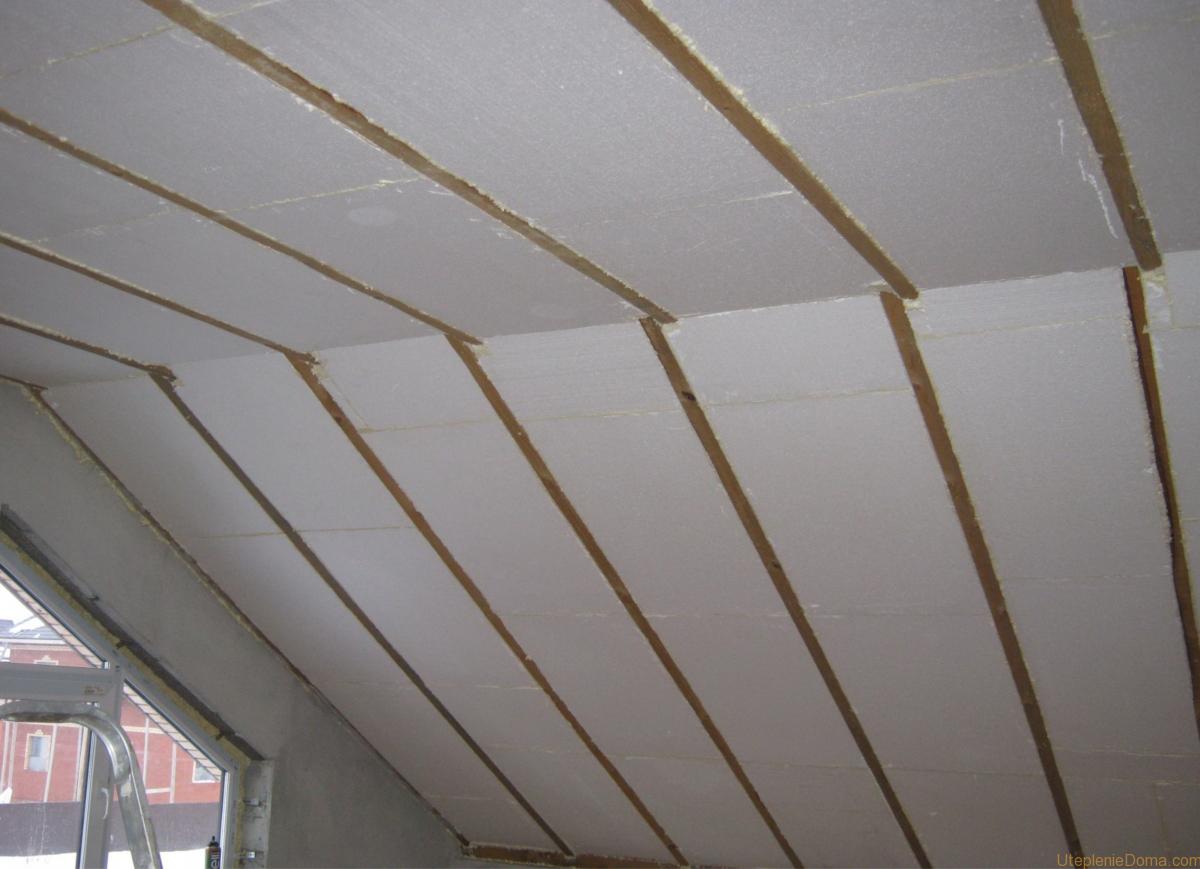
Styrofoam is used to insulate the attic ceiling. The heat insulator is placed between the rafters, adjusting the dimensions of the plates according to the width of the openings. FROM inside be sure to use a vapor barrier. The protective film is attached to the rafters with a stapler. Separate pieces of the vapor barrier are overlapped and fixed with adhesive tape.
It is advisable to use external waterproofing between the rafters. At the same time, be sure to leave a ventilation gap.
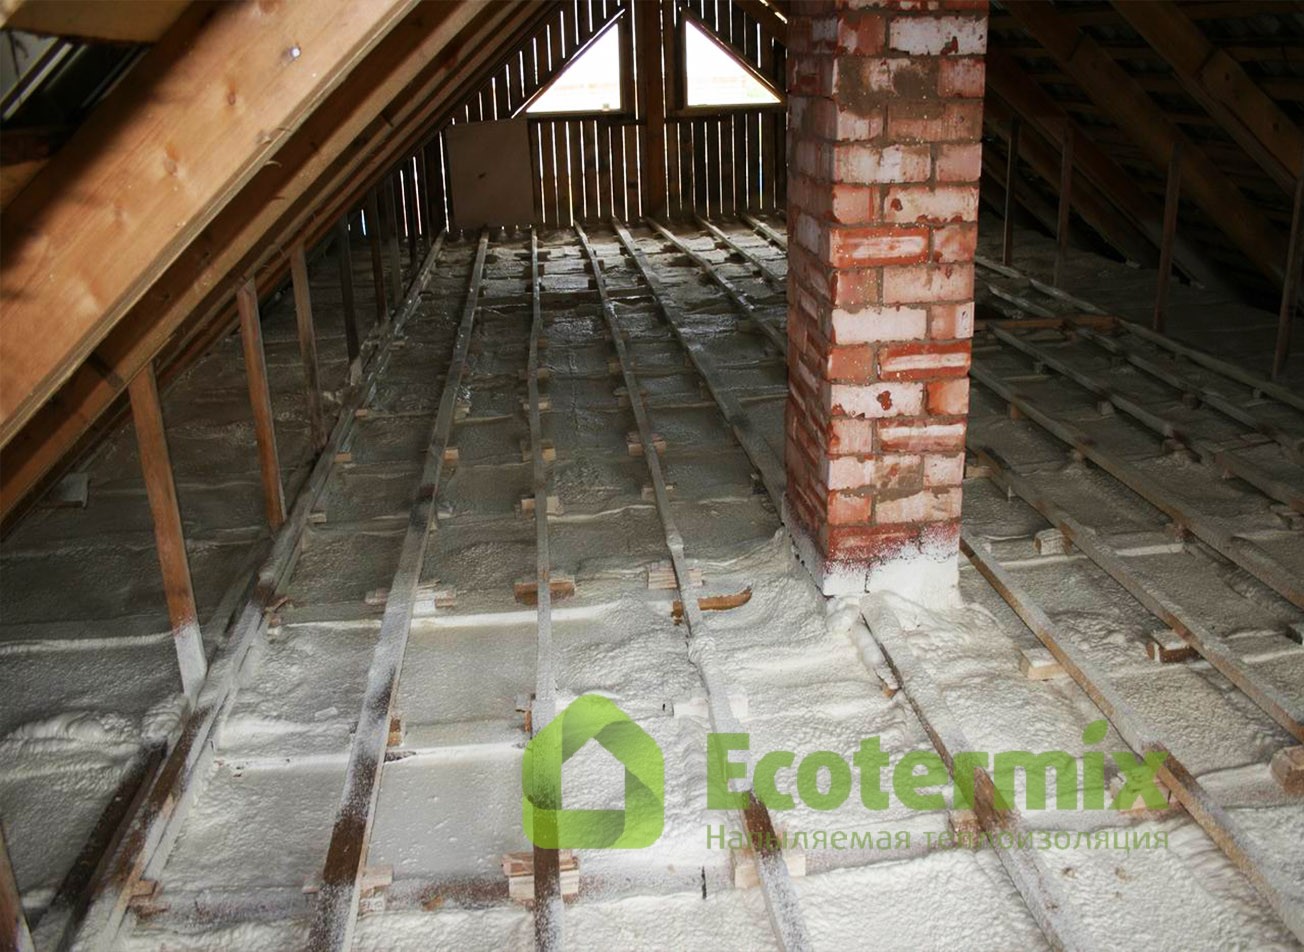
Attic insulation with polyurethane foam
Spraying polyurethane foam provides sufficient vapor barrier. The formed layer is not afraid of water, heat-insulating foam closes up all joints and cavities.
Polyurethane foam has a low coefficient of thermal conductivity, so the thickness of the insulation can be no more than 12 cm. As a rule, spraying is performed between the rafters on the crate.
The use of polyurethane foam has several advantages:
- simplicity, ease of application of a heat insulator;
- the formation of a monolithic insulating layer without joints and seams;
- suitable for different floor materials: brick, metal, wood, concrete;
- reliable protection of the house and attic from the formation of condensate;
- low thermal conductivity allows the use of a small layer of insulation, which saves usable area attic.
Lack of material - high cost. However, most experts agree that subsequently the price of polyurethane foam pays off with a long service life and savings on vapor barrier materials.
Attic insulation in a private house: step by step instructions
To insulate the attic with mineral wool, the following materials and tools should be prepared:
- mineral wool;
- mounting stapler and staples;
- mounting foam;
- construction knife and tape;
- waterproofing film;
- personal protective equipment for hands and eyes;
- glue for mineral wool.
Preliminary activities:
- measure the area to be insulated - multiply the width of the surface by the length;
- determine the number of layers of mineral wool - for the middle zone of the Russian Federation, the insulation layer in the attic should be at least 20 cm;
- free the attic from unnecessary items, remove debris and cobwebs;
- provide good lighting and raise to the attic necessary tools/materials;
- lay the floor logs with sheets of plywood - for the convenience of performing work.
The procedure for warming with mineral wool:
- Installation of ventilation ducts is carried out in a cold attic. Under the roof, special ventilation troughs are fixed with staples. If the attic space will be equipped as a living room, then it is not necessary to install such gutters.
- Arrangement of waterproofing, which will protect the mineral wool from moisture. Stretch the film on the truss structure, leaving small overlaps. Fix the film waterproofing with a mounting stapler.
- Placement of mineral wool. Laying is carried out in the direction from the bottom up:
- apply glue on the mineral wool slab on one side;
- press the canvas between the rafters;
- fix the insulation with screws or nails;
- according to the described technology, place the second layer in a checkerboard pattern relative to the first - this will reduce heat loss;
- insulate ventilation shafts and communications in the attic.
- Installation of vapor barrier. Using a stapler, fix the film on the mineral wool slabs. Glue the joints with adhesive tape, ensuring complete tightness.
- Arrangement of crates for finishing. A frame is mounted flush with the rafter system. Subsequently, drywall sheets or OSB boards will be attached to the crate.
- Insulation of the attic floor is carried out by analogy with the described technology for insulating roof slopes. Logs are preliminarily installed on the floor, holding the entire heat-insulating structure.
How to perform insulation without access to the attic
If there is no access to cold attic, then the insulation is carried out from the inside of the dwelling. In this case, you will have to reduce the height of the ceiling.
Warming sequence:
- Using adhesive-sealant, the vapor barrier membrane is fixed to the ceiling.
- A wooden crate is arranged under the ceiling - the slats are fastened in increments of 50 cm.
- A heater (mineral wool, polystyrene) is installed between the rails.
- The second layer of the vapor-tight membrane is fixed.
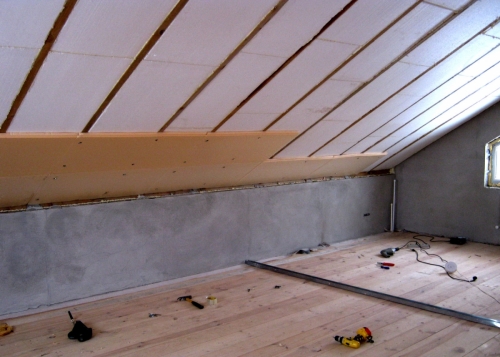
After arranging the draft insulated ceiling, a decorative ceiling made of plasterboard, PVC panels or stretch fabric is mounted.
The floor of the attic, aka the ceiling of the room on the top floor, is the most vulnerable spot in terms of thermal insulation. It is here that warm air rises and it is from here that it safely flies out into the street. To ensure comfortable living conditions in the house, thermal insulation of the attic floor is necessary.
It is worth noting that the insulation of the attic floor of the house is an event sufficient for energy saving. If the arrangement of a residential attic is not planned, then it is not necessary to insulate the roof slopes.
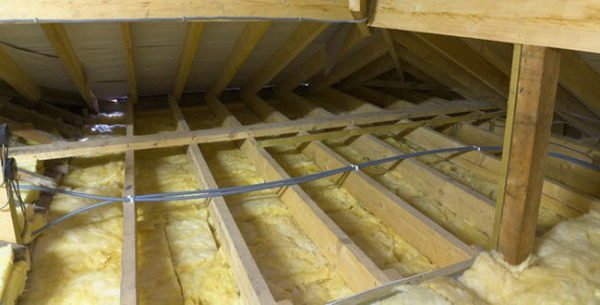
Thermal insulation of the attic floor can be carried out in three ways:
- Backfill. This technology has been used for thousands of years, is the cheapest and easiest. Glassine, kraft paper are laid on the logs and floors, or they simply coat the floor with clay. The selected material is poured from above. If the attic will not be used intensively, then boards are laid directly on top of the insulation so that it is convenient to walk. With good roofing and high-quality waterproofing of the roof, no additional measures are required.
- Insulation with sheet and roll materials. Logs and ceilings are covered with a vapor barrier film, and then thermal insulation is laid. Particularly carefully insulate the gaps around the vertical pipes, leaving the air along the plumb lines.
- Attic insulation with polyurethane foam. No preparatory operations other than elementary cleaning are required. The material is sprayed even on complex structures, without forming joints and cracks. Additional vapor barrier and wind protection are not needed, polyurethane foam is universal and protects the attic floor from all adverse factors.
The choice of insulation method depends on financial condition and enthusiasm of the owner of the house. If there are opportunities for risks and experiments, then you can try to insulate the floor in the attic yourself. If your time is money, then the best option would be to call Ecotermix specialists for.
How to insulate an attic
One of the most exotic materials for insulation - foam glass
The modern construction market offers a lot of options for insulating an attic. When choosing materials, the conditions for their future operation should be taken into account:
- Temperature fluctuations from -30 ºС in winter to +30 ºС in summer in middle lane Russia. The material should not emit volatile substances when heated and freeze.
- Humidity fluctuations. It is good if the selected insulation is moisture resistant.
- High mechanical loads in the arrangement of the attic. The material should not cake and crack under pressure from above.
- The presence of electrical wiring. To protect the house from fire, it is worth choosing a fire-resistant insulation.
Advantages:
- ease of machining and installation;
- affordability;
- fire resistance;
- light weight.
Flaws:
- hygroscopicity;
- tendency to caking;
- rapid loss of performance.
Thermal insulation of the attic floor with foam
Styrofoam crumbles and passes heat through the gaps between the joints
Before starting work, the floor surface is carefully checked for the presence of bumps and protrusions. Accurate laying is possible only on a flat horizontal overlap. A vapor barrier is required. In some cases, a concrete screed is made over the insulation.
Advantages:
- light weight;
- ease of installation;
- cheapness.
Flaws:
- combustibility;
- fragility;
- the need for a double layer.
Attic floor insulation with polyurethane foam
Sprayed polyurethane foam creates a monolithic coating with a porous structure - rigid and durable
The material is applied in liquid form, foams and hardens. It turns out a monolithic coating with a porous structure, rigid and durable.
Advantages:
- lack of cold bridges: there are no joints and fasteners;
- resistance to moisture and adverse external conditions;
- low coefficient of thermal conductivity (compared to mineral wool and polystyrene);
- light weight and small thickness;
- absence of rot and mold;
- fire safety;
- no need for a steam and wind protection device;
- high speed of work.
Flaws:
- the material is sensitive to ultraviolet radiation, therefore it requires a good coating;
- polyurethane foam is impossible, requires experience and special equipment.
Regardless of the chosen method of insulating the attic floor, it is necessary to ensure ventilation of the under-roof space. This will keep the temperature inside approximately equal to the temperature outside. This means no condensation, always dry rafters and warm living quarters.
PPU from Ecotermiks is considered the best among other heaters. We recommend watching the video on attic insulation below:
The prices for the services of our company can be found in the section
Or order a consultation of a specialist at a convenient time for you!
Request absolutely free and does not oblige you to anything!
The ceiling must have very good thermal insulation in order to keep the temperature in the rooms within the dew point. Otherwise, condensation will begin to form on the ceiling, and repairs will be required in a few weeks. However, these are not all the troubles that lie in wait for future residents of the house with inadequate insulation of floors. As a result of the temperature difference, mold and microscopic fungi appear at the junction of walls and ceilings, which can provoke various diseases allergic in nature. The use of heat-insulating materials of dubious quality also often leads to disastrous consequences. Even the most effective heaters, if the technologies are not followed, become useless, and in some cases dangerous. This is with regard to modern thermal insulation materials.Do not forget that in the floor insulation system, a layer of vapor barrier film is of no small importance, which increases the life of the thermal insulation. The slightest violation of the vapor barrier coating will lead to rapid wear of the heat-insulating layer.
Another very important requirement for a heat-shielding cake. In the attic, it is mandatory to provide several windows or special openings for ventilation of the under-roof space. This will ensure air exchange in the room and moisture transfer in structural elements.
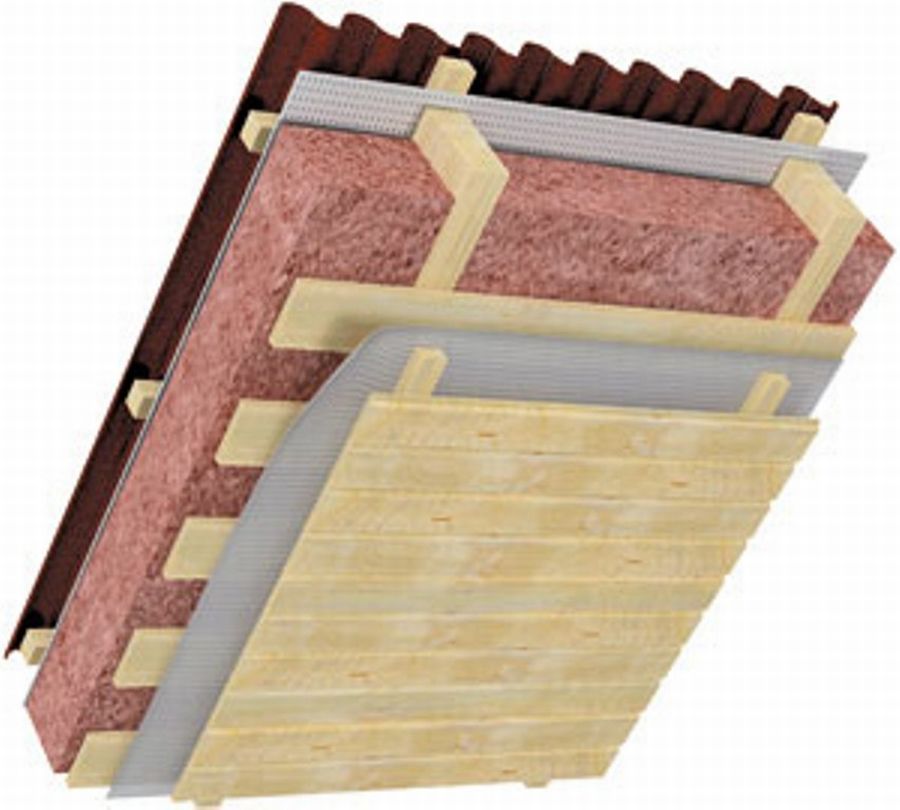
Schemes of the location of the heat-insulating layer of the attic
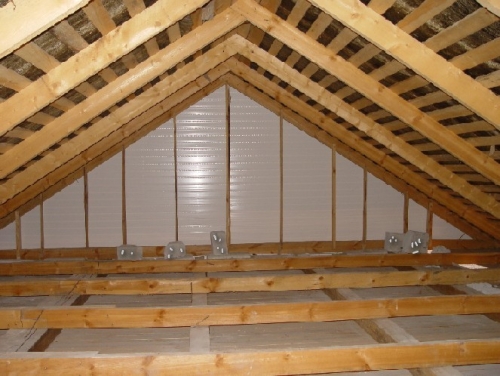
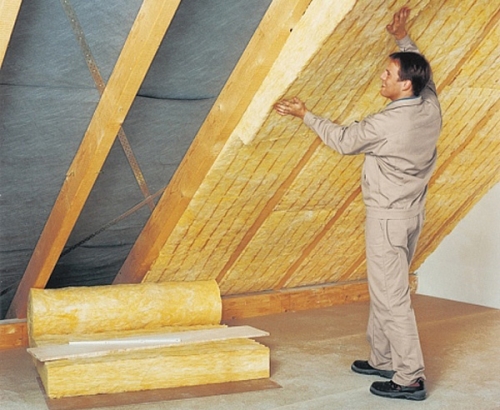
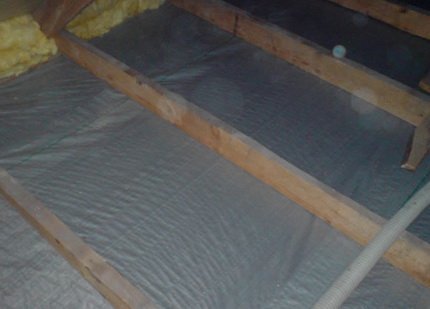
As mentioned in previous articles, the space under the roof can be residential and non-residential. If the use of the attic does not provide for year-round living, then it is enough to insulate only the ceiling itself, which
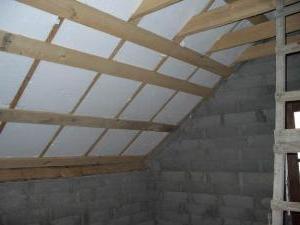
separates the living area and the attic. Everything is simple here, the thermal insulation is laid directly on the surface of the attic floor, observing the installation technology (Fig. 1), the insulation of slopes in this scheme is not at all necessary. Please note that in order to more effectively retain heat around the perimeter of the room, it is recommended to live a double layer of insulation to a width of 80 - 100 cm. When laying the material, it is very important not to block the ventilation ducts, therefore restrictive strips are installed at the cornice overhangs.
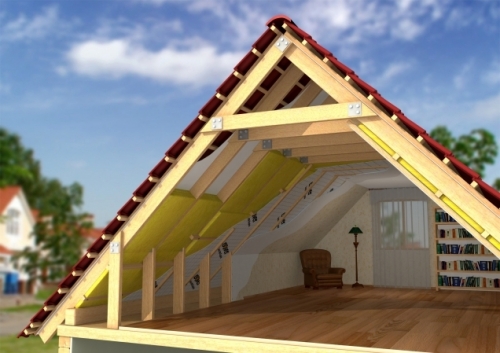
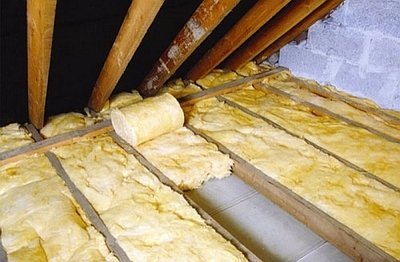
If you are planning to use square meters under the roof for arranging a rest room or a children's playroom, then the method of insulation can be invariant (Fig. 2).


For regions with different climatic conditions, the value of the heat-insulating layer ranges from 50 to 200 cm. And it is desirable that the height of the beams be no less than the height of the insulation, so sometimes it is necessary to increase the size of the floor beams with additional bars that are stuffed over horizontal elements (a, Fig. 3) .
Tools and procedure for insulating attic floors
metal ruler
construction knife
Mounting foam
Special tape
Construction stapler
Of the tools you will need
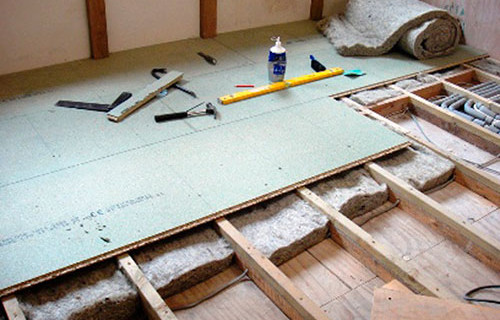
The technology of layer-by-layer laying of material in the inter-beam space is practically no different from the insulation of roof slopes. The only thing is that depending on the type of material used, some additions to the design may be made. Basically, the principles of insulation of walls, ceilings, roofs are very similar.
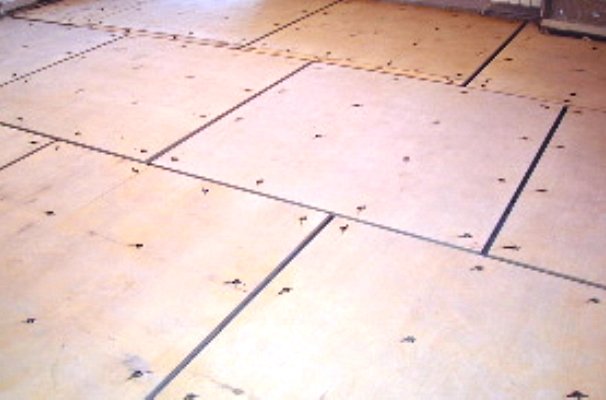
Inter-beam insulation begins with the installation of the draft ceiling of the lower floor. For this, ordinary low-grade lumber is used, the slab is used as a reel, and shields are knocked down from the board (b, Fig. 3). In some technologies, for example, insulation with foam insulation, a reinforced film is taken as the base, which is the base of the draft ceiling.
Then, in the structure, all the cracks that are inevitable in the places where pipes, manholes and other engineering communications come out are carefully sealed. Mounting foam, special mastics or waste heat-insulating materials are perfect for this.


A vapor barrier membrane is spread over the entire surface of the ceiling, in budget option- This is an ordinary polyethylene film, 150 - 200 microns thick. But at the same time, one must be aware that such a material is very impractical, it is subject to mechanical damage and poorly resists low temperatures. When using extruded polystyrene foam, the installation of vapor barrier material can be omitted, since it itself is an excellent vapor barrier.
In order to avoid tearing of the film during the installation and laying of the insulation, its fit must be free, without any tension. Ideally, it should completely describe the surface of the floor, covering the beams and the space between the beams. The vapor barrier layer is fastened with staples, using a construction stapler. Butt joints are glued with a special tape, turning individual vapor barrier strips into a single sheet.
At the next stage, heat-insulating material is laid. The horizontal surface expands their list many times over. To a greater extent, this applies to bulk materials, since their use on roof slopes is rather difficult and time-consuming. Of the bulk, traditional can be called sawdust, expanded clay sand, coarse granular vermiculite, expanded perlite, etc. Of the new technologies, ecowool should be noted, which is made from newspapers and pulp industry waste. This is a fairly energy-efficient and environmentally friendly material.
 When using rigid insulation, such as polystyrene foam boards, blocks of cellular concrete with a density of D 200 - 400, cement-bonded mats or from a mixture of clay and straw, leveling of the floor surface is required. To do this, all kinds of irregularities and differences between the boards are removed. The easiest way to do this is with building leveling mixtures. Thus, you will ensure a snug fit of the piece material to the base of the floor. Particular attention should be paid to manhole covers, it is best to glue the insulation on the entire surface, and not in local areas. Thermal insulation scraps can be used for insulation in hard-to-reach places and structures with complex configurations.
The simplest and fastest is considered to be insulation with rolled materials (mineral wool, basalt and flax fiber), spraying method (polyurethane foam) and applying compositions in the form of quick-hardening foams (penoizol). Currently, the last two of the above methods have become very popular. Special compositions appeared on sale, which, under the influence of pressure, form a dense and stable foam - an ideal heat-insulating material. However, independent guidance of solutions does not always lead to positive results, so it is better to entrust such work to professionals.
Laying of engineering communications
As for the laying of engineering communications and, in particular, electrical wiring, this issue requires special attention. Non-residential attics are very often a place to store old things and other rubbish. Dustiness and susceptibility to temperature changes make it possible to classify rooms with similar conditions as fire hazardous. Conducting electrical wires in attics is highly undesirable, but it is not always possible to avoid their presence, in such cases it is worth following some rules.
 The wiring cannot be laid under the insulation, it must be visible and have free access, so the wires are thrown either along the top, 2500 cm from the ceiling, or attached directly to the beams. It is necessary to exclude their contact with wooden structural elements and heat-insulating materials. Metal pipes can be used for this, but the connections must be completely sealed to prevent moisture and dust from entering.
Another very important point, all pipes are covered with a protective material, for example, foil insulation, to prevent their direct contact with thermal insulation.
Completion of works
The final layer can be a waterproofing coating, although it is not necessary when insulating attic floors. But for ease of movement, especially on soft material, it is necessary to lay ladders, but it would be best to sew up the heat-insulating flooring with a thinned crate.
3673 0 1
Fawn hat for a country cottage or attic insulation
27 August, 2016
Specialization: Capital construction works (laying the foundation, erecting walls, constructing the roof, etc.). Internal construction works (laying of internal communications, rough and fine finishing). Hobbies: mobile communication, high technologies, computer equipment, programming.
If you live in an apartment building, then you probably never thought about attic insulation. Moreover, you hardly guessed about the presence of such a technical room in the building, unless, of course, you ran to the roof as a child.
However, in country house or a country cottage (which I am currently building for my son), the under-roof space plays a huge role. Often an open expansion tank of the heating system, ventilation pipes, chimneys are installed there. And sometimes they equip living quarters - attic.
Therefore, I will not talk for a long time about how important thermal insulation measures are for this room, but I will simply tell you how to insulate the attic of a private house using the example of my own son's country home.
I think the described technology will be useful to everyone who builds or is going to build a dwelling outside the city with their own hands.
Thermal insulation materials
Attics have been insulated for as long as I can remember. My great-grandfather and grandfather used hay and straw, sawdust and shavings for this purpose, and some in their village also used dry leaves from trees.
Dad was already a more “advanced” builder and cold - in a private house and in the country house he insulated the attic with expanded clay and old soldier's blankets. By the way, expanded clay granules are also used in modern construction.
Now I will not tell you which option is better from the above, as I can offer more technologically advanced and efficient thermal insulation materials for attic insulation.
However, before that, I’ll note what technical characteristics a heat insulator should have in order to be used for the described work:
- Light weight. The material after laying should not exert a large load on the attic floor, roof rafters and load-bearing walls.
Otherwise, even during construction, more durable building materials will have to be included in the project, which increases the amount of the final estimate.
- Safety. The material used for insulation should not harm human health.
Therefore, both the floor of a cold attic and the roof must be insulated with heat insulators that do not emit hazardous chemical compounds into the air. Especially if you plan to equip a living room there in the future.
- Ease of installation. The less effort you need to spend on the installation of heat insulators, the better, right?
In addition, there is not much space in the under-roof space of some houses, so working there is not very convenient. I always try to buy materials that do not require the use of sophisticated equipment.
- Low thermal conductivity. The better this indicator is, the smaller the layer of heat-insulating material should be used. Accordingly, the interior space of the attic will not greatly decrease.
Again, I consider this important, since I plan to make an attic in my son's dacha in the attic. But I think it’s not very interesting for you to lay thermal insulation with a thickness of 20-30 cm.
- hydrophobic properties. In attics, the air often has high humidity, which reduces the efficiency of the heat-insulating layer.
I advise choosing materials that are either treated with water-repellent compounds or those that do not change their performance when wet.
- Fire safety. The roof is where there is a risk of fire due to improper installation or blockage of the chimney.
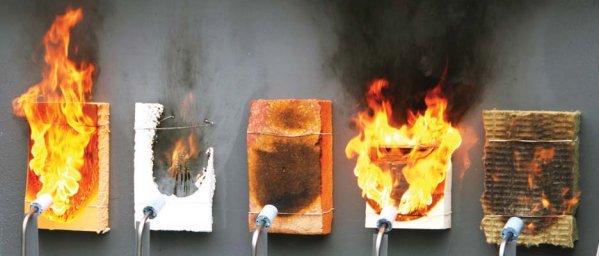
Therefore, when choosing a material, I would give preference to those varieties that do not ignite under the action of an open flame and do not support combustion.
Of course, I failed to choose the perfect insulation that 100% meets all the listed requirements. But still I will tell about those with whom I had to work.
So, I insulated attics:
- polyurethane foam;
- foam;
- mineral wool;
- expanded clay.
I'll tell you more about them.
polyurethane foam
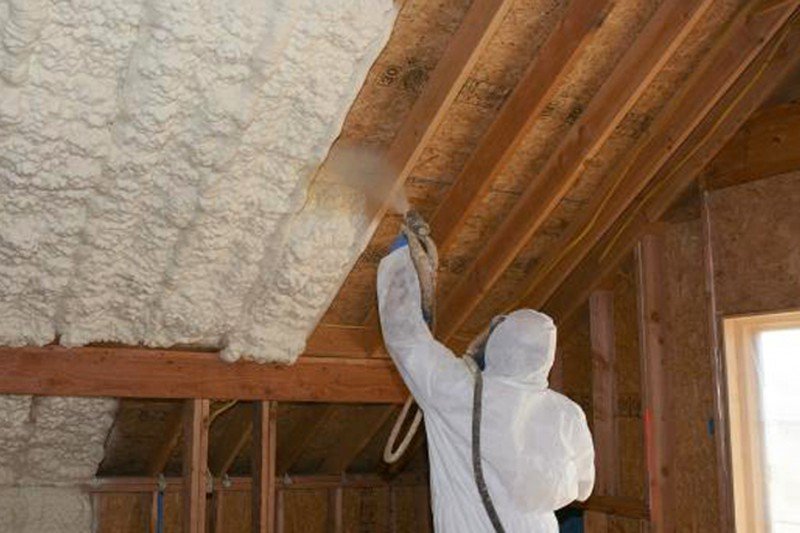
The raw material for the manufacture of this heat insulator is plastic. Insulating the attic with polyurethane foam is a pleasure, but this requires special equipment. The fact is that the insulator is applied by spraying, for which compressors are used.
But you do not need to buy screws, adhesive mixtures, crates and so on. And the polyurethane foam itself is applied very tightly, leaving no gaps through which cold air can penetrate into the under-roof space.
After hardening, the insulation becomes rigid, therefore it additionally strengthens the structure. The material has antiseptic properties; mold, fungus and other microorganisms do not multiply on its surface.
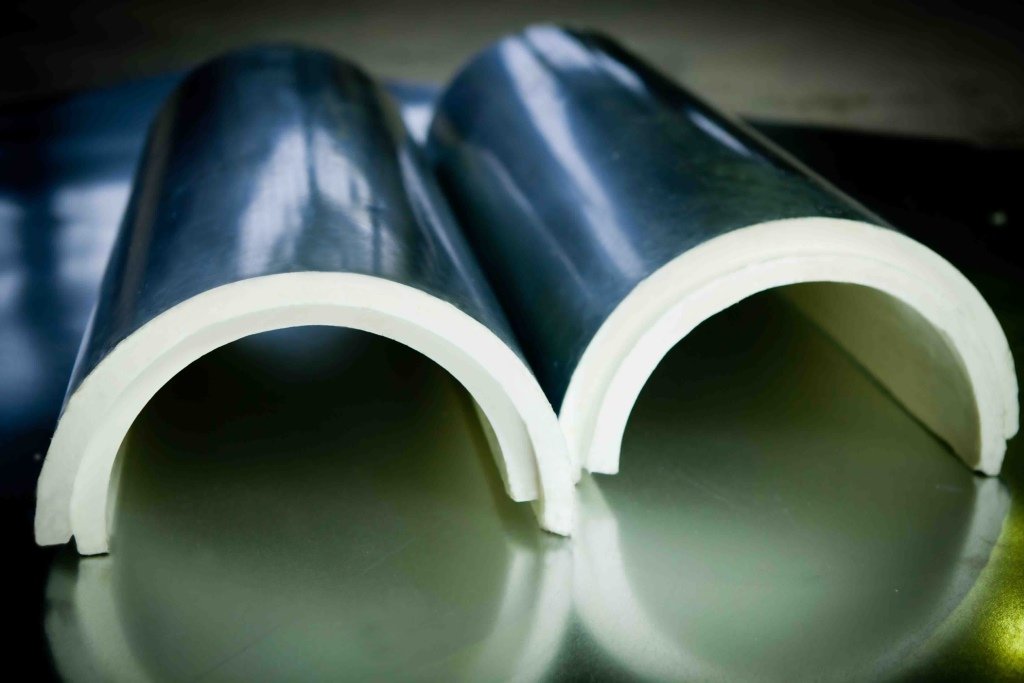
If you need to insulate the ventilation pipe in the attic, you can also use polyurethane foam. Only not sprayed, but in the form of ready-made shells with protective layer from aluminum foil. They simply need to be fixed to the pipelines with adhesive tape or plastic ties.
The biggest drawback of the material in question is the high price. However, if you consider the total cost of work, then you can save money, because in this case additional hydro and vapor barrier is not required.
Styrofoam
This insulation, as well as expanded polystyrene, similar in technical characteristics, are widely used for warming rooms under the roof. I personally prefer the expanded polystyrene obtained by extrusion. It is more durable, does not burn, has a low coefficient of thermal conductivity and is not damaged by rodents.
The cost of insulation is quite affordable, and anyone, even the most inexperienced summer resident, can lay it in the attic. Polystyrene is processed with hand construction tools and fastened with dowels.
Mineral wool
Fibrous heat insulators are a versatile material. Mineral fiber-based heaters are rolled, slab, in the form of a dry mix, and so on. They are great for insulating attic floors and roofs.
Basalt fiber, from which mineral wool is made, has a very high temperature melting. Therefore, this insulation can be used for installation on chimneys, the surface of which can be very hot.
There is one point here. The insulation is not waterproof and, when moistened, may lose its heat-shielding properties. To avoid this, when insulating, it is necessary to install hydro- and vapor barrier membranes. Or buy those varieties of mineral wool that are treated with special water-repellent compounds.
The bottleneck of some types of mineral insulation is environmental friendliness. In the manufacture of basalt mats, a certain amount of formaldehyde resins is used, which can be harmful to human health. Especially during the installation process.
Expanded clay

Granules of this material, as I already told you, were also used by my father, insulating his first cottage. Expanded clay has a low coefficient of thermal conductivity and weighs a little. However, it is loose, so it can only be used to insulate the floor of the under-roof space.
But the installation process itself does not require any tricks. You just need to pour it on the floor, and then properly protect it from moisture with a moisture-proof membrane. If you are going to equip the attic later, you can cover it with a screed on top, and then lay a decorative coating.
Independent insulation of the attic space
We sort of decided on the most popular heat-insulating materials, now I’ll tell you how to properly insulate the under-roof space so that you can equip an attic there in the future.
Let's take up the question of how to lay the insulation under the crate, because this method will allow you to stuff the decorative material of your choice without any problems in the future.
In my son’s attic, I decided to use mineral wool, but I’ll tell you right away about foam plastic, since the work technologies are similar, and it’s easier to work with foam plastic if you are a beginner builder.
The whole process of warming consists of several stages:
- preparation;
- waterproofing;
- laying a heat insulator;
- vapor barrier;
- arrangement of the crate and installation of decorative trim;
- insulation of engineering communications;
- floor insulation.
I will tell you about each stage in more detail.
Preparatory activities
Let's start, as usual, with preparation, because it is unlikely that your attic is already ready for construction work.
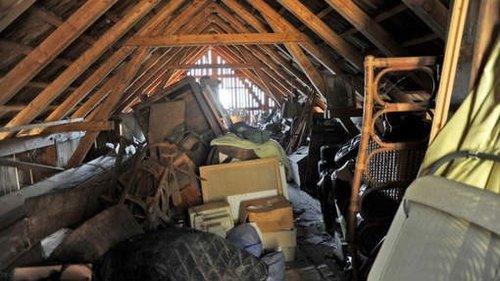
After all, in almost 100% of cases this room is used as a trash storage, where all unnecessary things are taken down (and sometimes they are taken from the apartment). In the attic of my son's dacha, it was clean, since the house is new, but in my home, when sorting through the rubble, I found old books, clothes, several family heirlooms (which my wife did not consider as such) and much more.
In addition, if you have tried to perform insulation before, then I advise you to get rid of any traces of this process. For example, remove sawdust, scraps of felt, construction debris, and so on from all slots. Believe me, I have insulated attics more than once and I know how important it is.
By the way. And drive all the spiders out of the attic, then clear the room of the cobwebs. After all, you will build an attic for yourself or your children, and not for any insects.
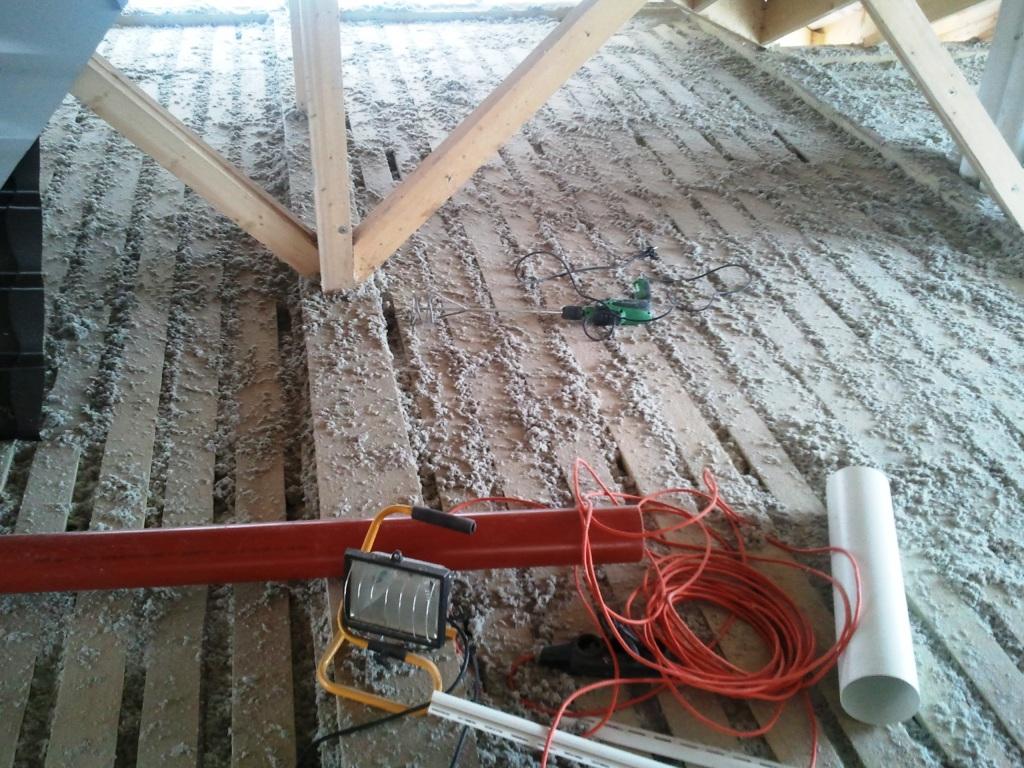
Last moment. Bring the necessary tools into the attic and provide lighting. It is unlikely that you have sockets there, so you will have to stretch out an extension cord with a light bulb. Although these measures seem obvious to you, since I had to return to the city for electric, since not a single extension cord at the construction site reached from the switchboard to the attic.
Waterproofing
A waterproofing membrane is needed in order to protect the thermal insulation layer itself and the room under the roof from excessive moisture. This is especially important if the roof has been laid for a long time (for example, you are insulating the attic of an old house) and roofing materials used not the most modern.
The moisture-proof film is installed directly on the roof structure. It must be stretched and overlapped so that after the end of the work an airtight layer is formed. You can fasten the material with a construction stapler with staples.
Insulation laying
The heat-insulating material, as I said, must be mounted on a pre-mounted crate. However, if you want to save a little, you do not need to design a separate frame. The roof truss system will perfectly play its role.
In the latter case, in order to press the material and be able to mount the decorative sheathing, it will only be necessary to equip a light counter-lattice at a certain distance from the surface of the heat insulator. Then you get a small ventilation gap that removes excess moisture from the insulation layer.
So, the scheme of work on laying insulation is as follows:
- Rolls of mineral wool must be cut so that their width corresponds to the distance between the rafter supports. After that, lay under the roof surface, gluing to the surface or temporarily attaching with wooden slats.
- To make installation easier, mineral mats can be used.. Their width should slightly exceed the distance between the rafters, so that after installation they suddenly fall into place and do not fall out.
- The foam must be cut as accurately as possible so that it comes close to the installation site.. The gaps between the insulation panels will greatly reduce the effectiveness of insulation measures, so they need to be blown out with mounting foam.
vapor barrier
After laying the insulation, you need to install a vapor barrier membrane. It will protect the insulating material from the penetration of moisture to it, which is formed during the life of people.
For vapor barrier, special films are used that do not allow the heat insulator to be moistened, but do not prevent air infiltration through the building envelope. As a result, a microclimate comfortable for living will be formed in the attic, when viewed from the point of view of humidity.

So, after installing the insulation, it is necessary to attach a vapor barrier to the rafter supports (which act as a crate). This should be done with a stapler, gently pulling the film.
The edges of the material overlap each other to prevent the mineral wool from getting wet. To further insure yourself against surprises, I recommend gluing the seams with adhesive tape.
Vapor barrier films allow air to pass only in one direction. Therefore, before installation, make sure that you have unfolded the membrane to the desired surface.
Control grille
Having finished with the films, you can begin to complete the operations for finishing the walls (well, or the roof, that's how you look). I will use it for this, but in the same way you can fix OSB boards, drywall, lining, and so on.
Here, too, there is an opportunity to significantly save on the purchase of materials and reduce the time for all work. The fact is that the main details of the crate will be powerful rafter legs, and you will only have to make the crossbars, which will serve as additional stiffeners for the skin.
The material for the transverse frame can be a wooden rail or a galvanized profile. The essence of this will not change. The parts just need to be screwed from above to the rafters so that they are located at right angles to them. The step between adjacent elements depends on the decorative finish, I made 30 cm so that the skin does not sag under load.
Herself decorative trim also depends on your imagination. I'm going to glue the wallpaper on top for now to save money, and then I'll come up with something prettier. You can do the same.
Just before sticking the wallpaper, do not forget to putty the seams between the plywood sheets and perform other necessary operations (priming, and so on).
Warming of engineering communications
If you do not provide for the creation of an attic, it is imperative to insulate the ventilation ducts in the cold attic, as well as, if available, pipes for heating, water supply and smoke exhaust (what term did you come up with).

Of course, you can use mineral wool for this, wrapping it around pipes, wrapping it with roofing material and fixing it with wire. But why complicate your life if you can buy ready-made shells for pipes of the desired diameter (made of polyethylene foam, polyurethane foam, polystyrene, and so on). They just need to be snapped onto the pipe and wrapped with adhesive tape to be sure.
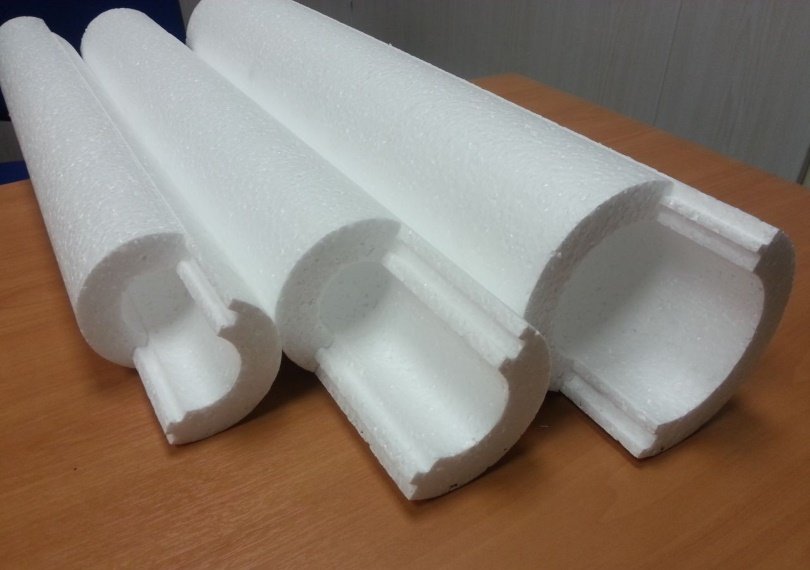
The cost of such insulators is low, so you definitely will not go broke.
Attic floor insulation
The floor is a horizontal surface, so it can be easily insulated with bulk material. For example, expanded clay. But since I started working with mineral wool (styrofoam), I won’t buy expanded clay, I’ll limit myself to what I have at my disposal.
So, the attic insulation technology is as follows:
- First you need to clean the surface of dust, accumulated debris, foreign objects, and so on.
- Then install the support lags. I make them from wooden blocks with a section of 20 by 10 cm. You can select the height of the lags based on the thickness of the thermal insulation material you have.
- The entire surface is covered with a layer of waterproofing. Be sure to check the tightness so that the mineral wool does not get wet, as this may affect its technical characteristics.
- Cotton wool is laid on the waterproofing layer. Choose a material that is specifically designed for insulating horizontal surfaces. For example, Izover KT37.
- From above, the vapor barrier membrane is stretched again, on which it is stuffed facing material. I used plywood, which I plan to cover with linoleum.
If you do not plan to use the attic as a living space, then you can not insulate the roof, but only insulate the floor. In this case, you need to pay attention to some features:
- Wood for lags and sheathing must be treated with hydrophobic, fire-fighting and antiseptic compounds in order to maximize its service life.
- To enter, it is better to use an insulated hatch to the attic, since it is this structural element that is often the source of large heat losses.
Now we can say with confidence that the insulation of the floor (or the ceiling from the side of the cold attic) has been completed in full. And in order to achieve maximum efficiency of thermal insulation measures, I still advise you to make an insulated hatch with a ladder, as described in the video in this article.
Conclusion
As you can see, there is nothing terrible and heavy here. If you liked the material or have any questions, you can ask them in the comments. I would also be grateful for stories about how you perform attic insulation in a private house with your own hands.
August 27, 2016If you want to express gratitude, add a clarification or objection, ask the author something - add a comment or say thanks!


