
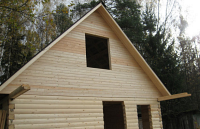
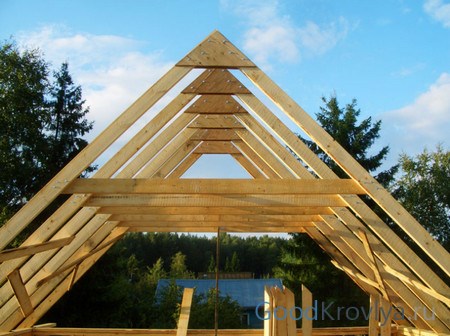
In order for the roof being erected to be reliable, a very strong truss system is required, which is the supporting structure of the roof. Fastening the connections of individual elements affects both the safety of the roof and its characteristics. A necessary condition for a strong roof is the correct Mauerlat. If mistakes are made during the construction of the truss system, then in this case everything can lead to early destruction of the roof of the house. That is why it is very important to follow the rules and requirements of SNiP, which regulate the arrangement of roofs.
What is Mauerlat
Mauerlat is the so-called foundation for the construction of the roof. This is because it allows not only to securely fix the rafters, but also to distribute the weight of the entire structure evenly along the perimeter of the walls of the building. The rafters can be fastened using various methods, however, it should be borne in mind that if the installation is incorrect, a skew is formed.
Mauerlat is mounted directly under the rafters themselves. For this, either timber or logs with a cut side are used. Thus, the rafters to the Mauerlat allow you to evenly distribute the load on the upper part of the walls of the house. In total, the fastening of the rafters to the Mauerlat performs 2 main functions: to withstand temporary and permanent loads. Seismic phenomena are temporary, and permanent ones are the constant pressure of the weight of the roof structure on the support.
In order to perform high-quality fastening of rafters, it is necessary to purchase exclusively high-quality fasteners. All cuts should be very clear and fit snugly together. In addition, different substrates and linings cannot be used. All this violates the attachment point of the rafters to the Mauerlat. Such parts can be deformed and fall out of the overall structure due to heavy loads. All fastenings of rafters to the Mauerlat are carried out exclusively with the help of metal plates, brackets, nails and bolts. Washers are required for bolts and nuts. Such elements will allow the nuts not to cut into the wood of the rafters and Mauerlat.
Rules for attaching rafters
There are only a few basic, very important rules fastening rafters to the Mauerlat, non-compliance with which can lead to early destruction or distortion of the roof. Here are the main ones:
- All rafters must be attached exclusively to metal corners or plates. Many people ignore this recommendation, while its non-fulfillment leads to the fact that all fasteners begin to penetrate deeper and deeper into the structure of the tree. That is why you need to purchase these plates in advance.
- As for the installation of the beam, for this it is best to use special truss fasteners and bolts instead of screws and nails.
- Before directly attaching the rafters to the Mauerlat, it is necessary to fill in special saddles, which in the future will ensure a tight fit of the wooden elements to each other.
- To make the cuts the same, apply templates. In the event that the angle of inclination of the slopes is different, then the templates, respectively, must be made different for each of the slopes. On average, the depth of the cut should be equal to ¼ of the width of the rafter leg. If you do not have templates on hand, you will have to constantly take measurements and make sure that the cuts are made correctly.
- When installing, you must use only high-quality fasteners. You can not save on materials, as this will subsequently lead to the fact that the roof structure will not be durable. Cuts for rafters must be done very carefully, without haste, in order not to use inserts and other additional elements later.
- If it is being built wooden house, then a sliding mount is used. This installation technology is necessary for connection with both the Mauerlat and the side logs. To create sliding fasteners, special “sleds” are used. In this case, their use is mandatory.
All fastenings must be very strong in order to withstand the loads of even the strongest wind. Otherwise, the hurricane will be able to rip off the roof.
Ways of fastening rafters
In total, there are two main methods of fastening: hard and sliding.
Rigid - such fastening of rafters to the Mauerlat is required in cases where inclined rafters are attached, since in this case it is necessary that the leg sits very tightly on the base. This type of fastening should not be subjected to any effort: sliding, twisting, turning, etc. To achieve this effect, you can do one of the following:
- make a notch on the rafter leg;
- sew a retaining bar on the rafter.
To make a cut to the Mauerlat, you must first make a cut according to the template on each rafter leg. Then each rafter is sunk into the Mauerlat with a saddle and fastened with nails. This method is used in any construction and provides a rigid connection.
As for the second method, its implementation is carried out using a meter bar, which is hemmed to the rafter leg. For fastening, metal corners are used, which prevent the lines from shifting in different directions.
Sliding - such fasteners are used in cases where the house is built from timber or logs, in other words, when building a house from wood. Subsequently, the tree changes its physical properties, namely, it begins to shrink and dry out. The entire structure of the building begins to collapse. The rafters also tend to shrink, so in this case it is impossible to make solid fasteners.
In order to prevent deformation of the building, the rafter attachment point is provided with free movement.
To date, manufacturers of fasteners produce special elements for this purpose, which are called sleds. In addition, metal corners with oblong holes for fasteners can be used.
Materials and tools for fastening
- metal corners;
- brackets;
- wire ties;
- beam;
- rafters;
- bolts with nuts;
- jigsaw;
- screwdrivers;
- drill;
- wrench.
How to create a do-it-yourself ridge of a rafter pair
In total, three main methods are used:
- Butt connection. Using this scheme, the upper part of the rafter leg is cut at the same angle as the slope of the slope. After that, they are connected. For a more accurate angle of inclination, it is advisable to use a ready-made template. Long nails are used for fixation.
- On a skate run. This method is similar to the previous one. It differs only in that in this method there is a ridge beam. This design is very reliable, however, in some circumstances it requires the installation of additional supports. This greatly reduces the functionality of a room such as an attic. Thus, this design is not suitable for those who plan to make another insulated room out of the attic. The main advantage of this method is that no template is required for the construction.
- Overlap. With this method, the upper joint of the rafter legs is overlapped with the lower one.
How to attach rafters to Mauerlat
Using the sequential installation scheme described below, it will be possible to fasten the rafters to the Mauerlat. Subsequence:
- First of all, you need to lay the Mauerlat itself. This is a beam, which will serve as a support for the entire structure of the rafters. Mauerlat must be laid over the walls on a concrete belt. Studs made of galvanized metal are installed in it in increments of 120 cm. The diameter of the studs is 10 mm.
- If you plan to make a heated attic, then a layer of thermal insulation is installed under the Mauerlat
- The beam must be laid near the studs, after which it is necessary to determine the places for drilling holes. Mauerlat is put on studs, while a protrusion of 20-30 mm should remain. Using nuts with large washers, the Mauerlat is fixed.
- After installing the Mauerlat, you can begin to attach the rafters to the support beam. It is fixed with galvanized steel brackets and brackets.
- In the same way, the rafters are connected to the ridge beam.
Studs are used for connection: for ondulin - with a diameter of 8 mm, for a cement-sand roof - 10-12 mm.
When installing a roofing system milestone is the fastening of individual elements to the rafter legs and the fastening of the rafters to the girders, mauerlat or beams. The design drawing must necessarily indicate the types of connections for each structural unit, and the installer's task is to correctly read the drawing and make all connections in accordance with the recommendations of the project. It would seem that everything is simple: strengthen stronger - and there will be happiness. However, in practice, everything is somewhat more complicated. There are different types of mates: rigid pinchings, sliders with different degrees of freedom, etc. For each truss system, various combinations of such mates are used, each type being dictated by the calculation of forces, i.e., actual mechanics, and arguing with facts, as you know, inefficient.
The rafter system must perfectly cope with the load roofing material, as well as wind and snow load
Types and designs of the main load-bearing elements of the roof
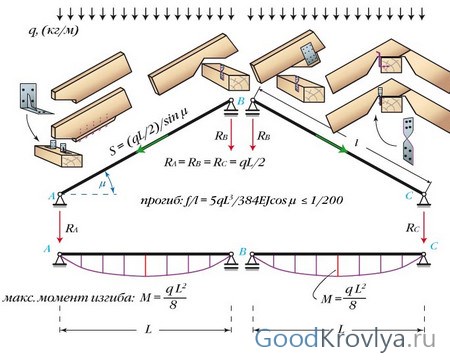
The rafter, or rafter leg, is the main load-bearing element of the roof, which directly receives the load created by the weight of the roofing pie, precipitation and wind, and transfers this load to the walls of the building through the rafter structures.
For convenience, we will consider the types of rafters using an example gable roof. Mechanics is not the easiest subject to understand on the basis of superficial knowledge, so it is better to talk about simple structures that can be easily imagined using spatial imagination and elementary logic.
So, rafters are of two main types - layered and hanging.
Hanging rafters and types of their connections
Hanging rafters have two points of support - the outer walls of the structure. At the top point, such rafters are connected, resting against each other. As a result, a compressive and bending force acts on the rafter legs, and the system tends to “disperse”. Therefore, hanging rafters, as a rule, have a lower tightening that connects the ends of the rafters and relieves the force aimed at bursting. Often the role of the lower puff is played by a floor beam, the ends of which may or may not be extended beyond the walls.
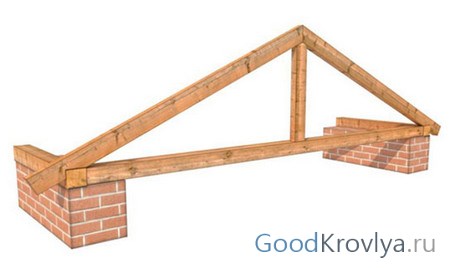
As you can see, the design of the hanging rafters is a triangular truss.
The triangular truss of hanging rafters effectively relieves the force of bursting
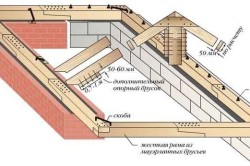
Depending on the angle of inclination of the rafters and the span between the bearing walls, the truss can be strengthened with additional struts, crossbars, girders and racks. Trusses are usually assembled in part or in full according to a template on the ground or temporary decking directly on the roof and mounted on the walls when assembled.
Connection of hanging structures with lower tightening
As shown, hanging rafters tend to move apart, so at the point where the leg is attached to the puff or beam, the rafter board will tend to slide along the surface of the puff in the direction of the force. To avoid this sliding, it is necessary to rest the end of the rafter leg. For these purposes, the following types of compounds are used:
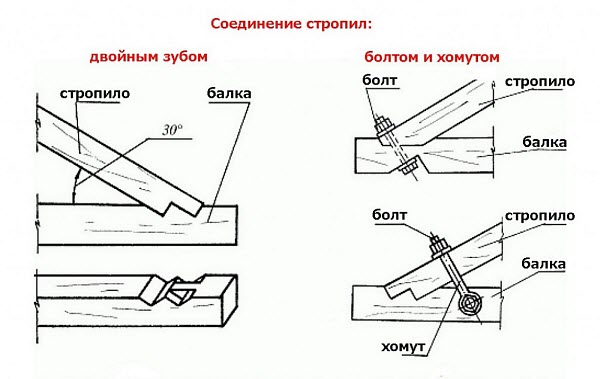
- tooth with an emphasis;
- spiked tooth;
- emphasis at the end of the tightening.
Depending on the angle of inclination of the rafter leg, a single or double tooth is used. To prevent horizontal displacements of the leg along the axis of the beam, the connection can be made with a spike and an eye.
A single tooth is used if the slope of the roof slope with respect to the horizontal is equal to or exceeds 35 °.
In the heel of the rafter, a wedge is cut out, as it were, at the end of which, on the lower plane, a spike is made. In a puff, respectively, a nest or an emphasis with an eye is made. The depth of the nest is approximately 1/3 - 1/4 of the thickness of the beam bar. A large cutting depth is unacceptable in order to avoid weakening the beam.
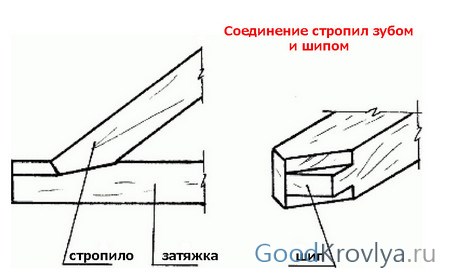
A single tooth with a spike is made at the end of the rafter
To prevent chipping of the beam end under the pressure of the rafter leg, the socket is cut at a distance of 250 - 400 mm from the outer edge of the beam. Such a connection is called a single tooth with an emphasis and a spike, it prevents the rafter leg from sliding and sliding along the beam in the direction of its longitudinal axis, and also prevents the rafter board from moving at the attachment point in the horizontal plane from side to side in the direction perpendicular to the longitudinal axis of the beam.
In the case of a sloping roof with an angle of inclination of the slopes relative to the horizontal of less than 35 °, a connection with an expanded friction area of the rafter leg and a protracted beam and an increased area of \u200b\u200bthe support of these elements is used. For these purposes, a double tooth with or without a spike is used.
For a double tooth with a spike, two stops are cut out in the beam, and a spike is cut out at the extreme stop, and a corresponding eye is cut out in the extreme tooth of the rafter leg, precisely fitted to the dimensions of the spike. The geometry of these elements must match as closely as possible to provide the necessary friction.
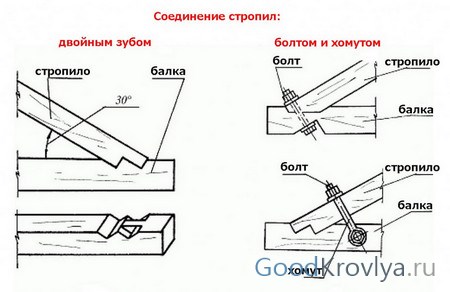
To stop the rafter leg, use a double tooth connection with a spike
The depth of the insert is most often used the same for both teeth. If the teeth differ, then, as a rule, the insert is carried out to a depth of 1/3 of the thickness of the beam for the first tooth and 1/2 of the thickness for the second.
Sometimes, for attaching rafters, the method of attaching a leg to the end of a beam is used. With such a connection, a stop tooth is cut out in the rafter so that the extreme plane of the tooth lies on the edge of the plane of the protracted board, and its other plane rests against a specially made in puff washed down. For connection at the end of the puff, the depth of the cut is 1/3 of the thickness of the puff beam, and the tooth should be cut as far as possible from the edge of the leg.
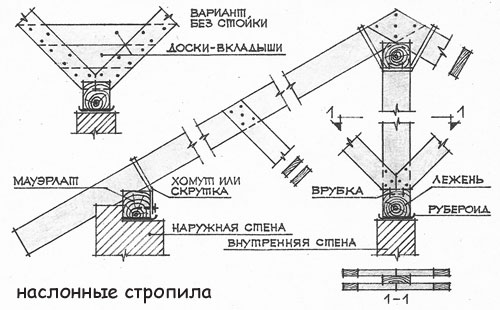
Rafter rafters and typical connections for them
Laminated rafters are placed in houses that have one or more load-bearing intermediate walls. In this case, a wooden beam is laid on the upper edge of the wall - a bed, into which vertical posts rest. On these racks they put a run, usually a ridge one. If the intermediate wall is not in the middle, then the run may be offset relative to the ridge. Such an offset should not exceed one meter for roofs spanning a span of up to 14 m.
Rafter rafters are installed in houses with columnar supports or with bearing wall in the middle
In the case of the middle location of the wall, the ridge run serves as a fulcrum for the rafter legs, which now rest not only on the outer walls, but also on the inner one. For such a design, the presence of a lower tightening is not always necessary, since only a bending force acts on the rafters. Such a system is called non-thrust.
Important! For a non-thrust system, the following rule must be followed: a bending non-thrust rafter has one fixed, but freely rotating support and one movable and freely rotating support.
There are three options for securing rafters that comply with this rule:
- Rigid pairing in the ridge and movable - to the Mauerlat. This is the most common connection for gable roofs with layered rafters. The top of the rafter leg rests on the run or on the opposite leg and is fixed with a wooden scarf, MZP or nail fight. Bolt fastening is also used. The lower end of the rafter is attached to the Mauerlat using a flexible metal plate, a vertically hammered nail or two side nails hammered obliquely through the rafter into the Mauerlat.
Sliding pairing at the bottom and rigid in the ridge does not give space
You can also fix the rafter leg with the help of corners nailed on both sides of the board, but then the nails are not driven into the rafter. The connection must be a slider, so you should not fasten the beams with a large number of nails or screws, otherwise the structure will become spacer.
press down truss system to the walls there will be wire twists made between the legs and crutches driven into the wall. If this function is transferred to the corners that attach the rafters to the Mauerlat, then the structure, again, will become spacer.
- Rigid attachment to the Mauerlat and movable - in the ridge. To implement such a scheme, the bottom of the rafter leg rests against the Mauerlat with a hemmed support beam up to 1 meter long, or a saw-tooth is made in the rafter bar, with which the rafter rests against the Mauerlat.
At the upper end of the leg, a horizontal cut is made with a bevel, and the depth of such a cut should not exceed 1/4 of the height of the rafter bar. The bevel is done so that the trimming does not interfere with the bending of the rafters, because otherwise the notch may rest against the girder beam with its side cheek and the system will become spacer. Trimming along the length should not exceed the height of the section of the rafter beam, and the length of its beveled part should be at least half the height of the section of the rafter.
Thus, we obtain a gable roof system, in which the rafters are freely laid on the ridge run and attached to it according to the principle of a sliding support, while the rafter legs are not fastened together. Therefore, now a gable roof can be considered as two inclined single-pitched systems adjacent to each other. high part.
It is important to note that the supporting filing with ribs or the cutting of the upper part of the rafter must be strictly horizontal, otherwise, at the slightest deviation, the system will immediately show the thrust. Due to the complexity of the implementation of the upper attachment point, such a scheme for gable roofs is practically not used, in addition, the lack of thrust on the Mauerlat when the rafters deflect under load is fraught with opening the ridge assembly of the roofing system.
- Rigid pinching in the ridge and a movable slider in the Mauerlat. With such a joint, the maximum bending moment falls on the ridge support, and the rafter legs receive unloading. With such a connection, it is possible to obtain a greater bearing capacity of the rafters, but at the same time the ridge assembly is loaded more heavily, so additional calculation of this assembly may be required.
Obviously, in all three mounting options, we used one support that allows sliding and turning, and one that allows only turning. Such fasteners today are made using mounting plates, as they significantly reduce the complexity of the work. You can use traditional staples, nails and wooden shorts.
Fasteners and elements
To increase reliability, the attachment points of the rafters are strengthened with bolts and clamps, the nodes themselves are attached to a crutch hammered or embedded in the wall with the help of steel wire rod or a metal strip.
Also, to make fasteners and connections of elements of the truss system, various wooden and metal devices are used - truss fasteners.
They are:
- wooden - kerchiefs, beams, short pieces for creating a spike, plates for creating a dowel;
Wooden scarves are often used to fasten elements of the truss system.
- metal - sliders and sleds, toothed plates, corners, perforated tapes, bolts, clamps, loops, staples, lining, nails, anchors, etc.
Corners, linings and clamps - the usual fastening of rafters
It is convenient to create sliding mates using special truss mounts.
Sliding connection mount
Such fasteners (sliding) are especially relevant for wooden and frame houses, since they “breathe” during operation, that is, they change their geometry depending on humidity and temperature. It is clear that if the rafter system is fixed rigidly and is deprived of the ability to level the movement of parts of the house, then the roof may simply not withstand the loads and collapse.
The choice of certain connections, the determination of their degrees of freedom, as well as the limits of this freedom, should be carried out only by a competent engineer or architect. The execution and manufacture of connections can only be entrusted to a professional, since the level of reliability of the roofing system, and hence the level of your comfort, directly depends on the accuracy of the geometry and fitting of parts to each other.
Fastening the rafters to the Mauerlat is one of the most important moments in the construction of a house, in particular when installing the roof.
The entire complex roof system rests on the mauerlat, which is its basis, the so-called foundation of the entire roof.
It is the mauerlat that protects the load-bearing walls from distortions associated with roof pressure, while equally distributing the load along the entire length of the walls.
Rafters, in turn, are the main structural parts of the roof.
The main nodes for attaching rafters to the Mauerlat
To begin with, it is worth highlighting the main mounting elements for installing a roofing system.
These include:
- corners - if necessary, firmly install the rafter legs on the Mauerlat. Able to make the mount more durable. The plus is that you do not need to make cuts in the wooden parts - the corners are fixed with “ruff” nails or self-tapping screws;
- brackets are made of galvanized steel. Installation is carried out without washing down the wood, the brackets are fastened with anchors, nails or screws;
- perforated mounting tape - used for additional fixation of the connection node, giving tenacity to the roofing system. Self-tapping screws or nails are required for installation;
- fasteners LK, "sled" - used to protect the roof from deformation during soil subsidence and shrinkage of the building;
- bolts with nuts, nails, wire ties, self-tapping screws, some other elements.
All connecting parts must be of high quality and reliable - you should not save on this.
It is necessary to exclude the use of all kinds of gaskets, which over time can deform and fall out.
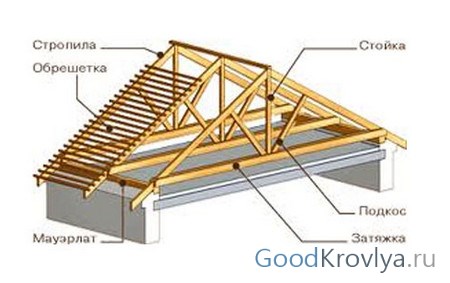
The truss structure consists of a mauerlat, valleys, rafter legs, ridge partitions, purlins, battens.
To figure out how all the components are interconnected, you need to determine what the Mauerlat and rafter coupling units are.
To begin with, the Mauerlat is attached to the axis of the wall. There are few bonding methods.
The first method is suitable when installing a roof of a large area. To do this, an armored belt is poured around the entire perimeter of the wall, into which metal pins are immediately inserted.
In this case, the power plate will be attached to the wall with studs that pass through the beam and are mounted.
When using the second method, the power plate is attached to the wall using wire. To do this, you need to lay it between the layers of bricks (3-4 rows before the end of the masonry).
In this case, you can fix the rafter with wire directly to the wall. However, this kind of connection can compromise the integrity of the wall.
If the knot is fixed to the beam, then a “tooth with a spike” is prepared in the rafter, and a stop for the spike should be cut out in the beam with this socket.
The cut is made at a distance of 0.2 - 0.5 m, starting from that part of the beam that hangs down. A single "tooth" is made with a spike that will not allow displacement to the sides.
In the case of a sloping roof, if the degree of inclination is less than 30 °, then the rafter legs are mounted with increased support on the beam.
There are three types of ridge joint: butt, overlap, fastening to a ridge beam.
In the first case, one part of the rafters must be cut at the same degree as the slope at the roof, and then it is necessary to rest against the corresponding rafter from the back (they must be cut the same way).
Trimming corners is desirable to do on a stencil. For fixation, 2 to 4 nails are usually used. The joint is fixed by placing a plate of wood or metal on it.
Installation on a ridge beam is similar to the previous mount. The difference lies in the fact that a ridge beam is fixed between the rafters cut at an angle. This type of knot is difficult, for this reason it is practically not used in construction.
Overlapping is the most popular way, although it is similar to the first. The main difference is that the connection is made not end-to-end, but overlapped. The rafters are connected by side cuts. Attract them with nails, bolts or studs.
Schemes and methods for attaching rafters to the Mauerlat
Rafter fastening is one of highlights during roof construction. The condition of the roof under different circumstances (snowfalls, showers, temperature fluctuations) will depend on the method of fastening the support beams.
Rigid mounting scheme
For a shed and gable roof, a rigid scheme for installing the truss system to the base is used.
The system of this fastening eliminates the possibility of influencing the joints of the nodes. During the operation of the roof, possible shifts and deformations of the roofing system are minimized.
High strength is based on the use of metal corners. Additionally, it is recommended to fix the beam to the base on both sides with special corners - this will help prevent transverse displacements.
The installation of the rafter system is carried out at the desired angle, while it is necessary to set the structure to a certain slope, fixing it with side nails. Using a rigid circuit, anchors and wire are often used.
Sliding mounting option
Everyone knows that wood expands in high humidity, and shrinks in hot and dry weather.
For this reason, it is more often used in construction wooden houses not rigid, but a sliding scheme.
When using this fixation scheme, in certain cases, the nodes of the truss structure can move in the right direction. A gable version of the roof device is suitable for the use of this mount.
There are several types of fasteners for this circuit. So, you need to make a recess on the rafter leg, then fix the Mauerlat and the beam, then fix everything with nails.
Moreover, this must be done in such a way that the nail passes through the beam and firmly sits at the base.
Another type of fixation can be done using metal staples and special plates. Very often an element called "sled" is used.
Despite the fact that the scheme is called sliding, all structural elements are securely fastened together, but if necessary, they are evenly displaced.
The use of this fastening scheme is due to the fact that over time the soil shifts and the foundation sags - this leads to a violation of the roof frame.
The sliding scheme helps to avoid unnecessary changes and destruction of the roof structure.
How to attach rafters to Mauerlat? It depends on the location of the load-bearing walls. Methods for attaching rafters to the Mauerlat are divided into layered and hanging. Layered, in turn, are divided into expansion and non-expansion.
Laying method of fastening rafters
The use of a rafter legless device makes the pressure on the load-bearing walls less. On a pre-fixed tightening, vertical racks are located, which will be the fulcrum. This method is suitable for pitched and double pitched roofs that have a main load-bearing wall.
The node supporting the rafters to the Mauerlat is often made articulated (sliding). If movable hinges are used in the joints, the roof structure can be lowered by several centimeters.
This property is very useful in the first years after the completion of the construction, as over time the new building sags.
If, together with the supporting walls, the roof does not change its position, then the walls of the building may be subject to deformation or destruction. This will not happen if the rafters are attached in a layered way.
Using the rafter fasteners of the spacer system, rigid fasteners without the use of hinges are required.
In this design, all connections are made thanks to the support bar. It turns out that the top of the attached rafter rests on the top of the corresponding rafter on the other side.
How to fix the rafters in this case? Fasteners to the desired Mauerlat must be carried out to the wall.
For this, a rigid frame is suitable, fixed to the wall with anchors or brackets, in the corners of which you need to install special corners.
This design is suitable if you need to install a roof for small houses. For large buildings, Mauerlats are installed in special concrete gutters with anchors. The main load in such a system falls on the gutter and is used in the construction of cinder block buildings.
Hanging mounting scheme
Hanging rafters are designed for use in the construction of buildings without load-bearing walls inside. The support points in this case are only external load-bearing walls.
Fastening of this design is carried out by a rigid type knot. Other options are not suitable, since the attachment of rafters with Mauerlat on the walls is the only support for the entire shed or gable roof.
Rafters, the installation of which took place in a hanging way, exert a strong horizontal load on the walls.
To reduce pressure, puffs (crossbars) are used. They are installed at the base of the structure perpendicular to the rafters. Attached to all the beams, the crossbars collect the rafters together.
It is impossible to build a roof with hanging rafters without the use of puffs.
A few important nuances
- you need to use only high-quality materials. It is not worth saving on this, since the durability of the roof and the safety of the residents of the house directly depend on the reliability of the building. Negligence during the installation of the roof is fraught with all sorts of displacements or, even worse, the collapse of the entire structure;
- all work should be done very carefully, the use of various gaskets is unacceptable;
- it is not recommended to use the installation of rafters without a power plate, as there may be a risk of distortion and violation of the integrity of the walls of the house;
- the most suitable way is the sliding method of fixation, which will avoid deformation of the truss system in the event of subsidence of the soil.
The arrangement of the roof of the house should be taken very seriously - you should not rush when attaching the rafters to the Mauerlat.
Before starting construction work, the truss structure must have a clear design, you must immediately select all the places of the connecting nodes.
Adequate stock of all mounting elements of proper quality is required. With this approach, you can be sure of the reliability and durability of the roof.
Fastening rafter beams to the Mauerlat is one of the most important connections, the strength of which determines the durability of the roof structure and the safety of people in the house. Illiterate work can lead to the gradual lowering of the rafter legs, deformation of the roof, and even the collapse of individual elements on the territory surrounding the building.
How to mount: basic rules
Creating a reliable connection between the rafters and the Mauerlat is a rather difficult task, but quite feasible under certain conditions.
- The fastening of the connecting parts to the rafters and the Mauerlat must be done efficiently and firmly.
- At the points of contact with the Mauerlat, the cuts must be as accurate as possible to ensure the reliability of the connection. It is acceptable to use various additional elements (for example, linings), which over time can be deformed, fly out, etc.
- When mounting rafters on a Mauerlat, in the process of attaching to other rafters, braces, stretch marks, and other parts, metal corners, plates, threaded studs, bolts, brackets specially designed for this purpose are used. The modern construction market provides the widest selection of truss fasteners for different types connections.
- When using bolts and nuts, washers or metal plates must be used to prevent the nut from sinking into the wood material. They can be replaced with scraps of plywood.
- Fastening rafters only with screws or nails is permissible only for a limited time period - during the installation of rafters. Then they must be replaced with a mount using corners, plates, bolts.
- For wooden buildings, the method of sliding fastening to the Mauerlat beam or the upper side logs is used.
- So that during the shrinkage of the walls, the rafter legs can slide along the wall, special details are used - “sleds”. They are an indispensable element, especially when installing soft roof or when the roofing is expensive shingles.
- Before fixing the rafters, it is necessary to saw the “saddle” into the rafter of the lower attachment at the junction of the rafters to the Mauerlat.
Such a measure will ensure a secure fit to the surface of the Mauerlat. Basically, for such an action, a template is pre-executed, after which cuts are made on all rafters with the same roof angle on all slopes. In the case of different values of the angle, the differences concern and washed down under the Mauerlat for the rafters of each of the slopes. As a rule, the depth of the cut is no more than ¼ of the width of the rafters.
- In order for the attachment points of the rafters to the Mauerlat to ensure the stability of the roof against strong gusts of wind and to withstand the load of the weight of the roof structure on the Mauerlat, it is necessary to use special steel-based corners. In a similar way, knots for laying rafters on the so-called vertical chair are created.
- The fastening of the rafters to each other in the ridge run is carried out end-to-end; steel plates are used to fix it.
- In other areas where the rafters fit together (for example, on a diagonal rafter), precise sawing of the elements is also required for the tightest possible fit. Fastening is also carried out using corners or plates (the choice of a specific fastener is determined by the junction) and twisting with bolts.
Ways to create a ridge rafter pair
There are three main methods used in the ridge run.
- The first is a butt joint. Its essence lies in cutting the upper part of the rafter leg at an angle equal in magnitude to the angle of inclination of the slope, followed by connection with its pair, also processed by a similar method. The best way to get the same rafter attachment points is to use a ready-made template. In this case, long nails are used for fixation.
- The second option is to fix the rafter beams on the ridge run. It resembles the first method. The difference lies in the presence of a ridge beam with this method. The result is a fairly robust design. In some cases, it becomes necessary to use additional supports, the presence of which significantly reduces the functionality of the attic space. Naturally, the use of such technology is not advisable when planning the insulation and arrangement of a living room in the attic space.
- The third way is to connect the rafters with an overlap. The method is similar to the one described above. The difference lies in the fact that in this case the upper joint of the rafters overlaps. The resulting connection is characterized by considerable strength, since the contact area of the rafters increases, and the studs used pass simultaneously through two elements.
The advantage of this method is that there is no need to use a template and the ability to mount the beams directly on site. The support for the upper part of the rafter is the ridge beam, and the lower part is the Mauerlat.
Installation of the lower ends of the rafters
The method by which the lower ends of the rafters are fixed is determined by the type of construction.
In the case of a wooden building, the upper framing of the walls can serve as a support, but this method is not suitable for foam and gas blocks. The essence of the problem lies in the need to attach the rafters to the Mauerlat, since stone blocks cannot hold the rafters.
If the walls are based on foam blocks, this creates certain conditions under which the traditionally used methods do not work properly. For example, a nail 10 cm long can be pulled out of the block with your hands - for this reason, fixing the twist does not work. In addition, it is necessary to take into account the presence of significant pressure in the horizontal plane.
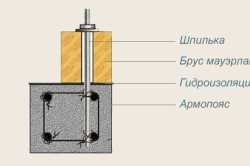
If masonry materials are used, one of the most effective solutions is the creation of an armored belt, so you can not come up with new methods for attaching rafters. As a rule, a reinforced belt is located at the top of the wall reinforced concrete structure. In width, it is equal to the thickness of the wall, and the height is usually 200 mm.
Filling requires formwork: as a rule, it is arranged from boards connected by screeds. Before pouring into the formwork, anchor bolts or studs are mounted. Their location must be strictly vertical. They serve as fasteners for the beam, the installation of which is carried out after the concrete has acquired the necessary strength. In addition to the strictly vertical arrangement of the studs, it is necessary to ensure that the step length does not exceed 150 cm. When using a smaller diameter fastener, it will not provide the required degree of reliability and will bend.
The method of attaching rafters to the Mauerlat is the most popular way to fix their lower section. The work must be carried out with the utmost care, since the durability of the structure directly depends on the strength of the joints. The creation of such a connection requires a cutout in the rafter legs so that they can be put on the Mauerlat beam.
This action is required for secure installation rafters - otherwise, the probability of slipping of the flat edge of the bar increases.
A reciprocal notch can be arranged in the Mauerlat. This moment determined by what kind of wood the timber is made of. In the case when the basis of the element is hardwood, it will be enough to create a slot. Acting with a slot in the rafter leg, it forms a stubborn lock.
The process of fixing the rafters to the Mauerlat made of coniferous trees is carried out without a slot, since its presence will reduce the reliability of the structure.
The main methods of fastening to beams
 Two main methods are used to fasten rafter beams to beams.
The simplest option is to attach the rafters to the beam, followed by fixing the structure with nails, however, the roof created by this method will not be reliable. It can be arranged on a small building for household purposes or a gazebo. For the installation of the roof of the house requires a great reliability of the structure.
To prevent parts from sliding relative to each other, when attaching rafters to floor beams, special connections are used:
- spiked tooth;
- emphasis on the end of the beam;
- pointed tooth.
The connection is carried out using one or two teeth. The specific choice is determined by the angle of inclination of the slopes. The reliability of the design can also be increased through the use of metal corners.
Cutting with one tooth is advisable with a fairly steep roof - in the case when the angle of inclination of the slope exceeds 35 degrees. A tooth with a spike is arranged on the rafter heel, and the stop with a socket for the spike is made in the beam. The depth of the nest will be 1/4 or 1/3 of the thickness of the beam. The depth must certainly be maintained within the specified range - this is necessary to prevent weakening of the structure.
The rafters must be attached to the beam with an indentation of 25-40 cm from the edge - compliance with this requirement will prevent the end of the beam from chipping under the pressure of the rafter legs.
On a single tooth, the use of a spike can be dispensed with, but it is necessary to prevent the rafters from moving sideways.
With an inclination angle of less than 35 degrees, the installation of the legs is carried out in such a way that the contact area increases due to the overlap with the beam - in a word, by increasing the supporting leg. In such a case, the following methods of fastening are used:
- stop with or without a spike;
- in two spikes;
- in 2 two spikes in the castle.
With an emphasis with a pinch (without it), it is supposed to use a tenon cut with an emphasis only under one tooth, as well as the use of a separate emphasis for the second tooth. In the rafter leg, it is necessary to cut an eye with the specified characteristics. In such a situation, the rafters are attached to the floor beams using a notch, the depth of which is one third of the thickness of the beam. For different insertion depths, the following values are recommended:
- for the first - 1/3;
- for the second - 1/2.
A less popular way is to mount the rafters at the end of the puff. For this purpose, a stop tooth is cut in the rafter leg, one plane of which should fall on the very end of the beam, and the second plane should rest against the created gash. Its depth should be more than 1/3 of the total thickness of the beam, and the execution of the stop itself should be carried out at the greatest possible distance from the edge.
The reliability of the connection can be increased by using rafter bolts or clamps, then mounting the entire assembly to the wall of the building - more precisely, to the pre-embedded anchor crutch. In this case, iron strips or wire loops are used.
Types of fasteners for mounting rafters to Mauerlat
For fastening the rafters to the Mauerlat are used different kinds fasteners and cuttings (inserts).
For metal rafters, the following fasteners are used:
- corners;
- bolts with nuts;
- wire ties;
- plates;
- self-tapping screws;
- fasteners LK;
- brackets WB;
- different types of KR corner;
- perforated mounting tape TM.
The use of LK fasteners is advisable if it is necessary to connect the rafters to the mauerlat, as well as other elements of the rafter system. Fastening to wood is carried out similarly to fastening with brackets. The exception is anchor bolts.
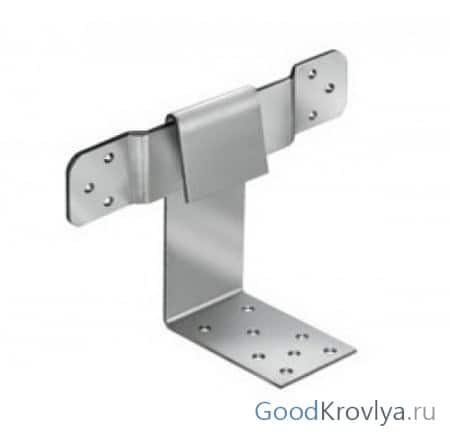
The use of WB brackets is recommended for mounting rafters to the Mauerlat. In this case, the tie-in on the rafter is not carried out, due to which it is possible to avoid weakening its bearing capacity. For the manufacture of brackets, galvanized metal of 2 mm thickness is used, and fastening is carried out using bolts, nails or screws.
Read the recommendations of experts on our website if you are looking for information.
What are the advantages and disadvantages of copper roofing can be found.
The use of the corners of the KR, its various modifications when constructing the rafter system, strengthens the attachment points of the rafters to the Mauerlat. In addition to giving additional strength to the joints of roofing elements, corners improve the load-bearing characteristics of the entire structure. Similar to the use of other metal fasteners, in this case there is also no need to cut corners into the structure, due to which the required level of load-bearing capacity of the parts of the rafter system is maintained. The corners are fastened with screws or nails with protrusions in the form of a ruff.
Mounting perforated tape when installing a truss system is used to increase the strength of the joints. It applies:
- to ensure a stronger fastening of the Mauerlat and rafters;
- in order to fix additional parts of the rafter system, which provide strength and rigidity to the entire system.
Nails or screws must be used to fasten the perforated tape. Its application does not lead to weakening of the load-bearing structures, since their integrity is not violated.
The process of attaching to the Mauerlat
The specific type of interface is selected depending on the design of the roof: in some cases, the use of a rigid joint is optimal, in other cases a sliding one is more suitable.
The advantages of rigid fastening are the absolute immobility of the structure and the absence of the likelihood of turns, shifts, and torsion of elements. This is achieved in two ways:
- through the use of corners with hemmed beams;
- by creating a saddle on the rafter leg, followed by fixing the connection with staples, nails, wire.
In the first version, the rafters are attached to the Mauerlat using a support beam. The rafter legs rest firmly on the pressure line. This becomes possible as a result of the use of a hemmed beam up to 100 cm in size. Then, to exclude transverse displacement, fixation is carried out. For this, metal corners are used.
The first method of fastening is rarely used today. AT recent times the popularity of the second method is growing, in which nails driven at an angle to each other are used for fastening. Inside the material, they intersect, after which a third nail is hammered in the vertical direction. The knots obtained as a result of such clogging are characterized by increased strength.
Both in the first and in the second case, additional fixation is carried out by means of wire rod.
In certain cases, it is required to perform a sliding version of fastening the rafters to the Mauerlat. In this case, special corners for sliding fastening are used. They allow one of the elements to slide freely in two directions, so they are excellent for ensuring safe shifts.
To use these details, you must perform some actions:
- make a drink and mount the rafter leg on the Mauerlat;
- connect the elements using special corners.
In most cases, a sliding type of connection is used for wooden buildings that are prone to a certain shrinkage during operation. When using a rigid fastening, shrinkage can lead to a violation of the geometry of the structure, damage to the walls or roof structure. The use of sliding joints avoids such consequences.
CONCLUSIONS:
- Fastening rafter beams to the Mauerlat is one of the most important connections, the strength of which determines the durability of the roof structure.
- To create a reliable fastening, certain rules must be observed.
- The ridge of a rafter pair is created in three ways: butt-joining, fixing the rafter beams to the ridge run, and overlapping.
- The method by which the lower rafter ends are fixed is determined by the type of building.
- Attaching rafters to the Mauerlat is the most popular way to fix their lower section.
- For fastening to beams, two main methods are used.
- When attaching rafters to the Mauerlat, various types of fasteners and cuttings (inserts) are used.
- The type of interface is selected depending on the roof structure: in some cases, the use of a rigid joint is optimal, in other cases a sliding one is more suitable.
Video instruction on how to fasten the rafters to the Mauerlat.
In order for the roof to have high strength and reliability, it will be required Special attention pay . In addition to correctly made calculations and drawings, fasteners for rafters and all its elements are of no small importance in the stability of the structure.
In addition to the load of atmospheric precipitation, the rafters must withstand the weight of the lathing and the total weight of the roofing pie, which must be taken into account when selecting fasteners.
The truss system is a spatial structure consisting of the following elements:
- Mauerlat;
- rafter legs;
- valleys;
- ridge beams;
- runs;
- crate.
In order to understand how all parts of the truss system are attached to each other, you need to figure out what nodes it consists of, what fasteners are used in each case and what they are. When assembling the supporting structure of the roof, fasteners, both steel and wooden, are used.
The main nodes of the connection of the truss system
Before connecting the Mauerlat and the rafter leg to each other, the first one will need to be firmly connected to the wall. Mauerlat is a thick beam (15x15), laid along the axis of the wall and parallel to the ridge of the beam, on which the rafter legs rest. The functions assigned to this element of the supporting structure are to distribute the load from the rafters, the weight of the roofing pie and atmospheric precipitation throughout the wall, including internal supports. In other words, the Mauerlat is the foundation for the entire roof. It is laid on the axis of the wall and fixed to it. In this case, there are several connection methods.
Method one. When constructing a roof of a large area along the entire length of the wall, an armored belt is poured, where metal pins are immediately embedded under the M12 thread every 2 m. In this method, there will be studs that pass through the beam through the wall and are attracted to the wall with a nut and pucks. With a small area of \u200b\u200bthe roof, where there is no large load on the wall, they do without a Mauerlat and the rafters are attached directly to the studs embedded in the masonry process.
Method two. Another quite affordable way to make the truss system stable is to attach the Mauerlat to the wall with a wire. To do this, you need to lay the middle of the wire between the rows of bricks 3 rows before the end of the masonry. Its length should be sufficient to tie and pull the Mauerlat to the wall. You can also do without the Mauerlat and fix the rafter with wire directly to the wall. But such a connection will give a point load on the wall, which may affect its integrity.
The scheme for attaching the rafter leg to the Mauerlat can be rigid and sliding. The type of connection depends on the shape of the roof and the type of rafters, which can be hanging or layered.
Rigid and sliding connection of the lower part of the rafters with Mauerlat

Connection nodes in this case will be made of wood and can have several types:
- A tooth that has only an emphasis.
- A tooth with a spike and an emphasis.
- Emphasis directly on the beam.
A single tooth notch is used for a roof with a large angle of inclination, where the angle between the mauerlat and the rafter leg is more than 35º. To do this, you will need to cut a tooth with a spike in the rafter leg, and create a nest under it in the Mauerlat. The use of a spike avoids lateral displacement of the rafters. The double tooth notch is used when installing more gently sloping roofs. The latter method is used extremely rarely.
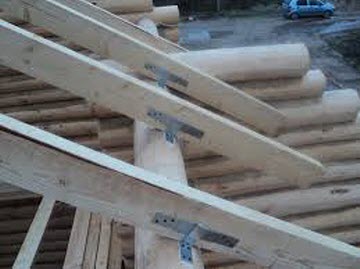
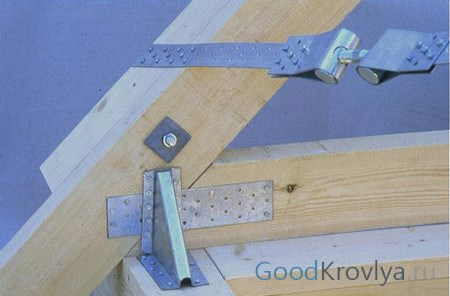
Recently, more and more often, a wooden mount for rafters has been replaced by a metal one, since it allows not only to get a more reliable one, but also to significantly reduce the installation work. Therefore, metal rafter bolts, brackets, plates, clamps, hinges and various corners are used as additional fasteners.
![]()
The most used method of rigid connection is driving nails from the sides at an angle into the mauerlat. Thus, internal crossing takes place within it. Further, for the final fixation of the connection, the third nail is driven vertically. Another way to prevent transverse displacement of the rafter leg is to fix it on the sides with metal corners.
The scheme for movable fastening of the rafters in the lower part is used for houses built from logs or timber. Since during operation the truss system is in motion due to a change in its physical properties, i.e., the building shrinks.
The rigid fastening scheme in this case is unacceptable, since such movements can lead to the destruction of the wall. This means that the attachment points need to provide mobility. In such cases, special swivel joints are used, which are called skids or corners with an oblong hole for fasteners. The sliding interface in this fastener achieves two levels of freedom through the free movement of one of the fastener elements.
Nodal ridge connection
The ridge connection of the truss system can be obtained in three ways: butt, overlap and on the ridge beam.
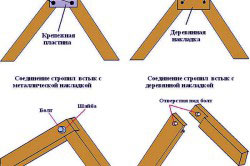
Butt. The upper part of the rafter leg must be cut at an angle equal to the slope of the roof. The opposite leg is also adjusted to the appropriate angle, but with an inclination to the other side. Further, they are interconnected at the top point with the help of a nail, which must be driven into the end of the rafters with the capture of the opposite end. In addition to nails, special plates are used for a more durable connection of joints. Both a 30 mm wooden board and a double-sided metal fixing plate can act as such fasteners. For its installation, bolts or nails are used.
The next two methods will be similar to the first, but have a slight difference. When fastening with an overlap, the upper parts of the rafter leg will be interconnected by their sides. The latter option is carried out by connecting each rafter directly to the ridge beam. In this case, threaded studs with washers and bolts are used as fasteners.
If trusses are used to stiffen the truss system, then to ensure good resistance to wind loads, it will be necessary to install required amount diagonal ties. The presence of a brace and a brace (rafter leg) in the supporting structure helps the gables of the house to be more stable. The brace is installed by resting the upper part in, and with the lower part it rests against the main floor beam. The strut helps to reduce the load on the rafters in the center. Its installation is carried out at an angle of 45º. Diagonal connections are fixed using clamps, corners, plates.
Types and features of metal fasteners for rafters
If earlier craftsmen used wooden elements as such fasteners (bars, slips, dowels, metal staples, wooden pins, wedges), now such methods are inferior to more modern types. The construction market has a large range of metal fasteners, which are now much stronger and make the process much easier. The manufacturing technology of these elements uses metal, the thickness of which varies from 1.5 ... 3.0 mm, which allows the product to be more resistant to loads compared to any other material. In addition, rafter fasteners are available in any size and allow you to carry out the technological process with great accuracy.
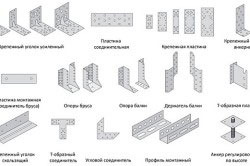
The metal fasteners of the rafters, which can be perforated and nailed, include:
- perforated mounting tape;
- corners;
- plates;
- beam support;
- beam support;
- wire tie;
- self-tapping screws;
- bolts with nuts;
- corners of the KR;
- brackets WB;
- fasteners LK.
The use of perforated products allows strong enough with all parts of the system and provide good rigidity and strength at any angle. They are characterized by the presence of many holes for bolts, screws and self-tapping screws, with the help of which the attachment to the tree is carried out. The size of the product is adjusted by trimming to the desired length and width.
Also fasteners can be nailed. However, the use of this type is possible only in the factory by cutting, which bends the cone-shaped part. This operation is carried out by special machines under pressure.
KR corners have a large number of modified types, which reduce the risk of bolted joint breakage during natural settlement of the structure. Fastening is carried out without the use of special equipment using screws and nails.
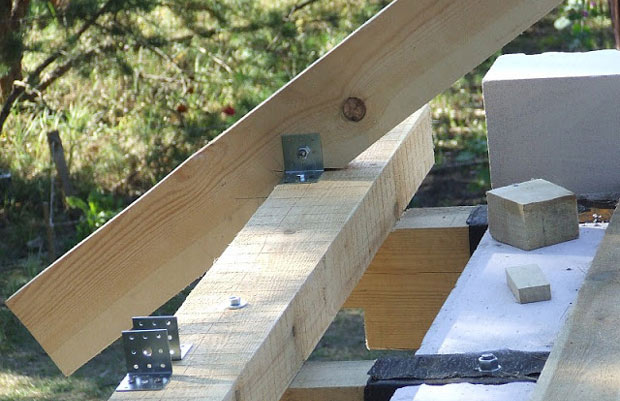
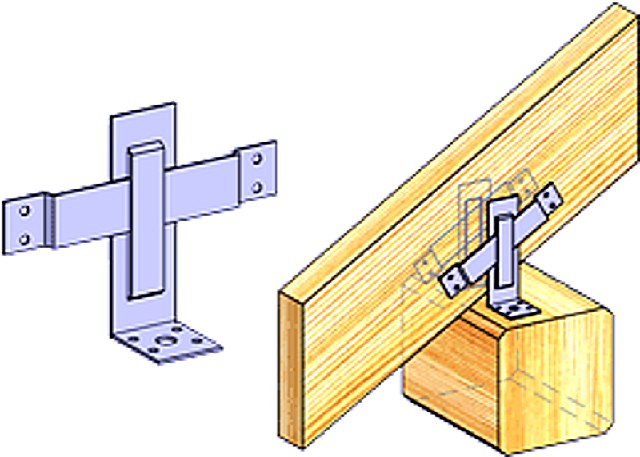
Brackets WB are used to fasten the bracket of the carrier beam during the installation wooden floors in houses made of rounded logs or timber. At the same time, the tie-in on the rafter leg is not made, which does not weaken its bearing capacity. The connection is carried out using anchor bolts, nails or screws.
LK rafter fasteners are applicable where it is required to connect rafters and beams. It has the same advantages as WB fasteners, but the process is carried out only with screws or nails. Used in the construction of wooden houses.
Fasteners in the rafter system play a huge role. It depends on him the strength and duration of operation of the entire roofing pie. Therefore, the choice of type and method of attachment should be treated with great attention.


