
It is possible to independently perform the installation of a wooden floor between floors, subject to significant experience in carpentry and general construction work. Interfloor floors made of wood are among the most important structures in residential buildings and require careful adherence to installation instructions.
1 Do-it-yourself wooden flooring - advantages and disadvantages
Any overlap between floors, including wood, must meet the following characteristics:
- Static and dynamic strength. The design must withstand the weight of the expected load with a large margin;
- Rigidity sufficient for a high-quality basis for the arrangement of floors (upper floor) and ceilings (lower floor);
- Durability comparable to the life of the entire structure. Replacing interfloor floors in an old building is a complex and expensive repair procedure; at the stage of capital construction, it is much easier to make floors between floors from durable wooden beams;
- A good floor must have decent heat and sound insulation.
Floors made of wood satisfy all the listed qualities and are distinguished by additional advantages. They are easily mounted by two people and do not require the involvement of heavy construction equipment. A span of up to 100 m 2 can be laid in one day, if we talk about load-bearing structures, and not their finishing. Wooden beams are many times cheaper than reinforced concrete slabs or steel floors - and their service life is tens (or even hundreds) of years.
The potential dangers of using wood as a load-bearing interfloor structure include the danger of its decay and ignition in case of fire. These factors are minimized by appropriate processing of the beams prior to installation. Equally important is the consideration of the minimum allowable deflection. Coniferous wood is used for interfloor beams due to durability and resistance. But it is quite plastic - therefore, the maximum the size of the beam span made of wood is limited to a size of 5 meters. If it is necessary to block a large room, additional supports (columns, crossbars, etc.)
2 Overlapping of the second floor on wooden beams - design calculation
From the correct calculation and competent general construction preparation, it largely depends on how high-quality the device of the wooden floor between the floors will turn out. According to convenient seats with the help of optimally prepared beams, interfloor openings are covered quickly and easily. First of all - the direction is always chosen according to the short size of the room. The installation step is interdependent on the cross-section of the base of the floor, but is usually equal to 1 meter, since a smaller step will lead to great labor intensity when arranging seats. It is wiser to buy wood of a larger section than to spend money on a palisade of weak floors.
For an installation step of 1 meter, subject to the habitability of the second floor, it is necessary to acquire such load-bearing bars that can withstand a load of at least 400 kg / m 2:
- With a span of up to 2.2 meters - 75x150 mm;
- With a span of up to 3.2 meters - 100x175 mm;
- With a span of up to 3.2 meters - 125x200 mm;
- With a span of up to 5 meters - 150x225 mm.
Overlapping of uninhabited attics is carried out with the same step, but with a material of a smaller section. For example, for half the load (that is, 400 kg / m 2), bars 50x160, 50x180, 70x180 and 70x200, respectively, will be enough. Just keep in mind that you will then have to crawl in the attic with such an overlap, and not walk ... As you can see from the calculations, load-bearing beams with a ratio of 1.5: 1 height to width are considered optimal. For attic spaces, on the contrary, a narrow tree of an elongated profile is used due to a small load in the future.
3 Overlapping between floors - getting ready for installation at the construction stage
When erecting walls made of bricks, silicate blocks, aerated concrete, they provide openings for floor elements. The step of these openings is 1 meter, the depth is at least 30 (and preferably 40) centimeters, the width is the same. The beam must enter the wall by at least 20 cm, plus free space will be required for its ends. The end part of the ceilings is not filled with any building mixtures in order to natural ventilation and inhibition of decay.
The more accurately the seats in the walls of the house are displayed in height, the easier it will be to lay the beam structure. In houses made of wood, it is possible to embed beam structures directly into the walls, here the implementation of the future overlap preparation at the stage of wall construction is not required. It is important to take into account the inadmissibility of installing load-bearing bars close to a parallel wall, no closer than 10 cm, and be sure to maintain a strict constancy of the installation step - the allowable "run-up" from the nominal value of 1 meter should not exceed ± 5 cm.
4 Overlapping the second floor on wooden beams - installation steps
The walls with landing nests are ready, the wood and auxiliary materials are purchased, the tools are ready - we begin the installation of floors:
- One day before installation, the tree is smeared with antiseptic mixtures and fire-resistant compounds - with the exception of the ends, no "chemistry" can be applied to them. The choice of such compositions is now very large, you can name brands Finesta, Seine and, Neomid, Pinotex and others with a wide selection of antiseptics and flame retardants. All primer should dry well;
- We measure the beams and saw off with a sharp wood saw with a margin of 35-45 centimeters from the size of the room for reliable support on the walls. The cut should be at an angle of 60˚, so that when viewed from the side, the overlap element looks like a trapezoid with a wide lower part. The ends recessed into the walls are coated with resin and wrapped with roofing paper after it dries;
- Installing the end beams. We work from a high, wide and reliable "goat", it will not be possible to manage with ladders alone. Carefully set them in level and on the horizon. As linings, wide sections from the same floors are used, and in advance with antiseptic and fire-fighting compounds. Make sure that the ends of the beams do not rest against the walls, there should be a gap for ventilation of at least 3-5 cm in depth;
- When there is no doubt about the accuracy of the installation of the side beams, they are fixed with dry gravel in the landing nests. Lines are pulled tightly between the extreme beams. On these auxiliary fishing lines, other elements of the beam frame of the floor are installed;
- The installed beams are once again carefully measured and adjusted, after which the landing nests are concreted with a solution of cement and crushed stone.
The base of the wooden interfloor ceiling with your own hands is ready. After the cement mortar has hardened, you can proceed with the thermal insulation of the floors, laying the waterproofing film and laying the floors on the new floor. If the floors of the upper floor are laid on additionally installed logs, then the ceiling of the lower one can be fixed directly to our beams.
Private construction of houses is widespread in our country. Timber floors between floors brick house, in a wooden or block structure are used without fail. They are quite cheap, have a low weight, do not require the use of heavy equipment for installation, and are strong enough. With proper installation, their service life is measured in tens of years.
What are floors made of?
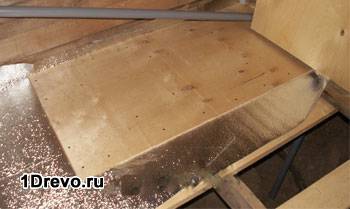
Wooden floors between floors are arranged in cases where the span width does not exceed 8 m. The main structures are beams. They can be made from beams (photo No. 1) or logs. The minimum section of the bars can be 50x150 mm, the maximum - 140x240 mm. They are laid in increments of 0.6-1.0 m. The wood used is usually coniferous. It has a special bending strength. You can make floor beams from materials that are well air-dried. When tapped with the butt of an ax, a clear and sonorous sound is heard.
To build an interfloor overlap, you need some more materials:
- cranial bars 50x50 mm;
- boards for the construction of the subfloor;
- finishing floor boards;
- insulation material;
- hydrovapor barrier film;
- antiseptic mixtures;
- bituminous mastic;
- ruberoid;
- decorative coating on the floor and ceiling.
The cranial bars are attached to the beams from their lower part. A draft ceiling for the lower floor is later hemmed to them. Draft ceiling boards can be any, even raw. Boards for the manufacture of a finishing floor must be planed and tongue-and-groove. Mineral wool boards are usually used as insulating material. Sometimes rolled material is also used. The insulation is covered with a film of hydro and vapor barrier. It provides impassability of water vapor to the insulating layer. Antiseptics and mastic, along with roofing material, are needed to protect the tree from moisture and fungus. Floors and ceilings are usually finished with a decorative coating: tiles, linoleum, carpet, laminate, parquet and other materials.
How to make a ceiling in the house
Interfloor overlapping begins to be done even during the construction of the walls of the house. The ends of the beams are laid in the walls. For this in brickwork walls are made nests with a depth of at least half the thickness of the bearing wall. Can be done and through holes. They are later sealed with a vapor barrier material. Rectangular beams have a wide side in the vertical direction. In this position, their rigidity increases significantly. First, the extreme beams are laid in place. Between them, you can stretch the fishing line to orient the following beams. The horizontal position of the beams must be constantly monitored by the level (photo No. 2).
The ends of the beams are treated with bitumen mastic and wrapped with roofing material. The ends do not need to be covered with anything: let excess moisture come out through them. We continue to do the wooden floor in this way. Bars 50x50 mm are attached to the beams with self-tapping screws. They serve to support the ceiling of the lower floor and the subfloor of the upper one. Bars are better to take pine. They are treated with an antiseptic. Draft boards are also fastened with self-tapping screws to the cranial bars. They also need to be treated with an antiseptic. A vapor barrier film is placed on top of the laid floor. The strips are overlapped, the joints are glued with adhesive tape. Insulation material is laid on this film. Its thickness should not exceed the height of the beam. Can be used for insulation mineral wool, expanded clay, polystyrene. It is better to take fire-resistant materials (photo No. 3).
The laid insulation materials are covered with a film to isolate from water from the upper floor. Further, this whole cake is closed with thick plywood, chipboard or other similar materials with a thickness of 16 mm or more. Next, you can level the floor of the upper floor and do the final finishing on it. This is done after the completion of construction, during the finishing works.
You can also install a "warm floor" system. Similar floor slabs in a brick house are made at each level of a brick house. They almost do not create a load on the foundation built under the house, they have the properties of thermal protection and sound insulation. Floor slabs from natural materials allow the floor and ceiling to "breathe".
Interfloor floors made of wood have some more advantages:
- ease of installation;
- availability of all materials;
- high environmental friendliness;
- attractive look.
Along with the pluses, there are also minuses in such facilities. It:
- wood may rot;
- it is able to deform and creak;
- some elements, if installed incorrectly, “play” under loads.
Conclusion on the topic
Overlapping in a brick house can be made from different materials. Can be used monolithic overlap from reinforced concrete, overlapping of a ceiling by wooden designs. In private homes, home-made wooden floor slabs are more often used. The total thickness of the floor slab, taking into account the laid thermal insulation, is more than 15 cm. The beams are inserted into the brick wall with their ends. From the bottom of the beams, the ceiling of the lower floor is formed, from above - the floor of the upper one. It is possible to do all this with my own hands. The floor and ceiling with proper installation for many decades retain their performance.
Monolithic reinforced concrete slab has a long service life. But its mass is also huge. Such a monolithic ceiling should be mounted in a building standing on a strong foundation. In private construction, this is not always possible.
Wooden parts must be impregnated with compounds that will protect them from rodents, bark beetles, from moisture and fire.
Short beams can be spliced different ways. You can strengthen them if you attach and fasten a channel of a suitable size with anchors on the side. Choose for your brick house a monolithic floor or a lighter and more affordable wooden one is up to you.
In private construction, situations often arise in which it is impossible or not very convenient to use reinforced concrete floors. Such cases include the installation of the ceiling on a frame-panel or wooden house.
Wooden floors are used quite often, even if ordinary building bricks are used as the wall material.
In general terms, a wooden floor is a bar, an inter-beam filling, a roll, a finishing layer. Wood flooring is much lighter than concrete slabs or monolithic pouring, it can be done by hand and it does not create a significant load on the foundation and walls.
Types of wooden floors
Quite often, developers build houses with an attic or with a basement, houses with several floors. All premises of the house must be separated from the main residential area by a ceiling.
According to its purpose, a wooden floor in a brick house is divided into the following types:
- basement or basement. It serves to separate the residential floor from the basement. The main requirement for it is good thermal protection;
- attic, which serves to separate the residential floor from the attic. It must also retain heat and not be affected by condensation. Therefore, when arranging the thermal insulation of the attic floor, a vapor barrier layer is necessarily used;
- interfloor, which serves to separate residential floors. The main requirement for it is good sound insulation.
The choice of beams for overlapping
There are several types of wooden beams:
- from a solid bar;
- knocked down from boards;
- from round wood.
Beams from a bar
This construction material is used most often, the main advantage is its affordable price and environmental friendliness. The main disadvantage is the fact that most often the timber is made from the core of the tree, which is inferior in density to the outer layers. Because of this, deflection of the beam is possible, which is highly undesirable.
A separate type of timber is glued laminated timber. In terms of its load capacity, it significantly exceeds the solid one. The manufacture of such a beam is possible according to individual sizes, which can significantly save time on its fitting and installation.
Beams knocked down from boards
Round timber beams
Note! High-quality wooden flooring should be made of dry softwood. Only in this case you will get full confidence that the floor will not be subject to rotting with proper installation and operation.
You can find out the cross section of the beam and the required center distance from the table:
| Beam dimensions, mm | span length | |||||||
| Beams for basement and interfloor ceilings | ||||||||
| 140*180 | ||||||||
| 150*200 | ||||||||
| 160*220 | ||||||||
| 50*160 | ||||||||
| 50*200 | ||||||||
| 80*180 | ||||||||
| Beams for attic floors | ||||||||
| Bars Beam center distance | ||||||||
| 140*180 | ||||||||
| 150*200 | ||||||||
| 160*220 | ||||||||
| Planks Distance between centers of beams | ||||||||
| 50*160 | ||||||||
| 50*200 | ||||||||
| 80*180 | ||||||||
The order of the device overlaps
Instructions for correct installation next:
- when erecting the outer walls of the house, special niches with a depth of 150-200 mm are left in them. Very often as modern material for walls choose double silicate brick m 150, which is convenient to work with;
- prepare the bars for laying in niches, treat the ends with bituminous mastic or wrap them with several layers of roofing material;
- the ends of the bars are not processed, this is necessary to release moisture from the wood;
- if necessary, treat them with a refractory agent and an antiseptic;
- lay the bars in niches. It should be borne in mind that the supporting part should be 120-180 mm long in order to provide a gap between the beam and the wall of 20-30 mm;
- wooden shields or lightweight concrete panels are attached to these bars;
- from below, the space is sewn up with boards, panels or sheets of drywall;
- a layer of insulation is laid on top of wooden shields. In attics, a clay-sand layer is often used, then a layer of dry sand or slag.
Note! The thickness of the layer of any material for interfloor overlapping should be at least 100 mm, and for the attic and basement of the order of 200-250 mm.
- pierce the logs across, at a distance of 50-70 cm;
- planed boards are fixed on the logs;
- sometimes, instead of wooden logs and boards, a reinforcing mesh is fixed and a concrete screed is made;
- perform the final finishing of the floor and ceiling.
Conclusion
In the presented video in this article you will find additional information on this topic.
Hello dear readers and subscribers of Andrey Noak's blog! Not very long ago I had construction experience wooden house and I commanded in my own house. Now an important task has arisen in the construction of floors between floors. Yes, probably the most important point, the secrets of which I decided to share with you.
So, today I will talk in detail about how to make a wooden floor between floors with my own hands. This design consists of load-bearing beams, inter-beam filling, floor, as well as a finishing layer of the ceiling. For heat and sound insulation, a special flooring is used - reel. Let's look at each element of the design separately.
Beams are usually called rectangular bars - load-bearing structural elements. Their cross section directly depends on the load created by the ceiling itself, as well as on the future furniture in the room.
You should always count on the load with a margin of at least 30%. Most often, beams are used with a height of 140-240 mm, a thickness of 50-160 mm and laying every 60, 80 or 100 cm, according to the section.
The supporting ends must have a length of at least 15 cm. For their laying, the “beacon” method is used, when the extreme and then the intermediate beams are first mounted. How to check the correct installation, you ask? We check the extreme beams with a spirit level or level, and the middle beams with a template or rail. For leveling, different tarred trimmings of boards are used. It is strongly not recommended to lay chips, trim the ends to align the structure.
The bars must be laid at the same distance and parallel to each other. They must be treated with an antiseptic, and wrapped in several layers of roofing material. In case you have brick walls, the edges of the bars are additionally processed with bitumen, which will increase the resistance to moisture and rotting processes.
When installed in the walls and at the ends of the beam, spatial niches will appear around the mount, they can be foamed or sealed with insulation. You can even use cement.
If the wall is thicker than 2.5 bricks, then at the ends of the bars you need to leave ventilation grommets that will protect the base from moisture condensation. At the joints with the internal walls, several layers of roofing material are placed under the beams.
Every third beam must be attached to the outer wall with anchors from the sides or from below, while embedded in the brickwork.
If you do not have enough timber, then you can put together boards so that the total cross section does not decrease compared to the main beam.
Hewn log beams
Instead of beams, logs hewn from several sides (often from 2 sides) can be taken as a basis, among the people such material is called a gun carriage, you can read more about it. But for them there are corresponding requirements:
- First, you need to choose the right diameter;
- Secondly, the wood must be dried indoors or under a canopy to a moisture content of no more than 20%.
The big "plus" of this solution is its cheapness.
To strengthen the bearing capacity of the floor, you can use a cross installation scheme. With such a structure, the ceiling rests along the contour on all the walls of the building and less lumber is taken for the structure than with the usual one. To strengthen the intersection nodes are pulled together with wire twists or clamps. Such a system is used very rarely, because it is easier to make an ordinary floor and reduce the pitch of the supporting beams.

Crossover between floors. Fastening is carried out with special clamps ...
It is worth noting that the floors differ in insulation. The attic is insulated using the lower vapor barrier layer, the basement - using the upper vapor barrier layer, and soundproof materials can be placed between the first and second floors.
The next step is rolling
Highly milestone in the construction of the floor is the roll. To properly strengthen it, bars (5 × 5 cm) are nailed to the beams.
The plates must be tightly fitted together, and there should be no gaps between the individual boards. The bottom surface of the filing must necessarily be in the same plane with the beams.
Boards (20-25 mm), fastened with nails (at an angle). During the construction of the reel, the boards can be replaced with gypsum-slag, fibrolite and other light-weight concrete slabs. Additionally, such plates increase the fire resistance of the structure. A layer of roofing felt or roofing material is laid on the already attached boards (plates) and sealed with insulation. To do this, you can use slag, sawdust or mineral wool. The type of insulation, as well as its thickness, must be determined in accordance with the outside air temperature.

We roll and cover with a board 25 * 150 ...
The top of the beams is covered with a layer of roofing material. If the beams have a rare arrangement, then special logs can be applied. They are not a mandatory element and their presence is determined by the wizard.
When constructing ceilings between the room and the roof, as well as basement ceilings, some elements will be superfluous. For example, in the attic you can do without a lag and a clean floor, and in the basement there is no filing. When making a basement, you can lay a roofing material ball all over the floor, and use crushed stone or gravel as a backfill.
Economic overlap
Such an overlap consists of wooden panels, has a one-sided or two-sided sheathing, which takes the load along with the frame of the shields. It has an excellent bearing capacity in cases of a strong connection of the skin with the ribs of the boards of the shield frame.
For the construction of such a structure, you can use construction plywood or chipboard. It is not recommended to use cement-bonded, carpentry, gypsum board and gypsum-fiber boards for support, as they are not able to bear the load and are much more expensive than chipboard.
Limit deflection under load
The overlap tends to sag, which can be felt even when walking. To avoid discomfort, the deflection should correspond to 1/300. For example, if the span is 8 meters, then the deflection should be no more than 2.5 cm.
It is very important to take into account that various external loads are transmitted through the ceiling to the entire structure of the building. To compensate for such loads, it is recommended to strengthen the upper skin. All connections must be strong, and additional partitions must be connected to the ceiling.
Fire protection structure
All materials used are divided into combustible and non-combustible, which is prescribed in building codes. In accordance with this, ceilings are distinguished, if possible, by fire-resistant and semi-fire-resistant.
If the structure is made of solid wood or other wood-based materials, it is recommended to treat it with a special fire-resistant mortar before construction. Gypsum boards and gypsum boards are non-combustible and do not need additional processing.
We increase the bearing capacity of the floor
If necessary, the bearing capacity of the beams can be increased by attaching special overlays made of thick boards. Very often, a method is used when the ends of the overlays, like beams, lie on supports.
Instead of boards, steel channels can be used. Such pads are attached to the side of the beam with bolts, while only one side of the beam can be strengthened, but still it is more reliable to strengthen both sides.
The easiest way to increase the bearing capacity is to lay additional beams. But this process is more laborious and expensive. Additional bars cover the spans between the main beams.
As you can see, in old houses, the beams are laid with a small step and have a sufficient section, which indicates a quality construction.
It is very important to check the condition of the beams and ceilings, and in case of damage by pests or moisture, be sure to strengthen them. If, under prolonged exposure to moisture, the heads of the beams on the supports are damaged, then the damaged part must be removed, and the remaining part must be strengthened and lengthened with durable thick boards.
The overlapping elements are a clean floor and a filing, but they belong to the finishing work section and we will talk about them another time.
Related videos
Good luck and see you again, Andrey Noak was with you!
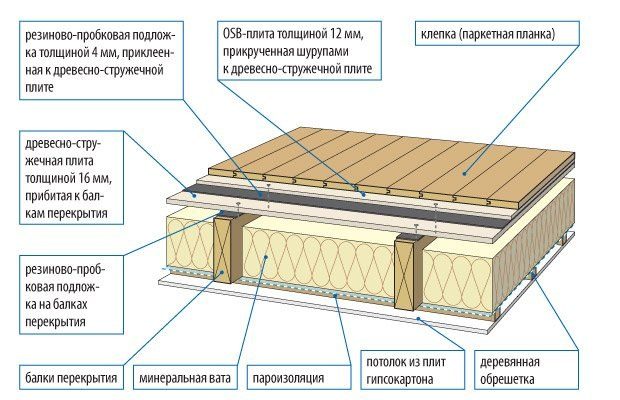
High-quality interfloor overlapping in a wooden house depends on the correct calculation, choice of material and accompanying layers of thermal and waterproofing. An independent device is possible if the following rules and process steps are followed. It also describes the common mistakes of home-grown craftsmen, warning which it is not difficult to achieve safe operation.
The choice of material for beams and heat-waterproofing raw materials
Professionals are well aware that floors in any object must have the following qualities:
- Reliability in terms of the weight of the superstructure, placement of household items, frequency of operation. That is, if the second floor is determined to be a residential type room - bedrooms, children's rooms, offices, then wooden beams should be at least 150 mm in cross section.
- Have an allowable deflection of 0.7% of the opening. These are the rules of SNiP. The design of interfloor ceilings, having a margin of transverse rigidity, transfers it to all load-bearing elements.
- Fire resistance, hydro, heat and vapor barrier are important companions of beams, so the interfloor pie in a wooden house has a complex configuration and does not tolerate deviation from the laying rules.
The type of object also matters - a frame, a beam, a log. Accordingly, raw materials for a rigid bond are chosen.
For profiled solid wood, this is a beam from 2.4 m to 3.6 m long, glued - 4.2-6 m with a cross section from 150 mm to 200 mm. Logs should be covered with appropriate material, which will also look aesthetically pleasing.
Floor insulation
The spans between the floors of any building are both the ceiling and the floor. Accordingly, the layering of insulating materials varies. For the load part, that is, the floor, the following raw materials are used:
- Inch boards (depending on the weight of the furniture, they are changed to a more impressive thickness).
- Moisture resistant plywood in two layers.
- Cork insulation between plywood boards.
- Waterproofing.
- Clean floor.
Accordingly, the lower part, which is the ceiling, will be loaded less, as it is deprived of operation:
- Vapor barrier.
- Drywall sheets.
- Finishing material - block house, lining.
The construction market is full of proposals for insulating and finishing materials. You need to choose according to your wallet, but at the same time do not save on quality - wood is a capricious material.
Do-it-yourself installation of interfloor ceilings
The design of interfloor ceilings is a responsible matter, so the following steps must be followed strictly. So:
- Installation of niches for inserting beams takes place on the longest walls, that is, the logs must be commensurate with the smaller wall parameter.
- The timber installation step should not be less than one meter; for large spans, the laying width is provided up to 0.5 m.
- Niches are cut by hand with an electric saw. It is universal for both timber and solid logs.
- Next, there is a tab of beams. The ends of the lag are wrapped in two layers of roofing material or other material, so that the edges of the insulation on inside the walls protruded by 4-5 cm. The fastening takes place with anchor bolts.
On the beams, cuts are made in advance for inch transverse boards in increments of 40-60 cm. The ends should lie exactly in the middle of the butt.
- Next, you should fill the boards from the side of the ceiling. Thus, two goals can be achieved - to make a rough coating from below and to provide sector space for the insulation tab. As this, mineral boards or styrenes are purchased, which are the best in their class in terms of heat capacity.
- Further, after laying the slabs, moisture-resistant plywood follows, between which cork sound insulation is laid - the best in the class of muffling sounds. Plywood should be laid with seams in a checkerboard pattern.
- Now the floor needs to be protected from possible moisture. To do this, waterproofing is lined - polyethylene, rolled rubber - it will work as depreciation or another product for this purpose. fasten protective layer using adhesive tape or a furniture stapler, which is more reliable.
- It's time for the cleanup. If the general finishing work has already been completed, then you can use rolled decorating surfaces - linoleum. When finishing is yet to be done, then solid raw materials are laid on the prepared platform - grooved board, laminate, parquet, and so on.
Now you should bring the lower surface - the ceiling - into proper condition. It is not worth sealing or tightly knocking out draft boards - the gaps will create the necessary ventilated channels for the wood.
- A vapor barrier is laid on the surface. It will prevent the ceiling from being moistened with fumes from the inside.
In this capacity, a foil membrane is used. It is attached with the shiny side out using a furniture stapler.
- Now you can proceed directly to decorating the ceiling. The budget and most common option is upholstery of the GKL ceiling.
Be sure to be labeled as moisture resistant. A more aesthetically pleasing interfloor ceiling in a wooden house will look sheathed with clapboard or block-house of natural origin. Thus, the environmental component is fully observed.
It can be seen from the written that installation is not difficult even for non-specialists. Using high-quality tools and accurate measuring devices, you can achieve professional results.
Errors when installing wooden floors
With an independent device of any design, there is a real chance to save your own budget. However, with a caveat - with a professional approach.
Beginners, on the other hand, can make a lot of mistakes, in which the interfloor floors of a wooden house will become not only unreliable, but also pose a danger to residents. So, what are the tricks of a quality installation:
- The biggest mistake will be the installation of beams closer than 40 cm to the chimney. Wood, as you know, burns and this does not always happen because of an open flame - heating and charring will cause smoldering and not far from trouble. In addition, the surface of a brick chimney must be plastered with special compounds to a minimum thickness of 2 cm.
- Log wood should be perfectly dry. If it was purchased without confidence in this, then it is worth waiting up to six months, setting the raw materials on stands in a dry and ventilated room. Installing wet whips is fraught with the entire structure of the house, especially when it comes to log cabins.
- Treat future floors for protection against rot, fungus and bark beetle. Even if the seller assures that the goods are processed in the best possible way, this does not mean that you need to take a word. Then, in case of misfortune of all the described types, professionals will have to open the floors and “treat” the beam.
It becomes clear that the "tricks" mainly relate to the requirements for wood. If it is of high quality and the installation steps are followed, then the arrangement of interfloor overlapping in a wooden house will meet all the canons.
You need to enable JavaScript or update the player!


