
The first thing to do before erecting a hip roof is to develop a project. It must contain an accurate drawing and the correct calculation of the entire structure. If you have experience in this matter, you can make a project with your own hands. For a person who does not have certain knowledge, it is better to entrust the drawings and calculation of the roof to a specialist. However, in any case finished project requires approval prior to commencement of construction work.
Common mistakes when calculating the roof
Many even experienced craftsmen, when calculating a hip roof, immediately begin to draw up a drawing and a detailed plan, which is extremely wrong. Behind these actions lies the main mistake - the lack of measurements of the building box. Of course, there are general dimensions, but few people pay attention to the walls. From the outside, they appear straight with perfectly right angles. But if you take and perform additional accurate measurements with your own hands, you can find many invisible errors even in a new house. Ignoring them will lead to the fact that the drawn roof drawing will contain incorrect dimensions of some nodes. These errors will prevent the first supports from being correctly mounted.
Before making a calculation of a hipped roof, you need to take a level, tape measure, construction cord and make new measurements. With the help of a cord and a tape measure, diagonals are measured between opposite corners, the elevations of the walls are checked with a level. Although small inaccuracies, but they will still be and they need to be corrected:
- The non-parallelism of the walls of the box is aligned due to the correct location of the Mauerlat.
- A small error in the height of each wall is corrected with linings under the Mauerlat.
If, surprisingly, self-made control measurements showed large errors, additional elements of the roof frame must be added to the calculation and drawing to correct the shortcomings.
Important ! A two-dimensional drawing of the roof frame creates an erroneous vision of the structure. To have a complete picture of the future roof, it is necessary to create its own three-dimensional model.
According to the developed model, it is easier to determine whether you like the design or not. At the design stage, you can still change something. In the future, this will not be possible.
Advice ! When looking on the Internet for a ready-made drawing for a certain size of a box at home, you should not take detailed diagrams with complex formulas and Latin symbols. Only a specialist can understand them.
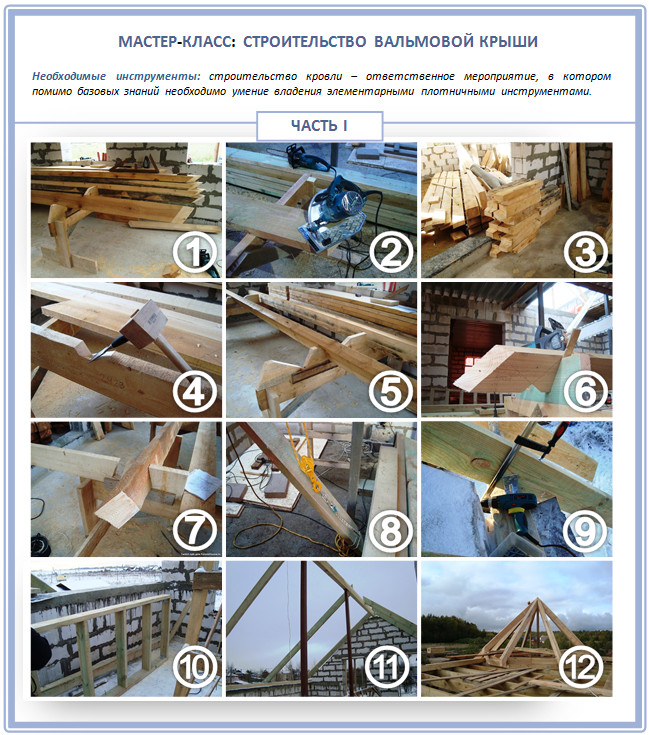
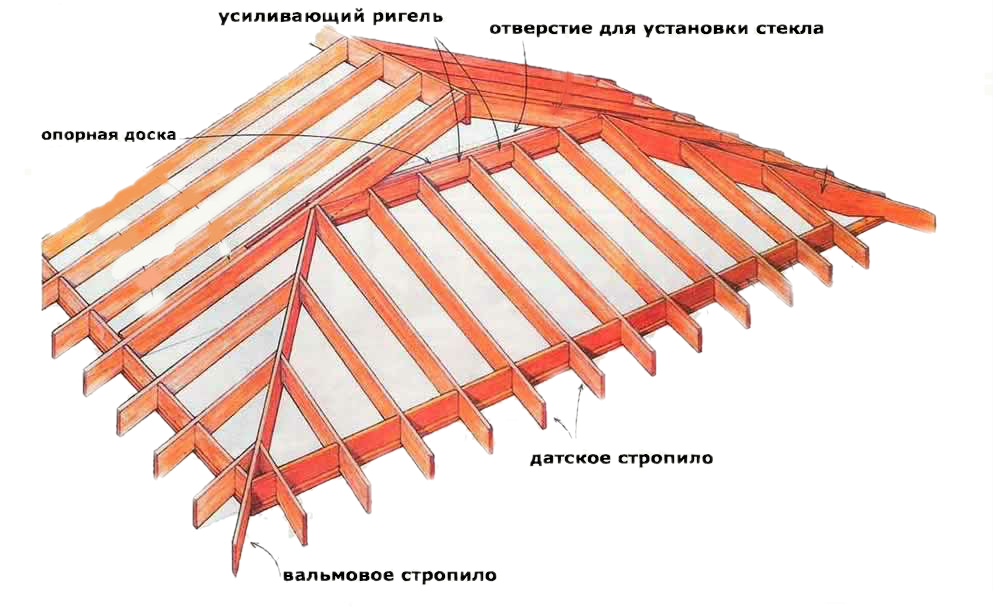
For a better idea of the construction process, you can see a master class that shows all the main components and the stages of their construction.


Calculation of the truss system and lathing
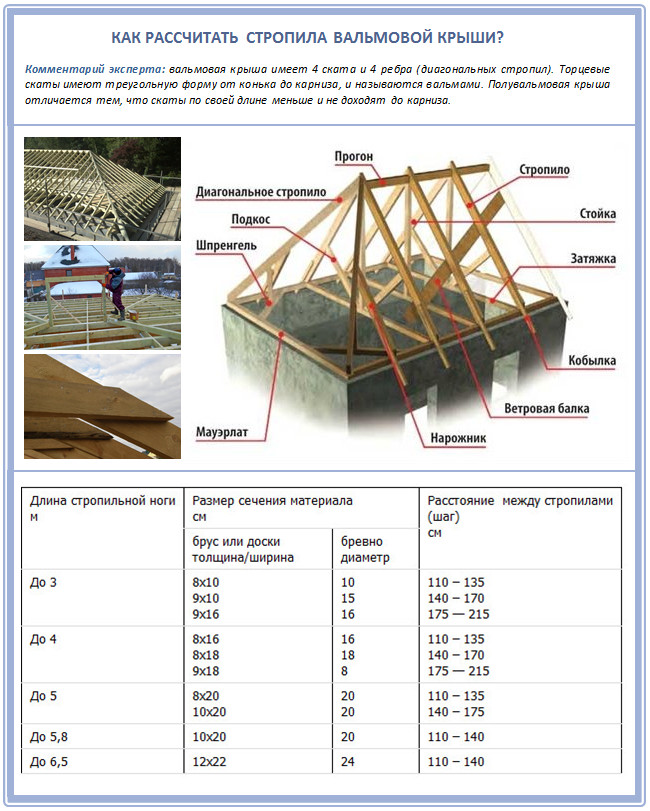
The most important and difficult is the calculation of the truss system. You will have to do it yourself first. The strength and durability of the entire roof will depend on this. It is on the rafters that the main load of the roofing cake, precipitation and wind falls. During the calculation, it will be necessary to determine the optimal cross section rafter legs and their step, that is, in the finished frame. As for the crate, here they find out the same parameters related to the section and step of the elements.
When starting calculations, it must be taken into account that the length of the rafter leg and the distance between them are interconnected. To help the developer, there is a special calculation table, from where you can take important data.

In addition, the table displays the optimal cross-section of blanks for a certain size and pitch of the rafters. If it turns out that the table requires large-section lumber, and they are expensive, you can resort to construction tricks. They take several blanks of a smaller size and section and simply splice them. This, by the way, is not contrary to building codes.


Depends on the selected coverage. The harder the roofing, the less often the step of the crate. Under soft roof mount a continuous crate of plywood or OSB. For metal tiles, sparse elements with a section of 32x100 mm are laid.
Advice ! It is better to calculate the crate after an exact decision, than the hip roof will be covered.

The procedure for calculating the roofing
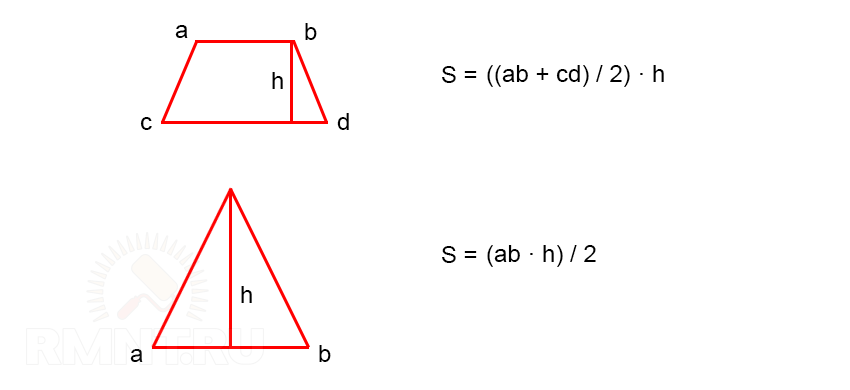
To calculate with your own hands how much roofing is required for a hip roof, you need to remember the school curriculum in geometry. The fact is that the shape of the slopes represents two triangles and two trapezoids.
Having measured the sides of the trapezoidal slope, calculate its area according to the formula: S \u003d 1/2 (b1 + b2) h.

Next, measure the sides of the triangular slope and similarly calculate its area using the formula: S \u003d 1/2 bh.

Since there are two triangular and trapezoidal slopes on the hip roof, both results are multiplied by the same number. Now it remains to add up the results to find out the total area of \u200b\u200bthe roof.

However, it is too early to do the calculation of the roofing with your own hands. Additions need to be taken into account. For example, you will have to add space to the overhang. Usually its width ranges from 300 to 500 mm.

But additional structures on the roof reduce the coverage area. These can be chimneys, windows, balconies, etc. When doing your own calculations, you will need to calculate the area of \u200b\u200beach structure, and subtract the result from the total area of all slopes.
Attention ! If, for example, there is only one chimney or ventilation pipe as a protruding structure, they are not taken into account.
It should be noted that due to the non-rectangular shape of the roof slopes, there will be a lot of waste roofing material, which requires adding 20% to the finished result.
Calculation of additional elements
When doing the calculation of the hip roof cover with your own hands, you need to remember about the additional elements. They complete roofing, and some, on the contrary, mount first.
Additional elements are calculated in the following order:
You can reduce the consumption of additional elements by ordering their production of individually longer lengths. Savings come from fewer overlaps.
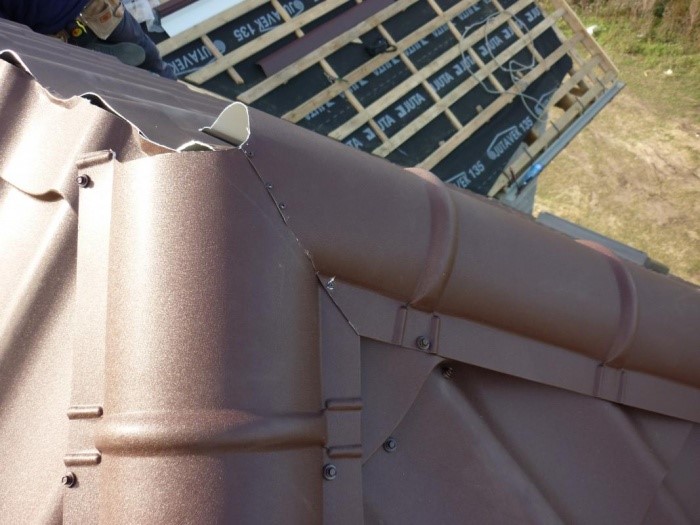
It is important to remember about the structures protruding on the roof. The places where the roofs adjoin them must also be covered with planks. It is better to put tight caps on round pipes.
Calculation of the consumption of roofing cake materials
The composition of the roofing pie includes waterproofing, and if the attic is warm, a vapor barrier and insulation will also be required.

The amount of hydro - and vapor barrier always matches. These materials represent a film or membrane. Only the place of their attachment differs. Waterproofing is laid on top of the rafters, and vapor barrier from the inside. You can calculate their consumption with your own hands according to the total area of \u200b\u200bthe slopes, making a tolerance of 20% for overlaps.
The consumption of thermal insulation depends on the number of rafters and the distance between them. This is due to the fact that the insulation is placed between the rafter legs. Although this is not so important, because the total consumption will still correspond to the total area of \u200b\u200bthe slopes. The only exception is that you do not need to make an overlap allowance.
Slope calculation
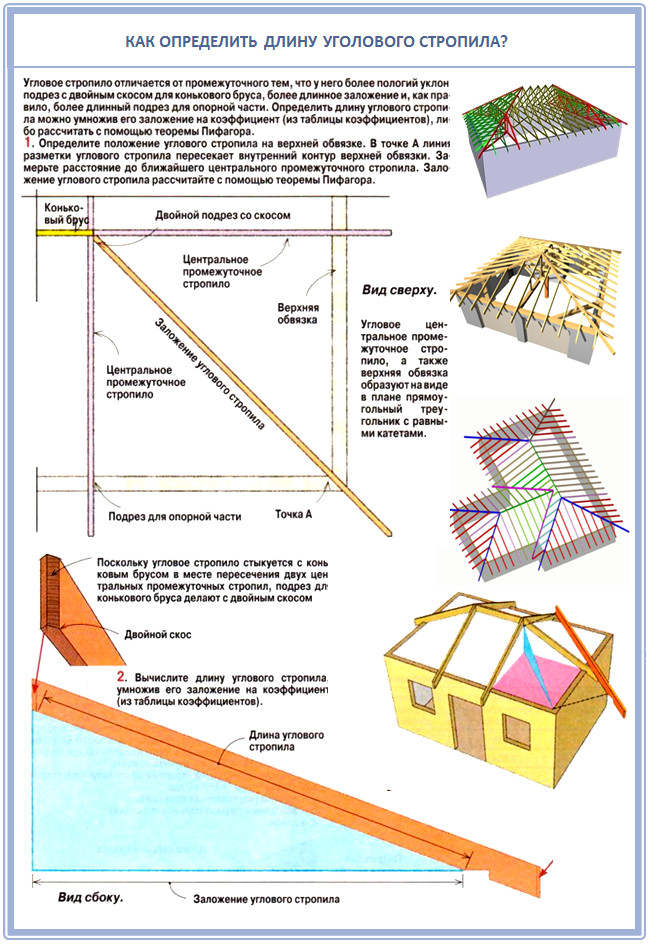
It is very important to correctly determine the slope of the roof slopes. You can do it yourself using geometric formulas using the Pythagorean theorem.

The photo shows a diagram of a classic hip roof. To determine the angle of the slopes, it is necessary to take into account the height of the frame - h, the length of the legs of the side rafters - e, the length of the legs of the hip rafters - d. All these indicators can be calculated using three geometric formulas.

You need to know that the greater the height - h, the steeper the slopes will turn out.
When calculating the angle of the slopes with your own hands, it is necessary to take into account the mass of the entire roofing pie, the amount of precipitation in the region, climatic features and the weight of the roof intended for installation additional equipment. All this creates a load on the truss system and the strength of the hip roof depends on the correctly calculated slope.
This video shows the calculation of the hip roof:
As you can see, making all the calculations of the roof is not an easy task, but with a strong desire it is possible. Except ready-made examples photos and drawings, you will need mathematical knowledge.
The first thing to do before starting the construction of the roof is to make accurate calculations. Necessary detailed description all connections and nodes, an accurate drawing of the entire truss system and the approval of this by an experienced person. It sounds complicated, but in fact everything is simpler - not more difficult. children's constructor, it is only important to do everything right. And, if you are looking for how to calculate the hip roof truss system, you will find all the information you need here!
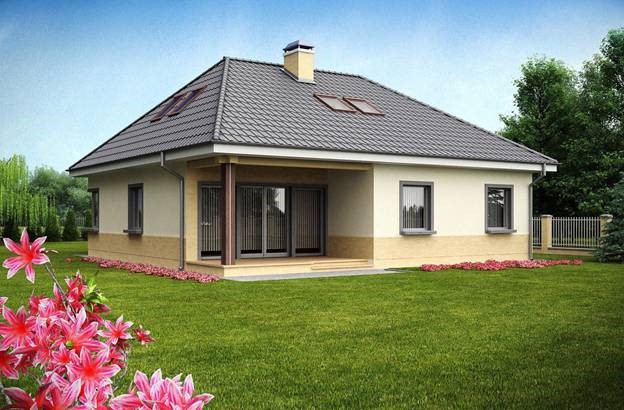
So, so what is it? This is a four-slope structure, i.e. one that has four planes. Such a roof is much more complicated than a gable roof, but it is stronger and more reliable in operation. And her appearance is recognized all over the world as one of the most successful and aesthetic.
Here are the main advantages of this design:
- Due to the presence of triangular end slopes in the hip roof, ordinary skylights can be installed.
- Due to the absence of a sharp protrusion at the hip roof, higher resistance to various atmospheric phenomena.
- The hip roof is considered economical - due to the fact that it does not have gables.
- Temporary deformations of such a roof are reduced to zero - all thanks to its special design.
- Warming such a roof is much easier than a gable roof (there are not all the same problematic gables).
- Great resistance to wind loads of the terrain - due to low angles of inclination.
- The ability to easily and easily convert an attic space into a comfortable attic. And this is a valuable increase in the living space of the house.
Among the shortcomings, we highlight the main one: the hip roof truss system is more complicated than that of a conventional one, and therefore its installation will cost you more, although you will save on brickwork.
Types of hip roof construction
So, let's see what types and subtypes hip roofs are being built today:
- Hip. This is a traditional hipped roof with triangular slopes on all end sides.
- The roof, in which the hip does not reach the eaves, is called half-hip.
- A hipped roof is called a hipped roof, in which identical triangles are connected together by one upper point. By the way, once in Russia, such roofs were built without exception.
- The cruciform hip roof is a rarer view due to the high cost of execution and the high labor intensity of the work. Usually it is built on houses with a complex layout or separately only above the front doors.
Our diagram will help you understand in more detail:

As we have already said, if the hip does not reach the eaves, the roof is called half-hip. It is in these places that dormer windows are installed, which completely solves the problem of the need for inclined roof windows. But in terms of complexity and cost of construction, a half-hip roof is higher than others.
The simplest example of a hip roof (quite aesthetic, mind you) is a triangular roof. All slopes here are the same size, and all angles are equivalent. If this height and design suits you, then give preference to this particular option - you will avoid many pitfalls and nuances!
The only point: the hip roof in its classic version is bad because it does not have vertical planes and dormers or attic windows have to be placed on sloping walls. As a result, such elements become the most unprotected in terms of leaks during rain.
Hip roof architecture in detail
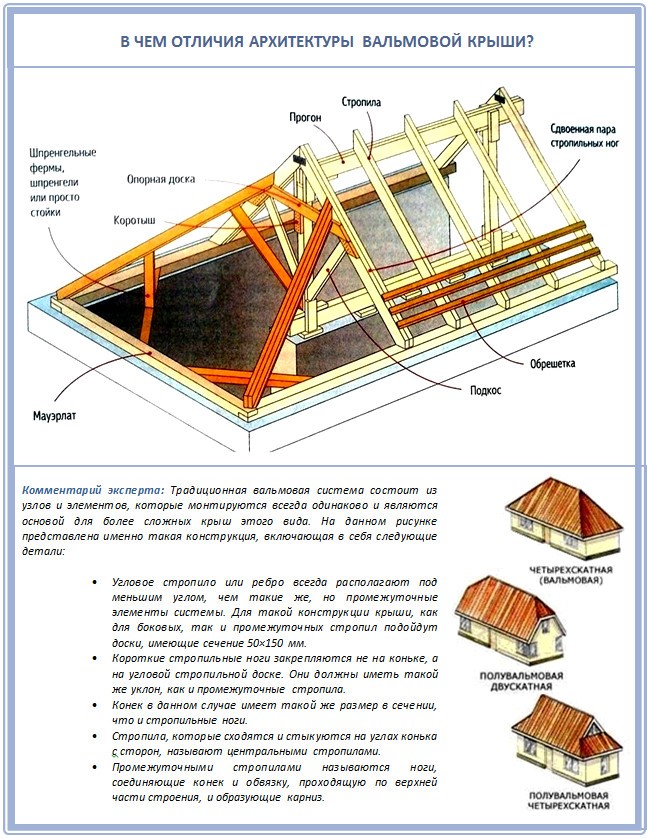
For the installation of a specifically hip roof, experienced builders recommend taking rectangular beams from coniferous species, and reinforcing the stability of the entire system with additional steel elements. Indeed, in addition to the rafters themselves, in any case, you will need the following building elements:
- Mauerlat is the lower support for the rafters.
- A run is a beam that needs to be placed parallel to the Mauerlat as another additional support.
- Racks and struts are supporting elements for a structure with the so-called multi-span.
- Crossbars are special elements that help to cope with spacers (a common occurrence with improper installation).
- Sprengel is another additional element of the rafter support.
- Lying - a special support for racks and struts.
So, construction material purchased? Now put all the parts in a stack or dry them additionally. The main thing is to think about protection from the rain.
How to avoid calculation errors?
And now let's avoid the very first and most annoying hip roof design mistake - the lack of measurements of the house itself. The problem is that even trained craftsmen manage to start work with drawing up a plan and a drawing of the roof, but they do not work with the base - the walls. But only at first glance it seems that the walls are perfectly even, everything is parallel to each other and the like, but in reality it is far from ideal, even completely new house. And then, only during the construction process, certain errors are found that prevent the first supports from being correctly installed.
Therefore, first of all, before carrying out any calculations on the hip roof, we arm ourselves with a ruler and level. We check elevations, parallelism of walls, diagonals (correctness of rectangular walls) and draw up a measured plan of the house. Let's say you will be surprised by some inaccuracies. And now we decide how we will fix it:
- We correct a slight error in parallelism with a Mauerlat.
- We correct the slight difference in the heights of different walls with gaskets.
- We correct significant differences with additional elements of the truss system, which we must include in the calculations.
In addition, we recommend that you do not make a simple two-dimensional drawing of the roof, but create a three-dimensional model that will give you a clear idea of \u200b\u200byour hip roof. At a glance, you will be able to understand whether you like what happens or not. It's pretty hard to change something. And modern computer programs will help you with this, which are quite a lot.
If you are looking for a ready-made roof drawing that fits the required parameters, do not take too detailed drawings with Latin abbreviations and formulas: they are only needed by the master who can read them. And so that you have an idea of what exactly awaits you, we offer you a simple master class on the construction of a hip roof, where all the elements are clearly visible:

What data is needed for construction?
Here are the parameters of the future roof you should know before you start building it:
- The angle of the roof, on each side of the hip slopes.
- The angle of the roof from the sides.
- The exact area of the entire roof surface
- The weight of the future roof and the exact load of the roofing material on the roof truss system.
- The length of the diagonal rafters.
- The section of the rafters, taking into account regional wind and snow loads, the pitch of the rafters and the weight of the roofing material.
- The required volume of all rafters in cubic meters.
The total surface area you will need to know in order to purchase required amount roofing material and calculate its future weight in advance:

Next - the rafters. On hip roofs, the rafters are placed directed to the corners of the walls - to the internal and to the external, and are called oblique or diagonal. The second ones are longer than ordinary rafters, and shortened ones - sprigs - rely on them. As a result, such rafters carry a load already 1.5 times more than usual.
The length of the diagonal rafters is longer than the standard length, so they are made paired. Their advantage is that the double section is designed for increased load and, as a result, is a solid, uncut board. As a result, the design solutions for such a roof are quite simple. And in order to ensure the multi-span of the hip roof, one or two supports will need to be placed under the oblique leg.
If you have already purchased scaffolding for the construction of the roof, then calculate the pitch of the rafters based on the section of the finished boards. If you have not purchased yet, look now, before drawing up the project. After all, it is not uncommon for a situation when a project is ready, but it turns out to get good wood that is not at all the parameters that were planned.
We bring to your attention a special free.
What should be taken into account when calculating?
The hipped roof project is one of the most difficult. Here it is extremely important not to make mistakes in the calculations, because the hip roof is a large number of very different elements, and each of them has an important function.
So, the slope of the hip roof usually varies from 5 to 60 °. Based on this, they choose the roofing material: roll coverings for small slopes and tiles for steep planes. But count right away that the greater the angle of inclination of such a roof, the more roofing material you will end up with. And the smaller the angle, the stronger the frame will have to be built, because a considerable load will now go on it.
For the final decision, you will have to take into account all these factors:
- The total weight of the planned roofing material.
- Additional weight of waterproofing and insulation.
- Local climate features (check with neighbors).
- The type of rafters and the presence of additional elements to maintain the strength of the roof.
- All devices and equipment that you are going to hoist on the roof.
It is important to take into account the wind and snow load so that tons of snow do not break through your roof and a dashing wind does not tear it off, and the weather conditions of a particular area will indicate what deformations of the truss system are possible over the years (for example, dampness, sea air, etc. .).
Note that there are usually no problems with a hip roof with a wind load, but almost always with a snow load. The reason is that at the hip roof all planes are inclined. Bad for the wind, but good for the snow.
Have you decided on a project? Have you done all the necessary calculations? Then get started!
Hip roofs have many advantages. They are beautiful, reliable in all weather conditions, the four-sided design allows you to effectively insulate the house from the side of the roof. Some difficulty is the device of the truss system. We will deal with its schemes and calculations in this article.
Hip roofs, sometimes called Dutch and Danish, are distinguished by good quality, reliability and spectacular European design. The truss base of such roofs consists of many basic and reinforcing elements that require drawings or three-dimensional drawings, accurate calculations and execution.
Hip roof varieties
Hip roofs, in addition to the basic classical design, consisting of two trapezoidal slopes and two triangular end hips, also include their varieties:
- Half hip double slope.
- Semi-hip four-slope.
- Shatrovaya.
- Hip-pediment.


Each variety has its own scheme of the truss system. Next, we consider and calculate the classic hip roof.
Scheme and main elements
To perform the calculation of the truss system, you need to familiarize yourself with its basic scheme, the main and auxiliary elements.
The main elements of the truss system
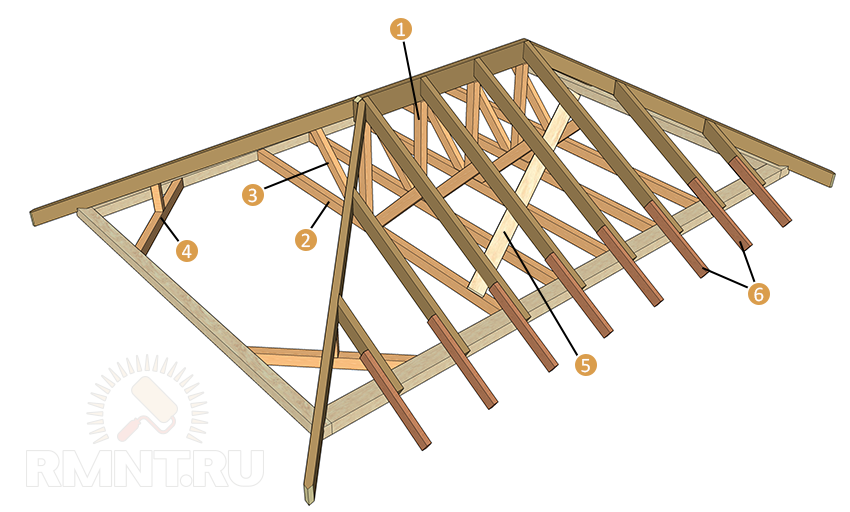
The main elements include (see the figure below):
- Mauerlat. It is a beam fixed along the perimeter of the outer walls, indented from the outer edge. Attaches to the wall. Mauerlat disperses the load from the pressure of the rafters, connects the truss system with the walls of the house, and is the basis of the roof.
- Skate. Upper crossbar for fastening the rafters of the roof slopes. The height of the ridge depends on the angle of inclination of the slopes. Gives the system rigidity and strength.
- The central rafters of the slopes. The ends of the ridge are supported on the sides of the Mauerlat. There are 4 such elements in the system. - 2 pcs. on every slope.
- The central rafters of the hips. The ends of the ridge are supported on the end sides of the Mauerlat. There are 2 such elements in the system. - 1 pc. on every hip.
- Skew legs (diagonal, corner rafters). Connect the corners of the Mauerlat with the ends of the ridge. They are part of the supporting structure. There are 4 of them in the rafter system.
- Intermediate rafters of slopes. They are installed parallel to the central rafters of the slope between them with the same pitch, relying on the side of the Mauerlat and the ridge beam. If the length of the ridge is insignificant, they may not be used.
- Shortened rafters of slopes. They are installed parallel to the central rafters of the slopes and have a variable length - the closer to the corner, the shorter. They rely on the side of the Mauerlat and slanting legs. The number of elements depends on the installation step.
- Shortened hip rafters or sprigs. They are installed parallel to the central rafters of the hips and have a variable length - the closer to the corner, the shorter. They rely on the end part of the Mauerlat and oblique legs. The number of elements depends on the installation step.
 Scheme and main elements of the truss system
You can read more about attaching rafters to the Mauerlat in our article.
The above elements are basic, basic. Other elements are designed to reinforce the main ones and are used in critical buildings, for example, for residential buildings:
- Vertical racks for supporting the ridge beam. They rely on crossbars (see below), laid parallel to the end of the house or a bed located along the longitudinal axis of the building (if there is a main wall under it).
- Crossbars or puffs. The rafter legs of the slopes are connected in pairs. They serve as a support for racks and diagonal struts (see below). They can serve as floor beams if they are built into the Mauerlat or installed directly into the longitudinal walls of the house. If the puffs are placed closer to the ridge, they will become the basis of the attic ceiling.
- Diagonal braces (braces). They are used to increase the rigidity of the system if the length of the rafters is more than 4.5 m. The use of struts allows you to reduce the cross section of the rafters, which they reinforce.
- Sprengel. Beam installed in the corners of the Mauerlat. Serves for mounting a stand that supports and reinforces the oblique leg.
- Wind beam. It serves to resist the deformation of the rafter legs in gusty, strong winds. It is attached to the rafters of the slopes from the inside, obliquely, on one or both sides - it depends on the wind load in the construction area.
- filly. An element of a smaller section than the rafters themselves. Extends the leg of the rafters to provide a roof overhang when a single piece is not available due to limited lumber length or for cost reasons.
 Gain elements
Calculation of the truss system
The calculation of the system includes the choice of the angle of inclination of the slopes and hips and the calculation of the lengths of its main and auxiliary elements.
The choice of the angle of inclination of the longitudinal and end slopes
The choice of the angle of the slopes and hips ranges from 25-45 ° and depends on the desire to have an attic, the roofing material adopted, the assessment of static (roof weight) and dynamic (wind, snow) loads.
In hipped roofs, the angle of inclination of the hips and slopes is the same. In hip roofs, the same angles are also often taken in terms of aesthetics, but they may differ if this is the architect's idea.
 Recommendations for the use of roofing materials
For a better understanding of the calculation algorithm, consider as an example a hip roof of a house with sides of 8 and 12 m, and a ridge height of 2.5 m. Let's take the angle of inclination of the slopes at 35 °, and the angle of inclination of the hips - 45 °.
Calculation of the main truss elements
The classic hip roof consists of two slopes in the form of trapezoids connected in a ridge, and two hips - end slopes in the form of triangles.
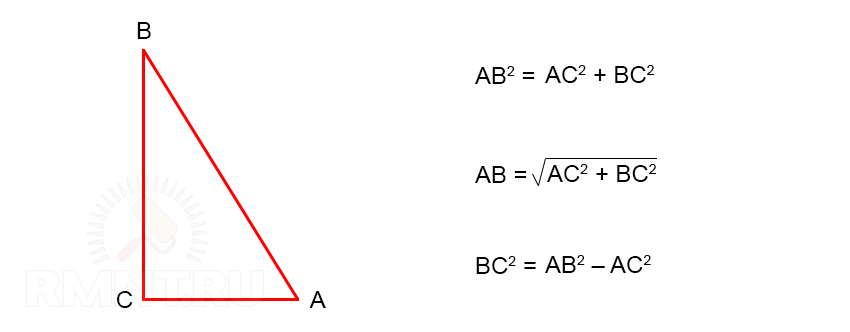
First you need to remember some formulas from the school algebra curriculum. This is the ratio of the lengths of the sides of a right triangle, expressed in terms of the trigonometric function of the angle and the Pythagorean theorem.
 Trigonometric functions of an acute angle of a right triangle
Let's depict the frame of the truss system in an axonometric view:
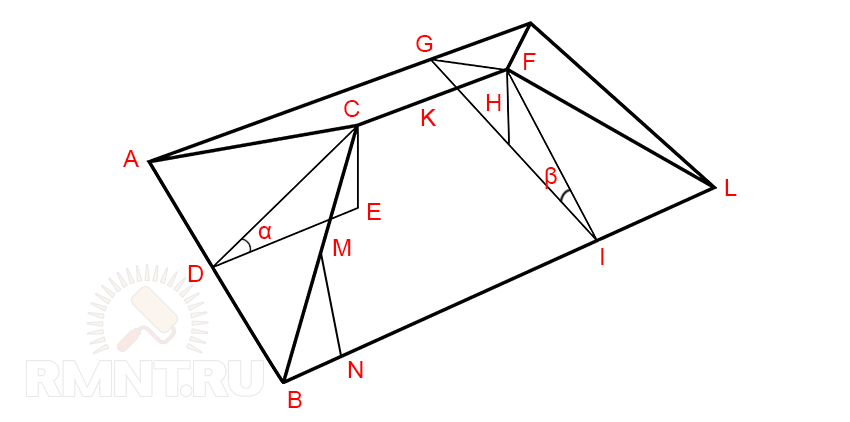
Let's calculate the main elements of the truss system.
1. Calculate the length of the central hip rafter CD, which is the height of an isosceles triangle (hip) and the hypotenuse of a right triangle whose height is equal to the height of the ridge (CE = 2.5 m). Angle of inclination of the hip α = 45°. Sin 45° = 0.71 (according to the Bradis table).
According to the trigonometric relation:
- CD = CE / sin α = 2.5 / 0.71 = 3.52 m
2. Determine the length of the skate K. To do this, from the previous triangle we find the length of the base ED, using the Pythagorean theorem:
House length: BL = 12 m.
Skate length:
- CF \u003d 12 - 2.478 x 2 \u003d 7.044 m
3. The length of the corner rafters CA can also be obtained from the Pythagorean theorem for triangle ACD. Half the width of the house AD = 8 / 2 = 4 m, CD = 3.52 m:
4. The length of the central rafters of the slope GF is the hypotenuse of the triangle, the legs of which are the height of the ridge H (CE) and half the width of the house AD:
The intermediate rafters of the slopes have the same length. Their number depends on the pitch and section of the beams and is determined by calculating the total load, including weather.
These tables correspond to the atmospheric loads of the Moscow region
| Rafter pitch, cm | Rafter length, m | ||||||
| 3,0 | 3,5 | 4,0 | 4,5 | 5,0 | 5,5 | 6,0 | |
| 215 | 100x150 | 100x175 | 100x200 | 100x200 | 100x250 | 100x250 | — |
| 175 | 75x150 | 75x200 | 75x200 | 100x200 | 100x200 | 100x200 | 100x250 |
| 140 | 75x125 | 75x125 | 75x200 | 75x200 | 75x200 | 100x200 | 100x200 |
| 110 | 75x150 | 75x150 | 75x175 | 75x175 | 75x200 | 75x200 | 100x200 |
| 90 | 50x150 | 50x175 | 50x200 | 75x175 | 75x175 | 75x200 | 75x200 |
| 60 | 40x150 | 40x175 | 50x150 | 50x150 | 50x175 | 50x200 | 50x200 |
Let's compare the maximum, average and minimum section of a beam with a length of 4.717 m (see the values for 5.0 m).
At section 100x250 mm the step will be 215 cm. With a ridge length of 7.044 m, the number of intermediate rafters will be: 7.044 / 2.15 = 3.28 segments. We round up - up to 4. The number of intermediate rafters of one slope - 3 pcs.
- 0.1 0.25 4.717 3 2 = 0.708 m 3
At section 75x200 mm the step will be 140 cm. With a ridge length of 7.044 m, the number of intermediate rafters will be: 7.044 / 1.4 = 5.03 segments. The number of intermediate rafters of one slope - 4 pcs.
The volume of lumber for both slopes:
- 0.075 0.2 4.717 4 2 = 0.566 m 3
At section 50x175 mm the step will be 60 cm. With a ridge length of 7.044 m, the number of intermediate rafters will be: 7.044 / 0.6 = 11.74 segments. We round up - up to 12. The number of intermediate rafters of one slope - 11 pcs.
The volume of lumber for both slopes:
- 0.05 0.175 4.717 11 2 = 0.908 m 3
Therefore, for our geometry, the optimal option from the point of view of economics would be a section of 75x200 mm with a step of 1.4 m.
5. To calculate the lengths of the shortened slope rafters MN, you again have to remember the school curriculum, namely the triangle similarity rule.
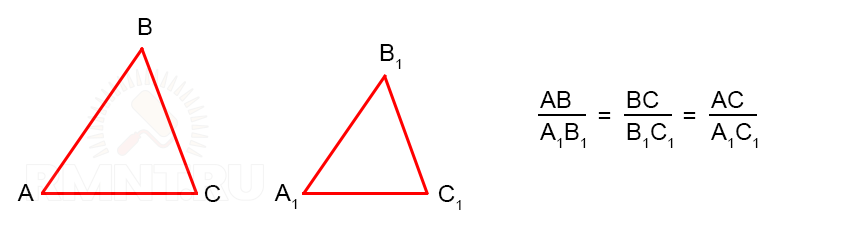 Similar triangles on three sides
The large triangle that we need to reinforce with shortened rafters has known dimensions: GF = 4.717 m, ED = 2.478 m.
If the shortened rafters are installed with the same step as the intermediate ones, their number will be 1 in each corner:
- 2.478 m / 1.4 m = 1.77 pcs.
That is, two segments are formed with one shortened rafter in the middle. A small triangle will have a leg, 2 times smaller than ED:
- BN = 2.478 / 2 = 1.239 m
We compose the proportion of similar triangles:
Based on this ratio:
At this height, the cross section of the rafters is taken according to the table - 75x125 mm. The total number of shortened rafters of both slopes is 4 pcs.
6. Determining the length of shortened hip rafters (spreaders) is also performed from the ratio of similar triangles. Since the length of the central hip rafters CD = 3.52 m, the step between the shortened rafters may be greater. With AD \u003d 4 m, shortened rafters with a step of 2 m will be one on each side of the central hip rafter:
- (2 3.52) / 4 = 1.76 m
With such a height, we take the rafter section 75x125 mm. The total number of shortened rafters of both hips is 4 pcs.
Attention! In our calculations, we did not take into account the overhang.
Calculation of the roofing area
This calculation comes down to determining the areas of a trapezoid (slope) and a triangle (hip).
Let's do the calculation for our example.
1. The area of one hip with CD = 3.52 m and AB = 8.0 m, taking into account the overhang of 0.5 m:
- S \u003d ((3.52 + 0.5) (8 + 2 0.5)) / 2 \u003d 18.09 m 2
2. The area of one slope at BL = 12 m, CF = 7.044 m, ED = 2.478 m, taking into account overhangs:
- S \u003d (2.478 + 0.5) ((12.0 + 2 0.5) + 7.044) / 2 \u003d 29.85 m 2
Total roofing area:
- S Σ \u003d (18.09 + 29.85) 2 \u003d 95.88 m 2
Advice! When buying material, consider cutting and inevitable losses. The material produced by large area elements is not the best option for hip roofs.
The most important structure of the house, which affects the entire structure as a whole, is its roof. The main design features of the roof depend on many factors, such as the maximum allowable load on the walls, the type of construction, the type of roofing material, etc. The hip roof, the truss system of which is not quite simple, is nevertheless quite a popular construction during construction. Its main advantage is considered to be its excellent self-cleaning ability, as well as good resistance to heavy snow and wind loads.
The hip roof has found wide application in construction due to its durable design feature, durability and sufficient original design having beautiful appearance. The roof structure allows you to equip a spacious living attic floor with magnificent cut-in windows, and the streamlined shape reduces aerodynamic loads from strong winds.

The hip roof rafter system consists of four slopes: two of which are lateral(having the shape of a trapezoid), and two more - hip(in the form of triangles). Thus, the structure has two vertices, united by a ridge run.
The main nodes of the hip roof
- Skate run- the main bearing axis in the upper part of the roof, which is the junction of all four slopes. It is made from edged boards 50x200 mm.
- Diagonal (sloping rafters)- an important load-bearing element of the frame, connecting the corners of the house with the horse run. It is carried out from the same board as the ridge run.
- Side roof rafters- made from a board 50x200 mm. It is attached to the ridge run and the side walls of the building or the Mauerlat. Their main task is to evenly distribute the lateral load on the load-bearing walls.
- Shortened rafters (spiders)- a board sawn at a certain angle, which is attached to the diagonal rafters and the hip part of the wall of the house or Mauerlat. Thus, there is no connection between the sprigs and the horse run.

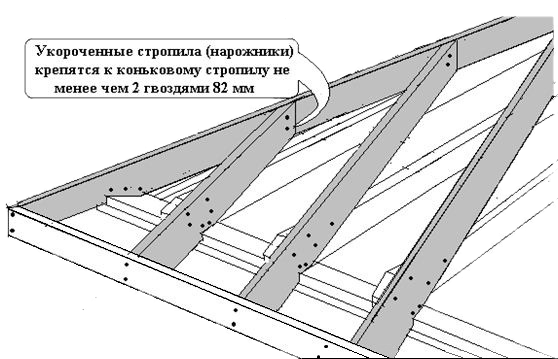
It is important to follow the basic rules for linking structural units; the reliability and strength of the entire structure will depend on the quality of their fastening. To do this, use only high-quality lumber and "ruffed" nails.
![]()
Hip roof truss system - connection diagram of the main components of the structure
Types of hip roofs
There are a lot of variants of hip roofs, in addition to the standard one, there are also: (half-hip Dutch and Danish, hipped roofs, as well as broken roofs).
- If, for example, the length of the hip roof slope is less than the side ones, such a design is called half-hip (Dutch). Such a design with dignity withstands strong blast loads, and thanks to sharp slopes, snow almost never lingers on it for a long time. This type more similar to the classical one, however, it significantly surpasses it in its characteristics.

- The Danish half-hip roof is a little more difficult to implement. The design difference lies in the fact that the hip part is already located not from below, but from above, a vertical pediment, which can be replaced with a beautiful frame with glass.
- For buildings with walls of the same length (square), a hipped roof is perfect. Unlike the hip one, which has a ridge run, the hipped one does not have one. The design is as follows, four absolutely identical roof slopes converge at one top point. thus forming a pyramidal geometric figure.

- Broken roofs due to the complexity of the design are very rare. However, their appearance is so mesmerizing that for a long time you can’t take your eyes off her. It represents itself, a set of many slopes, arranged at different angles relative to the walls. With your own hands, without having enough experience behind you, it is very problematic to make such a roof, so it is better to entrust this matter to professional roofers.

Hip roof do-it-yourself truss system
Correct calculations are the key to the reliability and durability of any roof. Having drawn the design diagram correctly, you can easily assemble it yourself, while having 2-3 partners as an apprentice. It will not be necessary to resort to the help of a team of builders, it is enough to do everything according to the plan and adhere to the given calculations.
The angle of the hip roof
When designing any roof, its angle of inclination is chosen based on climatic conditions, which in Russia are very different, depending on the region. If the building is being built in a region with heavy snowfall prevailing in winter, then it is desirable to make the angle of inclination large, so the snow cannot linger on the roof and will constantly slide off it under its own weight. In the southern regions, where precipitation is quite rare, and only in the form of rain, but strong gusts of wind are not uncommon, roofs are erected with a slight slope. The main task of which is to resist these wind loads.

Also an important factor in calculating the slope is the type of roofing. The fact is that some of them have a recommended corner height limit, which should not be neglected. And so, in order not to make mistakes, read each of them:
- Slate - Recommended Slope Angle 15º - 65º. Failure to comply with these parameters can lead to moisture ingress between the joints of the sheets;
- Ceramic tiles - the best sloped angle for slopes 35° - 65°. Neglecting the slope recommended by the manufacturer will lead to the possibility of condensation;

- Metal tiles - the minimum slope for this material is 13°, the maximum is not set by manufacturers;
- Soft tiles - optimal size slope is considered not less 15º. Roof installation can be carried out at any other value of the angle above the minimum;
- Ondulin - any slope angle is not less than 5°, the step of the crate will directly depend on the size of the corner.
Metal seam roofing - should be used when the slope of the slopes is over 25° degrees.
Correct calculation of the hip roof area
In order to correctly calculate total area surface of the hip roof, first we need to calculate the area of \u200b\u200beach slope separately, then add the resulting numbers together. As we remember, the slopes of the hip roof are the geometric shapes of two trapezoids and triangles. Remembering the school curriculum, it is easy to calculate their total area.

If you are still afraid to make a mistake, the specialists from whom you will purchase roofing material can correctly calculate, or you can use any of the online calculators that are convenient for you, which are full on the Internet. Having accurately indicated all the parameters of the future roof, they will help to calculate everything with an accuracy of up to a square meter.
Calculation of the hip roof truss system
For an accurate calculation of the rafter system, you must use the table below of the relationship between length and their placement.
| Roof angle ratio | Correction factor for corner rafters | Correction factor for intermediate rafters |
| 3:12 | 1.016 | 1.031 |
| 4:12 | 1.027 | 1.054 |
| 5:12 | 1.043 | 1.083 |
| 6:12 | 1.061 | 1.118 |
| 7:12 | 1.082 | 1.158 |
| 8:1 2 | 1.106 | 1.202 |
| 9:1 2 | 1.131 | 1.250 |
| 10:12 | 1.161 | 1.302 |
| 11:12 | 1.192 | 1.357 |
| 12:12 | 1.225 | 1.414 |
Based on the above table, the length of the rafter leg is equal to its product of the coefficient and the projection. The use of the table will help to make all the necessary calculations as accurately as possible.
The calculation itself is carried out in the following sequence:
- Using a regular rail, find the laying (horizontal projection) of the intermediate rafter leg. Find your slope coefficient in the table and multiply by the presented coefficient;
- From the ridge run to the attachment point of the lower part of the stacking leg, we measure the length of the rafter;
- In the same way, multiplying the correction factor by the laying (horizontal projection), we find the length of the overhang of the rafters. Or you can use the Pythagorean theorem (see Fig. 1).

- Now find the length of the corner rafters. It will be easier to visualize this using the figure below.

Installation of hip roof rafters
- The process begins with the installation of vertical supports, on which the ridge run is laid and firmly fixed. After installing them, measure the resulting horizontal, if the result is positive, proceed to the next step.
- Installation of diagonal (sloping rafters). The lower part of the rafter legs, at the undercut for the supporting part, is connected to the strapping beam in the corner of the building. The upper ones are fastened between themselves and the ridge beam. Their ends should have special corner cuts, made in such a way that the tightest possible connection is obtained between them. The exposed rafters are reinforced with additional vertical supports. The upper end of the support is sawn at an angle equal to the angle of inclination of the rafters. Metal plates are used to fasten the supports and rafters.

Hip roof rafter system - installation of supports, ridge run and corner rafter legs
- The next step is to install the side roof rafters, installation step 600 mm., such a step is preferable, since most standard insulation has this width. We act here in a similar way. The lower part with a notch is attached to the strapping beam; metal brackets or corners can be used for fixing. The upper ends are connected above the ridge run with plates. In order for the rafters to fit as tightly as possible to the ridge run, make a small cut on it at a right angle.
- The final stage is the installation of shortened rafters (spiders). The installation steps are the same 600 mm. One side of them rests on a strapping beam, the second is connected to a diagonal (sloping rafter). Pay attention to the installation of the central sprig, which is located in the middle of the hip slope. The fact is that it will immediately adhere to both legs of the corner rafters, so the end of its upper part should have a double bevel.
Frame reinforcement
In order to give the structure greater rigidity, it must be strengthened with additional corner braces and vertical posts. Their required number is calculated based on the maximum load of the truss system. The value includes the weight of: roofing cake and coating, as well as the mass of snow and wind loads.
After the hip roof truss system is reinforced, you can safely proceed with the installation of the crate. Its step and design depends on the type of roofing material you choose. For example, under it should have a solid carpet.
In contact with


