
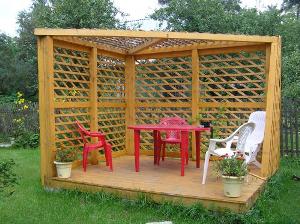
A suburban area is perceived by everyone as a recreation area - and this is right! Of course, garden lovers can weed their endless beds, flower garden lovers can take care of plantings, but everyone, absolutely everyone, will prefer to relax not in a house, and not even in an open-air “clearing”, but in a cozy gazebo. And this same gazebo can be built with your own hands. You can make a gazebo out of metal - it will be durable, reliable, a kind of "monumentalism" on 10 acres. But it would be much more reasonable to choose a tree as the main material for a gazebo in a suburban area - it is environmentally friendly, beautiful and, most importantly, affordable.
Table of contents: We recommend reading:Types of wooden gazebos
If a decision is made to build a wooden gazebo with your own hands, then you immediately need to remember some necessary nuances:
- the two most important points in the entire process of building a wooden gazebo are competent, high-quality wood processing and laying a reliable foundation;
- immediately decide on the size of the future building - the gazebo can only accommodate family members, but can also be used to receive a large group of friends;
- the gazebo should harmoniously fit into the existing landscape design and the exterior of the house (if it is not being built on an empty lot).
To build a really suitable gazebo that meets individual requirements, you need to decide what shape and type it will be. In general, experts distinguish several main types of the structure under consideration.:
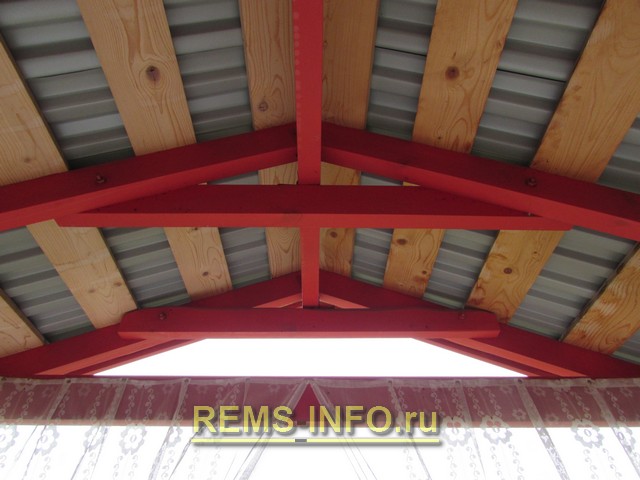
- Closed. They belong to the capital category, have a roof and can be used all year round.
![]()
- open. They are used only in the summer and are divided, in turn, into several subspecies:
- tented - a light awning simply protects the area inside the gazebo from the sun's rays and light summer rain;
- pergolas are arches that are simply interconnected, there is no coating on them, and the gazebo can only be used in dry weather;
- "Fungus" - a semi-open gazebo, which has a completely stationary roof, but it is not able to protect against wind / precipitation during the cold season.
If construction work is not your strong point, then the easiest way is to start building a wooden gazebo of the correct rectangular or square shape. Although they are hexagonal, and round, and in general any shape you like.
Note: we will consider the simplest option - a do-it-yourself wooden gazebo of a rectangular or square shape.
Preparatory work
First you should choose a place for the construction of a gazebo, and immediately exclude the lowlands - they are more suitable for arranging. During rains, moisture will constantly accumulate in these places, and wood, as you know, rots precisely in conditions of high humidity, even when each element is treated with protective solutions.
The proximity to the house of the future place to stay is a purely individual matter, but if you decide to join the gazebo to the house, then follow the rule of the same exterior design. You can arrange a gazebo in the far corner of the site, but observe the following conditions:
Place chosen? So, it's time to prepare the site for construction - mow the grass, remove debris, level the ground. And keep in mind that the construction site must be absolutely clean, not only within the size of the wooden gazebo, but one and a half to two meters more along the perimeter.
On the ground preparatory work finished, it remains only to collect / prepare the material and tools for building a wooden gazebo with your own hands.
Definitely need:
- sand, cement and crushed stone of fine fraction;
- piles, bricks and fittings;
- boards, wooden bars, self-tapping screws (nails) and metal corners;
- material for roofing works- here the choice must be made purely individually (slate, polycarbonate, profiled sheets and more);
- chisel, hammer and wrenches;
- electric plane, Circular Saw and a screwdriver.
There are several types of foundation, but specifically for a wooden gazebo, the most reasonable would be to build column foundation. And before you start building it, you need to make markings on the ground.
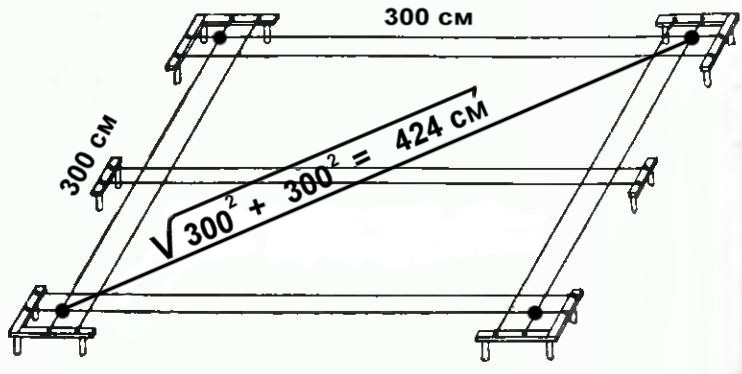
The figure shows an example of marking for a square wooden gazebo:
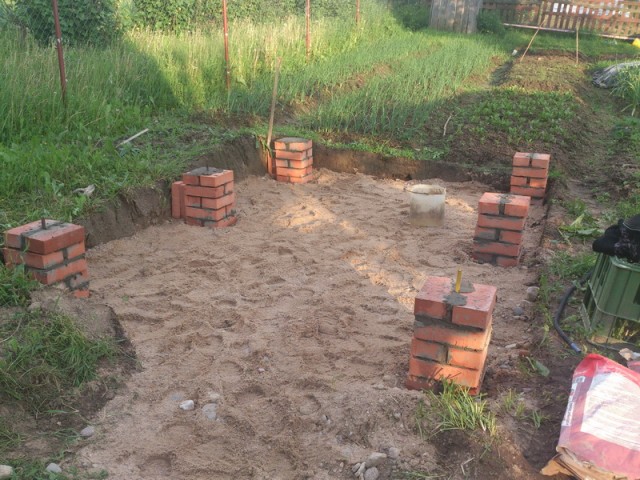
- at the points indicated on the markings, we make recesses, pits with a depth of at least 30 cm;
- the bottom of the resulting recess is carefully rammed and lay out brick columns right inside - there should be 5 bricks in each row, the last row must be elevated above ground level;
- it is necessary to accurately derive the horizontal level of these columns - it will depend on how even and stable the whole structure will turn out;
Note:when erecting brick columns, it is necessary to insert reinforced rods into each of the corner ones so that they rise 15-20 cm above the masonry and are just as deepened into the column. This technique will provide rigidity to the entire building.
- we equip a waterproofing layer - any waterproofing material is laid on the surface of each column, but it is advisable (both reliably and cheaply) to use a roofing material folded in two layers.
The columnar foundation is already ready - and this is the easiest option. Some prefer to make the foundation more solid:
- remove the soil over the territory of the entire site under the gazebo to a depth of 50 cm;
- lay a "cushion" of sand and fine gravel (each 10-15 cm);
- from above, everything is poured with cement mortar and allowed to dry for 7-10 days;
- brick columns are already installed on the finished cement "floor".
What to choose is up to the owner of the site to decide, but both the first and second options fully meet the building requirements and ensure the rigidity / stability of the wooden gazebo.
Construction of the base and frame of the gazebo
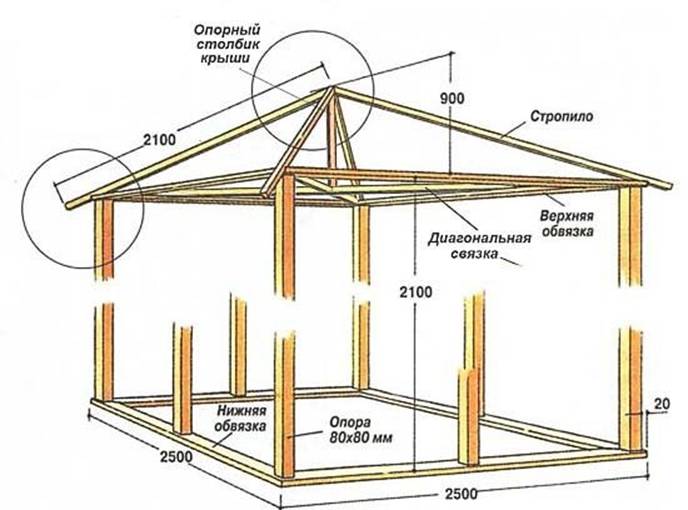
For the base and frame of a wooden gazebo, experts recommend using a bar with a section of 100x100 cm. And for the construction of the foundation of the "building" in question, you will need several pieces of such a bursa:
- if it is supposed to build a square gazebo, then 5 pieces will be enough;
- if a rectangular wooden gazebo is being built, then 6-8 pieces of timber will be needed, depending on the length of the building.
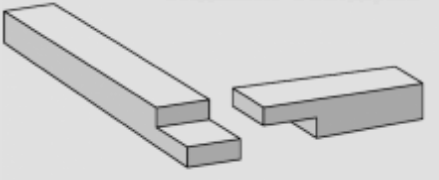
We ream those bars that will be laid through the corner brick columns - we make holes corresponding in size to the reinforcing bars. With these holes we will “put” the bars on the rods, and you can also “tie up” the bars with each other using the “half-tree” method - this will create additional strength and rigidity for the base and the entire structure as a whole.
How to make a half-tree connection correctly is shown in the figure:
It is quite easy to make a ready-made base for a wooden gazebo with your own hands - in most cases, when the size of the gazebo is small, even helpers are not needed.
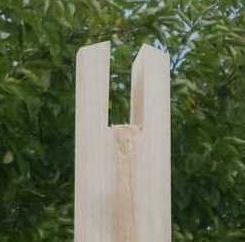 The next step is the construction of the frame. First you need to process the beam, which is supposed to be installed in four corners - working with an electric planer, we make the surface of the beam smoother. Be sure to make a hole in the lower end of the support post for fitting the beam onto the pin, and you can immediately make cuts on top - they will be needed to attach the roof rafters. The cuts have a size of 40x100, but in general these parameters are adjusted for the already prepared rafters.
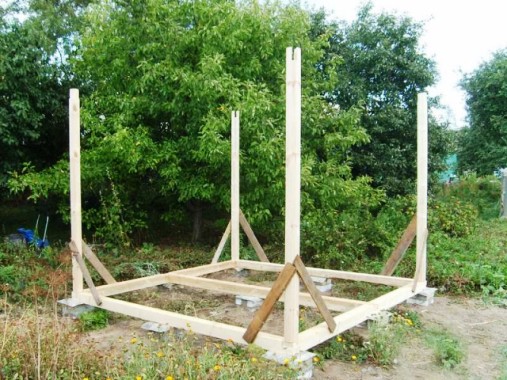
The support pillars placed on the pins are aligned with the help of the building level strictly along the horizon. You need to fix them with struts - they are made of a bar measuring 40x70 mm, fastened with self-tapping screws.
Do-it-yourself installation of the roof of a wooden gazebo
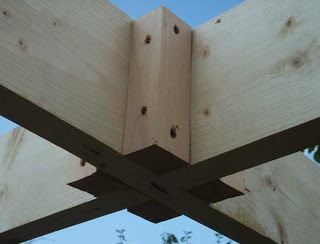
On the ground, you need to make a central cross - two beams are interconnected in a “half-tree” way. And the edges of each beam (or board - depending on what is used), which will be in contact with the supporting pillars, must be “marked” with cutouts. These same cutouts correspond to the size of the cut in the upper part of the support post.
We put the finished horizontal cross in place - we insert the edges of the timber / boards with cutouts into the cuts. It is possible to fasten at the junction of the boards of the horizontal cross with the support pillars with nails (200 mm) or bolts.
Note:to ensure greater structural rigidity of the horizontal cross, even when working on the ground, it is possible to strengthen the junction of two beams with wooden plates measuring 40x40 mm.
This is done as shown in the figure:
It remains to make the strapping of the roof - a beam of 100x50 mm in size is used for this, all four sides of the roof are “closed”. And from the same timber, railings are made at a height of 1 meter from the base of the gazebo. The bars are fastened either with nails (200 mm), or with bolts, or with self-tapping screws. The railing will carry not only a decorative function, although this is important - they reinforce the entire structure, make it more rigid.
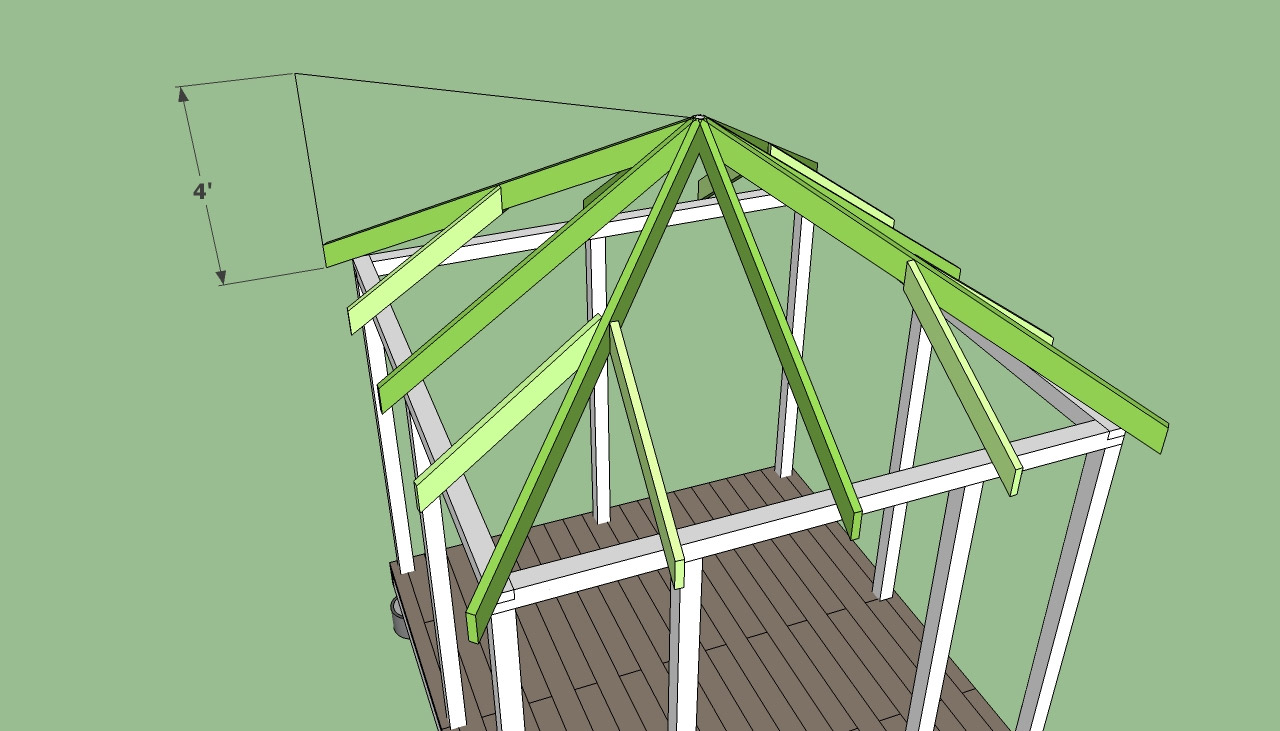
Next comes the most crucial moment in arranging the roof of a wooden gazebo with your own hands - choosing the type of roof. It can be single-sided, but in this case it needs to be made at a slight slope. But it's more practical hipped roof- spend more time and material, but the result will be much better.
So, let's start installing a hipped roof:
- an octahedron 80 cm long is made from a bar with a section of 100x100 mm;
- in the finished octahedron, a cut is made under the first two strips of rafters;
- we fix the finished column in the center of the cross;
- we fasten the first two rafters together using the “half-tree” method and put them into the cut of the octahedron;
- we attach two more rafters to the central column using the “overlay” method;
- we fix four more planks on the octahedron, the ends of which "lie" on the supporting pillars.
The result should be something like this:

All boards are fastened to the octahedron with screws or nails (200 mm), and when calculating the length of the timber / boards on the roof, it must be taken into account that their edges should extend beyond the roof trim by 30-50 cm - this will ensure the impermeability of the internal space of the wooden gazebo.
If you plan to make a beautiful entrance to the gazebo or install doors, then you will need to do the following:
- We measure the distance from the support column with a tape measure - it is determined only by the width of the future entrance.
- Now, at the marked points, you need to drive a nail from the reinforcement - just a piece of rod on one side is sharpened and hammered, and a hole is drilled in the beam, which is supposed to be installed as a "platband" for the door.
As a result, the prepared poles are simply “mounted” on the hammered nails from the reinforcement and attached to the upper roof trim with nails or self-tapping screws.
Building a solid wooden gazebo is a rather complicated project that requires a serious approach. Our instruction with a photo takes a step-by-step look at the process of building a wooden gazebo, placed on a site coated with natural stone.
Stage one - construction of the base of the gazebo
Planning a location garden gazebo made of wood, take into account the dimensions of the structure itself and the free space in front of the entrance for installing a barbecue or sun lounger.
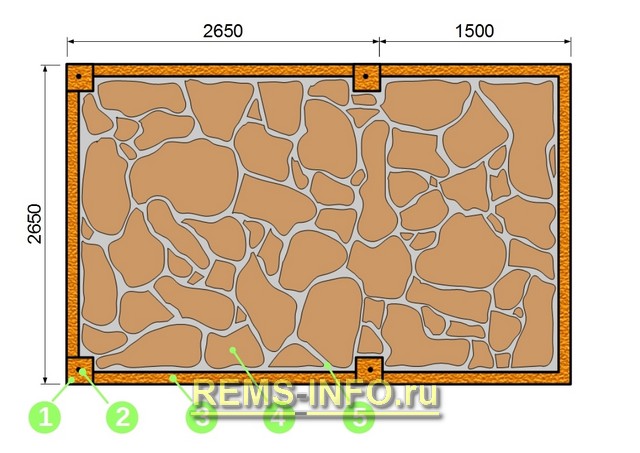
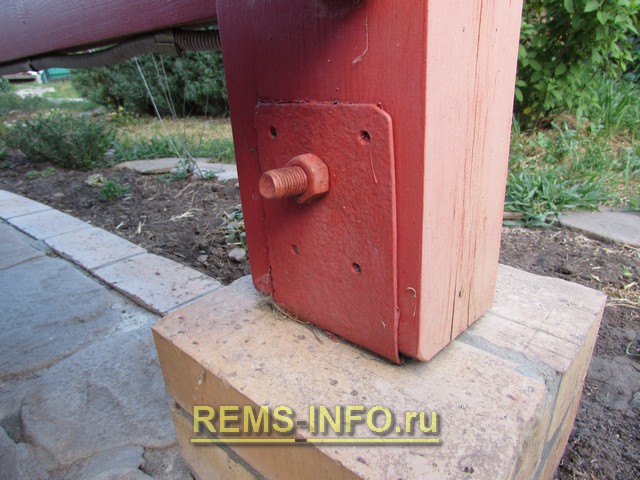
Scheme of the site for the gazebo: 1 - support pole; 2 - hairpin; 3 - brick border; 4 - stone; 5 - cement mortar.
When constructing the lower part of the gazebo, brick is used - a suitable material for both supporting posts and enclosing borders.

Arbor base device: 1 - roofing material; 2 - nut; 3 - brick; 4 - fittings; 5 - solution; 6 - lower layer of sand; 7 - gravel; 8 - corner; 9 - hairpin; 10 - top layer of sand; 11 - sandstone.
Calculation of materials for the platform for the gazebo:
- Ceramic solid brick - 130 pcs;
- Flat stone 20-30 mm thick - 11 sq. m;
- Sand - about 4 cubic meters. m;
- Cement PC-400 - 250 kg;
- Crushed stone - 0.2 cu. m;
- Stud galvanized M14x400 and nut - 4 pcs each;
- Mounting angle 150x150 - 4 pcs.;
- Reinforcement with a diameter of 6–8 mm - 12 pieces of 210 cm;
- A small piece of rolled waterproofing.
For the construction of the pit, you will need twine, several pegs, a level, bayonet and shovel shovels. Preparation of solutions will require mixing equipment, and brickwork- trowel and hammer.
The procedure for laying brick supports and curbs:
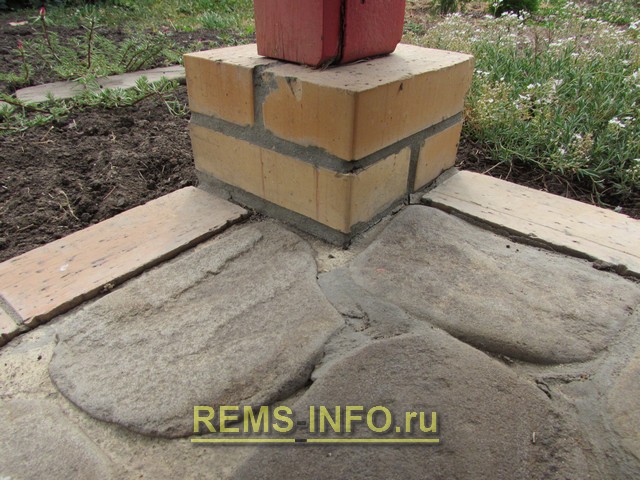
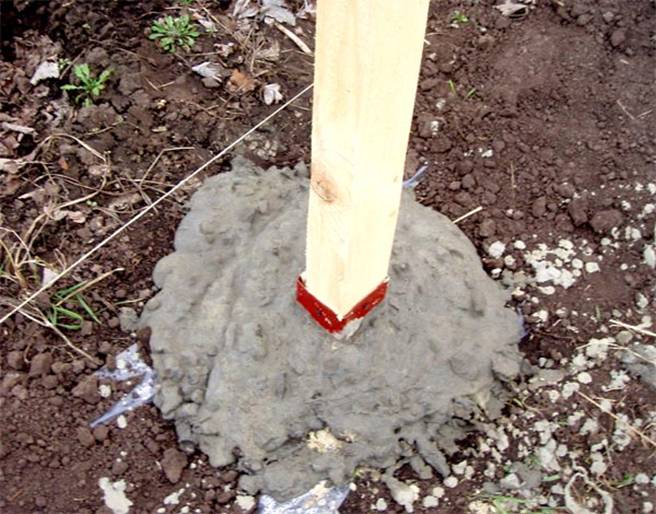
Support post for a wooden gazebo.
- They dig a trench 30 cm deep, adding 20–30 cm to the size of the site on each side.
- Check the surface horizontally, level if necessary.
- Mark the location of the columns and make recesses 20 cm slightly wider than the brick.
- Fill the holes with gravel and tamp.
- Stakes are installed to mark the outer corners of future supports, controlling the accuracy of marking along the diagonals.
- Knead the cement mortar (1: 3) and lay the first two bricks.
- Arrange the next four rows of masonry, laying a threaded stud in the center.
- Lay out the rest of the brick columns in the same way.
- They check the heights of the supports made and set the same level with the last rows of masonry.
- A well-packed sand cushion 150 mm thick is arranged at the bottom of the trench.
- Lay the bricks of the first row of the curb on a thick thick layer of mortar, not forgetting to lay the reinforcement.
- The second row is placed on a batch of normal consistency, reinforcing the masonry with steel wire.
- Having surrounded the entire perimeter, the work is stopped until the cement composition has hardened.
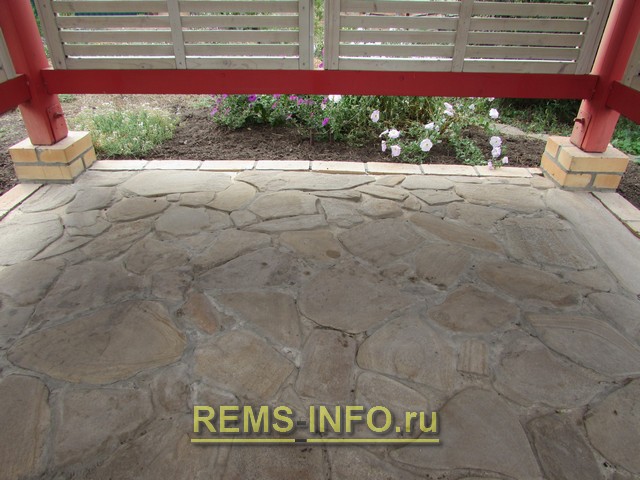
Paving with natural stone
A day later, the space inside and outside the curb is covered with a second layer of sand. The level of a carefully compacted cushion should coincide with the last seam of the brick frame and rise 20–30 mm towards the middle of the site.
Paving is carried out on a dry cement-sand mixture in a ratio of one to three. The stone is pre-cleaned and laid out on top of the binder layer, picking up the slabs so that the gaps remain small. Having adjusted in place, the sandstone is strongly pressed into the mixture.

Laying is carried out in small sections - as far as you can reach with your hands. After filling one square, add the mixture further and continue paving.
Having laid out the entire area, they spill it with a shallow water jet, evenly moistening the surface and not forming puddles. Irrigation is carried out for an hour, after which the film is stretched.
Having removed the polyethylene the next day, inspect the seams between the stones. If necessary, add the cement-sand mixture, moisten the site and again cover with a film for several days. You can walk on the stone after a week, but the calculated strength is achieved 20 days after laying.
Stage two - the construction of a wooden frame gazebo
To process wood, you will need a power tool:
- Drill and drills;
- plane;
- screwdriver;
- Grinder;
- circular saw.
required hand tool every owner has:
- Hacksaw;
- chisel;
- a hammer;
- roulette;
- square;
- protractor;
- pencil;
- brushes.
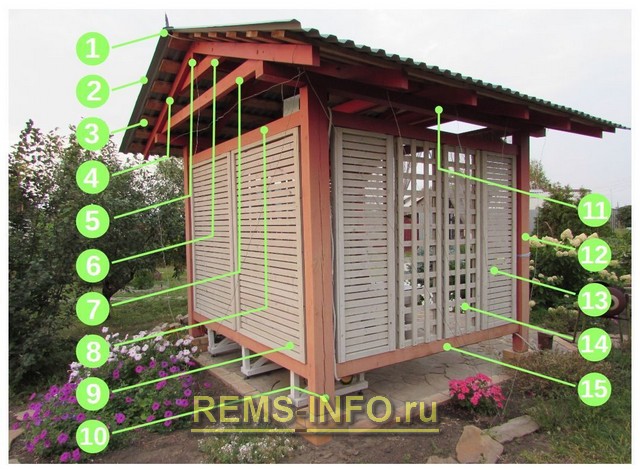
Photo of a wooden gazebo device:
- Roofing ridge 200x200x2500 - 2 pcs.;
- Professional sheet S21 1051x2100 - 8 pcs.;
- Sheathing board 30x150 - 14 pcs.;
- Rafter beam 50x100 - 12 pcs.;
- Ridge run 50x100 with chamfers;
- Crossbar 50x100 - 6 pcs.;
- Puff 50x100 - 3 pcs.;
- Crossbar 50x100 - 3 pcs.;
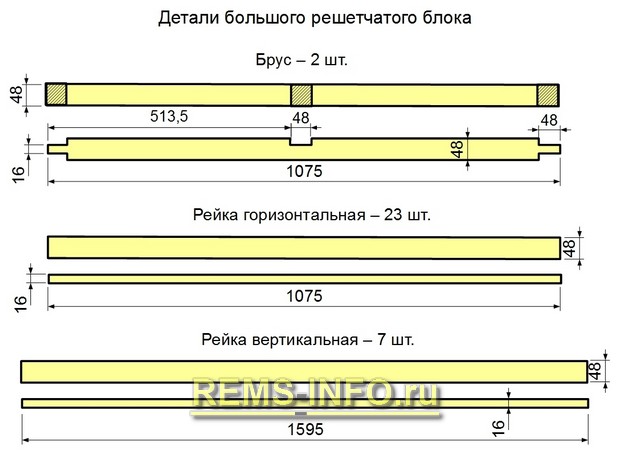
- Large lattice block - 2 pcs.;
- Bolt M16x120 with nut and washer - 4 pcs.;
- Mauerlat 100x100 - 2 pcs.;
- Rack 100x150 - 4 pcs.;
- Small lattice block - 4 pcs.;
- Lattice - 4 pcs.;
- Crossbar 50x100 - 4 pcs.
List of fasteners used:
- Roofing screws - 130–140 pcs.;
- Corner 90x90x60 - 12 pcs.;
- Plate 50x150 - 6 pcs.;
- Corner 60x60x30 - 6 pcs.;
- Corner 50x50x50 - 6 pcs.;
- Wood screws: 41 mm - 90 pcs., 78 mm - 150 pcs., 42 mm - 50 pcs., 30 mm - 500 pcs.;
- Bolt M10x140 with washers and nut - 18 pcs.;
- Nails 75 mm - about 2 kg.
The manufacturing process of all wooden elements of the gazebo is divided into successive operations:
- Cutting blanks according to drawings.
- Planer surface treatment.
- Making carpentry connections.
- Surface grinding.
- Protective impregnation.
- Gluing knots.
The structural parts of the gazebo made of wood are built in turn, the marking of the details of the next block is started after the construction of the previous one. Workpieces and connecting nodes are adjusted in the course of work based on real sizes lumber used. For example, the acquired unplaned timber 100x50 actually turns out to be thicker or narrower by 3–5 mm, and after processing with a planer, it becomes thinner by another 2–3 mm.
Manufacturing of the supporting frame
The skeleton of a wooden arbor consists of two parts connected by crossbars. For each side of the frame you will need to do:
- Front and rear racks, differing in spike sockets.
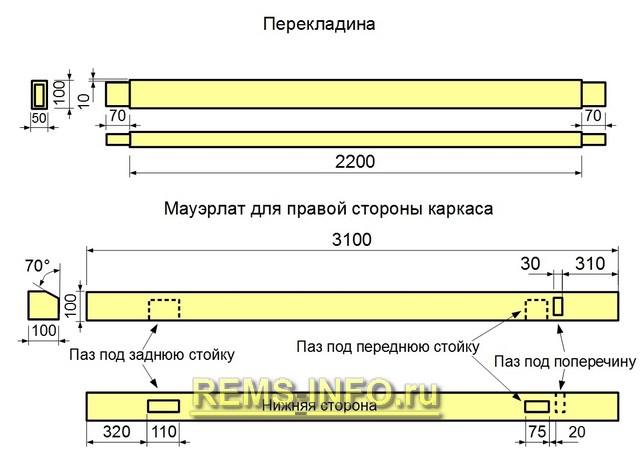
- Two identical crossbars.
- Mauerlat with a bevel under the rafter leg.
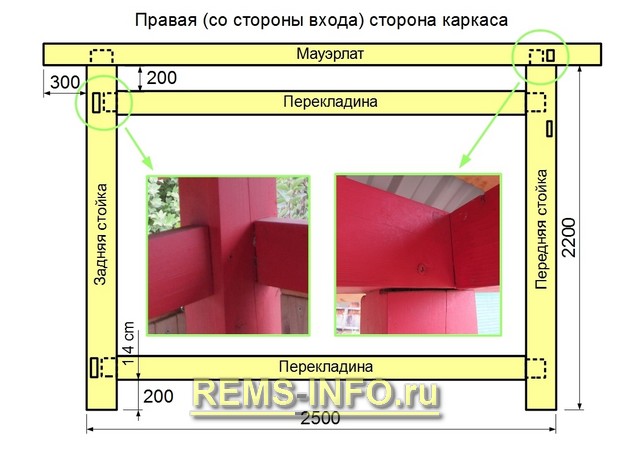
The support posts are made from pine timber according to the drawing showing the details for the right side of the frame. The marking of parts for the left side is done in mirror image.
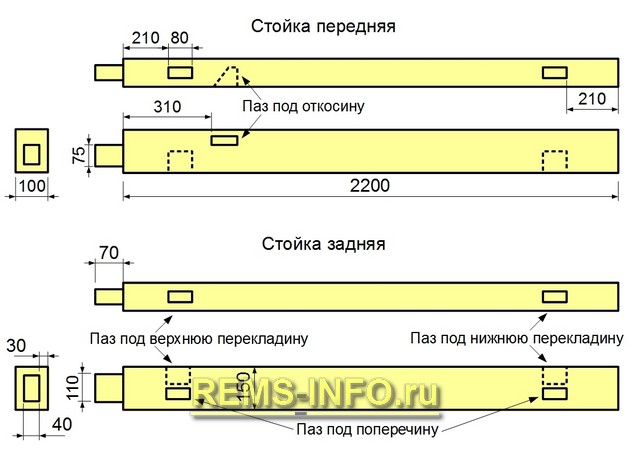
Carpentry connections begin with grooves and lugs. The dimensions of the studs can always be changed according to the hollowed-out recesses. Nests for spikes are first drilled with a feather drill bit of a slightly smaller diameter than the width of the groove. Then the corners are cut with a chisel and the excess wood is removed from the sides of the recess. Having made the nests, the sizes of the spikes are adjusted to fit them.
For crossbars and Mauerlat, bars are selected without large knots and ornate sections.
The prepared parts are connected “dry”, checking the docking of the spiked nodes. In order not to be mistaken when gluing, marks are placed on the fitted blanks and the wood is treated with an antiseptic.
After drying, the frame racks are placed on a flat surface, the sockets and spikes are coated with carpentry glue. Insert the Mauerlat and crossbars into place, check the right angles between the elements and fix the structure with self-tapping screws.
Having assembled both halves of the frame, leave them motionless until the adhesive composition sets in strength (at least a day). At this time, connecting elements are made:
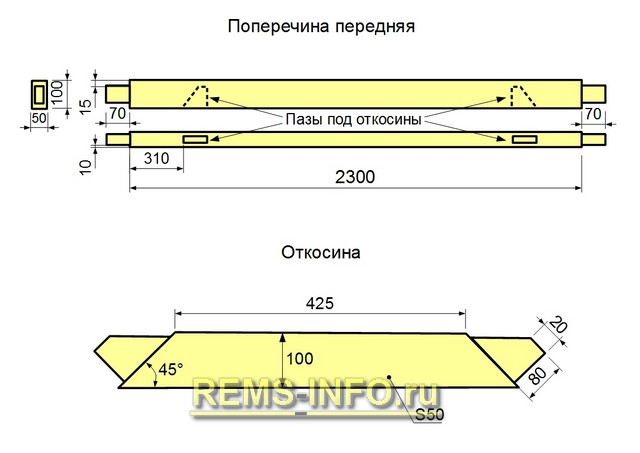
- Frontal cross member with slotted recesses for struts.
- Two gouges.
- Two crossbars of the back wall, identical to the front bar, only without grooves.
The procedure for installing the frame on brick pillars
- The corners are screwed, placing pieces of waterproofing under the metal.
- Cut off the protruding ends of the studs.
- Mark and drill recesses for nuts at the ends of the bars.
- They seize with carnations trimmings of roofing material, designed to protect the tree from contact with metal products.
- They bring one side of the frame and put the ends of the racks on brick pillars.
- They raise the structure and temporarily fix it with boards, nailing it to the timber and resting it on the ground.
- Align the posts relative to the corners and vertically.
- Drill holes for mounting bolts and screw wooden supports.
- The second part of the frame is brought up and glue is applied to the spiked joints.
- Insert the crossbars into the grooves of the pillars standing still and install the jib.
- Raise the wooden frame, while driving the connecting bars into the sockets.
- The spikes are planted to the stop, striking with a hammer on the board attached to the rack.
- After making sure that the geometry of the assembled frame is correct, the fixing screws are screwed in.
Subsequent installation work carried out when the glue dries and hardens, guided by the manufacturer's instructions.
The construction of the roof of the gazebo
![]()
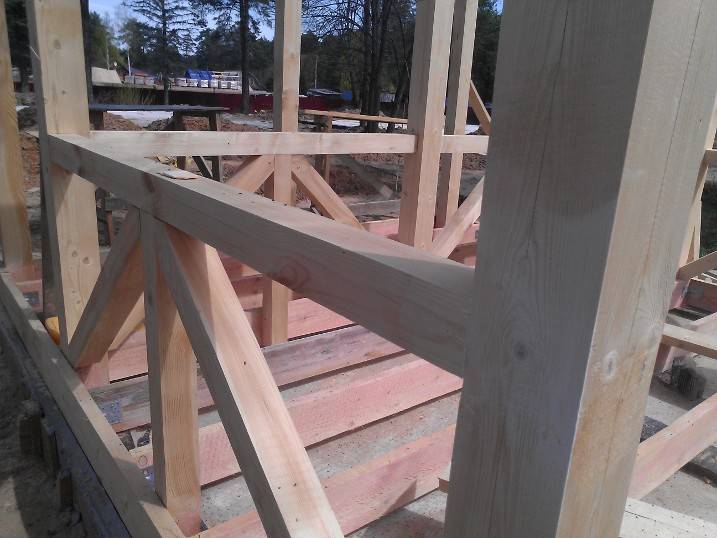
The classic roof with two slopes has a very attractive appearance, is resistant to wind and is available for do-it-yourself work. Using wood with a section of 50x100 mm, load-bearing structural elements are prepared according to the drawings.
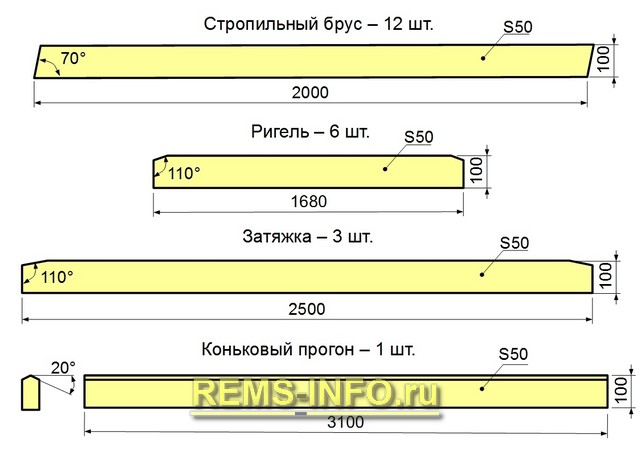
The construction of the roof begins on the ground with the manufacture of two extreme trusses, consisting of rafter legs and crossbars. The ends of the long bars are connected with mounting galvanized plates, and the crossbar is attached with bolts.
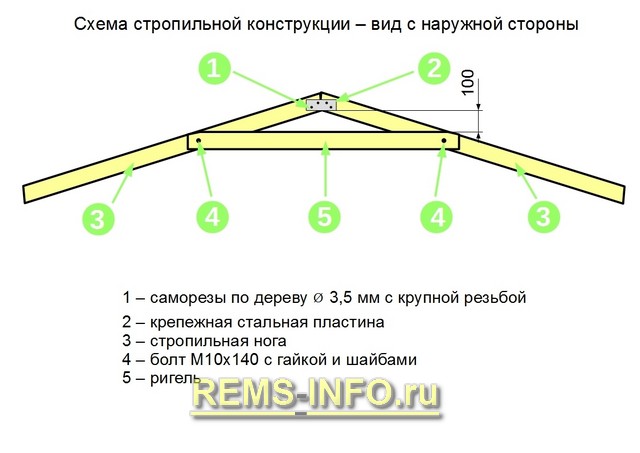
Two puffs are installed on the Mauerlat, stepping back from the ends to the width of the rafters and using metal corners. Raise and place previously assembled trusses in place, align, drill holes and tighten the parts with bolts.

Mount the ridge beam, connecting it to the crossbars and rafters with steel corners.
Mark the location of other inclined elements and fully assemble truss system. Another truss with a lower tightening is located in the middle of the Mauerlat, the rigidity of the rest is provided by tightening crossbars.
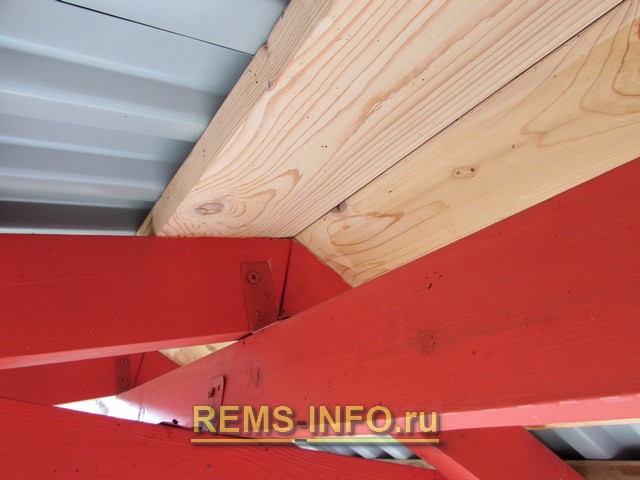
The crate is arranged from planed boards on the front side, cut both in the full width of the slope, and in short segments. The joints are placed "out of order", and whole boards 3.5 meters long are used on the ridge and along the edges.
Decking is placed with an overlap of 100 mm and an overlap in one corrugation. The sheets are fixed with self-tapping screws with a sealing washer 30 mm long when fastened to the lower bend and 57 mm when mounting the ridge through the upper corrugation. Having completed the roof, they proceed to filling the back and side walls of the frame.
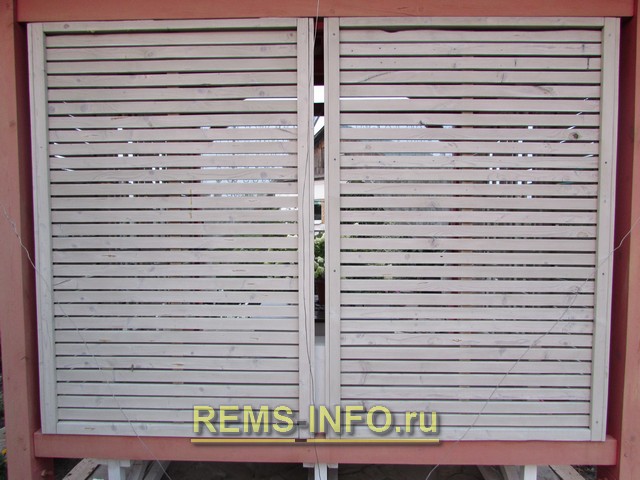
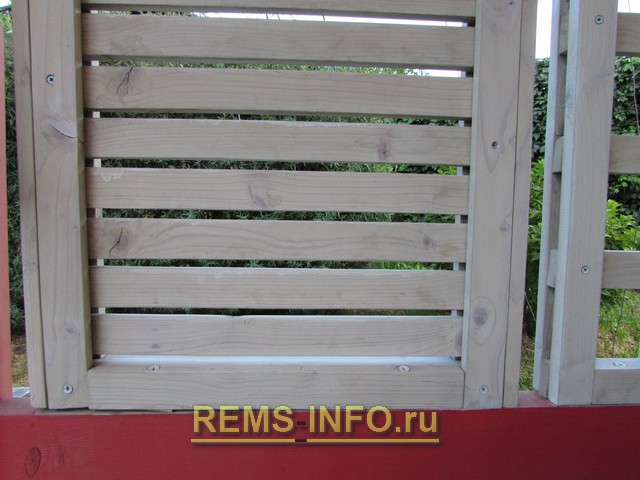
Manufacturing of wooden gratings
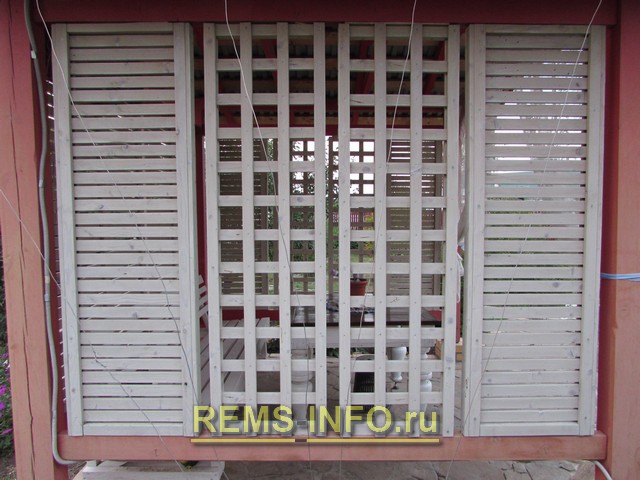
The attractiveness of a wooden gazebo is achieved by the use of lattice elements in the design, which play a decorative role and protect from wind, rain and prying eyes.
The main component of openwork blocks is slats with a section of 16x48 mm, sawn on a circular machine from bars. Significant savings can be made by using suitable trimmings or substandard timber with curved surfaces. Illiquid boards are cut into slats, rejecting rot, blue and large splits.
The fastening unit of the small lattice block is two bars with grooves sawn at the ends, corresponding to the section of the rails used.
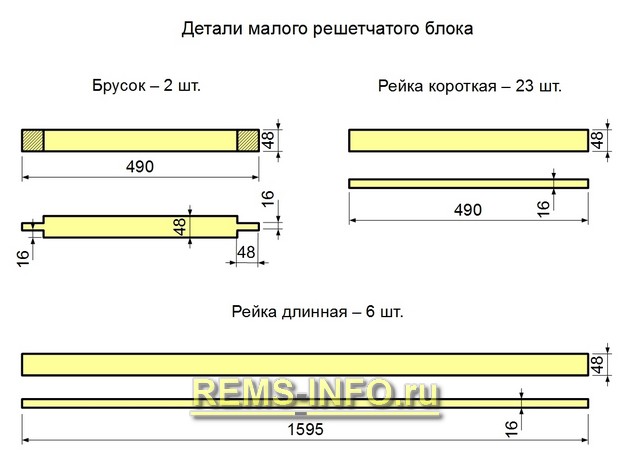
In the center of the bars of large shields, recesses are made for reinforcing bars.
The design of the central grilles is even simpler and requires less material.

The dimensions of the lattice blocks are removed from the finished frame. By measuring the distance between the crossbars and subtracting 5 mm, the desired height of the decorative shield is obtained. The width is taken as calculated, small deviations do not play any role here.
Having prepared all the details, proceed to the assembly of the gratings:
- Lay out two vertical slats on a flat surface.
- Mark with a pencil the location of the horizontal bars.
- Glue the grooves of the upper and lower bars with glue.
- Put the parts in place, align the corners.
- Having made a hole with a thin drill with a countersink, fasten the workpieces with self-tapping screws.
- They take a short bar, apply glue and place it according to the markup.
- Fix the part with screws, having previously drilled a hole.
- The rest of the strips are attached in the same way.
- Having covered the surfaces to be joined with glue, install long rails and tighten the screws.
In the wall frames, lattice structures are mounted using spacers and fixed with self-tapping screws screwed in with a slight inclination.
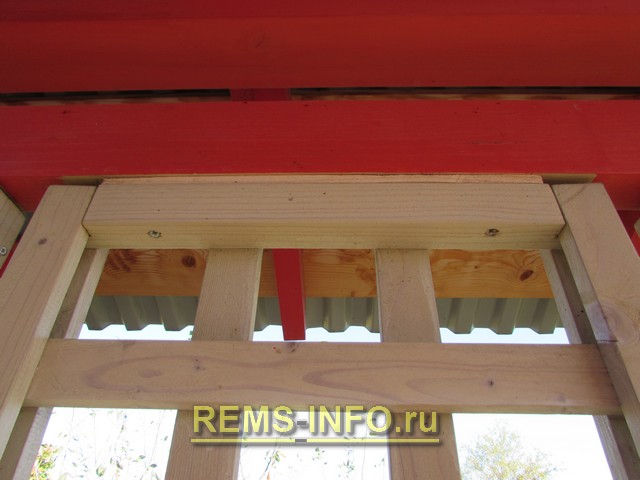
The wooden elements of the gazebo are covered with stain and protected from moisture with varnish or enamel.
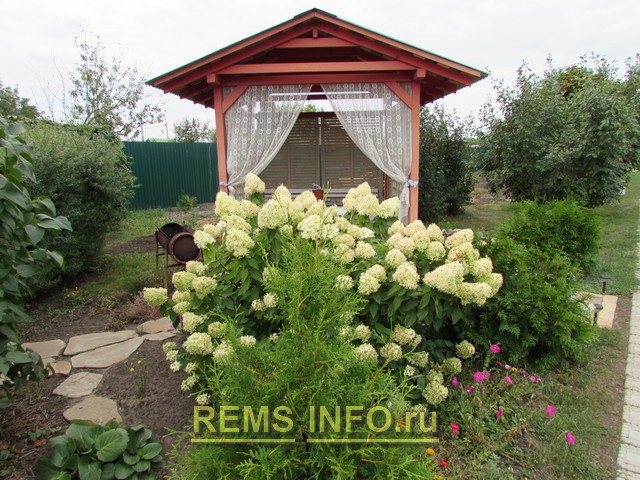
Having chosen our project as a basis, and having understood the step-by-step construction technology presented, you can make a wooden gazebo with your own hands that meets your own preferences and tastes.
The gazebo on the estate is an integral part of modern landscape design. The beauty is that a gazebo with your own hands can be made in absolutely any style. Many people ask the main question after they decide to build a gazebo with their own hands - where to start? We will give a clear answer to this question in today's material, and we will also analyze at least important points regarding the construction of a wooden gazebo with his own hands.
Before starting work, you need to realize that the gazebo is a fairly simple structure that does not require special skills and knowledge in the field of construction. If understand simple technology and the sequence, which will be discussed below, then the gazebo can be erected in a couple of days, with a minimum of effort, because in the end, you don’t Vacation home set out to build.
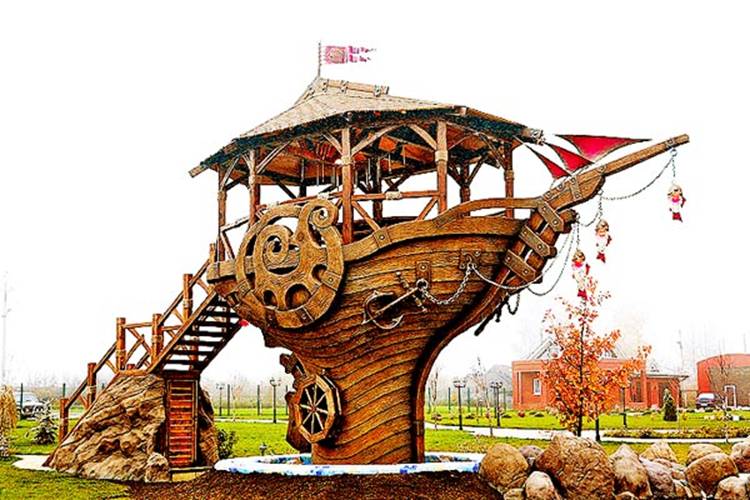
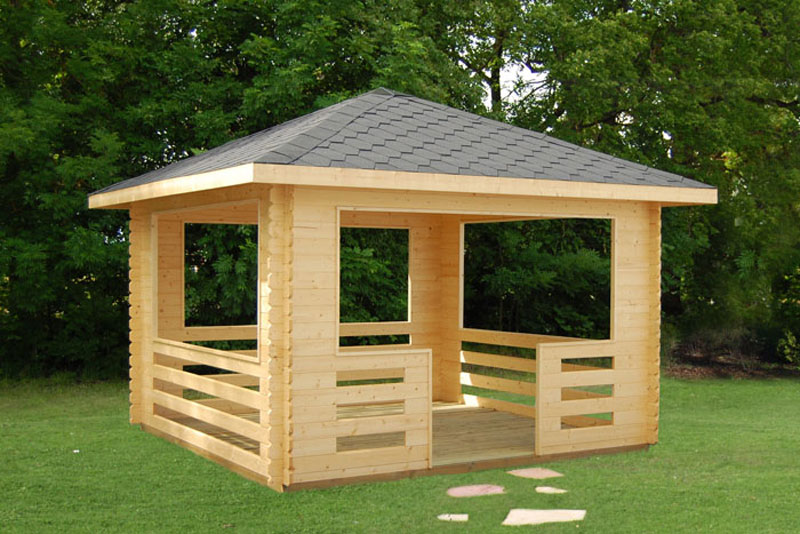
Moreover, by studying the detailed manual for building a gazebo with your own hands from wood, you will save not only time and effort, but also money. If you don’t like the gazebo design below, you can choose a slightly different shape, because you will now be familiar with the main stages and principles of construction. Who knows, maybe you will be able to make yourself such a masterpiece, shown in the photo below. The main thing is to believe in yourself.
Gazebo with their own hands. What to do?
Decide immediately on the material for future design. Most experienced builders assure that the best gazebos are made of wood. This choice brings many advantages:
natural look;
Ease of construction
Simple woodworking
Can be made in any style.
In addition, during the construction process, you will need the most common tool that lies in the garage of each owner. Materials for the design will take just as little, which will save significant funds. Do not forget that if you wish, you can build such a gazebo from wood, at the sight of which guests will not want to leave your site. This is sarcasm, of course, but there is some truth in it.
What about the foundation?
A wooden gazebo is quite plastic, elastic and weighs little. Thanks to these qualities, you can start its construction without a pre-prepared foundation. It is enough to treat the wood with special chemicals to protect it from contact with the ground. This will protect it from the effect of decay. Moreover, there are such types of gazebos, for example, wicker ones, which would be simply stupid to put on the foundation.
Initial stage of work
The first thing to do is to work out in detail the plan for future construction. If you can't find your bearings regarding design, then today there are a lot of magazines and websites dedicated to construction topics. There you can see examples of the most unusual, and at the same time, the simplest arbors for the estate. Making a plan includes:
The purpose of the building
shape of the gazebo
The shape of the structure can be square, round, rectangular, octagonal, hexagonal, and so on. The owners of the site with creative thinking and wild imagination can experiment by building a gazebo in the form of Baba Yaga's house, a fairy-tale palace or spaceship. Below is a very creative and unusual example of a gazebo.
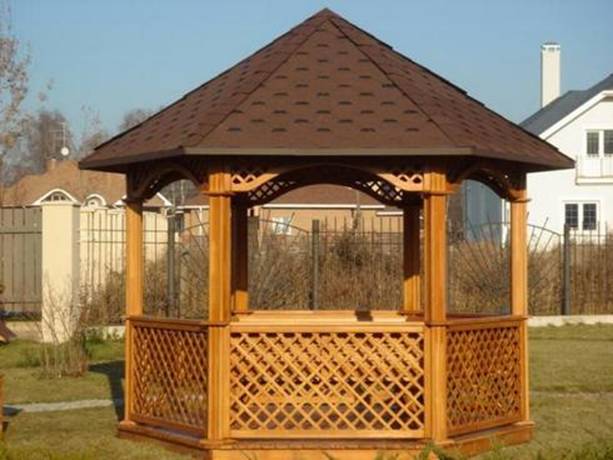
Or you can prefer more classic style which will look simple and tasteful.
Arbors also differ in their purpose. It is necessary to decide from the very beginning whether you just want to relax in the shade in the fresh air or a large company will have fun in the gazebo.
If the first option, in this case, you can start building an ordinary gazebo with your own hands with several benches.

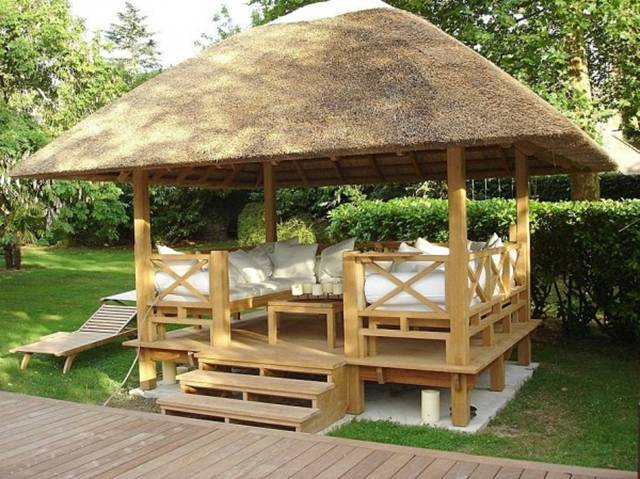
If you plan to build for a fun pastime of the company, give preference to a large platform and a canopy.
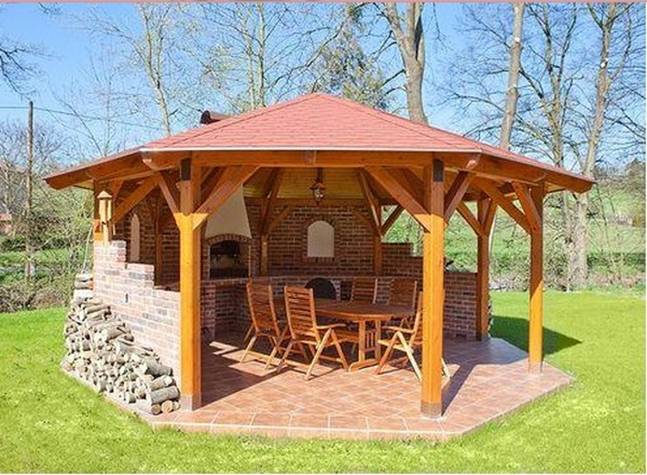
For those people who cannot imagine a vacation without a barbecue in nature and a field kitchen, a gazebo with a Russian stove or barbecue will be an ideal option.
Advice! Before choosing the shape of the future structure, you should pay attention to the existing buildings on the site, as well as landscape design in general. The chosen style of gazebo should be in harmony with the surroundings.
Deciding on a place
Once you've made your final design decision, it's time to choose the right location. Regarding the proximity of the location of the gazebo from the house, this question remains at the discretion of the owner. Proceed from the following - whether you want to take a break from the hustle and bustle of your home or want to spend time sitting outside with your family.
Do not place the building in a lowland, this cannot be done for obvious reasons - it is in the lowland that water will accumulate over time, which will lead to rotting of the wood.
Advice! Position the gazebo near trees, flower beds, or other vegetation. So you will achieve the maximum aesthetic effect, because it's nice when you have a view of the wonderful plants from the gazebo.
Gazebo with their own hands. Photos, drawings
After the above preparatory activities, we proceed to the design. The drawing will take into account:
· height;
· the size;
· components;
fastening methods, etc.
The drawing should also take into account the number of necessary building materials which must be pre-purchased.
For example, we settled on the standard square shape of a structure with a roof. It is about such a design that will be discussed in today's practical guide. We remind you, taking into account the information and examples below, you can choose any other gazebo design you like.
Necessary tools and materials
To start building, you need the following materials:
concrete for the process of mounting racks;
timber 15x15 cm for making the base and racks;
timber 10x10 cm for roofing elements and upper lathing;
bars for log 5x15 cm;
board for flooring;
plywood or boards for roofing;
· roofing materials, depending on your choice, it can be metal, slate or corrugated board;
boards for railings and other decorative structures;
lining for side cladding;
frames with glasses (if these elements are provided for in the plan);
· paint, varnish;
Self-tapping screws, screws, nails.
It is worth recalling that changing the project will also affect the list of materials, it can either decrease or increase, keep this in mind.
Also take care of the availability of the tools that you will need during the construction process:
hatchet;
shovel
hacksaw for wood;
Electric or chainsaw
a hammer with a nail puller;
planer
· chisel;
roulette;
· stairs.
Armed with the above tools, you can build almost any wooden gazebo on your site.
How to build a gazebo with your own hands
After all the above recommendations are fulfilled, it's time to start the main thing - building a gazebo with your own hands. To begin with, it is necessary to treat the wood used with moisture-proof and antiseptic agents. This must be done to keep the tree from rotting.
The next step is to install the supports. Mark the location of the future building with pegs and ropes.
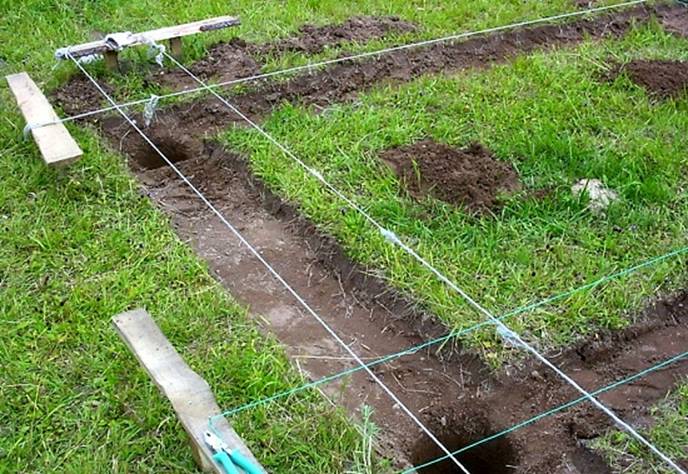
Advice! In order to get a perfectly even rectangle or square, it is necessary to observe the symmetry of the diagonals.
We will focus on the option when the foundation is not poured, but. This option is much easier to implement. Dig holes for the posts about a meter deep.
Pack the bottom of the pits with gravel, approximately 5 cm, after which, pour a 10 cm layer of concrete. Wait for the moment when the concrete hardens a little, and place the anchors in it. It is on them that the racks will subsequently be attached.
You can do it a little easier. Place a post upright in the hole and fill with concrete. It is important to ensure that the rack is installed exactly, strictly vertically. Racks should be dug into the ground in such a way that their strapping is a perfect square.
After installing the racks, it's time to start building the frame. This action must begin with the bottom strapping. For the floor, you can use a regular beam, which must be laid every 50 cm. This design is guaranteed to withstand the weight of the flooring.
Next, install the remaining frame structures - racks. They are responsible for supporting the roof and the top trim. The location of the racks should be strictly symmetrical, the number of which depends on the dimensions of the gazebo.
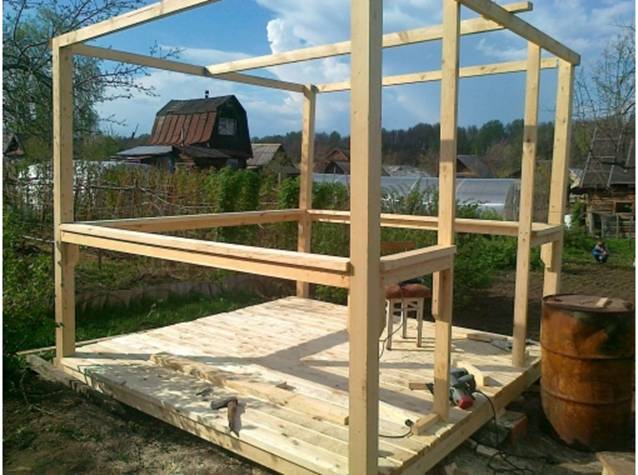
After the construction of the frame, we are engaged in flooring. The floorboard is fastened with ordinary screws or nails.
Roof installation is a critical stage of construction. First of all, the upper strapping of the entire structure is carried out from the bars, which must be attached to the supports with nails. Subsequent construction depends on what form of roof you have chosen for your future gazebo. More often, a four or gable roof is chosen, due to its practicality, reliability and ease of execution.
The hipped roof looks very original, we will focus on it as an example. To make the structure stronger, it is necessary to install additional rafters fixed to the upper and main harnesses. You should follow the symmetry of the rafters, this is very important.
Important! It is necessary to fasten the material to each other every 20 cm along the entire length of the rafters.
It is worth paying your attention to the fact that you should follow the safety rules for working at heights. Make sure that the stepladder does not wobble and that there are sharp and dangerous tools under you.
The final stage is decoration. It's time to show your imagination and decorate the walls, roof and railings of the gazebo. Usually they use a standard beam for the railing, then sheathing the structure with clapboard.
If you get a little confused, you can apply carvings to the wooden surface of the railings and walls. This adds color and originality to the finished design. However, for wood carving to look really spectacular, there must be certain skills in this matter.
After, you can open the wooden surfaces with varnish or paint them.
The next steps depend on your preferences. You can fill the gazebo with comfortable and spacious sofas, install a deck chair in it, or give preference to ordinary benches and a table.
By the way, you can also arrange tables, benches and chairs for a gazebo with your own hands. This will complement the overall design. Provide light, install mosquito nets, take care of the path from the gazebo to the house and enjoy the outdoors with close friends and family.
Weaving from rods - we simplify the process
If you like simple but tasteful, then you will definitely love our next idea. Moreover, it will greatly simplify the construction process. Arbor made of rods is very popular today. It not only looks spectacular, but is also quite practical.
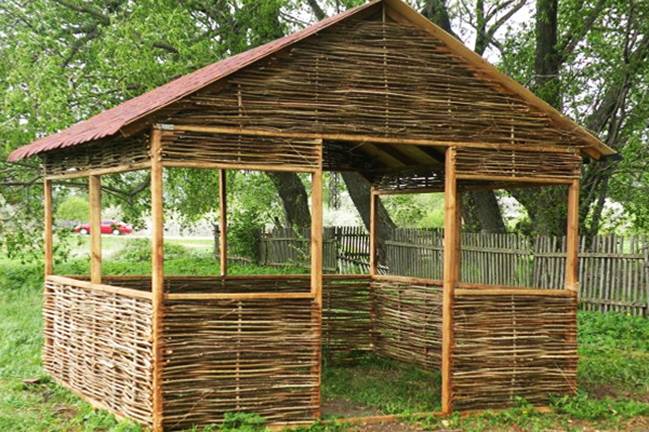
The process of building a gazebo from rods with your own hands is quite simple. It is necessary to drive rods into the ground to a depth of 35 cm. The main thing is that the rods form a symmetrical square or rectangle, although it is possible to make a design in the form of a hexagon or octagon.
You can also sheathe installed wooden racks ordinary arbor weaving. This also looks impressive. If your gazebo is located near the sea or river, you can use ordinary ropes for weaving, it will look quite appropriate.
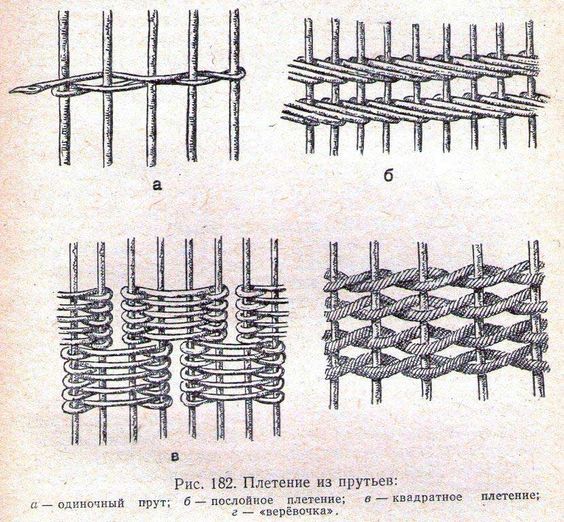
It is worth emphasizing that weaving is a very painstaking process, although not expensive. According to the principle of the above weaving patterns, you can choose the most acceptable pattern for your gazebo.
Do-it-yourself gazebo made of wood step by step video
Surely, you have seen from your own experience that it is not difficult to build a gazebo with your own hands from wood on your site. We figured out how to build a gazebo with our own hands. Choose your favorite gazebo design and decide on the place of construction. The main thing is to follow the above recommendations and use our methodology. Don't worry, you will definitely succeed. We recommend that you watch the following video of the gazebo construction process on your own, for a better understanding of the construction process.


