
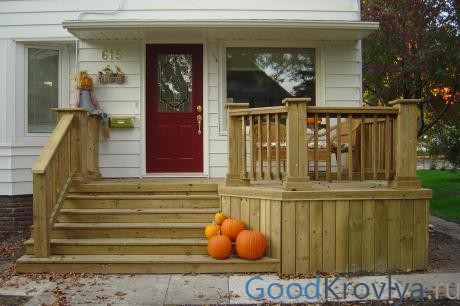
The first thing guests see when they enter your home is the front porch and front door. It is here that the main impression of the house as a whole is formed. The canopy on the facade was originally designed to protect the entrance and the door leaf from rain and sun, but its decorative role is in the foreground.
Entrance canopy options
To get the same beautiful canopy over the porch of a private house as in a magazine photo, you should approach its arrangement with all responsibility and seriousness.
Types of mini-canopies by type of installation and design
The main task of the canopy over the porch is to cover the front doors and the threshold of the house from rain, snow and sunlight. Canopies can be classified according to the type of installation, design, material for the roof and frame, size and shape.
Ways of fastening canopies over the door
Usually a small visor is hung over the door, commensurate with the dimensions of the porch. However, you can also build a wide canopy, which in the summer will play the role of a terrace. Wide canopies with closed sides serve as a good protection from the wind.
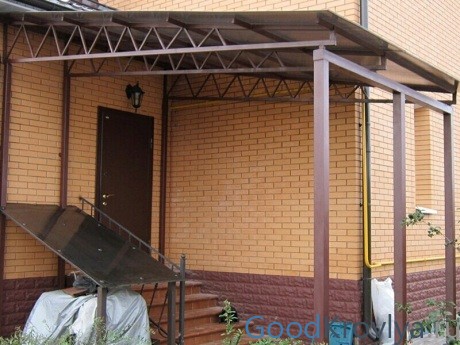
Support Structure Example
According to the type of installation, canopies are divided into two types:
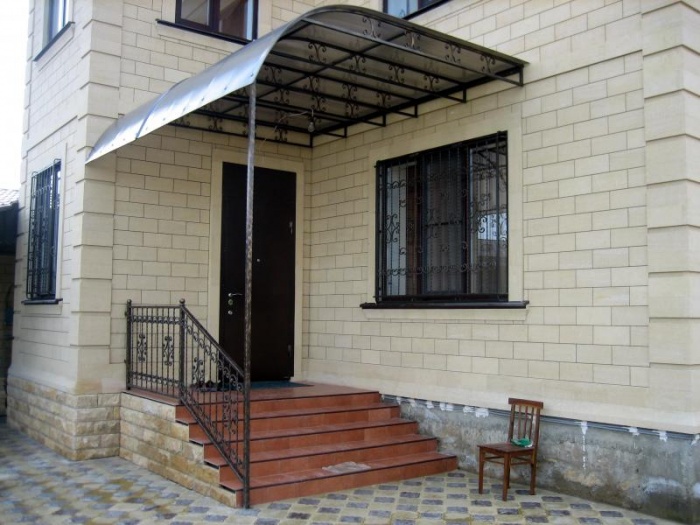
- Support. These are massive structures that require reliable fixation. Such canopies are attached to the house with one side, and the opposite side is installed on metal or wooden supports.
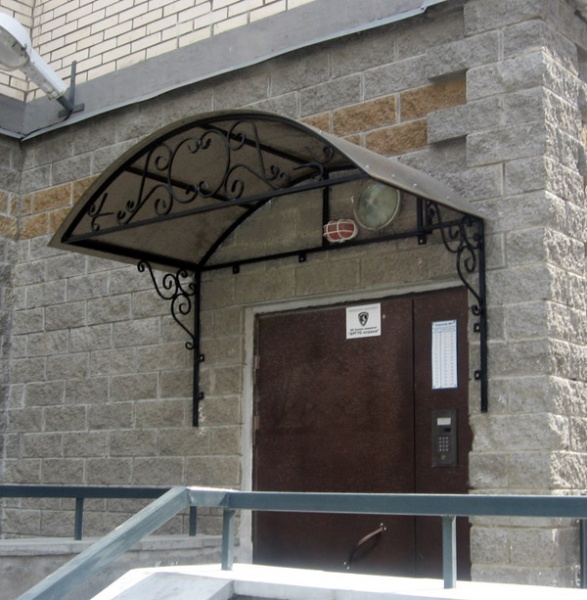
- Mounted. Lightweight, small structures that are mounted directly above the door. Such visors are easy to install, but often play a more decorative role, because a small shelter is unable to protect, for example, from a downpour or heavy snow.
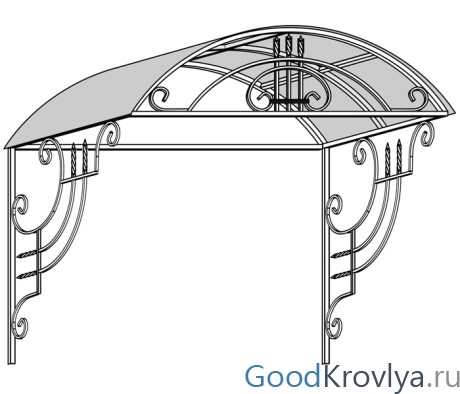
Hinged canopy - sketch
To make a canopy or a canopy over the porch with your own hands, photos of ready-made structures will help. Looking at the work, it's easier to decide how you want to see your canopy. Roof design options are many.
Variety of shapes and design solutions
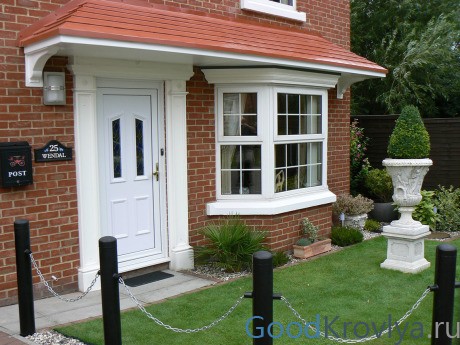
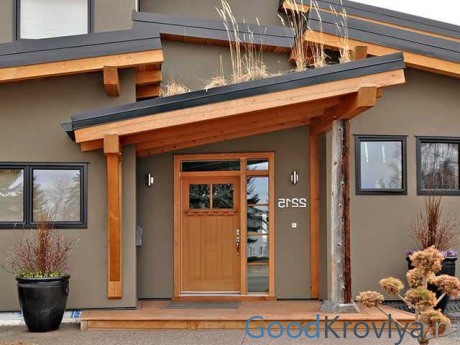
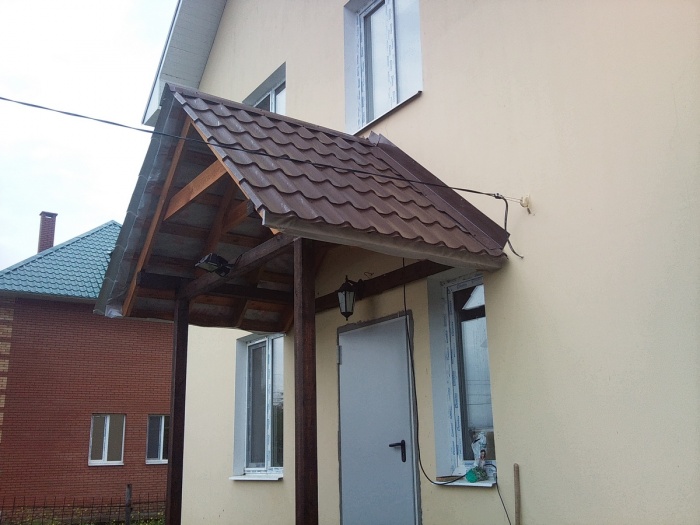
shed roof. The simplest design is functional and without any frills. It can be done even by a person who has only initial experience in construction. This shape is ideal for wide supporting canopies made of profiled sheet or slate, as well as for open terraces. When erecting a shed structure, it is important to make a sufficient slope so that precipitation or foliage from trees does not accumulate on the roof.
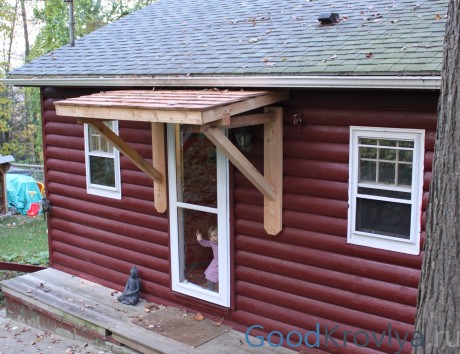
Shed canopy over the door
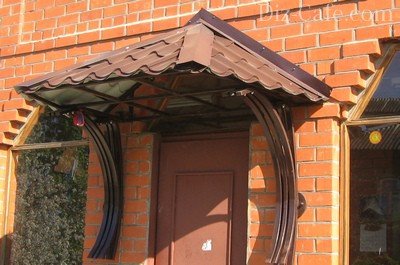
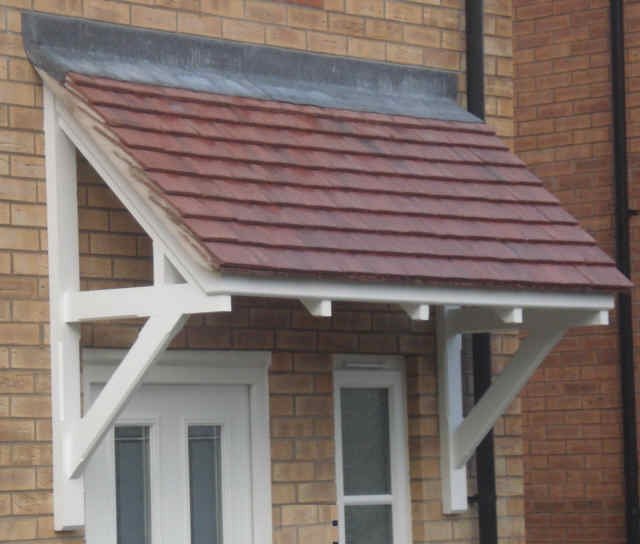
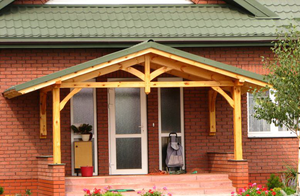
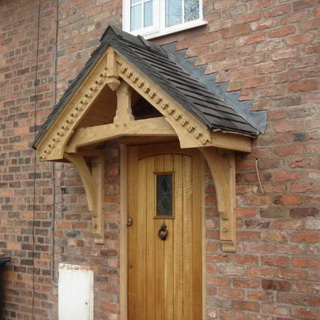
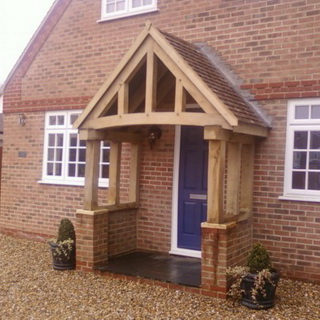
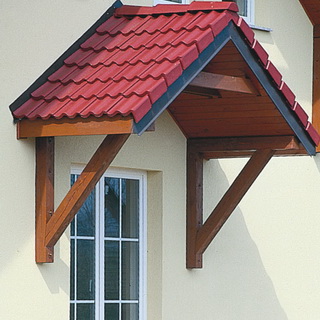
Double or triple visor. The roof of the "house" will decorate the porch in both classic and rustic style. Gable wooden or tiled porches look especially nice. Most often, such a porch is made with supporting pillars so that the structure can withstand the considerable weight of the roof. A three-slope canopy is a complicated version of a gable roof. It is not so easy to make it, but it looks more interesting.
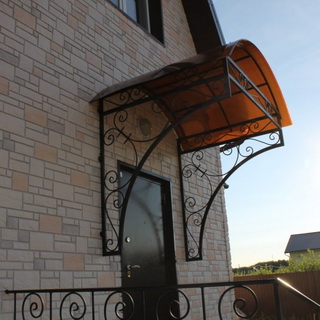
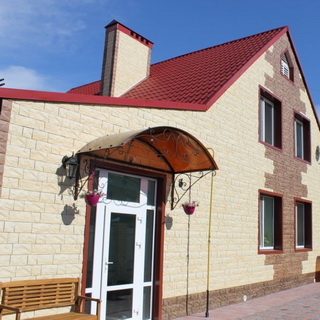
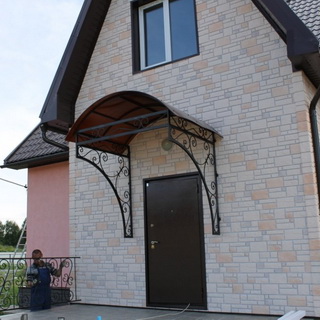
Tri-slope visor looks noble
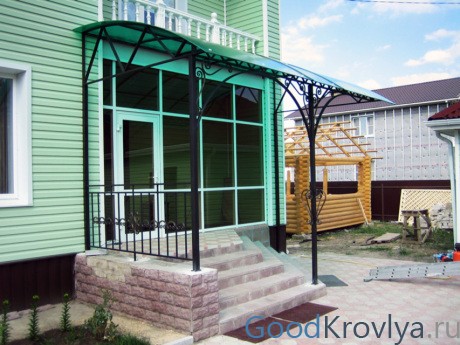
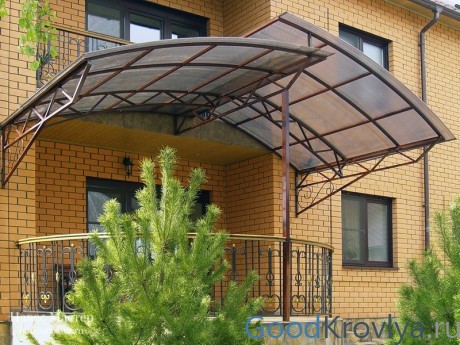
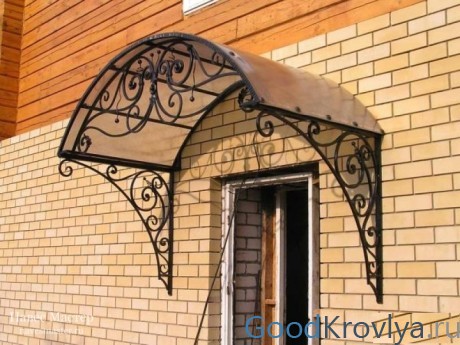
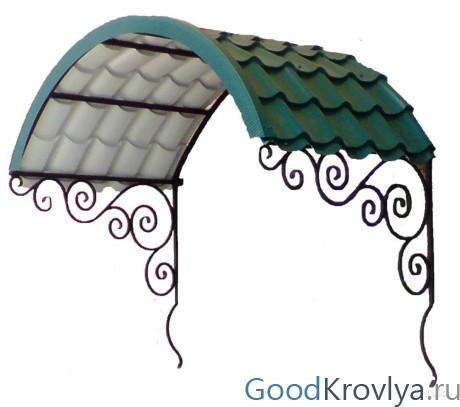
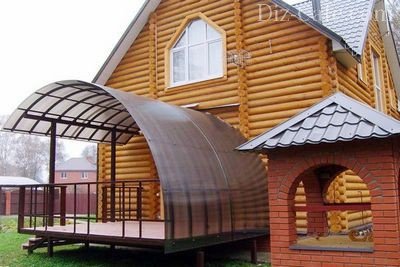
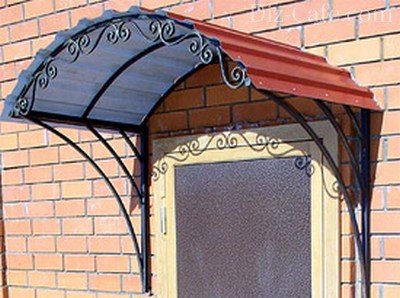
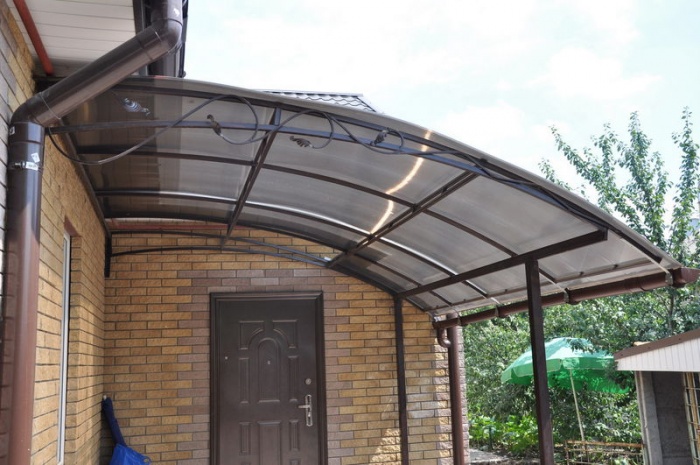
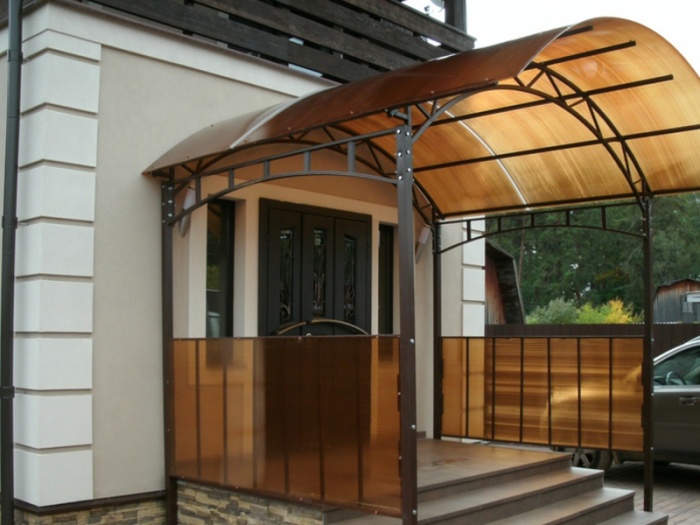
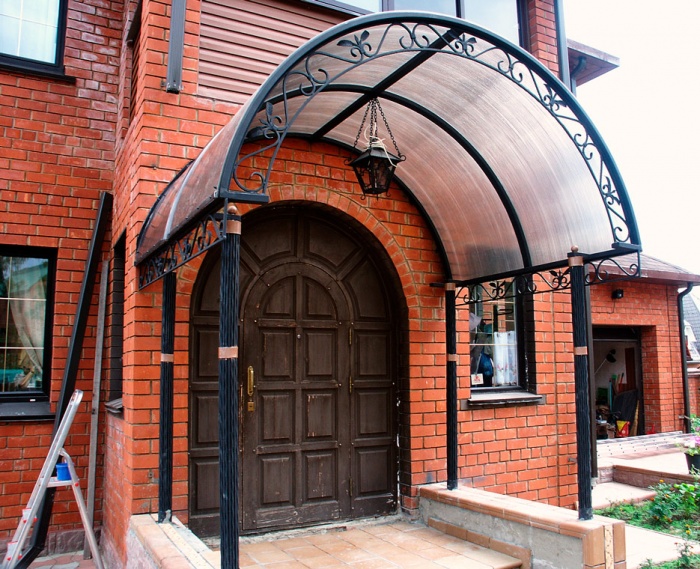
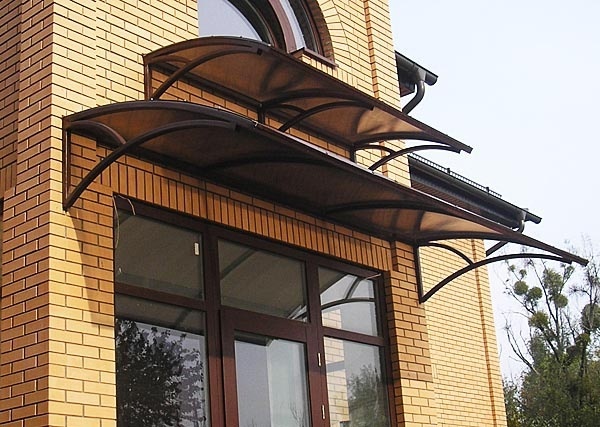
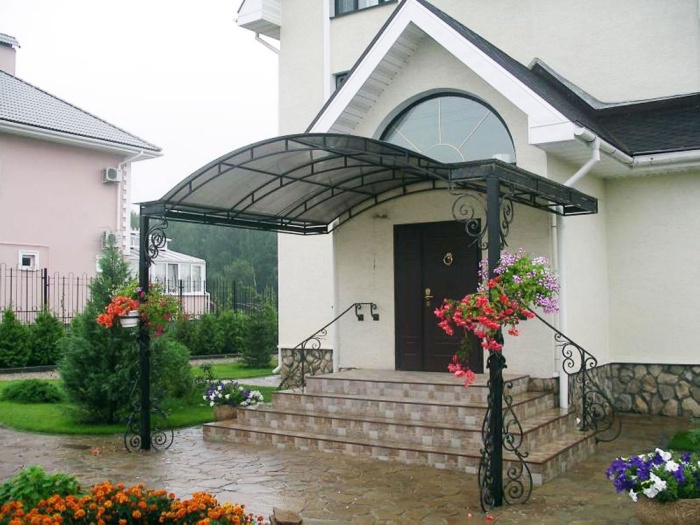
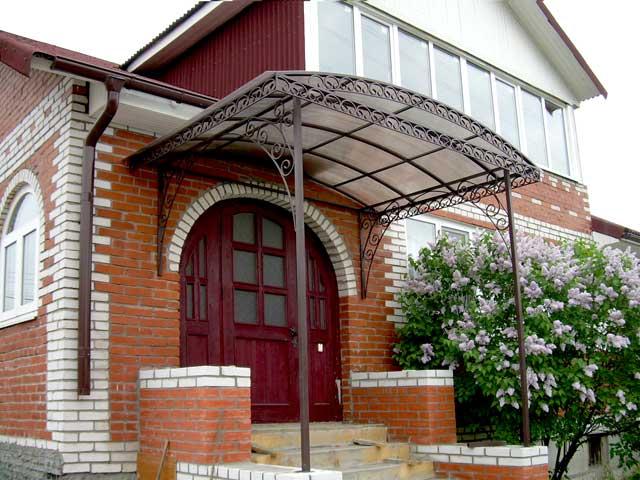
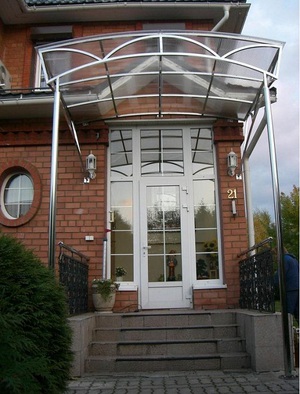
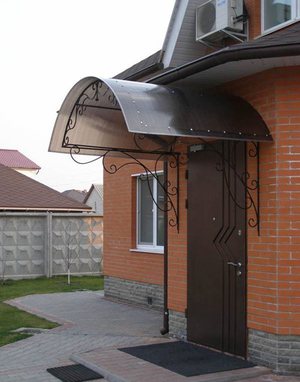
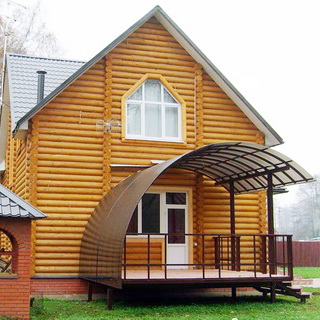
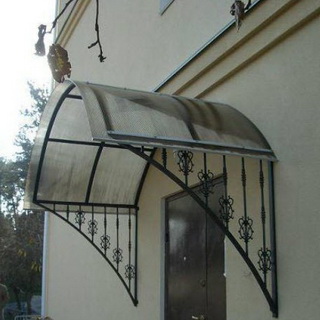
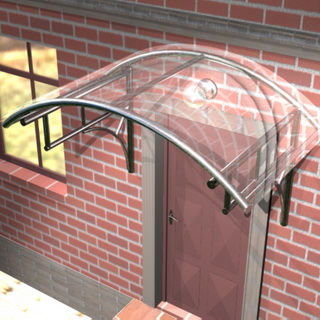
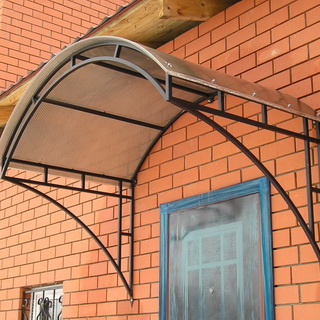
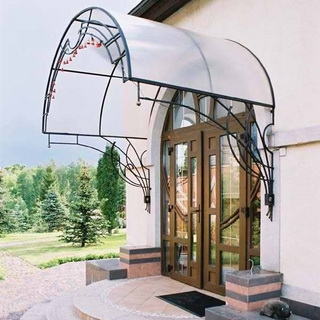
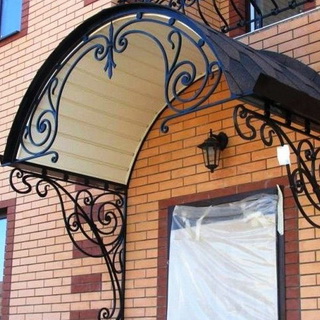
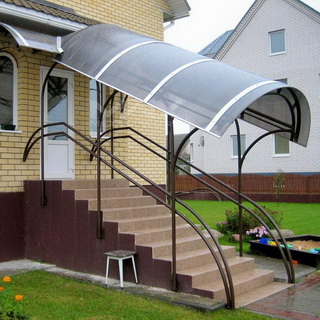
Semicircular visor. Previously, such visors were made of metal. Now for them, as a rule, use cellular polycarbonate. This material bends perfectly, is easily attached to the frame and generally looks very presentable. The lightness of the design allows you to make it hinged, and different colors of polycarbonate give room for design delights. Semicircular can be made as a small canopy over the door, as well as a large-scale structure that covers the entire facade.
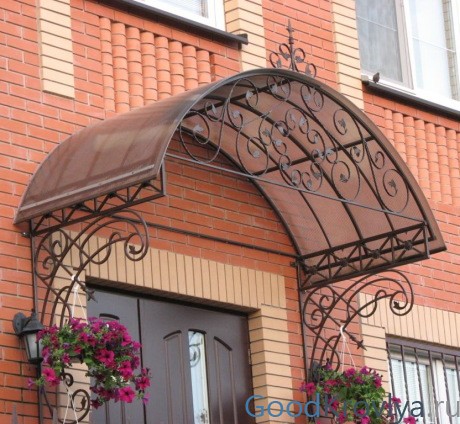
Semicircular structures are made of polycarbonate
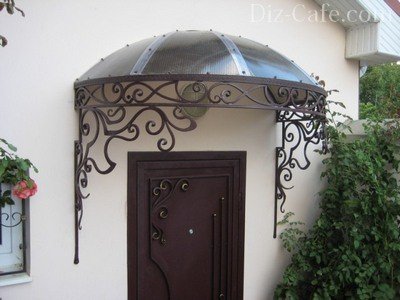
Figured awnings. To make a porch with a custom roof, you will need extensive building experience. Such canopies are difficult to perform, but always attract attention and cause admiration. For their construction, they choose such roofing materials with which it is easiest to create complex shapes, for example, tiles, cellular or monolithic polycarbonate.
The design can be very different - in the form of a simple or elongated dome, polygonal, concave or any other shape.
Canopy can be very unusual
Variety of materials for the visor
From what the canopy will be covered, its functionality and durability will depend. The modern market offers a lot of options for roofing materials. Before you make a visor over the porch with your own hands, you should familiarize yourself with their properties and only then make a choice.
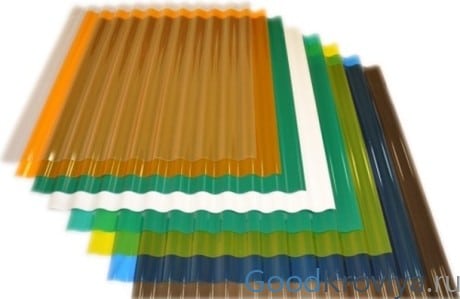
Modern polycarbonate roofs
Last years this material has gained immense popularity. Polycarbonate sheets come in different colors, so you can easily build a visor that fits into the overall color scheme of the building.
Polycarbonate transmits light well
Polycarbonate has a lot of advantages:
- transparency, due to which it practically does not obscure the facade of the house;
- variety of colors;
- light weight of sheets combined with sufficient strength;
- ease of installation;
- flexibility, which is important when building semicircular and complex shaped canopies.
Stylish asymmetry
Despite all the advantages, polycarbonate also has disadvantages. Perhaps the main one is low impact resistance compared, for example, with tiles or profiled sheets. The polycarbonate visor can easily withstand the snow cover, but it can wrinkle or even crack from a heavy branch that has fallen on it.
From polycarbonate, you can make a canopy over the porch of the most diverse design - flat shed, arched, gable or any other shape you like.
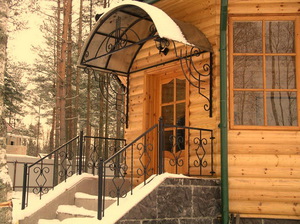
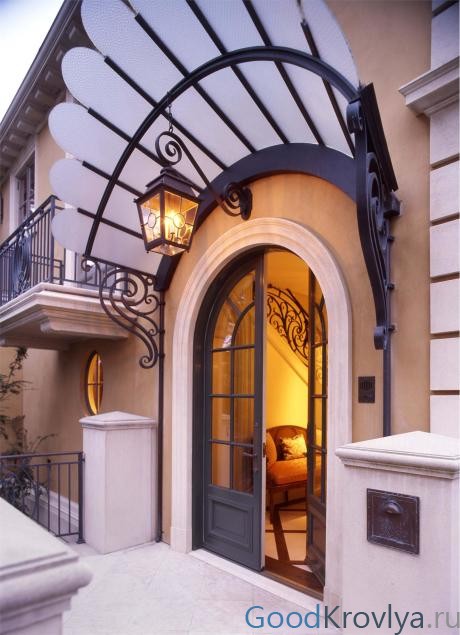
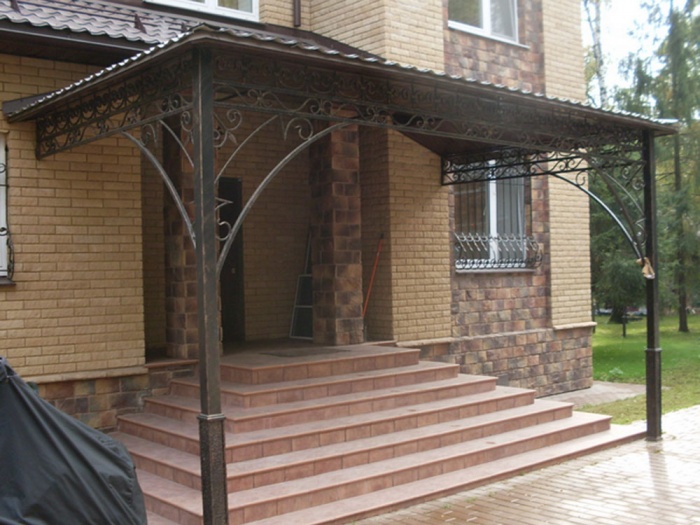
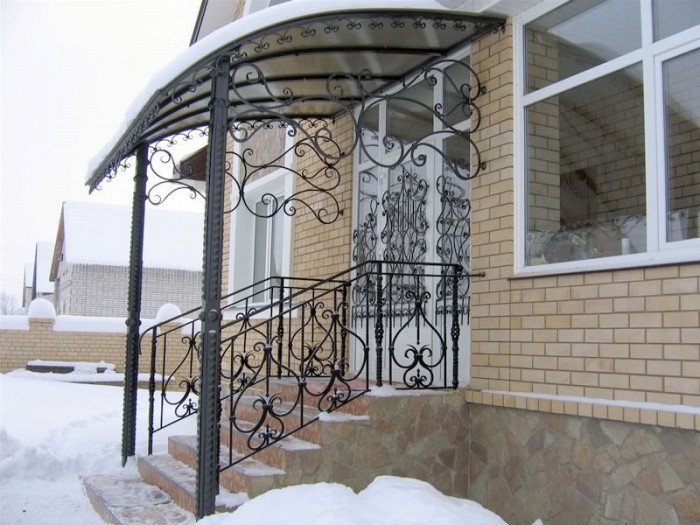
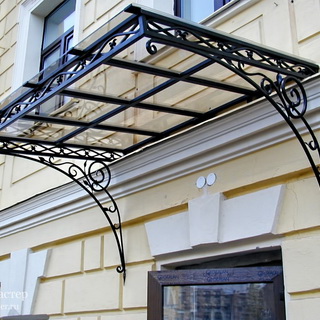
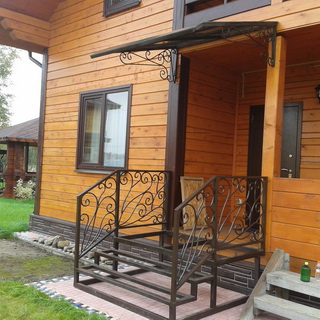
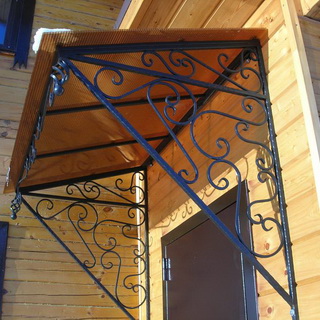
The classic is considered hinged forged visor with polycarbonate roof.
Large canopy with supports
Combination with forging
Classic metal roofing
The metal tile combines classic design and the latest technologies for the production of roofing materials. The metal base is responsible for strength and durability, and the polymer coating prevents corrosion.
Advantages of metal awnings:
- service life up to 45 years;
- strength;
- resistance to the external environment;
- easy installation.
The disadvantage of metal tiles is one - the high price compared to other materials.
A single ensemble of roof and canopy
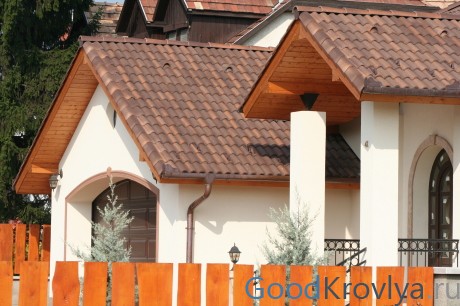
It is advisable to make tiled peaks at the stage of building a house, along with the main roof. The remnants of tiles, which always remain after large-scale work, will fit perfectly on the visor. In addition, the roof and canopy in the same style will look very stylish. Given the considerable weight of the tiled roof, it is better to put the porch on supports.
Metal roofing combined with forging
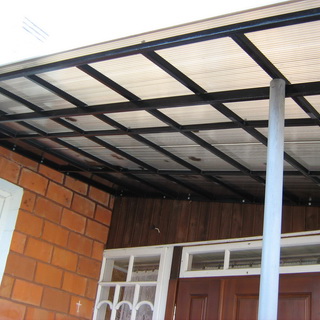
Practical and reliable decking
Ordinary galvanized profiled sheets are not particularly decorative, but recently a profiled sheet with a polymer coating of different colors has appeared on sale.
The roof over the porch from corrugated board is distinguished by the following features:
- strength and impact resistance;
- relatively small weight;
- ease of installation;
- low price compared to other roofing materials.
Peaks made of corrugated board are strong and durable
Given that the sheets have quite big sizes(width 0.75-1.0 m and length up to 12 m), it is advisable to use corrugated board for large-scale metal canopies over the porch of the house. It is unprofitable to buy a full-size sheet for a compact visor, so small structures are covered with scraps of corrugated board left after a large construction site or other materials are used.
Good old wave slate
Until recently, slate was almost the only and ubiquitous roofing material. Now slate is not so popular, however, modern masters continue to use it in construction.
Slate canopies are valued for the following qualities:
- resistance to environmental influences;
- heat-insulating properties (slate is little heated by sunlight);
- durability.
At the same time, slate has a lot of disadvantages:
- big weight;
- fragility of sheets;
- difficult installation (due to the fragility of the sheets, it is not easy to cut and drill holes for fasteners in them).
When making a slate canopy over the porch with your own hands, it is necessary to take into account its considerable weight, so be sure to provide for a strong frame and secure fastening to the facade.
Plastic slate for visor
An alternative to traditional slate is plastic and euro slate. They also have a wavy surface of the sheet, but are more practical, weigh less and look more attractive, as they are produced in various colors.
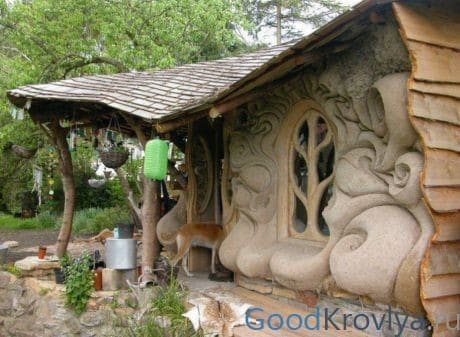
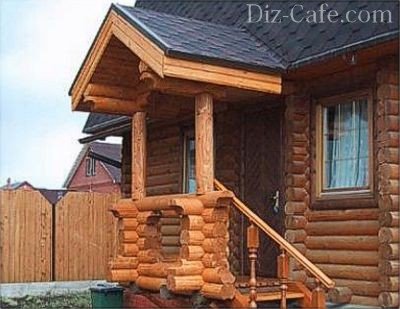
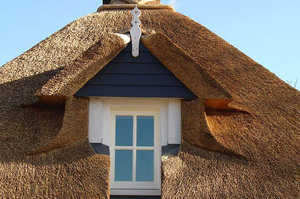
Eco-friendly wooden canopies
Wood never goes out of style. The wooden canopy over the porch has not lost its relevance from ancient times to the present day. This design looks especially good in combination with a log house or a house with wood trim.
Wooden canopy in eco style
The advantages of wooden canopies are obvious:
- environmental friendliness;
- high decorative effect;
- reliable protection from the sun - under such a canopy it is always cool;
- simple installation process.
Unfortunately, wooden structures are susceptible to decay and can be destroyed by bark beetles. In order for a do-it-yourself visor over the porch to last as long as possible, you will have to cover it with several layers of special impregnations.
Quite often, combined canopies are erected over the entrance, where the supports and beams are made of wood, and the roof is covered with corrugated board or tiles. Wood is the best suited for the manufacture of figured or carved structures, because it is malleable to processing and in the hands of a master can turn into a real work of art.

Wooden porch can become the main decoration of the house
How to build a canopy over the porch yourself
So, inspired by the colorful photos of the canopies over the porch, you decided to build your own structure. Where to start work?
Design and important calculations
The whole process includes several milestones:
- Drawing up a drawing and an approximate estimate.
- Frame construction.
- Installation of the frame on the facade and, if required, the construction of additional supports.
- Roof lining.
All measurements must be present on the canopy drawing, because they will be used to calculate the flow necessary materials. When designing a visor, it is necessary to take into account the width of the front door. Add another 30-50 cm to this figure and get minimum width roofs. For example, if the front door has a width of 90 cm, then the visor is made at least 110 cm. The angle of the roof must also be considered - it should be 20-30 degrees.
The wider the canopy, the more they make the slope.

Drawing of a metal visor
Frames for visors are made of wooden bars, a metal corner or a profile, and they also order finished forged products, which you only need to cover with roofing material to your liking.
Canopies to the house from polycarbonate
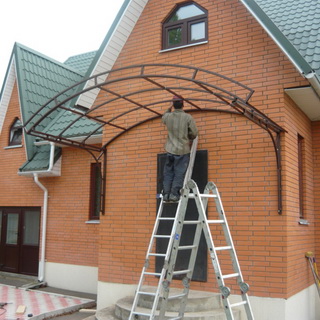
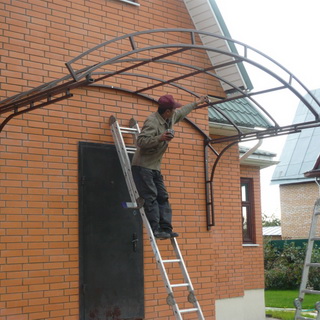
Stages of building a protective canopy over the door
When constructing a frame, they adhere to the basic rule - the heavier the roof, the more powerful the supporting structure should be. For light polycarbonate visors, even fittings with a diameter of 5 mm or more will fit perfectly as a frame. And for massive slate or tiled roofs, you will need bars or a metal corner with a section of 5-10 cm.
The finished frame is attached to the facade with anchor bolts. The junction with the wall of the house is covered with a protective bar. If required, support posts are installed, which are usually not only dug into the ground for strength, but also concreted.
Conclude construction work with the installation of the roof. The method of fastening it depends on the material used. Polycarbonate is fixed with self-tapping screws through thermal washers, and the ends are sealed with a special tape. The profiled sheet and metal tile are screwed with self-tapping screws on the profiled sheet or, in extreme cases, with ordinary wood screws. The slate is nailed to the crate.
Unusual canopy over the door
Regardless of which version of the canopy over the porch you choose, the construction must be approached with all responsibility. Then the visor will not only protect, but also decorate the house, and will also serve for more than one year.
Video: Canopies over the entrance
It is enough for the owner of the cottage to go out onto the porch in the rain or snow, as the question of whether to have a visor or not will be unambiguously resolved in favor of this design. That's just a convenient time for its construction will be irretrievably lost: you have to wait for spring. During this time, the steps of the porch may one morning become covered with ice. Or a snow build-up forms on them, and it will be so high that even the front door will be difficult to open. Another scenario is well known to motorists: in the evening it rained, which flooded the castle, and froze at night. Don't want to be in this situation? Make a canopy over the porch in time!
What should be the visor?
In order not to have to redo the visor later, you need to have a good idea of what exactly you want to get as a result. The minimum list of requirements that this structure must satisfy is presented below:
- it must withstand not only its own weight, but also the weight of climatic precipitation, taking into account the snow that can fall on it from the roof, as well as the weight of green spaces wrapping around it;
- since water will drain onto it, it is necessary to provide a system for collecting it into a storage tank or outflow into a storm sewer;
- it is desirable that the design protect not only the front door, but also the porch as a whole;
- the structure should not look like an alien spot: it must fully comply with the general style decision cottage.
As for the last point, everything will be fine with external indicators and design if you focus on the material from which the visor will be created. It should be combined with the exterior of the house, with the porch itself and with the roof. In this case, it is not necessary to completely match the material. It is important to choose the right shape, size, color, suitable shade or justified contrast.
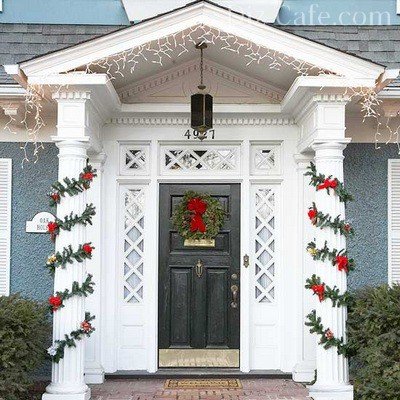
Sometimes the canopy over the entrance is created as part of the main building. Then this is a solid structure, provided for by the building plan, equipped with columns that you so want to decorate for Christmas
The shape and dimensions of the visor should depend on appearance and entry locations. Sometimes it is better to replace the visor with a canopy: in this case it turns out to be a more appropriate structure.
We choose the design of the future design
Take the time to compile a list of items that your choice is focused on, since it is your own time that will save you as a result, deciding on the design of the visor. By putting your thoughts in writing, you will not lose sight of anything.
Option #1 - Polycarbonate
As the main material for the construction of the visor, polycarbonate has far outstripped all its competitors. In addition to such remarkable qualities as durability, reliability and practicality, polycarbonate is also distinguished by visual appeal. Due to the variety of colors used in its production, it is able to match any design ideas. There are, of course, materials that are cheaper than polycarbonate, but working with it is a pleasure.
Before building a visor yourself using polycarbonate, you need to study the rules for working with it: nothing supernatural, but it is recommended to follow
Option #2 - metal
A structure completely assembled from metal is a fairly simple and not too expensive option. It is not as easy to work with metal as with polycarbonate, because a special apparatus is needed to weld it. And this means that there must be at least some skills to work with him. However, if desired, welding can be changed to riveting or used to connect the nut to the bolt structure.
The disadvantage of this option is that the metal requires anti-corrosion treatment. Note that this design, unlike the previous one, is completely made of metal, which means it requires more attention.
Any product will look wonderful if the hand of the Master touches it. And in this respect, the choice of this or that material does not really matter.
Option # 3 - corrugated board
Decking in popularity can be compared with polycarbonate. A nice polymer coating allows it to compete with this material. But corrugated board has a significant drawback, which should not be forgotten - when it receives mechanical damage, its surface is irreparably distorted.
Well, who's to say that a corrugated visor looks too "simple"? As for mechanical damage, hail in our area is not a frequent occurrence.
To level this minus, you will have to look for the thickest corrugated board as possible, but you will have to pay more for it. It should be noted that it is much easier to work with it than, for example, with metal and even metal tiles.
Option #4 - lightweight plastic
This material is very similar to polycarbonate, but in fact they are special PVC boards. They are used for outdoor work, they should not be confused with cheap plastic that goes to interior decoration premises. A feature of this material is its truly unique lightness. At the same time, the material remains durable and quite reliable. Plastic is available in different colors, but can be brought to the desired shade with the help of a film.

Very concise and simple. But by no means "rustic", mind you! Such a visor is similar to a royal speech: laconic and to the point
Option #5 - metal and shingles
Two very different materials. Peaks of them are best built simultaneously with the construction of the roof of the building itself. Then the remnants of the material will go to the visor, and it will come out practically free. In addition, these materials will only be appropriate if the roof and canopy cover is completely identical. Otherwise, the difference will be too striking.
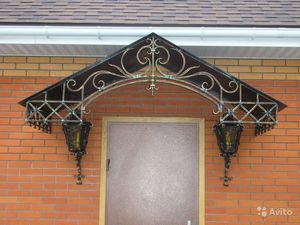
A nice visor made of reddish-brown metal tile looks quite unusual. Its Gothic form is fully consistent with the architectural design of the entire cottage.
These types of tiles are diametrically opposed in weight. Metal tile is a heavy material, and shingles are light. Nevertheless, both visors will turn out to be cute and of high quality. A metal tile product will be somewhat noisier in case of rain.
This is not even quite a visor, but a whole canopy covered with flexible tiles. A nice bonus of such coverage is silence during the rainy season. You can’t expect anything like that from metal, metal tiles and corrugated board
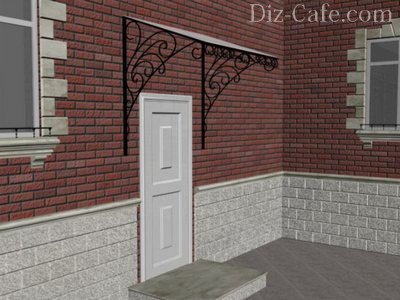
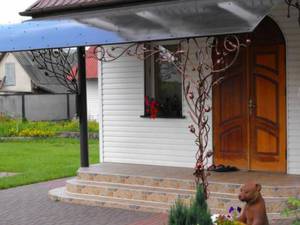
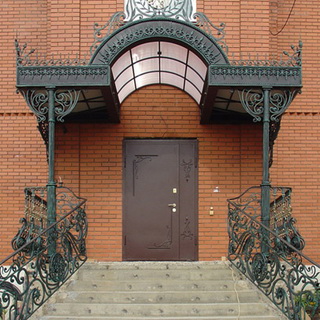
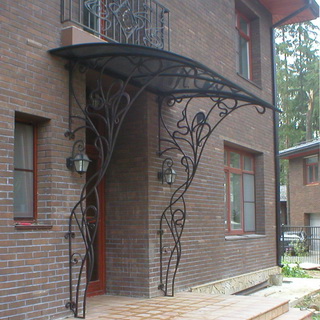
Option #6 - artistic forging
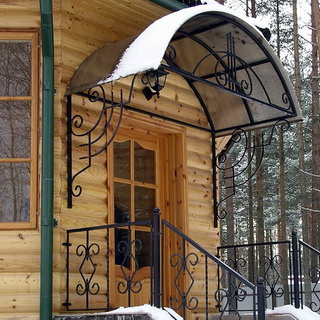
In terms of design, the forged visor has always looked and will look exactly the way it is: expensive and original decoration. Yes, forging is expensive. But how beautiful! If you didn’t have enough money for everything, opt for the combined option.
![]()
Yes ... Well, in principle, a completely forged visor is not needed. It will look heavy, and weigh too much. But this work of art, combined with railings and lanterns, looks luxurious.
In combination with polycarbonate, tiles, plastic, forging will still be invariably good. The only downside to this quality build would be its hefty weight. This circumstance must certainly be taken into account and the installation of such a visor should be entrusted to trusted professionals so that in winter it does not collapse under the additional load of snow.
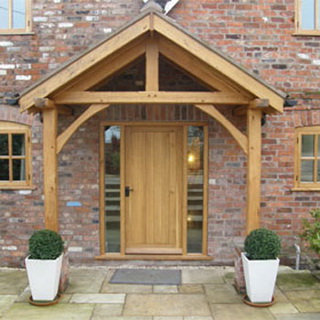
Option # 7 - a classic made of wood
AT recent times among country houses lurid gothic began to come across less and less, more and more attention is paid to high-quality, reliable and environmentally friendly log cabins. It looks most harmonious with such massive buildings wooden porch and a visor, also completely made of wood.
A flimsy European building on a mighty Russian log house will look alien, albeit funny. But here everything is in place: a durable structure and flexible tiles as protection from rain and snow
Like the whole log house, the visor must be treated with agents that protect against decay, insects and other troubles that can happen to wood. In addition, waterproofing must be present, which can be used as slate, roofing felt, plastic, sheet metal, polycarbonate, corrugated board and other materials.
Master classes and examples of construction
Metal single-sided visor
Making a canopy over the porch with your own hands is not as difficult as it might seem. However, at the very least, patience is required. To create this reliable and durable design, we need the following materials:
- metal corners;
- eaves plank;
- adjoining bar;
- bars;
- gutter;
- pipe;
- flexible tiles or corrugated board;
- screws, screws, anchors.
It is necessary to prepare the tools:
- roulette;
- welding machine;
- hacksaw for metal.
Do-it-yourself work on arranging a visor above the porch begins with a sketch of the future design. Since we are not going to make an abstract canopy, but a very concrete one, you will have to take a tape measure and determine the width of your porch. Add 60 cm to the figure determined by the measurement, and you get the width of your visor.
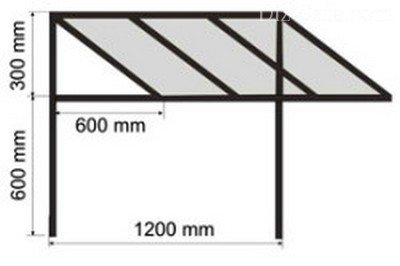
An approximate sketch of the structure looks like this. You should not rely on your own memory and imagination: draw, it won’t take you much time, but it won’t let you make a mistake
By measuring the distance from the front door to the place that should be under the protection of the visor, we get the length of the future home-made structure. The height of the shed canopy is calculated based on the architecture of your cottage. Do not forget that the visor should have a slope of approximately 20 degrees. You have received all the necessary parameters, on the basis of which you can create a sketch.
Next, we proceed to trimming the metal corners to the required dimensions. The length of the rafters from the corners is equal to the height of the slope. From the corners, struts and a wall beam will be made. Between themselves, all the details of the frame are assembled by welding. The resulting strong and reliable frame will be fixed above the porch. The wall beam is fixed with stainless screws in front of the entrance, and anchors must be used to fasten the struts.
The general appearance of the structure will be approximately the same. By the way, if you also want to decorate your visor with forging elements, be aware that they are sold separately, they can be welded
A crate is laid out from the bars on the rafters. If the visor is covered with corrugated board, a distance of 30 cm must be made between the slats. If the design is made with flexible tiles, the crate must be made continuous. The selected roofing material will be laid out on it. You need to fix it with self-tapping screws, but with an overlap, and not end-to-end.
We all know perfectly well that the theater begins with hangers (wardrobe), but in a private house this function is performed by a visor. With this classic element, you can not only protect the entrance to the house, but also give your country mansion a beautiful and original look.
Design options
The photo shows a design option for the porch. canopy over front door(pictured) can be done not only by professional engineers, but also by novice builders.
Advice! Before proceeding with the construction of the porch, consider which materials are best to use so as not to disturb the style of the entire structure.
How should a modern canopy over the porch of a private house look like? The design option depends on the taste preferences of the owner of the house, as well as on what material was used in the construction of the building.
In any case, the porch should have such a canopy that would protect it from the negative impact. natural conditions(rain, snow, hail). The stylish and durable canopy offered in the photo will become a real decoration of the porch. How to choose the right materials for it?
Attention! Only durable and practical materials are suitable for the visor. Special attention giving them a long service life.
Action plan
In order to make a high-quality and reliable canopy for the porch, it is necessary to act according to a clear plan.
First step. First you need to choose the material from which you will create a canopy for the porch.
Advice! Give preference to those materials that do not corrode. Aluminum alloys would be a good option. Of these, you can create a structure for a canopy.
Canopy materials
There are many roofing materials on the modern construction market, you just need to carefully read their main specifications to find the perfect option for decorating your entrance to the house.
Polycarbonate
If you decide to use polycarbonate to cover the visor, please note that for wooden house it will be inappropriate. Polycarbonate is perfectly combined with a metal frame, it is suitable for brick and block structures. The demand for this material is due to its excellent performance, as well as excellent appearance.
Among the positive properties of such modern material like polycarbonate you can mention its ductility. It is this physical property that makes it possible to create canopies for the porch of any geometric shape from polycarbonate. Note the high strength of this material to mechanical shocks. If you make a polycarbonate canopy over the porch, the material will withstand heavy rain, hail, and heavy snowfall.
We will pay special attention to the excellent fire resistance of polycarbonate. Despite such a number of advantages, there are also certain disadvantages of polycarbonate. The material does not withstand ultraviolet radiation.

If the coating does not have a protective layer, then two years after the start of operation, the polycarbonate will become cloudy, all the original aesthetic characteristics of this roofing material will be lost.
metal sheets
The use of metal as a roof covering is considered an acceptable (budget) option. But to work with roofing metal, certain skills will be required. Among the advantages of this type of finish, we highlight a long operational period, reliability. But the metal sheets chosen as roofing will require additional corrosion protection.
Advice! Purchase alloys with anti-corrosion characteristics to decorate the visor.
metal tile
A distinctive feature of such a roofing surface is a unique appearance. A visor made of metal tiles will have an unlimited service life. Its installation is quite within the power to perform even for those who do not yet have the necessary building skills.
We will supplement the list of positive characteristics of metal tiles with simple care for the finished coating. This material harmoniously fits into any design chosen for decorating the porch. Are there any disadvantages of this roofing material? The main disadvantages of tiles is the lack of sound insulation. All the sounds of rain will be clearly audible on the porch. With an increase in air temperature, a significant heating of the metal tile occurs.
Decking
Working with these common roofing materials is much easier than with metal tiles. Its demand can be explained acceptable cost, ease of installation. The finished structure has an aesthetic appearance, does not require additional painting. The main disadvantage of this roofing is the lack of resistance to mechanical damage.
Second step. After you decide on the source materials, you can proceed to the next step, think over the design option, and also select the shape of the porch canopy. In order to solve such a complex problem, you can contact a professional designer. Interesting design options for visors are also presented in the video fragment
What parameters will affect the design option? First of all, it is important to decide on the installation method. For example, if your plans include the creation of a massive structure, you will need metal pipes or wooden beams to further strengthen it. The suspended structure does not need such a support, you can limit yourself to fixing the frame on the wall.
When choosing the general style of this decorative and protective element, it is important to take into account the shape of the canopy used.
The simplest is the flat version. It is an open version of the visor, which is able to protect the porch only from vertical streams of rain and snow. Considering that mostly snow and rain are always associated with gusts of wind, such a design can be considered as a decorative element.
More difficult will be the installation of a gable visor. With it, you can protect the entrance to the house from rain and snowstorms, strong gusts of wind. To create such a design, you can choose any materials that have corrosion resistance.
Three-slope canopies are suitable for metal frames, are considered by professionals to be the most reliable and effective in use.
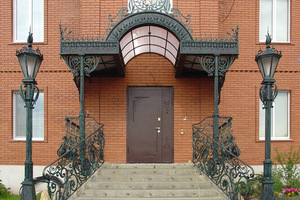
In order to give the porch a beautiful appearance, you can use artistic forging. Such a technique gives the product additional lightness, turns the porch into a real work of art. Exclusive forged canopies and canopies have a presentable appearance, so all the material and physical efforts spent on the construction of such a structure will be fully rewarded.
Entrance to any a private house adorns the structure, consisting of a porch and a canopy located on it. This element is a must for most modern households. Peaks for the porch can be very different. To see all the variety of design, shape and design of canopies, just go to the Internet and see photos of these elements. They act as a decoration of the facade of the house. But their purpose is not limited to this.
They also have certain practical functions. Among them, one of the main ones is the protection of the extension from environmental factors:
- snow;
- rain.
In addition, the structure of the porch with a canopy provides the greatest comfort at the entrance to the house.
Design features of the roofs of canopies and canopies
 The porch of the house with a canopy can be of various sizes. Some of these structures are quite small. Others are distinguished by a significant area and encircle the entire structure around the perimeter. What sizes to choose when building a ring, each owner of the house decides for himself, depending on his needs. However there is a certain set of rules, which must be taken into account when it is planned to work on the construction of a canopy over the porch with your own hands. Compliance will ensure:
- creating the right visor for the porch of the house that meets all standards;
- reliable protection entrance to the dwelling from dirt and precipitation;
- safety when using this design.
It should be noted that today the visors over the porch, made of polycarbonate, are the most popular designs. They are chosen by many owners of private households. A metal profile is used as a material for creating frames of these structures. Often metal roofing is also used to cover the canopy, which is mounted on the crate using wooden rafters. The first type is suitable for houses made of brick and stone, as well as buildings built of concrete. They can be arranged for country houses or buildings of public institutions:
- hospitals;
- schools;
- shopping centers.
They can also be used for structures whose facade is lined with wood-like finishing materials.
Separately, we note the porch with forged canopy. This element of the structure, decorated with different roofing materials, is distinguished by its versatility. It can be arranged both for a private house and for an office building. To make it look stylish and harmonize perfectly with the main architectural style of the building, you must follow the rules:
- competently approach the task of creating the design of this element;
- correctly combine materials in the process of constructing a structure.
Photo of visors above the entrance to the house
support for visor
 The canopy can rest on the porch different ways. It all depends on the option of its installation to the extension. So, it can hang on vertical pipes or hang on special brackets that are fixed on the wall of the house. How the support points will be located depends largely on:
- the state in which the wall is located;
- visor dimensions;
- materials used in its manufacture.
It is worth saying that various materials are used for the manufacture of visor supports. The most lightweight are structures made of wood. However, using this natural material to create supports, it is necessary perform the required processing wooden columns with special compounds that will provide protection against microorganisms, rotting processes, moisture and fire.
The nuances of mounting the support
 As a mounting support, metal poles and brackets made of profiled pipes can be used. These designs are among the most popular. Their shape can be either simple or curvilinear. Therefore, they can be used for almost any outdoor design. Before creating a canopy over the porch, photos can clearly demonstrate how it will all look.
Forged products can also be used for visor supports. They are are the most sophisticated fasteners this part of the porch structure. During operation, they acquire a unique flavor. Their installation is an opportunity to emphasize the originality of the architectural style of the building.
roof type
 The roof of the canopy over the porch can be of different shapes. The most common varieties:
- lean-to;
- gable;
- arched;
- tent.
Roof rules
 In most cases, the same material is used as the material for the manufacture of the canopy frame as for the supporting structures. Although it is quite acceptable to combine metal with wood during construction work, concrete pillars can be complemented by a frame made of metal.
If it is decided to create a shed type roof for the porch, then in this case a large frame type structure is made. She is her inside rests on the wall of the house and goes from the facade. This ensures the efficiency of rainwater runoff. When a gable type roof is installed, its slopes are directed sideways from the porch. The arched roof has the same method of inclination. Photos of canopies over the porch only confirm the absence of any special structural differences.
In some cases, when creating it, semi-arched visors are built. In this case, near the wall, the roof has a straight shape. By its location, it is located above the front edge, so that moisture falling on it rolls off the porch. by the most hipped roofs are practical, and along with them canopies of a sectional form. They provide roof protection from precipitation from all sides.
Roof
If speak about roofing materials for the visor, we note that the solutions may be different. If the roof of the porch is shed, then the material can be used:
- profiled sheet;
- slate;
- metal tile.
 The original design of the roof are branches, leaves and reeds.
If the structure is of complex shape, then in this case it is advisable to use polycarbonate or perform work using soft tiles. The main advantage of such a roof is a light weight, reliability and strength.
Polycarbonate and roof tiles are popular materials among consumers. They are offered on the market in a wide range of color scheme, that's why need to select material, which will be in harmony with the main style of the building. To avoid mistakes with the selection of a canopy over the porch, a photo of this structure will help you make the right decision.
How to make a canopy over the porch: step by step instructions
 The very process of building a canopy over the porch is simple, but not only calculations are required. The technology when performing work on the device of the visor must be strictly observed. It will also be useful to have the skills to use the tool that will be used during the work. There is one more thing you should be aware of: if you plan to create a metal visor, you will have to purchase a ready-made frame or create it yourself. In the latter case, you should have a welding machine at hand. wooden frame you can create your own, using during the work simple tools that are in the arsenal of every master.
We will take a wooden extension as the basis for creating a canopy located above the front door with a shed type roof.
The first thing to do is to transfer the dimensions from the terrain to the drawing. They must be carefully measured. Pegs must be hammered around the perimeter. The top layer of soil must be removed. If the canopy extension is created with dimensions of 2x1 m, a height of 2.2 m, then two log posts 2.5 m long and two more 2.7 m long will be required. Before use, the posts must be treated with an anti-fungus and fire compound. The parts that will be in the ground must be smoked and coated with mastic.
Next, they dig a hole 70 cm deep. Sand is poured into the bottom with a layer of 200 mm. Gravel is laid on top of it. After tamping, we proceed to the preparation of concrete. The bottom of the pit should be filled with a small amount of mortar, after which a post is installed. Further it needs to be leveled so that it stays only vertical. After that, the remainder is added so that the pit is completely filled with mortar. Next, you need to wait seven days until the concrete gains the required strength. When the indicated time has passed, the supports should be sawn to the required level.
Then we move on to creating a strapping from the bars. During the creation process, the geometry of the logs must be constantly monitored. Anchors are used to fasten the pillars and the facade. Thanks to them, the connection of two structures is ensured.
Then we proceed to the creation of lag supports, on which the rafters will be laid. We have the latter in increments of 200-300 mm. As a material, we use a bar 50x50 mm. After that, we move on to creating ebbs. We fix the gutter parallel to the facade of the building. He should be at a slight slope to the bottom edge of the roof. The chain is fixed on the corner of the drain. Through it, water will flow to the ground. Upon completion of the work, you can proceed to the finishing of the canopy. What it will be, it all depends on the imagination of the owner and his financial capabilities.
The porch of the house is a great solution to decorate your home. However, during its construction, you need to think not only about the walls, but also pay attention to the design of the canopy over the porch. Photos of this structure will not be superfluous for review, as it can be of various shapes and made of various materials. Show your imagination and you can create a structure that will provide comfort at the entrance to the house and make your home more original.
A do-it-yourself canopy above the porch is the visiting card of the owner of the dwelling. It can be shed or semicircular, wooden or metal - in any case, this simplest design is designed to protect the front door from precipitation, and also be a decorative element that is not discordant with the overall design of the building. Here you will learn how to make a canopy over the door with your own hands, based on various designs.
Do-it-yourself canopies and visors over the porch of a private house (with photo)
A canopy or canopy over the porch of the house is an indispensable element of its arrangement. And although this design is small and uncomplicated, it is designed to protect households and guests from negative natural phenomena, whether it be snow, rain, icicles, bright sunlight, dust or hail. In addition to protection, a canopy or canopy is also a decoration for the facade of a building, a window, a balcony or an entrance group.
As you can see in the photo, do-it-yourself canopies and visors, regardless of appearance, must be functional, strong and durable:
A popular material for the production of visors is metal: it fully complies with the specified requirements and is easy to process. Most often, in the manufacture of metal frames, a profile, square or round pipe with a section of 20 x 20 mm, 20 x 40 mm and a thickness of 1.5-2 mm or a steel corner with shelves of at least 25 mm is used. The main disadvantage of steel frames is their strong susceptibility to corrosion, therefore, after welding, all components and parts of the structure must be carefully sanded, primed and coated with special paints intended for processing metal surfaces.
A very popular material for canopies and canopies for a private house is wood, but it requires regular maintenance, moreover, when choosing a material for a canopy, it is necessary to take into account not only its structural properties, but also the stylistic decision, that is, the style of the canopy being developed matches the general style building facade. A wooden product is not suitable for all facades. However, the same applies to metal.
Look at the photo - for awnings and canopies over the porch of the house, the most practical and reliable coating is cellular polycarbonate, as it is a flexible, lightweight, translucent universal material:


Glass coatings are very beautiful, but it is very difficult to work with them without proper training and equipment.

The slate roof is quite reliable, but unaesthetic. For forged canopies, sheet metal is mainly used as a coating.
When choosing the type of canopy or canopy built by oneself, each owner goes his own way, taking into account his own capabilities, taste, preferences and local traditions. But even the simplest design of the canopy leaves the widest possibilities for choosing materials, methods of processing them, fixing and connecting parts, final finishing and design of external elements, which allows you to give originality to each home.
The options for do-it-yourself canopies above the door below are attractive in that you can implement them alone, without resorting to anyone's help, and quickly enough. In addition, they are easy to upgrade, adapting to protect not only the entrance group, but also for other objects of the estate.
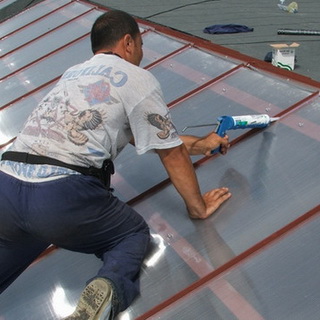
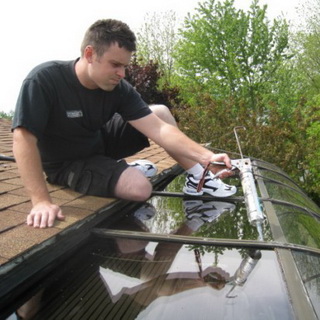
Installation of a polycarbonate visor (with video)
A do-it-yourself polycarbonate visor has many advantages. It can be operated in a wide temperature range (from -45 to +80 °C), it is durable. Cellular polycarbonate has a sufficiently high load-bearing capacity (up to 150 kg/m2 with a lathing step of 1-2 m) with a low dead weight (from 0.8 to 3.5 kg per 1 m2). This material is easy to install and process. But you should pay attention to the most common mistakes made when installing polycarbonate.
The internal stiffening ribs in cellular polycarbonate are located along the length (which can be 3, 6 or 12 m), so the panel in the structure must be oriented in such a way that the condensate formed inside it can freely drain through the internal channels of the panel and be discharged outside.
Pay attention to the photo - when making a visor with your own hands during the installation of vertical glazing, the stiffening ribs of the panels should be located vertically:
In a pitched structure, the ribs are located along the slope. In an arched structure, the stiffeners must go in an arc, and when bending the sheets, they must not exceed allowable norms. In a horizontal position, the sheets should be provided with a slight slope in the direction of the stiffeners to ensure free drainage of condensate.
For outdoor use, cellular polycarbonate is used with a protective UV-stabilizing layer applied to the outer surface of the sheet. The protective film on this side of the sheet has a special marking. In order not to be mistaken, the panels must be mounted in a film, and removed immediately after installation. In the absence of such a film, the upper (outer) side of the panel can be identified by a bluish color on the cut.
Polycarbonate sheets can be attached to convex or concave surfaces, but the recommended bending radius for a given sheet size must be observed. Failure to comply with the requirements leads to cracks and creases, which may not appear immediately and intensify under the influence of wind and snow loads.
When installing a canopy over the entrance, you should listen to the manufacturer's recommended methods for attaching sheets. The obligatory use of the provided profiles and thermal washers reduces the likelihood of cracks and premature destruction of the roof.
After watching the video "Visors with your own hands", you will see how such mini-canopies are made:
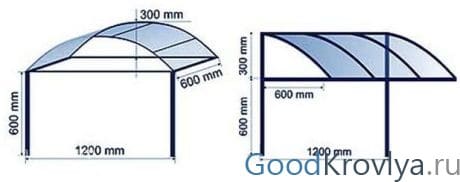
A simple single-sided visor. Before you make a visor over the porch with your own hands, you need to draw a sketch of the future design and calculate the dimensions. When calculating the width of the visor, it is necessary to add at least 30 cm to the width of the front door on each side so that the canopy does not allow rain and snow to fall on the porch.
By measuring the distance from the front door to the place that should be protected by the visor, we get the length of the structure. The height of the shed canopy is calculated based on the architecture of the cottage. Do not forget that the visor should have an inclination of approximately 20 °. The length of the rafters from the corners should be equal to the height of the slope. Given these data, you need to create a sketch and calculate the amount of material needed for work.
Making a visor over a polycarbonate porch with your own hands is quite simple. To do this, you will need cellular polycarbonate with a thickness of at least 10 mm and shaped metal pipes 20 x 20 mm.
Assemble the frame of the visor from a metal profile. To do this, pipes of the required length are cut, laid out in the form of separate units, fixed with clamps and welded at the joints. Then the finished nodes are welded together into a single structure. Welding according to GOST 5264-80 is carried out with electrodes E-42 GOST 9467-75. The leg of welds is assigned according to the smallest thickness of the welded elements.
The depth of the visor can be different, depending on your wishes and the architecture of the house, usually 0.5-2 m.
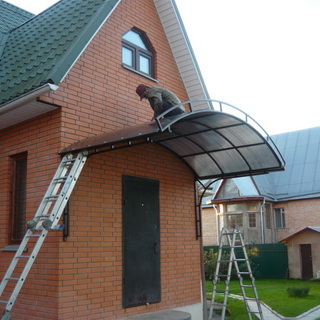
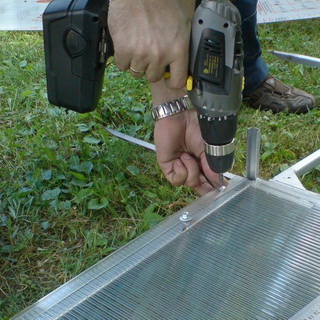
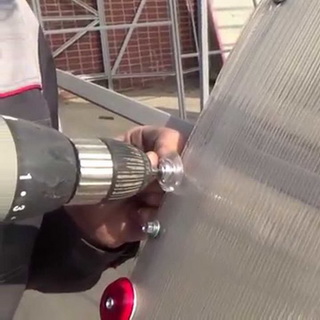
At the end of welding with a chisel and abrasive material, it is necessary to clean the welding seams. In the finished frame, holes are made for mounting bolts and markings are made above the entrance, marking the places where the frame is attached. After that, the frame is primed and painted. When the product is completely dry, you can proceed with the installation of polycarbonate sheets. To do this, a sealing tape is installed on the ends of the frame, a polycarbonate overlap is laid and screwed with metal screws. In this case, shock-absorbing washers should be used and not overzealous, so as not to damage the material.
The finished structure is fixed on the wall in marked places. The wall beam is fixed with stainless screws in front of the entrance, and anchors must be used to fasten the struts.
As shown in the photo, the seams of the do-it-yourself visor above the porch are sealed at the end of the work at the points of contact with the wall of the house:
Then the protective film is removed from the polycarbonate - and the visor is ready for use.
If you want the visor to look more sophisticated, the task can be slightly complicated. The visor shown is only slightly different from the one above. The main difference is the need to bend the profiles.
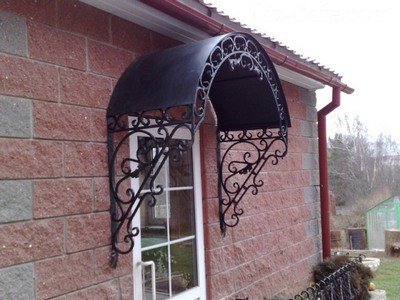
Semicircular visor. To create it, you will need profiled metal pipes 20 x 20 mm for the frame, a 10 x 10 square to make figured inserts, and a galvanized sheet as a roofing.
To make such a polycarbonate visor with your own hands, you need to bend the same semicircular arches from the profile, to which the lower and central lintels are welded. This is the base of the frame. Two arches are connected by jumpers, after which they are welded with struts bent from the same profile, and support brackets from profile pipe or corner. Now you need to bend curly elements from a square or reinforcing bar (the shape of these elements depends only on the place intended for them and your imagination). The resulting inserts are placed in the openings of the arch and welded at all points of contact with the frame.
The rest of the installation of the polycarbonate visor is the same as in the previous version: priming the frame, galvanized cladding and fixing the latter with metal screws, painting the structure in the required color and fixing it on the facade of the building above the entrance.
These photos show do-it-yourself semicircular canopies on private houses:
Production of a cylindrical canopy with steel brackets
This do-it-yourself canopy design for the house is not only neat, but also practical: water from such a canopy flows to the sides without forming puddles on the porch, and the snow does not linger. The main elements of the canopy: 2 brackets, 2 bearing half rings and 3 spacers.
To make do-it-yourself brackets for the entrance visor, use steel corners of a suitable size (for example, 50 x 50 mm). Having decided on the dimensions of the future canopy, cut off 2 corners of the required sizes (long ones for brackets and short ones for jumpers). Long corners at the bend are cut to the edge, bent along the cutouts and the resulting brackets are connected to the jumpers by welding or using rivets. Similarly, the place of the fold should be strengthened.
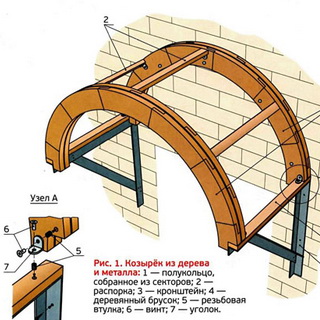
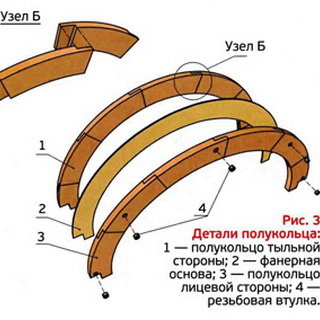
Wooden bars are attached to the upper part of the brackets with screws, on which the bearing half rings are directly mounted. For the manufacture of one half-ring of plywood with a thickness of 4-5 mm, an arc is cut in accordance with the selected values of the outer and inner radii. Then, using this template, separate sectors of the semicircle are made from a board with a thickness of 20-25 mm. They are adjusted to each other so that the joints located on opposite sides of the plywood base are offset relative to each other. This achieves the necessary rigidity of the semi-rings, which are the bearing elements for the roofing material. To fasten sectors to plywood, when making a visor over the front door with your own hands, use PVA glue and screws.
The cutouts at the ends of the semicircle form ledges that ensure the conjugation of the structural elements. Therefore, their dimensions should also be linked to the selected section of wooden bars fixed on brackets.
As struts of the roof frame, wooden bars of a suitable section are used (corresponding to the selected dimensions of the half-rings).
Pay attention to the photo - when installing the visor to the house with your own hands, the connection of spacers with half rings can be different:
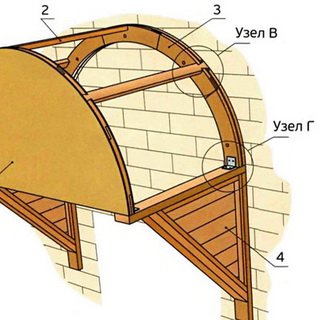

In the proposed version, furniture corners-ties are used as fasteners. Blind holes for threaded bushings are drilled in half rings and spacers, then bushings with internal threads are screwed into these holes, to which metal corners are screwed with screws.
With the same corners, you can attach the assembled frame to the brackets, or rather, to the wooden bars attached to them. But the roof of the visor is held not only thanks to the brackets. Holes are drilled in the semicircle adjacent directly to the building and the frame is screwed to the wall using dowels or anchor bolts.


