
- If the slope of the roof is more than 15 degrees, the sheets of corrugated board should be laid on top of each other, which will be 200 mm.
- If the slope is from 15 to 30 degrees, the overlap must be done the same or 50 mm less.
- It is advisable to use silicone sealants, especially if the roof slope is up to 20 degrees.
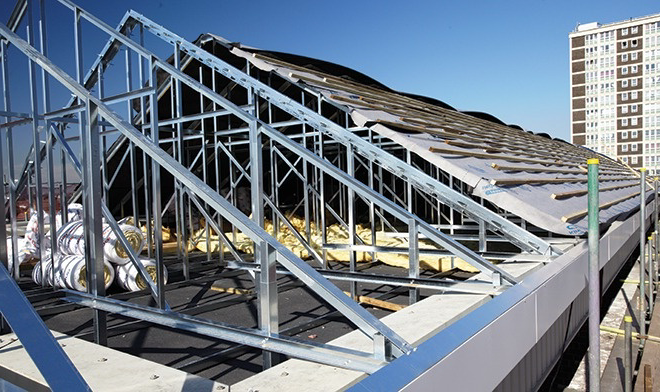
Before you begin to strengthen the corrugated sheets on the roof, you need to make a crate.
It is most convenient to make it from wooden bars. They are easier to mount, and their price is much lower than metal counterparts.
For the manufacture of crates, you can use bars made of alder, oak, aspen, spruce or pine. Before starting the installation of the bars, they must be treated with an antiseptic so that in the future a fungus does not appear on the roof. Also, the boards must be impregnated with a refractory compound. At this stage of construction, special membranes can be mounted that will protect against steam and moisture penetration.
Beginning of installation
First you need to install the upper and lower bars, located across. You can assemble the structure with nails or self-tapping screws if metal elements are included in it. If the bars have to be fixed to concrete, then dowel-nails can be used. It is most convenient to start installation from the bottom, gradually rising up. The step between the bars should not be more than 50 cm.
vapor barrier
Vapor barrier is usually done on the roof of the building that will be heated. It serves to prevent moisture from accumulating under the roof. Most often, a vapor barrier is a special film that has special membranes that prevent the passage of moisture and release steam. This film is mounted before you start laying the profiled sheet. Vapor barrier sheets are overlapped, sticking to the roof with special self-tapping screws. You can make a lap on the wall.
When the crate is ready and the insulation is done, you can mount the sheets of corrugated board.
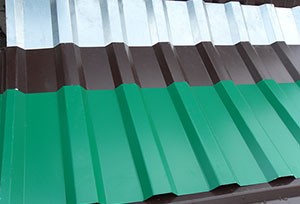
What is corrugated board?
These are stamped sheets of steel coated with zinc. They are quite light, able to bend, but at the same time durable. Thanks to these qualities, the sheets are excellent for roofing. The corrugated board is suitable for any type of roof, regardless of how many slopes the roof has and what its slope is. They can cover residential and commercial premises.
Sheets of a professional flooring are issued various. They have different ribs and can be covered with special enamel, or they can be without it. Don't forget to let the film sag a little. This is necessary to be able to ventilate the room. It is better to take a film along with which it will be possible to use bituminous mastic.
If you are using rolled material, it's okay, but the sheets will need to be placed very tightly in relation to it. The laying of the material will need to be done perpendicular to the location of the sheets of corrugated board.
How is a corrugated roof installed?
Before starting work, you need to take care of your safety, as work takes place at a height. In order to avoid accidents, you need:
• Use ropes for insurance and use special belts for mounting.
• If the slope of the roof is large, you need to make a protective fence.
• Use shoes with non-slip soles.
Do not mount sheets in the rain, they can become very slippery.
• Shoes should not have hard elements. Stepping on the sheets may damage their protective coating. If possible, do not step on them.
Damaged coating can be covered with a composition that is sold in hardware stores to restore the protective coating of sheets.
Direct installation
Most often, sheets of corrugated board are attached to each other with special self-tapping screws, which have a wide hat with a rubberized skirt. If you use nails, then they must be special: they are distinguished by a wide hat and rubber skirt. It is needed so that the metal body of the nail does not scratch the sheet of corrugated board, and also in order to prevent moisture from entering the hole. The gasket can be made of polymers, but rubber is considered more reliable. It is best to process the place where the screw is screwed or the nail is driven in. sealant. The same is done with the seams, which are formed from the imposition of sheets of corrugated board on top of each other. This is done in order to prevent moisture from getting under the sheets, even at the molecular level.
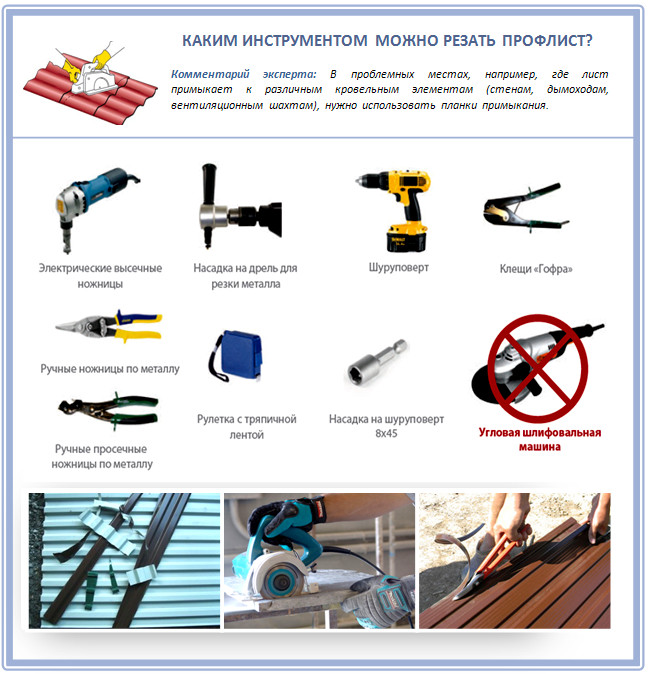
If the sheet of corrugated board is too large and does not fit, the excess can be cut off with a hacksaw. You can use scissors for metal, but they rarely cut accurately. It is convenient to cut small parts with scissors, but not a large sheet. Great if you have an electric cutter at your disposal. They can quickly cut off perfectly even pieces, betraying the sheet necessary form. Also for this goals will suit Circular Saw, but you need to choose the right disk.
When cutting a sheet, do not use a grinder. This saw heats up the corrugated material too much, causing the steel to become brittle and may begin to rust over time. Using this tool, you will destroy protective layer sheet and ruin the factory-applied insulation layer. This will cause the corrugated board to quickly fall into disuse, and you will have to repair the roof, which will start to leak.
Sheet fixing point
How to fasten sheets of corrugated board to each other?
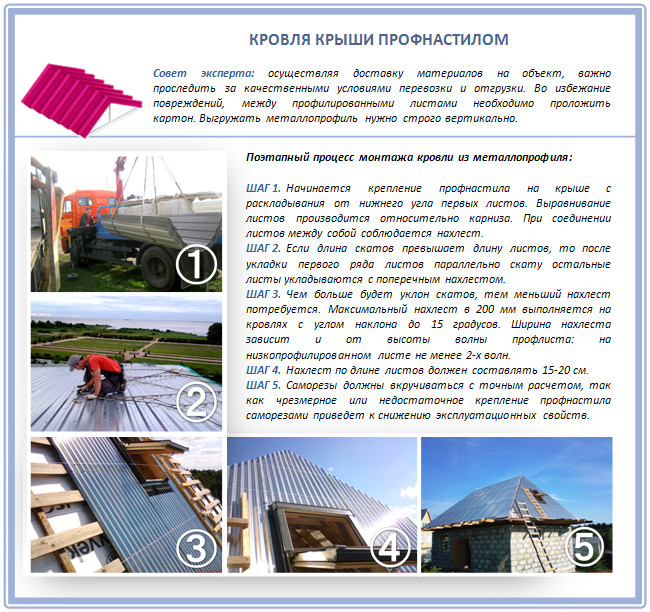
Start installation from the bottom corner of the roof end. The bottom row is laid in such a way that its edges hang from the roof by about 4 cm. The first row is fastened with self-tapping screws. The point where you need to screw in the screw is the bottom of the wave. Screw the screws into the waves through one.
When working with the sides of the building, you need to use the wind corners that sew up the boards from the end. You can mount sheets both along and across, it depends on which method is more convenient for you personally. The sides need to be sewn up with a special sheet after you lay the entire row. All sheets of corrugated board should be overlapped.
If the direction of the sheets is vertical, then the top sheet should cover the bottom one by at least 20 cm. If the wave pitch does not allow this, you need to overlap more, but in such a way that the waves coincide.
With horizontal placement of corrugated sheets, the sheet located on top should overlap the bottom sheet by a wavelength. If you use a gasket seal, then it is better to overlap for a length of two waves.
If the angle of the roof slope exceeds 16 degrees, it is necessary to use a sealant.
What is a sealant?
This is a special gasket that is needed so that snow does not clog between the sheets of corrugated board. It also protects from wind and rain. The point is that the sealant makes the sheets of corrugated board fit snugly against the crate. Seals are sold ready-made. You need to choose them relative to the waveform of your corrugated board.
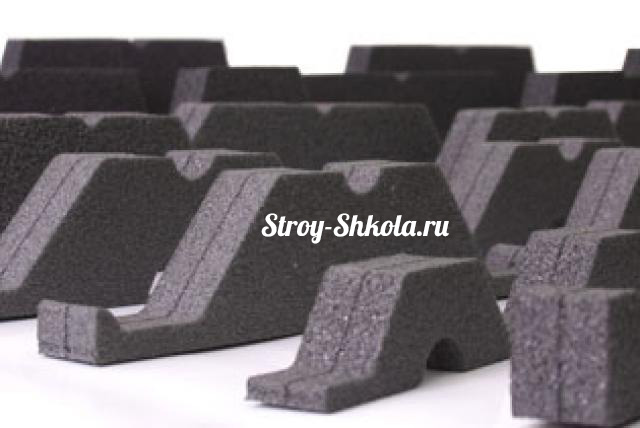
Sealant for corrugated board - photo
How to properly fix corrugated sheets on the roof?
Laying sheets should start from the edge. From the center of the edge, one sheet is attached with self-tapping screws. It is better to fix it on one self-tapping screw for now. This is done for the purpose of being able to correct the sheets. The following sheets are attached to it with an overlap and are also fixed with one self-tapping screw. This is done in order to be able to correct the row if it turns out to be uneven. Then you can fasten the sheets securely.
After the row is corrected, it is necessary to fix the sheets along the crest of the wave, and the joints are fastened with one self-tapping screw for two sheets. This is done in each depression of the wave.
The fastening of the first sheet is done in the following way: the longitudinal connection is made along the crest of the wave, the pitch is 500 mm, and the vertical joints are fastened in each day of the wave.

The places in which the screws are screwed are indicated in the figure.
For one meter squared, you will need about five self-tapping screws. This consumption is the most optimal.
Installation of the ridge and end strip should be carried out only after the main canvas has been securely fixed.
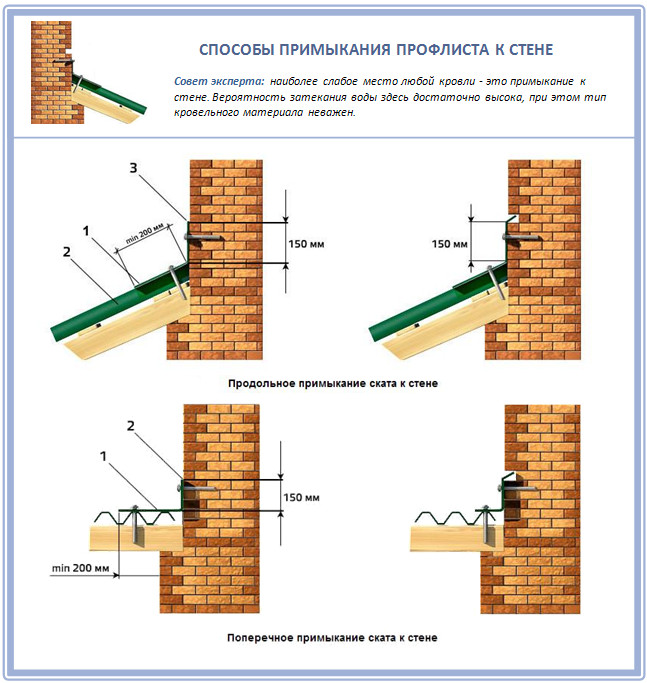
The most difficult thing is to mount corrugated board in places of contact with the wall. This part of the work is carried out last, as well as the installation of chimneys.
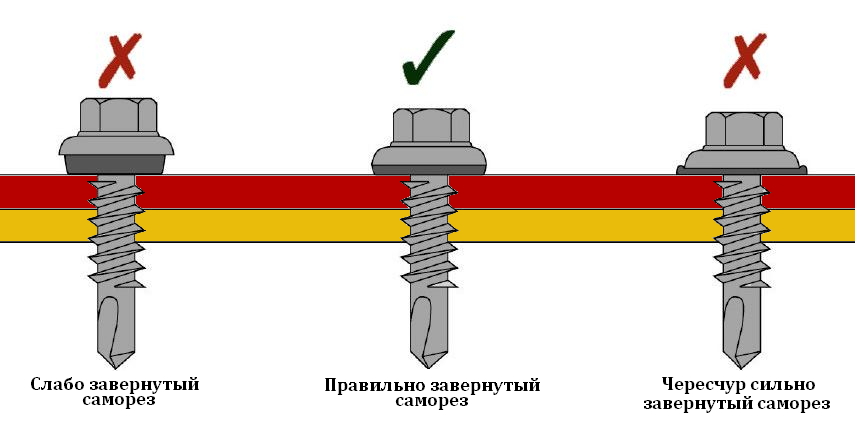
Pay attention to how the self-tapping screw is twisted. Don't let it hang loose, but make sure it doesn't bend the sheet. The correct location of the screw is shown in the picture.
Video - do-it-yourself roofing with corrugated board
Decking is one of the most reliable and, at the same time, affordable roofing. Therefore, this material is very popular with individual developers. The professional sheet is used both for covering the roofs of country or country cottages, and for assembling various auxiliary outbuildings.
Strictly following the rules for laying corrugated roofing, installation of roofing from this material can be done even on your own, without the involvement of professional builders. The technology of laying roofing from corrugated board provides for a certain procedure for performing installation work - we will consider the stages of work in detail and step by step below.
Laying roofing from corrugated board: the stage of creating waterproofing and ventilation
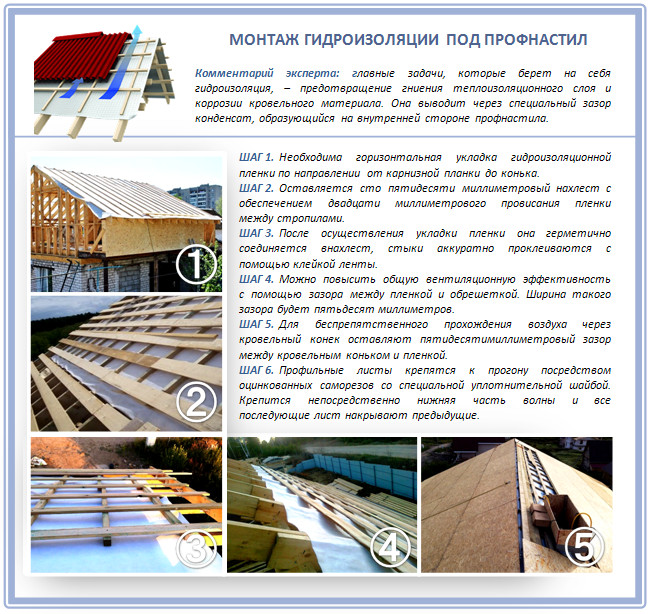
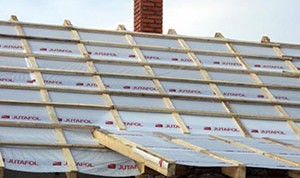
Roofing begins with installation waterproofing film. Despite the fact that laying a profiled sheet on the roof reliably protects it from rain and snow, you still cannot do without waterproofing.
Firstly, with strong gusts of wind, moisture can still get under the roofing in the area of \u200b\u200bthe cornice or ridge.
Secondly, with sudden changes in temperature, condensation may form on the inner surface of the roofing profiled sheet.
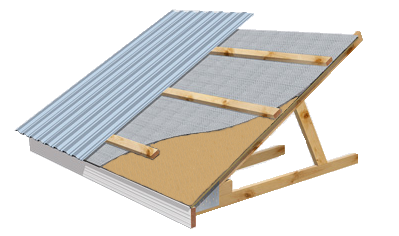
It is in these cases that under-roofing waterproofing comes to the rescue. The waterproofing film is laid over the rafters freely, without tension, and is pressed against them with bars of the counter-lattice.
But fastening the waterproofing film is not the most important task that the counter-lattice performs. The technology of laying corrugated board on the roof provides for the need for a ventilation gap under the surface of the coating. It is this problem that the counter-lattice solves, creating the possibility of free air circulation under the corrugated roof.
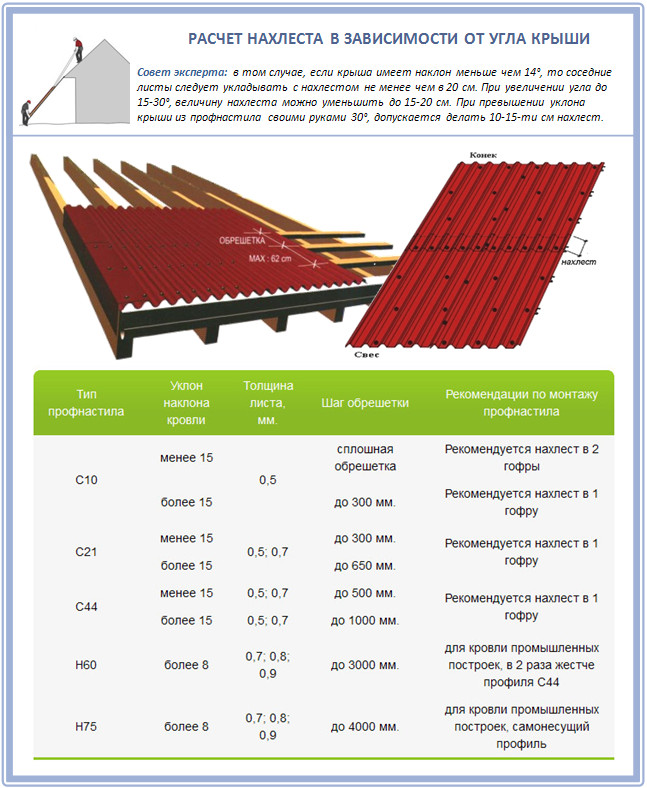
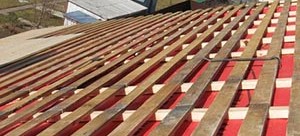
On top of the counter-lattice, perpendicular to the rafters, a crate is mounted for fastening the corrugated board. Most often, the pitch of the rafters is 900-1200 mm. In this case, a board with a thickness of 30 mm and a width of 100 mm is used for the crate. In this case, the step of the crate depends on the brand of the profiled sheet and the angle of the roof. For roofing corrugated board, it can be from 500 to 1200 mm, and wall profiled sheet with a small bearing capacity is recommended to be laid on a continuous crate.
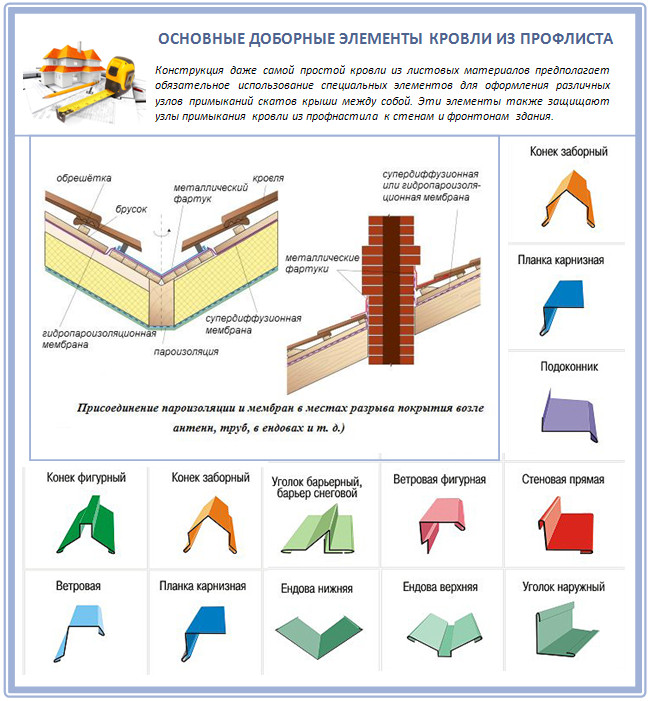
After the installation of the crate is completed, those additional elements are installed that are mounted before laying the corrugated board.
How to lay corrugated board on the roof: step two - installation of valleys and cornice strips
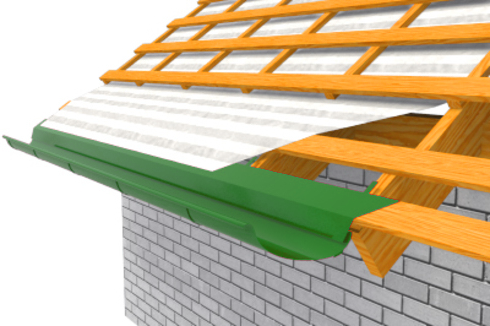
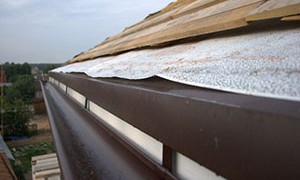
If the roof has an organized drain, a special cornice strip is installed before installing the corrugated board. It protects the end board and the ends of the rafters or filly from moisture flowing from the surface of the waterproofing and takes it to the gutter.
The laying of the profiled sheet on the roof is carried out in such a way that the edge of the corrugated roofing protrudes beyond the cornice strip by 40-50 mm. After fixing the cornice strip, you can install the gutters and install the cornice box.
Before laying corrugated board, valley strips are also mounted on the roof. The valley is the lower junction of two roof planes. Since water flows into this place from two roof slopes, waterproofing of the roof in the valley area is carried out especially carefully. The valley plank is installed on a continuous crate, while the width of each side must be at least 300-400 mm. Waterproofing starts in the valley. After the valleys and cornice strips are installed, the corrugated board can be laid on the roof.
Laying corrugated board on the roof: instructions for doing the installation of the roof with your own hands
From corrugated board, you can cover roofs with any slopes. But in order not to have to purchase expensive load-bearing corrugated board with a very high profile trapezoid height, experts recommend using a corrugated sheet coating for roofs with a slope of more than 10-12 °. For such roofs, I most often use HC35, HC20 or C40 corrugated board.
You can determine which side to lay the corrugated board as follows. The underside of the profiled sheet with a colored polymer coating is painted with gray enamel. If the corrugated board does not have a color, then the wider side of the profile is laid down.
Having chosen a profiled sheet, they calculate required amount materials. Using the finished crate, it is easy to determine the area of \u200b\u200bthe slopes and calculate the number of sheets of corrugated board required for the installation of roofing. In the coverage area, you must not forget to take into account the eaves and gable overhangs and protrusions beyond the edges of the eaves.
If the size from the edge of the cornice overhang to the roof ridge is greater than the length of the profiled sheet, the laying of sheets of corrugated board will have to be done in several rows. In this case, when calculating the number of profiled sheets, the overlap between the rows of coverage must be added to the coverage area. The technology of laying corrugated board on the roof provides that the overlap between adjacent rows of corrugated board should be from 100 to 200 mm, depending on the slope of the roof.
Now consider how to properly lay corrugated board in two or more rows. There are two ways to do this.
According to the first method, the first sheet of the bottom row is first mounted and temporarily fixed. Then the first sheet of the second row is laid and so on.
According to the second method, first they mount, fastening together, two sheets of the lower row, and only then the first sheet of the upper row.
All this applies to rectangular slopes. The procedure for laying corrugated board on a roof with slopes in the form of a trapezoid and a triangle is somewhat different. For a triangular slope, the installation of a profiled sheet starts from the middle. For slopes in the form of a trapezoid, characteristic of hip roofs, the profiled sheet is laid on both sides of the top of the trapezoid.
For roofs of a more complex shape, before laying the profiled sheet on the roof, it is better to first make a sketch of the sheet layout of the corrugated board on a sheet of paper.
![]()
It must be remembered that the longitudinal overlap between adjacent sheets is always performed in one direction.
Having aligned the sheets of corrugated board along the edges of the cornice and the gable overhang, they proceed to the final fastening of the profiled sheet.
How to properly lay a profiled sheet: fixing the roofing to the crate
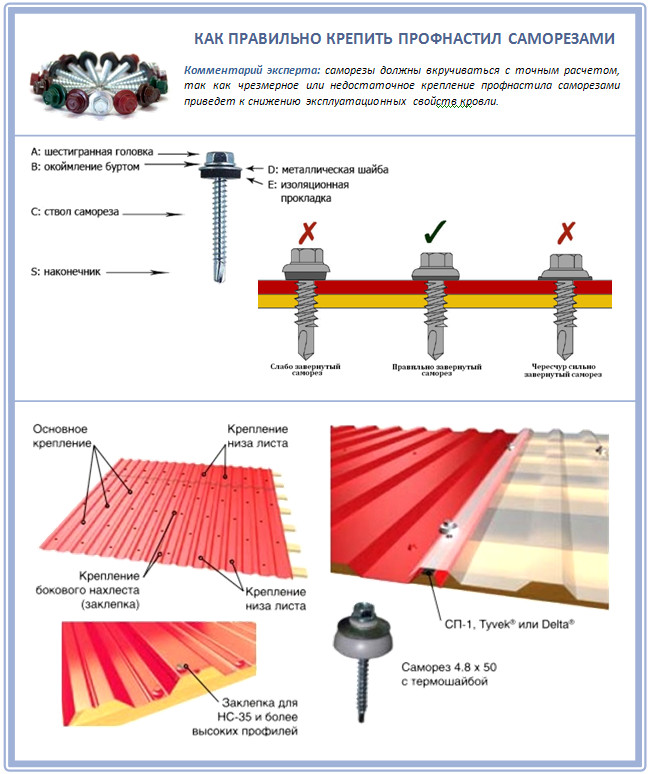
For fastening a metal profiled sheet, special roofing screws with a tip in the form of a drill and a hexagonal head with a press washer are used. The roofing screws also have special neoprene rubber seals.
The figure below shows how to properly fix the corrugated roofing.
In the area of the cornice overhang, the profiled sheet is attached to each lower wave of the profile, and in the area of the gable overhang, to each board of the crate.
In each wave, the corrugated board is also attached at the overlap between the rows of the coating.
Before laying the profiled sheet on the cornice overhang, a special profile seal is usually mounted under it.
The same sealant is often installed between the corrugated board and the roof ridge. At the same time, in those places where it is necessary to ensure air circulation, special perforated seals are installed.
How to lay corrugated board correctly: installing a ridge and wind slats
After installation and final fastening of all sheets of corrugated board, end strips and ridge elements are mounted.
At the place of installation of the ridge on both slopes, an additional board of the crate is mounted. In this case, the edge of the roofing should not reach the junction line of the roof slopes by approximately 50-100 mm. This allows air to circulate freely under the roof surface.
The ridge element is fastened with roofing screws, 80-4.8 mm in size, through the upper wave or profile trapezoid with a step of 300-400 mm. Ridge elements are installed with an overlap of 100-150 mm.
The cost of laying corrugated roofing
If the roofing installation work is carried out on its own, the developer will have to spend money only on the purchase of the materials necessary for this. If a construction company or a team of roofers is involved in the performance of the work, the cost of laying the profiled sheet on the roof will also include the cost of paying workers or services of the installation organization.
Prices on installation work significantly depend on the complexity of the roof, the region of construction and the remoteness of the object. On average, if a construction company is laying corrugated roofing, the price of a turnkey roofing installation will be from 1300 to 1500 rubles per 1 m² of roofing.
Each roofing process has its own characteristics. The roof to be covered can have a different number of slopes and be with any slope. First you need to make a roofing crate, it can be constructed from both boards and steel. When designing, it is necessary to take into account the presence of additional elements, such as: gutters, snow catchers.
For error-free laying of the roof with corrugated board, you need to take into account some principles, including:
- Having a roof slope angle of not more than 12 degrees, the profiled plates should be thrown about 20 centimeters. In this case, the use of hermetic means is recommended.
- Having a roof slope of no more than 15 degrees, the optimal laying of sheets is about 20 centimeters.
- Having a roof slope of 15–20 degrees, an overlap of sheets from 15 to 20 centimeters is recommended.
- With a roof slope of more than 30 degrees, the approximate overlap of the corrugated sheet is about 15 centimeters.
The smaller the angle of slope, the greater the load from precipitation, which subsequently leads to the leakage of the roof. In this case, it is better to increase the overlap.
The fastening of the sheets must be strong and reliable, if these are self-tapping screws, then when using them, mandatory rubber washers must be present.
Installation steps
One of the many advantages of using corrugated roofing is the ability to choose the material by type and size, as well as color and wave level, based on your own preferences. Once the choice is made, you can proceed to a number of stages in the process of laying corrugated board.
Preparatory work
In order not to miscalculate with the size and the right number profiled plates, before buying you need to calculate right amount, dividing the total width of the slope, by the width of one sheet.
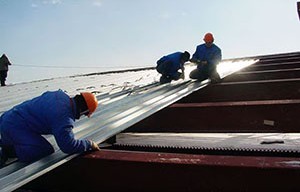
Before starting the main work, you will need to carefully consider the transportation of the purchased plates, as well as their subsequent lifting to the roof. For the complete preservation of the surface of the profiled sheet, carefully consider the methods of safe movement.
To raise the corrugated board to the roof, it is desirable to attach several working hands. Sheets must be lifted one at a time.
In case of bad weather conditions, such as rain or strong winds, it is better to postpone this process until more favorable conditions occur.
Hydro - and vapor barriers
Any residential building must be provided with reliable hydro - and they provide vapor barriers reliable protection from the ingress of moisture to the insulation, which is also provided for in the design of the roof.
Insulation layers are made from a variety of materials that are freely sold in hardware stores. The main thing is to make the right choice and not get confused in the assortment.
First of all, such a layer serves not only as an obstacle to liquid, it is also capable of evaporating it. Moreover, waterproofing performs its function with outside roof structure, and the vapor barrier is reliable from the inside.
The roof needs high-quality insulation, this is achieved with the help of matte heaters that are laid after applying a vapor barrier film. The final stage will be the laying of a waterproofing film, which is a membrane that is resistant to ultraviolet rays and temperature changes.
When purchasing hydro - and vapor barrier films, it is important to focus on quality. At right choice and construction installation of corrugated board, insulating layers can not be changed for more than 40 years.
Necessary tools and materials
Roofing with corrugated board by hand, the process is quite complicated. First of all, it requires basic knowledge in this area, as well as the presence of mandatory materials and fixtures, on which, in essence, the quality of the original roof will depend.
- Scissors for cutting metal (special manual scissors, electric scissors).
- Bend pliers.
- Gun for removal of sealant from the bologna.
- Band bender.
- stapler.
- Screwdriver.
- Roulette.
- Construction knife.
- Level.
- Drill.
- A hammer.
- Self-tapping screws made of galvanized steel with a neoprene rubber gasket.
If corrugated sheets are treated with a colored polymer coating, then it is recommended to select fasteners in accordance with the color.
Do-it-yourself installation
The corrugated board is laid on the crate, which serves as a reinforcing structure, to exclude possible bending of the roof, under the weight of precipitation and strong winds.
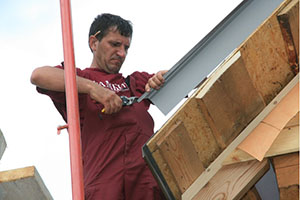
It is necessary to start with fixing the end plate, which is fixed at the height point of the roof profile, above the frame. At the level of the frame, under the strip of the gutter with a funnel, flooring is made of planks. It should be on both sides with an indent of sixty centimeters.
The option when the groove is made of galvanized alloy provides for an overlap of 20 centimeters in size. The bottom bar is baited using self-tapping screws to the edges. Its main and reinforced attachment is carried out in the process of laying and fixing the corrugated board. It is advisable to equip the joints with a sealant, especially if the roof is flat.
![]()
With any roof device, the installation stage of the cornice strip is suitable. A universal sealant is placed between it and the corrugated board plate, and ventilation is also considered. The curved edge of the profiled plate, which provides for the flow of water, must be at the bottom during installation.
With a slight slope of the roof, the sheets are laid by the method of throwing plates in two waves, with flat roofs, the profiled plate is thrown in one wave. In the latter case, the use of seals is mandatory.
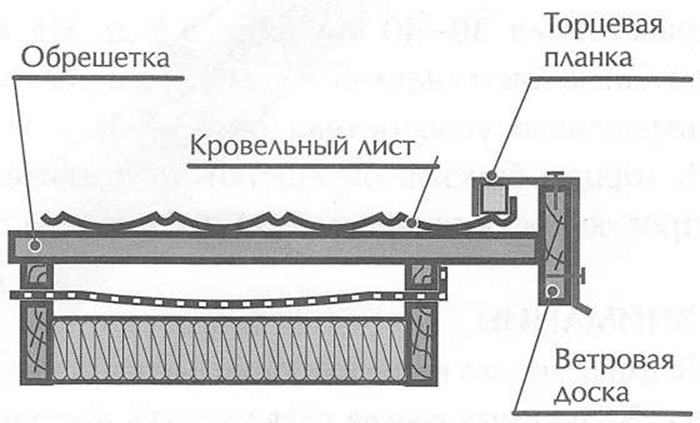
After reviewing the details of the installation scheme, it is allowed to proceed to the features of laying corrugated board.
Step-by-step instruction

- Start laying any roof should be from the right end.
- When overlapping a hipped roof, the laying of profiled plates begins on both sides, based on the high point stingray.
- Using self-tapping screws, install and fix the eaves strip, leaving an overhang indent of 4 cm. Lay the seal in the gap between the profiled sheet and the strip.
- It is necessary to pay attention to the slope, if it is less than 14–12 degrees, then the sealant will also be required on the longitudinal seams, and the overlap of the sheets should be in 2 waves.
- First of all, the first sheet is fixed with one self-tapping screw (this is necessary in order to be able to rotate it), then it is aligned along the edges in accordance with the eaves.
- Subsequent sheets are overlapped and fixed at the corners with self-tapping screws.
- The first four stacked sheets must be aligned with a cord, then secured.
- Starting the second level of corrugated board, you should attach the first sheet of the second row to the first sheet of the first row.
- When choosing the order of laying sheets of corrugated board, you will need to take into account the factors of temperature difference, as well as the possibility of strong winds and snows.
Laying methods
There are two ways of laying corrugated board on the roof.
1 way. This method is called vertical stacking. Lower the first sheet down from the overhang by 4 cm and bait with a self-tapping screw. Next, take the second profiled plate and align with the sides of the first plate and secure. Using this method, collect four sheets together, and then fasten them at the top of the waves using self-tapping screws. New blocks are attached to the received section.
2 way. With this method, a section is made that includes three profiled plates. Two plates are laid in the first row and aligned along the edge, followed by fastening. The whole point of this method is that the third plate from the second row should be docked last. In the same way, all subsequent sections are collected.
Subject to all instructions and good fastening, corrugated roofing will be reliable and of high quality.
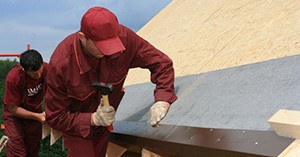
Ridge and end strips: how to install
The standard length of the end strip is made in the amount of 2 meters, in order to build it up, you can overlap the strips. When installing them, choose the direction to the ridge starting from the roof overhang. The end bar, without fail, must cover at least one wave crest. With a step of about a meter, this bar is fixed using self-tapping screws.
The next mandatory step in the construction of the roof will be the fastening of the ridge.
Skates are installed with an overlap of 20 centimeters and fastened using self-tapping screws to a profiled plate. The distance between the fasteners should not be less than 25 centimeters. All ridge elements must have a smooth surface.
Adjoining strips
As well as the end strip, the abutment strip has a factory length of 2 meters. At the junction of the plank with sheets of corrugated board, it is fixed in increments of 40 centimeters with self-tapping screws.
Having familiarized yourself with all the secrets and features of installing a roof with corrugated board, you can draw a clear conclusion that everyone can do it with their own hands!
High-quality and durable roofing from corrugated board is quite easy to build on your own. It is only important to know what materials to take, how to properly attach the sheets to the crate and how to protect the inner under-roof space from dampness. And Special attention we will devote to additional elements that need to be bypassed with full observance of technology. So, do-it-yourself corrugated roofing - step by step!
Material preparation: avoiding the first mistakes
Once you have made accurate calculations for your roof, you can order profiled sheets. But, if you purchased corrugated board, but for some reason its installation will have to be postponed (for example, prolonged rains), then store the sheets without removing the factory packaging, on a flat surface and indoors. Additionally, bars should be placed under the sheets in increments of 50 cm.
Shift and move such roofing material carefully, holding the edges along the length and especially avoiding creases and deflections of the sheets. You also need to move the sheets carefully, because. modern polymer coating is particularly sensitive to mechanical damage. As well as cutting this material with abrasive cutting tools: fragments from the circle will scratch, and significant heating will occur at the cut site. But, if you had to work that way, then immediately cover all the damage with repair paint.
Fortunately, the technology of roofing from modern corrugated board will allow you to carry out all the work in the warm season, from April to September, and you will not have to store the sheets for a long time.
Installation of corrugated board: step-by-step master classes
Let's first of all immediately deal with building terms so that you do not have to search the Internet for the meaning of each new word:
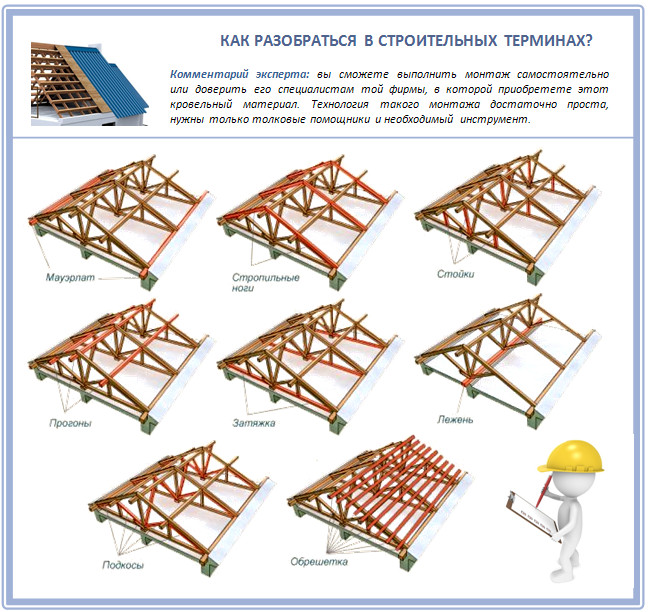
You will be surprised, but the same (at first glance) material needs to be laid in different ways. It's all about the manufacturers - everyone gives their own recommendations for laying, and they are really important. Because corrugated board from different companies is demanding on its conditions, even if the differences are small. Therefore, carefully study the instructions attached to the roofing material and do not trust fully hired workers who “ate the dog on such roofs” and try to do everything their own way.
Here is a simple example of how the installation of corrugated board with a thickness of less than 0.7 cm and more durable differs:
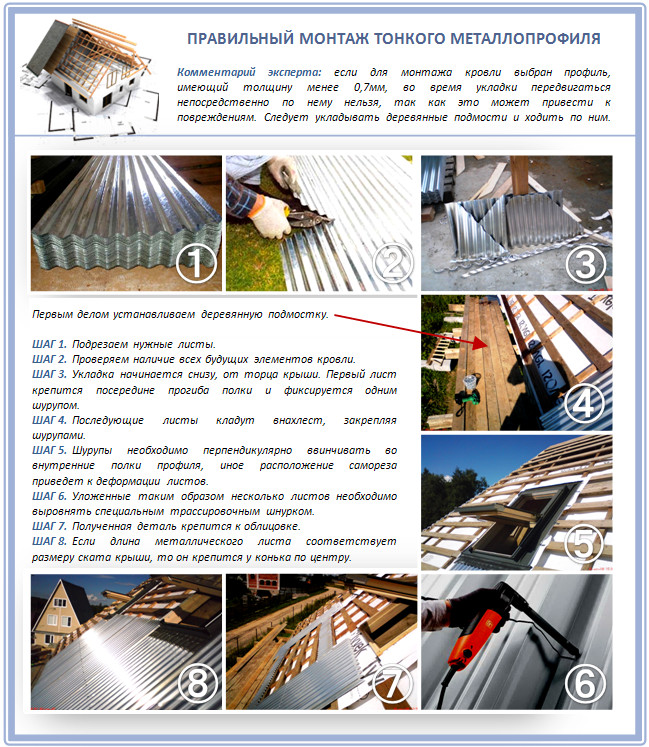
And when working with such material, a wooden scaffold is no longer needed:
Imagine that a hired team starts stomping on thin corrugated board, because before that they “put the exact same roof on your neighbor” and “nothing bent”? And now it will bend, and how, to which the unfortunate workers will declare that "the way it was."
But, speaking in general, the main indicator of high-quality roof installation is tightness. After all, the roof just serves to protect all internal structures from moisture and cold. And even an inconspicuous gap can become a serious problem: dampness, smudges, quickly deteriorating materials and fungus. That is why we will now analyze in detail all the subtle points.
A little about safety
The technology itself is not as complicated as it is important not to damage the roofing during its installation. After all, although this material looks strong and tough, caution is still required when working with it:
- On the finished metal profile flooring, move in soft shoes.
- Try to step only on the concave waves of the sheets and better directly on the screws.
- So, you can only step on the roof on your toes.
- Keep your foot always parallel to the slope.
- Only one leg should be in one recess.
Construction of a sheathing for corrugated board
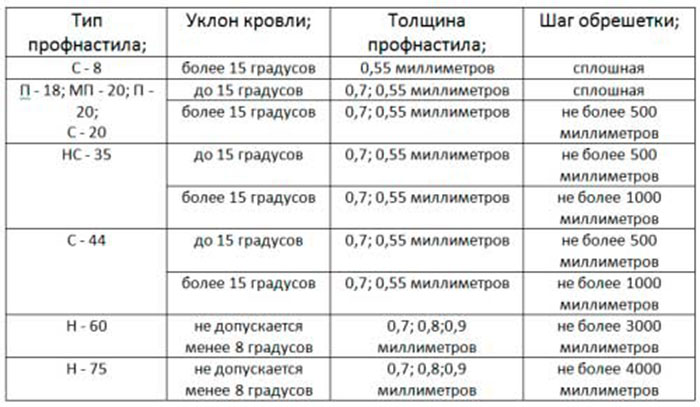
The crate for mounting the roof is made either solid, if the slope is small, or sparse, in increments of up to 5 meters. But with what step the roof lathing is needed depends on how thick the sheets of corrugated board will be:
Waterproofing and wind protection
Next, we think about how to properly make a roofing roof pie. The modern market produces a lot of waterproofing materials, the most different types and properties. We even have a whole separate article about it. But in general, focus on the following program of action:
- Step 1. So, fix the selected waterproofing material on the rafters. To do this, take the most common construction stapler, but before laying it, be sure to check whether you are laying the film or membrane on the wrong side. And glue the panels together with a special tape.
- Step 2. After that, we break through the slats along the rafters (take a thickness of at least 2 cm) and thus form the ventilation gap necessary for ventilation.
- Step 3. Now we put the roofing material on this upper crate.
Here's what it all looks like in real life:
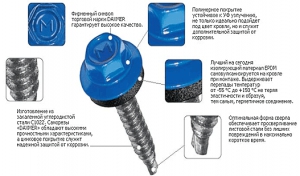
We select high-quality self-tapping screws
The consumption of self-tapping screws when fastening corrugated board is usually about 6 pieces per 1 square meter. Self-tapping screws 4.8 by 28-35 mm are suitable, as for wood, and for additional elements - 4.8 by 50 or 60 mm. As a tool, purchase a screwdriver with a special nozzle or a cordless electric drill from the same manufacturers of roofing materials.
Special self-tapping screws for fastening profiled sheets are indispensable, because. This is the only way to ensure:
- Complete waterproofing of the roof.
- High connection strength.
- The minimum risk of injury to the coating during fastening, and, therefore, the absence of corrosion in the future.
The highest quality and most reliable self-tapping screws for corrugated board are sold by the same suppliers that deal with sheets. Use zinc plated carbon steel or stainless steel screws whenever possible - this is ideal. But when buying, still carefully inspect all sealing washers.
How to properly fix the corrugated board?
You can understand that you have fastened the screw correctly by the metal washer - it will protrude about 1 mm of the rubber gasket.
It is necessary to screw the screws into the roofing material strictly perpendicularly, directly into the deflection of the vertical wave at the corrugated board. Although there are a lot of disputes about this in the construction fraternity, and each method has its own advantages. So, a self-tapping screw in the lower wave creates a more reliable fastening, and in the upper wave, rainwater is much less likely to get into the under-roof space.
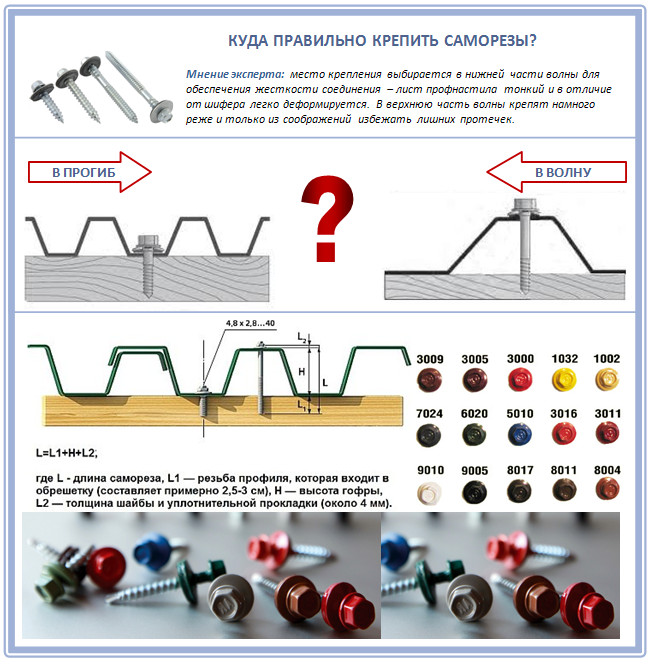
Let's just say one thing: manufacturers recommend fixing the corrugated board in the deflection.
On the eaves and ridge, you need to screw the screws into the deflection through the wave, and in the middle of the sheet - into each board of the crate. In total, you will need about 5-8 pieces per square meter.
What tools are needed for installation?
Note that the device of the roof itself from corrugated board is really within the power of even a person with little knowledge in construction. Of course, there are roofing materials that only experienced professionals can properly install. But in the case of modern corrugated board, we can reassure you: you can handle it yourself!
Fortunately, there is nothing complicated here. Due to the large length of the sheets, the roof slopes overlap without additional transverse joints, and the material itself is easy to cut and shape. You will need a minimum of tools for this business:
So, you can lay corrugated board on slopes of almost any angle of inclination, it is only important to correctly calculate the amount of transverse overlap:
- 150-200 mm for roofs with 15-30°.
- 200 mm for slopes from 14°.
- 100-150° at large angles.
For fastening, you will need self-tapping screws with special sealing washers:
In what order should the sheets be laid?
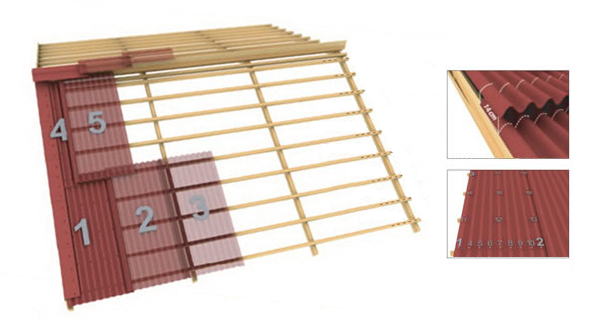
Many roofers install profiled sheets as follows: starting from the bottom row, they first lay 4-5 sheets, and each of them is fixed with only one self-tapping screw in the center. After that, the sheets are interconnected with self-tapping screws 4.8x19 mm, which are installed in increments of 500 mm. Now they check how the sheets turned out to be aligned with the roof overhang, and finally fix the roofing material. Here is the scheme:
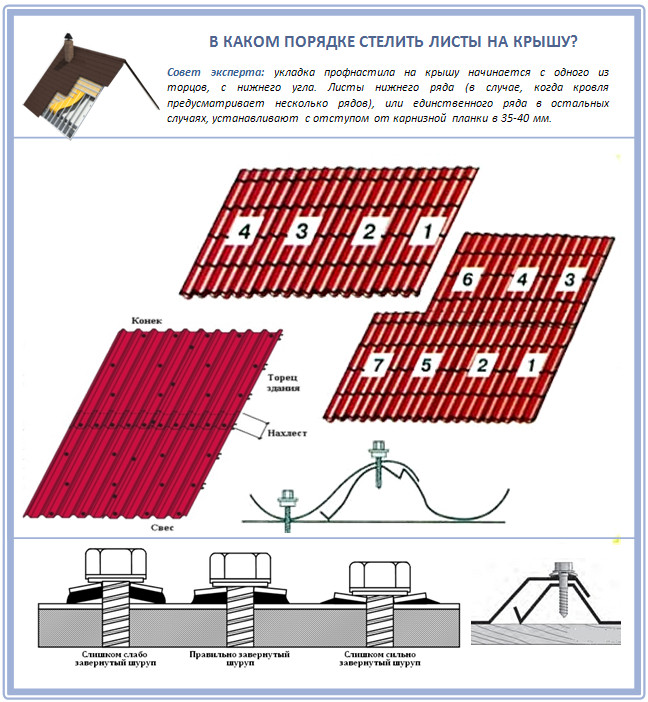
But, if you are working on the roof for the first time, in order to avoid distortion, fasten the profiled sheets in the same way, but in this order:
- Step 1. We install the first sheet on the crate, and fasten it with one screw at the very ridge.
- Step 2. We lay the second sheet so that the bottom edges of both sheets below form one perfectly even line.
- Step 3. We fix the overlap along the top of the wave under the very first transverse fold.
- Step 4. We evaluate by eye how correctly the sheets are docked. Uneven? Then lift one sheet from the other, tilt it slightly from the bottom up, and again join the fold by fold. Secure everything with self-tapping screws at the top of the waves.
- Step 5. Work with 3-4 sheets in this way, carefully align them with the cornice and then install the remaining sheets.
To the base of the roof, the corrugated board must be mounted so that the edge extension is 40 mm from the eaves. This is necessary in order to leave a gap on the ridge optimal size and the ventilation of the roof was not disturbed. By the way, if the profiled sheets have a gutter, then each next one should overlap the groove of the previous one.
Remember: when laying, you cannot step on the comb of the sheets - they will bend. In general, fitters wear soft shoes for such work. That's all the details!
Working with additional elements
And now let's move on to our numerous additional elements. All of them, as a rule, are made in standard lengths: for a roof with a polymer coating - 2 meters, for a galvanized roof - 2.5 meters. They complete the roofing work themselves. The sealant, which is traditionally placed between the roofing material and additional elements, allows them to fit more tightly to the sheets, further preventing moisture from entering under the roof and allowing it to “breathe”.
But for the design of skates, cornices and other complex structures, you need to purchase special elements that are offered by the same manufacturer whose roofing material you purchased:
It is necessary to fasten the additional elements with the same 4.8 roofing screws as the main material. The only difference is that the metal roofing is fastened with self-tapping screws 28-35 mm long, and the elements - with self-tapping screws 50-60 mm long.
Valley and valley overlay
And now let's deal with such a mysterious name as "valley". The valley and the valley lining are additional elements duplicating each other, which are mounted at the points of internal convergence of two differently directed slopes. You need to fasten the valley under the corrugated board.
Therefore, if the roof has a complex shape, with internal surface joints, then take a valley and a valley lining as an additional element. So you will give your roof a neater and more aesthetic appearance, additionally protecting complex transitions from moisture getting inside.
Aprons for pipes
The most critical stage of the roof is the removal of pipes. Such pipes consist of two conditional parts - the lower one, which goes along the roof profile, and the upper one, the actual pipe. And, if the through passage of the pipe falls on the lower part of the roof, it makes sense to install a snow stop above the passage.
For sewer ventilation system an uninsulated pipe about 10 cm in diameter is passed through the roof, without a head. And for radon, they take the same pipe, but with a cap. Remember that these pipes cannot be connected to ordinary ventilation pipes, because. for those, insulated elements of 125 mm in diameter are already used.
The pipe itself can be installed both before the installation of the roof, and at the end. If you chose the second option, then in the finished roof you will need to cut a hole for the pipe and cover it with some material for a while. In the course of finishing work, pipe cuttings will need to be made of galvanized steel aprons or more modern materials like Wacaflex.
Here is a good tutorial on how to do it:
dormer window
Now we are working with the dormer window. So, we cut the sheet of corrugated board into two parts at the lower end of the groove, put the bottom sheet, then the bottom plank of the groove, and only then the top roofing sheet.
snow holder
The snow guard is mounted in those places where there is a risk of snow rolling. For corrugated board, this is usually the second line at a distance of 30-40 cm from the eaves. For installation, use self-tapping screws 4.8x50 through 1-2 profile waves.
Outer and inner corner
If the slope changes its direction, then additional finishing elements are used, such as the inner and outer corner and the transition. Their main task is to create maximum tightness and give the joint of sheets an aesthetic appearance.
adjoining
The junction is an additional element that serves as a bypass for the chimney or protection of the roof adjoining the wall:
Cornice, end plank and joint plank
And here is the instruction:
- Start the installation of the end strips from the side of the roof overhang, directing towards the ridge.
- He already has an extra part of the end plate, just cut it off.
- Fasten the plank to the end board and profiled sheets in the ox comb with screws in increments of up to 1 meter. If you did everything right, the end strip will cover at least one wave of the roof profile.
- Fasten the end plate with wood screws 4.8x60 or 4.8x50, directly to wooden base. Leave a step from 30 to 50 cm and make sure that the end plate completely covers the end of the extreme wave of the corrugated board.
Now we move on to the installation of the connecting strip of the joint. Its length is 2 m, and the overlap of the planks cannot be less than 1 meter. The joint plank is taken 2 meters long, and two planks are attached to each other with an overlap of at least 1 meter. Attach the additional element to the wall in a strobe, or hide everything under the wall sheathing.
The main purpose of the eaves strip is to protect the under-roof space from precipitation, especially in rain with strong winds. And the lower the angle of inclination of the roof, the more necessary this additional element. But you need to fix the eaves bar earlier than the sheets of corrugated board. Overlap - 100 mm.
Installation of the skate
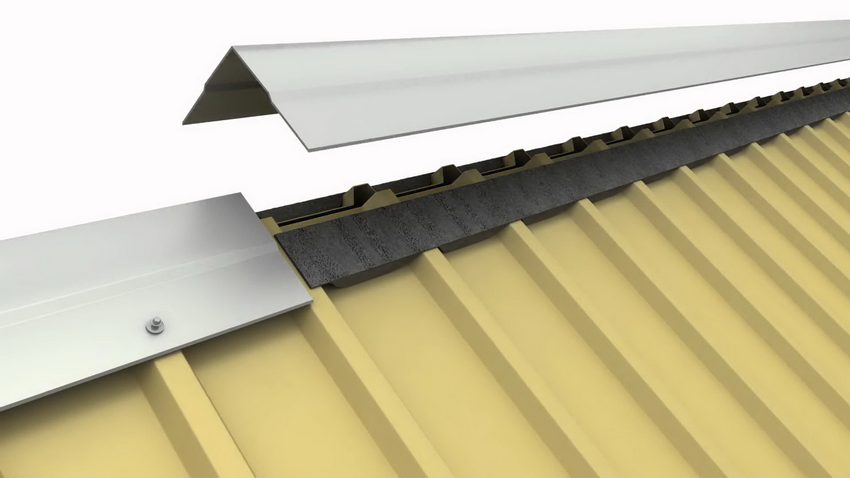
After all the roofing material has been laid, we fasten the ridge. In advance, we line the joints of the ridge and the roof with a sealant. Ridge elements for trapezoidal roofing sheets are usually taken smooth. Between them and profiled sheets, it is advisable to put ventilated seals, and for small corrugations - special ridge seals.
We fix the skate with screws on both sides at a distance of 2-3 waves. It is important that the skate itself covers all the first screws that hold the sheets roofing material. Ridge strips should overlap each other with a grip of at least 1 meter, and we fix the elements to the roofing sheets with self-drilling screws in increments of up to 3 meters.
An important point: the smaller the angle of inclination of the roof, the wider the ridge itself should be. Yes, the most standard sizes- 140x140 mm or 200x200 mm.
But today it is more fashionable and rational to order a figure skate, which comes in two dimensions: 110x30x110 mm and 145x50x145 mm. There are also special types of ridge for a complex roof, when multidirectional slopes come together.
Roof care from corrugated board
Snow on the roof of profiled sheets lingers quite a bit, and therefore it is not necessary to clean it. But, if you need to carry out certain repairs, then arm yourself with small plastic shovels that will not leave scratches.
Caring for corrugated roofing is quite simple: the rain itself will wash away all the dirt and dust, and you just have to clean the grooves and drainage systems from clogged fallen leaves once a year.
If for some reason a more serious cleaning is to be done, then use ordinary water and a hose with a pressure of up to 50 bar. Detergents can be used only those that are intended for painted surfaces, and "White Spirit" will help to cope with stubborn stains.
As you can see, nothing complicated!
Laying corrugated roofing is the best way to create a reliable and high-quality roof. Despite the different types of corrugated board, the dimensions of the sheets, the qualities and advantages of the material remain the same.
The corrugated board itself is made by stamping steel sheets which are later galvanized for additional corrosion protection. This method allows you to increase the strength of the material, which remains unchanged in weight.
Advantages of corrugated board
Decking is often used for roofing works thanks to a number of advantages:
How to choose the right material?
 There are three classes of corrugated board, depending on the properties and functional purpose:
- C - wall, for covering the facades of buildings and creating partitions
- H - for floors, formwork and roofing
- HC - combined purpose corrugated board, suitable for all types of work
Roofing material, which is produced under the marking "H", is the most best material due to the presence of additional stiffeners, thickness and high corrugation. Decking marked "NS" is also used for roofing, but only in cases where there will be no additional pressure on the roof.
It is best to use corrugated board marked "H" for roofing. Despite the increased cost compared to other brands, its characteristics are ideal for creating reliable roof structures.
Preparatory work before installation of corrugated board
Before you carry out the direct laying of corrugated board, you need to decide which crate will be used, how to properly waterproof and ventilate, and also calculate the amount of material needed to fully cover the entire roof.
Material Quantity Calculation
In order to accurately calculate how much corrugated board is needed, it is necessary to measure the crate, roof slope and its diagonal.
Even if the calculations have already been carried out on the drawing, it is necessary to take measurements after the fact to take into account the possible error.
It is best if the length of the slope and the length of the corrugated board are the same - this will reduce the complexity of the work and there will be no additional problems with sealing. When making calculations, it must be taken into account that the sheets of corrugated board should protrude beyond the eaves by 40-50 mm.
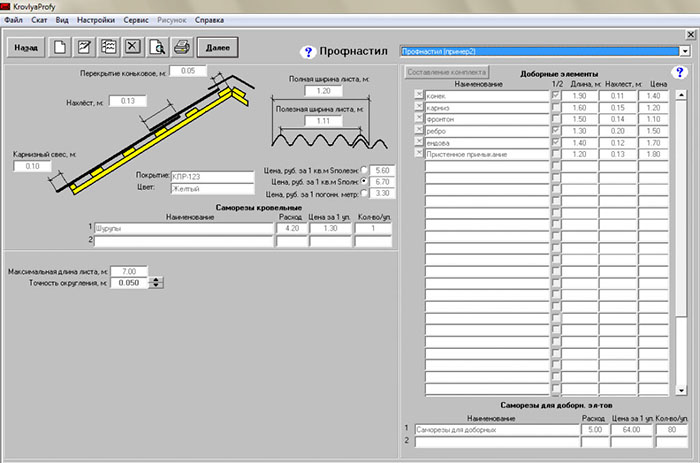
Calculation of corrugated roofing using the program
Waterproofing and ventilation
 Before direct laying, you need to take care of the waterproofing installed on the crate.
This is necessary so that there are no leaks and condensation under the roof. For the same purpose, ventilation is also used.
After laying the waterproofing coating, it is necessary to lay sheets of corrugated board at a distance of 20 mm from the surface of the insulating layer. For this, wooden planks are used, installed on top of the waterproofing. An important condition is high-quality ventilation of the resulting air gap.
Choice of crate
 If on the roof of the house there are various elements, such as chimneys, fire hatches, ventilation shafts, then to strengthen the roof, it is necessary to install a crate.
There are no uniform standards that define the rules for installing the crate.
An important requirement when installing the lathing bars under the corrugated board is that their dimensions must be at least 32X100 mm.
Lathing step table for corrugated board
Do-it-yourself corrugated roofing
 If the roof has a large number of connections and transitions, it is advisable to start with the installation of the valley. On both sides of the groove, a boardwalk is installed, in which the bottom boards of the valley should have an overlap of about 20 cm. Next, the bottom (bottom) plank of the valley is installed.
It should be noted that a profiled seal must be installed later between the corrugated board and the bottom strip.
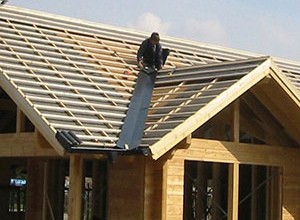
We mount the end overhang
 Roof filing is carried out only after the end plate is installed. It is fixed with nails or screws.
It is necessary to mount the bar in such a way that when sheathing with corrugated board, it is completely hidden by the wind corner.
It should be borne in mind that there must be high-quality ventilation of the under-roof space, which is necessary to prevent the accumulation of condensate.
We mount the cornice overhang
It is worth remembering that the installation of the overhang should be carried out taking into account the 40 mm indent above the roof.
The overhang installation technology is as follows:
You can install in two ways:
- Vertical laying. It starts from one of the edges of the roof and is an alternate laying of several sheets of corrugated board
- Block masonry. Sheets of corrugated board are assembled into a block, after which they are fixed on the roof by joining the blocks and fixing them with self-tapping screws
We install the end and ridge bar
 The standard length of the end plate is 2 meters. In order to increase the length, the planks are overlapped to a depth of 50-100 mm.
Installation of strips should start from the roof overhang towards the ridge. If the plank is too long, it can be shortened, and the rest put aside under the next plank.
It is important to remember that correct installation implies the overlapping of at least one wave of the roofing sheet with a plank.
The strap is fastened to a pre-fixed end board and profiled sheets using self-tapping screws. The recommended distance is no more than 1 meter.
The ridge bar is fixed with self-tapping screws on the upper crest of the corrugated board wave from both sides. The sealant is attached to the ridge strip before it is installed on the roof. Before installing the insulation from the ridge, you need to remove the protective film.
End plate mounting scheme
Installing the connecting plate
The standard length of the junction bar is 2 meters. Such strips are installed with a large overlap (at least 200 mm). The joints of profiled sheets and planks are fixed with self-tapping screws, while maintaining a step of 400-500 mm. The attachment point of the junction bar in the wall can either be hidden under the sheathing or in the strobes.
Types of junction bars
How to fix corrugated board on the roof?
 The final stage is the installation of corrugated board. Sheets are fixed on the roof with the help of special fasteners (metal screws), which have protective gaskets to prevent moisture from entering under the metal sheets.
When fastening the corrugated board with a self-tapping screw, it is necessary to ensure that the gasket lies flat, and the self-tapping screw is tightened tightly, but not very tightly.
Laying corrugated board is the easiest part of the job. At this stage, it is necessary to observe safety precautions and use insurance. Additionally, roof drains, snow retainers and grounding can be installed on the roof.
Gallery about calculations and installation schemes for corrugated roofing
This gallery provides an example of calculating the required amount of corrugated roofing, as well as the nuances of its installation. There is also a table on the characteristics of corrugated roofing in accordance with GOST.
custom_gallery
images not found
Video about corrugated roofing
We bring to your attention two videos on how to cover the roof with corrugated board. The first video shows based on the program, the second is a real case.


