
Before ennobling the area in front of the house, many owners are wondering what material to choose for this. Paving slabs are great. With its help, you can create a functional durable coating that has no equal.
Positive sides
Do not assume that you will have to pay an impressive amount for such material. The market price is very reasonable. But if you still do the work yourself, then the cost of the track or platform will be significantly less. Thinking about the question of how to put paving slabs, you must remember which stages to overcome. Compliance with certain technology standards is very important to achieve a positive result, however, the installation of this material may well be carried out even by a master who has not previously encountered such manipulations. After completion of the work, you will receive a path or territory that will become a worthy decoration of the exterior.
Features of paving slabs
If you are thinking about how to lay paving slabs, you will probably be interested to know that this coating is popular all over the world. This is due to the fact that products of this type have a number of advantages. Among the positive qualities, one can single out a variety of shades, textures and shapes. This allows professional craftsmen and home craftsmen to create unique harmonious ensembles that combine the elements of the site into one whole picture. Paving slabs allow you to embody any, arbitrarily bold design and architectural ideas. If you are faced with the question of how to lay paving slabs, then when purchasing the material, you should be aware that it is environmentally friendly, during operation it will not emit volatile harmful substances that would be hazardous to health.
Carrying out markup
If you are faced with the task of how to lay down correctly, or lay paving slabs (more precisely), then you should ask about the features of marking. Before carrying out these manipulations, it is necessary to roughly calculate the estimated dimensions of the future track and platform. If this is not done, then there is a high probability that the tiles will have to be cut, and this will not only make the site unaesthetic, but also add labor intensity to the work. In order not to encounter such a problem, the length and width of the site must be made in multiples of the dimensions of the purchased tile. If you do not eliminate the need to trim the tiles, the coating is less durable. For the accuracy of the markup, you must use a tape measure.
Before using a dry mix, it is necessary to take into account the peculiarity that a margin must be supplied for the curb, according to its dimensions. For its installation, a shallow ditch is laid around the perimeter. Once the track or platform has been placed, it is recommended to walk along and feel how comfortable the route is, which will have to be done more than once during operation. Listen to the sensations: if they suit you, then you can proceed to the next stage of the work.
Coating with natural drainage system
Paving slabs allow you to create a surface, the seams of which pass through themselves an excessive amount of moisture, eliminating the occurrence of puddles. It will be very easy to serve which territory, and it can be operated for more than 15 years. If any part of the surface is accidentally damaged, it can be repaired by replacing individual products.
Depending on the location and purpose of the coating, the material can be laid both on mortar and on sand or gravel. For example, if you don't know how to lay paving slabs to get a garden path or a recreation area, then remember: a base of crushed stone and sand is best.
Preparatory work
Initially, you will need to select products and prepare the necessary set of tools. Before laying paving slabs in the country, you need to visit the store and ask the seller what performance characteristics the products have. If you have to equip a covered carport, the material must be able to withstand heavy structures and constant loads. For laying, it will be necessary to prepare a rubber mallet, trowel, manual tamper, wooden pegs, building level, I-beam. You will need a watering can or watering hose. It is important to prepare a broom, cement, rake and sand.
Features of the work
Thinking about the question of how to lay paving slabs in the country, each master must take into account the need to ensure the slope of the surface. For each meter, the slope should be 5 millimeters, this will allow water to freely go into the lawn or well area. Work must begin with the arrangement of the foundation. The successful outcome of the entire construction will depend on the reliability of the base surface. Before laying paving slabs with your own hands, wedges must be hammered along the edges of the location of the future path. At a height of 7 millimeters from the ground, it is necessary to pull the cord. Rubbish, construction debris and stones are removed from the intended territory. Next, the base is carefully leveled, the surface must be compacted, and then it is important to check the horizontalness according to the building level. To make leveling easier, you can use a rake.

Features of working with soft ground
Before laying paving slabs with your own hands, soft soil must be moistened, compacted and leveled. The uniformity of pavement laying will depend on the quality tamping of the base. The depth of the base must be determined with a margin of 2 centimeters, they are necessary for further shrinkage, which will certainly occur after the completion of the installation work. To install a layer of sand and the tile itself, you will need about 30 cm. At this stage, it is important to carry out work on laying communications, if any.
Some nuances of ground preparation
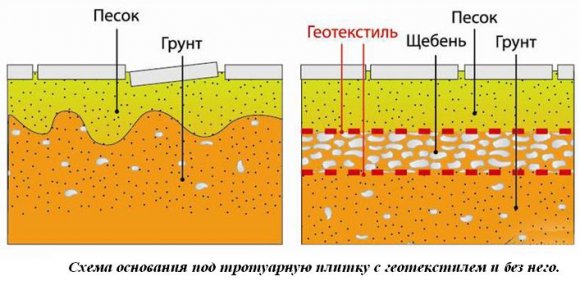
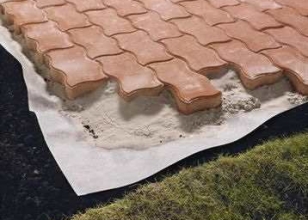
Before laying paving slabs on sand, it is imperative to check the presence of all layers. Thus, before filling the aggregate, it is necessary to lay geotextiles, which will prevent the growth of weeds. The use of sand will help increase the stability of the pavement. Among other things, the aggregate acts as a drainage system. After the sand is covered, it can be leveled with a rake, spilled with water, continuing to do this until puddles form on the surface.
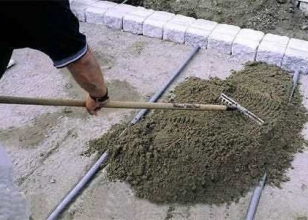
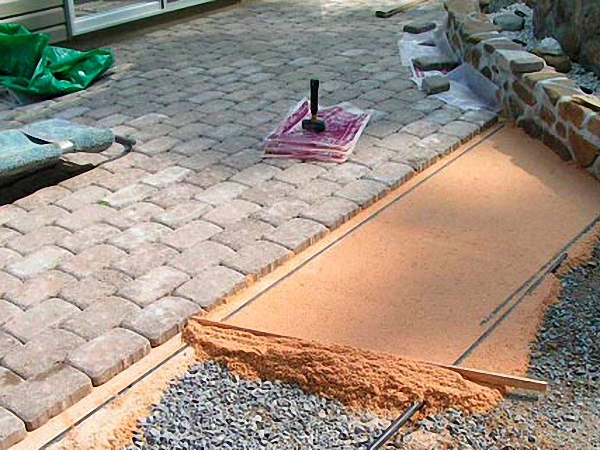
After 4 hours in warm sunny weather, sand preparation can be given a flat, smooth surface using a profile for this. As the latter, you can use a beam or a regular pipe. Pipes should be arranged according to the type of rails, removing them at a distance of three meters from each other. In the intervals between them, sand should be poured to an equal height. In order to give more impressive strength to the coating, you can lay tiles on a crushed stone base. For this, a solution is often used. If you are thinking about how to properly lay paving slabs using this method, then a sand-cement dry mixture is prepared for this, which will be obtained using a 3 to 1 ratio.
The composition must be laid out in an even layer, and then screeded with a channel. If paving slabs are to be laid on a complex base, then it is advisable to use a combined laying, which involves the use of a layer of cement and sand, as well as concrete.
Laying tiles
Before you start installation work, you need to pull the cord between the pegs. It is necessary to start work from the curb, it will be most convenient. The first row should be laid out according to the level, since it is on it that you will have to navigate when carrying out further work. It is necessary to mount products in the direction away from you.
It is necessary to position the tiles so that one product fits snugly against another. This will avoid getting different sizes of seams. Before laying paving slabs on concrete, it is important to stock up on crosses that will allow you to form equal gaps of 2 millimeters between products. If the tile was laid unevenly, then using a trowel, you can remove the product and put a layer of sand under it. After the surface is compacted, leveled, and the tiles are laid on top again. After completion of the work, the seams must be filled with a mixture of cement and sand, and then everything is watered.
If you are thinking about how to properly lay paving slabs, then it is important to take into account every nuance. Experts advise to rub the seams with quartz sand to give the surface a more aesthetic and attractive look. If the tile does not fit well with other elements landscape design or buildings on the territory, then you can trim the edges. To do this, you need to use a grinder.
After completion of the laying work, all debris and residual sand must be removed from the finished track. The border is installed on the liquid mortar brand M 100. It plays not only an aesthetic role, but also a practical one. It lies in the fact that this element prevents loosening of the tiles. The elements are supported on both sides and do not spread apart even when exposed to heavy rain. During operation, you only have to update the sand in the seams, which will come out with water.
Conclusion
Before each owner of a private house or suburban area, sooner or later the question arises of how to properly lay paving slabs with your own hands. This aesthetic coating, which is durable, is the most common. It is quite difficult to use other materials, in addition, many of them cannot be repaired. This cannot be said about paving slabs, which can be purchased in any quantity.
Before starting work, it is quite simple to calculate the required volume of material. It will be quite easy to repair the coating at any time. Moreover, the path or area for car parking can be increased or expanded without losing aesthetic and performance qualities. It is for these reasons that the modern consumer is increasingly choosing paving slabs, which show only their positive qualities during operation. You can also choose this type of coating, but before that, think about what external qualities the tile should have.
Paving slabs in the courtyard of a private house or in the country house perform two functions - aesthetic and utilitarian. The key to high-quality implementation of both is the correct laying of paving slabs.
Many trust this to professionals, hoping that they know their business. Is that so? Will the hired worker always perform the installation better than the owner himself?
The main thing is to know how to lay paving slabs with your own hands.
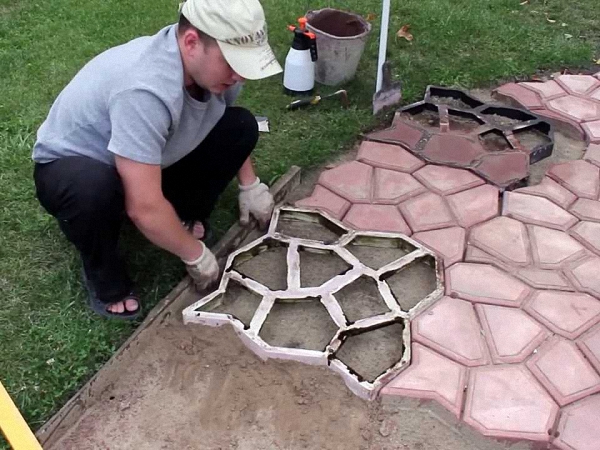
It will be a good help step-by-step instruction, in which, in addition to the order of work, all the nuances of this rather simple and fascinating process will be revealed. Where the result is shown with the first laid tile.
Preparation for laying paving slabs
Planning is a guarantee that a homemade track will not let you down for a long time.
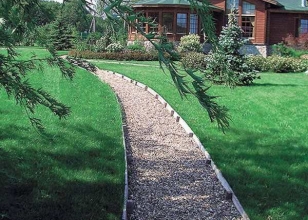
- Plot layout. Few people dare to lay out the entire space on the site with tiles, just as it is difficult to do without paths, at least from the gate to the cottage and outbuildings. The ideal option is to think over the paths to the house and from it to the main buildings on the site. So the lawn is preserved, and in the rain it is not necessary to knead the dirt. In addition, you do not have to uproot trees and other perennial plantings.
- Material selection. Paving slabs are gradually gaining ground from other types pavement. The main advantages: ease of operation, the ability to dismantle the coating, does not “float” like asphalt from heating, does not burst from the cold (frost-resistant), and is not demanding in care. The path, lined with paving slabs, allows moisture to pass through, thereby not harming the soil and soil (environmentally friendly).
- Tile. When choosing a tile, you need to know that, according to the manufacturing method, it can be vibrocast (possibly independent production) and vibropressed (done in industrial conditions). Varies in color, thickness and shape. Requires a device with a different composition of the base. All these factors determine the technology of laying paving slabs.
Tiled paths and grounds - parameters
Comparative analysis of tiled pavement is provided in the table
The type of soil also affects the choice of base for paving slabs. Moving soil requires a concrete base even for a footpath, and dense soil allows you to get by with a sand-cement cushion and under a car.
Laying paving slabs with your own hands - step by step instructions
General tips and rules on how to lay paving slabs correctly:
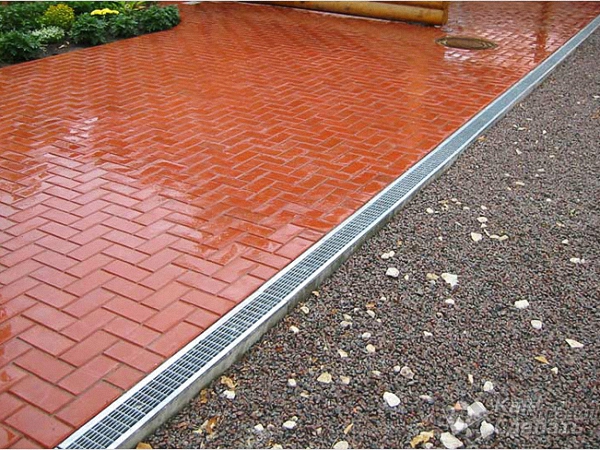
- provide drains for water drainage. If paving slabs are laid on sand, then water will go into the gaps between the tiles, and if on a concrete base, then a transverse, longitudinal or transverse-longitudinal slope is required. Thus, water, rain or melt, will not collect between concrete and tiles. Therefore, the possibility of swelling of the track sections is excluded. The optimal slope of paving slabs is 1 cm per 1 meter. Please note: the gap for water drainage must be placed between the curb and the tile sheet;
- correlate the size of the tile with the dimensions allotted for the track. The wider the track, the larger the tiled elements should be (subjective opinion), or vice versa, from small tiles. It would seem that large tiles will make the layout faster and easier, but in fact, it may turn out differently. The large dimensions of the tile are directly reflected in the mass, the weight of paving slabs 40x40 cm is 15-16 kg (depending on thickness). As a result, such plates are difficult to lift, move, level. While adjusting the height, you will have to lift the weight several times to add sand;
- lay (bring) communications before laying paving slabs. Otherwise, it will need to be dismantled and reassembled. If there is no need for communications yet, then conditions can be created for their installation later. To do this, it is recommended to lay plastic pipes with a diameter of 50 mm under the track in the most likely places for the passage of future communications;
- installation of paving slabs is not carried out during rain or immediately after precipitation. The soil and the laid pillow should dry out. The optimum moisture content of the base is a guarantee that the tile will not spread over time;
- the base for laying paving slabs must be perfectly flat. The sand used for backfilling should not contain clay or other impurities;
- choose optimal size tracks. It is reasonable to select the width of the track, based on the size of the paving slab, plus a value equal to the sum of the gaps between it. Thus, it will be possible to avoid time-consuming and not always beautiful trimming of tiles. The same applies to patterned layout. However, this approach is only possible when laying tiles with the correct geometry. Use of imitation natural stone, circular pattern, complex geometry does not always make it possible to do without cutting. In this case, you need to consider the exact location of individual whole and trimmed elements.
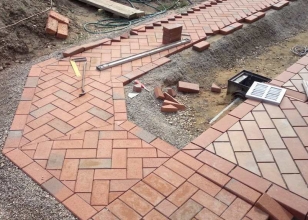
Stage 1 - Layout of paving slabs - schemes, patterns, drawings
To create a beautiful tile path, you need to make the right sketch. A drawing or scheme for laying paving slabs will help not only visualize the project, but also calculate the required amount of material.
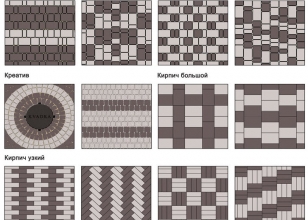
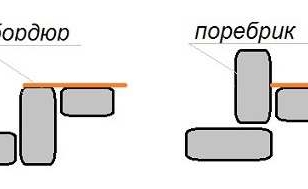
The choice of laying scheme is influenced by the shape (geometry) of the tiles (see photo) and the planned layout design.
Significant room for maneuver creates the use of rectangular paving slabs, with standard sizes 100x200 mm, type "paving stone" or "brick". They provide the most styling options.
Traditional options for laying paving slabs:
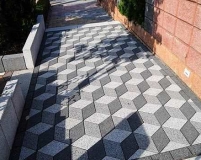
1. Geometric styling. It can be represented by colored canvases or illusions.
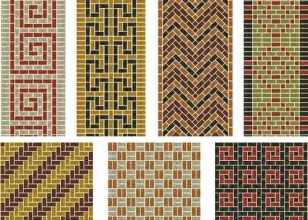
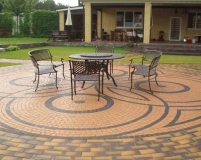
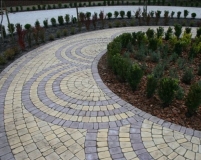
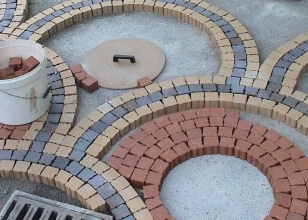
By playing with colors and laying out tiles, you can create unique design garden paths. Examples in the photo (rhombus, square, circle, new and Old city, parquet, checkerboard, fan, coil, butterfly, wedge sheet, hexagon or honeycomb).
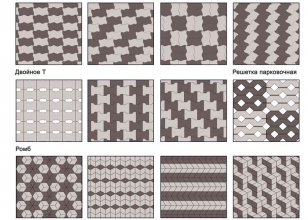
2. Illusions 3D - paving slabs with 3D effect. Laying tiles with a pattern that creates a three-dimensional stereoscopic (three-dimensional) image is a tricky technology of optical illusion.
![]()
![]()
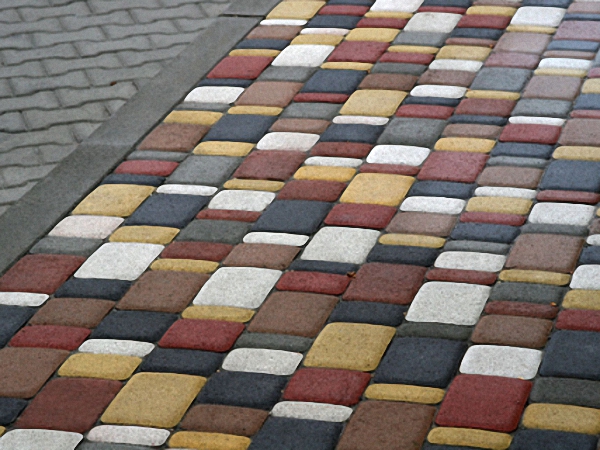
, an example of which is provided below, does not have a schema in the classical sense. It involves laying out tiles in an artistic mess. If the tiles are monochromatic, then the size of the tiles varies when laying out, if multi-colored - the colors.
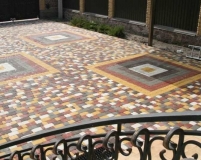
4. Artistic layout of paving slabs, the photo of which is provided below, gives an idea of the variety of different styling options. The complexity of the drawing is determined by the skill or perseverance of the master.

Stage 2 - Preparation of material and tools for laying paving slabs
For work you will need: sand, cement, tile, curb. Of the tool is useful: nylon thread, pegs, rubber mallet, long rule, level, rammer, trowel, broom. In case of trimming, you need a grinder with a disc for cutting concrete. Knee pads are a handy thing, because work takes a lot of time with an emphasis on these parts of the body.


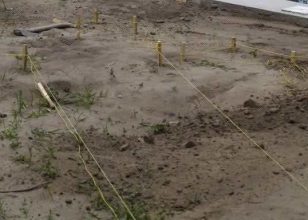
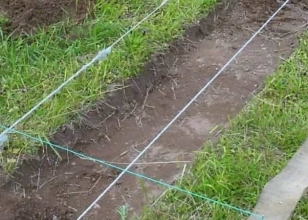
Stage 3 - Marking for laying paving slabs
The marking of the site is to determine the contour of the future track. The place along the entire perimeter is indicated by pegs, between which a nylon thread is stretched. Due to the fact that it serves as a guide for laying out tiles, it must be pulled strictly according to the level.
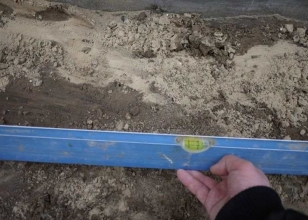
Stage 4 - preparation of the base for paving slabs
To build the base, you need to remove the top layer of turf, level the bed, pour it with water and compact it with a tamper. Dense soil does not need such work. There are stones, roots of trees and shrubs in the soil - all this should be removed.
Note. You can leave the soil, but then the path will be much higher than the rest of the cover on the site, which can lead to it being washed away by melt or rainwater.
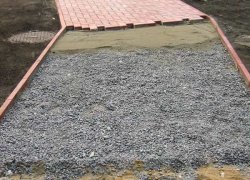
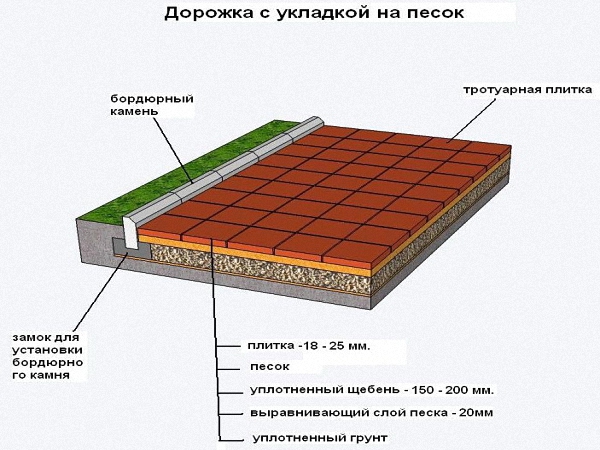
The resulting bed is covered with a drainage bearing layer, for example, crushed stone or gravel 150-200 mm high. For a car track (platform), the layer thickness increases to 400 mm. Many lay geotextiles under gravel and on it to eliminate the possibility of erosion of the pillow by groundwater. 20 mm is poured on top of the crushed stone. sand to level the base.
Stage 5 - Technology of laying paving slabs
Step-by-step instruction
1. Installing a curb for paving slabs or a curb
The purpose of the curb stone is to mark the path and protect the tile from spreading. But there are examples of laying paving slabs without a border.
Installation of a border is made on the leveled basis. For greater reliability, it is laid on a concrete base (concrete castle).
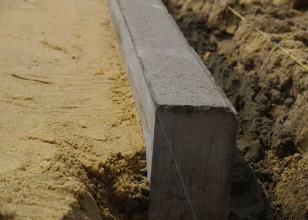

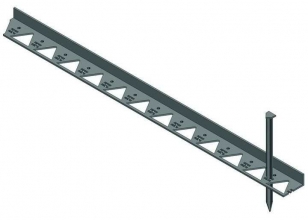
You can install a plastic border for tiles
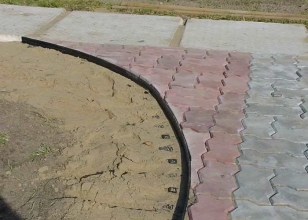
The border can be installed flush with the tile or protrude by a few cm. It is recommended to lay the tile just above the curb (border) by 5 mm, this is a shrinkage gap.
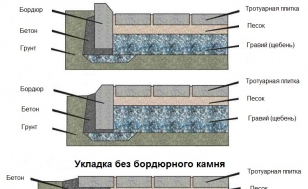
There are three types of foundation:
 Laying paving slabs on the sand.
In this case, the distance between the curbs (or stretched thread in their absence) is filled with sand. The height of the sand layer is 50-60 mm. Before work, the sand is poured with water using a sprayer and left to dry a little. Then it is leveled and rammed. The display is made on wet, but not wet sand.
 .
.
On the base prepared at the fifth stage, the second layer of sand (30-40 mm) is laid, on which the reinforcing mesh is laid. From above, the mesh is covered with a mixture of sand and cement in a ratio of 1: 4.
 Laying paving slabs on a concrete base.
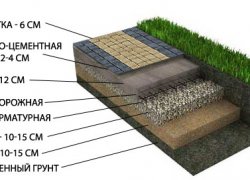
The composition of the "pie" is shown in the diagram.
Note. Laying tiles on concrete is not the best option. This is due to the fact that the concrete base does not allow moisture to pass through. Water lingers between concrete and tile and, at sub-zero temperatures, leads to deformation of the track.
3. Laying tiles
Simple rules for high-quality and efficient work.
How to properly lay paving slabs:
- the tile is laid out from the bottom point upwards;
- masonry is carried out by the method from oneself. That is, when performing work, the master moves along the already laid path so as not to damage the compacted and leveled base;
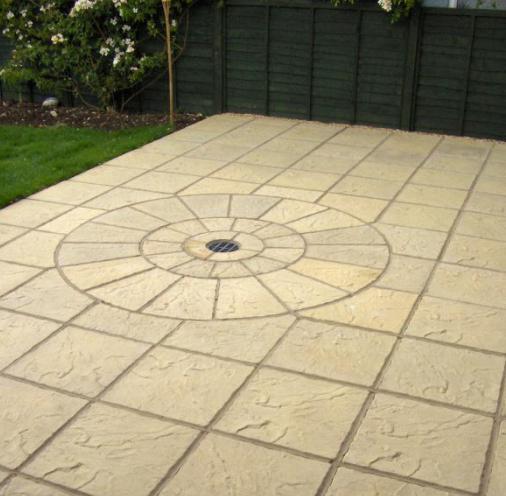
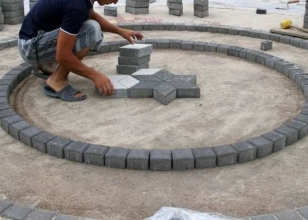
- installation of tiles in a circular way starts from the center of the pattern.
- the beginning of the montage falls on the optically visible boundary, i.e. to the place where the eye first falls: Entrance door, porch, veranda, gazebo, etc.
- tiles are laid out not in even rows, but diagonally. This makes it easier to align horizontally.
Starting laying, the first step is to stretch the cord along the width of the track, and the first row of tiles is leveled along it. The horizontal should be checked with a level every 2-3 rows.
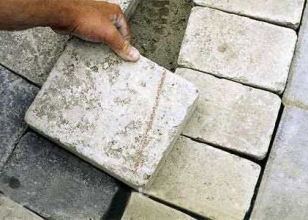
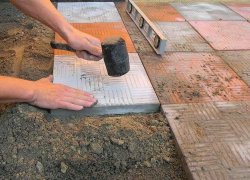
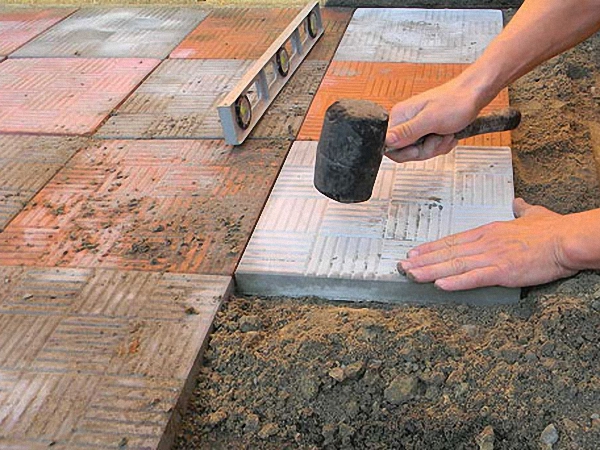
![]() "Landing" paving slabs The tile is placed in the place intended for it and is installed accurately by lightly tapping it with a rubber mallet. If the tile falls under it, sand or a mixture is poured.
"Landing" paving slabs The tile is placed in the place intended for it and is installed accurately by lightly tapping it with a rubber mallet. If the tile falls under it, sand or a mixture is poured.
The gap between paving slabs is usually 2-3 mm (enough for water to escape). The exact gaps are maintained with the help of crosses (but, this is a theory, it does not occur in practice).
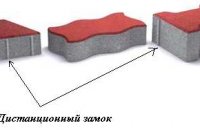 Some manufacturers have provided for the presence of limiters (remote locks) on the tiles, which allow laying without the use of additional devices at the same distance from each other.
The material was prepared for the site www.site
A new technology has appeared - paving slabs that glow in the dark. Installing such a tile will allow you to mark the boundaries and secure movement along the path in the dark. Luminous paint is applied over the tiles and is absolutely safe for users and the soil.
![]()


Another option for decorative lighting of the path is LED paving slabs. In this case, during the laying process, brick blocks are mounted - LED lights powered by electricity or solar panels.
![]()


Stage 6 - Grouting paving slabs
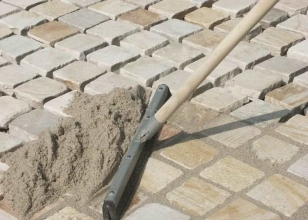
In addition to understanding how to lay paving slabs, you need to know how to seal the seams. Filling the joints between paving slabs is carried out in two approaches. To begin with, a thin layer of clean, sifted, dry sand is poured onto the laid tile. Using a broom or brush, the backfill is scattered between the seams. Then a layer of sand is poured onto the track (if the base is sandy) or a sand-cement mixture in a ratio of 1: 1 (for a cement-sand or concrete base) and the seams are also filled with a broom (spill).
You can purchase a ready-made dry mix for filling the joints of paving slabs: M150 (120 rubles / 25 kg) and Quick-mix PFN (1650 rubles / 25 kg).
At the end of the work, the path is watered with water using a sprayer. Watering is carried out until puddles form on the path.
Important. The distance between the curb and the tile is not concreted, and is also covered with a dry mix.
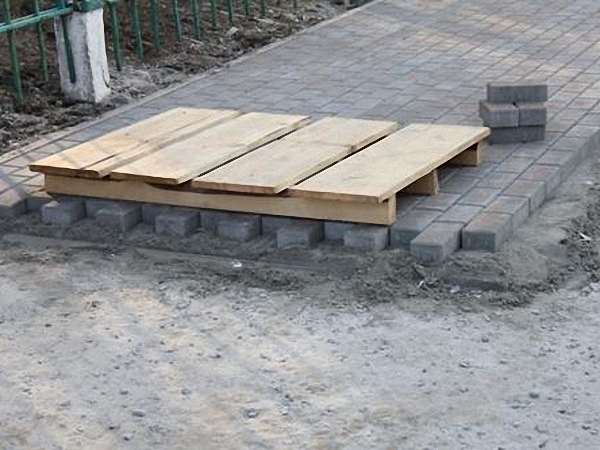
Note. Professionals advise vibrocompaction of seams with a special board, but users say that this is unnecessary in private construction.
Care of paving slabs
It is not enough to know how to lay paving slabs, you also need to provide her with constant care so that she lasts the billing period. A simple maintenance is to periodically sweep and wash the paving slab path (so that the colored tiles remain as beautiful). In winter, metal shovels should not be used for snow removal, but crowbars, ice axes should be used for icing, and the track should also be sprinkled with anti-ice compounds containing salt.
Water repellent for paving slabs
The porous structure of concrete acts like a sponge - it absorbs water. Hygroscopicity plays its detrimental role in winter, when water penetrates into the pores of concrete, freezes, expands and destroys the structure of the concrete base. As a result, the appearance of microcracks, dents, shells, discoloration.
 To prevent this, protective impregnations are used - water repellents for paving slabs.
Water-repellent compositions (materials, additives, liquids) do not protect the tiles from fading in the sun and abrasion, but only impregnate the surface of the concrete and thereby prevent “soaking” with water (they provide a water-repellent property).
How to process paving slabs
Some people want the pavement to shine, use the effect of wet tiles. And others, on the contrary, like matte tiles. On the question of how to impregnate the tile, opinions differ. According to reviews, Tiprom M, U, Neomid H2O Stop, Neogard, Penetron are used.
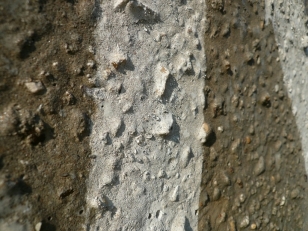
The budget option is the organosilicon water repellent GKZH-11 (cheap does not mean bad). The principle of application is simple: it is diluted with water in the proportion of 1 kg of concentrate per 25 liters of water, poured into a sprayer and sprayed over the surface of the tile track. This volume is enough for 50-70 square meters. m. tiles for processing in two layers. Spray until absorption stops and droplets appear on the tile. As a result, the tile will always be wetted (wet effect), and during rain it will not absorb water, plus frost resistance will increase. But, keep in mind, treatment with a GKZh water repellent does not have a reverse effect, i.e. you can't remove it afterwards. The principle of operation is shown in the photo "before and after".
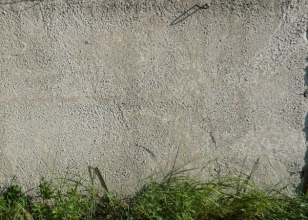 Concrete wall treated with water repellent - "to water"
![]() Concrete wall treated with water repellent - "after water"
Concrete wall treated with water repellent - "after water"
Video demonstrating the difference in water absorption of concrete treated with a water repellent.
To create the effect "after the rain" (wet stone), as well as to increase the resistance of paving slabs to abrasion, a protective compound for impregnation (treatment) of concrete is recommended - Eneclad CFS. And if you add bronze or aluminum powder to it, you can fix the desired color shade on the surface for a long time.
Of decisive importance is the way in which the tile was made - vibrocasting or vibrocompression. Handicraft tiles made by vibrocasting are less stable and wear out faster, while industrial (vibropressed) tiles will last about 100 years.
Advice. Keep in mind that a concrete (or brick) surface treated with any water repellent cannot be changed; After that, neither paint nor glue will work!
Practitioners argue that the treatment of the laid tiles with impregnations is carried out from above, but water somehow penetrates between the seams and penetrates into the “body” of the tile from the sides, the lower (rear) part.
Laying paving slabs with your own hands - video
There is one more point that I would like to draw your attention to. After all, everyone is interested in how to lay out paving slabs inexpensively.
The cost of the work will include:
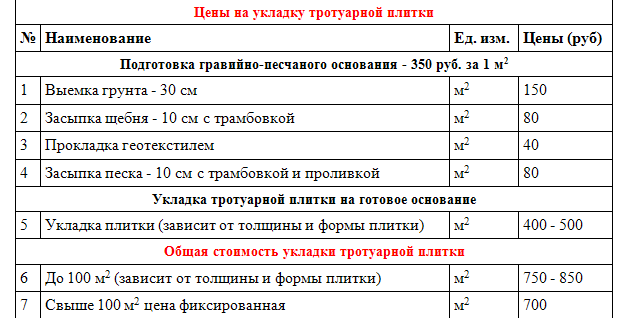
The table does not indicate prices for materials, but only for work.
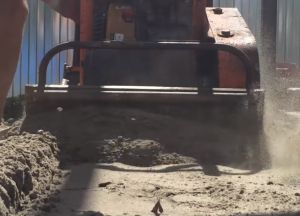
For your information, a team of four people per day can lay 30-50 sq.m. area, and a machine for laying paving slabs from 300 to 800 sq.m.


As you can see from the article, laying paving slabs is not so difficult. It is important to adhere to the rules and perform each stage as efficiently as possible.
Pavement and paving slabs are the most common. There are rules on how to lay paving slabs in the yard on your own and do it efficiently, while saving on the work of craftsmen. There are universal schemes for laying one or another type of paving. More complex tile laying options will require a careful approach, independent development of the scheme. But it is quite possible to master a novice master.
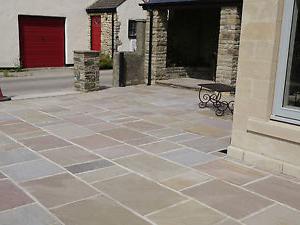
Properly laid tiles will last long years.
Ways of laying paving slabs
General rules for laying paving slabs, which must be followed, regardless of which installation method and option you choose:
- laying paving slabs is not carried out in wet weather (in extreme cases, you can make a canopy), it is best to work in cloudy, cool weather;
- it is not recommended to use sawdust for backfilling joints;
- difficult soils require a concrete pad 80 mm thick so that the base with tiles does not move, after which a layer of cement-sand mixture 40 mm thick;
- for heavy loads, sidewalk paving is carried out on a cement-sand mortar with a layer of 25 mm, applied to a reinforced concrete pad;
- in places near the gate and the porch of the house, it is better to lay the tiles on the mortar, since there the greatest load is placed on the paving;
- paths and platforms should have good drainage and a slope of 3-5 °.
High-quality paving slabs, laid with their own hands on the territory of a private house in accordance with all the rules with high-quality drainage, will serve for many years and at the same time will not lose their original aesthetic appearance.
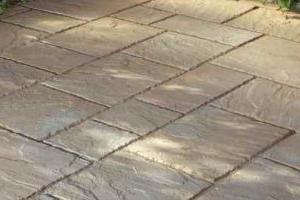
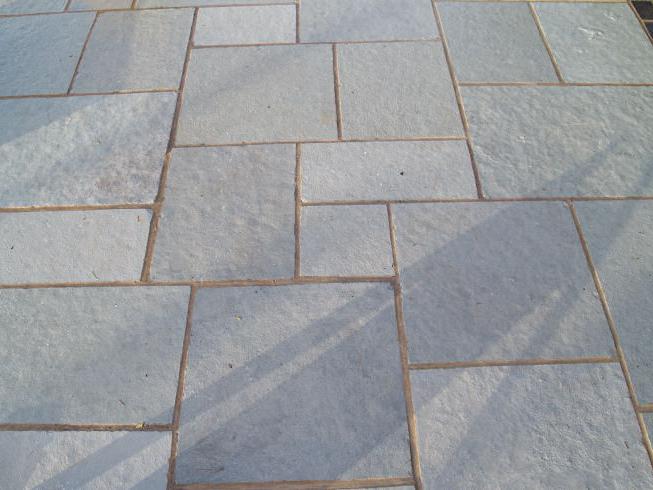
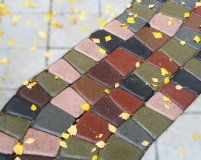
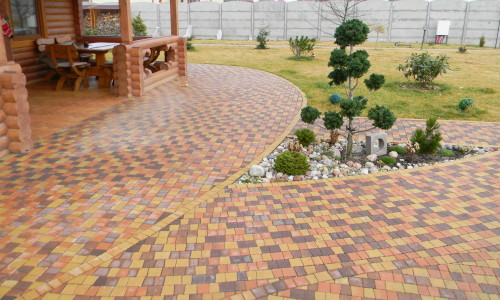
With the help, you can diversify the landscape of the backyard territory, organize paths in the garden and ennoble the yard. There are varieties of tiles with a beautiful curly shape or designed for laying out original patterns. The color of paving stone is different - from shades of gray to bright burgundy, yellow, green. By combining parts of the site with the help of paved paths into one ensemble, you can arrange a harmonious design.
As a rule, laying paving slabs with your own hands is not difficult, you just need to stock up on the right tools and building materials.
A set of tools and materials for work
For the process you will need:
- sand;
- manual rammer or vibrating plate;
- cement;
- rope;
- paving slabs;
- borders;
- rubber mallet;
- level;
- Master OK;
- broom;
- hose for irrigation with sprayer.
How to lay paving slabs yourself?
At the beginning of the improvement of the site, it is necessary to draw up a drawing of the coating and future tracks on paper, then mark the territory.
Having considered how to beautifully lay paving slabs at home on your own, you can carry out many design projects and get a practical and original coating for your backyard. Paving slabs are an impeccable coating for outdoor conditions, they tolerate winter well, have good strength and low abrasion. In addition, paving stones will be an excellent decoration of the site.
Paving slabs are ideal for finishing garden paths, areas near the house, garage or recreation area. The cost of laying paving slabs is quite high, by doing this process yourself, you will be able to save a lot. Let's talk about how to lay paving slabs with your own hands.
Manufacturing technology of material and photo of laid paving slabs
For the manufacture of paving slabs, concrete is most often used. The composition of the mixture for the production of tiles contains cement, water, plasticizers and other fillers. There are certain requirements for the manufacture of tiles, due to GOST.
In order for the tile to eventually turn out to be of high quality and serve its owners for many years, it is necessary to strictly observe the technological process of its manufacture and the dosage of materials. In some expensive tile options, there is also clay, granite chips or polymer sand.
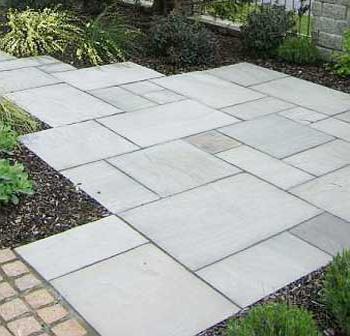
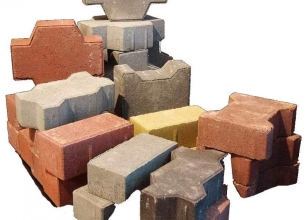
The shape of the tile depends on the preferences of the customer, it can be rectangular, triangular, square, rhomboid, hexagonal, etc. The color of the tile is determined by the coloring pigment that is part of it. Most often, tiles are produced in sand, olive, brown or beige.
How to lay paving slabs: advantages and disadvantages of the material
Paving slabs are quite popular material for sidewalk finishing. The scope of its use is quite diverse. With its help, they decorate not only alleys, parks and squares, but also private houses and cottages. This material differs not only in attractive appearance, but also in good operational characteristics.
Among the advantages of using paving slabs, we note:
- resistance to frost - the excellent quality of this material, ensuring its long-term operation;
- environmental safety - tiles are used in the production of tiles that are harmless to human body substances that do not emit toxic substances during heating;
- durability is another important advantage that ensures the popularity of this material in the finishing process, the technology for manufacturing tiles involves the use of special pressing, which makes the tile high-strength and resistant to mechanical damage;
- the tile does not need additional care, it is easy to clean and clean with water;
- resistance to moisture and other environmental irritants provide the possibility of laying tiles on the street;
- aesthetic appeal is another important advantage of this material, tiles of different sizes, colors, textures are distinguished, while it is used for both domestic and industrial purposes;
- affordable cost is ensured by the cheapness of the materials that make up the tile.

However, this material has the following disadvantages:
- the presence of seams between the tiles leads to the fact that dirt accumulates in them, worsening appearance coatings;
- ice that accumulates on tiles in winter makes them slippery;
- if you do not follow the technology of laying the material, the tiles subside in certain places, you have to dismantle it and lay it again;
- if a tile with high porosity is chosen, then moisture accumulates in it, which later destroys the material during severe frosts.
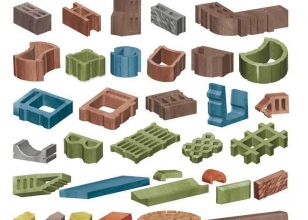
The main types of paving slabs
Before laying paving slabs on your own step by step, we recommend that you familiarize yourself with the varieties of this material, since the laying technology for each type of tile is individual.
First of all, paving slabs are solid and pressed. The scope of each of these tile options is diverse. Cast tiles are used in the process of arranging the territory in front of private houses, and pressed tiles are used in the process of finishing city parks, squares, paths, etc.
In the technological process of manufacturing tiles, the processing of a dry composition by a vibropress or vibrocasting is used. Let's take a closer look at these processes:
- Vibrocasting involves laying the concrete composition in a special form, installing them on a coating that is constantly amenable to vibration. After tamping the composition into a mold, it is removed from the surface and installed in the oven for twelve hours, held there at a temperature of 385 degrees. To improve the quality of the tiles, various plasticizers are added to the concrete composition.
- The second method of material processing involves its vibrocompression. The concrete composition is placed in molds that are installed on a constantly vibrating table. Initially, the matrix is affected by the press, then it is compacted under the influence of vibration. After giving the composition required form, the matrix rises, and the tile remains on the table.
For further use of the tile, it is necessary to wait for its complete solidification. The casting method for making tiles is cheaper and easier, it does not need additional equipment and technological processes. Therefore, cast products are distinguished by a variety of colors, shapes and colors.
Please note that a tile that is too saturated in color implies the use of a large amount of dyes in its production process. This factor negatively affects the performance of the material.

Vibropressed tile is more expensive, as its production requires specialized equipment. This version of the tile is more frost-resistant, moisture-resistant, there are practically no pores on it, however, such a tile does not differ in a variety of colors and shapes.
How to properly lay paving slabs - general information
The method of laying paving slabs depends on its purpose:
- functional - laying material on office roads, footpaths, in front of private houses in places with increased operational load;
- decorative - making beautiful patterns from tiles, original designs, etc.
In relation to the base on which the tile is laid, it should be noted:
- sandy base - needs careful tamping, is used on footpaths, is not suitable for vehicles to move along it;
- the use of a dry - cement-sand mixture, as it hardens, it contributes to the formation of a solid foundation, suitable for finishing parking lots;
- application adhesive solution on a cement basis - this method of installing paving slabs is the most expensive, but also the most reliable, the base is initially poured with concrete, then the tile is laid on a special glue.
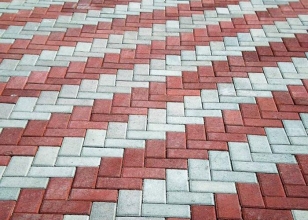
How to lay paving slabs on sand
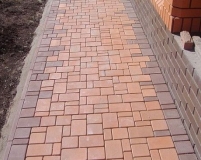
Most often, the shape of paving slabs is rectangular. There are many schemes according to which tiles are laid - the most popular of them are: herringbone, brick or laying in the form of columns. Paving slabs have gained popularity because of the ease of installation. Properly laid tiles will serve its owners for decades.
The type of base on which the tile is laid is determined by its thickness and purpose. In any case, it is initially necessary to remove the soil at the base by 15 cm, level it and equip a slope for water flow.
This is followed by the process of tamping the site with sand. For this, the sand, as it falls asleep, is moistened and well compacted. Special attention pay attention to the thickness of the material, if the tile is intended only for the movement of pedestrians, then a thickness of 2 cm is sufficient, otherwise, this value increases to 4-6 cm.
Before laying paving slabs on sand, prepare materials in the form of:
- sand, the amount of which depends on total area styling;
- paving slabs;
- border elements;
- cement;
- a conventional and rubber hammer;
- steel peg
- shovels;
- level;
- Bulgarians.
After the formation of the slope of the area of \u200b\u200bthe area on which the tiles are laid, the area should be divided into strips. However, the bar must be equal to the width of the rule. In order to divide the site, use pegs and thread. Next, the site is leveled using sand.
After that, the process of direct tiling follows. To prepare sand cement mixture, you should combine sand with cement in a ratio of six to one. Please note that the sand must be moistened. It is recommended to carry out work in the autumn-spring period. The prepared composition is evenly distributed over one lane, carefully compacted. Further, under the thread that delimits the site into zones, a steel pipe is installed. After careful leveling of the site with a sand-cement composition, tiles are laid. Install the first tile starting from the corner, carefully aligning it in relation to the markup. Tap it with a rubber mallet. Lay the second tile in the same way. Start work from yourself, thus, laying the tile, you will move along it.
If there are any obstacles on the site, it is dispensed with whole tiles, and then adjusted at the end of the work. After completion of work, the tiles are swept from sand. To fill the gaps between the tiles, the same solution of sand and cement is used in a ratio of six to one. All gaps must be carefully filled.
Laying square paving slabs is the easiest. Use a grinder and a diamond-coated disc to cut the tiles and fit them. Install borders along the edges of the tile laying. For their fixation, a thick concrete solution is used. In areas that are subject to particular stress, such as near gates, it is preferable to lay the tiles on a concrete base.
How to lay paving slabs on a concrete base
Sometimes there are situations when you have to lay paving slabs on a pre-poured concrete base. This method of laying provides greater strength of the material. Vehicles and heavy machinery can drive on tiles laid on a concrete base.
Initially, the area for laying is marked. Next, you should initially install the curbs, having previously calculated their location. If the height of the curb is about 50 cm, then it is placed in a trench of 25 cm, while 10 cm of the trench should be covered with gravel, 15 mm of the trench is poured with concrete mortar, then the curb is mounted in such a way as to facilitate the removal of moisture from the tiles.
If the base will be subjected to a high operational load, then before pouring the concrete layer, it is recommended to reinforce it. Laying paving concrete tiles should be in compliance with all technological nuances. To reinforce the surface, a mesh is used, the thickness of the cells of which is 15 cm.
For additional removal of moisture from the tiles, it is recommended to equip special drainage holes. For these goals will suit asbestos pipe, cut into sections, the height of which is about 150 mm. For one square meter one piece of asbestos pipe is installed.
This is followed by the process of preparing a concrete solution, which covers the area by 15 cm, in the event that there is no reinforcement on it and by 20 cm, in the presence of reinforcement. When pouring a large area, after three meters it is necessary to leave gaps for the expansion joint. To do this, boards are installed, then after the concrete has set, they are removed.
24 hours after pouring, the wooden formwork is removed and the drainage holes are filled with gravel. In order for the tile to hold well on the surface, it is laid on a mixture of sand and cement.
To mix them together, use a concrete mixer. The thickness of the sand layer is about 10 cm. A vibrating plate or toptukha is used to tamp the composition. Keep a slope on the surface to ensure that water runs off. A rubber hammer is also used to fix the tiles. Start work from the curb, gradually moving to the top of the site. Using a level, the surface is checked for evenness, if necessary, the tiles are adjusted using a rubber mallet. To fill the joints between the tiles, the same solution of sand and cement is used. Through these seams, moisture will enter the drainage holes and will not accumulate in the tile.
How to lay paving slabs video:


