
None of the modern attributes of the garage is in demand and appreciated as much as a good metal bench. Looking into the garage, you can at a glance evaluate and understand what the owner is worth and how much he loves locksmith work. For those who have to work with their own hands for a long time, cook or repair equipment, make automotive or household “devices”, it is almost impossible to do without a good metal workbench.
How to design a locksmith workbench with your own hands
You can buy a ready-made Chinese locksmith "miracle" or bargain for half the price of a used version of a metal workbench from an auto repair shop. Both cases are clearly stock. Neither in strength, nor in size, nor in terms of comfort for do-it-yourself locksmith work, they are suitable. And the last factor in plumbing is one of the main ones. The most realistic way to get a good metal workbench is to make it with your own hands according to your own judgment and understanding.
When making a locksmith workbench with your own hands, you need to consider several simple terms successful design of a metal workbench for metalwork:
- The height of the structure should be such that the level of the metal worktop is at the level of your navel. This means that if you come close to a metal table and put your palms on the surface, at a normal workbench height, your arms will be slightly bent at the elbows, and the hands will correspond to the level of the trouser belt;
- The scope of a metal workbench is not as serious for comfortable work as its height. Being at the middle point of the locksmith's workbench, you must reach with your hands to any of its edges, taking a half step, a maximum step;
- The most important characteristic of a locksmith's workbench was, is and always will be the strength of the locksmith structure. It is never redundant. Strength metal frame must withstand any blows and cataclysms, and at the same time not fall apart or, worse, tip over, injuring the owner.

Advice! Do not try to replace a metal workbench with a wooden locksmith, upholstered in metal.
A similar option is possible if you build a frame of a workbench with your own hands from a bar of old acacia or bog oak. In other cases, it is not necessary to count on carrying out serious plumbing work on such a table.
What should not be the metal structure of a locksmith's workbench
Rarely in which garage there is a perfectly flat concrete floor. Often, to increase the strength of a metal structure, individual amateurs manage to make a metalwork table with six or even eight metal supports with their own hands. As a result, such a metalwork treasure stands steadily on three legs, and three or even five more are in limbo. You can try to make part of the metal supports with screw adjustment of the length of the support, but is it worth it? For a stable and safe position, the locksmith's workbench must rest on four legs, giving excellent stability and maximum grip on the concrete floor.
In addition, it is desirable to lower the center of gravity of the metal workbench below the plane of the metal table top, the lower the better. To do this, it is advisable to place the heaviest and most massive tools on the lower shelves of the workbench.
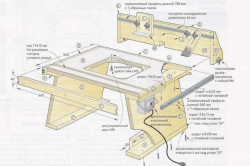
We build a metal workbench
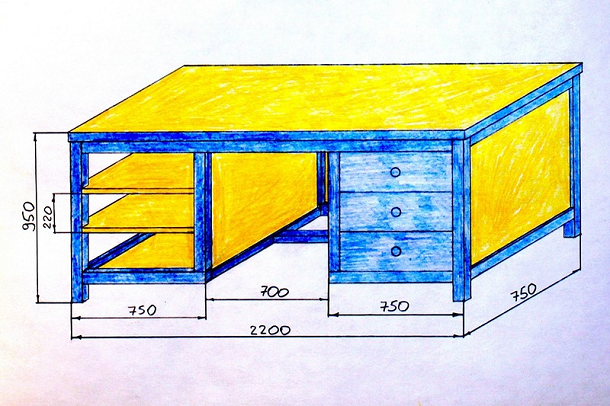
As a project, we use the usual two-pedestal design of a locksmith table on four supports and with a metal frame. We use one of the cabinets as shelves, in the second there are three drawers for standard boxes with fasteners, small instrument and all sorts of rubbish that should not be scattered on the countertop.
Design Description
The above design of a metal workbench can be called one of the simplest and most durable. At first glance, there are too many unnecessary elements in the locksmith's table, but this is a misleading impression.
In fact, the scheme of the locksmith's table is minimized to the limit. In fact, five main elements are used in a metal structure:
- Three horizontal beams made of metal profile 60 * 40 mm provide longitudinal rigidity of the table, each a little over two meters long;
- Vertical racks, 90-100 mm high, in the amount of four pieces, from the same metal square as the horizontal elements. As the material of the racks, you can choose any metal profile, preferably with the thickest wall. Even 2 mm will be enough to ensure strength, but may be weak for welding work;
- Nine small-sized beams - racks from a profile of 60 * 40 mm, from which the frames of two locker table pedestals are assembled. In addition, additional oblique steel strip braces are welded into the corners of the metal frame. Both types of parts make a major contribution to the rigidity and strength of the workbench frame, so all major welding points are thoroughly welded and reinforced with overlays;
- On the back wall of the locksmith's workbench, four vertical metal racks from corner No. 50 are welded, with a height of 170 to 200 cm. Places for attaching a working tool will be formed on these racks.
In total, the frame construction will take at least 25 meters square and 8-10 meters of a four-millimeter metal strip, 25-40 mm wide.
The design of the workbench has a low longitudinal rigidity, so the tabletop attachment plane is additionally reinforced with a corner frame. Thus, the supporting surface of the frame and the welded outer corner formed a seat for stuffing the tabletop from a 50 mm board covered with a steel sheet 750 * 2200 mm, with a metal thickness of 4 mm.
The greater the thickness of the steel coating of the tabletop, the stronger the workbench itself. But the cost of sheet metal grows in an arithmetic error from its thickness, it is quite difficult to work with such blanks due to a decent weight, and this does not bring any special advantages.
In addition, a wooden board compensates for possible deflections of a metal surface under a large static load and partly dampens vibrations of the tabletop under shock loads. Sometimes, in order to reduce the impact of shock and vibration loads on a steel sheet, a tabletop, under the boards, along the contour of the seat, a thick gasket made of a conveyor belt or similar rubber is laid with their own hands.
Such a measure does not so much reduce the load on the vertical posts, but reduces the risk of breakage or cracking of the welds during strong impacts.
Assembly work
In fact, the frame is built from only three types of elements, due to which the welding work is greatly simplified, it is simply impossible to get confused or confuse the assembly sequence. Most often, such a metal profile has an insignificant metal wall thickness of 2-2.2 mm. Therefore, to obtain the maximum quality of the seam, it is better to use a carbon dioxide semiautomatic device.
Obtaining the primary metal frame of the workbench
For amateurs with sufficient skills in welding thin-walled structures, it is quite possible to weld the frame of a workbench with my own hands using a conventional pulse welding machine. For everyone else, before assembly, it makes sense to practice or use the services of a professional welder.

First, the main frame is welded from two short and two long beams. To avoid twisting of the parts to be welded by the “propeller”, two conditions must be met:
- Lay out the elements to be welded on the most flat and even surface;
- Grab with “points” in each of the four docking nodes of the future tabletop frame;
- Gently weld all four seams on one side, turn over and repeat welding from the opposite plane.
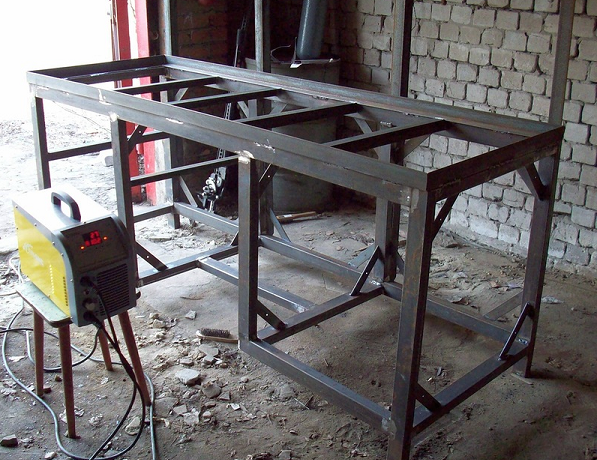
Further, the rear vertical racks and the rear third long beam are welded to the welded tabletop frame. At this stage, you need to carefully check the accuracy with your own hands. relative position vertical posts and, if necessary, bend with light blows with a light hammer.
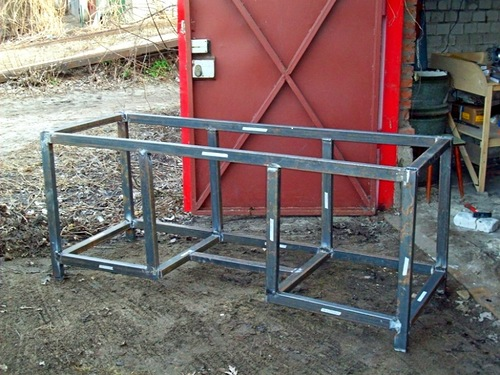
At the final stage, the remaining vertical racks and stiffeners are welded. As a result, we got the frame shown in the photo.
Finishing work of a metal workbench
At the next stage, a reinforcing corner is welded to the frame to assemble the countertop. Before laying the boards, they are treated with a fire-resistant composition. Usually, welding on a locksmith's workbench is not accepted, but impregnation guarantees and insures against accidental ignition from sparks or open flames.
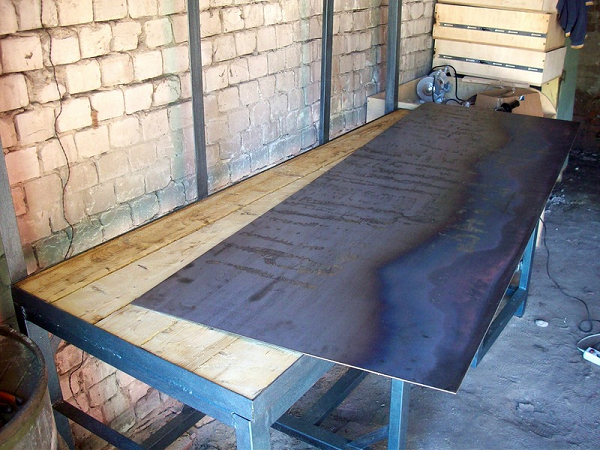
A metal sheet is mounted on top of the laid board. A plywood shield is attached to the vertical racks of the workbench with bolts, which will be used for a variety of tools.
The side walls of the frame and the left pedestal are sewn up with plywood shields, the right pedestal receives three large-capacity wooden boxes. If desired, they are quite simple to make with your own hands or replace with ordinary metal boxes.
A good locksmith's workbench requires the use of paints and varnishes to protect the metal base. The first layer is applied primer, the second enamel, resistant to impacts and the effects of greases and oils. Steel sheet The tabletops covering the boards are often not covered with paint, and after being treated with a rust converter, they are polished and rubbed with protective wax mastic.

The most problematic, from the point of view of loads, are considered to be the installation sites of metalwork vise, a set for cutting, welding and riveting steel structures. Most often, it is more convenient to place them on the left or right edge of the locksmith's workbench. The place should be comfortable and safe for work.
The next step in fine-tuning the locksmith's workbench is the organization of proper lighting. For this, two separate light sources are used. The first is used for general illumination of the entire surface of the workbench, the second lamp, as a rule, is a point portable light source that allows you to perform plumbing work with any, the smallest details.
A number of professionals recommend additionally weighting the workbench with everything that is at hand. Despite the solid weight of the metal structure of the workbench, it will be necessary to load the lower sections - the shelves and drawers of the workbench with the heaviest parts, tools and materials. This will increase the inertia of the locksmith's workbench and reduce the location of the center of gravity of the entire metal structure.
The shelves and drawers of the locksmith's workbench can be designed and built as open shelves, making it easy to find any tools and materials you need. At the same time, special doors or curtains are not used in the construction of a metal workbench.
As an alternative solution, it is possible to fix the supporting surfaces of the metal legs of the workbench to a concrete base using four anchor bolts embedded in the garage floor.
Conclusion
Let no one be misled by the finished design of a metal workbench. Very often, enthusiasts find many new great ideas to improve the design of a metal bench table and implement them with pleasure. The design of the locksmith's workbench becomes truly universal and convenient after four to five alterations. In such options, special attachment points appear for desktop machines, welding, plumbing and soldering equipment, and gas exhaust systems.
- Milling tables
- Drill bits
Today, a variety of power tools are used for home repairs and work on a suburban area. Special auxiliary devices and devices are produced for them, many of them can be made by hand. It is better to purchase complex technical devices ready-made, and workbenches, tables for a router, nozzles and much more can be made independently. Homemade fixtures for power tools can be adjusted to the required conditions.
Classification of accessories for power tools
They are usually classified into the following groups:
- Tools and nozzles for processing. These are manual devices, which include grinding nozzles and bars for grinders and drills.
- Devices that are designed to change position, set a specific cutting angle, drilling, and more. These are reference surfaces, templates, guides, and more. They may take different appearance are often made of metal or wood.
- Devices for dust extraction. Such devices are used to remove sawdust, dust, chips from the working surface. It is not so difficult to make such devices with your own hands, usually existing ventilation holes on the equipment are used for fastening.
- Grinding nozzles, blocks or bars intended for surface treatment are assembled with their own hands. For example, to polish a wooden surface or clean metal, you can use a wooden plate with a handle on top. Sandpaper of the required grain size is attached to its working side. The shape of the platform can be any, it is only important to choose the right grinding material.
Back to index
Milling tables
Devices for power tools are different, but sometimes they have overall dimensions, as is the case with milling machines and saws. It is recommended to assemble a solid table that will have everything you need for convenient and safe work. The simplest option is a milling table, made in the form of a large board with a hole for the router and guide board. The dimensions of the worktop can be different, it all depends on what kind of work will be performed. A more perfect option is a table with legs of the required height. The working and guide boards are made from chipboard. On the surface, a vice, clamps, etc. can be provided. The legs for the table are best made removable, provide a spare set.
Back to index
Workbenches for power tools
To work with many tools, the organization of the workspace is required. For a home workshop or garage, a small, compact and multifunctional workbench can become indispensable. Making it yourself is not so difficult, you just need to clearly define what functions it is needed for. It is best to make a workbench that can be used at any height, including on a table.
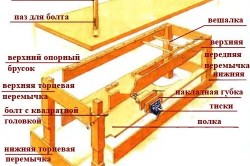
Figure 1. The main elements of the workbench.
Then the power tool can be conveniently located, change its position if necessary. For work, it is recommended to use any solid wood, a popular material is maple, which is easily processed, while possessing the necessary hardness and strength.
For fixing on the table, comfortable legs or clamps can be attached to the device.
A workbench requires a vise, they are often used in work. An example of the main elements of the workbench is shown in Fig. 1.
- How to quickly sharpen a saw?
- Planer for two persons
- Multifunctional drill
Probably, every person, at least once in his life, used home-made tools and devices in everyday life, in the country or doing a hobby. At the current level of technology development, there are a huge number of tools. They can be freely purchased at the store. But it happens that the store does not work, is far away, or simply does not have enough money to purchase.
More than anything modern man values comfort. And all the adaptations are there in order to achieve the desired level of comfort. Many tools that were bought a long time ago can still work properly. long years. They can be upgraded, supplemented with new functions and extended their service life.
![]()
Many old tools can be conveniently placed in the working area in the workshop
In any workshop where the spirit of creativity and invention lives, disorder becomes a frequent problem. It is caused by a large number of items that are out of place, and often do not even have their place. Therefore, the workshop must be equipped accordingly. There, as a rule, there is a working area and a storage area for all kinds of devices. You can make a workbench and racks for inventory and tools with your own hands. And this is what needs to be done first.
Workbench for modern workshop
The most common version of the workbench has a large, wide table top and a vise, front and back. In the classic version, everything is provided for self made. But we are interested in the possibility of placing power tools on the workbench.
We choose plywood for the countertop. It should be knot-free and at least 2 cm thick. We cut off the future countertop from the plywood sheet in size. You also need to cut out additional narrow slats, which are then glued to the countertop as sides.
In order for the workbench to be able to work with a jigsaw, it is necessary to make a guide slot.

The workbench is the central place of the work area and tools are located next to it for the convenience of work.
There are two options for workbenches. The first is designed to work in the home workshop. Therefore, you need to strive to make it not cumbersome. This is achieved due to the ease of construction. For example, the legs of the workbench can be made of metal, and the tabletop itself can be folded.
The second version of the workbench is for giving. Here everything can be made more massive. Instead of plywood and metal, boards and bars are usually used. Such a design cannot be called light, but it will be stable.
How can a power tool be adjusted? A folding part is cut out in the tabletop, to which a jigsaw is attached. It is installed upside down, so that only the file is visible. For ease of switching on, an additional switch is brought to the countertop. The folding part of the tabletop allows you to change the files and clean the tool itself.
Back to index
How to quickly sharpen a saw?
If there is a lot of work to be done, and the saw blade often becomes dull, then you have to spend a lot of time sharpening it. At home, this is often done on the knees. But you can make a small adaptation to the workbench, and then the process of sharpening the saw will not be so laborious.
Everything is done by hand. It is necessary to prepare:
- clip;
- 2 planks of wood 40 cm long and about 2 cm thick;
- 2 bolts M8.
Planks are best made from hardwoods such as beech or oak. But you can take multilayer plywood.

One bar, which will be the support, is connected to a workbench or other base. Previously, holes for M8 bolts are made in both strips. The saw in the clamp can be tilted, and for this you just need to insert a bar of the desired width between the planks.
Further, the saw blade is placed with the teeth up between the bars and, with the help of M8 bolts, is pressed. By the way, the upper part of the canvas is set to 1.5 cm for ease of sharpening. The bolts also serve as height limiters. That is, the canvas is fixed on them and will not fall below.
Back to index
Planer for two persons
Some summer residents experience difficulties with the fact that there are interruptions in electricity on their site or there is none at all. Planing boards with an electric planer does not work. It remains to operate with a hand tool. Of course, it takes a lot of time, and physical strength is quickly lost. However, for a long time our ancestors knew how to work with a two-handed planer. In our time, remembering this tool will be useful.
The tool, which can be used by two people at the same time, is much larger, and the cutting edge is also enlarged. Therefore, labor productivity is much higher. They just work with such a tool, mainly on the street.
So, a two-handed planer can be made entirely of wood or entirely of metal. Since it is difficult to create a homemade tool from metal, let's try to make it from wood.
First you need to make a body, which consists of front and rear parts, as well as side rails. All parts are interconnected so that something similar to a box is obtained, only without a bottom. Next, you need to make the sole of the planer. Here you can use one of three materials:

Drawing of a two-handed planer: 1 - “block” from a channel, 2 - bushings for handles, 3 - support angle, 4 - piece of iron (knife), 5 - clamping wedge, 6 - screw, 7 - thrust pin.
- textolite;
- getinaks;
- fluoroplast.
The sole is attached to the structure with screws, but this must be done so that the heads of the screws are hidden. By the way, the planer body is made in accordance with the existing metal knife.
The metal part of the planer or knife is sharpened and set at an angle of 40 degrees. The knife is attached to one of the walls of the base, to the back. It must be pressed with a special wedge, which is fixed with a bolt. The size of the bolt is usually M8, it should have a wide head, it is better if it is made of plastic. Then it is convenient to take hands.
The wooden base of the planer must be equipped with handles both in front and behind. The principle of operation is simple. One of the partners pulls the planer by the front handles towards himself, and the second from behind pushes away from him. Then they change. Work moves faster and the effectiveness of this tool can hardly be overestimated.


