
Metal ovens for a bath today they are a serious competitor in the market of heating appliances. They have been popular since the days when our grandparents tried to keep warm in damp houses with old ones. At that time, it became an indispensable accompaniment not only for steam rooms and baths, but also the only way to heat residential buildings and save them from severe frosts. Today, iron stoves for the home, baths and saunas are actively used in almost every country house Europe and Russia.
 The main designs of metal stoves for a bath
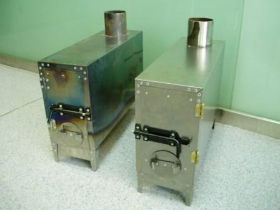 The simplest stoves of this type, in the common people - "potbelly stoves", consist of a box with a door and a pipe. Such designs give little heat and require a lot of firewood. They are unreliable, and most importantly - unsafe, therefore they are a relic of the past.
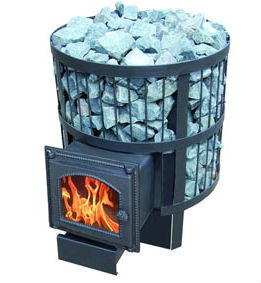
Now a metal stove for a bath is made of standard sheet iron with a thickness of about 4-5 mm. There is a special thermal chamber for stone filling. Designs may differ in the location of the water tank (usually has a capacity of 50-70 liters) - this factor depends entirely on the preferences of the owner of the steam room.
Most often, the unit is lined with refractory bricks, which allows the air to warm up evenly and reduces the risk of burns. Regardless of the complexity of the device, modern drawings of metal sauna stoves must be drawn up taking into account fire safety measures.
There are three types of designs of metal furnaces: closed, open and combined.
Closed will be convenient in family baths, due to ease of manufacture and compactness. Such a unit is lined with red refractory bricks outside and inside, which ensures the highest heat capacity. All bricks are fixed with wire clamps welded to the body. In the middle, a lattice of reinforcement is installed, on which stones will be laid.
Metal sauna stoves with an open design have a smaller tank and, in fact, an open heater. This unit quickly warms up the steam room. To increase the heat capacity, the stones can be covered with a screen cover made of galvanized sheet.
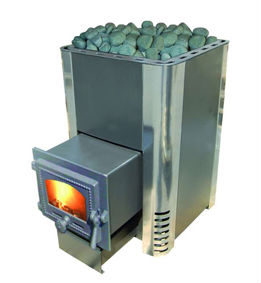
Combined ovens welded from steel sheets, the thickness of which should be approximately 3-5 mm. The unit consists of:
- Fuel tank. This is a steel box with a neck, which is designed for packing stones. It has two valves (large and small), a blower and heater grates.
- Two nozzles with a diameter of 100 and 140 mm, which have flanges with four holes for fixing the bypass elbow and pipe.
There are other metal ones too.
Varieties of metal furnaces
- Electric sauna stove
The design of such a furnace consists of a metal case, in which heating elements and heat-insulating materials are built. Often, metal ones are covered with brick or stone to give the structure a classic look.
- gas iron oven
 Metal includes in its design an iron case and a thermostat that will allow you to adjust the power. The safety of the unit is ensured by a special safety device that cuts off the gas supply in the absence of fire.
The advantages of such furnaces are economy, high efficiency and fast heating of the air.
The disadvantages include the difficulty of installation, which consists in the fact that you either have to stretch the gas line or put gas cylinders.
- Wood burning metal stove
Wood burning is the most popular option. Despite the existing flaws, a decisive role in such a massive distribution wood stoves plays a psychological factor. Neither electricity nor gas can replace the warmth of a real fire and the smell of burning wood.
But such furnaces, unfortunately, heat up slowly, while consuming more "fuel". In addition, there is a need to periodically clean the firebox and remove the ashes.
Advantages of metal furnaces
![]()
click to enlarge
- First of all, it is a fairly quick heating of the steam room (about 1.5 hours). Metal has a much greater heat dissipation than stone or brick.
- There is almost no possibility of carbon monoxide poisoning. Design features "send" all the harmful substances that are formed during the combustion of firewood into the chimney.
- When kindling with wet firewood, the room will not smoke.
Disadvantages of metal furnaces
Metal stoves also have disadvantages. The main one is high energy consumption with low efficiency.
Installation of a metal furnace
First of all, you should decide on the type of heating equipment that you want to purchase, and the material from which it is made. 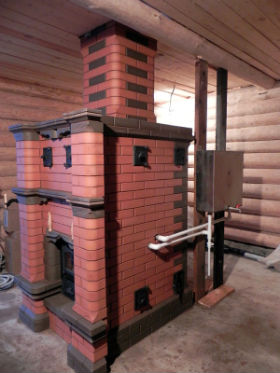 It can be made of cast iron or, for example, iron stoves in a bath of a combined design, the choice of which is undoubtedly more diverse.
There are a few general guidelines for installation.
- The stove can be located at a distance of no closer than 1 meter from the walls.
- The unit must be placed near a chimney
- The device must be placed on a massive base, which consists of refractory materials.
It is important to remember that a metal stove for a bath, the drawing of which does not meet the fire safety requirements, can cause a fire.
By taking all necessary measures, correct installation and properly used, the stove will delight you with warmth without unpleasant consequences.
Homemade metal stoves for a bath
click to enlarge
When choosing heating equipment, whether it be metal or open construction, the question of price and the amount that will have to be spent on the purchase may arise. But, if you do not take into account the limited budget for the construction of a steam room, you, for example, simply appreciated all the delights of such a unit as an iron stove for a bath. The drawings were studied, the choice in specialized stores was carefully examined. But you can't find the perfect fit for your needs. What to do then?
Of course, perfection is not achievable, but this does not prevent us from trying to “create” it. Sooner or later, you may come to the questions: how is a do-it-yourself metal sauna stove made? Will she be dangerous? Will it lose as purchased analogues?
 However, even modern craftsmen, in whom the real Russian spirit of the master still lives, calmly make such units. After all, home-made iron stoves for a bath are no worse than store-bought ones, but at the same time they will meet all the wishes of the owner. The main thing is that the manufacturing technology should be developed taking into account safety measures, namely, the tightness of the case, the absence of carbon monoxide, the use of non-combustible materials in the design. Functionality depends only on the premises of the steam room and the imagination of the "master". If you want to assemble the unit yourself, then the drawing of an iron stove for a bath can be simple and without “bells and whistles”.
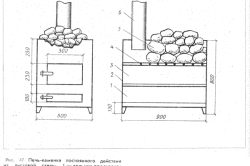
Before starting welding, it is necessary to carefully consider the plan for the upcoming work. The thickness of the metal for manufacturing is at least 10 mm. A nascent stove needs two parts: for installing a firebox and for a tank with water (for example, 0.9 m and 0.6 m). At the bottom of the heater pipe, it is necessary to make a cutout 18-20 cm wide - the future blew. A round steel plate is mounted above it. Next, a niche for the firebox is cut out, and from a piece of metal - its door, which will hang on hinges or hooks. A heater is welded above the firebox itself. 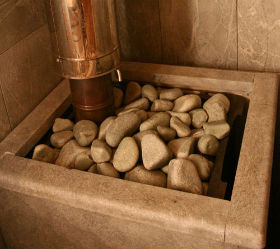 It is important that the distance from its top to the bottom is at least 10 cm. A small door is also needed here. Now comes the installation of the tank for hot water. It needs to make a hole for the chimney. During welding, it is imperative to monitor the tightness.
After installing the unit in the bath, you will be able to understand that with straight hands and the right approach, you can independently make a metal stove that will serve faithfully in the steam room, not inferior in quality to store counterparts.
Are you planning to build a bathhouse with your own hands and have already started drawing room layouts, choosing materials, and making a cost estimate? Do not forget to take into account such an integral attribute of the bath as a stove. After all, it depends not only on the insulation of the walls how well the bath rooms will warm up and what the fuel consumption will be. The choice of stove affects these parameters in the most direct way.
The question is, which stove to choose - iron or brick? Each of them is good in its own way and has its own characteristics. Although the brick heater warms up for a long time, the heat in the room can last for almost a day, the steam will be soft, the temperature is optimal. Iron, on the other hand, takes up little space, does not crack, warms up the room two to three times faster, which means that it requires much less fuel. In addition, ready-made heating appliances made of iron are much cheaper than brick ones.
However, the purchase of a finished stove is a rather impressive expense item in the construction of a bath, especially noticeable if you are building a building with your own hands, taking into account every ruble spent.
In this case, it is also more profitable to make the stove yourself. It is quite difficult to lay it out of brick, but the manufacture of this heating device from metal sheets or from an iron barrel will not cause any particular difficulties and will not take much time. Therefore, the choice is obvious - it is more profitable and more convenient to make an iron furnace on your own.
Making a sauna stove from steel sheets
The body is welded from sheets of steel 4-5 mm thick, thickened steel is taken for the bottom. There will be a firebox below. It must be laid out with red bricks “on the edge”, and support strips or rails should be placed on the walls so that gas escapes through the gaps. Between the blower and the combustion chamber there should be a grate with small holes. Through it, ash will fall into the blower, and larger coals will remain in the combustion chamber.
The inner walls of the heater are also laid out with bricks and are separated from the firebox by a cast-iron grate that can withstand high temperatures. Rounded smooth stones of various sizes are placed on the grate: the largest stones (about 150 mm) should be at the bottom, and the smallest ones (about 50 mm) should be at the top. Make sure that the lower stones do not completely cover the grate slots and that air circulates freely between the rows of stones.
Over time, the stones become covered with soot (you need to clean it off with your own hands), and then crack, and they are replaced with new ones. Do not forget to make a hole on the side through which you will pour water on hot stones.
A tank with two removable covers is installed above the heater. The water in it, like in a samovar, will be heated by flue gases coming from below. A chimney should be removed from the heater, and it is better to make it combined - install an iron pipe up to the first knee, and then an asbestos-cement pipe (an asbestos-cement pipe installed directly in the heater can crack from direct exposure to high temperature).
The chimney must be brought out half a meter above the roof ridge and covered from above with a cone-shaped cap to protect it from precipitation, leaving enough space between the cap and the end of the pipe for smoke to escape.
Do-it-yourself stove from an iron pipe or from a barrel without a bottom
Instead of steel sheets, you can use an iron barrel without a bottom or a piece of pipe with a diameter of half a meter to make a furnace. For an iron stove of this type, it is recommended to lay out a brick hearth, placing a grate inside it, which will separate the blower from the firebox. A grate is also laid on top of the hearth, a barrel is placed on it.
To prevent burning, from the inside, about half the height, it is recommended to lay out the barrel with bricks “on edge” and fill this volume with stones (large from below, small from above). On the side, you need to cut a hole and weld a door so that you can pour water on the stones. A water tank above the heater can be made by welding an 8 mm thick steel circle inside the barrel. A tap with a valve is provided on the front side of the tank, and the upper part of the tank is closed with a lid - this is where water will subsequently be poured for heating.
The chimney is installed in stones and passes through a tank of water. Its design is similar to the design of a chimney for an iron furnace made of steel sheet.
Important details:
- the place chosen for the furnace must be secured by sheathing the walls with iron sheets or overlaying with bricks. The floor is also laid out refractory material. You can not put the stove close to the walls of the bath;
- the more spacious the steam room, the larger should be the size of the firebox and the size of the hole in the heater;
- the grate lying in the furnace is exposed to high temperatures, so even heat-resistant steel will not work - choose cast iron grates;
- under the firebox there is a chamber for the accumulation of ash, or an ash pan, it is more convenient to make it in the form of a drawer so that it is easy to remove the accumulated ash without fear of getting dirty;
- stones for the furnace should not be toxic, the safest for health are soapstone, porphyrite, peridotite, basalt.
Today, the market offers a huge selection of a wide variety of stoves that can be installed in a bath: cast iron stoves, magnum baths and many other models. But so far, despite this, very often there are home-made metal stoves, most often made from a pipe. This is not at all surprising, given the combination of a set of their properties and characteristics with the possibility of making it yourself, which always brings additional pleasure with every visit to the bath.
Advantages of metal furnaces
Self-made metal sauna stoves owe their wide and almost ubiquitous distribution to their undoubted advantages, the main of which are the following:
- quick heating of the stove and the steam room in which it is installed. Metal furnaces provide the fastest heating rate of all possible alternatives. In most cases, with a more or less normal combination of the size of the stove and the steam room, it is possible to start procedures related directly to steaming already 1.5-2 hours after the start of warming up, the metal sauna stove, made by its own hands;
- low manufacturing cost. According to this parameter, a home-made bath metal stove is also out of competition. All other options are much more expensive both in making it yourself and when buying a finished product;
- sufficiently long service life of the furnace. When using high-quality materials in the manufacture of a metal furnace, its service life can be from 5 to 25 years;
- reliability and safety in operation. If the instructions and recommendations are thoroughly followed during the manufacture of the stove, the result is a design that guarantees safe operation and the absence of any danger of smoke in the premises. Moreover, this applies to both a wooden bath, and brick and all other construction options.

The advantages listed above provided by the presence of hand-made metal stoves make it easy to understand the reasons for their wide distribution and popularity.
Material for manufacturing
In order for a metal furnace to last long enough, it is necessary to responsibly approach the choice of material for its manufacture. Typically, manufacturers of finished metal furnaces use steel of the following sizes:
- for the combustion chamber - steel 1 cm thick and thicker;
- for containers for stones and water tanks - steel with a thickness of about 7-9 mm.
It is these parameters that are optimal for obtaining the most durable and durable structures. But at self-manufacturing less thick steel can also be used, for example, a sheet 5 mm thick, then the life of the furnace will not exceed 5 years with regular use.
The best option for the design of a metal furnace is a square or rectangular section of sheet steel. But this form requires a fairly large amount of welding work, which is highly skilled and cannot always be performed independently.
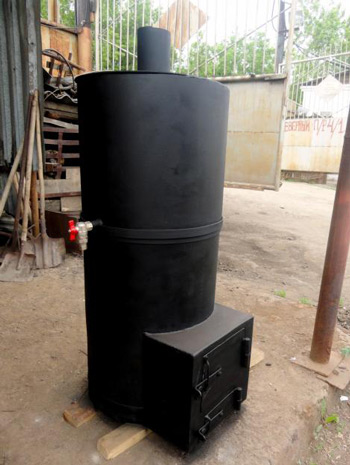
Therefore, often in the manufacture of a metal furnace with their own hands, finished pipes of various diameters or old barrels that have served their purpose are taken as the basis. Naturally, it is worth remembering the desired thickness of their walls - since this is the main factor determining the duration of the furnace being manufactured. The thicker they are, the longer the product will last. Making furnaces from a pipe is the most common option. One example of such a design is shown in the following photo.
The device of a metal furnace
Most metal sauna stoves have a fairly simple design, consisting of three main parts:


The above design is the most commonly used and typical. However, domestic craftsmen often creatively process and improve it, getting completely unique products.
Do-it-yourself metal furnace manufacturing work
As mentioned above, a metal stove-heater has a fairly simple design and can easily be made by hand.
Preparation of the required materials and the necessary tools
Before proceeding directly to manufacturing, it is necessary to prepare the materials required for the work and the tools necessary for this.
To make a small metal stove for a bath with a diameter of 0.7 m and a height of 1.6 m from a pipe, you will need:
- sheet of metal (thickness - 1 cm) 2.2 * 1 m in size;
- steel pipe (diameter - 0.7 m, length 1.6 m, wall thickness - 0.7-1 cm);
- steel pipe for the manufacture of a chimney (diameter - any from 10 cm, wall thickness - any - from 0.5 cm);
- an ordinary steel bar about 1 cm thick;
- steel or cast-iron grate (the easiest way to buy ready-made, available in almost all hardware stores);
- hecks and loops (respectively 3 and 8 pieces);
- faucet for water tank.
For the manufacture of a home-made bath metal stove-heater, you will also need a tool:
- ordinary grinder and metal scissors;
- apparatus for performing welding work;
- a variety of measuring and marking tools (ruler, tape measure, corner, pencil or marker, etc.).
After everything you need has been prepared, you can proceed directly to the manufacture of the furnace.
One of the manufacturing options is shown in the following video:
Stages of work production

The whole process of making a stove can be divided into several sequentially performed operations:
- Cut the prepared pipe into two unequal parts: 0.7 and 0.9 m.
- From the bottom of a long piece of pipe (at a distance of 6-8 cm), it is necessary to cut a hole in the shape of a rectangle measuring 20 * 5 cm. It will play the role of a blower in the finished structure. The cut out part of the pipe is planned to be used as a door, so the work must be done carefully and with maximum safety of the material. Above the hole made, another one is cut out - for loading firewood. The material is also saved and will be used as a door.
- Weld latches on the cut sections of the pipe, and loops on the pipe itself. Then assemble the doors.
- Cut a circle on a metal sheet with a diameter of 0.7 m (similar to the diameter of a pipe). Inside the circle, it is necessary to cut a hole equal to the dimensions of the purchased finished grate. The resulting structure must be welded inside the pipe slightly above the location of the already made blower. In fact, the design of the firebox is completed.
- Cut another hole up the pipe to load the stones. Using the technology described above, make and install a door.
- Make a grate for laying stones from a prepared metal rod. The step of the rod in it should be taken depending on the size of the stones that are planned to be used.
- Make a lid for a stone container by cutting a circle with a diameter of 0.7 meters from the already mentioned steel sheet. Then you need to cut a hole in it for the chimney. Its diameter is equal to the pipe prepared for the chimney. Weld the chimney to the circle and then weld it to the pipe as a cover.
- A short piece of pipe (0.7 meters long), which will be used as a water tank, must be welded to the structure already received from above.
- Cut a hole in it to accommodate the tap and secure it.
- Cut another circle in a metal sheet with a standard diameter of 0.7 meters. Then you should cut it into two unequal parts. Make a hole for the chimney in the larger one, and weld hinges to the small one, it will be used to pour water into the resulting container.
- Weld both parts of the circle on top of the structure.


