
Shelves for icons can be made from different materials. For example, wood, plywood, as well as plastic and metal are well suited for shelves.
If you decide to make a shelf for icons yourself, then the very first thing you need to decide on is the material for the future shelf.
To make the shelf beautiful, you need to draw it on paper, come up with a design, and only then get to work. The best option would be wood, as it will suit any chosen style in the interior. It can be both classic and modern.
The shelf can be single-tiered or multi-tiered, it all depends on your room, on how many icons will stand on the shelf.
The very first thing, before making a shelf for icons, is to measure it, make the necessary drawings, according to the shelf drawn on a piece of paper.
Using a pencil, we transfer our drawing to the prepared material, for example, let it be wood or plywood.
We cut out the necessary parts from the prepared material so that the surface is even and there are no rolling pins, for this it is worth taking sandpaper, thanks to which you can grind every corner. If possible, then the corners can be bypassed with a milling cutter.

After each part is cleaned, you can take on its connections. Using screws or nails, you can connect each cut part. After the shelf is ready, it can be opened with varnish or stain.
Loops are attached to the back wall, thanks to which you can attach the shelf to the wall.
To decorate the shelf, you can use carved flowers or other decorations made of wood, which are glued to the shelf with glue.
It is often said that before making a shelf for icons on your own, you should ask the church for blessings. Then the shelf turns out to be beautiful, and happiness will be in the house.
If it is not possible to make a shelf for icons on your own, then you can not only make it to order, but also buy it in a furniture store.
Just like several centuries ago, Orthodox houses are decorated Christian icons . Previously, all the icons in the house were kept on the iconostasis, it is also called the red corner or the goddess. AT modern apartments and at home, they try to place the iconostasis in such a way that it harmonizes with the room and the interior in it.
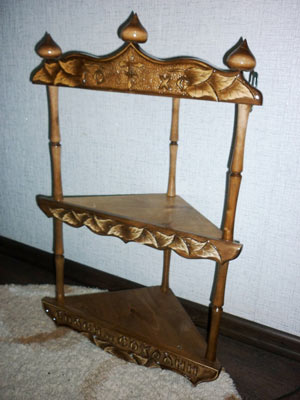
So that there is a place for icons special and beautiful, you can make corner shelves for icons with your own hands, this makes it possible to translate any idea into reality and put a piece of your own into the work souls.
By using modern materials and wood can make corner shelf for every taste. Such a shelf can be decorated in completely different ways, semi-antique or with carvings. In an icon shop or in a furniture store, you can buy any shelf for icons, but if you really want something original and unique, then of course you need to make it yourself.
Priests they say that the temple should always be open so that everyone who needs it can come to it. For believers, their housing is their own small temple, where there are many shrines and they take pride of place in the house.
What can be made shelf:
- Plywood;
- Wood;
- From plastic;
- From metal.
Icon shelves can be single-tiered and multi-tiered. Icons for the iconostasis can be attached to the wall or placed on shelves. We will consider the option of manufacturing a wooden shelf, since this material is alive and has a certain energy.
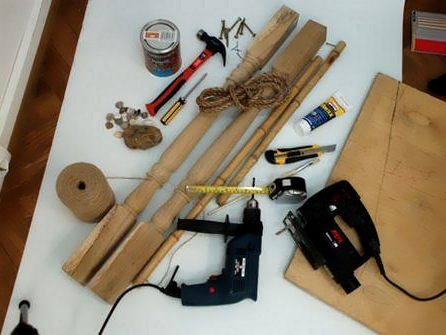
Required Tools
To make a three-tier shelf for icons, you need to prepare a tool, as well as purchase a quality material:
- Ruler;
- Pencil;
- Jigsaw;
- Milling manual machine;
- Sandpaper;
- screws or nails;
- screwdriver or a hammer;
- Glue for a tree.
Stages of work
In order for the shelf to turn out beautiful and to last for a long time, you need to do everything in a clear sequence, observing manufacturing technology.
- It is necessary to take measurements of the future shelf, to do this, measure the length, depth and width in the corner intended for the iconostasis. Making the shelf tall 70 cm, on the three sections.
- On a piece of paper it is necessary to draw a 3-tier shelf, after which it will be possible to make its drawing in detail.
- Further it is necessary with a pencil transfer the drawing to wood or plywood. If the material is dark in color, then the pencil will not be noticeable, in which case it is better to use a construction knife. For convenience, the drawing all the details need to be numbered, then do the same with the already cut components.
- With a jigsaw cut components future iconostasis.
- If possible, a manual milling machine can go around all the edges then they will look much better more beautiful.
- To avoid bumps and rolling pins, sandpaper should sand the entire surface, but only in the direction of the fibers, then they will be smooth and beautiful.
- Nails or screws all parts twist between themselves. To make it more reliable, wood glue is also used.
- Shelf if desired stained and varnish.
- Attach a corner shelf to the wall for icons, you can use large screws, or with the help of loops that are attached to the back wall of the shelf.
Good to know! For the reliability of the design, it is necessary to glue the details of the shelf with a special universal PVA glue for wood, and additionally twist with screws.
Most often, a shelf for icons is made in three rows, and there is one main row - it is called deisis. In order for the iconostasis to be correct and to protect your home and yourself, it is necessary to place the icons in a certain sequences:

The Orthodox traditions of the Slavs involve the use of icons to decorate living space. This tradition means people's desire to get closer to religion, to show deep respect for the church. The device at home of a reduced copy of the iconostasis is the placement of icons and church objects on a special shelf. According to the canons of Orthodoxy, a shelf for icons is placed on the eastern wall or in a corner oriented to the east. At the same time, it is not recommended to place anything other than Orthodox paraphernalia on it.
Consider what the corner shelf for icons consists of, how to assemble it with your own hands.
Making a shelf for icons
In order to make a shelf with your own hands, you will need wood tools: a jigsaw, a milling cutter, a lathe, a drill.
Materials:
- A board of any type of wood (from the list of construction lumber); thickness 15 mm.
- Pieces of chipboard, LDF or MDF in different sizes.
- PVA or any wood glue.
- Lacquer or wax.
- Black, gold, silver paint.
Accessories and hardware:
- Carved slats, racks in the form of balusters.
- Crucifix made of wood or metal.
- Self-tapping screws 27 and 41 mm long.
- Plugs.
- Loops.
- Wall dowels.
Where to get carved elements?
Some elements of individual production (balusters, candlesticks or carved slats) can be made independently. The crucifix crowning the shelf must also be carved. All these elements are sold by craftsmen, woodworking enterprises, you can also find them in a church shop. In addition to these details, the corner shelf for icons can have a back wall in the form of an iconostasis with carvings on plant themes, birds, and figures of the holy apostles. The top of the shelf can be designed in the likeness of the outline of an Orthodox church.
How to make bas-reliefs and balusters with your own hands
Bas-reliefs are cut out with their own hands, as well as complex patterns. To cut a crucifix, it is recommended to choose a suitable sketch. Soft wood is used for carving: juniper, pine, spruce, aspen, birch. As tools use a set of incisors. On a solid board, 15 mm thick, using a paper sketch, transfer paper, we outline the outlines and main contours of the convex parts. Now we cut out the crucifix with a jigsaw. Cutters make concave elements. The carving is carried out in layers, carefully highlighting the inner corners with a thin cutter. After everything is ready, we take the smallest abrasive mesh, skin the product, bringing it to the ideal. If you have to make bas-reliefs in segments, you need to fasten them to each other with an MDF sheet on the back side. We apply the resulting parts to the panel, draw a general outline, then cut out the margin along the edge (0.5 cm). We glue the parts of the decor close to each other, to the MDF sheet. Then carefully cut off the remains with a cutter or jigsaw. We grind the side with sandpaper.
Do-it-yourself balusters are made using a lathe. In the same way, products after carving must be sanded.
Parts manufacturing
The shelf consists of several parts: side panels, racks, shelves, sides. We take a board 125 * 15 mm. Cut out templates from pieces of MDF or chipboard. It is not recommended to use plywood, as it needs to be finalized after cutting. The following parts are needed: side panels (2 pieces), shelves, sides, fasteners.
First, we attach ready-made templates to the board. We form a detail with an electric jigsaw. We process the edges with a cutter, grind with abrasive paper. Fastening holes are pre-marked with a pencil, drilled. The side panels are done in the same way. The assembly of the shelf begins after all the details are ready, polished. As a result, the shelf should be varnished.
wall mount

The corner shelf is attached with dowels. First we attach the loops to the product. Then we attach the shelf to the wall and mark the attachment points. We drill holes with a drill and screw in the dowels.
How is the finished shelf attached?
Location requirements:
- The shelf should hang at or above the person's eye level.
- There should be no paintings or other decorative items near the icons.
- When using candlesticks, there should be no flammable and combustible materials (cloths, curtains, paper) nearby.
Additional ways to decorate
The shelf for icons is most often made of natural wood with the use of carved elements. If you can’t find carved parts and strips, you can make an imitation of carving. The effect is achieved by burning ornaments and painting their fragments with enamel. To do this, it is necessary to transfer the contour of the ornament to the surface of the side or top panel, then draw the contours with a burning device. The pattern should turn out uniform, have an identical shade for all burnt areas. Now that the contour has been applied, with an artistic brush of a minimum diameter (1 mm) we apply enamel to the areas. The paint should not paint over the contours. The product is varnished.
Corner shelf for icons is ready!
The corner shelf for icons is a necessary item in the homes of Orthodox Christians.
You can also adapt an ordinary shelf bought in a store for arranging images of saints. But a do-it-yourself icon case seems to be the best for the master.
Traditionally, wood was used to make a corner shelf for icons. It can be a flat pine board, and valuable species (bleached oak, cherry, etc.). The quality of the material will depend on appearance finished product.
AT modern world materials have appeared that imitate valuable wood species, but their acquisition will not cause difficulties or large financial costs.
Plywood or laminated chipboard is just as easy to process as a massive board; it allows you to make both openwork overlays and decorative balusters with little or no experience and special machines.
 In addition to solid wood or sheet materials, you will need:
- electric jigsaw and manual sawing device;
- drill with a screwdriver;
- self-tapping screws, furniture dowel, carpentry glue;
- sandpaper with coarse and fine grain;
- varnish or paint.
You can develop a sketch of the corner shelf for the icon yourself, using drawings and photos. The dimensions of the product must be chosen arbitrarily, based on the size of the icons and their number.
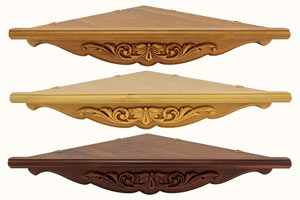
The simplest icon stand
A single-tier corner white shelf consists of only two parts: a corner element and a figured cornice (barma), which simultaneously performs the functions of a decor and a fence.
The figured contour of the cut must first be drawn on paper, then transfer the sketch to a sheet folded in half in order to obtain halves that are symmetrical with respect to the center. Draw a contour of the edge according to the pattern, cut out the pattern using a jigsaw. If desired, a corner shelf for icons can be decorated with pyrography, painting or carving.
 To create a pattern of a corner element on a sheet, you need to draw a right angle. Its sides should correspond to the size of the icon, if there is one, or be larger in order to accommodate several small images of saints, a lamp, etc.
Having set aside the desired dimensions on the sides of the corner, you should connect the extreme points with a straight line. From the resulting triangle, you need to remove a part in the area right angle so that the shelf for icons is conveniently mounted on the wall.
Drill holes for the dowel in the edge of the long side of the corner. Part of it should protrude above the edge at a distance less than the thickness of the board from which the cornice is made. Lubricate the dowel with glue and insert into the hole. Depending on the size of the corner of the dowels for fastening, there may be 2 or more.
Reciprocal recesses in the wrong side of the cornice must be drilled so that the holes do not turn out to be through. The connection is made with glue, after gluing the parts must be pressed tightly against each other until completely dry.
The simplest corner shelf for icons can be fixed to the wall with metal loops on the edges of the short sides of the triangle. You can nail planks to the wall, on which the corner element will lie. The length of the planks should be slightly less than the sides of the corner so that the cornice does not interfere with the shelf lying flat and horizontal.
Do-it-yourself icon shelf can be painted with acrylic and other paints, covered with transparent varnish or carefully sanded and waxed.

A corner bunk shelf can be made just as easily. Its difference from the previous version is that the corners are not attached to the wall, but to figured supports, which at the same time have an aesthetic function.
The back of such a shelf consists of two identical parts that mirror each other. The pattern and size are chosen arbitrarily. You can connect them with self-tapping screws or dowels with glue, laying one on the edge of the other and drilling the corresponding holes.
The shelf for white icons can additionally be decorated with cornices. For the manufacture of other corner shelves for icons, corners with a rounded front part were used. It is most convenient to fix the shelves on self-tapping screws screwed from the inside of the backs into the edge. If you need a three-tier icon shelf or more, then you can increase the length of the backs and install another row of corners of any shape and size.
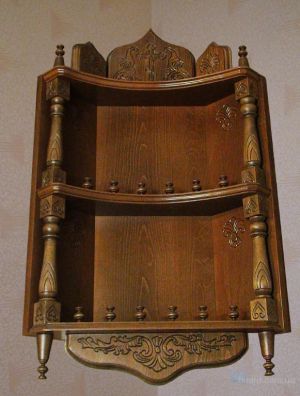
 A two-tiered corner shelf for icons looks very complicated only in appearance. Making it is not much more difficult than the previous options. The drawings will help the home master make a corner shelf for icons with his own hands in a few days, using only a jigsaw.
Thick plywood (8-10 mm) can be used for the backs, more thin material(3-4 mm). Transfer the decor drawing to a sheet of thin plywood and carefully cut it out along the contour with a hand jigsaw. From thick plywood to make the base of the backs. Side parts should be 2 pcs.
The wooden corner shelf for icons is assembled as follows:
- Sand the details of the backdrop on saw cuts and paint in a dark color.
- Cut out 8 mm plywood corners according to the scheme (2 pcs.).
- Prepared decorative overlays varnished or painted golden acrylic paint. Glue on the base of the backs.
- Lubricate the spikes on the edges of the corners with glue and insert them into the holes corresponding to them on the details of the backdrop.
The corner shelf for icons is almost ready. In the same way, multi-tiered structures can be made by increasing the number of corner elements.
A self-made shelf for icons, wooden or made of chipboard, will look neat if, after sawing the parts, process the front sections with a grinder, chamfering or rounding the saw cuts.
In the absence of such a tool, this operation can be done with a file and sandpaper. The edges can be highlighted by painting with a contrasting color or gilded.

A feature of the do-it-yourself shelf for icons is that it should not be wall-mounted, but angular, since the icons are supposed to be placed in the eastern corner of the brightest and largest room.
You can make a shelf for icons from a board, chipboard, thick plywood. You can also use old wooden shelves, window sills, or countertops for this purpose, such as the desk top that your son or daughter once studied at.
And you can buy a suitable board at a hardware store.
Single-tier rack from a purchased board
Tools and materials:
- a board made of pine, cherry or walnut 3 cm thick;
- dowels - 4 pcs.;
- wood saw;
- pencil;
- ruler;
- sandpaper;
- wood paint;
- wood varnish;
- brackets or brackets for mounting;
- 4 landscape sheets;
- tape or sticky notes.
Determine the size of the corner shelf you need (for example, the width is 420 mm, and the sides are 300 mm each), mark the canvas of the future icon shelf with a pencil and a ruler and cut out a rectangular triangle 420x300x300 mm with a hacksaw. Treat the rough edge of the shelf with sandpaper, paint the triangular wooden blank itself and varnish it on wood.
Determine the height at which the rack will be installed. To do this, measure down 50 - 80 cm from the ceiling.
The shelf should be mounted high enough, as according to the canons Orthodox Church icons should rise above the rest of the secular objects in the house.
Having determined the place for fastening, mark 4 points for the holes with a pencil: 2 points each in different directions from the corner. Roll 4 bags from the album sheets for drawing (as for seeds) and use adhesive tape or adhesive sheets to attach them under the marked points for the holes. This is necessary so that during the drilling of the walls with a drill, construction debris falls into bags, and not onto the floor. Using a drill, drill holes and drive dowels into them, hang brackets or brackets on them, mount the corner shelf.
You can also make a shelf for icons with your own hands from fiberboard (fibreboard), which is made by a woodworking plant by pressing cellulose fibers.
Back to index
Triangular hardboard shelves
Tools and materials:

- fiberboard sheet;
- jigsaw;
- sandpaper;
- pencil;
- ruler;
- veneer treated with glue;
- veneer thermal tape for the edge;
- hot iron;
- 4 metal hinges, equipped with self-tapping screws;
- drill;
- 4 dowels.
On a sheet of fiberboard, draw a rectangular triangle measuring 380x280x280 using a ruler and a pencil. Cut out with a jigsaw. Sand the edges with sandpaper, especially carefully on the edge of the wide side.
Take a sheet of veneer. It is more convenient to buy veneer already treated with glue and covered with a film on top. If you purchased an unglued veneer, then you additionally need to purchase a special hot melt adhesive. On a veneer sheet, draw a right-angled triangle of the same dimensions as the fiberboard triangle, that is, 380x280x280 mm. Cut it out with a sharp knife. Remove the film from the veneer triangle and use a hot iron to glue the veneer onto the fiberboard triangle.
In the same way, using a hot iron, stick veneer thermal tape on the edge of the wide side of the triangle.
Masters who masterfully use a jigsaw can cut a patterned frill from veneer instead of thermal tape and stick it on the edge of the wide side of the shelf.
Attach 2 loops on each side to the legs of the resulting triangular rack using self-tapping screws.
On the corner wall Mark out a place for the shelf and use a drill to drill 2 holes on each side of the corner. Drive in the dowels and hang your shelf on them.


