
The excellent work of modeling masters can encourage you to learn something new for yourself. With the help of improvised means and polymer clay, craftsmen are able to embody original ideas that delight connoisseurs of creativity.
How to learn to sculpt with polymer clay? Need to be inspired!
How to start doing miracles?
To get started, it is worth getting acquainted with the basic material. Polymer clay is a plastic material based on polyvinyl chloride, which allows you to create products self made. In addition to PVC, clay contains plasticizers that provide flexibility, and dyes. The material for modeling can be of two varieties:
1. Clay that hardens immediately after sculpting.
2. Clay that needs to be baked in an oven to harden. It will be more convenient for a beginner to start with the second option, since he does not yet have the necessary skill, which appears over time.
For baking the molded product, the temperature is from 110 to 140⁰C and the time is about 30 minutes. More heat will cause the clay to melt, releasing toxic substances. Therefore, do not forget to carefully ventilate the kitchen after baking polymer clay.
Examples of polymer clay works can be:
Women's jewelry (rings, earrings, bracelets, beads);
New Year's toys;
Talismans, key rings;
Souvenirs (flower bouquets, miniature animals, vases).
Sculpting tools
Modeling from a polymeric material is a delicate work, it requires a deep thought over of the final result and is not complete without tools.
1. Stationery knife for cutting small parts.
2. Thick needle or wooden toothpick.
3. Acrylic paints and a brush to give the product expressiveness and make it realistic.
4. Fine-grained sandpaper to sand the surface, smooth out the bumps.
If you plan to devote a lot of time to modeling and make it your craft, then along with clay you can purchase a professional set with stacks, rolling pins and molds.
Hello dear readers. In this article, you will find out the answer to the question,.
Bold statement? Is not it? Of course, after reading one article, you will not become a master of modeling, but you will find out the answers to questions - what you need for modeling and where to start.
First, before you start the sculpting process, you need to prepare. To do this, go to the nearest stationery store and buy yourself and a modeling board. What plasticine to buy? I will tell you more about this sometime in a separate article, but here I will advise you to choose a set of 12 colors from manufacturers such as Gamma, Luch and Kalyaka-Malyaka. Why these? Just in our stationery store, they don't sell others.
In addition to plasticine, we still need a modeling board. It comes in different types. Basically, A4 and A3 plastic boards are now sold in stores. The A4 format is smaller and it is the size of a regular landscape sheet, but A3 is twice as large.
Therefore, I recommend purchasing a larger modeling board so that there is room to turn around. If there is no particular desire to buy, then as a board you can use, for example, a sheet of plywood, pre-cut into the size you need and processed along the edges. That was exactly what happened in my childhood.
There is plasticine and a board. What else? We still need special sticks called stacks. You can find them in almost any set of plasticine.

A stack is a small stick used in the process of modeling clay or plasticine, with an extension at the end in the form of a straight, pointed, rounded spatula or other shape. The stack can have one working end or two - from both ends of the tool.
Even when sculpting, matches and toothpicks will come in handy. These elements are indispensable for fixing various parts of our plasticine crafts and figurines. But since matches are not a toy for children, and even more so sharp toothpicks, their use is ONLY under the supervision of parents.
>
We are ready for molding. Now you need to take a piece of plasticine and break off a part from it. Hold it in your hands for a bit and make a ball and a roller out of it - these are the main initial forms of plasticine from which various figures and crafts are later obtained. In addition, you can try to mold other forms.

Learn how to make a ball and a roller, then consider that you have already learned how to sculpt from plasticine. If you have any difficulties with the initial elements, then visit us at, watch the lessons and learn how to sculpt from plasticine. The main thing is that there is still a desire and then you will certainly succeed.
That's all for today. See you again.
There are a great many: one of them is working with plasticine. This universal tool will help kids master the simplest elements, from which they will later learn to make a variety of figures.
A large assortment of plasticine will allow you to choose the one that is suitable for creativity for young children. Pay attention to such features:
- plasticine should be soft and plastic;
- without fragrances;
- leave no traces on the hands;
- do not delaminate when sculpting.
If you chose this one, then it's time to get creative! Prepare a plastic board for work: it will be convenient for both the child and you to roll out plasticine on it.
Step # 1: Choose the color of plasticine that the child likes the most
Even at a tender age, children already have favorite colors. Invite the baby to choose the shade of plasticine with which he will start working.
Step number 2: learn to knead the plasticine in your hand

Preheat the mass in your hands to make it more pliable. When the plasticine becomes obedient, it will be easier for the child to knead it.
Step #3:show how to pinch plasticine correctly

Teach your child to pinch off small pieces of plasticine. Toddlers strive to do nails. Demonstrate by example until the baby understands how to do it right.
Step 4: roll into balls

For children, this task may seem difficult at first. Therefore, you need to show several options for rolling balls:
- between the index and thumb - if the piece of plasticine is small;
- between the palms - if the piece is larger.
Step #5: How to flatten the balls into "pancakes"

Ready-made plasticine balls are a semi-finished product of "pancakes". Show your child that easy movement with which he will turn the ball into a cake - with a simple press index finger.
Step 6: Stretch Playdough on a Sheet of Paper

In addition to the plastic board, you will also need a sheet of paper. Heat the plasticine in your palms. Together with the child, tear off pieces of different sizes and lay them out on a sheet. And then stretch it with your index finger in different directions - smear it on paper.
Step number 7: learn to make flagella

This is a rather complex process that children may not master right away. So be patient! This is where previously acquired skills come in handy. Together with the child, pinch off a piece of plasticine, then roll a ball out of it. After that, hold the ball between your index and thumb and start rolling. This process can also be done on the board. And before the eyes of the child, the ball will turn into a flagellum. The longer you roll, the longer and longer it will turn out.

And what can your child sculpt from plasticine?
More
Traditionally, plasticine modeling is perceived as an activity for children, but people of all ages can draw not only pleasure for themselves in this hobby, but also benefits.
If you still think that only short-lived trinkets are plasticine, look at this material in a new way. You can sculpt souvenirs, decor and even paintings. Having studied the theory, be sure to move on to practice. The cost of a box with multi-colored plastic bricks is more than acceptable, you will not lose anything if you do not like it.
The benefits of modeling for kids and adults
Modeling classes in many countries are mandatory included in the programs of kindergartens and schools. It is proved that working with plasticine:
- promotes the development of fine motor skills;
- improves coordination of movements;
- teaches both hemispheres of the brain to work simultaneously;
- develops imaginative thinking;
- reveals creative abilities;
- makes an active child more assiduous;
- increases attentiveness;
- introduces flowers and the possibility of obtaining new shades;
- normalizes the emotional state, which is especially important for;
- improves speech;
- helps in the future to quickly learn to write and draw.

Creative experiments with plasticine do not reduce self-esteem, since any failed craft can be easily corrected or turned into a new, no less beautiful figure. Modeling teaches you to achieve goals and achieve results.
There are also indirect benefit- children are distracted from TVs and computers, which means that in the process of classes, their eyes rest. If you teach a child to sculpt from plasticine in the evenings, he will calm down before going to bed and sleep peacefully at night.
For adults, modeling is no less useful. Doctors recommend kneading plasticine and sculpting simple figures for people who have experienced a stroke, who have noticed memory impairment and impaired coordination of movements. It is known that there are many reflex zones at the fingertips, the massage of which improves the condition of the body and the functioning of the autonomic nervous system.
Adults automatically start fiddling with something in their hands during stress, crumpling paper or clenching their fists. To combat outbursts of anger, they came up with “gum for hands” - an alternative that does not stain the palms.
Types of plasticine for children's and adult creativity
Do not rush to go to the store for a package of plasticine, so as not to get confused in front of the showcase, study what types are and how they differ.
What is classic clay made of?
Well-known to the older generation, classical plasticine appeared at the end of the nineteenth century. As often happens, different people in Germany and Great Britain came up with the material for modeling at the same time. The composition of the mass was based on natural clay, wax and fats.

The composition of the classic modern plasticine for children includes:
- kaolin (white plastic clay);
- paraffin or wax - natural plasticizers, due to which the mass softens from the heat of the hands and freezes in the craft;
- fats of animal or mineral origin (hence greasy stains on paper and clothes);
- ceresin - a waxy substance from a mixture of solid hydrocarbons;
- coloring pigments.
The composition of different manufacturers differs depending on the brand: M(soft) and T(solid). To obtain the desired properties, zinc white, sulfur, rosin, machine oil are added to the mass.
In sets of plasticine for modeling there are a different number of colors. To get started, you can buy a package in which twelve multi-colored bars. For complex crafts, you need kits that include at least sixteen shades.
Plasticine made from clay is relatively hard. To make the mass plastic, you need to knead the piece for some time in your hands. It is at this stage that modeling brings the most benefits, but it is difficult for babies and people with poor health to achieve a result.
Wax mass for modeling
For children's plasticine modeling, it is better to choose soft and safe wax-based materials. Plastic wax clay does not require long kneading and is almost immediately ready for use. It is also easier to fasten the parts from the wax mass together, it is enough to press them against each other.
In addition to wax, the composition includes paraffin, stearin, dyes, plasticizers, and other additives. If the manufacturer did not use harmful substances, such a product will not cause allergies and skin troubles.

However, wax plasticine is capricious in storage, afraid of warm air and the sun. Such crafts are less durable. For kids, this is an ideal choice, but for adults, it is better to take a different type of plasticine so that the painstakingly created beauty will please you for as long as possible.
Sculptural clay for durable crafts
Sculptural plasticine for modeling is chosen not only by amateurs, but also by professionals, including students of art schools and future sculptors. The main difference between the material is plasticity; it is possible to create miniature parts from it with high precision and clarity.

A product of this type is created on the basis of beeswax, natural clay, talc, plasticizer oils. As a rule, the mass is not dyed in bright colors, but natural shades are left. Thanks to this, you can sculpt realistic sculptures, masks, figurines. If you need bright crafts (culinary miniatures, toys, jewelry), it is not difficult to color them.
Bright balls for children's creativity
Plasticine balls look like small multi-colored peas or millet groats. The material is based on miniature foam balls glued together with invisible polymer glue. During the sculpting of the figure, the ball structure is preserved. Children love to sculpt from bright balls. The mass easily takes the desired shape.
Ball plasticine happens fine-grained and coarse-grained(diameter of one ball is more than 1 mm). Depending on the adhesive substance, the material is divided into curing and reusable. The first one gradually hardens, suitable for souvenirs and jewelry. The figure with non-hardening glue, if desired, is easy to disassemble and create something else.

Styrofoam balls can be used in combination with other types of plasticine. The result is original toys, mouth-watering miniature food and much more.
Unusual novelties with different properties
Manufacturers continue experiments, as a result of which new modeling materials appear on the shelves:
- Fluorescent plasticine crafts glow in the dark, gaining light during the day. From this material, interesting figures are obtained for the interior of a children's room and New Year's toys.
- Mother-of-pearl plasticine is convenient to use to highlight individual details. For example, for sculpting a dress for a doll or a parrot's tail.
- Rubber plasticine is very elastic, stretches and bends in any direction without breaking. But if you bake the finished craft, it will become durable and monolithic. Suitable for practical toys and jewelry - not afraid of water and does not beat. You can make flexible and monolithic crafts - the question is in baking.
- The polymer mass for modeling is based on polymers and plasticizers. The material does not require baking, the products harden in the air and become durable.
- Plasticine soap was invented for creative natures. In fact, this is a soap base from which you can sculpt using the usual technique. Water is used to connect parts. Ready soap can be used for its intended purpose.

- Edible plasticine is ideal for children's creativity, as it is absolutely safe. The main ingredient is confectionery marzipan. it best material for modeling culinary miniatures, fruits, exotic food.
- Gypsum-based self-hardening plasticine is a professional mass for modeling, from which you can create sculptures, souvenirs, panels, stucco, decorative dishes. Products do not need to be baked, they harden in the air.

If you want to try modeling different types plasticine, look for kits that include several materials and tools for working with them.
How to make mass for modeling with your own hands
If you do not have the opportunity to buy plant-based clay, make your own mass for modeling. Available homemade material - salty dough. The hardening of crafts lasts a long time; drying in an oven at low temperatures is used to speed up the process. Dough Recipe and Process Basics.
Play dough can be easily colored by adding food colorings or the juices of colorful vegetables and fruits, such as beets and spinach. Finished products are painted and varnished, making them durable and resistant to moisture. Salt dough makes beautiful toys, fridge magnets.
Another simple homemade plasticine can be made from starch and hair balm. Just mix half a cup of potato starch with ¾ cup of balm, knead well, add dyes. Of course, it’s not worth spending an expensive conditioner on this, and if the new balm doesn’t suit your hair, then dispose of it.
Sculpting technique and tools
If you just put a package of plasticine on your baby, a miracle will not happen. It will take some time to young master fell in love with unfamiliar art.
Basic techniques and general rules
Experts recommend introducing children to modeling from a year and a half, but only under adult supervision and choosing a safe plasticine. For the smallest sculptors, wax is suitable - it is on a natural basis and easily warms up without requiring effort.

Do not rush to show your child crafts - even the simplest ones will seem complicated to him. Start by mastering the basic techniques. Show how to tear off pieces, roll up sausages, balls, koloboks and cakes. Please tell me how to connect them. Learn how to get a different shade from two different colors.
Later, move on to recognizable figures, choosing the simplest ones. Let it be the simplest flower, the sun, grass, bagel, ladybug. Gradually complicate the task, teach how to use molds and tools for reliefs. At this stage, step-by-step lessons with photos will be a good help. Take our or as a basis.

Adults and the elderly, who have forgotten with age how to sculpt from plasticine, should also not immediately take on complex work. If we are talking exclusively about the therapeutic effect, for example, after a stroke, then let the person simply work with the mass, kneading it in his hands.
If you decide to master a new hobby, not only for the sake of benefit, but also for aesthetic pleasure, start with simple figures or panels. After practicing on children's instructions, try creating. This is not a shame to hang in the living room.

What tools are needed for sculpting
To create beautiful crafts from plasticine, one hand is not enough, special tools are needed. The most necessary manufacturers may be included in the kit, and additional ones must be purchased separately.
Modeling board protects the table from soiling materials and simplifies flattening, rolling sausages, forming various figured parts. Boards are made of plastic and silicone. There are completely smooth, and there are with a partially corrugated surface to create texture. An ordinary cutting board will not work, as the material does not stick to a special one.
Knives for working with plasticine are designed to divide the block into pieces and remove excess. Also, with their help, you can give reliefs to crafts and apply simple patterns. Knives are made of plastic, wood, metals. The blades are smooth and figured, linear and disk (as for pizza). Sharp blades are not needed here, the main thing is that nothing sticks to them.
Ruler useful for measuring details. Not everyone can determine the proportions by eye. An ordinary plastic ruler 10-20 cm long is suitable for work. A compass and a protractor may be required to get an even circle and the desired angle.
Stack- an important assistant, without which it is better not to start modeling from plasticine. Reliefs and recesses are formed in stacks, material is applied to surfaces (for applications), drawings are created. Stacks come in many forms:
- for pinpoint dents, you need a tool with a ball at the end;
- for smoothing the surface - with a spatula;
- for patterns - with a thin sharp tip;
- for relief - with teeth like a saw.
For children's creativity, it is better to purchase plastic stacks, although they can break, they are safer and lighter.

rolling pin- A very useful tool for sculpting in more complex techniques. A rolling pin is needed to roll out plasticine into an even and smooth layer. Such details are relevant when creating panels, paintings and postcards. For starters, you can use a small glass bottle. If you pour warm water inside, the material will soften faster.
Molds- These are tools that facilitate the creation of textures. By pressing the mold to the plasticine blank, it is easy to get a neat figure. Molds are convenient for modeling small flowers, leaves, berries from plasticine in large quantities. To make the perfect leaf of a tree by hand, you will have to not only painstakingly remove the veins, but also study the structure of the leaf.
texture sheets needed to quickly add texture to plasticine pieces and rolled layers of different sizes. With the help of textured surfaces, it is easy to get both a small detail for the application and the background of the picture. For example, sea waves or sandy beach.
In addition to special tools for modeling from plasticine, you can and should use improvised means. Look at home for beautiful textured buttons, corrugated perfume bottles, coins. Cookie cutters, stencils and other unexpected things come in handy.
The subtleties of modeling and useful tricks
Classic plasticine is capricious in work. Its plasticity depends on the ambient temperature and freshness. Before sculpting, the piece must be well kneaded in the hands until the mass begins to give in to molding and sticks together well.
To soften too hard plasticine, place it in a waterproof container and dip it in warm water. For example, you can put the pieces in a glass jar, which you then put in a pot of hot water.
Another problem is that it is difficult to cut out small details from a too soft plasticine sheet. Here you need to do the opposite - place the bar in the refrigerator for a short time or drop into cold water in a waterproof bag.
With all the plasticity, plasticine parts do not always succeed in firmly connecting to each other. To prevent the head of the puppet theater toy from falling off, use matches or toothpicks to fasten it. If the part is bent, you can strengthen the fastening with thread or fishing line. Only do not use needles! This is dangerous!
Plasticine goes well in crafts with other materials, including natural ones. Add cones, acorns, pasta, small toys. See what you can do with your own hands from sea stones.

Most types of plasticine are afraid of contact with air. To prevent drying out, store the leftover product from the master class in tightly closed plastic boxes. The stores sell boxes with compartments for different colors.
Even if the hands after sculpting seem clean, they must be washed with warm water and soap. Do not forget that the composition contains not only herbal ingredients.
What to mold from plasticine: step-by-step MK for children and adults
So that you don’t have time to “cool down”, we suggest that you immediately go to our plasticine modeling workshops for children. different ages and adults. We have prepared instructions of various levels of complexity, so that everyone can find a craft according to their strengths and talents.
Thomas Aquinas defined man as a being with brains and hands. “The greatest joy is when we can use our brains and hands at the same time in a way that is creative, useful, and productive.” Modeling from plasticine is a time-tested, extremely stimulating and useful activity for the development of a child.
Modern types of plasticine
Plasticine, or rather a composition resembling plasticine (plastichina), has been used by sculptors since medieval times to perform mainly sketches and preparatory work for (smaller) sculptures, and is mentioned in the Lives of Illustrious Painters, Sculptors and Architects by Giorgio Vasari. The material traditionally consists of beeswax, which is often replaced by mountain wax (ozocerite), fillers (clay powder) and plasticizers (animal fats, vegetable oils, glycerin). Microcrystalline wax is the basis of plasticine, providing its "body".
Plasticine is a material with special properties that make it practical and useful in preschool education. Unlike clay or wax, it remains soft and workable (does not harden or dry out).
Several plasticine formulations with similar properties have been developed since the 1800s:
- An oil version of the "Kunst-Modellierthon" (known as Plastilin), invented by Franz Kolb in Munich, in 1880. This product is still available today as "Münchner Künstler Plastilin" (Munich Artists' Clay).
- A similar product was invented in England in 1897 by the artist and art teacher in Bath, William Harbutt. It consisted of 65% filler (mostly gypsum), 10% petrolatum, 5% lime, and 10% lanolin and stearic acid. In 1915, Harbutt patented another formula that added wool fibers to give the material a stronger composition. The Harbutt Company, owned and operated by Harbutt's descendants, continued to manufacture the material as a children's toy at the Buthampton factory until 1983.
- In Italy, Pongo is sold as clay and shares its main characteristics.
- Plasticine is a trademark of Roma Plastilina; the formula is 100 years old (Plasticine Roma contains sulfur).
- In France, sculptural clay is produced by J.Herbin, and sold as Plastiline.
 Professional sculptural clay or sculpting clay is any of the plastic materials used in modeling and construction. Their composition and production processes may differ significantly from manufacturer to manufacturer. Oil-based material is made from various combinations of oils, waxes and clay minerals. It is compatible with all silicone rubbers, even polyadditive silicone rubbers (whose catalysis is inhibited by the presence of sulfur). Thanks to these characteristics, sculptural clay is used in the art sector for the production of models and sculptures, in the field of special effects and in industrial prototyping.
How to sculpt from sculptural plasticine? The special composition allows it to be molded at room temperature by hand, to create sculptures of any size with realistic details, with the help of tools (stacks, spatulas, modeling knives, etc.) to draw clear lines. A large figure molded from material can be reinforced with a metal core. To make the surface of the sculpture as smooth as possible, the master can treat it with a pad soaked in limonene or turpentine essence.
Modern types of plasticine are represented by a large assortment:
- wax-based plastic material;
- floating (very light plasticine, which allows it to stay on the water);
- fluorescent, mother-of-pearl;
- ball;
- smart plasticine: based on silicone polymers with amazing physical properties. It bounces, can flow like a liquid, but breaks on a sharp blow.
 For the production of modern types of plasticines, some high-tech materials are used, including polyvinyl chloride suspended in a plasticizer. Technically, such a modeling material is called polymer clay. When cured, it melts into a very hard plastic. Polymer clay impresses with its versatility. It can be sculpted, cut, stamped, textured and even sanded.
In order to be able to give it a shape, liquid and pigments for color are added. It is difficult for small hands to manipulate this material, at least at first. But the more you work with polymer clay, the easier it gets. Polymer clay can be baked in the oven to shape it. But it is one of the most expensive sculpting materials and its use is limited to small sculptures.
 Several companies produce light or air plasticine or light self-hardening mass (clay) for modeling - a non-toxic, air-cured material made entirely of natural ingredients. Lightweight, soft to handle, the material is perfect for making toys, vessels, jewelry, reliefs and sculptures. How to sculpt from light plasticine? It typically dries at room temperature within 24 hours, or possibly a few days, depending on climate conditions, model size, and thickness.
How does modeling affect the development of a child?
Plasticine modeling is an exciting art activity that is not just great entertainment for children. Her goals are much greater. The possibilities of the material as an art project are diverse and important for the social, cognitive, emotional, physical development child.
Health and emotional background of the individual
Playing with plasticine is one of a number of sensory games that play an important role in the development of the child. Sight, smell, hearing, touch, taste are all included in the sensory game. In fact, this is not only touch, sensory exploration is a way for a child to explore, discover, classify and comprehend the world.
Playing with clay contributes to the development of fine motor skills in a child. In modeling lessons, small muscle groups on the fingers, hands and wrists of babies are trained, strengthened, helping to facilitate the process of learning to write. The control over the movements of the fingers used in clay modeling is in fact the same as the ability to hold a pen and write with it. Without well-developed fine motor skills, a child may have difficulty not only with learning to write, but also with other tasks, such as turning the pages of a book, cutting, drawing, squeezing glue out of a tube, tying shoelaces, closing zippers.
 Sculpting calms the child during an "emotional crisis" - helps to resolve internal discomfort, whether it be boredom, anxiety, or another type of arousal. Creating figurines, be it a bunny or a kitten, or any other animal, makes it possible for kids to feel competent and proud of their achievements (“I can roll out”, “I made a smesharik”). During modeling, children communicate with each other, describe what they are doing and how, observe the actions of their comrades and compare actions and objects, which teaches interaction with each other, joint actions.
Mental and personal development
Through playing with plasticine, children express their ideas, satisfy curiosity, analyze and solve problems, and learn symbolic thinking. Playing with plasticine, children listen and talk with peers or adults, which helps them expand their vocabulary as they describe their actions, make up stories about their creations, use ideas from books that they read with their parents, refer to what they see in Everyday life.
Psychologists say that children live to play, they learn to understand the world through play. When they play, they explore, control or change their environment, learn to focus on something - all of which provide a preparatory stage for subsequent academic achievement. The education of a child depends very much on his ability to feel and touch.
 The most important aspect is the quality of the material. For babies, very soft plasticine is needed. If it is inconvenient for a child to sculpt, then his interest in such an activity will pass very quickly. Sculpting tools:
- board for modeling;
- stacks;
- rolling pins, including those with patterns;
- moulds.
The creative possibilities of plasticine are endless, which allows the child to spend a lot of time with the material, play with it and not be bored. It also encourages imagination. The material allows parents and children to create stories, characters, animals and geometric shapes.
How to teach children to sculpt?
Emphasizing the importance of the individuality of a small person, many parents and teachers are of the mistaken opinion that given the texture of a material such as plasticine, a small child will learn and create a sculptural object on his own. A great idea, but sadly not the case, and is mostly up to parents and teachers to provide adequate stimulation or motivation based on the child's own experience.
First of all, when we sculpt from plasticine with children, we teach how to form their basic forms:
- egg (ellipsoid);
- hemisphere;
- cake;
- sausage;
- cylinder;
- cone;
- brick;
- tourniquet;
- spiral.
After they master these forms and names for each of them, it is easier for us to give instructions on how to sculpt figurines, animals, fairy-tale and cartoon characters, for example, fixies, and so on, then gradually move on to compositions. The child, depicting the volume of an object (and its other features), gets an idea of such a concept as proportion. Modeling, for example, a snowman or a smeshariki, the child understands that the object is round and to create it you need to roll balls. Thus, the ability to generalize objects and form is developed.
Age 2-3 years
 This age group gets excited when they see bright plasticine and what can come of it. What do we sculpt from plasticine with children 2 years old? Small explorers can be offered simple art objects; blind, for example, a bright green-brown caterpillar.
- Cut out a leaf shape from a sheet of white paper. We ask the crumbs to color it.
- Together with the baby, you need to make balls from green and brown plasticine, which we collect together.
- Let the baby try to roll two or three balls and connect them independently.
- Using yellow and black plasticine, we make the eyes and mouth of the caterpillar on the first ball, roll out two small sticks for the antennae from red plasticine, which we place on the head.
We place the molded caterpillar on a form cut out of paper so that it seems that it is crawling along the sheet. It is important to comment on the modeling process, it is useful to accompany it with songs, rhymes or interesting history corresponding to the topic.
What do we sculpt from plasticine with children 3 years old? They already have a certain linguistic dictionary and you can teach them to sculpt Smesharik, Losyash, Krosha or Nyusha, explore such a shape as a cone and make ice cream out of plasticine. Other modeling ideas: any animal, hare, cat, even a beetle or spider; food, such as a fruit platter or pizza.
Modeling in this age group is usually given no more than 20 minutes.
Children 4-5 years old
 At this age, children are actively interested in the world around them. Modeling from plasticine is a great way to develop kids and, for this age group, it can already be divided into an object, a plot (a logical composition of different figures), decorative features. When a child forms a figure, he actively uses his imagination.
What do we sculpt from plasticine with children 5 years old? Ideas:
- mushroom meadow (a sheet of cardboard will serve as the basis for placing the composition);
- lawn with a lake;
- fruit basket (make a small basket of flagella, then fill it with tiny fruits using basic shapes and plasticine of different colors: apple, melon, banana);
- fabulous house with tiny furniture;
- a composition with “fake snow” (made of cotton wool) and “fake ice” (made of foil), in which fur seals or walruses molded from plasticine should be placed;
- a “game board” for tic-tac-toe in the form of a pond made of blue plasticine, on which four thin sausage rollers are “drawn”; "tic and toe" in the form of 10 green turtles. For each figure, roll up large and small balls, flatten them on one side and connect; roll out the sausage roller and cut into four short parts for the legs, which are attached to the body of the turtle. Make eyes out of yellow plasticine. Blind in yellow 5 "X" and 5 "O" and stick on the backs of the turtles.
- compositions that combine with plasticine various items(straws, buttons, shells, pebbles) - ideas designed for middle and older ages.
When depicting objects, children reproduce not only forms, but their characteristic features, firstly, color.
Drawing with plasticine from template pictures
 The developing technique is reminiscent of mosaic art, combining sculpting and appliqué. Using templates or coloring pages, we ask the child to “draw” fruits, leaves, the sun, a rainbow, a steam locomotive, a car, a tank, and so on. Applying the basic techniques of modeling from plasticine desired colors, place thin sausages, pancakes inside the contours.
Basic modeling techniques from plasticine:
- pinch off;
- flatten;
- roll and roll;
- pinch or pinch;
- pull or pull;
- lubricate and press;
- twist and twist;
- scratch.
With kids who are two and three years old, we start by simply smearing plasticine into the contour of the sun or a leaf (a great massage for little fingers!), Combining modeling and drawing, over time they will learn how to draw with plasticine according to patterns.
How to store plasticine crafts?
A bas-relief created from plasticine according to a template can be framed and hung on the wall, the figures can be put on a glass shelf - to show the child how much parents are interested in his work.
Figures molded from plasticine can be stored for years, but under certain conditions. To do this, they need to be folded separately in small boxes and put away in a cool and necessarily dark place.
We sculpt from plasticine step by step - ideas
How to sculpt animals from plasticine? It is not difficult for a baby, together with his mother, to create an elephant calf, for which you need to roll out a large ball for the body, a medium-sized ball for the head, two small balls for the ears, two small balls for the eyes and two tiny balls for the pupils from plasticine. Blind all the balls with each other, flatten the ears into a cake before attaching to the head. Roll up a long roll-sausage, which is cut into legs for an elephant calf and a trunk. Roll up a thin sausage roll for the ponytail.
Car
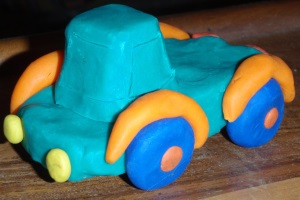 The car is definitely the most popular toy for boys. Blinding a car is quite simple and every child can do it with the help of adults. To make a machine, we need:
- children's set of plasticine;
- stacks for plasticine.
We sculpt a machine from plasticine step by step:
- We choose plasticine of any preferred color to create a car body. We knead the plasticine so that it becomes soft and elastic. We pinch off a piece of plasticine and roll it into a sausage.
- Smooth out the edges. The top of the part should have an arched outline.
- Cut off a piece of plasticine for the hood and base under the windshield.
- We smooth out all the bumps.
- From pieces of white plasticine we flatten cakes for glasses (front, side and rear).
- We sculpt four wheels from black plasticine for tires and gray plasticine for disks; roll four balls bigger size for tires, and a smaller size for rims. We flatten the "tires" and place the flattened "disks" in the center. Relief can be extruded on disks with a stack.
- We sculpt the wheels to the body of the machine.
- We attach arched wings to the upper part of the wheels, made of the same color of plasticine as for the car body (for the wings we roll up small sausages and flatten them) and we can drive our plasticine car.
Making a funny creature, such as a cat or kitty, is easy. First, we make the body, rolling up a large ball from which we make an oval. From the second ball of a smaller size we make a head, on which we form small ears in the upper part. We attach two parts, for reliability, you can use toothpicks.
From four small sausages we make paws, from a thin sausage - a tail. We sculpt body parts in the appropriate places. We make the nose and eyes from black plasticine.
Hedgehog
Light model, step by step:
- We roll a ball out of plasticine and pull it out from one part, forming a nose.
- We roll up two small balls of white plasticine and attach to the muzzle in place of the eyes. For the pupils, we roll up two tiny balls of black plasticine.
- We make spines from sunflower seeds.
Dinosaur
The step-by-step process of sculpting a Tyrannosaurus rex:
Step one: prepare four pieces of plasticine.
Step two: form the body. We roll one piece into a ball, make the tail part, thinning one side, and form the neck area, squeezing at the top at the opposite end.
Step three: we sculpt the legs by rolling a piece of plasticine into a sausage and dividing it into two parts. For each leg, we make claws from ribbons of white plasticine, sharpening them at one end.
Step four: we form the head of their small ball, stretching it from one side. Separate the lower jaw from the upper part with a stack.
Step Five: The arm (two parts) is formed in the same way as the legs, but smaller.
New Year crafts
It is easy and interesting to make Christmas decorations from light plasticine using a variety of shapes (stars, hearts, circles, and so on). The material is safe for children and therefore they will be happy to take part in such a pre-holiday event.
Flower
 Master class on making roses. We need colored plasticines for leaves and petals, and floral wire.
- First we make petals, for which we roll up a thin sausage, which we cut into several small pieces and flatten them into flat ovals.
- We fold one petal to make the center of the rose, sculpt the next petal around the open edge (the central petal).
- We continue to add petals, each time placing them over the open edge of the previous petal.
- We roll a piece into a sausage, a little thicker than the first, cut into pieces and flatten into flat ovals for larger petals.
- Add them to the rose bud, each layer of petals needs to be sculpted a little loosely to make a beautiful open rose.
- When the number of petals is enough, we make the flower stem. We roll out the green plasticine thinly and collect it around the floristic wire, leaving a small tip for the flower head.
- Leaves are made following the instructions for making petals, except that we squeeze them at one end (the tip of the leaf). If the leaves are too heavy, you can push a short piece of wire down the center to support them. We sculpt the leaves along the stem and plant the flower preparation on the top (tip of the wire).
 A plasticine person can be molded from plasticine of the same color or use colored plasticines for different parts of the body. This is when we want to show that our baby figure, man or woman is wearing some kind of outfit. For example, you can make a person out of blue plasticine, and a head out of material white color.
- Roll up a small ball for the head.
- For the body, form a cylinder that is larger than the “head” and smooth it out.
- Roll up sausages for arms and legs; one pair should be thicker than the other.
- We attach the head to the body: we pluck a little plasticine from it using a pencil or a toothpick. The hole should be deep or wide enough to fit the neck. We make the neck by stretching a small cone on the body, on which we put the head. Smooth the edge well.
- For the hands, you can add slightly flattened pieces of plasticine and round them so that they look like fingers.
- For the feet, bend the ends of the sausages; they should be large enough to support the legs. We press the feet to the plank, forming the soles.
- We fasten the finished arms and legs to the body and smooth the edges.
- We roll two small balls of white plasticine and two tiny balls of plasticine of blue color- for pupils. Tightly fasten both eyes to the head.
- For the mouth, roll up a small thin sausage (no more than the width of the head).
- You can add a nose by simply attaching some plasticine to the center of the face and smearing it with your fingers into any shape (ball, triangle, and so on).
 The most important thing in the process of modeling with young children is not only to teach them how to perform basic modeling techniques. The main thing is that they should have fun. Perhaps one of the children will quickly get tired of sculpting and switch to another game with pleasure. Someone, on the contrary, is very passionate about creative work.
Before sculpting, it is important to ask a child who is four or five years old what he wants to mold. You can offer your own version and not interfere with him, if he expressed a desire to make a figure on his own, choosing an animated character as a theme, perhaps it will be some kind of fix, and perhaps even an animatronic Freddie.
Plasticine sculpture develops children's creative potential, and we should refrain from any negative criticism, on the contrary, they will encourage creativity as much as possible. If a child is experiencing frustration, it is important to address the issue by encouraging more practice and experimentation.
In addition to the fact that the child is absorbed in the game, he begins to understand the cause and effect when he picks up plasticine and manipulates it to change the form. It stimulates the child's creativity, tickles his intellect. FROM scientific point vision, modeling creates many new synapses in the brain, activates neurons through the senses used in the work.
In contact with


