
Two-level plasterboard ceilings represent a separate direction interior decoration living room. Despite the significant height of the structure, the space of a room with such a ceiling seems higher and more spacious, especially with the right color. The design of a two-level plasterboard ceiling for the living room, the photo of which is presented in the material, is a two-tier frame made of a metal profile, sheathed with plasterboard. The frame is fixed on the basis of the ceiling ceiling with special direct hangers, and sheathed with plasterboard sheets. The seams between the sheets of material are puttied and, after drying, polished. The result is a ceiling surface suitable for any kind of finishing work: wallpapering or decorative tiles, painting.
Distinctive features of such structures
Suspended plasterboard ceilings are installed in almost every tenth new building. Them hallmarks are:
- the ability to get a flat ceiling surface even on the most uneven ground;
- structural durability. With high-quality installation, cosmetic repairs will be needed no earlier than after 5 years;
- ease of operation, the surface needs only dry cleaning from dust;
- aesthetic appearance. Regardless of the chosen design, ceiling structures look neat and attractive;
- the use of drywall sheets for sheathing ensures high environmental performance of the ceiling. Unlike stretch ceilings from PVC, when heated, drywall does not emit harmful substances;
- the opportunity to create a unique design. Different kinds a metal profile for the frame, as well as the flexibility of wet drywall, allows you to translate any ideas into reality;
- the ability to discreetly hide the elements of engineering communications passing along the ceiling.
The disadvantages of plasterboard ceilings are considered to be the possibility of their deformation when wet. However, the use of moisture-resistant material for sheathing sheets allows you to install such ceilings not only in the living room, but even in the bathroom.
The surface of moisture-resistant sheets is treated with paraffin impregnation, which prevents the material from getting wet even in case of an emergency. Obviously, suspended structures have a lot of advantages. It is not difficult to install them, but you will have to work hard on a two-level design.
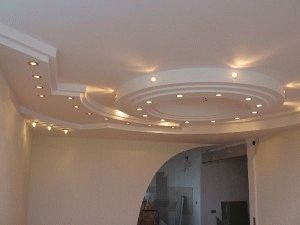


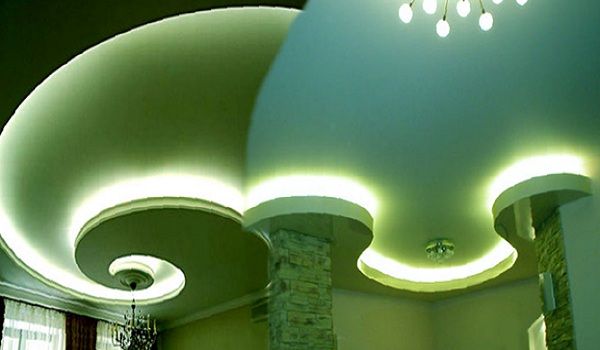
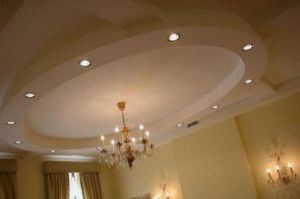
The design of a two-level ceiling can be different, as you can see by looking at the photo selection. It can be installed in the same style and color with the overall interior of the room or have a contrasting color scheme. The design can emphasize individual elements of the interior, such as a dining table, a fireplace, a beautiful mirror or paintings on the walls. Above the soft corner, you can create the illusion of a starry sky. For these purposes, mount the backlight LED lamps or fiber optics or part of the ceiling is pasted over with special wallpaper with fluorescent patterns. In the photo you can see models with imitation of the sky.
Two-tiered geometric pendants can create boundaries between different functional areas of a guest room.
In order to choose a ceiling model that will serve as a beautiful addition to the overall interior, you need to consider:
- designs with two tiers will add additional volume to the room or can modify its shape, make the interior of the room exquisite. Steep elevation changes or smooth lines, unusual color or a combination of highlights - all this can be embodied in drywall constructions. This design will certainly become the brightest accent in the design of the room;
- to install a two-tier structure, the height of the living room must be at least 2.5 meters. Multi-level ceilings usually have a height of over 20 cm and will only emphasize the small height of the room. With low ceilings, it is better to choose the painting option;
- two-level ceilings are used for zoning large rooms or for visually increasing space in small rooms. With their help, you can select a dining area and a place to relax. The design of a complex shape with backlight will decorate the space for relaxation, and a beautiful chandelier can be placed above the dining table;
- the circular layout of the second level of the ceiling structure will highlight the center of the guest room, and the rectangular shape will help to correct the narrow shape of the room.
Design suspended ceilings you can see in the photo, there are really a lot of options.


Selecting the type of lighting
The main purpose of designer lighting is to create a special atmosphere in the room. There are a large number of backlight design options, some can be seen in the photo. They have great popularity led strip and lamps. They are able to create soft, even lighting, visually increase the depth of the ceiling and create the effect of a floating structure.
By combining ribbons and lamps of different power and colors, you can get a unique backlight. To obtain bright main lighting, in addition to lighting, chandeliers and floor lamps are installed. Some types of combination of lighting with a chandelier can be seen in the photo.
When choosing the type of lighting, it must be taken into account that the built-in lighting elements must be evenly distributed over the entire area of the room. So all functional areas will be clearly visible.


Color solutions
To the choice color solution for the ceiling you need to approach responsibly. Certain colors can completely change the perception of a room. When choosing a color, it is recommended to consider the following provisions:
- choosing the color of the ceiling to match the color of the walls or a little paler, the room will seem more spacious and lighter. In the photo you can see the designs in bright colors;
- if it is necessary to visually reduce the height of the room to equalize its proportions, then construct a two-level structure in dark colors;
- glossy finishing of a part of a plasterboard structure, for example, with paints and varnishes, will fill the living room with light and visually expand the space;
- in rooms with insufficiently bright daylight, where the windows face west or northwest, two-level ceilings are recommended to be painted in warm bright colors. Yellow, pink, peach tones will add warmth to the atmosphere and make up for the lack of sunlight;
- in spacious bright rooms with south-facing windows, blue, green, gray tones will look good. You can also combine a neutral first level of plasterboard ceiling and a bright saturated second.
Ceilings with two levels in various colors are shown in the photo.


Installation of the frame of the first level
To work, you will need a metal profile, drywall sheets for sheathing, self-tapping screws and other fasteners, a screwdriver, metal shears, a stepladder. To obtain a curved shape of a metal profile, notches are first made on it.
 Materials that are useful for work
  This is how the profile is cut so that it can be bent
 After the design model is selected and all materials are prepared, installation can begin.
- the first tier is marked using a building hydraulic level at a distance of at least 10 cm from the base of the ceiling;
 Marking the plane of the ceiling
 - the guide metal profile UD is attached to the base. Fasteners are selected in accordance with the material from which the base is made: wood screws or dowel-nail;
 The guide profile of the first level is attached in a similar way
 - the main CD profile is fixed to the guide with self-tapping screws, the recommended profile fastening step is 60 cm;
 Mounting the profile on the ceiling
 - since the weight of the two-level structure is significant, it is necessary to use fasteners - suspensions to ensure reliability. They will support the frame and allow you to lower the ceiling to the desired level. The distance between the hangers should be no more than 50 cm. After fixing the hangers, their edges are bent to make a U-shaped element;
 Hangers are attached to the ceiling in this way. Then they are bent, forming the letter P in shape.
 - the main profile is cut into segments of the desired length, and installed on suspensions and guides. To connect the sections of the profile, docking fasteners are used;
- for fixing short joints of drywall sheets, backfill profiles are required. The guide profile is cut into small pieces and attached to the side parts of the main profile. Then, segments of a ceiling profile 53.5 cm long are attached to them. When sheathing with drywall, one of its sheets is fixed to one piece of the profile, the other to the second. If you plan to install a chandelier, then perform additional supports.
 Finished frame of the first level of the ceiling
  Plasterboard ceiling installation scheme
  The order of installation of tiers of the ceiling
 Installation of electrical wiring
Wiring, which is located behind the plasterboard ceiling, is called hidden. The wires are placed in corrugated plastic pipes, which are then securely fixed to the base of the ceiling or frame.
First of all, holes are drilled in the ceiling for fasteners - clips. The corrugated pipe is cut into pieces with a length corresponding to the distance from the switch to the location of the lamp with a margin of 10 cm. For each group of lighting elements, you need to use your own piece of corrugation, then all the wires from the switch to the connection point will be located in one pipe. Then we fix the pipe with wires in the clips that were installed earlier.
In the event of a mistake when laying electrical wires behind a suspended structure, many problems will arise, so you need to make accurate markings. After sheathing the frame, holes for fixtures are cut out in drywall.
Illumination of a two-level ceiling
Sheathing of the frame of the first tier
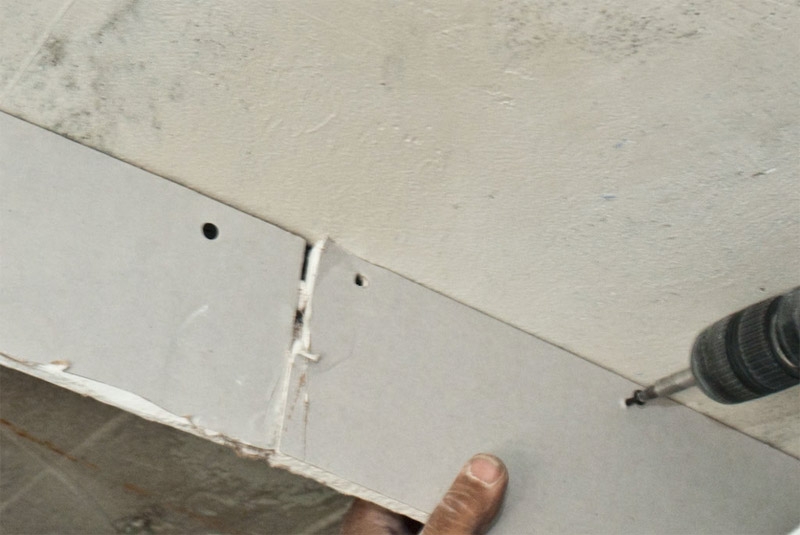
In places where the second tier will be attached to the first tier of the structure, drywall sheets are not attached. It is only necessary to leave an allowance of 10-15 cm to hide the frame. The sheathing material is fixed with self-tapping screws 2.5 cm long. Before starting work, you need to chamfer - cut the edges of the sheet at an angle. This is done so that later the putty easily penetrates into the gap.
Fixing drywall material should start from the corner, the sheets should not fit tightly. Permissible gap 2 mm around the perimeter. The recommended fastening step with self-tapping screws is 20 cm, the sheet is fixed along the perimeter and in the middle. The heads of the self-tapping screws are recessed into the sheathing material, which will simplify the subsequent finishing. The fastening of drywall material to the frame can be seen in the photo.
Pieces of material that need to be curved are slightly moistened. The surface of the sheet can be pre-treated with a needle roller made of metal. The perforated surface will be saturated with moisture faster, and the sheet will become flexible. Moistened parts are attached to the frame with self-tapping screws.
 Installation of drywall on the frame
  The principle of bending GKL
  Two-level plasterboard ceilings are sheathed with plasterboard in stages - first the first level, then after the construction of the frame of the second level, the second
 Installation of the frame of the second level
The complexity of installing bunk ceilings lies precisely in the installation of the frame of the second tier.
- on the sheathed surface of the first tier and on the walls, the construction of the second tier is marked. If the frame of the second tier will be located around the entire perimeter of the living room, then marks are made on all four walls;
- elements of the guide profile are attached along the line on the walls and along the inner border of the lower tier. Then pieces of the main profile are cut with a length of 1.5 cm less than the height from the profile on the ceiling to the mark on the wall. On the pieces of the profile, a “lip” is left at one end; it will be needed to attach the profile;
- pieces of the main profile are attached to the guide with a step of no more than 50 cm. A guide profile is attached to the "lip" with a sharp edge in the direction of the wall;
- the main profile is cut into pieces of such a length as to be inserted into the guide elements of the lower tier and secured. With a length of pieces over 50 cm, they must be additionally fixed with hangers.
Sheathing of the lower tier with sheets of plasterboard material is carried out similarly to the sheathing of the first tier. The last step is to seal the seams between the sheets of material and the subsequent finishing.
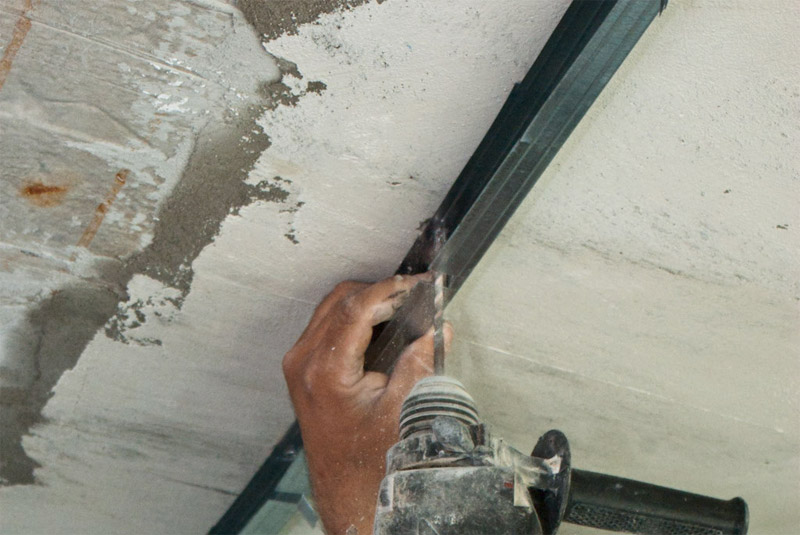
 The notched profile is attached to the ceiling with each segment
  Plasterboard ceilings 2-level, level drop in the bend area
  second level frame
  Finished view of the second level of the ceiling
 Installing two-level ceilings is not a quick and troublesome process. But a unique design created by oneself will surely become the main decoration of the interior of the guest room.
The ceiling plays an important role in creating an attractive interior space. Drywall is one of the best solutions, because it can be given a variety of shapes, and painted in any color. But before you start choosing a project, you need to familiarize yourself with what plasterboard ceilings are in general.
Types of plasterboard ceilings
There are two main types of plasterboard false ceiling:
- single-level;
- multilevel.
According to the shape of the surface, the ceilings are divided into:
- even (flat);
- curly (complex).
In most small private houses, it is rarely done more than two levels.
single level
When compared with multi-level ceilings, such structures will look somewhat simplified. But if you need to quickly and effectively just hide minor defects, you can not complicate the design. Especially since any suspended structure reduces the height of the room.
If the room is small, it is better to diversify the ceiling due to right choice color design, selection of lamps and surface texture of drywall sheets. Accordingly, and installation of a single-level ceiling will take less time.
Multilevel
It should not be denied that such a suspended structure looks much more spectacular. After all, the tasteful design of such a ceiling can make it not just an auxiliary element of decor, but also the main, attention-grabbing masterpiece.
Sharp height differences and smooth, curved, broken lines - all this makes it possible to implement the most daring design. How complex and bizarre such a design will turn out depends only on the imagination of the owner. And the color of the backlight and its location will add a special zest.
Fortunately, the plasticity of drywall allows you to fully implement this. The installation of a false ceiling made of plasterboard is carried out using special metal profiles.. From it you can easily assemble designs of any shape, a wide variety of figures and even compositions.
In addition to single-level and multi-level ceilings, there are others options for plasterboard ceiling structures: columns and arches. Today they are not so relevant. So, columns are more suitable for spacious rooms in classical, baroque or empire styles. They are easy to manufacture, and designing these elements will not be difficult.
Arches can be window and door. Modern tendencies in interior design, in fact, arches are excluded. Despite the great design possibilities, the design of these elements requires special experience and financial costs.
Decoration with lamps
Lighting plays a huge role in the design of a room. The standard design of the living room with one chandelier has not surprised anyone for a long time. At the moment, various types of lamps are very popular, with which you can easily adjust the intensity of lighting.
Lateral niches in plasterboard ceilings allow the placement of indirect light fixtures in them, which dramatically increases design variations.
Besides, using the color of the backlight, it is easy to visually make the room warmer and homely or colder and more aggressive, but it’s not even worth talking about the fact that it is possible to expand the space with the help of lighting or vice versa to reduce the size of the room.
Among the most common are the following types fixtures:
- raster;
- point (spots).
The raster lamp creates diffused lighting e and ensures the uniformity and softness of the distribution of light throughout the room. It is designed for any plasterboard ceiling.
By carefully considering the location of the fixtures, you can achieve amazing results. The backlight can also be placed between the levels, adding velvety and softness to the ceiling.
Spots are unique decorative elements. With their help, you can radically transform the living room, filling it with comfort and tranquility. Not a very massive chandelier and Spotlights On the sides.
Beautiful, well-chosen lighting complements the design of the plasterboard ceiling.
Hand-painted decoration
 One of the unusual and simple ways create unique design- reproduce a pattern on the surface of the ceiling. This type of decoration is not so popular, but quite unusual.
To do this, you must perform the following sequence of operations:
- apply the image on a sheet of drywall with a simple pencil;
- using liquid paper to give the drawing volume;
- after the image is dry, install the drywall board on the ceiling.
Of course, this type of ceiling surface decoration is more suitable for a single-level ceiling in order to diversify it in an unusual way.
Almost any style can be used to decorate the living room, and beautiful ceilings from drywall will serve as a good addition to the overall design.
In addition to the most common classics, such style directions as:
- eclecticism;
- country;
- minimalism;
- empire;
- baroque etc.
The style possibilities of suspended ceilings are limited only by the loss of room height.
eclectic style
If you need to decorate the living room fashionably and at the same time unconventionally, this is the most suitable option. Eclecticism combines a colossal variety of types and forms, and has a huge potential for the implementation of unusual ideas.
In this stylistic direction, other styles are whimsically combined from classic to baroque. But this variety is fine line, because a multi-style combination of decor elements can easily turn a room into a storage room inconsistency and insipidity.
A multi-level plasterboard ceiling in this style should be simple and concise, combining smooth flexible lines and geometric shapes such as an oval or a circle. The backlight should not be bright, it is designed only to complement the interior.
Country style
The main slogan of this style direction is naturalness. This style symbolizes home warmth and comfort. But it is worth considering that it is more suitable for country houses than for apartments, in which it will look somewhat old-fashioned.
 This style is characterized by the use of stone, wood and natural textiles.. Using uncomplicated forms of multi-level ceilings or classic glossy sheets in matte or light shades, it is easy to create a light romantic atmosphere, and a subtle flair of a rustic lifestyle.
Classic
The classics are always in demand. it style direction it's easy enough to imitate. Old cabinets, clocks, mirrors, etc. are quite appropriate here. For this style, the most suitable option is a single-level plasterboard ceiling with a glossy surface.
All existing styles for the living room are quite difficult to analyze. The choice rather depends on the tastes of the owner.
Plasterboard ceilings are one of the better ways decorate the ceiling surface, giving the room a bright and elegant appearance.
Additionally, photos of beautiful two-level plasterboard ceilings can be viewed in the video:
surfaces. This eliminates the need to be content with the modesty of one level, but allows you not to complicate the work with multi-level structures.
How to transform the interior of plasterboard ceilings for the living room
And although this design has a considerable height, its design allows you to visually make the room both more spacious and taller. If you choose the right color and lighting, as well as the configuration of the ceiling, suspended structures will increase your living room, albeit visually.
Design features
- You can make a very flat surface on an initially uneven base (although even single-level ceilings can cope with this task);
- The design is durable, which means that even the first cosmetic repair postpones high-quality installation for at least 5 years;
- Aesthetics - both as accurate and attractive as possible (the photo gallery proves this);
- High environmental friendliness of the ceiling, because drywall is made from natural materials;
- Ease of operation;
- The ability to hide engineering communications under the skin.


