
The history of the use of wind energy by man dates back to ancient times. The first mention of this appeared about 1000 years before our era. It is generally accepted that the history of western windmills begins with the first documented appearance of a European (or Danish) windmill in Normandy in 1180. Most likely, windmills came to Europe from Persia through the Mediterranean countries.
The most famous early type of windmill is the Persian mill, which is the simplest device with a vertical rotor (Fig. 1.1). At the same time, in Western Europe, the Persian windmill was quickly improved to a more spectacular type of windmill with a horizontal axis of rotation of the wind turbine. Researchers in the history of wind energy note that in a short period of time, windmills with a horizontal axis have almost completely ousted installations with a vertical axis from Europe.
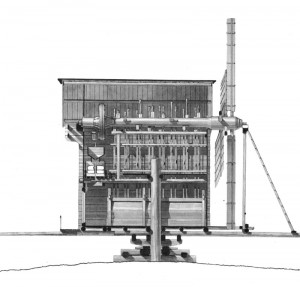
The complication of the design of the mill with a horizontal axis was justified by greater work efficiency. British mast, shown in fig. 1.2, is a triumph of engineering and the most complex mechanism at the beginning of the Industrial Revolution.
Intensively developing from the XII to XIX century, windmills have reached a certain perfection. The power of these mills was equivalent to 25 ... 35 kW.
The industrial revolution, caused by the creation of steam engines, and the cheapening of coal led to the gradual displacement of units using wind energy. One of the very interesting historical phenomena of wind energy, which is mentioned by many authors, is the American pumping wind turbines. The features of such installations are a multi-bladed rotor, a simple wind orientation system and the possibility of autonomous automatic operation. On fig. 3a shows the Halladay Standard, which was the first real commercial success. The second most popular type of wind pumps were units with a rigid rotor Eclipse (Fig. 1.3, b). The third step in the development of American built-in pumping units was made in 1888 by The Aermotor.
The Aermolor wind turbines (Fig. 1.4) were made entirely of metal, and mass production made it possible to significantly reduce their cost. The idea of stamping blades from tin was a revolutionary innovation. The stamped blades had a certain geometry and were set at the required angle. At high wind speeds, the rotor located behind the rack "floated" due to the swivel. It should be noted that these were all-metal units, optimally made in terms of design, efficiency and
economics of production.
Despite the widespread electrification of rural areas, data windmills remain fairly common in many countries.
Statistics on currently available wind pump installations are given in Table. 1.1. Their total number is more than a million windmills (mostly multi-bladed installations with a wheel diameter of about 2.5 m), and the total capacity is about 250 MW.
It is interesting to compare the parameters of the most common old windmills with modern units having the same dimensions of the wind turbine (Table 1.2).
As you can see, over the past 50 years, wind energy technology has made a powerful technological leap that has increased windmills about 10 times.
From windmill to wind turbine
At the end of the nineteenth century, the idea arose to use wind energy to generate a constant electric current. The need for such installations was great, therefore, in various countries was held whole line experimental work. There are descriptions in the literature of two very different wind turbines, which were among the first in power generation. The first of them, shown in Fig. 1.5 is a 12kW Brasch wind turbine that generates direct current to charge batteries. The system as a whole worked
automatically for 20 years and required minimal maintenance.
The Windmill of Brush was an important milestone in the history of the development of wind energy.
First, it was quite large. Second, it used a 50:1 overdrive two-speed belt transmission with the alternator spinning at 500 rpm. And finally, it was the first attempt to connect a well-developed system windmill with new electrical technology. At that
the installation showed that multi-blade wind turbines are too slow and inefficient for power generation.
The next important step in the transition from windmills to wind turbines was made by Poul Ia-Cour in Denmark at the beginning of the last century. He was the first to create a wind tunnel and apply an airfoil to his wind turbines (Figure 1.6).
By 1910, about a hundred of these wind turbines, ranging from 5 to 25 kW, were operating in the Danish countryside. In the 20s and 30s, commercial copies of small batteries for charging batteries appeared, which became very popular.
Neither rice. Figure 1.7 shows a Jacobs Wind Electric setup. A high-speed three-bladed wind turbine with blades with an aerodynamic profile rotated a generator with a power of 3 kW at a voltage of 110 V. It is interesting to note that it was at the stage of development of small wind turbines for charging batteries that the problem of the optimal number of blades for a wind turbine arose. Two-bladed wind turbines experienced significant vibrations when the wind direction changed, while three-bladed ones did not have this disadvantage.
It should be noted that this type has passed to modern designs with virtually no changes.
Created in 1925 the new kind rotor - named after its creator Finnish engineer S. Savonius. The advantages of this type of rotors are a high starting torque and the ability to perceive the wind from any direction, and the disadvantages are low speed and energy efficiency of the rotor, as well as a significant mass of the structure.
Another new type of wind turbine that appeared in the 30s of the last century was the vertical wind turbine proposed by F.
The rotor has two or three curved blades fixed at the top and bottom of the central column and can receive wind from all directions. This type wind turbines were largely abandoned until the early 1970s
years, when in Canada, and then in other countries, research began on large wind turbines with such a Darrieus rotor.
The evolution of modern windmills. From windmills to wind turbines
In a number of countries, research work in the field wind energy development developed intensively from the late 1940s to the early 1960s. However, by that time, fossil fuel prices had dropped markedly and, in terms of the cost of electricity, wind turbines could no longer compete with thermal power plants. During this period, the commercial practically did not develop. Various experimental samples were created, including the wind farm in Kursk.
In the early 1970s, there was a new rise in wind energy, primarily due to the well-known energy crisis. During this period, the governments of many countries launched large-scale programs to create windmills. Under these programs, technology development, design work, and experimental research were to be carried out in constant interaction. Plans foresee
Valid the creation of three generations of experimental units. The first generation provided the basic knowledge and data to create a clear concept for wind energy. The second generation was necessary to develop practical experience in creating windmills. And finally the third generation
It was possible to bring the level of reliability and efficiency of wind turbines to commercial use. These series of wind turbines were supposed to improve wind technologies to the point where the technical risk
small enough to attract significant commercial capital.
Research was divided into two areas - a wind turbine with a horizontal axis and a wind turbine with a vertical axis of rotation. For example, in 1974, the Federal Program was developed for the development of wind energy, according to which experimental prototypes MOD-O, MOD-OA, MOD-1, MOD-2, MOD-3 were created. In Europe, the most interesting and major projects were Growian Power
3 MW and Germany (1983), KaMeWe 2.5 MW in Sweden, LS-1 3 MW in the UK (1987), etc. It should be noted that german project Growian was the largest wind turbine ever built, with a turbine diameter of 100 m and a tower height of 100 m. This wind turbine was the first to operate with a variable speed wind turbine and had an asynchronized synchronous generator. Too many new products have caused a huge number of unforeseen problems in the operation of the windmill, but this windmill has made a significant contribution to understanding the problems.
other units.
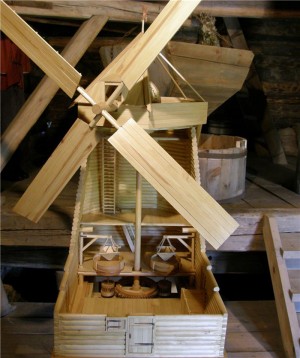
Windmills- one of the most common decorative elements of a country house landscape design. I am ready to tell you how you can make a beautiful windmill on your own even for a beginner, and step-by-step instruction clearly confirm my words.
A bit of history
A real windmill is an aerodynamic mechanism that converts wind energy. Due to this energy, it performs mechanical work - grinding grain.
Mention of wind structures dates back to ancient times. Therefore, it can be assumed that for a long time wind and water mills were the only machines used by mankind.
Historians believe that ancient mills were common in Babylon. This is evidenced by the codex of King Hammurabi, which dates back to around 1750 BC.
The documented evidence of the use of wind machines for grinding grains dates back to the first century of our era, and it belongs to the Greek inventor Heron of Alexandria. It is also known that Persian mills existed in the ninth century, as reported by Muslim geographers.
Persian mills differed from the European designs familiar to us with a vertical axis of rotation and perpendicular blades. They had blades on the rotor, and on the one hand they were closed with a shell. Without this shell, the wind pressure on all the blades would be the same.
The Chinese mill also had a vertical axis of rotation. It differed from the Persian mills in freely turning sails, while in Persian mills the sail was rigidly fixed on the axis.
Thus, Asia is characterized by designs with a vertical arrangement of the rotor of rotation. But a windmill with a horizontal rotor is familiar to Europe.
Classic windmills are especially widespread in windy lowland regions. In addition, they were built on the Mediterranean coast.
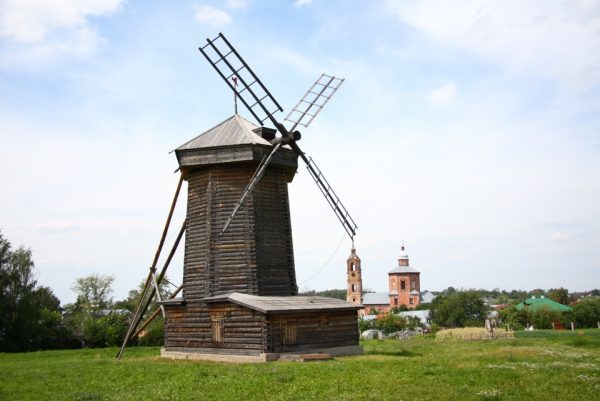
In our country, they were mainly distributed until the beginning of the 20th century, however, already in the 19th century, with the advent of steam engines, their number began to decline. True, these mills have not been completely abandoned to this day.
Well, for us, summer residents, windmills are just a beautiful element of landscape design, which, moreover, symbolizes prosperity and well-being in the family.
Mill manufacturing
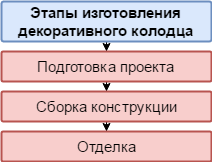
Now consider how to make a mill with your own hands. This procedure can be divided into several stages:
As you can see, one of the stages of work is the manufacture of movable vertical elements. Next, we will look at how to make the structure so that the roof and the axis of rotation rotate in the direction of the wind.
If desired, you can make it so that the whole structure turns towards the wind according to the principle of a weather vane. But, if you want to simplify the product on the contrary, make it motionless.
Preparation of drawings
Since the mill in our case is a decorative element, there are no strict rules for its design. The main thing is to decide for yourself what kind of design you want to see, and what size it will be.
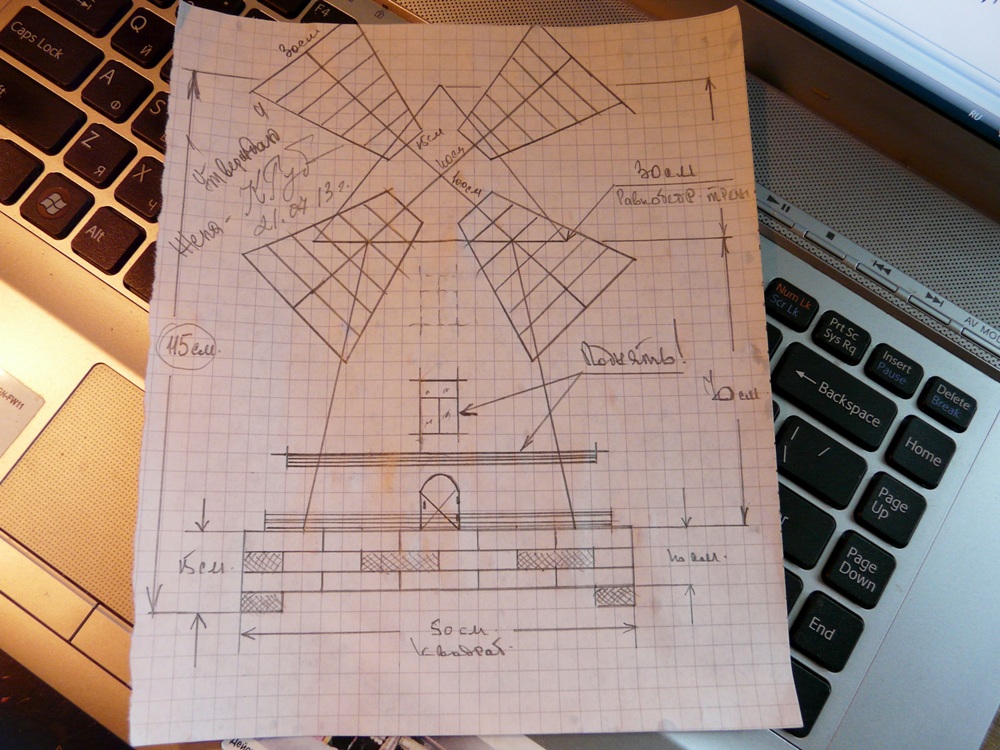
To simplify the task, you can use ready-made drawings, and only correct them if necessary. Moreover, it is not necessary to accurately draw the design to scale. The main thing is to depict its main elements and indicate the dimensions, which will simplify the work in the future.
Manufacturing base
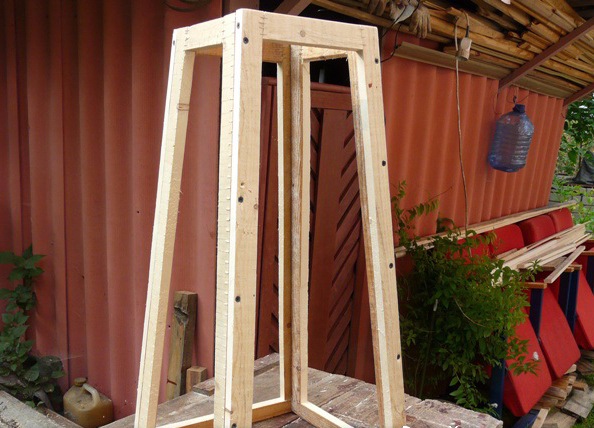
In the windmill project that I propose to you, there is a base on legs in the form of a pedestal. It is made as follows:
| Illustrations | Description of actions |
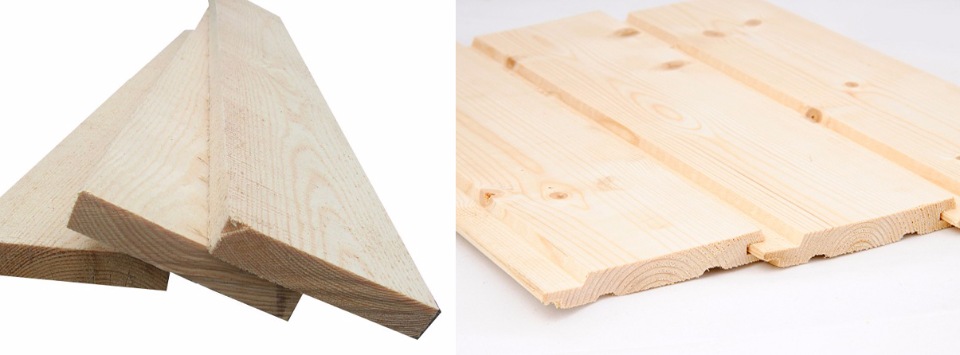 | materials:
|
Making the base (skirt):
|
|
 | Leg making:
If you know how to work with metal, you can use metal corners or profiled pipes as legs. |
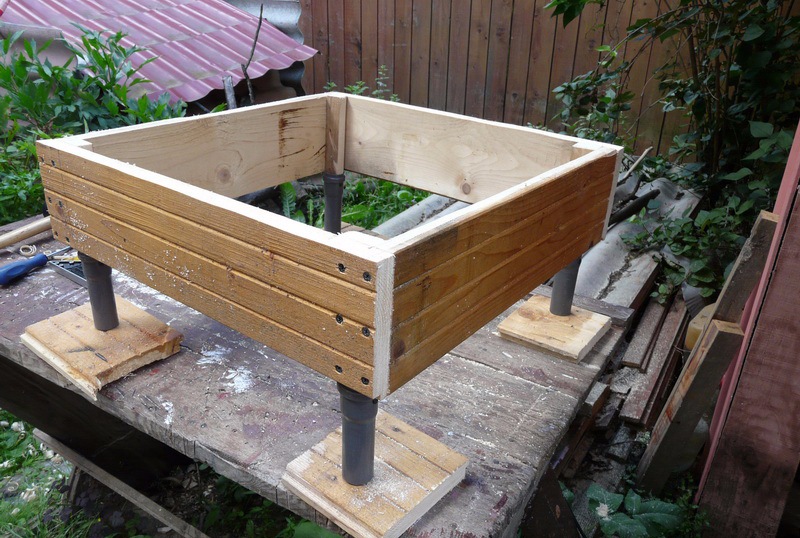 | Leg mounting. Fasten the legs to the skirt with bolts or self-tapping screws. |
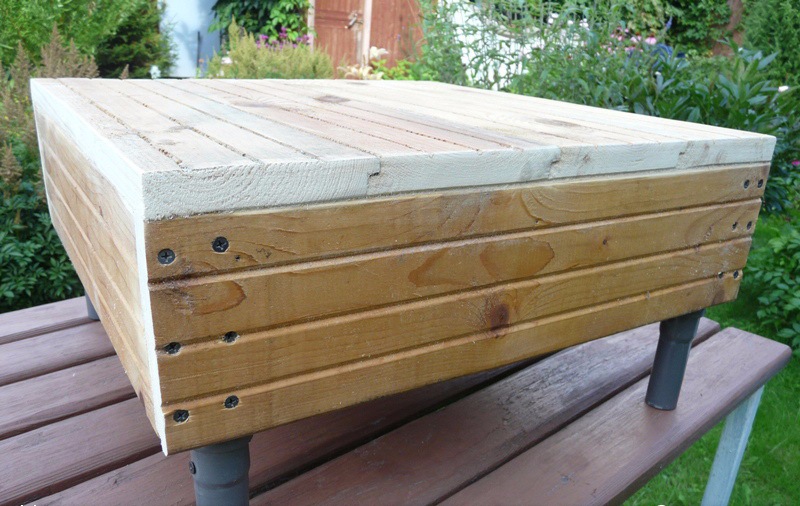 | Base lining. Sheathe the top of the base with boards, plywood or other material. |
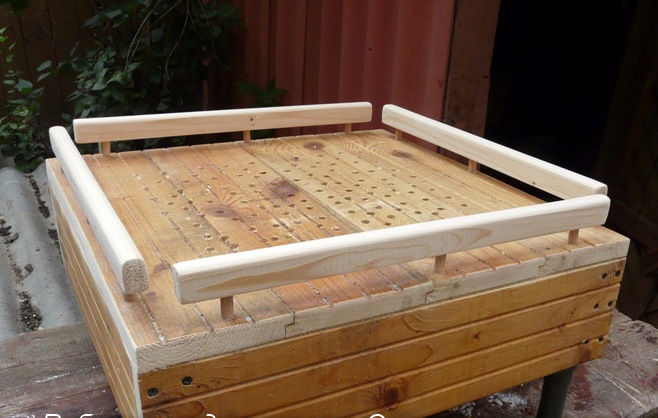 | Railing installation:
|
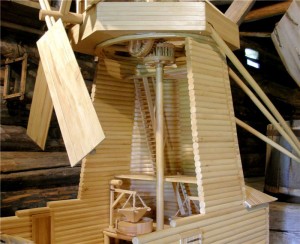
Fabrication of the frame of the middle and upper parts of the structure
| Illustrations | Description |
 | Materials:
|
 | Making the frame of the middle part:
|
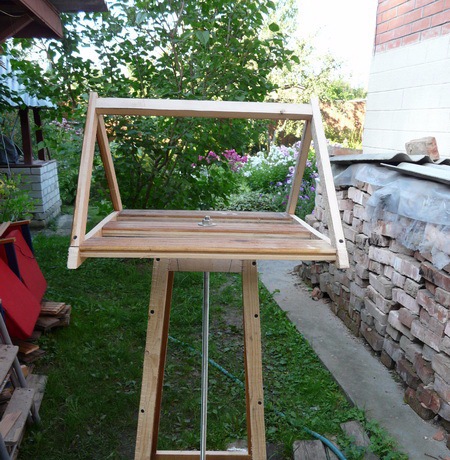 | Roof frame fabrication. Windmills in Russia usually had gable roof. In our case, it should be rotary, so we perform it as follows:
|
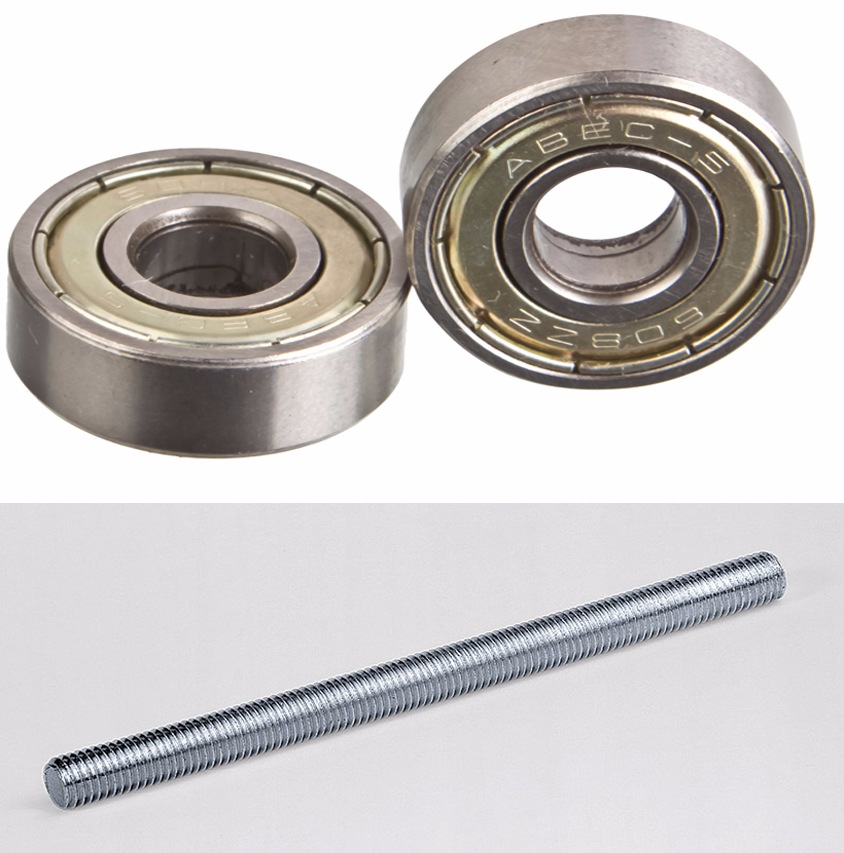
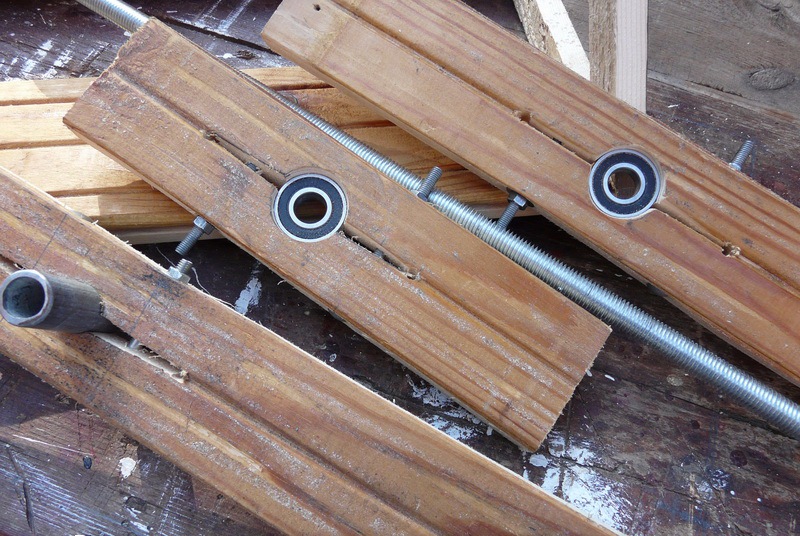 | Installation of bearings in boards. In order for our windmill to have a revolving roof, you need to fix the axle on bearings. To do this, you must first fix the bearings in the boards:
In the same way, you need to insert the bearing into the board, which will fix the axis at the bottom of the frame. |
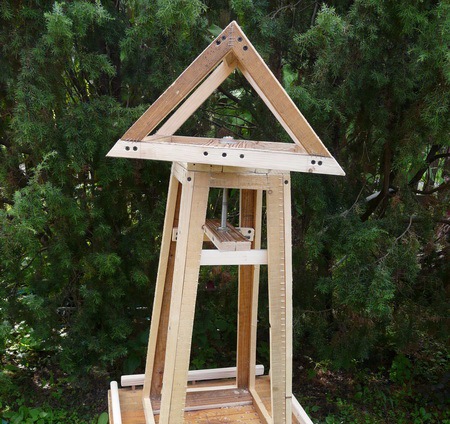 | Roof fixing:
Now the roof can rotate freely around its axis. |
 | Shank manufacturing. In order for our wooden mill, or rather its roof, to turn like a weather vane to meet the wind, you need to make a shank as follows:
The shank can immediately be sheathed with any sheet material. |
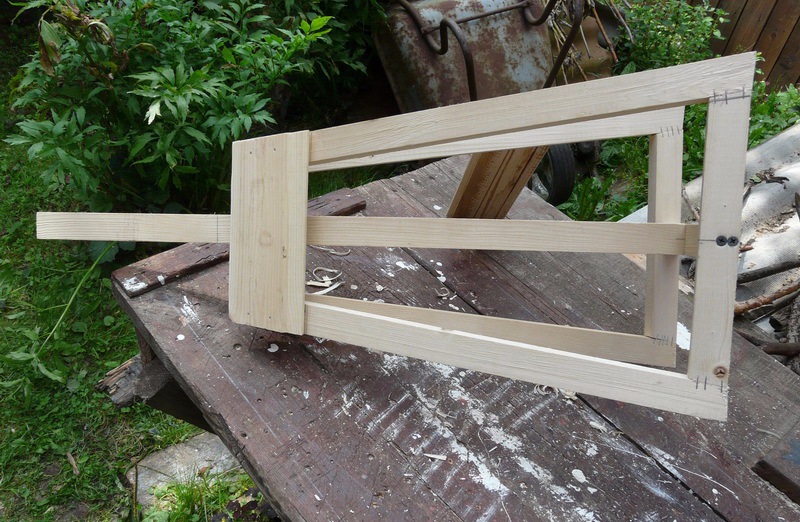
Manufacturing of blades and horizontal moving part
Now you need to make a horizontal moving part and blades:
| Illustrations | Description |
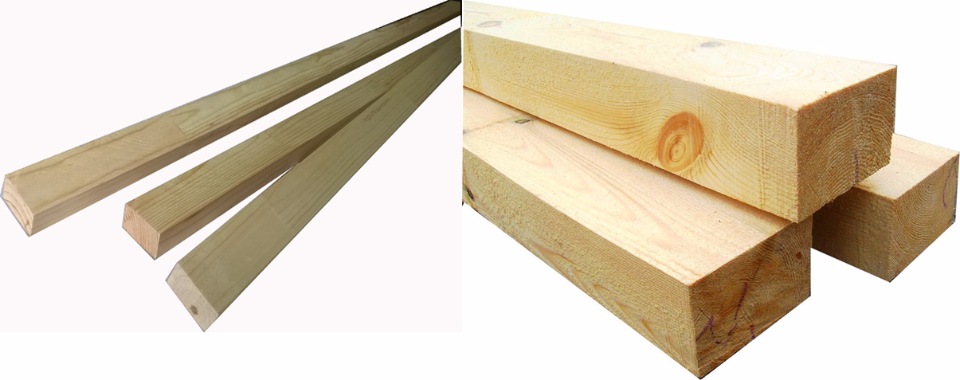 | Materials. At this stage, we will need the same materials as in the manufacture of the roof. |
 | Mounting the horizontal moving part:
|
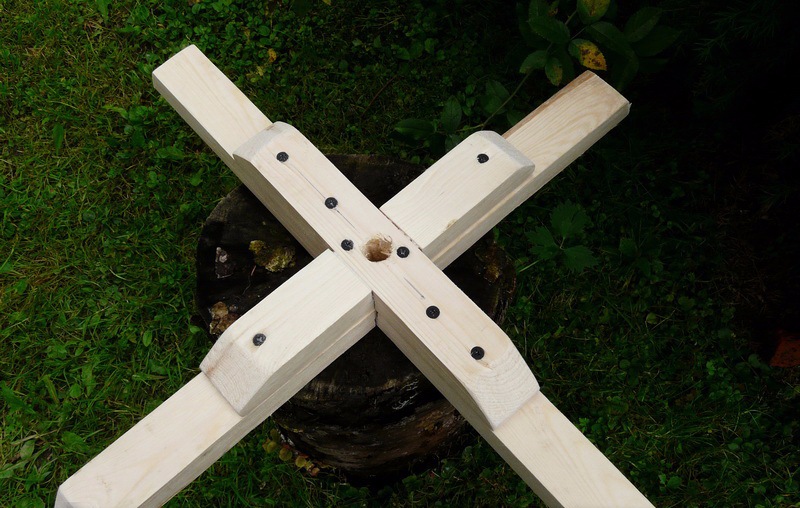 | Making a cross. The blades are based on a cross. It is easy to make from four bars. Make a hole in the center of the cross for the axle. |
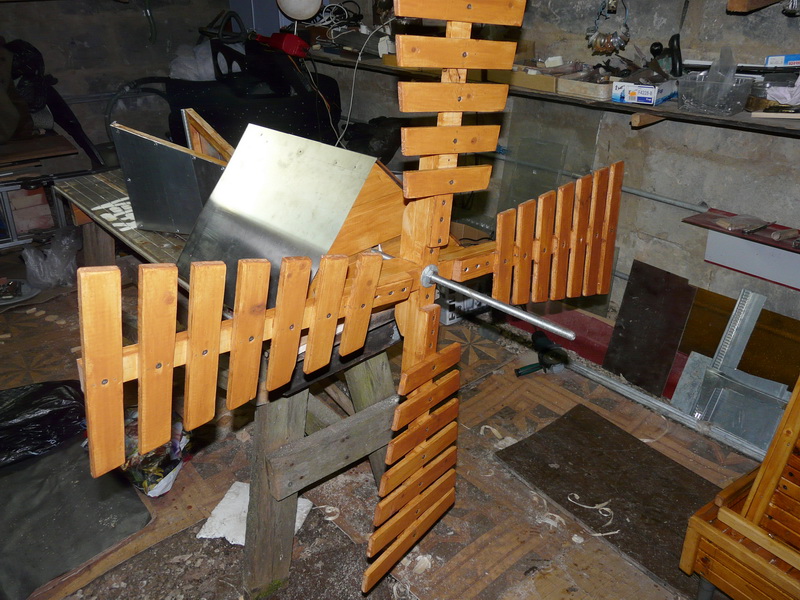 | Blade manufacturing:
|
This completes the most difficult part of the work.
Finishing
Now the final stage remains - finishing. It depends on him how the decorative mill will look. The essence of this work lies in the sheathing of the frame with clapboard.
At the same time, you can decorate the structure with windows, doors and other elements that your imagination tells you. The sheathed windmill can be painted and varnished.
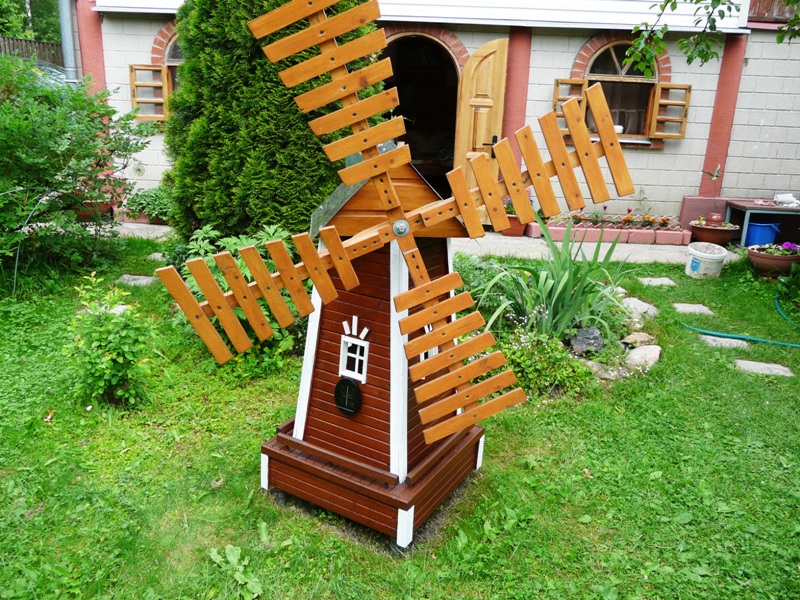
Windmills are often painted in folk style. If you want the design to look in the traditional Russian style, it is better to sheathe it with a block house, and not with a clapboard. The mill, decorated with carvings, looks especially beautiful.
Diodes and a light sensor can be integrated inside the mill. As a result, with the onset of darkness, the windows of the mill will light up. The price of the sensor is on average about 300 rubles.
Here, in fact, is all the information on how to make a windmill with your own hands.
Conclusion
Now you know how do-it-yourself decorative windmills are made. Watch the video in this article for more. If some points are not clear to you - ask questions in the comments, and I will be happy to answer.
2. History
3. Windmill in art
Antiquity
Chinese windmill
Presumably, the oldest mills were distributed in Babylon, as evidenced by the code of King Hammurabi. The description of an organ powered by a windmill is the first documented evidence of the use of wind to power the mechanism. It belongs to the Greek inventor Heron of Alexandria, 1st century AD. e. Persian windmills are described in the reports of Muslim geographers in the 9th century, they differ from Western ones in their construction with a vertical axis of rotation and perpendicularly arranged wings, blades or sails. The Persian mill has blades on the rotor, similar to those of a paddle wheel on a steamboat, and must be enclosed in a shell that covers part of the blades, otherwise the wind pressure on the blades will be the same on all sides and, since the sail is rigidly connected to the axle, the mill will not rotate.
Another type of mill with a vertical axis of rotation is known as the Chinese windmill or Chinese windmill. The design of the Chinese windmill differs significantly from the Persian one in the use of a free-turning, independent sail.
Middle Ages
Horizontal windmills have been known since 1180 in Flanders, South East England and Normandy. In the 13th century, mill designs appeared in the Holy Roman Empire, in which the entire building turned towards the wind.
Tower mill with fixed roof, Spain
This was the state of affairs in Europe until the advent of internal combustion engines and electric motors in the 19th century. Water mills were distributed mainly in mountainous areas with fast rivers, and windy - in flat windy areas.
The mills belonged to the feudal lords, on whose land they were located. The population was forced to look for the so-called forced mills to grind the grain that was grown on this land. Together with the poor road network, this led to local economic cycles in which the mills were involved. With the lifting of the ban, the population was able to choose the mill of their choice, thus stimulating technological progress and competition.
new time
At the end of the 16th century, mills appeared in the Netherlands, in which only the tower turned towards the wind.
Until the end of the 18th century, windmills were distributed in large numbers throughout Europe - where the wind was strong enough. Medieval iconography clearly shows their prevalence. They were mainly distributed in the windy northern regions of Europe, in a large part of France, the Low Countries, where there were once 10,000 windmills in coastal areas, Great Britain, Poland, the Baltic states, Northern Russia and Scandinavia. In other European regions, there were only a few windmills. In the countries of Southern Europe, typical mill-towers were built, with a flat conical roof and, as a rule, a fixed orientation.
Sawmill Open Air Museum, Netherlands
When the pan-European economic leap took place in the 19th century, there was also a serious growth in the mill industry. With the emergence of many independent craftsmen, there was a one-time increase in the number of mills.
In Russia, windmills have traditionally been used to grind grain or lift water. Modern wind farms provide electricity to small households and businesses.
| Explosion of expanding vapors of boiling liquid |
mills
Windmills
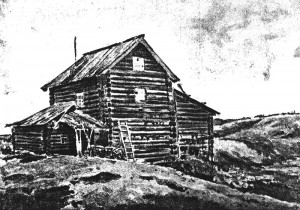
Windmills are visible from afar and are often, along with the church or chapel, the dominant feature of the village. They put them in full view of everyone, in a high open place, a little on the outskirts. Small villages had one or two mills, large ones had up to three dozen (the village of Azopolye, the village of Shchelkovo).
Mills near the village of Shchelkovo in the vicinity of Feraponov. Vologodskaya Oblast
Windmills, using the free power of the wind, grinded from 100 to 400 pounds of grain on millstones per day. They also had stupas (croupers) for obtaining cereals. In order for the mills to work, their wings had to be turned to the changing direction of the wind - this led to the combination of fixed and moving parts in each mill.
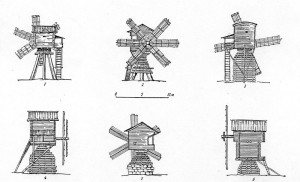
Despite the large variety of windmills, they can be combined into several typological divisions according to the common stable features.
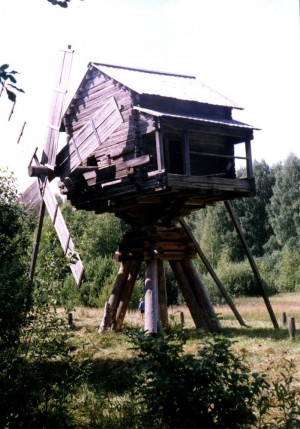
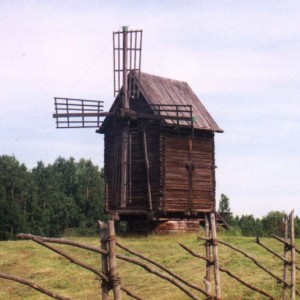
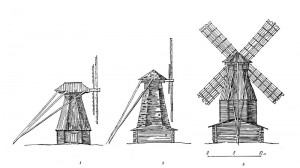
The largest gradation is the division of mills into "pillars" and "tents". They differ in the principle of their constructive device.
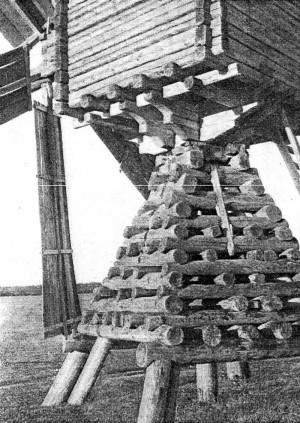
Pillars are characterized by the presence of a central fixed pillar dug into the ground, around which a quadrangular barn with mill equipment rotated on a special support made of a pyramidal cage (“row”) of logs.
Pillar mills on racks and rows
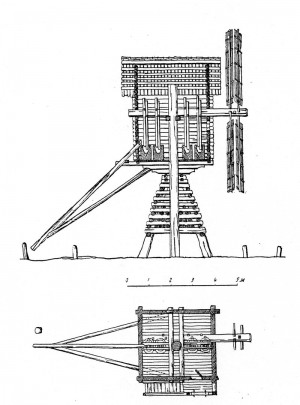
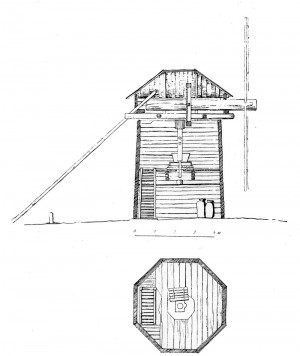
The shatrovkas did not have a rod axis, the mill barn was firmly placed on the ground, the wind was caught by turning the upper part with a shaft and wings - a sparrow.
Facade and section of the windmill
The name "tent" did not come from the shape of the roof, it could be any, but from the slope of the walls from the base to the top, resembling a tent. Smocks are much larger and taller than poles, their silhouette is more calm and static.
Pillar mills
Pillar mills have an original, distinctive architectural form. They consist of the lower part of the supporting row, made in one way or another, which narrows in the upper part, and a mill barn with wings hanging over it. Such a fantastic image is very picturesque, such windmills sometimes resemble the fabulous hut of Baba Yaga, they can also rotate in different directions.
Pillar mills are divided into three main subtypes: mills on racks, on rows, on frames.
1. Mills on racks were built in villages located in the Onega River basin, from Kargapol to the White Sea coast, as well as in the villages of the Vologda and Kostroma regions.
The mill barn stands on inclined pillars. In the upper part of the uprights there is a small tapering frame with 3-4 crowns. On the side of the barn, on the outlets of the lower logs, there is a balcony with a long hanging staircase. To lift bags of grain, a special device was made on the balcony in the form of a horizontal drum with pins for manual rotation. A small quadrangular log cabin of the mill had gable roof consisting of beds with chickens fixed on them, streams supporting the board, and a slab that covered the upper joint of the roof.
Pillar mill on racks. Soligalichesky district. Kostomskaya region. Early 20th century
Transported to the architectural and ethnographic museum in the city of Kostroma
As a variety of such mills, Vologda mills with an enlarged log row, which rests on support posts 50-100 cm from the ground, can be distinguished.
Ryazh mill in the village of Bulkino. Vologodskaya Oblast
2. Mill on a row (bonfire). Ryazh is a pyramid of logs chopped in cut, in which the pivot axis is fixed. Such mills were widespread in the Mezen river basin and in the Vologda region.

Pillar mill on a ridge from the village of Azopolis. Mezensky district. Arhangelsk region.
The end of the nineteenth century
The shape of the log row in different areas differed from each other. In the Arkhangelsk region, the row was usually rectangular in shape and began to narrow only in the upper part of the frame. In the Vologda region, the row had a pyramidal shape, the narrowing of the log house went immediately from the ground.
![]()
Pillar mill from the village of Shchelkovo. Vologodskaya Oblast
The equipment of post mills on racks and rows usually consisted of one millstone for grinding grains into flour or from a crush of a special device with movable pestles for producing cereals. In crush mills, massive teeth are made along the entire length of the shaft, lifting and dropping heavy crush pestles in a given order. The axis of the wings is a huge thick log, fixed in the walls and rotating in birch burls cut into them. A drive gear is also attached to the shaft, from which the rotation is transmitted to the gear drum and the vertical kingpin, and from it to the upper millstone.
Section of a mill-pillar with a millstone from the village of Yuksozero. Arhangelsk region
Sections of the mill - crowds in the village of Bulkino. Vologodskaya Oblast
3. A mill on a frame, the base of such a mill is a low log cabin about a meter high. Their mill barns are much taller and larger than those of previous mills.

Mills on the "frame"
This somewhat impoverishes their artistic image, but allows you to add a shell with pestles or a crush to one set, or even a second set.
Section of a crush mill with millstones from the village of Volkostrov. Karelia
Pillar mill on a frame from the village of Kalgachikha. Onega region. Arhangelsk region. Early nineteenth century
Transported to the architectural and ethnographic museum "Small Karely"
This type of mill was widespread in the Russian North, in the central regions and in the south of Russia.
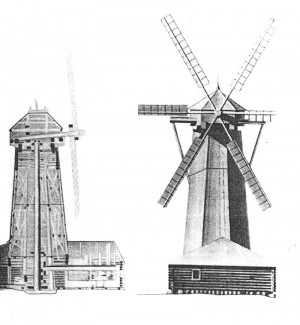
Tent mills.
Shatrovka mills, also called “Dutch mills”, are quite rare in the Russian North, they entered the life of peasants with the development of capitalism, and are no longer an attribute of subsistence farming, a highly productive, commercial enterprise.
The architecture of the tent mill is a transition from a peasant building to a factory one in terms of form, appearance and artistic image. By the nature of their architecture, hip mills resemble fire towers or water towers at railway stations. But despite this, their appearance also captivates an inexperienced eye. Tent mills play an important urban planning role in the spatial organization of rural landscapes.
The central core of the building in these mills rotates along its entire length. It receives the movement from the horizontal shaft in the upper part and transmits it to the millstones located in the lower floors of the mill. Initially, the shatrovka mills were a tapering octagon, later, to increase the capacity, the lower floor began to expand.

Smock mills
A new type of octagonal-on-chetvertik mills has appeared. The roof, and sometimes the entire tower of the tent mill, was covered with shingles (thin slats) or boards.
Rice. 7. Mills-tents
Shatrovka mills were widespread in central Russia and the Urals.
The base of smocks can be different in shape and design. For example, a pyramid may start from ground level, and the structure may not be a log frame, but a frame one. The pyramid can be based on a log quadrangle, and can be attached to it utility rooms, vestibule, miller's room, etc.
Section of the mill - smocks. Vesnino village. Kotelnichesky district. Kirov region
The main thing in mills is their mechanisms. In smocks, the interior space is divided by ceilings into several tiers. Communication with them goes along steep attic-type stairs through hatches left in the ceilings. Parts of the mechanism can be located on all tiers. And they can be from four to five. The core of the shatrovka is a mighty vertical shaft penetrating the mill through to the "cap". It rests through a metal thrust bearing fixed in a beam that rests on a paving frame. The beam can be moved in different directions with the help of wedges. This allows you to give the shaft a strictly vertical position. The same can be done with the help of the upper beam, where the shaft pin is embedded in a metal loop.
In the lower tier, a large gear is put on the shaft with cams-teeth fixed along the outer contour of the round base of the gear. During operation, the movement of a large gear, multiplied several times, is transmitted to a small gear or pinion of another vertical, usually metal shaft. This shaft pierces the fixed lower millstone and abuts against a metal bar, on which the upper movable (rotating) millstone is suspended through the shaft. Both millstones are dressed with a wooden casing from the sides and from above. Millstones are installed on the second tier of the mill. The beam in the first tier, on which a small vertical shaft with a small gear rests, is suspended on a metal threaded pin and, with the help of a threaded washer with handles, can be slightly raised or lowered. With it, the upper millstone rises or falls. This regulates the fineness of grinding grain.
From the casing of the millstones, a deaf wooden chute was obliquely passed down with a board with a valve at the end and two metal hooks on which a bag filled with flour was hung.
Next to the block of millstones, a jib crane with metal arches-captures is installed. With it, the millstones can be removed from their places for forging.
Above the casing of the millstones, from the third tier, a grain supply hopper rigidly fixed to the ceiling descends. It has a valve with which you can shut off the grain supply. It has the shape of an inverted truncated pyramid. From below, a swinging tray is suspended from it. For springiness, it has a juniper bar and a pin lowered into the hole of the upper millstone. A metal ring is installed eccentrically in the hole. The ring can be with two or three oblique feathers. Then it is installed symmetrically. A pin with a ring is called a shell. Running along the inner surface of the ring, the pin changes position all the time and swings the obliquely suspended tray. This movement throws the grain into the millstone. From there, it enters the gap between the stones, grinds into flour, which enters the casing, from it into a closed tray and bag.
The grain is poured into a bunker cut into the floor of the third tier. Sacks of grain are brought here with the help of a gate and a rope with a hook. The gate can be connected and disconnected from a pulley mounted on a vertical shaft. This is done from below with a rope and a lever. A hatch was cut in the floor boards, covered with obliquely set double-leaf doors. The bags, passing through the hatch, open the flaps, which then arbitrarily slam shut. The miller turns off the gate, and the bag is on the manhole covers. The operation is repeated.
In the last tier, located in the "cap", another small gear with beveled cams-teeth is installed and fixed on a vertical shaft. It makes the vertical shaft rotate and starts the whole mechanism. But it is forced to work by a large gear on a "horizontal" shaft. The word is enclosed in quotation marks because, in fact, the shaft lies with a certain slope of the inner end down. The pin of this end is enclosed in a metal shoe of a wooden frame, the base of the cap. The raised end of the shaft, which goes out, rests calmly on a "bearing" stone, slightly rounded at the top. Metal plates are embedded on the shaft in this place, protecting the shaft from rapid abrasion.
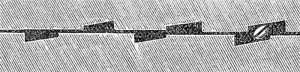
Two mutually perpendicular beams-brackets are cut into the outer head of the shaft, to which other beams are attached with clamps and bolts - the basis of the lattice wings. The wings can receive the wind and rotate the shaft only when the canvas is spread on them, usually folded into bundles at rest, not working hours. The surface of the wings will depend on the strength and speed of the wind.
The gear of the "horizontal" shaft is equipped with teeth cut into the side of the circle. From above it is hugged by a wooden brake block, which can be released or strongly tightened with a lever. Sudden braking in strong and gusty winds will cause high temperature when rubbing wood against wood, and even smoldering. This is best avoided.
A model of a windmill from the village of Moshok. Vladimir region.
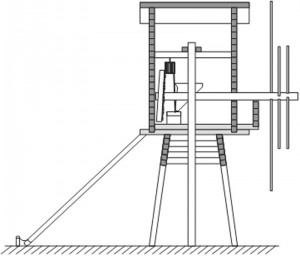
Before operation, the wings of the mill should be turned towards the wind. For this there is a lever with struts - "carrier".
Around the mill, small columns of at least 8 pieces were dug in. They were "driven" and fastened with a chain or a thick rope. With the strength of 4-5 people, even if the upper ring of the tent and parts of the frame are well lubricated with grease or something similar (previously lubricated with lard), it is very difficult, almost impossible, to turn the "cap" of the mill. "Horsepower" does not work here either. Therefore, they used a small portable gate, which was alternately put on the posts with its trapezoidal frame, which served as the basis of the entire structure.
A block of millstones with a casing with all the parts and details located above and below it was called in one word - setting. Usually small and medium size windmills were made "about one set". Large windmills could be built with two stands. There were also windmills with "crushes" where linseed or hemp seeds were pressed to obtain the appropriate oil. Waste - cake - was also used in the household.
The most essential part of the flour mill - the mill setting or tackle - consists of two millstones: the upper, or runner, and the lower, or lower millstone. Millstones are stone circles of considerable thickness, having in the middle through hole, called a point, and a notch on the grinding surface (see below). The lower millstone lies motionless; his point is tightly closed with a wooden sleeve, a collar, through a hole in the center of which passes a spindle connected to the upper millstone and rotating gear.
The surface of the millstone is divided by deep grooves called furrows into separate flat areas called grinding surfaces. From the furrows, expanding, smaller grooves, called plumage, depart. Furrows and flat surfaces are distributed in a repeating pattern called an accordion. A typical millstone has six, eight or ten of these harmonicas. The system of grooves and grooves, firstly, forms a cutting edge, and secondly, provides a gradual pouring of the finished flour from under the millstones. With constant use, millstones require timely grinding, that is, trimming the edges of all grooves to maintain the sharpness of the cutting edge.
Millstones are used in pairs. The lower millstone is installed permanently. The upper millstone, also known as the runner, is movable, and it is he who produces the direct grinding. The mobile millstone is driven by a cross-shaped metal "pin" mounted on the head of the main rod or drive shaft, which rotates under the influence of the main mechanism of the mill (using wind or water power). The relief pattern is repeated on each of the two millstones, thus providing the effect of "scissors" when grinding the grains.
The millstones must be equally balanced. Correct mutual arrangement stones is critical to ensure high quality flour grinding.
The best material for millstones is a special rock - viscous, hard and incapable of polishing sandstone, called millstone. Since stones in which all these properties are sufficiently and evenly developed are rare, good millstones are very expensive.
“A bad stone will ruin, a good one will enrich,” they said among the people. Therefore, for the manufacture of millstones, hard quartz rocks were sought. Millstones could be natural and artificial. Their dimensions were characterized by diameter and are still measured in quarters of an arshin. They are called three-quarters, fours, sixes. For example, a six-wheel in diameter is one meter, the width of the upper millstone - the runner is -40 cm, the lower one - the bed -25 cm, the weight is from 600 to 800 kg. For greater strength, the millstones were bound with iron hoops, the working surface was increased from time to time. The rotation speed of the millstone depended on the strength of the wind and amounted to 10-12 meters per second. Thanks to centrifugal force, the grain through the neck, the eye of the upper millstone came to the working surface of the bed, scattered, ground and poured in the form of flour along a wooden trough into a chest or directly into bags. The quality of grinding depended on the distance between the millstones, which was regulated by bolts.
On the rubbing surfaces of the millstones, a notch is made, i.e., a series of deep grooves are pierced, and the gaps between these grooves are brought to a roughly rough state. The grain falls during grinding between the grooves of the upper and lower millstones and is torn and cut by the sharp cutting edges of the notch grooves into more or less large particles, which are finally ground after leaving the grooves.
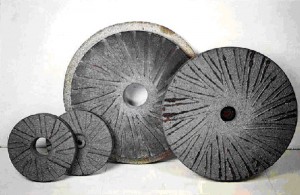
The location of the grooves in the process of grinding grains
The grooves of the notch also serve as the paths along which the ground grain moves from the point to the circle and leaves the millstone. Since the millstone, even from the best material are erased, the notch must be renewed from time to time.
water mills
In addition to wind power, water mills were often used to grind grain. They were placed on the banks of a river or stream, in a secluded, friendly place, next to shady thickets and dark pools. Watermills, compared to windmills, have a very modest architecture, but their image is also covered with legends and secrets.
Water mill in the village of Staraya Minusa. Irkutsk region
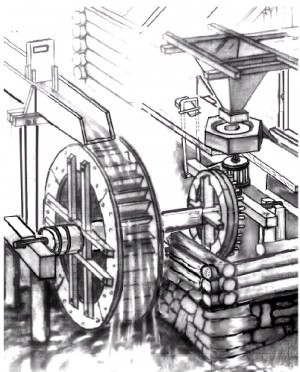
They represent a two-story cage covered with a gable or four-slope roof, one side of the mill stands on the shore, the other in the water on piles. The rotation of the millstones comes from the falling water on the water wheel; to dose the water entering the wheel, a dam was made next to the mills.
Depending on the characteristics of the area and the possibilities to organize a dam, the mills were made with a lower battle, i.e. with water supply to the wheel from below or from above.
The most important element of a water mill is a wheel, which reached a diameter of 4 m. Two wooden rims were attached to a powerful horizontal shaft with knitting needles, the distance between which was approximately 50 cm. buckets arranged one after the other along the wheel.When water entered the bucket, it set the wheel in motion, and with it the horizontal shaft.
Scheme of a water mill
Inside the mill, a wheel was attached to the shaft, which was connected with a horizontal gear with special teeth. The vertical axis from the gear passed through a hole in the center of the lower stone and was tightly attached to the upper one (the upper stone rotated, while the lower one remained motionless).
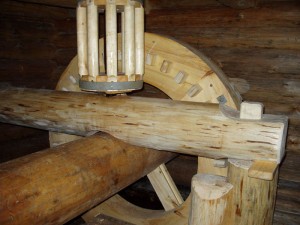
Wheel and gear of a water mill on Levusozero
The gap between the stones determined the fineness of the flour grinding. The uniform supply of grain to the millstones was also important for the quality of grinding: a swinging box - a dispenser - was hung from the bottom to the bunker with grain. Moreover, the location of this box made it possible to separate the flour of one owner from the next, who had already poured his grain into the bunker and prepared to grind. The clarity of the interaction of mechanisms was determined by the skill of the miller.
Falling on top of the wheel, the water gave it more torque, but such mills required the flooding of large areas. The pressure of the water was regulated by special dampers on the dam. When water was supplied from below (by the way, in this case the wheel had a different design - instead of buckets, the blades were strengthened on the axis) there might not have been a dam. The dam blocked only part of the river, due to which the flow of water received a greater speed. The wheel then turned faster.
In addition to millstones, water mills could be equipped with crushes; for this, another watercourse with a wheel was added that set in motion a shaft with teeth that lifted the pestles of the crush.
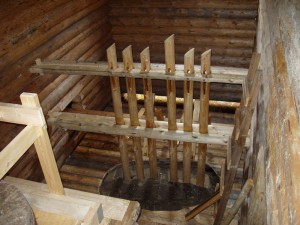
Setting up the crushing water mill on Levusozero
A mechanism that performs mechanical work due to wind energy captured by the wings of a mill. The best-known use of windmills is their use for grinding flour.
For a long time, windmills, along with watermills, were the only machines used by mankind. Therefore, the use of these mechanisms was different: as a flour mill, for processing materials (sawmill) and as a pumping or water-lifting station.
With the development in the XIX century. steam engines, the use of mills gradually began to decline.
The "classic" windmill with a horizontal rotor and elongated quadrangular wings is a widespread landscape element in Europe, in the windy flat northern regions, as well as on the Mediterranean coast. Asia is characterized by other designs with a vertical placement of the rotor.
Story
Antiquity
Presumably, the oldest mills were distributed in Babylon, as evidenced by the code of King Hammurabi (about 1750 BC). The description of an organ powered by a windmill is the first documented evidence of the use of wind to power the mechanism. It belongs to the Greek inventor Heron of Alexandria, 1st century AD. e. Persian windmills are described in the reports of Muslim geographers in the 9th century, they differ from Western ones in their construction with a vertical axis of rotation and perpendicularly arranged wings, blades or sails. The Persian mill has blades on the rotor, similar to the blades of a paddle wheel on a steamboat, and must be enclosed in a shell that covers part of the blades, otherwise the wind pressure on the blades will be the same on all sides and, since the sails are rigidly connected to the axle, the mill will not rotate.
Another type of mill with a vertical axis of rotation is known as the Chinese windmill or Chinese windmill. The design of the Chinese windmill differs significantly from the Persian one in the use of a free-turning, independent sail.
Middle Ages
Horizontal windmills have been known since 1180 in Flanders, South East England and Normandy. In the 13th century, mill designs appeared in the Holy Roman Empire, in which the entire building turned towards the wind.
This was the state of affairs in Europe until the advent of internal combustion engines and electric motors in the 19th century. Water mills were distributed mainly in mountainous areas with fast rivers, and windmills - in flat windy areas.
The mills belonged to the feudal lords, on whose land they were located. The population was forced to look for the so-called forced mills to grind the grain that was grown on this land. Together with the poor road network, this led to local economic cycles in which the mills were involved. With the lifting of the ban, the population was able to choose the mill of their choice, thus stimulating technological progress and competition.
new time
At the end of the 16th century, mills appeared in the Netherlands, in which only the tower turned towards the wind.
Until the end of the 18th century, windmills were widespread throughout Europe - where the wind was strong enough. Medieval iconography clearly shows their prevalence. They were mainly distributed in the windy northern regions of Europe, in a large part of France, the Low Countries, where there were once 10,000 windmills in coastal areas, Great Britain, Poland, the Baltic states, Northern Russia and Scandinavia. In other European regions, there were only a few windmills. In the countries of Southern Europe (Spain, Portugal, France, Italy, the Balkans, Greece), typical tower mills were built, with a flat conical roof and, as a rule, a fixed orientation.
When the pan-European economic leap took place in the 19th century, there was also a serious growth in the mill industry. With the emergence of many independent craftsmen, there was a one-time increase in the number of mills.
In Russia, windmills have traditionally been used to grind grain or lift water. Modern wind farms provide electricity to small households and businesses.


