
To have beautiful doors, you need to take care not only about choosing a door leaf. The door frame is also very important. But the most important thing, thanks to which the whole structure takes on a complete look and harmoniously fits into the interior design, is the door trim.
Today, the market offers an incredibly wide range of platbands that can not only decorate the gaps between the door frame and the wall, but also mask the wiring. We invite you to consider this diversity in detail and with passion.
Door frames: types
There are an incredible number of criteria by which door frames can be classified, whether it be shape, color or material. We will consider, maybe not all, but quite an extensive list of criteria and, accordingly, types.
The shape of the door platbands are:
- flat (with a rectangular section);
- rounded (with a rounded section);
- curly, or portals.
The last two types can only be cut at an angle of 45°, because due to their shape, another way of cutting during installation will not look aesthetically pleasing. As for rectangular architraves, they can be cut both at an angle of 45 ° and at 90 °.

According to the method of installation, platbands are divided into:
- mounted to the wall;
- mounted to the door frame.
Types of door platbands depending on the method of fastening:
- invoices;
- telescopic.
The first type is fastened with nails driven directly into the casing or special fasteners hidden inside the structure.

Telescopic door architraves are mounted without the use of nails, due to special combs included in the grooves of the door frame and extension. Telescopic door architraves will be the best solution if the width of the door frame is less than the thickness of the wall.
By functionality, platbands are divided into:
- simple (monolithic);
- With cable channels.
With the help of the latter, you can camouflage television, telephone and other wires, since they have special cavities inside.

Depending on the material of manufacture, platbands are:
- wooden;
- wood fiber(MDF);
- plastic;
- veneered and laminated;
- ceramic;
- stone.
Wooden platbands on the door are usually made not from solid wood, but from finger-jointed wood. Such a platband can be painted in any color or varnished. For those who are interested in woodcarving, wooden architraves I can be additional opportunity make interior design unique. And for those who are not fond of - to make no less unique platbands to order.

MDF architraves are made of wood fiber medium density slabs. Such platbands are cheaper than wooden ones, and their service life is almost unlimited.
The obvious disadvantage of MDF platbands, like wooden ones, is their low moisture resistance.
Plastic door platbands are more resistant to moisture and temperature changes, and therefore are not subject to rotting and mold formation and can be installed outside.
Almost everyone is familiar with the concept of lamination, with regard to veneering of platbands - this is the application of a thin layer of high-quality wood on them (usually on wooden ones, from MDF or chipboard) for the purpose of decoration.
Ceramic platbands are an imitation of a platband through ceramic tiles planted on glue.
PVC platbands - the same platbands with cable channels.
Stone door architraves are not widely used; as a rule, they are used to decorate the front door.

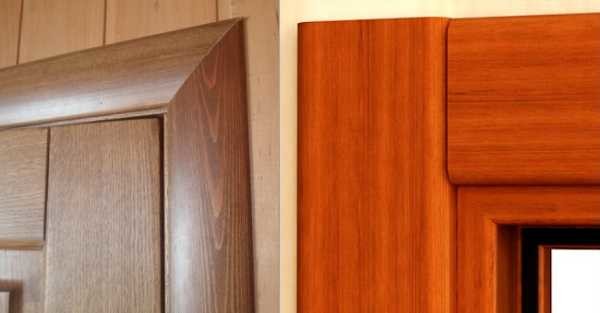
It is also possible to distinguish internal and external platbands on the door, where the door platbands facing the street, the hall, the living room, the corridor will be external. External architraves are characterized by additional decoration, such as carving or capitals.
The capital is also a type of architraves. It is mainly made of wood or MDF. The capital acts solely as a decor and can have a variety of shapes and figured carvings. Installing a capital will give the doors a complete rich look.
As we have already understood, in the design of the door, the platbands are no less important than the door leaf. And even more - the door frame and platbands will be enough to decorate the doorway without the door itself.
However, there are cases when the installation of platbands is inappropriate, for example, for very thick walls or in those rooms where all the walls are tiled. In this case, the slopes can simply be plastered and painted.
You can learn how to make and install platbands on doors from the article.
Since ancient times, doors have served people in order to save warmth and comfort in the room. Entrance doors they tried to make them durable and reliable, for the safety of residents, and they tried to make interior canvases aesthetically attractive, decorating, choosing various colors and shapes. After all, doors are the first thing your guests see. To emphasize the door and give it a complete look, platbands are used.
They act as a decorative element of the door structure. These are planks made of various materials that not only decorate interior doors, but also perform a protective function: they cover the gap and defects between the door frame and the wall. They are attached around the perimeter of the door frame, framing it. Door platbands can differ among themselves not only in materials, but also in the way of fastening and forms. We will tell you more about them in this article.
Trim materials
Depending on your doors, you can choose the products that suit you the most. This is easy to do, as the range of products is quite large.
Platbands on the door, depending on the material for manufacturing, are:
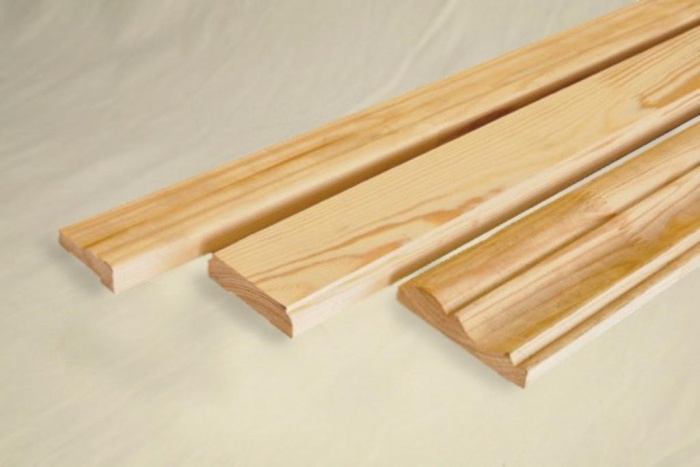
Wood
The most common are wooden planks made from pine, a quality and durable material. Nevertheless, such wood is soft, so most people prefer valuable wood species. Why? Wood is an ecological material that nature itself has given us. Moreover, finished products are strong, strong, durable, if properly maintained, and easy to install. They can be called universal, because the products are suitable for almost any door, despite the configuration of the door frame. There is one caveat: over time, the material may lose its original appearance, attractiveness due to external influences. But, it can be easily restored, washed, sanded, puttied and varnished. As for fastening, the wooden trim on the door can be fixed with liquid nails or small thin carnations without hats, in extreme cases, self-tapping screws can be used. Nevertheless, the tree has small disadvantages: without special means, it will rot, absorb moisture and deform over time. By the way, wooden platbands will cost you the most.
MDF
Planks made of MDF cost less than wooden planks, but are in no way inferior to them in performance and quality. We can say that they even surpass them in some ways, since they will not rot over time, which increases their service life for many years. Them appearance noble, you can choose such platbands that will fit into the interior. They are also easy to fix, using the same liquid or ordinary thin nails.

The only thing to consider is that MDF platbands absorb moisture well, so it is better to install them in a room with moderate humidity. This will extend their service life.
Plastic
Plastic can be called the most practical material among others, and here's why. Over time, plastic trim on the door will not change its original color and appearance. They are easy to care for, because plastic is not afraid of water and moisture. Simply wipe them with a damp cloth. In addition, due to the property of not absorbing moisture, the products will not rot, deteriorate, and mold will not form on them. Do not forget about resistance to temperature fluctuations. This means that plastic architraves can even be installed outside, where they will be exposed to the sun and frost. As for fastening, fixing with liquid nails is a priority, since ordinary nails can damage the material.

Form of platbands
But, platbands can differ not only in material, but also in shape. On the market you can find:
- Curly.
- Flat.
- Rounded.
The name itself speaks for itself, so the choice of one or another casing completely depends on your desire or preference. All that influences the form is the aesthetic appearance.
Mounting methods
According to the method of installation, the strips are divided into: overhead and telescopic. Overhead platbands - the simplest. They are attached to the doorway with nails, self-tapping screws, PVA glue, liquid nails or sealant. Telescopic architraves on the door, unlike overhead ones, have a D-shape, and their fastening on the door frame is a little different.

The box has a groove into which the legs of the casing are inserted. The advantage of this type is that, if necessary, they can be easily removed and then put back on without any damage. At the same time, neither nails, nor screws, nor glue are used for fastening. Let's look at how to mount the trim on the door.
Advice ! The installation of platbands is done at the end of the repair, when the wallpaper is pasted or the walls are painted, but before the skirting boards are installed.
How to install overhead trim on doors
You should know that this is quite easy to do. If you know how to hold a hammer in your hands, then everything will work out, due to the ease of installation.
Tools for the job
To carry out the installation of platbands, you need to prepare the following tools:
- tape measure and pencil;
- jigsaw or saw with fine teeth;
- building corner and miter box;
- hammer and pliers;
- planks;
- nails without hats, liquid nails, PVA glue (depending on the chosen fastening).
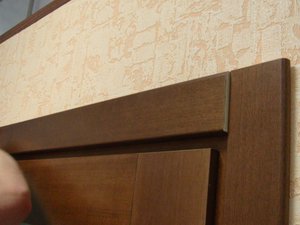
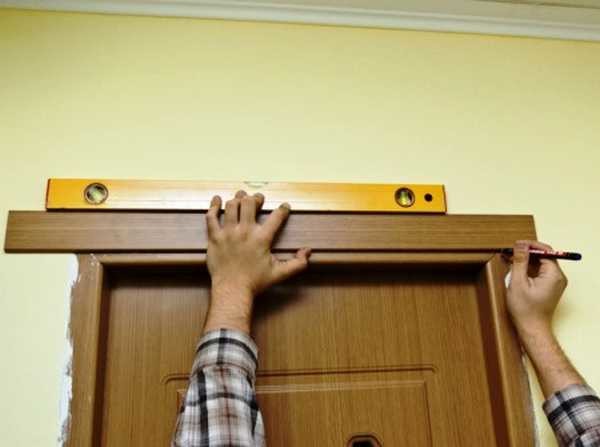
So, the first step is to prepare the casing for fastening. There are two docking options: install the casing at an angle of 45˚ or at an angle of 90˚. Below you can see a photo of the trim on the door, made in one way or another.
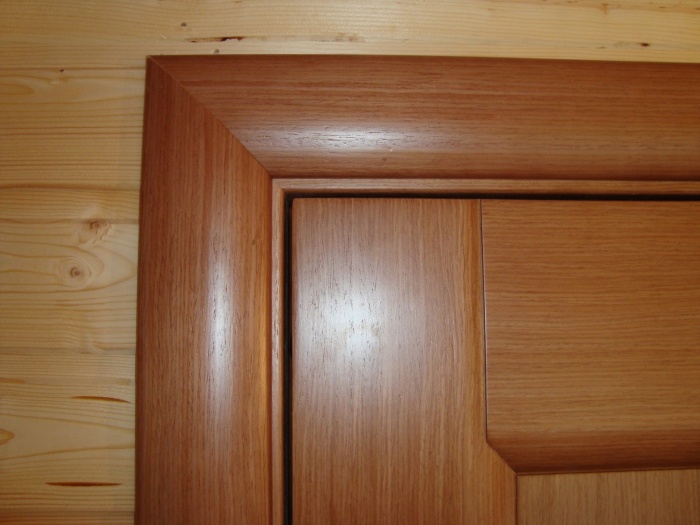

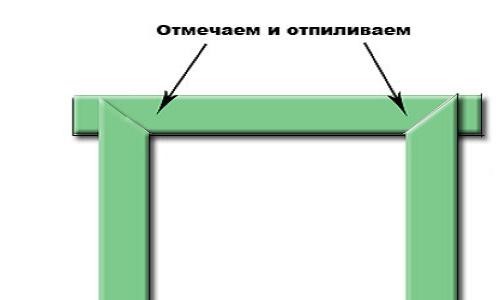
Installing a platband with a 45˚ joint
Let's look at how to make a casing with a 45˚ joint. Let's say right away that to facilitate the work, it is better to use a miter box that will help you cut the end of the casing exactly at an angle of 45˚.
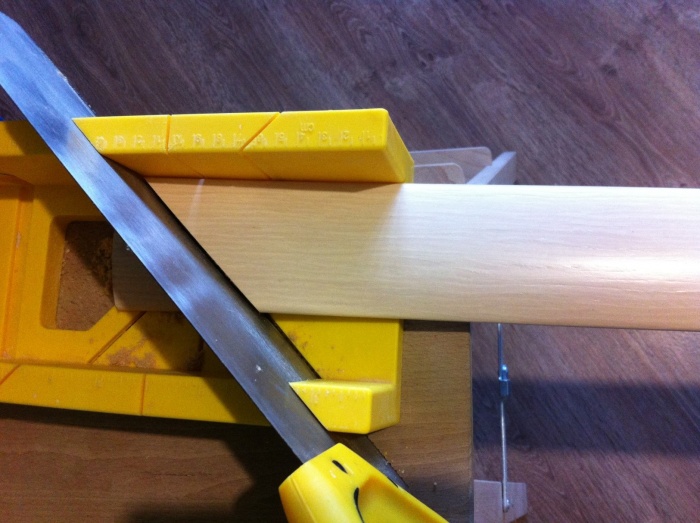
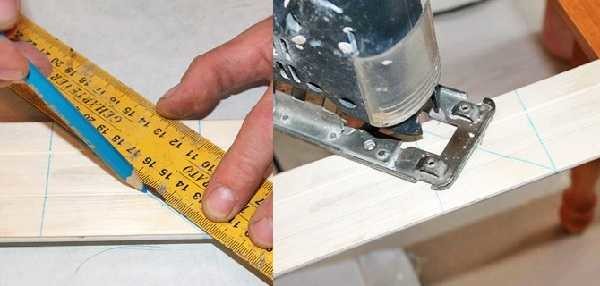
If there is none, you can use the corner. First, attach a vertical bar to the box (the bottom should be flat). Mark with a pencil where the corner of the box is. From it, make a small indent of 0.5-1 cm, since installing the trim flush will interfere with the door hinges. Draw a perpendicular line there.
Measure the width of the plank and draw a second perpendicular line, which will be equal to its width. Then it remains to draw a diagonal in the right direction.
Attach the trim in place so as not to confuse the direction. He's ready to cut. In the same way, measure the second vertical trim and make a cut at an angle of 45 ˚. It should be noted that when cutting with a jigsaw, you must do everything at once, without stopping. This is the only way to get the perfect cut. When the two side elements are ready, you can begin to mount them.

Important ! You need to start work on the side where the door opens.
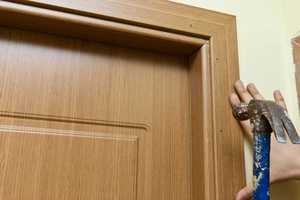
Make platbands on nails, one of which will be located at the base, and the other in the middle of the plank. At the same time, remember that you need to drive nails not in the center, but slightly offset to the frame so that they enter into it, and not into the wall. Now fix the first plank in place by hammering in two cloves. Do the same with the second one. At this stage, it is not required to nail them to the end. Why? Because then you need to decide on the upper bar. To make it perfect, slide it under two vertical ones, making a markup.
It remains only to cut it and nail it into place. At the end, use more nails to securely fix the entire structure. They can be hammered at a distance of 20 cm from each other. The platbands on the other side are attached in the same way, the only difference is that they can be made flush with the door frame.
Installing a platband with a 90˚ joint
If we talk about straight architraves, which are attached at an angle of 90˚, then everything is even simpler here. The main thing is to measure everything correctly, make a cut and nail them all in the same way. You can use other fasteners instead of nails.
Conclusion
Thus, you can easily and without outside help install any trim on the door. They will be a great addition to your door frame and will be pleasing to the eye, hiding all the imperfections of the door frame. As for telescopic architraves, we advise you to watch a video on how to install such a trim on the door.
The platband is an indispensable element of any door. It frames the doorway, closing the space between the wall and the box. Such a product can be created from various materials, including lining and PVC. Any person can handle the installation of the platband. To do this, it is enough to prepare essential tool and stick to technology.
When making a doorway Special attention it is worth paying attention to the choice and installation of the platband. Such products can differ significantly, so it is worth understanding the classifications. The most important criterion is door installation method. So, some platbands should be cut, while others do not need such processing.
- Trimmings are considered to be trimmed with a semicircular section, which are shown in the photo. They look very stylish on any door, but are difficult to install. So, it will not be possible to perform installation with a direct cut.
- Noncut elements are rectangular in shape. Accordingly, they can be docked without trimming. This option is ideal for those who have not yet engaged in self-assembly of doors.
Exists another classification, according to which products are divided into several groups according to the type of material.
Self pruning
Most often door frames cut at a 45° angle. A miter saw is ideal for these purposes, because it is it that allows you to get an even, clear cut. In the absence of such a tool, cutting laminated colored products becomes much more difficult. This is due to the fact that even a jigsaw will not help to avoid chipping the decorative coating. It will be possible to reduce this probability if one of the two devices is used.
- The miter box is considered a primitive tool, which is a groove with slots that help determine the angle. However, over time, these slots break, which means that there will be no accuracy.
- A rotary hand saw will help you cut cleaner. Working with the tool will not cause any difficulties. It is enough to turn the hacksaw at the required angle and make a cut.
Some masters cutting by hand. To do this, you must first apply the markup, and then make a cut using an electric jigsaw or a hand saw. Of course, it is worth doing such pruning if you have experience. In this case, tape, which is glued to the edges of the part, will help to minimize possible damage to the decorative coating.
Installing a door trim
 Experts recommend using only nails to secure the element to the door. Copper-plated fasteners are considered ideal, because their caps begin to darken over time, which means they will be invisible against the background of the casing. If you have light doors, then the caps will have to be removed using wire cutters.
Installation perform in a certain order. So, first the side and top element is fixed. The second side panel is fixed on the door last. It is better not to immediately nail the strips, because sometimes during operation it becomes necessary to adjust them.
Small gaps may remain between the cashiers themselves, located on the door. They are easiest to repair with a special wax. It is heated and fill all the gaps. Then the problem area on the door should be polished with felt. Some craftsmen use regular sealant instead of wax.
Installing the platband on the door does not require special knowledge. The main thing is to deal with the intricacies of pruning. You will also need a special tool that will help keep the part attractive. If done correctly, the design will look aesthetically pleasing.
Door frames
Wooden architraves on the door


The installation of platbands on the doors is carried out almost at the very end of the repair: the walls, the floor are ready, the doors are installed. Only the skirting boards are not nailed - they are mounted after the platbands have been installed.
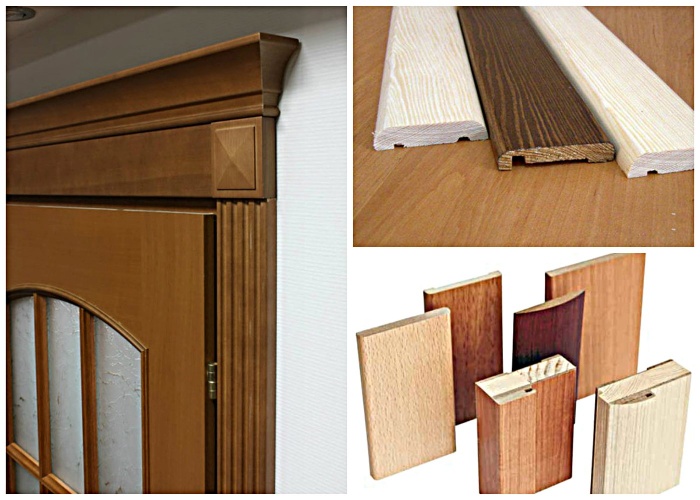
If we talk about materials, then the architraves, customary for a long time, made of solid wood or glued planks, have been supplemented with new ones: made of MDF, covered with veneer or PVC film. There are also plastic trims. They are the most inexpensive, they look quite decent, the color scheme is varied. They are also made from metals - from steel and aluminum, but they are placed on the front doors.
Architraves sizes
These products are molded - they are sold per linear meter, so we are not talking about standards for length. But usually it is somewhere in the region of 2.2-2.5 m (with a margin for fitting). Standard width is also a loose concept: from 30 mm to 80 mm. In this range, you can find a platband from any material. Under the order can be made of wood of any configuration and dimensions.
The width of the cashier is chosen depending on the size of the door itself and on how close the box is installed to the opening: the gap must be closed. In general, for narrow doors, a narrow frame is needed; with double-leaf doors, a massive border looks better.
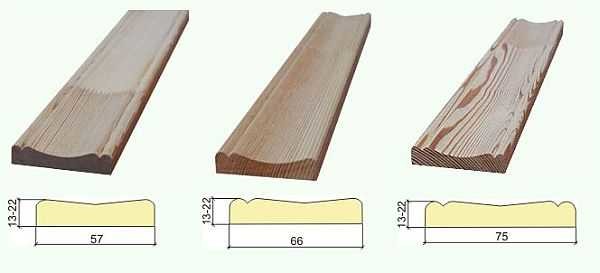
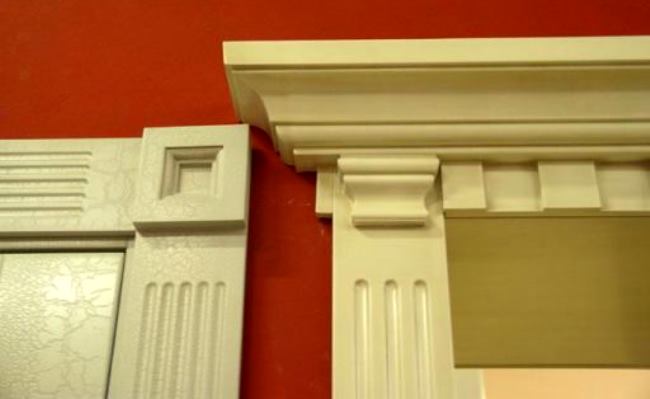
Shape and color
The platbands differ in shape. There are flat, curly, paneled, carved. AT recent times design with capitals and balusters began to come into fashion. But such a door frame is not suitable for every interior.
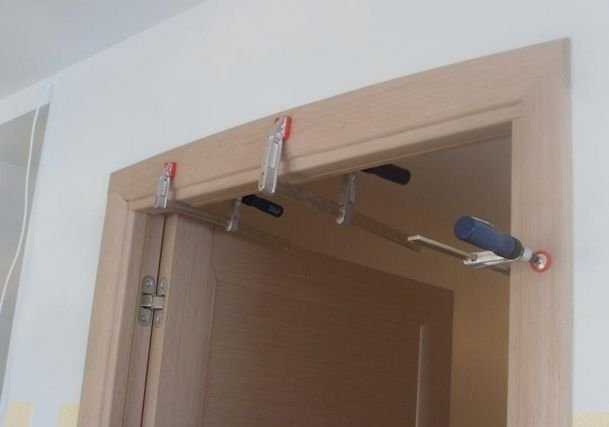
Appeared on the market and "L"-shaped and telescopic architraves. This is a very interesting system that makes it easy to match the frame and finish of the door to the width of the wall. The installation process of telescopic architraves is largely individual: the systems are assembled in different ways, respectively, there is a difference in the installation process (described in detail in the instructions).
The color range is very wide: almost any color of the canvas can be framed. It needs to be tone on tone. Often (but not always) these products are also included with the door leaf and frame. Then you don’t need to suffer with the choice: they are matched tone on tone. It remains only to install.

The order of installation of platbands
You need to start by choosing an installation scheme. There are only two of them and the difference is only in the size of the angles: they cut down the angles at 45 o and 90 o. The most commonly used installation is under 45 o: it is implemented on platbands of any shape, although it is more difficult to perform.
When sawing under 90 o, the whole trick is that the top bar needs to be drowned a little. For a few millimeters. Then everything looks organic. How specific - you need to look at the place: it depends on the profile. To "drown" it will be necessary to remove these millimeters from the back surface. This is done either by grinding or on a lathe.
Cashing doors at 45 o is more complicated, but it looks good with any relief, which cannot be said about the previous version.
Preparing the side planks
You need to start from the side in which the doors open. Install the side rails first. Take one, put it on the door. When measuring, make sure that there is no debris on the floor, the bar is pressed tightly against the floor. Even a seemingly insignificant fragment that fell under the casing leads to the fact that a gap appears at the top.
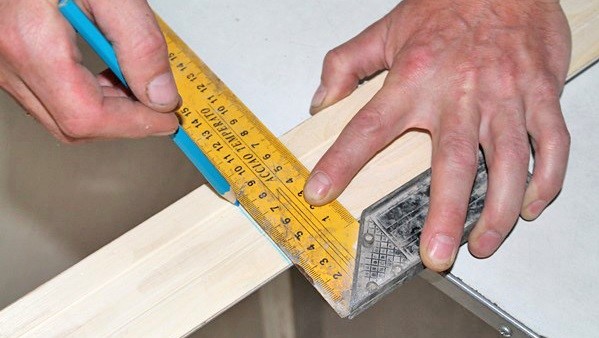
It is advisable to start from the side where the loops are fixed. Here it will not work to attach closely - they don’t give a loop, you attach it with a small indent. Mark the point from which you want to cut. Do this with a sharpened pencil or knife. With a knife, more precisely, a line is already obtained, and more precisely then a cut.
Now put another bar on the other side (you can without indent) and mark on it. Do not make a mirror image of the bar made earlier - they may differ, and then it will be problematic to adjust.
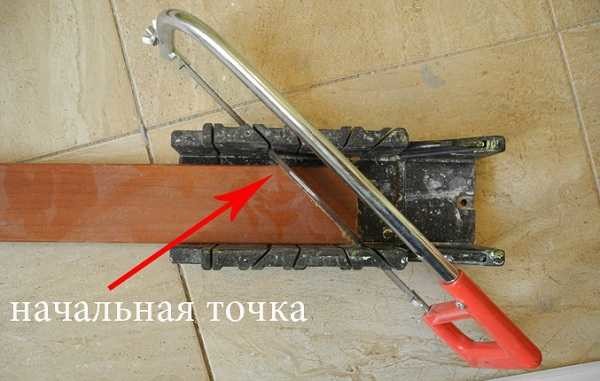
Now you need to cut them down at 45 o. This can be done in two ways: using a carpenter's miter box or using a regular ruler and pencil.
If you have a miter box, lay the bar there, compare it with the marked mark (do not confuse which way you need to cut) and, using a hand or electric saw (it is better with a metal blade - it will turn out smoother), saw off. There is one trick: MDF platbands covered with veneer and PVC should be placed face down. So on the front side there will be no scoring and chipping of the coating.
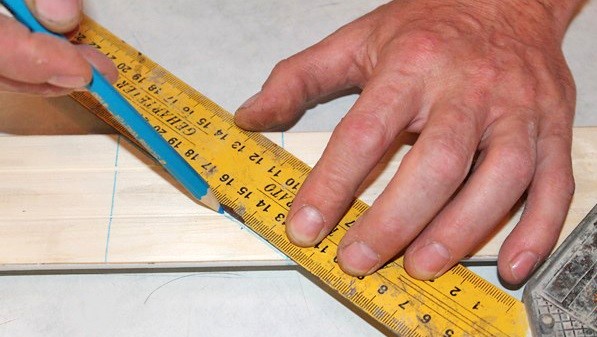
An angle of 45 o can be built with only a ruler and a pencil. At the point where the cut will begin, draw a perpendicular to the opposite side. Accurately measure the width of your casing, put this value up and draw another perpendicular line. There are two parallel lines. Now it remains to connect two opposite points, and you will get an angle of 45 o. But be careful: do not confuse which way you need the angle. So you can correctly cut the corners of the casing without special tools.
Installing the side rails
The next step is to fix (so far preliminary) the prepared planks on the door frame. We still need to fix them a little so that we can cut off the top bar. Therefore, we fasten it to two carnations: above and below. But you need to expose them the way they will be mounted later. Carefully try on and nail.
We measure and saw down the top bar
We immediately cut down one corner of the upper bar at 45 o. Please note that its length should be decently greater than the width of the box - at least a margin equal to three or four times the width of the casing is required.
For example, the width of the door frame is 800 mm. We chose a platband 60 mm thick. The preliminary length of the plank must be at least a meter: it is necessary to take into account the gaps that may be between the wall and the box, as well as the width of the platbands.
Therefore, it is advisable not to cut off the top before the side strips are installed. We installed the sidewalls, estimated the length, added a margin of five centimeters (to make it more convenient to cut) and you can cut.
Having washed down one side of the horizontal bar, apply it to the installed vertical one. There should be a perfect match with no gaps or crevices. If it is not there, take a skin or a grinder and grind off all that is superfluous. Only after the result suits you, you can mark where it is necessary to file the second corner: where the side bar begins.
Having washed down the last corner on the top bar, apply it again. And from this side, too, a perfect match (or almost perfect) is needed. The elimination method is the same: sandpaper or grinder. Sometimes fitting is not possible: there are gaps. If they are small, they can be removed after installation: cover with putty on wood suitable color(sold in hardware stores, selected by color depending on the type of wood).
Now all that's left is to finally fix the platbands.
What to mount
Here the question immediately arises: how to nail them. When installing platbands, several types of fasteners are used:

A little about what materials, what type of fasteners is better to use. Wooden architraves are traditionally fastened with nails. They are almost invisible in the array, and if something is noticeable, you can always cover it with putty. Mostly MDF products are attached to self-tapping screws (veneered or laminated - it doesn’t matter). They can still be glued on. But the masters advise to “plant” on nails without hats - no connections are visible. Plastic platbands are almost always attached with glue, sometimes with self-tapping screws. Nails in this case are unacceptable.
But in the case of using glue, the wall should be even: then the platband fits tightly and holds well. It is more convenient to mount on a curved wall with self-tapping screws: they can pull the planks tighter. No other fastener will give such an opportunity, even nails, especially without hats.
How often do you need to nail platbands? Approximately one nail per 50 cm.
We foam the cracks
After the installation of the platbands on one side is completed, we install wooden spacer pegs between the door frame and the wall, if possible, it is advisable to put spacers inside the box. So the geometry will be observed exactly.
Then we take a balloon with mounting foam, and fill the gaps between the box and the wall by about half. Leave for a day - during this time the foam will harden, and its excess can be cut off with a knife. If you process the box with foam before installing the platbands, most of it will come out, and so the consumption is very small.

We install platbands on the second side
Here everything is repeated in exactly the same sequence. Only here the loops do not interfere and you can not indent. After installation, if there are gaps between the platbands and the box, they are covered with putty on wood, sanded after it dries.
Difficult cases
Not all doors are installed in such a way that platbands are installed without problems. Difficulties may vary.
The most common option is that one of the walls is too close. If there is at least some gap, it is necessary to cut off the “excess” from one plank. Only the assembly will then be in a different order: install the uncut side bar, the top one to it, and put the last one narrow.
Sometimes the thickness of the wall is greater than the width of the door frame. Then they either put an additional bar - an addition, or use an L-shaped platband. Depends on the distance that is not covered by the box. If it is small - 1-2 cm, you can cover it with a platband, you need to close a more solid one with kindness.
To learn more about what a dosing is and how to install it, read here.
Results
There is nothing complicated in installing platbands on the doors with your own hands. There are several rules, following which even a non-professional carpenter will cope with the task.
Refinement of shortcomings or their concealment becomes final stage apartment finishing. These include the installation of doors and the fastening of platbands, which are intended for interior structures. Repair is considered to be of high quality when these works are performed perfectly.
Door platbands for interior doors perform the function of closing the gaps between the wall and the box, and also represent the front part, which plays the role of decor. The front part of the part is always in sight. There is a large selection of such decorative elements, in order to choose the right option, it is worth considering all their types.
Direct appointments of platbands
Platbands perform the following tasks in the interior:
- In terms of design, they improve the appearance of the door and the room as a whole.
- Some types help to disguise wires or cables.
- It does an excellent job of closing the gap between the box and the wall, covering the mounting foam or other unsightly places that formed during the installation period.
In appearance, decorative elements can be flat, rounded or curly.
For the design of the door structure is important. It is chosen individually depending on the installed design, as well as on other interior elements. There is a GOST size, which must also be taken into account.
Types of platbands
Depending on what role the door frame will play, the platbands are distinguished by their design and decorative features.
The first type is platbands for interior products, which are installed on the door to cover the unsightly places formed after the installation of the structure. The second type plays the role of a bridge between the door and the wall. If you use modern white decorative elements, you can hide the bumps.
Platbands made of wood
A few years ago, they were the only option for decorating the door. Such platbands have not lost their practicality and prevalence even today. Their main advantage is versatility. They come up to various types door structure. Modern wooden architraves for interior doors can be restored, they can be painted, puttied if necessary and varnished.

For such cashing, different coatings are used. The most common are paper strips with a laminating layer. They are not recommended to be washed with water, and even the flooring next to them should not be heavily wetted.
In appearance, the frame, which is finished with veneer, is no different. The disadvantage of this type of elements is also not high water resistance.

Other types of decorative element
Recently appeared on the market, but are rapidly gaining popularity. The price for them is affordable, and the appearance and indicators of moisture resistance are up to par.

The advantages of a ceramic trim allow it to be classified not only as a decorative element, but also as a stylization for stonework for a doorway.
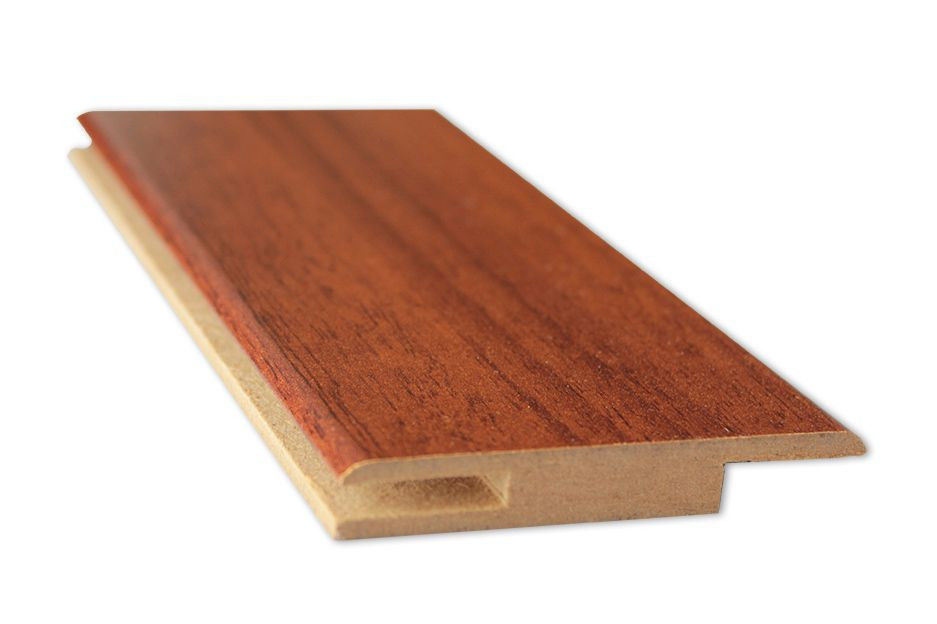
Differ from analogs in an unusual form. They have a complex configuration. The slats themselves are semicircular in shape, which forces them to put the trim in place with some features. This type of framing has a number of positive characteristics. At first glance, these are ordinary elements, but they have a special ledge that allows you to connect the door frame and the extension. The use of such strips is justified if the door frame is much narrower than the wall. This provided protrusion firmly fixes the bar in the grooves located on the ends of the door frame. The price of such a product is not significantly different from traditional types. If the installation is performed, then the part will become almost invisible.
Whatever type of platband you choose, you should purchase it together with door structures. When buying, pay attention not only to the price and appearance, but also to the methods of attachment.
Platband installation
The installation technology depends on the type of decorative element chosen. All of the above types differ in the installation method.
Installation of the additional rail is carried out after the doors are installed, and the mounting foam has completely hardened. If there is a special recess for the casing, it should be thoroughly cleaned of dust or foam that has fallen on it. If there is no such recess, it means that the foam should be cleaned behind the door frame in a section 2 centimeters wide and 2 centimeters deep.
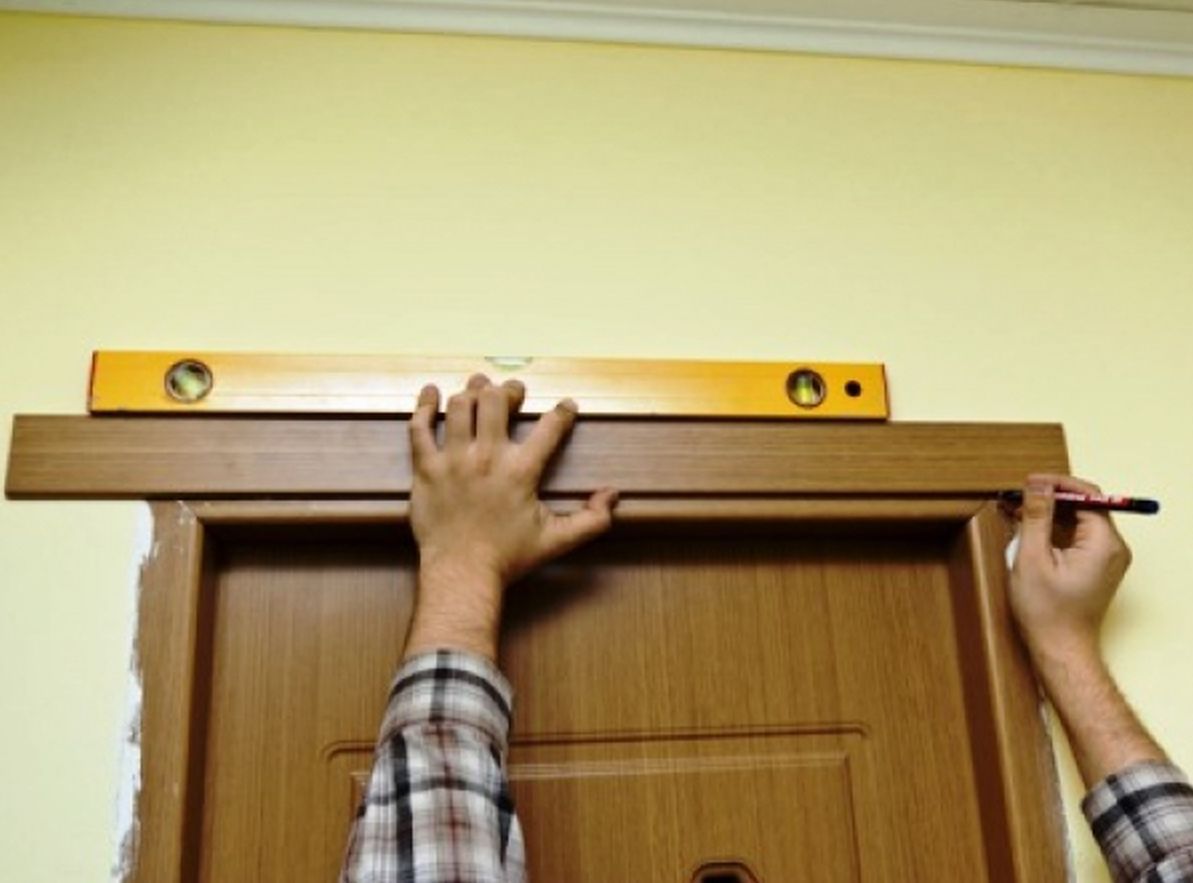
After graduation preparatory work, you can go to the main ones. You should start by fitting the bar that is prepared for the top. It is cut first in length, and then in width. To perform the fitting, as well as trimming correctly, you first need to put the bar on the wrong side in the place where it will stand, put marks on both sides. Then connect these marks with one line and cut evenly with a jigsaw. After that, you can start working with other rails. You can adjust the side strips in a similar way.
Length should be given special attention. See if there are gaps between the extensions. The top bar should lie in a horizontal position on the two side extensions and fit snugly against them. If everything worked out, you can mount. First you need to attach the casing so that there are no noticeable gaps between the opening and the box. Set it to level. When fixing, make sure that the connection points do not move. If necessary, correct and you can even wedged with slats or bars.
After completing this process, take a can of foam and blow out all the gaps between the plank and the opening. Initially, do the foaming pointwise, on both sides. Wait for the foam to set. Then complete the process. Blow out all the space that's left. After complete drying, you can remove excess mounting foam with a sharp knife.

Telescopic extensions are installed in the same way, but there is some difference in the technology of connecting the slats, which are stacked on top of each other. To do everything right, stick to the phased distribution of work. It is not recommended to first assemble a wide shield, as well as mount it in one piece. To begin with, install the first bar along the entire length of the opening, fix it, and only after that proceed to the second row. This is important, since when the mounting foam cools, the connection of the platbands may be broken. It is not possible to install all three telescopic bars at the same time.
Combined type of installation
There is another method of fastening platbands designed for interior doors. What is it? The main thing is the lack of capital fixation. Installation is simple and easy. The slats are set tightly into specially made grooves in the door frame. It is important to correctly fit the corners. You need to cut the top trim first. After its installation is completed, the other side strips should be adjusted in a similar way. It is necessary to trim the side elements only from the bottom side, since there is a notch in the upper part that should not be violated. A clear connection of the side extensions, as well as the upper bar, depends on this.
When trimming and installing platbands, it is important to remember that all work must be done with care and accuracy. After all, incorrectly cut planks and improperly mounted extensions will spoil the appearance of even the most expensive and outwardly attractive structures.
How to install the trim on interior doors in the right way can be viewed in this video:


