
You can have a garage without being a car enthusiast. Often, a garage is a place to hang out with friends, a workshop, even a production shop that needs heating during the cold season. Garages are not equipped with central heating. Therefore, heating a garage space is important both for the person working in it and for the space itself. Compliance with the temperature regime in the warm range, maintaining the humidity of the room at the proper level, has a positive effect on the durability of the garage. Buying a boiler and installing a heating system in a garage is quite an expensive pleasure. It is much more economical and practical to equip it with a do-it-yourself potbelly stove. Moreover, in a friendly garage team you can always find necessary materials, tools and fixtures.
What is used for
It should be noted that the installation of a potbelly stove in the garage does not provide for special engineering surveys. But its independent production will require the skills of owning power tools and metal welding.
The unequivocal advantages of such a stove are that it has compact dimensions, can be made for solid and liquid fuels, quickly heats the room and maintains heat well in it. As additional functions of the potbelly stove, the following can be distinguished: using it for cooking, using it as a dryer for clothes and shoes.
Subject to elementary fire safety standards, such a stove has practically no drawbacks.
Design and principle of operation
A solid fuel potbelly stove of the simplest design does not have any intricate elements. In fact, this is a metal container with two main compartments.
The main material used for its manufacture is metal. Since it must provide resistance to high temperatures, the metal should be selected thick-walled. Whether it's a barrel, an old gas cylinder, a piece of pipe or individual sheet metal blanks.
Use only steel elements for the manufacture of potbelly stoves. Aluminum, brass, cast iron (except grate) materials will not work. There will be a problem of their installation, associated with the peculiarities of welding various metals. And also the melting temperature of these metals may not be suitable.
The main compartment (furnace) is a container in which the combustion process takes place, which means it must be large enough, with air access, smoke and other volatile combustion products outflow, but at the same time structurally suitable for the installation site.
The second main compartment is an ashpit (blower). The ash pan is located under the combustion compartment, connected to it by mesh-type holes or a grate made of thick metal (rod, fittings). The ash pan serves to remove ash from the combustion chamber in a natural way. Ash under its own weight pours into the ash pan compartment through the holes. The ash is removed directly from the ash pan by hand.
It is advisable to install a door on the ash pan, by adjusting the gap of which you can control the intensity of the air flow entering the furnace. The door in the firebox should be closed after loading and lighting firewood.
Main compartments: firebox and ash pan
A branch pipe is welded into the top sheet, through which the outflow of smoke occurs. A metal pipe is welded to this pipe, which leads the smoke to the street.
Drawing and diagram: calculation of basic parameters
The main parameter that ensures the correct transfer of heat from the combustible products in the furnace - not into the chimney, but into the room, is the correctly selected chimney diameter.
You can calculate the cross section of the chimney pipe based on the volume of the furnace. The optimal ratio in numerical terms should be 1 to 2.7. This indicator is taken from the calculated parameters of metal and brick furnaces. It is nominal and generally accepted.
This ratio is very easy to calculate. We calculate the volume of the furnace. For example, 70 liters. Then the cross section of the required pipe will be 182 mm. (70 * 2.7 = 189 mm closest according to GOST - 182 mm). This calculation means that such a pipe section will optimally ensure the outflow of smoke in the chimney and sufficient resistance to keep heat in the potbelly stove.
Efficient heat transfer is the main parameter of the potbelly stove. The rest is design features. Which depend on the installation site and the imagination of the designer. This refers to the volume of the stove, its dimensions, the presence of legs or stands, vertical or horizontal position.
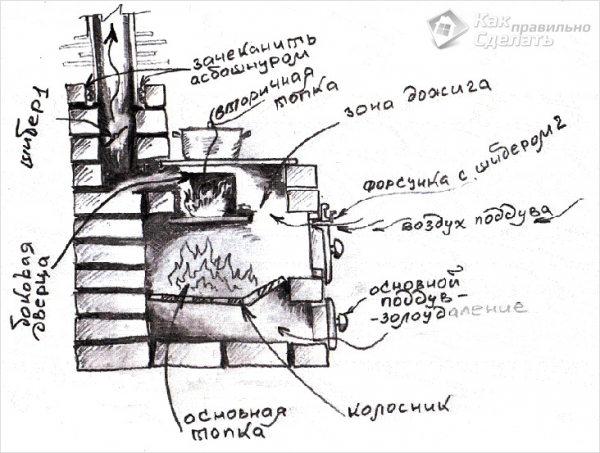
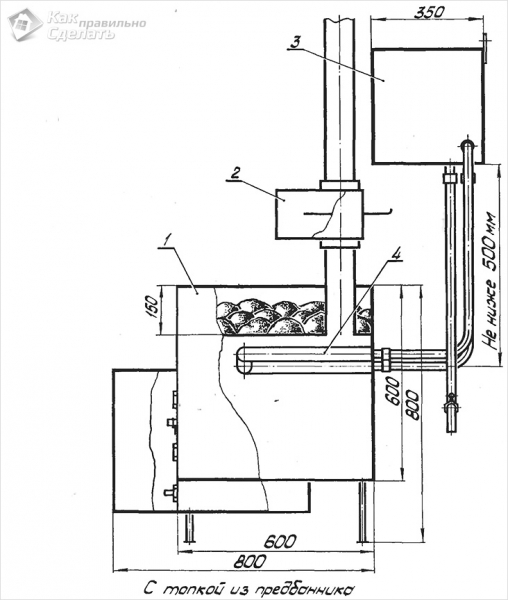
The most efficient design, designed taking into account thermal technological features, is presented in the following diagram:
One of the most efficient models Furnace "Inzhenera Loginova"
The diagram clearly shows structural elements made of sheet metal with dimensions, the process of movement of hot air and combustion products in the furnace section. And also the names of the main elements are applied to the diagram.
Necessary materials and tools
The assembly of the potbelly stove design involves working with metal. The following tools are required to prepare structural elements:
- grinder with a set of cutting and cleaning wheels for cutting and processing metal blanks of various thicknesses.
- welding machine for welding structural elements.
- metalwork tools: hammer, clamps, pliers, etc.
- electric drill with a set of drills for metal. For making technological and mounting holes.
And you will also need a measuring tool: ruler, scriber, square, level. In order for your product to come out smooth and have an aesthetic appearance.
Rulers, squares and levels are better to use metal. In the process of processing and welding, the metal heats up and can damage the measuring tool made of non-metallic materials.
If a decision is made to build a potbelly stove from sheet metal, then its thickness must be at least 4 mm. The grate should be made of reinforcement or rod with a cross section of at least 12 mm. This ensures the durability and safety of the product.
Monitor the quality of welding of the grate structure. Scald the rod on both sides. A weak weld can burn out in a short time.
It is not always possible to buy rolled metal for a new product. But, for sure, in a garage cooperative you can find an old propane tank, a piece of pipe, a metal barrel, and the like for cheap. The main thing is to choose a container for the firebox with a sufficiently thick wall. Further, if the dimensions of the firebox suit you, turn on your imagination, or stick to the above scheme as much as possible.
When preparing structural elements, cutting metal, welding, safety rules must be observed. Work should be performed in overalls, be sure to wear safety glasses. Welding work should be carried out outdoors or in a well-ventilated area.
Preparatory work
Before assembling the stove, it is necessary to determine its size and installation location in the garage. There are no standard guidelines for this. It is necessary to take into account such factors as the convenience of the design, understand the physical processes of heating the room and heat transfer, the flow of air in the room and its ventilation. How more area heated surface of the potbelly stove, the faster the garage room warms up. But the dimensions of the potbelly stove should not be a detriment to the area of \u200b\u200bthe garage. This is also important for reasons of fire safety, because the entire structure of the furnace is heated to fire-dangerous temperatures.
Potbelly stoves often recommend installing in the far corner of the garage, and making the chimney in the opposite direction. Thus, the fastest heating of the room is achieved, due to the long design of the chimney pipe, a large heat transfer is produced. The disadvantage of this design is the slope of the chimney pipe. The angle of inclination should not be less than 30 degrees. The ideal position is upright. Providing better heat transfer, you have to sacrifice the efficiency of the chimney. This increases the risk of smoke leakage into the garage. The seams of such a pipe should be checked for tightness before installation in place.
This principle of placing a potbelly stove would be more suitable for a basement than for a garage.
It is optimal to place the potbelly stove in a convenient place. The place itself needs to be prepared. A metal sheet or a small concrete slab must be laid on the floor, the edges of which must extend beyond the dimensions of the potbelly stove by at least 200 mm. This is due to fire safety. It is also necessary to remove flammable materials to the maximum possible distance from the potbelly stove.
Photo gallery: where is it better to put a potbelly stove in the garage
Gate location Far corner location Gate location
How to make a potbelly stove in the garage with your own hands: step by step
The manufacture of the simplest but effective potbelly stove is presented on the example of a potbelly stove from a pipe.
Pipe based design
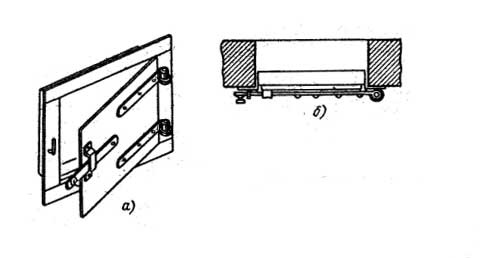
- on the prepared container for the furnace, it is necessary to mark and cut out two rectangular holes. The cut out segments should not be thrown away - these will be the doors for the firebox and ash pan compartments. You will need loops to fasten them. Seals are made with a metal strip along the perimeter of the doors.
- in the furnace tank, at a height of 100 mm from the lower edge of the door, there are stops for the grate. It is convenient to make such stops from a corner with a shelf of 40 - 50 mm, on which the grate structure rests. A grate made of ordinary metal mesh will not work, it will quickly burn out. Therefore, rods with a diameter of at least 12 mm are used.
- the grate is welded from reinforcement bars according to the grid pattern.
- after doing welding work inside the pipe, you can weld its ends - the bottom and ceiling of the potbelly stove.
- for the stability of the furnace, legs are welded to the bottom.
- in the ceiling of the potbelly stove, a chimney hole is made with a diameter corresponding to the cross section of the chimney pipe. Weld the pipe.
- hinges are welded and doors are hung. Equip locks or hooks for locking doors.
- welding seams should be processed with a grinder with a cleaning wheel to give the product an aesthetic appearance.
- also the product can be painted with heat-resistant paint.
Such a potbelly stove is often made from a gas cylinder:
The video is taken from the Youtube Internet resource, is used as an introductory material and is not an advertisement.
Making a potbelly stove from a gas cylinder yourself.
Video: how to make a garage stove yourself
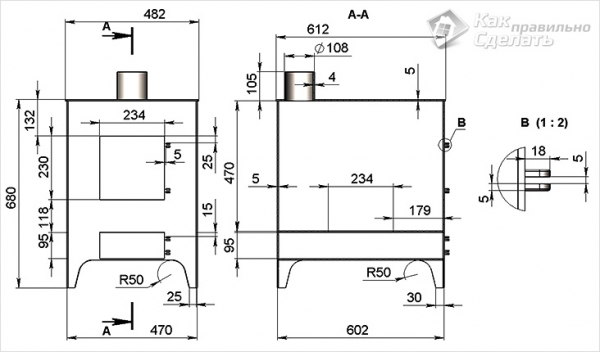
Rectangular potbelly stove is made mainly of sheet metal. It has the same main compartments as a potbelly stove from a pipe or barrel. The manufacturing process of a rectangular potbelly stove is no more laborious than the example discussed above. In a sense, a rectangular design is more practical. On such a potbelly stove you can heat up food. Such an oven is more stable.

Rectangular potbelly stove
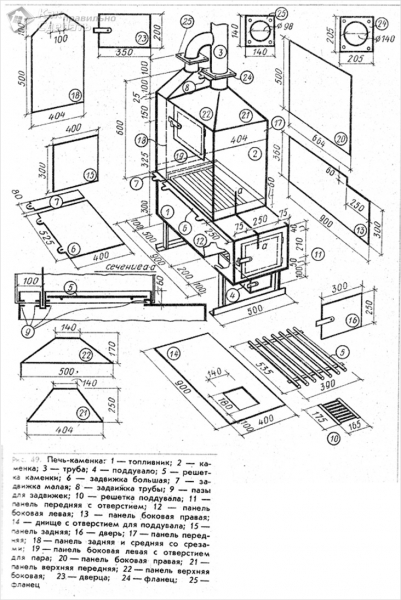
A diagram-drawing indicating the dimensions of such a stove is given below.
sheet metal model
The so-called "Pipe in Pipe" model combines a firebox and an additional shell around the firebox. This design increases the area of \u200b\u200bthe heated metal, due to which the air space around the stove heats up faster. Heat dissipation is more efficient.
A diagram of such a potbelly stove is shown below.
Assembly diagram "Pipe in pipe"
This diagram shows how a suitable air flow receives heat from the burning material, and exits through the technological holes at the top of the potbelly stove. This design is called a heat gun. Some garage engineers install a fan under the potbelly stove, thereby providing a forced outflow of hot air. Due to this addition, the heating efficiency increases, but the need for fuel also increases, since the furnace is cooled by air.
When making welds, you need to monitor their tightness. This is important for safety.
Metal cutting should be carried out with the use of protective equipment. Follow the safety rules when working with power tools.
The design of potbelly stoves largely depends on the imagination of the engineer and on his practical skills in working with metal. Some "Kulibins" bring the art of mounting bourgeois to perfection:

Potbelly stove from the garage of George Lucas
Operation features
For efficient and safe operation of a potbelly stove, you need to know and follow a few simple rules.

Cleaning and repair
Cleaning the furnace from the ashes should be done carefully. Spilled incandescent particles can cause a fire. But you should also remember that the potbelly stove can be very hot. It is recommended to clean the ash pan after each long burning. It is also necessary to clean the chimney. It is better to do this before the onset of cold weather, so as not to freeze again.
Repair of the stove consists mainly in the restoration of burned-out metal structural elements. The walls of the firebox can be scalded with metal in burnt places. A burnt grate is better to make a new one.
The remaining elements practically do not fail.
Undoubtedly, designing and assembling a potbelly stove is a worthy and interesting task for any garage owner. The main thing is to follow the safety rules when assembling the structure and the fire safety rules when installing and operating the potbelly stove.
At the word Bourgeois, a rickety smoking stove from the distant past appears, but modern designs are not at all like these pre-war stoves.
What are the potbelly stoves
Fuel for different types potbelly stoves can serve: waste oil or solid fuel.
The main materials for the furnace are steel or cast iron (or a combination of both), as well as heat-resistant bricks.
Modifications of potbelly stoves: with a stove for cooking; stove with oven and hob; heater with a special outer casing; gas-generating two-chamber potbelly stove.
The appearance of the heating device depends on your ability to handle the tool. Furnaces are constructed as rectangular, cylindrical from barrels and cylinders (the most simple), and other geometric shapes. To decorate the stove, they use decorative forged elements (doors, grates and other decorations) and heat-resistant glass in the door, through which it is pleasant to watch the flame, especially after all the work done in the garage.
What to consider when building a potbelly stove for a garage
We will be made of metal. This design heats up as quickly as possible, does not take up much space in the garage and is quite simple and economical. When designing, it should be taken into account that for the most efficient use of the thermal energy of heated gases, the chimney should be made as long as possible and be sure to equip it with a slide valve.
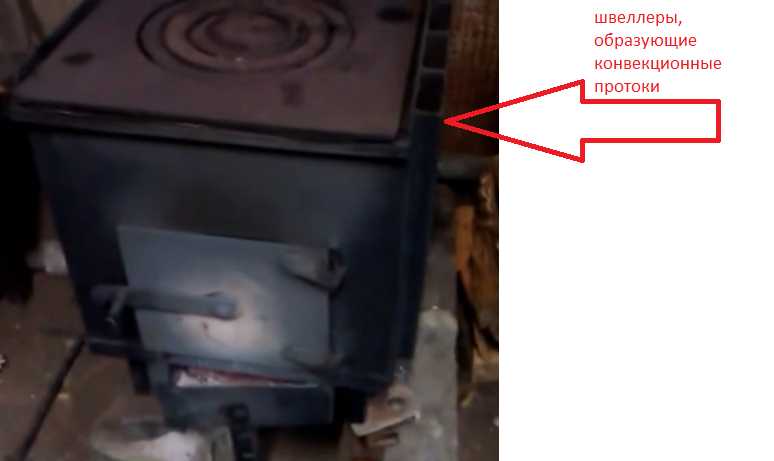
Potbelly stove with convection system for garage
Prepare sheets of steel (at least 2 mm thick), grinder or gas cutter, drill, welding machine, chimney pipes, channel, fittings for oven doors (hinges, latches, asbestos sealant), 5-6 fireclay bricks. Also useful: sandpaper, heat-resistant paint, tape measure.
Video - do-it-yourself wood burning stove for a garage
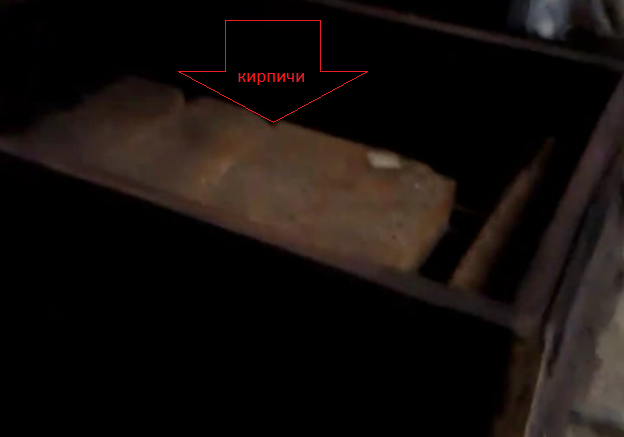
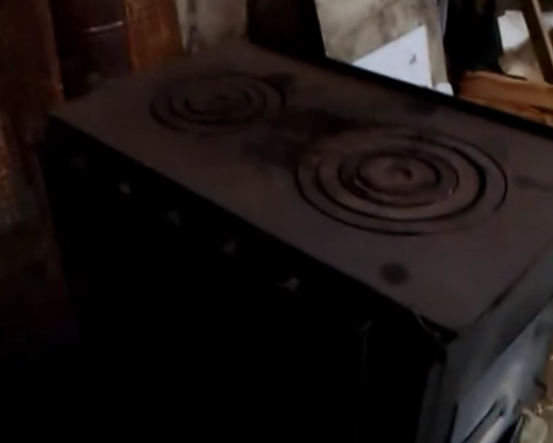
For the garage, we will perform a rectangular shape. The design provides: ash collection compartment with drawer; the zone where the combustion of the fuel takes place (we will put the fuel on the grate); chimney; convection system and top compartment with fireclay bricks and hob.
Operating principle
During combustion, heat is released, which heats the bricks and the walls of the furnace. Convection ducts (or simply vertical pipes) are located on the walls of the furnace. Cold air enters the ducts from below, heats up and goes up. Thus, the room warms up quickly, and the efficiency of the furnace increases. And due to the presence of fireclay bricks in the construction, heat is stored longer in the garage.
Assembly
To begin with, we draw on paper a scan of the walls of the furnace - the bottom, the front and rear walls, two side ones. We transfer the drawing to a sheet of steel and cut out the details with a grinder.

We fix metal corners on the side and back walls by welding, on which we will later lay a grate-grate and a steel sheet holding the bricks. The height of the compartments is taken from the calculation of ¼ of the height of the furnace - an ash pan, 2/4 of the height - a firebox, ¼ of the height - a compartment with bricks and a hob.

We make a grate. Its function is to hold the fuel and freely pass the ash and ash into the waste collection box. The grate can be made from a sheet of metal, with a grinder making longitudinal holes in it or from metal fittings, placing short and long bars perpendicular to each other and fastening them either with steel wire or with a welding machine.

We lay the grate on the bottom row of corners. An ash pan will be located under the grate.
Next, make a box for collecting waste. We take its dimensions slightly smaller than the dimensions of the zone for collecting combustion products (ash pan). We make markings on a sheet of steel and cut out the bottom, back and side walls. We connect them by welding. You should get a box without a front wall and top. For ease of use, a small loop should be welded in front, for which we will later pull the box out of the oven and clean it from the ashes.
When this stage is completed, we cut out a rectangle from a sufficiently thick steel (about 5 mm), which will be located on the top row of corners and hold the bricks. It is not recommended to weld the grate and the retaining plate to the furnace, so that in case of defects, they can be easily replaced with new ones.
On the back wall in the upper part of the firebox, we drill a hole with a diameter of about 10 centimeters and weld a metal pipe to it. We will connect the chimney to this pipe.
On the front wall of the furnace, it is necessary to place the blower door and the firebox door. For both, we cut out two rectangular holes, and for a snug fit, we sheathe the remaining metal rectangles around the edges with corners (frame) and with an asbestos cord from the inside, attach valves and handles to them, then “plant” the doors on the hinges. You can purchase ready-made cast-iron doors with or without heat-resistant glass inserts. We take the size of the doors so that it is convenient to load the fuel and get the ash collection box.
After installing the doors, we weld the front wall of the furnace to the body, and lay several fireclay bricks on the steel sheet above the furnace.
We proceed to the installation of convection ducts. For them, you will need sections of the channel, the length of which is equal to the height of the furnace. Each channel must be vertically welded to the furnace walls.
It is rational to make a chimney in a T-shape with a sliding damper. To do this, we select two pipes: the first should be tightly put on the pipe coming out of the furnace of the potbelly stove, the second should be long enough to remove flue gases outside the garage.
We make a hole in a long pipe, to which we attach a short section of pipe perpendicularly by welding. Here we will place the valve. We drill two holes with a diameter of not more than 1 cm so that a metal bar passes through them. We bend the end of the rod. We weld a circle inside the pipe to this bar. When the bar is rotated, the circle must rotate accordingly and change the size of the gap in the pipe.

The walls behind the chimney must be insulated with asbestos cardboard or steel.
The last stage of work is the installation of the furnace on the legs. The base (legs) are made: from sections of profiles, attaching them by welding or screws to the furnace body; from a metal box without a front wall (acts as a woodcutter); from bricks or forged elements.
It remains only to connect the stove to the chimney and kindle a fire in it. After installing the potbelly stove in the garage, it will always be warm, dry, and after work there will always be an opportunity to warm the kettle and relax.
Motorists who, in addition, are the owners of the garage, know firsthand that in winter the garage must be heated. Of course, not all the time, but while people are in it. And since the garage for many is a kind of male corner, men try to install a small stove inside the room. By the way, there are a lot of options here. In this article, we will be interested in one option - a potbelly stove. This is the simplest type of heating device that runs on solid fuels. Moreover, it is not difficult to make such a unit. So, the topic of our article is a do-it-yourself potbelly stove for a garage.
Let's start with the fact that there is a fairly large range of this simple heater. The classification is made according to the method of manufacture, and according to the materials from which the furnace will be assembled, and according to the method of fuel combustion. We will not deviate in different directions from the topic, we will simply analyze the so-called classic version. Here he is in the photo below.
 Potbelly stove in a classic version
Materials for the stove
First of all, you will need a metal sheet with a thickness of 4-5 mm. It is not recommended to take thinner, such a sheet will quickly burn out. Be sure to pipe with a diameter of 80-120 mm. The diameter will depend on the size of the installation. The smaller the homemade garage oven, the smaller the diameter of the installed chimney. The photo shows that the potbelly stove is installed on legs. The functions of the legs can be performed not only by a metal corner, but also by pieces of a pipe with a diameter of 20-32 mm.
What can be said about the materials used to assemble the stove? All of them are metal, which means that only the person who knows how to work with a welding machine can assemble such a stove with his own hands. If you have such skills, but the problems disappear by themselves.
 Typical design
Device and principle of operation
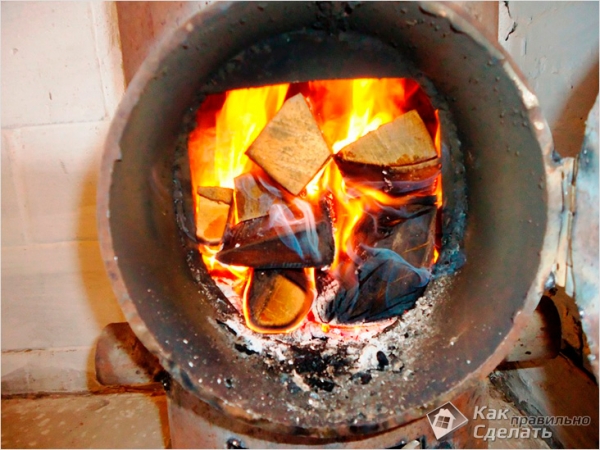
Before you start assembling a potbelly stove, you need to figure out how it works. In principle, there is nothing complicated here. Inside the stove, firewood is laid on the grate, which, when burned, release a large amount of thermal energy. The latter is transferred to the metal case of the unit, which releases it into the room. Carbon monoxide and smoke exit through the chimney to the outside. Everything is simple.
But it is necessary to pay attention to this moment. Firewood just will not burn without oxygen, so you need to make sure that fresh air constantly enters the combustion zone. There are two options here:
- Cut a hole for the blower on the front side and install the damper there.
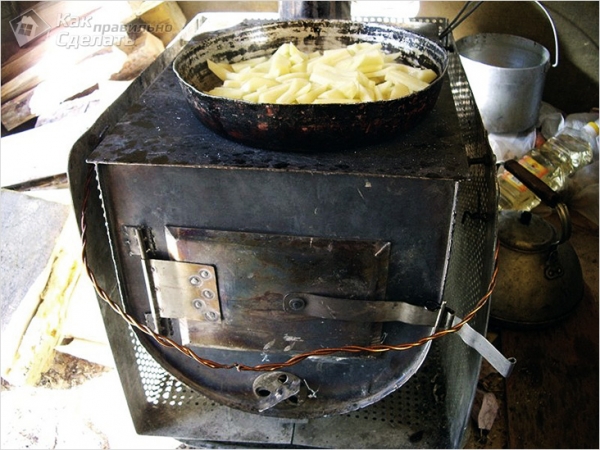
- Make several holes through which air will flow into the stove. As shown in photo #2.
A potbelly stove for a garage consists of a body (in our case, it is a box of rectangular section), a furnace hole is made on the front side and a door is hung. A chimney pipe must be installed, for this it is necessary to make a hole in the back wall or on top of the body and weld a pipe to it with a diameter slightly less than the diameter of the chimney and a height of 10-15 cm.
 Potbelly stove assembly
Assembly steps
Even such a small heater, or rather, its assembly, is divided into several stages, answering the main question, how to make a potbelly stove in the garage.
Preparatory
First of all, let's decide on the size. As in the case of any stoves, the size of the potbelly stove is selected according to the size of the garage. And the larger the latter, the larger the oven should be. Although this is a purely conditional ratio.
- The metal sheet must be divided into six parts. The body is assembled from it, so you should first decide on the shape of the heater. In this case, we will be interested in the section, because it can be rectangular or square. If a square is selected, then four walls will be the same. The back and front walls will be different, but identical to each other.
- Now a rectangular hole is made in the front wall. Firewood will be laid through it. The cut piece should not be thrown away. You can make a door out of it by welding hinges to it. To prevent smoke from entering the room through a loosely pressed door, it is recommended to inside attach an asbestos cord to it around the entire perimeter.
- A hole is made in one of the main walls for the chimney. A prepared pipe is welded to it.
- Four legs are cut from a pipe or corner.
- A grate is being made. It can still be the same metal sheet in which you have to make holes. And you can make a lattice of metal fittings or wire.
 Finished
Assembly
So, now you can move on to the main process.
- First, the bottom wall and two side walls are welded together.
- Then the back and front are welded to them.
- Stops are welded inside under the grate. It is better to make the grate itself removable so that it is easier to clean the ash and ashes from the stove. Corners or wire, which are welded along the body, can act as stops.
- The grate is installed. This must be done right now, it will be difficult to do this from the side of the firebox.
- The top wall is welded.
- Next, the legs are welded.
Everything, a homemade garage oven is ready. It must be installed, the chimney connected, the grate laid inside and a test kindling carried out.
Don't forget to rate the article.
A potbelly stove for space heating began to be widely used a hundred years ago. After central heating appeared, metal potbelly stoves migrated from apartments and houses to summer cottages and garages.
One of the most significant shortcomings of a potbelly stove can be considered the conditions for its heat transfer. Its heat is not accumulated by anything and almost everything goes out through the pipe. Such a furnace is effective only near the installation site and only during the combustion of fuel.
In order to increase the efficiency of the potbelly stove, you need to use the lost heat. The maximum losses occur through the chimney, which heats up when the potbelly stove is running.
The chimney can be turned into a heating element by changing its straight shape to a stepped one, which increases the heat transfer area.
In this article we will tell you how to make a potbelly stove for a garage with your own hands from various materials. The easiest way out is to take the old gas cylinder (in which propane gas was transported) as a basis. In the absence of a cylinder, you can use a 40-liter milk flask or any other metal blank.
From a gas bottle
Potbelly stove from a gas cylinder
You need to start work with a drawing, but not on paper, but on the cylinder itself. The future firebox door and blower are marked with a marker. The door should be located in the center of the cylinder, and the blower - in its lower part. The distance between them is maintained no more than 10 cm, and a closed line is drawn in the middle. According to it, the grinder cuts the balloon into two parts.
A grid is welded from 16 mm reinforcement, which is welded to the lower half, after which both parts of the cylinder are joined again.
In the places intended for loops, cuts are made. Then hinges are welded there, and a door is cut out. The same operation is carried out with the blower.
It remains to equip the chimney. To do this, a valve is cut off by a grinder, and a metal pipe is welded in its place, the diameter of which should be 80-90 mm. The chimney cuts into the garage hood system or is led out through the wall.
 Ready potbelly stove from a cylinder
From a milk flask
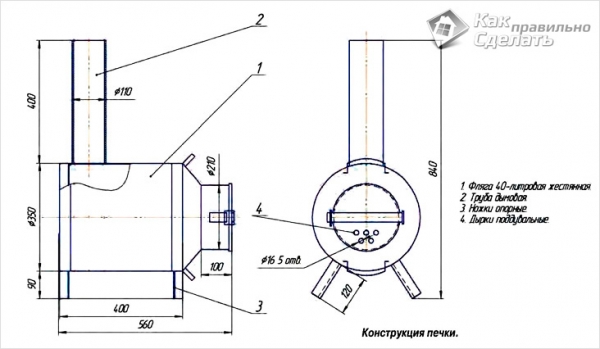 Scheme of a potbelly stove from a flask
A metal can is a great thing in the household, suitable for storing paints, motor oils, and fuel. The design of the flask is ideal for making a potbelly stove from it, but as a heating device it will not be as durable as we would like, its walls are not thick enough. We can say with confidence that it will last for 2-3 seasons.
How self-manufacturing potbelly stoves need to perform several operations.
First you need to mark, and then cut out at the bottom of the can, almost at the very bottom, a hole for the chimney. At the final stage of work, the pipe is seized by welding. The diameter of the chimney is selected from 8 to 12 cm. The chimney is extended after the stove is manufactured and installed.
The can lid is a ready-made oven door with a successful latch, it remains only to drill a few blowing holes in it, the diameter of which can be 15-18 mm. This is done at the bottom of the lid.
4 legs of equal length are made from a corner or pipe trimmings, which are then symmetrically welded to the bottom of the can. A metal sheet can be laid in front of the door so that an accidentally fallen coal does not fall on flammable material.
Flask handles are a handy thing for carrying a potbelly stove from place to place, by holding them you can easily shake out the ash accumulated in the stove. It is for this operation that the chimney is best made detachable.
Well, that's all, it remains only to test the new stove.
Installation
 Installation
The use of potbelly stoves made at home, as well as any other heating installations, requires strict adherence to safety regulations. Initially, you should choose a place to install a potbelly stove. This unit, as practice shows, is best installed in a corner, namely near the walls opposite in location to the garage door.
Do not install the potbelly stove closer than 1.5 m to the location of the car. It is worth considering that all flammable materials and products must be located at a distance of at least 1.5 m from the potbelly stove.
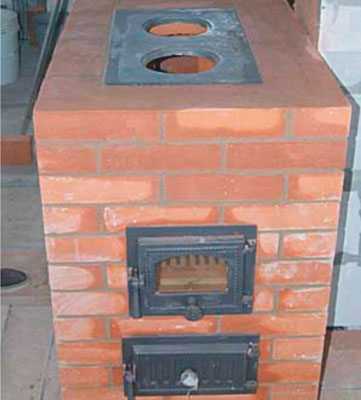
It is better to overlay the stove on all sides with brick walls. So, the possibility of touching a red-hot furnace will be excluded, and the heat generated from its furnace will also be accumulated. Thus, you will increase the efficiency of the device several times.
 Increasing the efficiency of the furnace
If the walls of the garage are made of wood, then there must be a certain distance between them and the stove, namely not less than 100 cm. In addition, in order to avoid igniting the building, the walls near the potbelly stove should be lined with asbestos sheets / bricks or other refractory materials.
As a base for a potbelly stove, you can use a sheet of steel having a thickness of 1-2 cm. Another option is to fill in a concrete screed. Thanks to these actions, you will be able to prevent the spread of fire if coals / sparks, etc. suddenly fall out of the firebox.
To use the potbelly stove in the garage, you must first make high-quality ventilation in it. Fresh air must be supplied here in sufficient volume, which will ensure the normal burning of the fire. As ventilation, a small gap between the ground and garage doors. Otherwise, you will have to make a special channel for the timely flow of air into the garage, which is not very profitable from an economic point of view.
The potbelly stove becomes very hot when burning in its firebox, so you should not leave flammable materials near it, such as wood, oils and greases, gasoline, etc. This can lead to disaster.
 Potbelly stove with burner
If you equip the potbelly stove with a water tank, then the stove can be used to heat it. By installing burners on it, you will also have the opportunity to heat food.
It will take no more than 2 hours to complete the entire work on making a potbelly stove, and you can enjoy the results of your work for several seasons.
Video
A good example of creating a potbelly stove from improvised means in video format:
Blueprints
The drawings and diagrams we have proposed will help you understand the principle of manufacturing a potbelly stove for heating a garage:
 Scheme of a rocket stove
 Scheme-drawing of a potbelly stove from a gas cylinder
 Scheme of a double afterburning potbelly stove
 Pyrolysis potbelly stove
 Drawing of a rocket potbelly stove
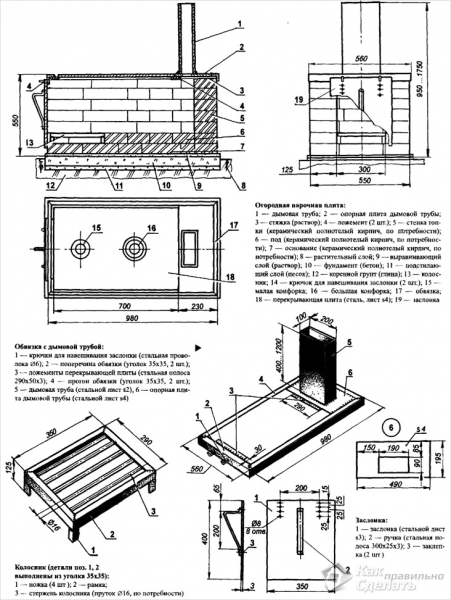
 Drawing of a stove-stove for a garage
 Drawing of a potbelly stove from a gas bottle
 Potbelly stove drawing
 Drawing of an army potbelly stove
 Drawing of a potbelly stove from an old tank
Is it really possible to do it yourself for heating a garage with minimal time and money? The idea is not new, but not everyone knows how to implement it. After reading the article, you will understand how to make it correctly, on wood, etc.
Key requirements
- Of course, a do-it-yourself garage stove must meet certain requirements:
- simplicity of design;
- so that liquid or solid fuel can be used;
- compactness;
- ease of use;
- the ability to maintain a high heating temperature for a long time;
- fast heating to warm up the room;
- unpretentiousness in service;
- relatively low cost of materials for manufacturing.
Fuel moment
Initially, you should decide what fuel to use for heating the garage. Naturally, we would not want to use high-cost (expensive) heat carriers for heating. In addition, security issues are not in the last place.
- So, the following picture emerges:
- supplying mains gas is completely unreasonable. The slightest accidental spark (and there are a lot of them in the garage), and the risk of fire increases to the limit. The same goes for gas cylinders;
- electric heating will require too large financial costs;
- or hard coal - an option worthy in all respects;
- a homemade stove for working out is perhaps the best option in most cases.
Waste oil is available in almost every household where there is a car or other type of transport. You can use it to heat the oven in the garage - it's profitable and wise.
metal or brick
Now you need to figure out what material to use - make or metal. There are pros and cons in both cases. Let's see what's what.
BrickworkIt is quite easy to lay out a small stove out of brick, even if there are no special skills. The main disadvantage is the fact, what brick construction deprived of mobility. That is, it is not possible to transfer such a structure from place to place.
- Why is it important? The fact is that the internal arrangement of garages is often subject to change:
- I wanted to rearrange items (racks, repair tools, etc.);
- an idea came up to expand the premises (for example, another vehicle appeared in the family
Making a brick heating source with your own hands is not entirely far-sighted. Although technologically quite easy, but from a financial point of view it is quite economical.
- As a rule, do-it-yourself heating systems are made from a metal sheet or from ready-made used elements. Everything that can be used is used, having at least a minimal engineering mindset:
- iron barrels;
- welded cubic and cylindrical containers;
- cut off parts of electrical cabinets, etc.
The main advantages of this product:
- deficiencies identified during operation can be easily corrected by performing welding work - expanding or reducing the size of individual elements (changing the shape of the door, increasing the chimney, etc.);
- it can be easily moved from place to place.
The pipe can be made according to the principle of telescopic assembly, so that, if necessary, the chimney can be easily dismantled and reassembled.
How to make a garage stove with your own hands
Let's take a look at the most popular and affordable versions of garage heating stoves that you can make yourself in a relatively short time. By comparing the proposed options, you will make an informed decision - what to make the furnace structure from and what fuel to use later.
brick oven
It has already been said above that this design for heating a garage requires a lot of painstaking work, and besides, it is devoid of mobility. However, this option is sometimes still considered.
- Peculiarities:
- the base area should be no more than 2.5 by 2.5 bricks;
- the recommended height of the structure is no more than 9 bricks;
- masonry mortar is kneaded on the basis of sand, fireclay powder and refractory clay;
Only refractory bricks are used, and not ordinary masonry.
- it is also laid out of brick, after which a stainless steel sleeve is introduced into the channel. Chimney outlet through the roof of the garage (wall outlet increases the risk of poor draft).
Keep in mind that do-it-yourself masonry work without experience is a sure way to the fact that all the work will have to be redone again with the involvement of a competent specialist. Some instructional videos show you how to do all the masonry work, but in most cases this is not enough.
Homemade potbelly stove
Structures of this kind are found all over the place.
Peculiarities:
- you will need a welding machine and, of course, some skills in working with it;
- sheet metal is suitable for manufacturing, as well as a metal barrel or pipe with a diameter of at least 300-400 mm;
- the thickness of the sheet must be at least 5 mm, otherwise after a short time, with intensive use, the walls of the structure will begin to burn out;
- the thickness of the metal of the chimney pipe at the base should not be less than 10-12 mm, otherwise, again, the iron will quickly burn out under the influence high temperatures;
- sometimes located on the side of the back wall (with a slope of at least 30 degrees), although it is preferable to do this from above;
The optimal diameter of the chimney pipe is about 120 mm or a little more.
- under the firebox, it is necessary to organize a place for collecting wood ash and solid coal residue.
- make cuts of 10-12 mm if you use coal or small wood for heating. For large-wood structures, the advice is different - slots of 40 mm or more in size;
- install a removable drawer below the slots. As it fills, it is removed, emptied and installed back. Sufficient thickness of sheet steel for such a box is 3 mm.
Due to welding of metal perpendicular plates with a thickness of 5 mm on the sides, productivity increases, that is, the potbelly stove quickly gains heat and the heating process is extended.
Waste oil stove
In the matter of heating the garage, home-made furnaces for working out perfectly cope with the task. And they are also popular due to the fact that used engine oil does not need to be specially purchased - it accumulates in the household stocks of any motorist. To date, there are two versions of this design.
Potbelly stove with a secondary afterburner
Device:
- in the lower tank, ignition and heating take place, after which oil vapors are released;
- they burn in the primary chamber;
- at the same time, air through the damper installed on the hole for filling the used oil enters the combustion chamber;
- secondary air enters through the holes in the afterburner pipe. As a result, the released pyrolysis gases are burned in the upper chamber;
- here, the combustion products give heat to the metal walls;
- then the combustion products are sent to the chimney and leave the potbelly stove.
Flaws:
- in cold weather, the power of such heating is insufficient;
- unfortunately, water is often present in mining, and even the slightest bit of it will lead to splashing of burning oil - therefore, a fire hazard is high;
- during ignition and in the first minutes of burning, acrid smoke is released, which at first is kept in the room (until normal draft is established).
Tips for choosing materials and assembling the structure:
- sheet metal 4-6 mm thick;
- iron pipe with a thickness of 4 to 5 mm, a diameter of 100 mm;
- the pipe must have drilled holes;
- when welding, observe the absolute impermeability of the seams.
If you settled on this option, then watch a useful video on how to do the work in advance.
Stove "dropper"
- Against the background of the previous "recipe", this option is more perfect, safe and modern. The fuel burns out almost completely due to the fact that it is dripped. To make this design with your own hands, you will need much more materials and fixtures:
- find the optimal capacity - so that it can perform the function of a separate oil tank;
- install a pump in the oil tank, which will be responsible for supplying fuel.
In the absence of a pump, you will have to place the fuel tank above the level of the furnace - this is the only way you can organize the flow of oil by gravity through the tube.
Operating procedure:
- it is recommended to make a vertical case in a round shape (for example, from a used gas cylinder);
- at the bottom of the body there is a bowl where the combustion of fuel occurs;
- a tube is attached to the bowl, through which the used oil slowly drips;
- a pipe is inserted into the firebox from the upper side, which has many slots and holes - thanks to them, pyrolysis vapors are burned out and secondary air is supplied.
In principle, the natural supply of air to the firebox due to natural chimney draft and gravity flow of fuel are factors that do not require effort on the part of the user. Just remember to make a small hole in the top of the heater and fit it with a cover. Purpose of this element:
- an explosive safety valve (as soon as a pop occurs inside the oven, the lid will fly off to the side, and that will be the end of it - no rupture of the body will follow);
- viewing window.
More complex versions of stoves for testing involve forced fuel supply. Their construction should be considered separately and more substantively. If you are interested, watch a few sensible videos on this topic to get a good understanding.
There are universal designs that can work in the garage either on waste oils or on firewood. Their manufacture is extremely difficult, so it makes no sense to "bother" when there are simpler alternatives.
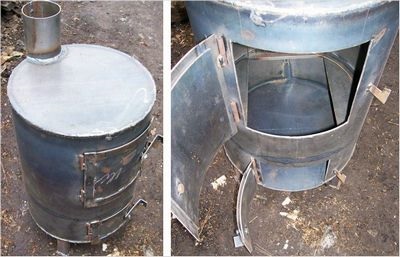
Long burning wood stove
Features and Benefits:
- firewood does not need to be added often;
- the device works on the principle of not burning, but on the principle of smoldering;
- firewood slowly smolders for 12-15, and sometimes 20 hours, releasing heat;
- the effect is achieved through moderate traction;
The intensity of the process is regulated by the air.
- the device fully works only if the special damper is correctly made;
- in order for the process to be long enough and correct, it is necessary at the start to fully load the firebox with firewood.
How to make:
- take a metal 200-liter barrel;
- cut off the top
- make a hole in it for a chimney pipe and a hole for an air supply pipe with a diameter of 100 mm;
The optimal diameter of the chimney is from 150 mm. Only in this case, you can count on effective traction.
- then you need to cut a circle out of sheet metal and weld a couple of pieces of channel to it. The size of the circle must be such that it can move freely inside the cylindrical barrel;
- cut a hole and weld a piece of pipe with a diameter of 100 mm to it;
For greater stability of the structure, weld not a round, but a square piece of metal to the bottom of the cylinder.
- then insert the load into the barrel and cover it with a lid from above. At this point, don't forget to run the air supply pipe through the hole you cut earlier;
- cut through two hatches - one for removing ash, the other for laying firewood;
- weld metal covers to both hatches.
For safety reasons, install such an oven on a special foundation made of brick or stone.
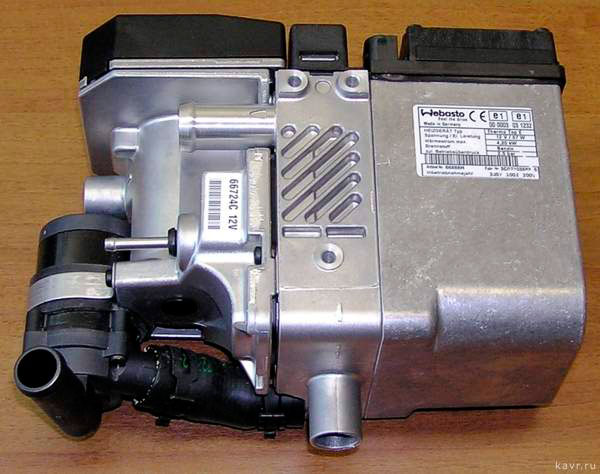
German car heater
Many motorists are well acquainted with the Webasto brand (a German manufacturer of automotive equipment - starting heaters). Webasto equipment has shown itself well at low temperatures, especially when it is required to quickly organize the warm-up of the car engine.
Using such a heater in the garage is a great idea. The unit is mounted in the heating circuit. Most often, these are cast-iron radiators, the role of the coolant is played by water. There is currently no intelligible information about the use of oil coolers complete with "webasta".
Advantages:
- the device is portable and small-sized (only 250x100x170 mm);
- no problem to find a place to place the heater;
- easy control by remote control, software timer or even via mobile phone;
- the consumption of internal fuel in the unit is not more than 0.5 l / h (that is, there will be no increased consumption and heating will occur gently, without an abrupt cessation - it is always possible to predict room heating with some safety stock).
Difficulties:
- without knowledge, it is quite difficult to design a heating circuit (calculate the number of cast-iron radiators, direction method); http://site/pechki/pechi-dlya-dachi-na-drovax.html, and I suggest a stove with one firebox, but lay out half of the furnace firebox (left or right) from bricks, and make half from bent (or welded) at an angle of 90º of a sheet of heat-resistant iron, corresponding in shape brickwork and simply replacing it in this place.
To increase the heat transfer of the surface of this iron sheet, it is necessary to weld perpendicular metal ribs to it (10 pieces or more). The size of these ribs is equal to the width of the bricks replaced by the iron sheet (25 cm, if the furnace walls are 2 bricks.) In addition, the overlying layers of brickwork will rest on these ribs.


