
At what stage of construction to install windows
Wooden windows must be installed after all wet work has been carried out inside the house finishing works- plasters and floor screeds.
House before installation wooden windows should dry out a little. Otherwise, high indoor air humidity (up to 96%) causes the wood to swell, moisture condensation on the glass further moistens the wooden parts of the windows. As a result, deformation and sticking of parts occur, the paintwork of the wooden window profiles is damaged.
Finishing the walls with drywall, instead of plaster, significantly reduces the release of moisture into the air of the room. Wooden windows can be installed after the installation of screeds, before the walls are finished with plasterboard.
PVC plastic windows are not afraid of moisture. They can be installed before the start of finishing work in the house.
If the walls are finished with dry plaster - drywall, then the windows in any case must be installed before the start of finishing work. Drywall can be damaged by atmospheric moisture entering the house through unfilled window openings.
If interior decoration is carried out in winter
Often, work on the construction of walls and roofs of a private house ends in the fall. Interior decoration home owners decide to do in the winter. In this case insert plastic windows and start heating in the house. Wall decoration in winter is best done using drywall. Plasterboard cladding does not greatly increase the humidity in the premises and allows you to quickly complete the following finishing steps.
In case of installation of wooden windows finishing work in winter must be carried out using dry plaster.
To quickly reduce humidity, in a house with installed windows it is recommended to increase the intensity natural ventilation by installing electric fans in the ventilation ducts, and keeping the windows ajar.
The temperature in the premises during the finishing work, as well as until the plaster and screed have dried out, it is necessary constantly maintain above +5 ° C.
The amount of building moisture in the house can be further reduced, and the completion of finishing can be accelerated if, when installing floors in all or part of the premises, instead of a monolithic concrete screed, use a dry prefabricated screed.
If the decoration of the house is done in the summer
If finishing work in the house begins in the spring, then plastic windows are best installed before work begins.
After installing the windows, the slopes and corners of the window openings are first plastered. Then the walls are leveled with plaster.
In the case of wooden windows their installation must be carried out after all wet finishing work has been completed.
At the time of finishing work, to exclude drafts in the house, window openings are covered with foil.
First, the walls are plastered, without touching the window slopes. It is better to wait a while to allow the house to dry out from building moisture. Then wooden windows are mounted.
After installing wooden windows, you will have to invite finishers again to plaster window slopes or clad them with sheet material, for example, drywall.
When to finish the facade
For single layer walls(without insulation) facade plaster can be applied both before and after window installation. But it is better to finish the facade after installing the windows. In this case, the window and wall joint will be properly sealed, window slopes will be made immediately, and external window sill drains will be installed.
If you finish the facade before installing the windows, then you will have to return to the plastering of the slopes again. The plaster applied later will differ from the previously completed one, which will be noticeable.
For double wall installation of insulation and finishing of the facade is performed after the installation of windows.
In a two-layer wall with facade insulation, the windows must be installed before the installation of the insulation boards. This will allow you to properly finish the window slopes from the outside.
When finishing the facade with plaster over the insulation, the insulation boards should be 2-3 cm. put on the window frame. Insulation plates are laid without joints in the corners of window openings. To do this, the insulation plate is cut off, giving it an L-shape, and installed with a cutout around the corner of the window.
At the time of finishing (plastering) the facade of the window, it is recommended to cover it with plastic wrap, securing it with adhesive tape. Protecting the window profile with ordinary masking tape is not recommended - traces may remain after removing the tape.
The protective film on the frame outside the window is removed immediately after installation. Otherwise, under the influence of the sun, the film will stick so that it cannot be removed.
The protective film on the frame inside the room can remain on the window for no more than one month from the moment of installation.
Window installation - rules
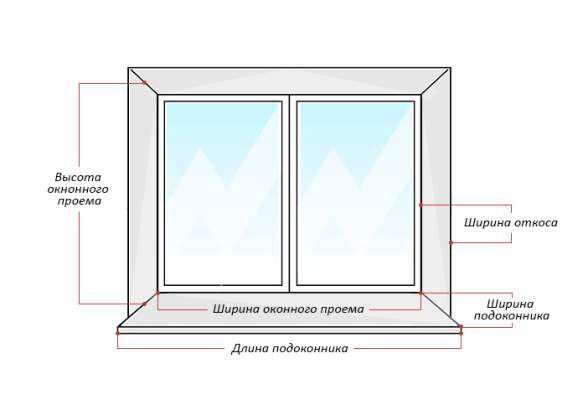
To place an order for the manufacture of windows, it is very important to correctly determine the dimensions of the window block. If the dimensions of the block are too large, then during installation it will not be possible to correctly perform slopes, install a window sill and ebbs. If the dimensions of the window block are too small, compared to the dimensions of the opening in the wall, the load on the fastening elements increases, difficulties arise with high-quality sealing of the joint between the wall and the window, which will create problems during the operation of the window.
It can be advantageous to order the production of windows in winter - manufacturers give discounts from the price during this period. It is necessary to store windows purchased in advance before installation in a dry place, excluding exposure to sunlight.
In winter, plastic windows are not recommended to be installed at outdoor temperatures below -5 ° C. Although, according to the standards of window manufacturers, their installation is allowed at air temperatures up to -10 ° C. At lower temperatures, plastic becomes brittle, and the risk of cracks and chips in window details increases .
Mounting foam, even "winter", at low temperatures may not have good adhesion to the wall. In a new house, the surface of the wall in the opening is often covered with a thin crust of ice invisible to the eye. At low temperatures, the hardening of the foam occurs very slowly. It is better to postpone the installation of windows for the warm season.
Fixing a window to a wall
The window block is installed in the window opening on the spacer bars and aligned horizontally and vertically according to the level.
The window block is attached to the wall in two ways: with steel anchors or frame dowels.

One end of the anchor - galvanized steel plates, is fixed on the window block, and the other end is screwed to the wall. The anchor is attached to the window as recommended by the window manufacturer.
With the help of steel anchors, you can fix any type of window to a wall of any material and different designs(single layer, multilayer).
Fastening a window to a wall with a frame dowel is not so universal.

To fix the window with a frame dowel, a hole is drilled in the window profile. Through this hole in the profile, a hole is drilled in the wall. A steel frame dowel is inserted into the resulting channel and the dowel screw is tightened. The end of the dowel in the wall unclenches and fixes the structure to the wall.
This method of fastening forces one to intervene in the design of the window. Excessive tightening of the dowel leads to deformation of the window profile, limits the movement of the structure when the temperature changes. It is necessary to follow the recommendations of the manufacturer of windows for fixing them to the wall using dowels.

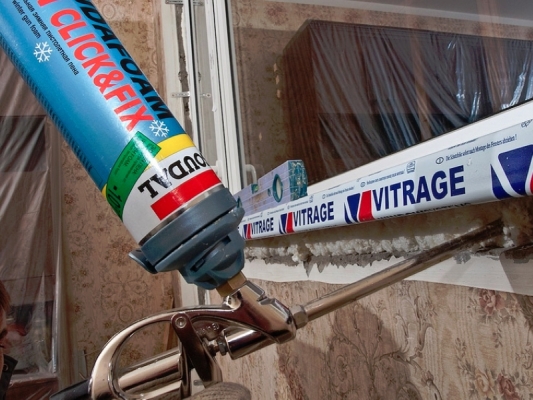
The most important thing when installing a window is to ensure a high-quality seal between the wall and the window. Be sure to check the work of the installation team to fill the joint with polyurethane foam.
Under the influence of ultraviolet sunlight, the polyurethane foam collapses over time. That's why outside adjoining window and wall protect against atmospheric influences with a special tape or liquid sealant for outdoor use.
 The adjoining of the window to the wall outside the house is sealed with a special tape.
 The seal between the window and the wall protects the joint from the penetration of rain, wind and ultraviolet radiation.
From inside the room the space between the window frame and the wall is sealed with vapor-tight tape. Sealing allows you to exclude the penetration of steam and its condensation at the junction of the wall and window.
The location of the window in the wall
The location of the window and door in the thickness outer wall should ensure minimal heat loss through the wall in the slopes around the window perimeter (bypassing the window).
Window in a single-layer wall without insulation
In a single-layer wall, it is recommended to place a window or an external door along the thickness of the wall, closer to its middle. In this position, heat loss in the slopes at the junction will be minimal.
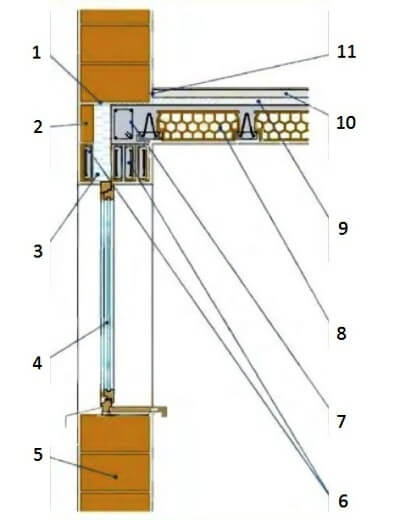
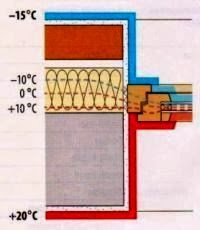
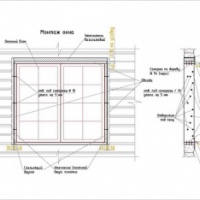
In the figure: 1 - reinforcement of the seam (if necessary); 2 - additional ceramic block; 3 - thermal insulation 10 cm; 4 - window; 5 - masonry of large-format ceramic blocks; 6 - reinforced concrete lintels; 7 - reinforced concrete belt; 8 - often ribbed floor; 9 - plates of heat and sound insulation; 10 - concrete screed 5 cm; 11 - compensation tape.
Location of a window in a two-layer wall
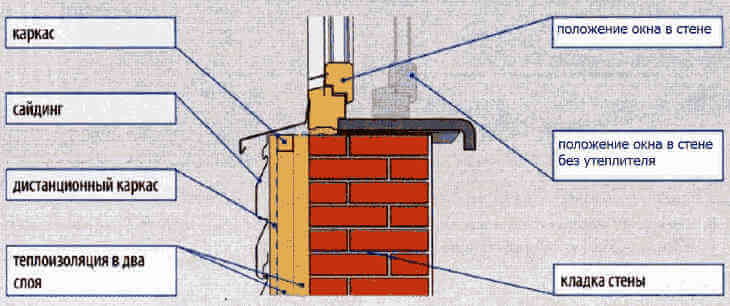
In a two-layer wall with facade decoration with siding or plaster over insulation (“wet facade”), the window block is installed flush with the outer surface of the wall masonry.

The insulation layer on the facade of a two-layer wall should overlap the joint between the window and the wall, and overlap the window profile by 2-3 cm.
Location of a window in a three-layer wall
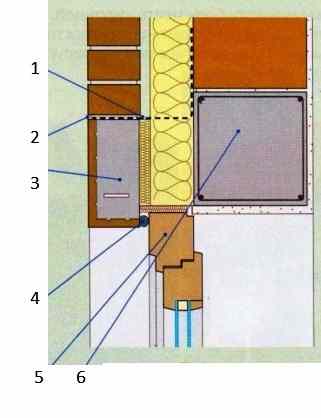
In the figure: 1 - horizontal waterproofing with a twist on the wall; 2 - a hole in the vertical seam between the bricks for water drainage and ventilation; 3 - reinforced concrete lintel in the cladding, pasted over with clinker tiles; 4 - silicone sealant or sealing tape; 5 - a window located in the thickness of the heat-insulating layer; 6 - reinforced concrete jumper in the bearing layer of the wall.
In a three-layer wall, with brick lining of the insulated facade, the windows are installed in the insulation layer, closer to the masonry of the bearing part of the wall. The gap between the cladding masonry and the window block is filled with elastic tape pos. 4. The seal between the window and the cladding protects the joint from rain, wind and ultraviolet penetration.
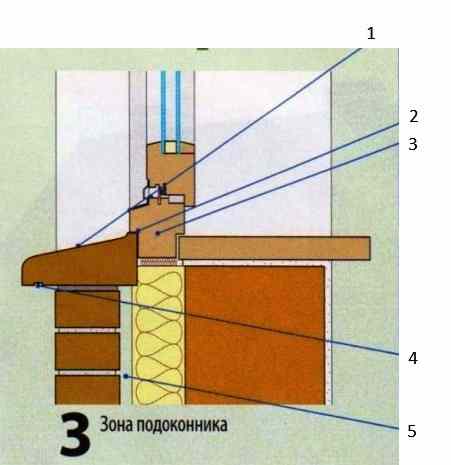
In the figure: 1 - clinker window sill (shaped brick or tile); 2 - joint sealing; 3 - window box; 4 - groove - drip; 5 - ventilated gap.
 Temperature distribution in the window area in a three-layer wall
 Window in timber wall

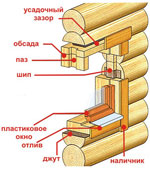
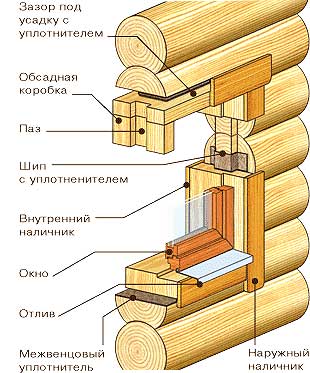
Correct installation windows in a wall made of timber: 1 - wall; 2 - rail; 3 - casing; 4 - window; 5 - window box; 6 - wall beam above the window; 7 - interventional insulation; 8 - shrinkage gap above the window and deck; 9 - window frames; 10 - wall beam (wall); 11 - deck; 12 - nail.
Roller shutters on windows
From the outside to the windows of a private house Roller shutters are recommended. Closed roller shutters not only protect windows from burglary, but in severe frosts they reduce heat loss through windows, and in summer heat they reduce overheating of the house by the sun's rays. It is better to foresee the installation of roller shutters on windows in advance, at the stage of designing a house or placing an order for the manufacture of windows.
Articles on this topic:
More articles on this topic
Happy Holidays, dear reader!
watch this funny video
Plastic windows were able to gain their popularity not only because of the high technical and operational qualities provided, but also due to the ease of installation. Ease of installation is due to the presence of high-quality fasteners and reliable equipment from manufacturers. Thanks to this, you can install plastic windows yourself, without calling a wizard for this.
In order for the installation of plastic windows to be as correct as possible, it is necessary to carefully consider the implementation of the installation process itself. In addition to skills, it is necessary to acquire patience and attentiveness, since this is the only way to cope with all the tasks related to this process. Only in this case, the installation will be carried out on high level with the potential to save significant amounts of money.
Carrying out measurements and calculations
Before purchasing a window, it is necessary to carry out certain measurements of the window opening, moreover, taking into account its dimensions with or without a quarter. The first option, that is, openings with a quarter, are considered a characteristic option for a foam concrete structure, while here possible heat losses are minimized, which is positively reflected in the comfort of people. If the opening is without a quarter, then you can get by with ordering only one window, and the length of the product should be 5 centimeters less than the opening under the window itself. As for the width, here you need to remove three centimeters.
If the opening is provided with a quarter, then it is necessary to measure at the narrowest point, and when ordering, 3 centimeters must be added to the width, and the length remains the same. The installation of the window should not be done in the middle of the opening, but retreating 1/3 deep, so that in the future the structure is firmly fixed. But if desired, the window can be combined in any direction to create the required appearance. At the same time, do not forget that it is necessary to leave room for formation. This possibility must be taken into account when purchasing ebbs and window sills, since this is the only way to ensure the creation of the correct design with all the necessary features. And here, to the resulting indicators, it is necessary to add five centimeters on both sides in order to get the exact dimensions.
 But the calculation of the window sill may also change depending on the location of the battery, since it should half cover the heating radiator. So you can not only create a relying appearance, but also the corresponding technical qualities. In the calculation, you must add another 2 centimeters.
The minimum margin for a window sill can be 8 centimeters, but you should not skimp on measurements, because you can add 15 centimeters each so that the window sill looks beautiful in interior design, emphasizing everything favorably. Keep in mind that if you use plastic window sills, then you need to use special side plugs here so that the product has a complete appearance.
Window frame installation methods
Many mistakenly believe that the technology for installing plastic windows can vary depending on the number of cameras in a double-glazed window or in a profile, but in fact the technology depends on the window material, wall construction and the parameters of the window itself.
And on the basis of the criteria presented, the choice of the optimal option for mounting the window frame is carried out. Installation can be carried out in the following ways:
- special anchor bolts or dowels that are installed through through holes in the profile. That is, the installation here is carried out through the product itself;
- toothed plates can be used that are pressed into the profile, but in this case they do not pass through the walls, but are installed by surprise, while being fixed with screws.

Nevertheless, the first method is considered more reliable, since it is characterized by certain advantages in implementation. The most common application of this technology is in the installation of large and heavy window systems, which can only be supported with the help of appropriate products. Through-hole installation provides the opportunity for quality installation, so that the product will ultimately withstand all the shock loads and impacts provided. And besides, the anchors that pass through the window frame structure allow you to correctly adjust the verticals and horizontals, while providing the appropriate technical qualities. At the same time, the strength of the structure and its operational parameters depend directly on how the structure was adjusted.
But if you want to install a small window package with blind panes, then in this case it is recommended to pay attention to the possibility of installation using special anchor plates. In this case, the appearance does not deteriorate due to the fact that all the details are hidden under the slopes of the window.
Consider the advice: in order to install anchor plates in a concrete base, you need to make a small depression in the surface. This is the only way to eliminate the need to apply an additional layer of plaster in order to finally complete the surface.
![]()
Often there are combinations of several methods, since this is how builders want to ensure high quality and ease of use of window construction. If we are talking about installing a window in, then in this case the anchor method is used quite rarely, since over time the anchors can loosen and cannot withstand all the loads imposed. Instead of anchors, galvanized self-tapping screws with the appropriate technical qualities are perfect. Installation of plastic windows in accordance with GOST, the instruction will help in installation, subject to all standards and norms according to the documents.
Features of installation in a wooden building
In fact, the installation method largely depends directly on the used building material and its most important features. If we are talking about installing a window directly in foam concrete, hollow or solid brick, then in this case the difference is presented only in the degree of anchor penetration. But if you need to install in wooden room, then an appropriate approach is required here, since this is the only way to count on providing High Quality work. Here it is necessary to take into account not only the place of fixing the anchor, but also the time for installation.
Equip wooden house plastic windows is possible only after two years after the completion of construction. Such a period of time is needed specifically so that the house gives the appropriate shrinkage. If the windows are installed earlier, then during the shrinkage process they can be deformed, so there will be some cracks, cracks and other similar defects. The shortest shrinkage period is provided during the construction of a house from glued beams, since a special structure of the material is noted here.
Installation is not carried out directly in the window opening itself. To prevent further deformation, it is recommended to install a window exclusively in a wooden box, since this provides all the required structural features and nuances. And besides, the tree should not have signs of rot, mold and many other unpleasant components that can spoil the appearance and quality of the structure. But in any case, pre-treatment of all products with special antiseptic agents is required.
Building codes do not provide any advice on the material for creating ebbs and window sills for arranging in a wooden house, therefore, as a rule, standard ebbs are used, and window sills can be either wooden or polymer, depending on the features provided. But the builders themselves say that wood is most preferable for creating a window sill, since by its design it can let air through, therefore the technical qualities of the foam used are reduced.
But in order for the mounting foam not to be moistened during the drying process, it is recommended to cover the existing window block along the line of application of this material with a foil polyethylene foam tape.
The main standards for the installation of plastic windows
home distinguishing feature technology lies in the fact that mounting foam can be used here, which gives additional rigidity to the space between the frame and the opening. And besides, the resulting layer provides additional insulation, which is considered its important advantage.
The owner selects the season for installing windows on his own, but most often the work is carried out in the winter season or in late autumn, since then it can be determined whether there are any errors. It is important to choose the appropriate mounting foam, depending on its curing temperature.
How to prepare a window opening
A prerequisite is the absence of dust, debris and dirt on the opening, since all this can provide certain inconveniences in the process of further use.
If the installation will be carried out in an existing box, then you need to cut off the top layer, since it may provide some inconvenience during further installation. This rule is important to consider for all craftsmen who want to install without the services of professionals. In this case, the foam will be able to firmly connect to the surface, thereby providing correct installation.
Tip: the gaps between the window and the opening can only be blown out if the distance is up to four centimeters, but if the space is larger, then it is recommended to choose another material, for example, brick or drywall.
How to prepare a window for installation
From the very beginning, the frame must be freed from the sash, so the pin installed at the top of the hinge is pulled out, but work must be done carefully and carefully. For safety reasons, double-glazed windows must be removed from blind windows, since this is the only way to easily install without fear of damaging the glass.
If you need to install a small window using anchor plates, then you can eliminate the need to remove the sash or double-glazed window. Is there such a possibility? Then you can not violate the integrity of the product, which is provided by the manufacturer.
Laying the product flat or placing it with some kind of distortion is strictly prohibited, since even a small pebble can cause damage to the material. And also from the outside of the window, you need to remove the protective film in advance, since in the future some difficulties may arise in this.
Installing a plastic window
The frame must be inserted into the opening, and along the perimeter it is necessary to install plastic corners or small blocks in order to leave an appropriate technological gap in the structure. The blocks can be moved to eventually provide the necessary side clearances in accordance with the set standards. Keep in mind that it is important to install the spacers near the place where the self-tapping screw or anchor is attached, since this way deformations can be avoided during further installation.
Given that different fasteners can be used to install a plastic window, it is here that all the most important differences are determined. For example, for wooden house galvanized self-tapping screws are suitable, and for foam concrete or brick, you can use anchors, or combined versions of anchors and anchor plates.
Final fastening can be carried out only after all control measurements have been taken in accordance with the set requirements and regulatory data. After that, the installation of blinds can be carried out on plastic window. In any case, keep in mind that windows are not recommended to be used for 15-16 hours after installation is completed in order to reduce the seams in the appropriate form.
Do-it-yourself installation of plastic windows video
Plastic double-glazed windows have gained popularity because of their performance. But can they be used in the construction and repair of wooden buildings? Of course, you can and should.
Installing plastic windows in a wooden house has a lot of differences and features. The process includes a number of preparatory manipulations, primarily related to the fact that the structure tends to sag over time.
We install a PVC window in a private house
Features of the technology for installing PVC windows in a wooden house of a new or old building do not have a strong difference. In any case, experts recommend technology using casing - time-tested, this technology allows you to avoid deformation, regardless of the material from which it is made.

Installing a plastic window in a wooden house or cottage with your own hands will require some knowledge and skills from the performer. Of course, if there are none, then it is better to turn to specialists. The complexity of the self-assembly of PVC systems in a wooden house lies in the fact that the frame is attached using the tongue and groove mechanism. This design allows you to create such operating conditions in which the deformation and subsidence of wood does not have a direct effect on the double-glazed window.
According to statistics, a wooden house can shrink up to 30 cm. Depending on the material, due to the drying of wood for 1 year after the construction of the building, the amount of shrinkage of the structure per meter of height is:
- log: 40-60 mm;
- beam: 30-40 mm;
- beam glued 10-30 mm.
These factors should not be neglected, since the subsidence of the structure already in the first year threatens to crush the window with the crowns of the wall structure.
Shrinkage of the walls can also occur after 5 years of operation of the house under the influence of seasonal changes in the composition and humidity of the air. At the same time, the installation of windows in old houses also implies the presence of casing.
So, consider the algorithm for installing PVC systems in wooden houses.
Stage number 1. Preparatory work
Before starting direct installation, it is necessary to carry out a number of preparatory measures:
- dismantling the old window (if replacement is taking place);
- cleaning the opening from dirt and debris;
- make the necessary measurements and calculations;
- drawing up a drawing and fixing the measurement parameters of the opening;
- alignment of the contours of the sides of the window opening, if the hole has an irregular shape;
- alignment is performed using putty or sealant;
- decide on the design and functionality (number of doors, their size, which of them will open);
- determine the manufacturer and color of the product.
Only after completing all the above manipulations, we order a window from the manufacturer, taking into account individual wishes.
Stage number 2. Installation
As soon as the windows are delivered and the necessary preliminary work has been carried out, you can proceed directly to the installation. Tools:
- drill;
- construction level;
- chisel;
- screwdriver;
- roulette;
- mallet;
- pliers;
- anchor plates and bolts;
- key for adjusting windows;
- mounting foam;
- spacer wedges;
- spray bottle with water.
Important! The installation of a plastic window in a wooden house is not recommended during strong winds and at low temperatures (not lower than -10 degrees).
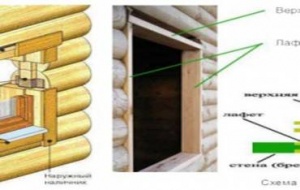
Casing: purpose, types and design
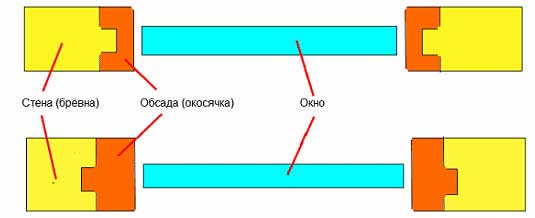
The casing is a box-shaped structure, which is made of three or four boards and installed around the perimeter inside the opening.
The system allows you to install a plastic window yourself, so that the window is fixed independently of the main wall structure and has a floating character. The window system is fixed with the help of grooves on the side, which are mounted on spikes protruding from the end of the logs and timber.
To fix and seal the casing, only tow, linen or fiber insulation is used. In any case, mounting foam.
Attention! A gap is left at the top based on the draft of the wood.
Thus, the shrinkage of the walls of a wooden structure in no way affects the window and, moreover, will not damage it. Depending on the fasteners, casings can be classified into the following types:
- into a spike. Such a design is characterized by the presence of a spike, which is mounted on the side parts of the casing, and a groove, which is located in the logs of the opening;
- in a mortgage bar. The basis of the fastening is a bar, which is placed in a groove at the ends of the opening and passes through the casing posts;
- into the deck. The spike is located at the ends of the logs of the window opening, but the groove is in the casing posts.
The box is a floating mechanism that excludes deformation of the plastic window during operation, regardless of the type of casing installation.
Calculations should be made with high accuracy, since even a slight error can lead to deformation of the window frame or leakage of the structure. In addition, proper installation is a guarantee of the quality of the plastic window itself.
How to make a pigtail (casing)
The design can be of two types: complex and simple. A simple pigtail is the system described above, with bars and grooves. The complex design is performed somewhat differently: a comb is cut out in the window opening, on which a carriage with grooves is put on. This option is more reliable. When the walls shrink, the comb can slide and does not allow vertical deviations, excluding pressure on the window frame.
The casing, as a rule, is made of timber. Using a wood chisel, a 0.5 cm groove is knocked out in the center of the beam, and a spike (0.5x0.5x.25 cm) is cut out from one end. A comb with spikes 0.5x0.5 cm is cut from the end of the opening logs. To do this, you can use a saw or a chisel.
Important! Comb marking - important point. The quality and reliability of the design depends on the accuracy of the markup.

After the comb is ready, we proceed to install the risers and form the opening structure between them. The bars are set according to the level, taking into account the gaps for shrinkage of the walls (1 cm on the sides and 0.5 cm on top). The frame of the bars is strengthened with the help of grooves with the main canvas of the walls and dowels between them. The gaps left are sealed with tow or other fiber. That's all, now you can proceed with the installation of the plastic frame itself. You can see the process in more detail in this video:
Stage number 3. Installation in the prepared opening
After carrying out the necessary preparatory work and installation of the pigtail, you can proceed with the installation of the window.
Attention! Installing plastic windows in a wooden house without casing is the wrong option.
To begin with, we check the dimensions and location of the parallels, the gaps between the casing and the frame. The stock for foaming should be: 4-5 cm at the top, 2-3 cm in width and height, 3-4 cm in the window sill area. After making sure that the stock corresponds to these indicators, we proceed directly to the installation of a plastic frame.
The window is fastened with special fasteners, which are sold at any hardware store. They are metal plates with holes.
Installation of a plastic window should be carried out according to the level. If you neglect this factor, then you risk getting a tilted design, which significantly reduces the operational and aesthetic objectives of the window.
Advice! Before installing the window, the sashes are removed. This facilitates the design and it is much more convenient to mount it in the opening.
After the window is fixed in the opening, it is necessary to fill the gap with mounting foam. To avoid displacement of the structure during foaming, bars are placed that will maintain the position of the frame without deviations. After drying, do not forget to remove it.
Securing the window in the casing is done with care. In this case, it is necessary to choose the correct location for tightening the screws. Under no circumstances should a window be fixed in the ridge area!
That's all, we finish the process by completely foaming the opening. We put on the sashes and let the foam dry.
We have presented the correct way to install a plastic window in a wooden house. This process can be difficult, so if you are unsure of your abilities, it is better to turn to professionals.
However, installing a plastic window with your own hands is a significant cost savings. We offer you to watch a video instruction for installing a window with your own hands:
Greetings dear readers!
I decided to replace the old windows in a wooden house on my own. This is not at all easy, so before that I reviewed a bunch of sites and forums, talked with friends who performed the installation. And he singled out for himself the basic rules in the installation.
First you need to take measurements of windows in order to know the exact dimensions and order the window correctly.
Next, you need to dismantle the old windows. Then he prepares the installation site of the window, for this you need to remove the dust and debris accumulated during dismantling. Next, we install the window sill and prepare the plastic window for installation. Then install the window itself.
At first it seems very simple, but there are little nuances, given that you can easily do it. I want to tell you more about the installation later in this article.
Do-it-yourself installation of plastic windows in a wooden house. Installation technology. Instruction, photo
Do-it-yourself installation of plastic windows into the prepared pigtail of a wooden house, like other construction and installation works, is carried out using a building level and a plumb line.
It is very important that the plastic windows in the house are strictly level, otherwise an open, for example, window sash will close itself or, on the contrary, open under its own weight. Thus, the technology of installing plastic windows in the pigtail of a wooden house includes setting it in terms of level and plumb before fixing the window.
Here is our, developed by our own experience, instructions for installing plastic windows in a log house.
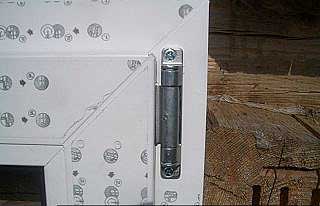
First, I would like to note one point that you will need to remember when buying plastic windows: When you buy windows, it would be nice to immediately buy mounting brackets for them, ideally 6 pieces per window.
These are iron plates (see photo) which, with the help of little effort, are fixed in special technical slides on the sides of the window frame. Thus, the frame is attached to the pigtail using self-tapping screws through these mounting fasteners.
Many installers of plastic windows during installation fix the window by drilling through the frame, but this is a violation of technology, and the tightness of special air chambers in the profile of a plastic window is thus violated, so this is not our method.
Plastic windows in a wooden house are generally a very capricious thing, but if the correct installation technology is followed, then such windows in your house will last a long time without upsetting their owners with all sorts of distortions and other problems.
 In order to prevent the installation of windows with your own hands from becoming a torment, we advise you to remove the window sashes from the window frame. To remove them, you need to pull the pins out of the loops. Without window sashes, the frame weighs a little, and it will be much more convenient to tilt it, which will greatly facilitate the installation of windows.
The instructions for installing plastic windows in a prepared pigtail of a wooden house are as follows:
Align the window. We put the window on the lower part of the opening on chips about 2 cm thick and adjust it horizontally in level. For setting a horizontal level, the best tool, in our opinion, is a water level.
You can't deceive water, it always levels off with the horizon.
Thus, setting the window exactly at the horizon level, placing chips of the required thickness under the frame for this, it will leave about a two-centimeter gap below for foaming with mounting foam, we proceed to setting the vertical level so that the window sashes do not live their lives.
How the vertical level is set when installing a plastic, and indeed any other window, I think it’s not worth explaining in detail, everything is clearly visible in the photo.
 After we put the window on the level, we fasten it to the pigtail with self-tapping screws through the above-mentioned mounting fasteners.
There is one technological point here - do not hit the crest of the log on which the pigtail sits with a self-tapping screw.
It is better to screw the self-tapping screw a little obliquely than to deprive the construction of the pigtail of independence from the log house in terms of freewheel carriages on the crests of logs.
The next step in our instructions for installing plastic windows in a wooden house is to fix the window sashes. It is necessary to hang the sashes on the window before foaming, but if you foam the frame without sashes, the mounting foam can slightly bend the frame, and the sashes will close / open poorly.
 Thus, if the technology is correctly followed and the installation of the pigtail and the plastic window is evenly done, your window should stand in such a way that distances of about 2 cm for mounting foam will remain on all sides from the frame to the pigtail.
And above the upper part of the pigtail there will be a gap of 5-10 cm to the log for shrinkage of the log house, so that when it dries completely, the upper logs do not press on the windows.
Window foaming. Control check - On the already fixed, but not yet foamed window, with the shutters inserted, open the window and look.
 If the half-open sash of a plastic window does not try to open further or, on the contrary, close, then our window is installed correctly and you can foam the frame with mounting foam.
Here we have such a technology for installing plastic windows with our own hands. We hope you find it useful in the construction of your wooden house! Happy building!
http://dachaclub.rf/
How to install plastic windows in a wooden house with your own hands
In our wooden house, we decided to replace the old wooden windows with modern plastic ones. This article discusses in detail the installation of double-glazed windows with your own hands in a wooden house. The article is based on personal experience. Why is it profitable to install windows yourself:
When installing double-glazed windows in a wooden house by a supplier or manufacturer, the cost of a window along with installation will cost 40-50% more than its original cost.
As a rule, about 95% of companies that install windows do not guarantee the quality of installation in a wooden house. Therefore, when self installation in a wooden house of plastic windows, you do not lose the warranty period of operation, but only save yourself for the good.
The installation of windows is shown on the example of self-installation of double-glazed windows, without the help of strangers, which takes an average of two and a half hours (for one window). Further, the process of inserting a plastic window into the window opening of a wooden house is described step by step.
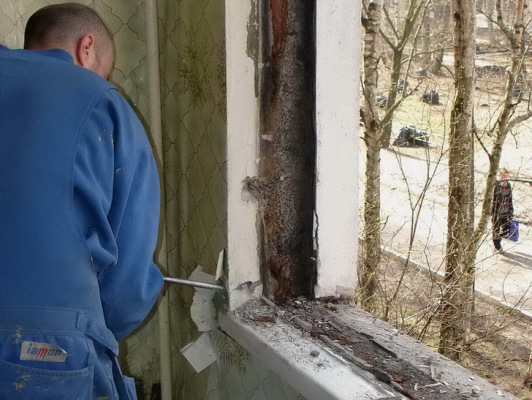
Removing old windows
Self-installation of double-glazed windows in a wooden house is carried out on a solid foundation (frame). Since in our example the window boxes were installed quite recently (about 5 years ago) and were without damage (cracks, chips, putrefactive formations and wormholes), we decided to use them instead of the frame for installing new windows.
Old window frames that are in good condition and have sufficient strength can be reused, for example, to install a greenhouse.
Therefore, in order not to damage the frame tree, their dismantling must be carried out carefully, and before that it does not hurt to remove the glass from them. In our case, we did not pull out the glass from the frame, since the strong frames did not warp when they were removed and were dismantled quite easily.
Preparation of a place for the installation of double-glazed windows
With a dry and clean cloth (or soft brush), you need to wipe the window frame, remove the waste and debris accumulated after dismantling.
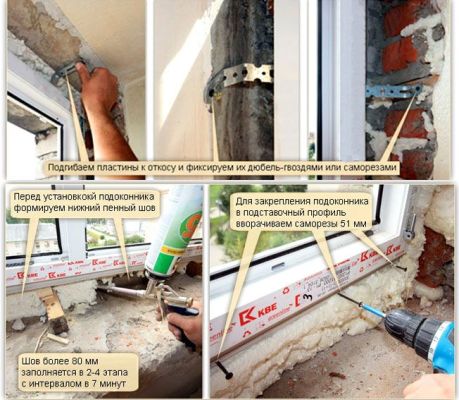
 The PVC window sill is mounted first, as it is the base of the double-glazed window when it is installed. In this regard, the window sill should be installed as evenly as possible (ideally horizontally). We check the exact horizontal position of the window sill with a level both in the longitudinal and transverse positions.
To make the window sill stand firmly, we make cuts up to a depth of 8 mm on the sides of the window frame. To adjust the evenness of the window sill, we use special plates made of plastic or fiberboard, or thin wooden planks treated in advance with an antiseptic. After the final installation of the window sill, we measure the evenness of the window sill with a building level.
We fasten the window sill on self-tapping screws to the bottom of the window frame, while indenting from the outer end of the window sill by 2 cm. PVC window sill has cavities). After the window is fully installed, the window sill attachment points will not be visible, as they will be hidden from the eye.
Preparing a plastic window for installation
At the very beginning, even before you start installing the window, you need to install the handle. It is not yet necessary to remove the entire protective film from the window surface, as it protects the window from possible mechanical damage.
Note!
The protective film can only be removed where the handles need to be installed. Handles of the handle at their installation should be in horizontal position.
This position means that the window opens on its side, while if the handle is turned down, the window will be locked in the closed state, if the handle is turned up, the window will open in the cranking mode.
We fix the handle to the window with two bolts, move the handle handle down. On the side pillars of the window (at the ends), we make markings for making holes on which the window will be fixed to the block.
Next, we drill with an electric drill according to this marking, two through holes (lower and upper) in the right rack of the double-glazed window and in the bottom rack (in total - 4 holes). The distance between the lower and upper parts of the double-glazed window to the hole should be from 25 to 35 cm. The diameter of the drill for this work should be 6 mm, while the diameter of the self-tapping screw is 5 mm.
In order for the screw head to firmly rest against the window frame, we are on the side racks with inside we drill holes for fastening with a drill with a large diameter - 10 mm, to the very metal frame. The hole should be such that the head of the self-tapping screw freely passes into the cavity of the window pillar.
window installation
We install the assembled window in the window opening. The center is controlled by measurements taken with a tape measure starting from the edge of the window and ending with the surface of the window frame on both sides, the distance should be the same (about 1 cm each).
We install the window on the surface of the previously installed window sill. Since we have already checked the window sill for evenness using the building level, there is no need to control the window itself for horizontality.
To install a window parallel to the wall of the house, we install a building level between the wall and the siding to stop. If the house was sheathed with other finishing material, for example, a clapboard, which fits snugly against the wall and does not allow you to place a level, then you need to use a plumb line for control.
We install a spacer bar 1 cm wide between the window frame and the window. It is necessary that this bar enters between the window frame and the window tightly enough. This bar is needed as a stop at the moment when the window is fixed in the window opening using self-tapping screws.
If this is not done, then the window may go to the side during its fastening (it will simply be taken away) and the mechanism for opening and closing the window will not function well, or the window sash will not open at all.
When the installation of the stop bars is completed, and the window is leveled or aligned parallel to the wall of the house, then we fix the double-glazed window on the self-tapping screws. We fix the window to the window frame from below and above its side posts, so that the self-tapping screw is in the free space between the frame and the window.
Such fastening is not only reliable, but also provides a floating effect. If there will be seasonal shifts in the structure of the house, distorting window openings, then windows that do not have a rigid binding to the frame are almost not subject to distortion, due to the fact that the self-tapping screw can arbitrarily move towards the window frame skew.
Installation of double-glazed windows in a wooden house
First, we install adjusting plates between the drain holes. This is necessary so that the double-glazed windows do not close the holes through which condensate is drained from the window.
Carefully install a double-glazed window in the window opening. We make sure that it does not fit tightly between the racks of the window, since if seasonal changes occur and, accordingly, distortions of the window frame, the glass may burst.
Note!
If you have a tight entry of the double-glazed window, and there is no gap between the window pillars and the double-glazed window (at least 5 mm), then you should contact the company that made the windows for you according to your order for an explanation, so that the company's employees eliminate this shortcoming. It is necessary to check the gaps between the frame and the double-glazed window even before removing the old window.
We install the double-glazed window evenly and fix it with plastic glazing beads, which have profile spikes that are inserted into the grooves of the window frame by lightly tapping on the glazing beads, during which the spike goes into the groove and a click is heard. A click indicates that the bead is securely fastened.
After the window is installed, we fill the void between the window frame and the window with mounting foam, both from the inside and outside of the house. Excess hardened mounting foam is cut off with a sharp knife.
After that, you can start finishing with platbands, fittings and drainage.
source: http://stroykaportal.ru/
How to install plastic windows in a wooden house
The relevance of the question: “How to install plastic windows in a wooden house” (and not only plastic ones), lies in the fact that wooden houses are very unstable. Moreover, unlike a stone or reinforced concrete house, this instability manifests itself throughout the entire service life of a wooden house.
If these factors are not taken into account when installing plastic windows or doors in a wooden house, very unpleasant (to put it mildly) problems can arise!
 What is the peculiarity of a wooden house? And the fact that the tree tends to "shrink", especially in the first years after construction. Those who claim that the log house shrinks a year after its installation are mistaken.
Yes, the most noticeable shrinkage occurs in the first year, but the process continues for at least 5 years, and in some climatic zones - for a lifetime! As the logs or beams dry out, the height of the wall can decrease to 1.5 cm per meter of masonry. This means that the height of the wall can “shrink” up to 6 cm.
And now imagine what will happen to a plastic window if, as always, you left a gap of 2 - 2.5 cm for foam ?! So, installing plastic windows in a wooden house is generally unrealistic? Quite the opposite!
But only if a special structure, called a pigtail or casing, is installed in the opening.
The purpose of this design is to give windows (and not only plastic ones) complete independence from bearing walls at home, to exclude even the slightest load on the window during shrinkage or curvature of the walls:
- The casing prevents the logs from moving from the vertical in the window opening.
- Does not interfere with vertical shrinkage.
- Takes all the load.
- Strengthens the wall of the house in the opening area.
Let's take a look at this system in detail. The simplest casing option is when a vertical groove of 50x50 mm is cut at the ends of the opening logs and a bar of the same size is inserted into it.
But this method of pigtail is ONLY suitable for wooden windows. Therefore, we will not dwell on it. A more reliable option for casing is when a comb is made at the ends of the logs, and a window carriage with a groove is put on it.
 Now the logs during shrinkage (due to the ridge) will slide inside the groove without deviating from the vertical and without pressing down the window.
It happens that the groove is made in logs, and the spike on the gun carriage, the main meaning, I think is clear.
Window carriages are vertical bars 150x100 mm, at the ends of which 50x50 cutouts are made for inserting horizontal lintels - boards 150x50 mm with spikes at the ends.
The assembled casing is made smaller than the window opening by 7-8 cm in height. This gap is left in the calculation for the shrinkage of the wall. When assembling the pigtails in the opening, we cover the ridges with rolled tow and fill the gun carriages on it. This will save us from squeaks during shrinkage and insulate the opening.
Note!
Further, the procedure is as follows - we lay the lower jumper, stuff the gun carriages on the comb with tow, we wind up into the upper gap and lower the upper jumper into the grooves. We fasten the entire structure with self-tapping screws, trying not to capture the ridge, otherwise the whole point of installing the casing will be lost. In the gap between the pigtail and the logs, we also hammer in the tow.
And now you can insert plastic windows into a wooden house without fear for the consequences. We make installation in compliance with all technology: steam - noise - moisture protection. The gap between the casing and the frame is filled with thin boards wrapped in tow.
As the house shrinks, they have to be knocked out and replaced with others. To do this, the upper trim (attached only to the casing) is carefully removed and, after replacing the filling, is put in place.
At seminars, I was often asked the question, why does a window fitter need to know the technology of building a wooden house. And then, so that you can determine whether it is possible to install a window in this opening.
And, if necessary, equip it with a classic casing. Of course for a fee. There have been cases like this in my experience.
Now this is an important point. You insert a plastic window into a wooden house where there are wooden windows. They removed the platbands for accurate measurement, but there is no casing. That is, the box of the old window plays the role of a pigtail.
This is where the choice has to be made (by the owner, but with your help): to remake the window opening for casing or to significantly reduce the size of the future window. After all, on each side you need to add the thickness of the casing + window frame + gap for foam. And what will be left there?
And in conclusion, I want to warn:
Helpful advice!
In no case do not agree to the installation of windows without casing in the opening. Even if the owner proves that the house is 300 years old and "all the shrinkage has already settled down." The tree "breathes" all its life with all the consequences, as they say.
Well, in the most extreme case, you can give in to the client, under his responsibility. But do not forget to put a dash in the contract in the column "Guarantee" !!!
All the same, the installation of plastic windows in a wooden house requires very serious attention.
Plastic windows are used everywhere. They replace wooden structures due to a number of advantages, the main of which are reliable thermal insulation and the absence of wind blowing. Installing a window in a wooden house has a feature, which is that the structure is not rigid. Therefore, a special frame fastening is made for it, protecting it from loads from the walls.
How to install a plastic window in a wooden house? To do this, you need to measure the opening, dismantle the old structure, make and assemble a new box if the existing one does not fit. After that, you should insert new frames with double-glazed windows and a window sill, and then install slopes on plastic windows.
Determining the size of the opening
To take measurements, the platbands are first removed. The plastic frame should fit into the opening inside the box. Between them, a gap of 2 cm should be left around the entire perimeter, so that in the future it can be filled with mounting foam. In addition, an 8 cm opening should be left above the box to the top log, which is necessary for wall shrinkage.
Tools and materials
Slope installation
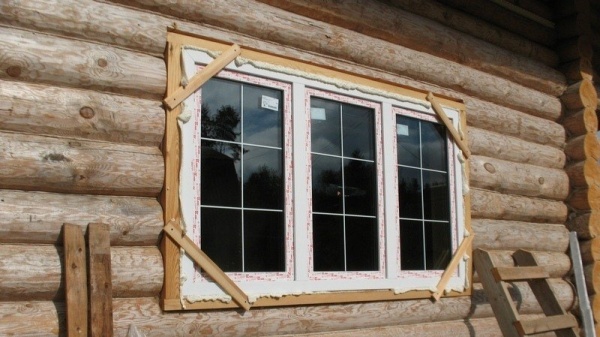
When we install a plastic window ourselves, there is nothing easier to finish the slopes of a wooden house. To do this, you can use lining or block house, which are well suited to the rest of the room. They are nailed across to the pigtail, and the corners are sealed with a corner. From the side of the frame, guides are installed for them. Window openings can be finished with wooden panels, which are glued to the mounting foam. 
To prevent the foam from pushing out the slope, it is attached to the wall with mounting tape (masking tape). After gluing, the mount is removed, the protrusions are framed with a profile. Minor assembly defects are eliminated with silicone sealant.
ebb mount
The outer trough made of tin is installed with a slope to remove precipitation. Slopes are made and installed under it. The length of the ebb is selected with a margin of 3 cm on each side. When installed, the edges are bent up. It is advisable to foam the ebb from below so that it does not rattle from wind and rain. You can also put an elastic substrate under it.
Conclusion
Following all the rules and tips on how to install a plastic window in a wooden house, you can long years create comfortable conditions in it.
The heat-shielding properties of a double-glazed window are selected according to the table of coefficients of the reduced heat transfer resistance.
Before installing a plastic window, it should be ensured that it is independent of the displacement of the walls when they dry out. For this, a pigtail is used with the possibility of slipping relative to the logs.


