
The output of chimneys through the roof slopes must be carried out in accordance with strict rules, since the integrity of the roof and protection against leaks largely depend on the reliability of the connections and connections made. In this article, we will tell you how to properly organize the connection of the pipe to the roof, where it is best to place the chimney on the roof, how to choose the height of the pipe, etc.
Connection location
In the SNiP standards regarding the arrangement of chimneys, there is no clear regulation of the location of the chimney pipe.
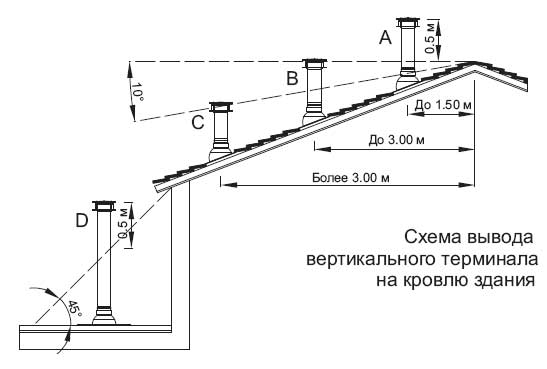
Specifically, only the parameters for determining the height of the chimney are indicated:
- the chimney must rise above the ridge by at least 50 cm, if the pipe itself is located at a distance of up to 150 cm from it;
- if the chimney is located at a distance of 150-300 cm from the ridge, then its height may be equal to the level of the ridge or higher;
- if the chimney is located more than 300 cm from the ridge, then it is placed at the level with the ridge or not below the line that is drawn from the ridge at an angle of 10 degrees relative to the horizon.
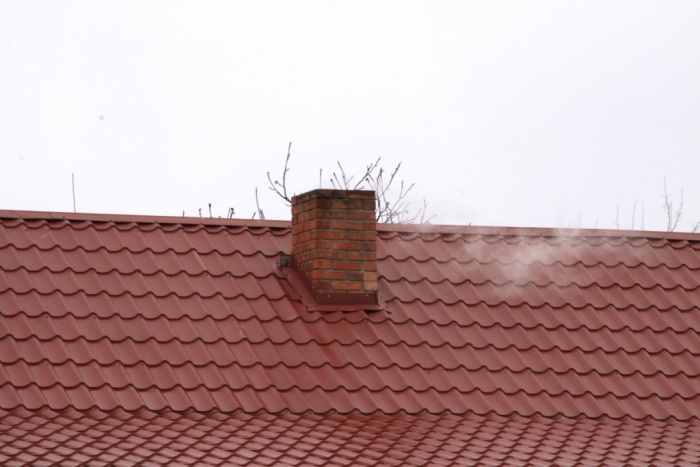
Condensation may fall inside the pipe or on the inner surface of the protective umbrella. The main danger of the resulting moisture is that at low temperatures it forms ice, which adversely affects traction. In addition, condensate flows down into the walls of the chimney, thereby contributing to the development of corrosion processes and reducing the life of the chimney.
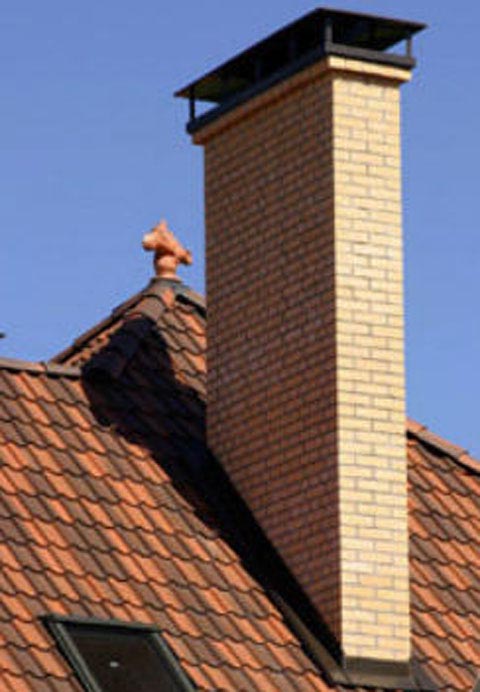
It is better to bring the chimney through the roof as close to the ridge as possible. There are two reasons for this:
- in this place it is much easier to organize the connection of the pipe to the roof;
- due to the small area of the slope above the pipe, the formation of snow pockets, which lead to leaks, is minimized.
How to seal a pipe on a roof
The question of how to organize the adjoining of the roof to the pipe arises quite often. This is especially true in cases where the roof consists of several layers of various insulators at once - heat, hydro, steam. The greatest protection must be provided by thermal insulation, since when moisture gets on it, the material immediately loses some of its performance.

According to the SNiP standards, in addition to protecting the roofing pie from leaks, it is also necessary to take care of fire safety. So, in order to minimize the possibility of ignition of the material, it is necessary to remove the roofing cake at a distance of 15 to 25 cm from the chimney.
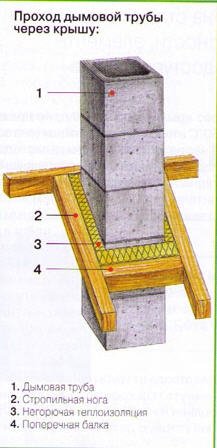
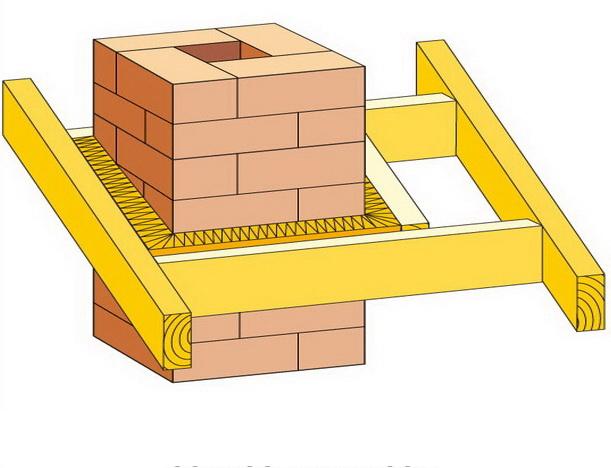
In this case, the best solution would be to seal the roof around the pipe in the form of a protective box, taking into account.
It can be created with:
- rafter legs on the sides of the chimney pipe;
- fastening the cross beams to the rafters.
Thus, the chimney pipe is limited to a wooden box. For even greater security, its internal space is filled with heat-resistant material - in most cases, basalt wool. This one copes well with moisture, which allows you to lay a layer of waterproofing directly around the chimney. In a similar way, erecting a brazier with a roof and a pipe.
The adjunction of hydro- and vapor barrier films to this element is performed by the standard method:
- canvases are cut in the form of an envelope;
- their edges are brought to the transverse beams or rafters;
- fix the material with staples or nails;
- waterproofing is additionally pressed with planks of counter-battens and battens;
- the vapor barrier is pressed with the base of the frame under the attic finishing material.

At the junction points of the roof to the walls of the box, maximum protection of the insulation from moisture can be ensured through the use of a special tape or adhesive composition. Builders often say that outer side the chimney does not heat up above 60 degrees, which allows you to bring the roofing cake directly to the chimney. But in this case, you should make sure in advance that the specific chimney is really well protected from high temperatures and its outer walls do not heat up. Otherwise, this is fraught with damage to the roofing cake and the occurrence of leaks, so you need to think about it.
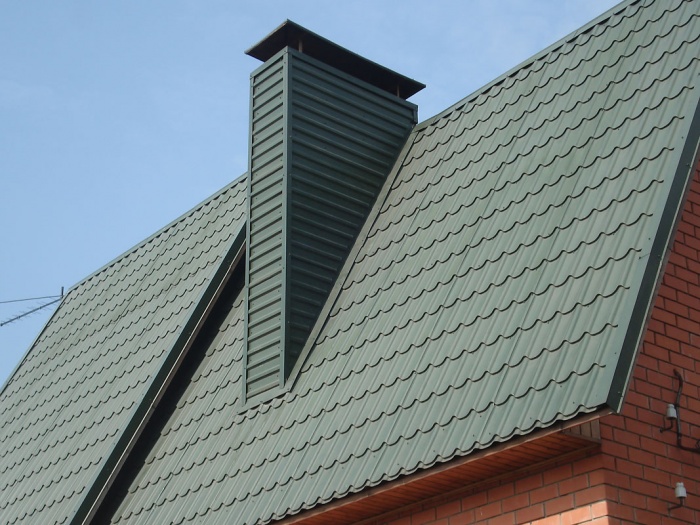
If the width of the chimney is more than 80 cm, then from the side of the ridge it is necessary to make a slope - a small gable roof that removes snow and water from the chimney (read also: ""). It is made from the same material as the main roof. At the same time, the organization of such an element is vital. With a large chimney width, it becomes a great place to trap snow and rainwater, which eventually leads to leaks. Also, do not forget that the slope has some difficulties in creating hydro, steam and thermal insulation. Therefore, this must be taken care of in advance. A wide chimney, among other things, prevents good ventilation of the insulation. Therefore, it is necessary to install additional ventilation outlets on the slopes. When performing work, it is important to remember that the chimney pipe is plastered before laying the roofing material. Otherwise, the roof can be damaged (read another article: "

The construction of a residential building is a rather difficult process, which is associated not only with various material costs, but also has its own specific nuances. The chimney system is one of the most difficult elements in construction, because mistakes made during its construction can be fatal for residents.
Undoubtedly, a dangerous moment in the construction of a building is the connection of the roof and the chimney. Incorrect connection can cause heated bricks to come into contact with dry parts of the roof, causing a fire.
Chimney outlet through the roof
In the process of building a new house or renovating an old one, the logical question arises for the owner of the building, which is how to remove the chimney from the structure.
There are several options. The first is to bring the pipe through the roof of the house. The second is to draw a pipe outlet separately from the building, near one of the walls of the house.
Consider the negative and positive aspects of each option. The output of the chimney directly through the ceiling and roof will create more problems for the owner of the house:
- Additional material costs.
- Longer building time.
- Complicated cleaning process.
The positive side is that the chimney will give off heat to the walls through which it will pass. Thus, providing additional heating of the room, which eliminates all the above points, because the owner of the house will save on heating the room.
The second option is when the pipe is attached directly to one of the walls of the house. The advantages of this method is that the funds spent on construction will be much less, the time for the construction of the chimney will be accelerated. However, the heat will not be used rationally, which will increase the cost of heating the area of the room.
Any building is regulated by different standards, there are different standards regarding the construction of the chimney.
SNiP 41-03-01-2003 gives a complete list of standards that a person should be guided by when building a chimney.
The location of the chimney on the roof
Most experienced builders agree that the most suitable place where the pipe should exit the roof is the area near the ridge. Such an arrangement is by no means meaningless, because it will reduce the amount of accumulated snow near it, which eliminates leakage into the house.
Also, the height of the chimney in the open air is mineralized, which will protect it from negative impact various natural phenomena.
You need to know that there are places where it is forbidden to place the pipe:
- near skylights, if there are any on roofs, of course, this rule is based on protecting residents attic floor from carbon monoxide;
- it is not allowed to build a chimney at the junction between the roof ridges, because to guarantee and ensure reliable protection moisture is not possible.
In addition to the above, it is forbidden to make a rigid connection between the roof and the pipe laying itself. When heated, the brick expands slightly, which within a few years will lead to the formation of a gap between the roof and the pipe.
Design
The design determines directly the materials from which the chimney will be built. Most often, ceramic bricks are used, because it is this type of brick that calmly tolerates various temperature changes and is not subject to such destruction as other types of similar material.
Modular chimneys, consisting of blocks, are beginning to enjoy great popularity. The choice of this material on the market is huge, therefore, in accordance with the needs, you can find blocks of various sizes.
Of course, we must not forget about the iron channels. Reviews about them are extremely positive, but their cost is a significant disadvantage.
In accordance with the standards described in SNiP, the chimney well must be smooth without protrusions or protruding bricks from the common masonry. Masonry seams between bricks must be completely filled with mortar. Similar requirements apply to block and iron chimneys.
The mortar that needs to connect the bricks must be made of clay, the negative side of such a connecting material is that it is not suitable for buildings exceeding a height of 3 meters.
It is also necessary to make a solid foundation, due to the fact that a brick structure will have significant weight.
Rigid connection to the pipe

A rigid connection of the roof to the chimney can lead to various negative consequences. The most common are the likelihood of a violation of the ventilation process in the space under the roof of the house.
In order to neutralize the possible danger, if it is rigidly adjacent to the roof, it is necessary to install aerosol grills and other similar devices.
If an iron structure has been installed, then around it it is necessary to build a box filled with a material that does not ignite. Such materials can be basalt, mineral wool and other similar materials.
Other chimney options
Brick is not the only material from which such structures are made. AT recent times such type of material as ceramic modular blocks became popular.
Such blocks are lined with fireclay or porcelain stoneware, and basalt is placed between the block and the finishing material, which serves as a heater. Negative side Such an innovation is that there are no enterprises manufacturing such modules on the territory of our state yet, all products come from abroad, which significantly increases the cost.
Pipes made of iron have recently begun to enjoy particular popularity.
Of course, ordinary metal is not suitable for such purposes; such pipes are made directly from high-strength material that is resistant to high temperatures. The wall thickness of the product must exceed 0.5 mm.
Iron chimneys can be conditionally divided, there are single-circuit and double-circuit ones. The former are made of stainless steel and are a budget option As a rule, such pipes are short-lived due to their cost.
Double-circuit pipes are more interesting, because they consist of several layers, and can be compared with a sandwich. Inside there is a pipe that can withstand high temperatures, it is wrapped in a stainless steel pipe, between them there is a seal that absorbs the temperature.
Such a complex design protects it from destruction due to high temperatures, but also effectively prevents the formation of condensate, which is dangerous for iron and brick pipes. Of course, option No. 2 is much more expensive on the market, but it will fully pay off during operation, which will be several times higher than option No. 1.
Coaxial chimneys are a novelty in the domestic market. Operates exclusively with a fan. It is installed on boilers operating on forced draft.
Pipe sealing
Sealing is one of the most important elements in construction. Every builder, novice or professional knows that water is the enemy of any building. To properly seal, you must first glue a special membrane between the roof and the pipe itself. Then make a pipe primer using mastic. The ends of the membrane should be wrapped up and only then coated with a primer and glued.
This must be done in order to completely deprive moisture of the opportunity to penetrate into the space between the roof and the protective membrane. After that, the so-called "ties" should be made, that is, the corner metal should be laid in such a way as to ensure the free flow of water to the floor of the roof.
After that, we fill with sealants the places where the plane is in contact with the membrane. We very carefully coat the joints with bituminous mastic, after which you can install a plastic apron.
After all the procedures done, it is necessary to lift a couple of buckets of water onto the roof and conduct tests to make sure the structure is stable.
This must be done without fail due to the fact that it is better to immediately identify the shortcomings than to figure out what to do with the penetration of moisture under the roof that has begun in the winter.
The effectiveness of the functioning of the roofing pie depends on how correctly the roof will adjoin the pipe. If you do not follow the rules for performing work at this stage, moisture may begin to penetrate through the cracks near the pipe under the finishing material, which will lead to the destruction of the roof elements.
Features of creating an adjoining
The device for adjoining the roof to the pipe can be performed in various ways. The choice of a particular option depends on which products are used during finishing. The shape of the chimney, its location and the material from which it is made are also taken into account. Prefabricated structures are often used to protect adjoining structures from precipitation.
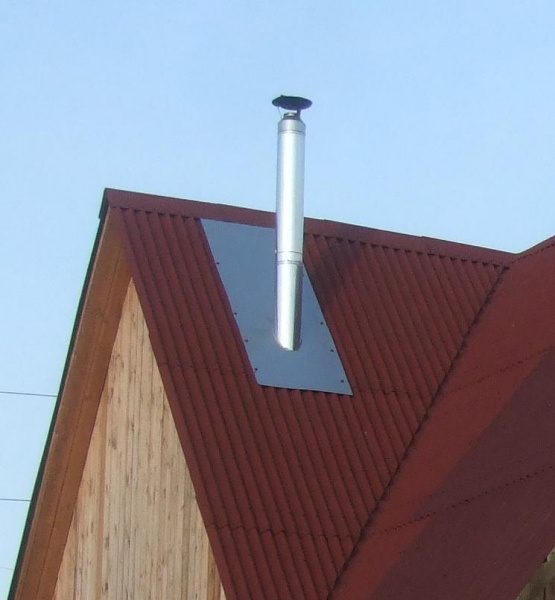
The easiest way is to waterproof the chimney, which is installed in the high point roofs. This is due to the fact that snow does not accumulate behind the pipe and moisture cannot penetrate under the roof. But many owners country houses install the pipe a little below the ridge. This is due to the fact that when creating traditionally two pitched roof this option is more convenient.
Rectangular chimneys can be installed between rafters or with a ridge beam interrupted when creating truss system layered type. In this case, the installation of additional reinforcing elements of the roof is required.
It is also quite easy to waterproof the junction of the pipe to the roof if it is located at a short distance from the ridge. The most difficult thing to make waterproofing in the case when the chimney is located at the bottom of the slope. In such cases, the installation of a special pitched structure is required.

The pipe should not be installed at the intersection with the valley, as this greatly complicates the sealing of the joints.
Connection location
According to building codes, the arrangement of chimneys can be carried out in several places on the roof. During the removal of the pipe, the following parameters should be considered:
- The chimney must be installed in such a way that it rises above the ridge by at least 50 cm, if this structural element is located no further than 150 cm from the ridge.
- If the pipe is brought out at a distance ranging from 150 to 300 cm from the ridge, it can be at the same height with it.
- In the case when the pipe is located further than 300 cm, it is located at the level with the ridge or below it. But at the same time, it is impossible to mount below a line drawn relative to the horizon at an angle of 10 degrees.
All other rules regarding the location of the chimney are not regulated, therefore, during the work, you should rely on the experience of professional builders. To correctly position all the elements of the roof that protect the junction from moisture, you need to look at various photos, depicting the installation of the "apron".
Many homeowners who have been building on their own recommend removing the pipe as close to the ridge as possible. This is due to several reasons:
- in such a place it is easy to organize an adjoining;
- due to the fact that the slope above the pipe is small, a large amount of snow does not form there.
After determining the most optimal place in which to place the pipe, you need to know how to fix the coating so that it reliably protects the joints.

How to seal a pipe
The most difficult thing to organize an adjoining is when the roof consists of several layers of hydro- and vapor barriers. The insulation should be protected most reliably, since when exposed to moisture, it loses its properties.
During the work, it is necessary to take into account building codes, according to which it is necessary to minimize the risk of fire. To do this, the roofing cake must be located at a distance of at least 15 cm from the chimney. To protect the roof and prevent the ignition of materials, a protective box is created around it, which can be made from rafter legs on the sides of the pipe or by fixing cross beams to the rafters.
After carrying out such work, the pipe is limited to a wooden box. In order to protect the roofing cake, it is necessary to fill the internal space with a material that does not deform under the action high temperature. In most cases, basalt wool is used. This material is not affected by moisture and at the same time allows you to lay waterproofing around the pipe.
The adjunction of waterproofing and vapor barrier materials to the pipe is carried out by the standard method:
- first, the canvases are cut into the shape of an envelope
- after that, their edges are brought to the transverse beams
- fixation of the material occurs with staples or nails
- the vapor barrier is fixed by the base of the frame, which is necessary to secure the finish of the attic space.

At points where the roof adjoins the walls of the box, it is necessary to protect the insulation from moisture. To do this, use a special tape or glue. If the outer walls of the chimney do not heat up above 60 degrees, you can bring the roofing pie close. But before starting work, you must make sure that the temperature is not higher. If the pipe heats up more, this can lead to deformation of the roof and the appearance of leaks.
Before insulating the pipe, it is necessary to create a drainage gutter according to waterproofing film. This is necessary to remove moisture that will fall under the roofing material.
Chimney and roof lining
Before starting work on waterproofing the junction of the pipe to the roof, it must be taken into account that the choice of a particular option depends on the shape of the chimney. The type of material used to finish the roof is also taken into account.
When leading the chimney through the roofing system, it is necessary to organize an effective flow of water that rolls down both the roof and the walls of the pipe. If the pipe is made of concrete or brick, and the cross section is round, waterproofing is carried out with materials sold complete with finishing. For example, many roofing materials are sold with adhesive tape. It must be fixed on the pipe with a metal bar. To completely protect the joint of the apron with the pipe, it is necessary to use a sealant.
Using soft roof the junction is created in a similar way, but instead of the film, a valley carpet or a row of tiles is used, which is wound onto the pipe walls. When waterproofing a roof from a metal tile, an apron is created from metal sheets. It should be borne in mind that these materials must have the same shade as the rest of the roof.
It is worth noting that if the width of the chimney is more than 80 cm, then from the side of the ridge it is necessary to make a ramp. This is necessary for more efficient removal of moisture and snow from the junction of the chimney. A slope is created from the same material as the main roof. If such work is not carried out, even effectively sealed joints may begin to leak due to the large amount of moisture.

Since a wide pipe can cause poor ventilation of the insulation, it is necessary to install additional holes necessary for ventilation of the roof. Before carrying out work, it is necessary to plaster the surface of the chimney. If such actions are carried out after waterproofing the junction, the roofing material can be damaged.
It is worth noting that many round chimneys already have insulation, so they are installed using ready-made metal aprons. That is why such products are chosen by many owners of country houses who do all the work with their own hands.
The junction of the roof to the pipe is an essential unit, the quality of which, in most cases, determines the correct functioning of the roofing pie, the strength and durability of the entire structure.

Features of the installation work of the smoke outlet
The device for adjoining the roof to the pipe can be made according to various designs, using materials suitable for the type of roofing. The principle of sealing the connection of the final decking with vertical systems, also the chimney, is established during the work on the roof project. It is required to take into account not only the type of roofing, but also the location of the smoke outlet, its shape and the material from which it is made. In many cases, it is quite possible to use ready-made systems and standard components for waterproofing adjacencies.
![]()
The easiest way is to waterproof the chimney installed at a sufficiently high point of the pitched roof - in this option there is no danger of collecting snow behind the pipe, which leads to depressurization of the junction and moisture getting inside the roofing pie. A rectangular chimney passing through the roof ridge can be installed between hanging trusses, or with an interruption of the ridge beam in a structure with layered rafters and installation of additional supports.
It is very easy to waterproof the junction of the roof to the chimney, which is located not very much below the ridge. Significantly heavier pipe equipment from the bottom of the ramp. In this variant, in order to protect the chimney from snow masses and collecting snow behind the chimney, it is often necessary to install a specialized sloping system with a groove.

Roof access equipment
A reliable connection of the roof to the pipe can be made only under the conditions that the frame frame of the roof is a rigid system, into which the load from the coating and external influences is equally divided. If the chimney is installed without violating the integrity of the crate, then the rigidity of the external decking made of sheet materials can help ensure the installation of a specialized roof penetration with a base in the form of a sheet of metal.
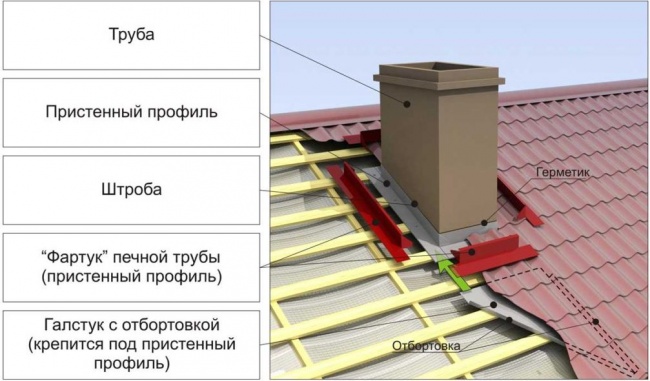
The construction of a rectangular smoke outlet in most cases is associated with the need for selective dismantling of the crate. In most cases, you will need to remove part rafter leg. In order not to affect the bearing capacity of the rafter system, a specialized wooden frame is installed around the smoke outlet, on which the waterproofing and vapor barrier layer of the roofing pie is attached. The waterproofing sheet is pressed with a crate and counter-lattice, vapor barrier - with frame components for installing the lining of the room under the roof. The size of the gap between the frame and the chimney must meet the conditions of SNiP, it is filled with a non-combustible thermal insulator - stone wool.
The roofing pie system must be constant throughout the roof area.
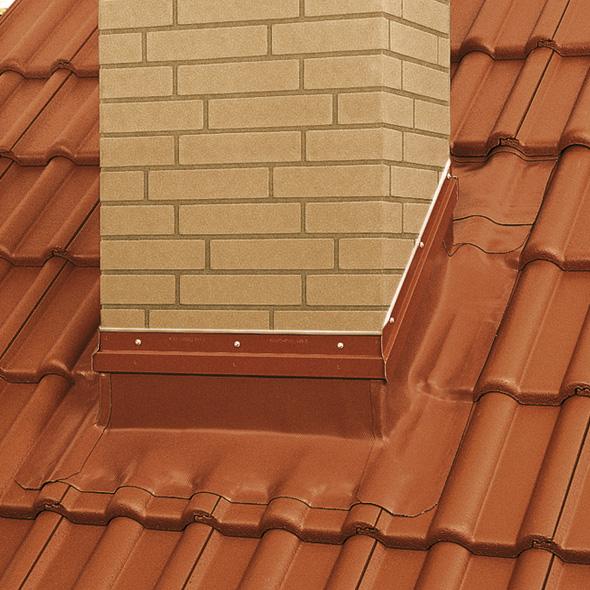
When arranging the chimney passage through the roof, much attention is paid to sealing the pipe and roofing material with a sealant. It is necessary to provide a drainage system flowing down the roof slope and the pipe itself. In most cases, when making a connection, an apron must be installed.
Attaching a tile roof to a chimney
The connection between the roof and the chimney is often created using aprons designed specifically for specific roofing materials and sold as a set of components. Ceramic and cement-sand tiles are completed with flexible tapes made of aluminum alloy and endowed with an adhesive layer on one side.
To cover the joint with sealant, the elastic tape is glued along the joint, with one half adjacent to the pipe, and the other to the roof, repeating the curves of the tiled coating. Then the part on top of the tape needs to be fixed with a profile metal bar. To do this, heat-resistant dowels are used. The mounting points of the fasteners and the junction of the strip with the pipe must be finished with a sealant.

The adjoining roof assembly made of elastic tiles is prepared according to the same know-how, but instead of a flexible metal tape, a valley carpet or an ordinary tile is laid, which was brought into the chimney in advance.
Joining a metal roof
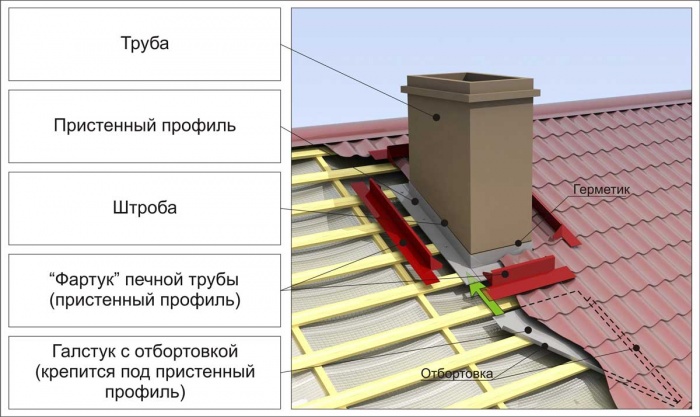
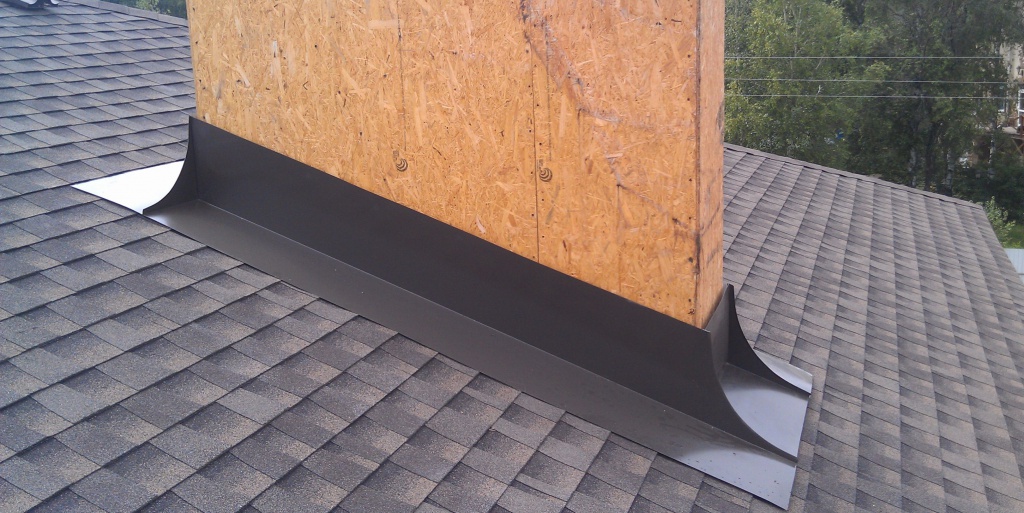
If the roof is made of metal tiles, in most cases a sealing apron is used, made using the lower and upper abutment strips. To do this, the lower bar should be attached to the walls of the chimney and highlight its upper edge. A strobe is created along the marking line, the depth of which must be at least 1.5 cm. Upon completion of work, dust should be removed and the strobe should be washed with water.
The equipment of the inner apron starts from the bottom wall of the chimney.
Planks are installed with an overlap of 15 cm to eliminate the risk of leakage. The upper edge of the additional components is placed in a strobe and filled with a heat-resistant silicone sealant. Under the bottom of the apron, a flat sheet of metal with an anti-corrosion coating should be placed, it will make it possible to ensure water flow. You need to direct it down to the eaves of the roof or to the nearest valley, a side is created along the edge with the help of pliers and a hammer.

So that the junction of the chimney to the roof is as good as possible, before installation work of the inner apron on the pipe, insulation from moisture should be removed (to a height of 5 cm), and its upper edge should be glued with adhesive tape. The insulation material must be heat resistant.
A metal tile is laid on top of the inner apron around the pipe. Upon completion of the installation of the roof covering, an external decorative apron is prepared. To do this, you will need to use the upper junction bars. Installation is created according to the same rule as the installation of an internal apron, but in this option, the upper edges of the components are fixed to the flue walls without chasing. The joint must be filled with sealant.
Round pipe: connection protection
The junction of a round pipe to the roof is in most cases created using prefabricated structures. Today's circular cross-section chimney is a three-layer system, the main section of which is made of a material for thermal insulation. Specialized roof connections are made to them, which consist of a steel cap apron and a flat sheet through which the chimney pipe passes.
The junction models differ, first of all, in the angle of inclination of the plate of a relatively vertically placed pipe. Systems are produced that are designed for use on roofs with a very popular slope angle.
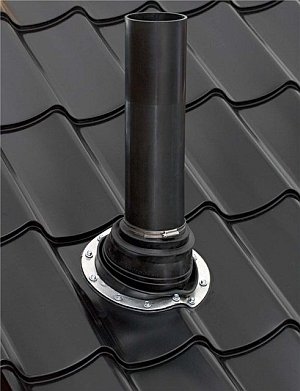
The abutment plate is rigidly attached to the roof surface. The top of the cap is cut off with a similar calculation so that the pipe enters closely into it, without gaps. After fastening the abutment plate, the upper edge of the apron is pressed against the pipe using a steel clamp with a flexible heat-resistant gasket. This makes it possible to cover the joint with a sealant, to prevent moisture from getting under the apron. The installation of the plate itself is recommended to be performed using screws endowed with rubber or neoprene gaskets.
If the angle of inclination of the pitched roof does not make it possible to install a ready-made penetration of the usual standard size, you can do it yourself with your own hands. An airtight apron around a round chimney is most easily made by gluing the perimeter with segments of lead or aluminum tape. You can use a finished piece made of lead, it has a rounded shape and is very easily profiled on the roofing with a rubber or wood mallet.
The self-adhesive lead material makes it possible to make a good connection. Lead is resistant to temperature extremes, ultraviolet, rust.
To ensure good quality installation, all surfaces on which this material is glued must be dry, clean and free of grease.
A well-equipped junction of the pipe to the roof is a guarantee of the absence of leaks in this section of the roof. The correct implementation of all measures for sealing and connecting this part with the rest of the coating will help to fulfill the requirements for arranging a chimney on a pitched roof, as required by building codes. In addition, this will ensure the durability of the structure, increase reliability and contribute to the efficient operation of the roofing pie.
Adjacency rules
Building codes SNiP do not have strict regulations on the location of the chimney, but contain instructions on the height of this element:
- The height of the chimney must exceed the height of the ridge by at least 0.5 meters, if it is located at a distance of 150 cm or less from the ridge itself;
- When located 1.5 - 3 m from the ridge, the chimney pipe can be equal in height to the level of the ridge, or exceed it;
- If the distance from the ridge to the pipe exceeds 300 cm, then its height should be on the same level as the ridge, or not lower than the line drawn from the ridge at an angle of 10 degrees to the horizon.
All other performance features required by the device for adjoining the roof to the pipe remain without regulatory recommendations, and therefore can be performed at their own discretion.
But given the experience of professionals, it is better to install a pipe on the roof closer to the ridge, for the following reasons:
- This arrangement facilitates the process of high-quality sealing and provides a coating without leaks;
- The closer the pipe is to the ridge, the less space left behind to collect snow and water, reducing the risk of leaks.
Attention! Condensation can form both inside and on the surface of the pipe, which leads to the formation of ice in the cold season. It damages the walls of the chimney, significantly worsening the draft and reducing the service life.
round pipe
A roof equipped with a round chimney is one of the most common options for private construction.

To ensure a good connection to the roof of such a pipe, standard three-layer structures are produced. The central part of such a multilayer system is made of heat-insulating material. The kit is completed with a steel flat sheet and an apron-cap, into which the chimney pipe is inserted.
Choosing the right kit is depending on the angle of inclination of the slope. For the most common angles, standard systems are also available. With the help of such structures, it is quite simple to make an independent high-quality connection.
On the roof plane, the abutment plate is tightly and rigidly fixed. The top is cut off on the cap, the size of the cut should allow the pipe to pass tightly into the hole, with no gaps. The upper edge of the apron is pressed against the pipe with a steel clamp with a gasket made of heat-resistant elastic material.
Attention! All materials must be sufficiently clean, as well as the surface of the roof. This will ensure maximum quality sealing work.
The plate is fixed with self-tapping screws, using rubber or neoprene gaskets.

If the slope angle does not allow the use of a standard type chimney system, then this can be done without the involvement of specialists. To do this, to create a sealed apron, it is necessary to glue the perimeter of the pipe with lead or aluminum tape.
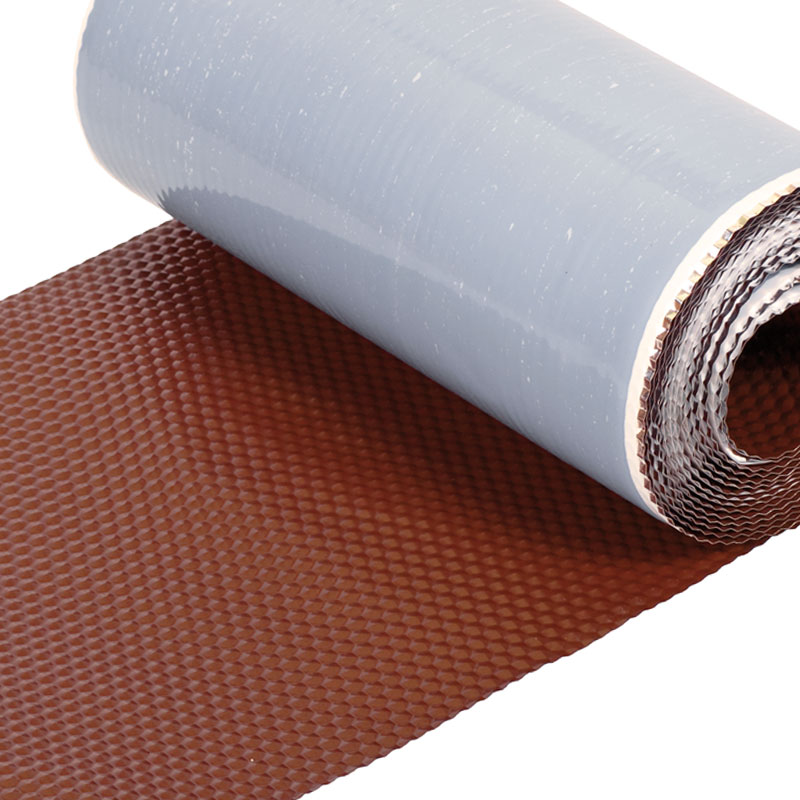
It is also possible to use an oval-shaped finished piece of lead, which can be easily profiled on a soft or hard roof covering with a rubber mallet or a wooden tool.
Such a lead self-adhesive is a material with high performance properties. It is resistant to temperature fluctuations, corrosion and UV radiation.
One of the ways to self-sealing a round pipe on a metal roof is shown in the video:
square tube
For the arrangement of pipes of square and rectangular cross-section, it is very rarely possible to find ideally suitable ready-made elements offered for sale. Depending on the type of roofing material, methods for arranging the connection of the pipe to the roof are also selected.
Rooftop junction
An important point in the arrangement of the chimney is its high-quality connection with other elements of the roof, namely the crate. If this condition is not met, then additional rigidity is provided by installing a special element - a sheet of metal.
When performing work on the arrangement, it is often necessary to partially dismantle the roof lathing. At the same time, to ensure the rigidity of the structure, a frame made of wooden beams is mounted around the pipe, to which layers of waterproofing and vapor barrier are attached. Waterproofing is attached to the crate and counter-batten. The vapor barrier is laid between the roof frame and internal finishing materials. The space between the frame and the pipe must be filled, in accordance with the norms of SNiP, with thermally insulating non-combustible material - stone wool.
Important! Particular attention should be paid to the quality of sealing the joint of the vertical element with roofing material. There should be no leaks at their connection points.
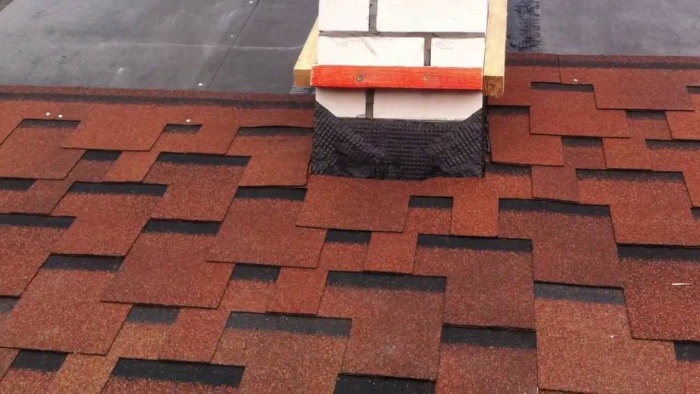
Roof tiles
On the roof, the coating material of which is ceramic tiles, the arrangement of the chimney fittings is carried out using elastic type tapes, which are made of aluminum alloy, with an adhesive layer on one side. Such a tape is attached along the perimeter of the entire seam, while partially adjacent to the chimney, partially to the roof, smoothly repeating the bends on the tiles. Further, the part that is glued to the chimney is fixed with a metal profile strip, using dowels made of heat-resistant material. The junction must necessarily be treated with a sealant.
Arrangement of a joint with a roof made of flexible tiles is carried out according to a similar technology, but the metal tape is replaced by a valley carpet, or ordinary-type tiles, previously inserted into the chimney.
metal tile
On a metal-tiled roof, a special sealing apron is most often used, which consists of adjoining strips for the upper and lower parts.
The lower bar is applied to the walls of the pipe, and then its upper boundary is marked. In this area, a strobe about 1.5 cm deep is made on the chimney. It is cleaned of dust and washed with water. With an overlap of 150 mm, the strips are installed.
Attention! This overlap is necessary to prevent future leaks.
The upper edge of the metal element is inserted into the resulting strobe, and sealed with a silicone-based heat-resistant sealant. From the bottom side, a metal sheet with an anti-corrosion coating is wound up, which provides an effective drain of water. He heads down to the roof eaves.
In order for the junction to be completely sealed, waterproofing (5 cm high) is removed on the pipe before mounting the inner apron. The top edge is fixed with construction tape.
The metal tile is laid on top of the inner apron. After the installation is completed, the top layer is installed - a decorative apron, using the upper adjoining strips. The upper edges of the elements are attached to the pipe without strobes, and the joint space is filled with sealant.
This process is clearly shown in the video:
By providing a high-quality connection of the vertical part - the chimney pipe, to the roof surface, an important condition for the reliability of the roof can be fulfilled. In this case, there will be no leaks at the junction points, and the snow lingering on the surface will not be able to damage the waterproofing layer.


