
Modern developments make it possible to realize intricate design ideas and create a unique interior of the living room, kitchen or bedroom. One of the elements of individual design is a two-level ceiling. Installation of the structure is somewhat complicated, however, having studied the entire installation technology, you can cope with the work yourself.
Features of stretch ceilings
For clearance stretch ceilings PVC film or fabric panel is used. The problem of a large area is solved by connecting individual sheets with strong welding. The stretch coating looks most aesthetically pleasing in free rooms where the ceilings exceed the standard 2.5 m. Installing a two-level structure has a lot of advantages:
- Absence of necessity complete elimination ceiling defects at the preparatory stage.
- The design of a multi-level ceiling is optimal for visual zoning of space.
- Possibility of combining various materials and textures during installation. PVC film is applied with a matte and glossy surface, it can be combined with a fabric sheet.
- It allows you to harmoniously combine several colors that fit well into the overall design concept of the room.
- If desired, the installation of lighting on the ceiling is carried out behind the film. To create an original effect, you need LED Strip Light and a special translucent film.
- Convenient installation of communications. If necessary, the canvas can be easily dismantled.
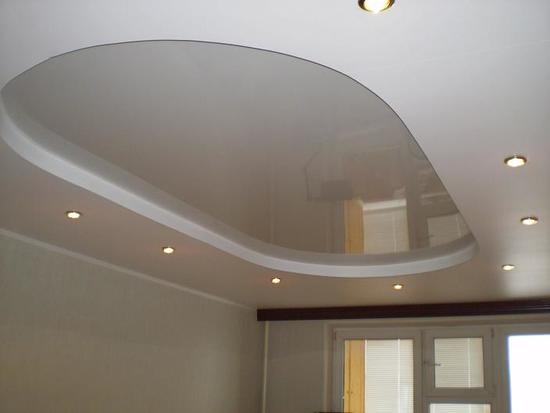
- The reflective surface of stretch ceilings contributes to the visual increase in space.
Installation of two-level ceilings is fraught with certain difficulties and limitations, which are best familiarized with in advance:
- Care must be taken during the operation of two-level ceilings. By hooking the coating with a sharp object, you will damage the panel, and its restoration is not always possible.
- In places of seasonal residence, in the absence of heating during the cold period, it is better to refuse PVC film, under the influence of low temperatures it is destroyed. In this situation, the installation of the structure is recommended to be carried out with a fabric cover.
- The cost and complexity of the work is higher than other options. However, this pays off with a long service life of the structure.
Remark ! The fabric-based material is characterized by greater strength and heat resistance than the film version.

Design options for two-level ceilings
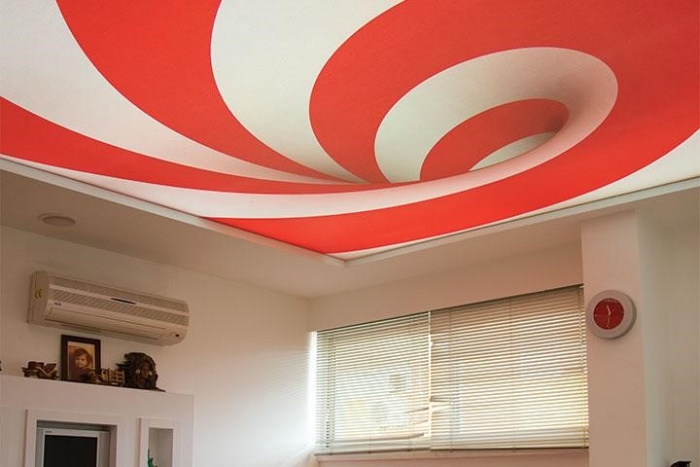
The choice of the form of a two-level structure directly depends on the overall design of the room. If desired, it can be given a wavy, round or spiral look. When choosing the shape and color design of a two-level surface, consider the recommendations of designers:
- If the concept of room design is built on conciseness and simplicity, then you should not equip the ceiling surface with a complex structure with an abundance of decor.
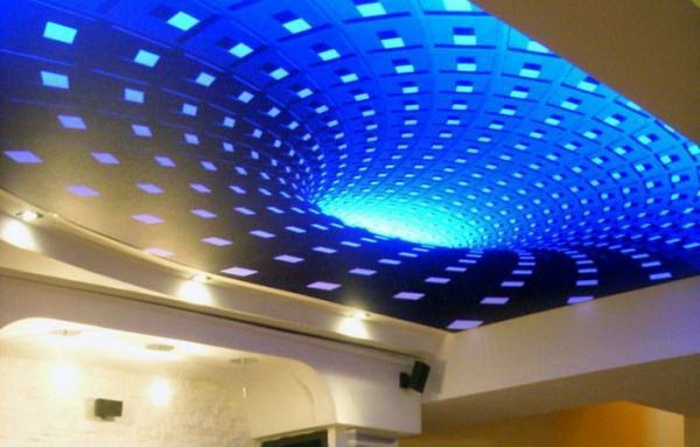
- The use of photo printing on stretch ceilings is permissible in spacious high rooms with large windows. Otherwise, the coarseness of the interior is guaranteed.
- Drawing patterns, imitation of the starry sky is preferable for the upper tier of the structure.
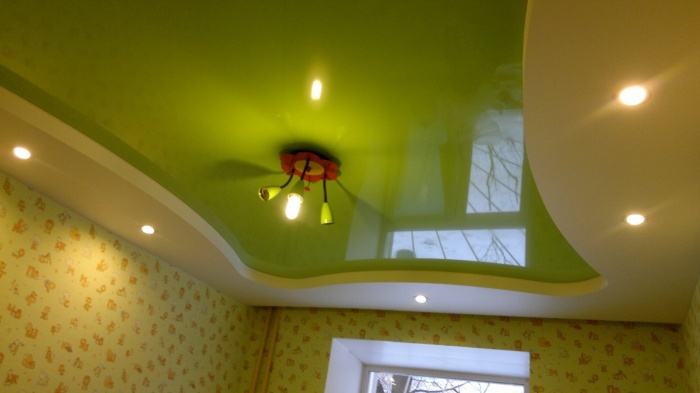
- The use of a glossy film on both levels with a combination of colors is a harmonious solution for the living room.
- The combination of a glossy and matte surface during installation is interesting in its own way. Matte canvas white color successfully complements the fabric material.
- The upper tier of the structure, as a rule, fills large area and is the main one.
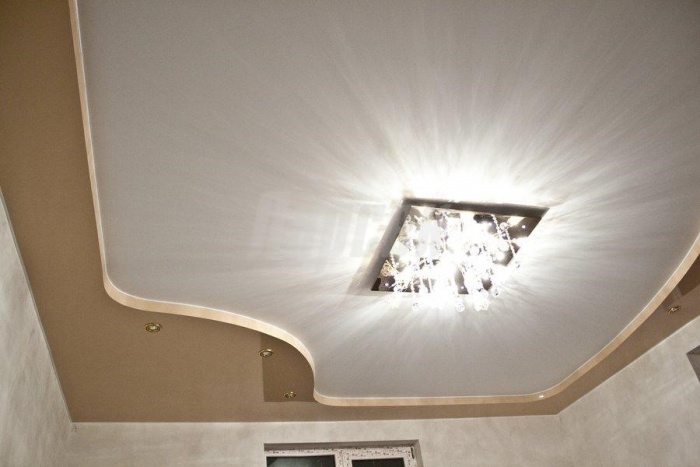
- Installation of inter-level lighting in addition to the main lighting creates a romantic atmosphere in the room. For this purpose, any lighting products are used, with the exception of incandescent lamps.
Professional skills allow you to experiment with 3D shapes on a film ceiling. Flowing elements in the form of funnels, cones and waves recent times are gaining popularity.


Preparatory work
Installation of a two-level ceiling is preceded by surface preparation. The process is facilitated by the absence of the need for perfect alignment. The main task at this stage:
- remove the old finish;
- get rid of rust stains, mold, fungus and soot;
- treat the ceiling with a primer;
- repair large cracks and re-primer.
A carefully thought-out sketch of the ceiling allows you to purchase materials for the installation of a two-level structure in the right amount. Simultaneously with the layout of the structure, the placement of lighting fixtures is determined.
Before installing a two-level ceiling, care should be taken to purchase the following structural elements:
- Aluminum or plastic baguette, designed to fix the film to the box or ceiling. There is a ceiling, connecting and wall type, the length of one product is 2.5 m.
- Film or fabric web, pre-soldered to the required dimensions.
- Decorative insert 0.4 cm wide, designed to mask the gap after installation between the side surface and the two-level structure.
- Plywood, beams, fasteners.
Advice ! Installation of a two-level ceiling is recommended to be carried out on final stage repair, after completion of all dust-forming work.
Installation of a two-level structure
Accurate marking is designed to ensure high-quality installation of a two-level ceiling. In addition to the usual level, you will need a laser level. The process consists of the following steps:
- From the base surface, the distance to the upper tier is plotted, then the height of the lower level is noted.
- From the sketch of a two-level structure, the contour of the upper tier is transferred to the ceiling, and the places for installing lighting fixtures are outlined.
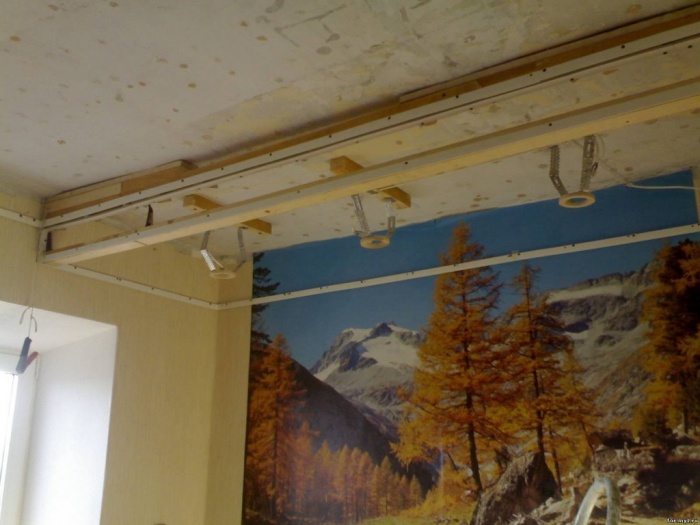
- To future lamps, wiring is laid, wound into the corrugation. The place of installation of the chandelier is equipped with a bar.
Plywood frame installation
To mount the base, you will need a piece of plywood of the required width. To give flexibility to the material will allow it to soak for an hour in heated water.
Mounting frame structure ceiling is carried out in the following order:
- A cord with a fixed pencil is attached to the driven dowel.
- The contour line of the second tier is marked.
- Pine bars are fixed along the contour line using dowels.
- The softened plywood veneer is fastened to a wooden beam with self-tapping screws.
- According to the markup, the profile is fixed for both tiers. The profile of the upper tier is located at a minimum distance from the ceiling.
- At 7 cm from the bottom, the baguette is fixed to the base. To form smooth lines, it is incised at an angle of 30 o.
- Using self-tapping screws or dowels, the baguette is attached to the walls at intervals of 10-15 cm.
If there is inter-level lighting in the sketch, at this stage the installation of spot lighting products is carried out.
Frame for a two-level metal profile structure
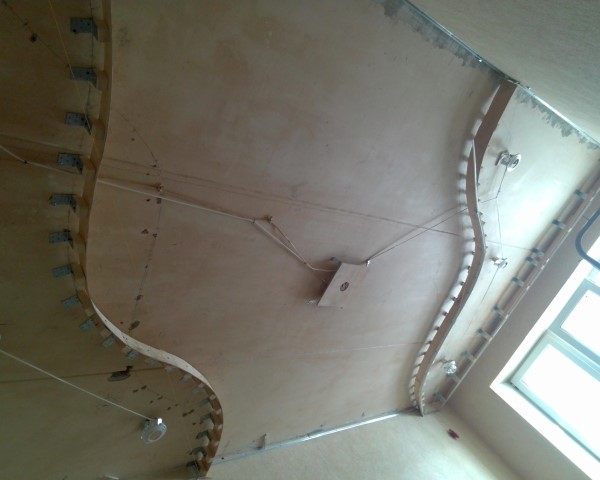
If there is no illumination between the levels in the installation plan, the box is installed on the basis of a metal profile. The procedure for mounting the frame of a two-level structure includes the following steps:
- using fixing products, we install a metal profile along the border line of two tiers;
- the profile is incised on the bends, the fastening interval is 4 cm;
- baguettes are attached to the side surfaces;
- drops are formed from the remains of the profile, their length is identical and ends on the same line with the level of baguettes on the wall;
- from a U-shaped profile, a box is installed for a two-level ceiling;
- using self-tapping screws "klopik", the drops are connected to the box with an interval of 25-30 cm;
- we mount the resulting box to the wall using a wide supporting profile.
Warning ! The design of a two-level ceiling is mounted with a regular check of the horizontal plane using a level.

Installation of fabric or film coating
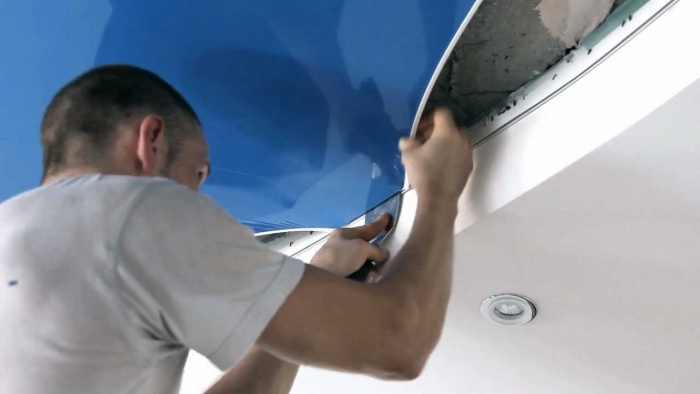
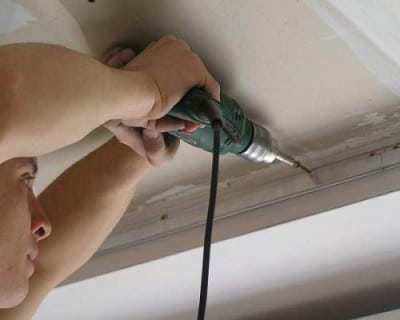
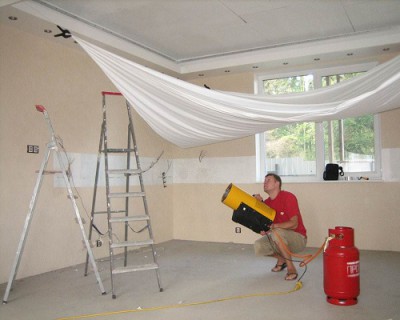
A special heat gun is used to attach PVC film to a two-level ceiling frame. The room warms up to a temperature of 55-70 o, after which the canvas is carefully unrolled. On the upper tier, the material is fixed with special clamps. Using a spatula, the harpoon is wound into a baguette. After that, the canvas for the second level is prepared and fixed at opposite corners. The film is inserted into the baguettes on the wall, after which they proceed to the installation of plastic flashings.
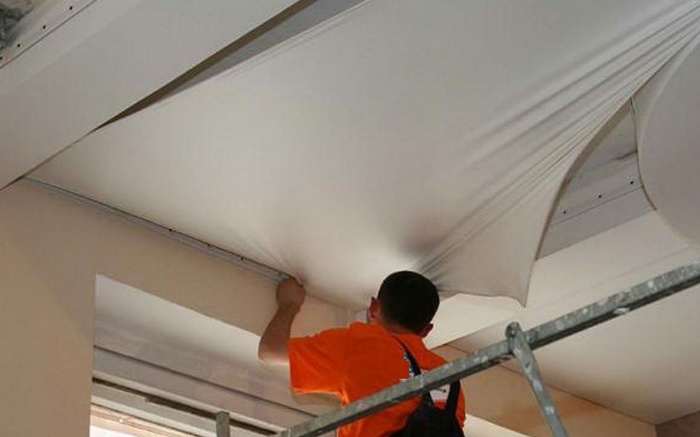
Installation of a fabric web for a two-level structure is carried out without the use of special equipment. First, we fix the material of the lower tier along the walls with a spatula, fixing the canvas with a clip. Wrinkled areas are heated with a building hair dryer and smoothed out. Then proceed to the installation of the upper level.
Owners of two-level stretch ceilings get the opportunity to enjoy their individual design for a long time without the need for repeated repairs.
Two-level ceilings can be constructed independently on the basis of various materials: gypsum fiber, wood-building boards or drywall.
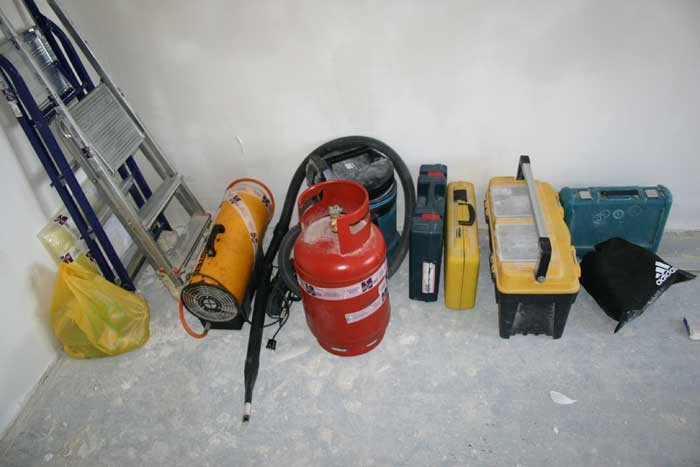
To carry out quick and high-quality installation, it is necessary to thoroughly prepare for work, purchase necessary tools and materials.
Features of the technology for creating a two-level ceiling
The installation of such a ceiling is in many ways reminiscent of the installation of gypsum structures: first, a rigid structure of the required shape is assembled, after which it is mounted on the main ceiling.
Perhaps the only difference is the need to use expensive materials for the installation of ceilings, which allow you to assemble an excellent quality frame in a very short time.
One of the features of two-level stretch ceilings is their low cost. Therefore, compared to other models, their installation is a relatively inexpensive process.
Work order
- The first step is markup. The ceiling should be divided into two tiers. The construction of tiers is carried out separately. The top level is a standard ceiling, while the bottom level is just an addition to the top level. However, the lower one is also an independent single-level ceiling of a different configuration developed by designers.
- First, the upper tier is marked. For this purpose, an exact contour must be outlined along the full perimeter of the room. It is necessary to determine the surface of the created ceiling. To obtain an absolutely horizontal plane, it is recommended to use a special laser level.
- The next step is the installation of metal profile guides under the main ceiling along the perimeter, in strict accordance with the intended line. To fix them, ordinary self-tapping screws are used.
- After that, with the help of special fasteners, ceiling profiles, or suspensions, are installed and fixed. Using adjusting hangers, you can easily set profiles according to the level.
- Hangers are fastened along the ceiling profiles, at a distance of 0.5 m from one another. As for the profiles, a 30-centimeter gap should be maintained between them.
- At large sizes rooms for fastening ceiling profiles to each other use spacers based on the same profile.
- The last step in the installation of the upper tier is the laying of drywall sheets and fixing them to the frame with self-tapping screws.
After that, you can proceed to the installation of the lower level.
Stretch ceiling is one of the varieties of suspended structures, we suggest that you familiarize yourself with them.
Setting the lower level
When installing the second level, you should focus on the location of the top.
The installation of rectilinear frame parts is not difficult, and certain problems may arise when arranging curved elements. The main task is to correctly cut the profiles so that these parts can be easily bent and given the required shape.
- As a rule, profiles are cut in several places, while the size of the cuts should be two thirds of the entire width of the profile. The metal profile can be easily bent along the cut lines.
- In the case when the lower level starts from the wall, the profiles are fastened directly to it.
- When the level is located in the middle, the profiles are mounted to the drywall of the upper tier. To withstand the load exerted on it, the frame of the upper tier must be distinguished by increased strength.
- At the end of the installation of the frame, it must be sheathed with plasterboard sheets in accordance with the technology used in the first case.
- With independent installation, the process of sheathing the side wall of the space between levels is of particular difficulty. Problems are associated with the curly surface of the ceiling. However, with the knowledge of some subtleties, the process can be carried out without much difficulty. It is necessary to cut a strip of the required size from a single drywall sheet and carefully moisten this part with a sponge. After completing the described manipulations, you should wait for the material to dry. The strip will gain the necessary flexibility, as a result, it can be easily installed.
- Fastening to the frame is done with screws. After the final drying, the drywall sheet will be characterized by increased strength. Using the described method, you can equip almost any uneven surface.
- The final stage of work is sealing the joints between the sheets, installing fixtures, applying a primer to the surface and finishing the surface.
Such a ceiling will decorate any room and give it an aesthetic unique look.
You decided to make repairs and want to update the ceiling and at the same time do it, as you no longer want to. You immediately imagine something more beautiful, better. Therefore, a logical question arises - which coating to use? Science and technology are advancing rapidly today, helping designers create completely new materials and designs. One of the latest innovations in design engineering has been the use of PVC films. With this technology, the surface of the coating itself is not built from rigid materials, such as drywall, but is formed by laying and stretching a special PVC film. Two-level projects are becoming more and more popular. What does he represent? This is a PVC film construction in two tiers. The first tier achieves alignment of all the irregularities of the main ceiling. The second creates a variety of geometric shapes to achieve a certain aesthetic design. Let's take a look at how technically difficult it is to install two-level stretch ceilings.
The installation process of two-level false ceilings
Project

Any construction work begins with a project. Therefore, in the beginning, it is necessary to carefully consider and plan the purpose of all work and how to achieve it. The work of creating a perfectly flat ceiling requires a serious and careful approach. So, you need to choose materials for work. Think about what colors to use and how they will be combined. Decide what design decision better to use and what kind of lighting to apply. You can sketch for a project. We calculate the estimate according to our capabilities and do not forget to prepare all the necessary tools. If everything is taken into account, the project is ready.
markup
Before marking the structure, pay attention to the walls of the room. Walls should be as straight and even as possible. A rigid profile for mounting and stretching a polypropylene film will be mounted on them. In no case should there be cracks, bends and gaps. Therefore, we prepare the walls.
Since a two-level system is being installed, the ceiling must be divided into two parts. One part is designed as the upper level. This level is the first, that is, under the ceiling itself. We calculate the second part of the ceiling as the lower level, which is mounted under the previous one. The lower level is a continuation of the upper level and can be made in the form of any geometric shape or figure. We apply markup in accordance with the chosen design. So:
- determine the height of the top level surface. To do this, taking into account the height of the recessed fixtures and the height of the mounting baguette, we put a mark. The set size is transferred to all corners of the room. We connect the marks in all corners with a solid straight line to create one level over the entire plane of the room;
- determine the height of the lower level. This indicator depends on the height and area of the designed ceiling drop. We add this value to the top-level markup;
- accurately calculate the area of the PVC film. This must be done separately for the upper and lower levels.
As a result, we get a completely marked perimeter of the entire room on two different levels and clearly defined boundaries between them.
Tools used for markup
The choice and condition of tools, both for marking and for installation, affects the accuracy and time of the work. The result depends on them. Therefore, we choose:
- Laser level. The most accurate tool for marking the horizontal projection of the ceiling. The device has practically no error. This is the most reliable option, but also the most expensive;
- hydraulic level. Also an accurate and reliable device, although quite simple. It consists of two identical transparent flasks with printed markings and interconnected by a flexible hose. Water inside. The device operates on the principle of a communicating vessel. It is only necessary to combine the readings on the scale. With the help of a hydraulic level, you can put marks around the perimeter of the room anywhere exactly on the same level. The absence of the device can be replaced with a home-made analogue. To do this, two medical syringes are connected to each other with a flexible tube and filled with water - the device is ready;
- bubble level. The most common building tool. Has some error. Applicable for small spaces;
- chocline - a device with a dyed thread for connecting marking marks with a solid line at various distances;
- tape measure, construction pencil or marker.
We mount the frame
Before mounting the frame, we choose the method of attaching the PVC film to the baguette. Let's look at two main ones.
Mounting methods
They are:

- harpoon mount. This is a method of attaching a PVC film to a baguette fixed to the wall. An L-shaped bar made of elastic material, similar to a hook, is welded to the film around the entire perimeter. At the entrance to the groove of the baguette, the bar is compressed, and inside it straightens out and is securely fixed in the internal partitions of the baguette. Thus, a very reliable connection is created. Removable decorative strip hides the fastening system. The disadvantage of this method: the L-shaped bar can only be welded to the PVC film in the factory, so the installation process may be delayed. High measurement accuracy is required. The film is calculated 5-15% less than the main size to ensure a good stretch. The harpoon mounting method is the most reliable;
- bead or wedge fastening. This method is based on fixing a PVC film with a wooden or plastic glazing bead in a U-shaped profile. This is the simplest and most common mounting method. With this method, it is not necessary to carefully measure the film, it must be left a little more, and the excess is removed after installation. The most budgetary and affordable option, but not reliable enough. In terms of strength, the connection is inferior to the harpoon method of fastening. After dismantling, the film cannot be installed back in the same place.
Each of these methods has positive and negative sides. We make a choice and proceed to installation:
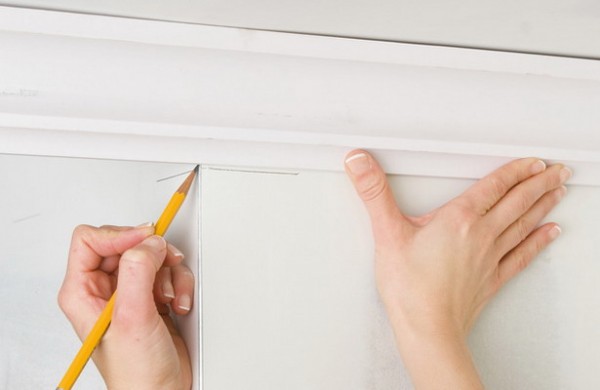
- Installation begins with the installation of a baguette on the walls. We mount the upper level. We measure the required length of the level profile. Cutting is carried out with any cutting tool, for example, an angle saw. The length of one standard profile is 2.5 m. We fasten the baguette approximately every 10-20 cm. We prepare holes in the wall with a puncher or, if the wall allows, we screw in the screws directly. For fastening, we use screws, self-tapping screws with plastic dowels or anchors. Let's pay attention to the marking line. It must always pass under the bottom plane of the profile. The profile itself is mounted with the flat side against the wall, and with a groove for attaching the film inside the room.
- We mount the lower or second level. We carry out installation using the same technology. The lower level is placed under the mounted upper level in accordance with the project configuration. Thus, we assemble a solid rigid frame.
- Fixing PVC film to the baguette. According to technology, the room must be heated at least 50 C. A special heat gun is used. At this temperature, the PVC film becomes elastic and acquires the ability to stretch. The canvas is hung on ropes, first diagonally across the room, and then completely. Align along the perimeter of the room and proceed to the stretch. Using a construction spatula, the heated PVC film is inserted into a baguette and fixed with the chosen method of fastening. With the glazing bead method of fastening, the excess is removed. And at the end of the installation, decorative overlays are installed, hiding the places where the film with the baguette is attached. After the room has cooled down, the PVC film is straightened and pulled tight. The surface becomes smooth and beautiful. Work is done.
On a note: If you wish, you can also watch the accompanying video, where the installation is considered taking into account all the technological subtleties. By combining video and text information, you get the most complete picture.
It is quite obvious that the installation of two-level suspended ceilings is a job that is quite difficult to do on your own without the appropriate skills. But the result is worth it, because it is a stretch ceiling made according to your own project, and even with your own hands, not only decorate your room, but also help you feel satisfaction from the work done.
Related videos
What could be more effective than a flawlessly smooth surface of a stretch ceiling? - Obviously, the question will be followed by a statement about the marvelous property of multi-level ceiling structures to transform the interior and in every possible way decorate the life of ordinary inhabitants, inexperienced in matters of design delights, with their unusual appearance. But, contrary to expectations, we will not praise two-level stretch ceilings without any arguments, we will only consider design features, the feasibility of arrangement and some options for execution. Information on how to make a two-level stretch ceiling will undoubtedly be useful to those who wish to evaluate the possible amount of work.
Various kinds of training videos will give only a general idea of how two-level stretch ceilings are made - video editing involves processing and restructuring the footage. But the addition of printed explanations, most likely, will clarify the situation and help to establish one's own opinion. It will help you get acquainted with how two-level stretch ceilings can be implemented in the interior of the photo collection - examples of interesting color combinations and play of textures, perhaps inspire the feat of creating a ceiling structure of incredible beauty in your own home. So let's get started...
A two-level stretch ceiling, in contrast to a single-level one, representing a straight plane and realized by a stretched between the fastening profile (“baguette”) canvas (fabric or PVC), is a more complex structure from a combination of stretch ceiling elements and various frame elements.
You can combine different versions of the ceiling with plasterboard structures, which allows you to realize various design ideas.
Consider the most common way of arranging a two-level ceiling, when the upper plane is represented by a stretch ceiling, the lower one is plasterboard.
Installation sequence
First of all, you need to measure the room, draw the required configuration on paper. When calculating the height of the structure, it is important to take into account the height of the recessed fixtures and their subsequent location. From the drawing, you need to transfer the desired shape to the ceiling, and only after that proceed with the installation.
Installation of a reliable frame
First, we make a frame of metal profiles for plasterboard structures. The plane of the structure to be constructed must be strictly horizontal, marking accuracy is required. Using a water or laser level, marks should be marked in each corner of the room. From these marks, with the help of a chopping cord, a continuous line is drawn around the entire perimeter of the room.
A U-shaped profile is attached along the allotted line with dowels and a perforator. The same profile is installed on the ceiling according to pre-laid markings. The shape of the box can be curvilinear and straight. To fix the profile along a curved line, it should be cut with metal scissors at intervals of 3-4 cm so that it can be bent to the required curvature. To the profile fixed to the ceiling, we fasten the descents from the segments of the profile of the required height. The lower edge of the drops must be at the same horizontal level with the wall profile. Together they will form the lower plane of the structure. Fixing interval - 25-30 cm.
We assemble a box from two U-shaped profiles and sections of the profile, twisting it with metal screws in such a way that we get a design similar to a rectangular pipe. This design must be attached to previously installed omissions. All fastening work on the profile is carried out with self-tapping screws of the “klopik” type using a screwdriver.
We fasten the installed box to the wall profile with a wide supporting profile. Strict correspondence of verticals and horizontals is mandatory; angles can be checked using a level. Thus, the entire frame is assembled around the perimeter of the room. A baguette for a stretch ceiling will subsequently be screwed to the box. When cooling, the stretch ceiling film is strongly stretched, the box design must be strong, designed for a load that can withstand the tension of the PVC film.
The next step is laying the electrical wiring for the backlight. Next - sheathing the frame with drywall. We cut out the sheets of the desired size and mount them on the box, fixing them with drywall screws. After installing all the drywall elements, it is necessary to reinforce the corners with a perforated corner, which is fixed to the gypsum putty.
All seams and recesses from self-tapping screws should also be puttied. After the putty has hardened, the box is polished with a special grinding grater. We mark the locations of the built-in lamps and drill holes using the appropriate nozzle (“crown”), then the surface of the box is primed and painted (or pasted over with wallpaper). Thus, the ceiling of the lower level is performed. Installing a stretch ceiling is much easier to perform.
Stretch ceiling installation
To the previously installed drywall box, you should attach a mounting plate (“baguette”) for attaching a stretch ceiling.
Installing the mounting plate (baguette)
If installation is foreseen spotlights or chandeliers, then appropriate preparation for installation is required (described in detail in one of the sections of the site). Installation of a stretch ceiling structure requires certain qualifications and the use of appropriate equipment; theoretically, it is possible to make a two-level stretch ceiling with your own hands, but it is better to entrust its installation to experienced performers.
Nevertheless, let's consider the process in more detail: PVC film is made according to previously taken measurements by the manufacturer. A special harpoon-type fastener is attached to the edges of the canvas. The packed cloth arrives to the customer cut according to the measurements. Before installation, the panel is unpacked and fastened in the corners on special mounting braces. After that, the air in the room is heated with a heat gun up to 60°C.
Heat gun heats the room
At this temperature, the PVC sheet becomes elastic, which allows you to attach it to the baguette. After cooling, the plane of the ceiling is leveled.

Heated PVC film is mounted in a baguette
The next step is the installation of fixtures.
There are a few things to keep in mind when designing a project. important points: functional feasibility and desired aesthetic effect. With the help of a two-level ceiling structure, you can hide the irregularities of the ceiling and effectively arrange additional lighting. The possibility of zoning space with the help of ceiling structures should also not be discounted. A few words about the aesthetic component: the choice of shapes and color combinations when arranging a multi-level stretch ceiling should be determined by the general concept of interior design. So, indoors, with a concise layout and color solution interior arrangement of the ceiling structure in the form of a bizarre curl, much brighter than other elements of the interior according to color combinations would be redundant.
Finally, a few tips on choosing colors, patterns and textures. Undoubtedly, two-level stretch ceilings with photo printing are spectacular and unusual in their essence. But focusing on the ceiling (an unusual shape and pattern attracts the eye) can only be justified in a spacious room with high ceilings. When choosing a pattern and texture, consider the property of gloss to “glare” and reflect the surface. The color selected in the shade catalog will be slightly darker than desired on the ceiling.
With the advent of stretch ceilings, many repair issues are resolved quickly and easily. A special PVC film protects from water from above, gives a smooth surface to the ceiling and is very attractive in appearance.
But last years there are more and more supporters of installing stretch ceilings with two levels, which look more impressive and will allow the bold ideas of owners and designers to be implemented.
Installation sequence: step by step with video
The widespread opinion about the complexity of installing a ceiling with several levels is wrong. If you know the algorithm of actions and follow the instructions of the training video, then everyone is able to understand the secrets of installation.
The algorithm of actions is as follows:
- ceiling markings. This work is done using a laser level. The main task at this stage is to find the lower level and draw a line from it;
- sawing a baguette. At an angle of 45 degrees, a baguette is sawn down, with the help of which the base is prepared for attaching the stretch fabric. Next, the master reduces the corners at the places where the wall and the lower level are combined. There may be several such places (depending on the configuration of the ceiling);
- console mounting. The next step in the installation of stretch multi-level ceilings is fixing the consoles to the floor slabs and hanging the profile. This design allows you to lower the level of the future tension structure. At this stage, it is set required form ceiling, thanks to the flexibility of the perforated aluminum profile and its several fixing points;
- fixing the entire perimeter of the profile. If the consoles have extra components, then they are bent;
- installation of reflective material. To achieve best quality lighting, craftsmen install a special reflective material in the areas of the ceiling where it is planned to install lighting devices. At the same time, there is no need for an additional base for installation;
- mortgage installation. One of the main problems for beginners is fixing the mortgage for fixtures. But there are no difficulties here if you go through the installation of stretch ceilings according to the given video tutorial. Masters clearly show how the mortgage is attached, and what elements may be useful for this;
- wiring preparation. After mounting the mortgage, power wires are connected to the place where the lamp is attached. It remains only to connect the light source after completion of work;
- grinding. Special attention is paid to joints and corners, profiles that should be processed with sandpaper and glued with adhesive tape. This is necessary to avoid damage to the ceiling;
- preparing a tool for mounting the canvas;
- refueling of the lower level (work is performed starting from the corners). In this case, the film is heated with a heat gun. As soon as the corners are tucked in, the entire perimeter is stretched;
- installation of fixtures and lighting checks;
- refilling the upper part of the ceiling (second level).


