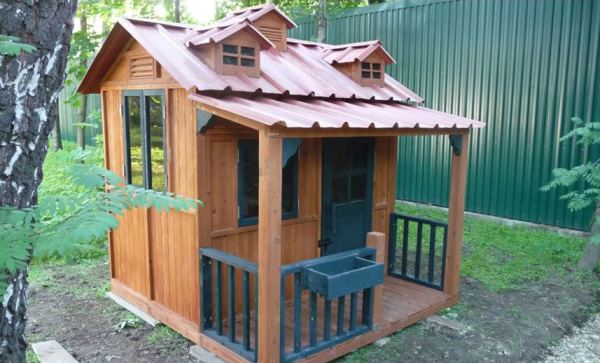
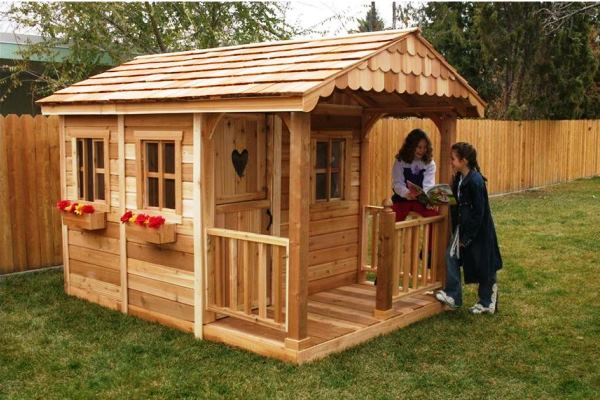
Every child is a person. It must be remembered that in addition to communicating games and activities, he needs a personal space where the baby could retire, dream or play with friends, feeling some independence. This personal space can be separate room(if available). If this is not possible, or if you want your children to spend more time outdoors, you can build a children's playhouse for them.
Materials for building a children's playhouse
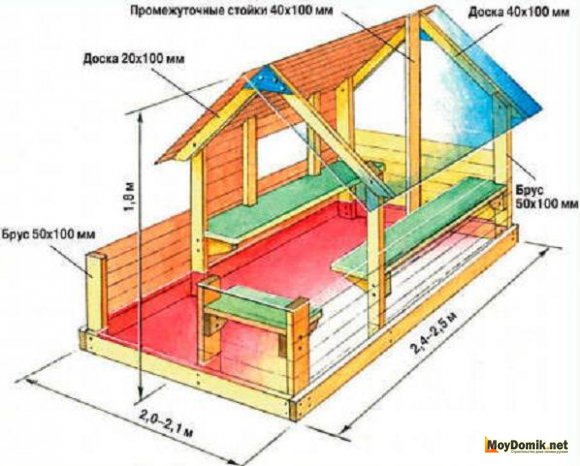
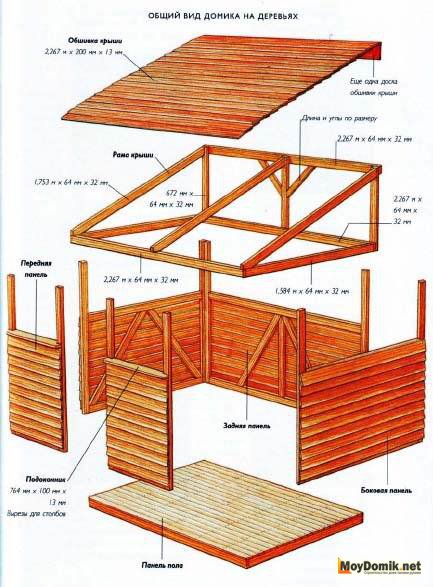
- 6 plank panels size 1800 2400 mm with posts section 50 75 mm - from them we will make a children's playhouse with our own hands
- 4 processed beams with a section of 100 * 100, 1800 mm long
- 2 processed beams with a section of 50 * 100, 2400 mm long
- 2 beams with a section of 50 * 100, length 2400 mm
- 1 beam with a section of 50 * 75, 2400 mm long (as even as possible)
- 1 beam with a section of 25 * 75, length 2400 mm
- 1 roll of roofing material
- 2 boxes of 30mm screws (500 grams each)
- Box of 75mm screws
- Box of roofing nails
- 10 liters stain (7 liters light cedar and 3 liters dark green)
- Thin boards.
Playhouse building tools
- Shovel
- Rammer
- Long level
- A hammer
- Drill driver
- Circular Saw
- chopping
- paint brush
- Stationery knife.
In addition, you will need an assistant in order to carry and install the panels from which you will make your own playhouse.
Terminology used in this article:
sheathing- planks that make up plank panels
Racks- bars with a section of 50 * 75, 2400 mm long, which are the basis of plank panels and on which the sheathing is attached.
Note: Make cuts with a circular saw from the inside of the panels. So there will be no chips on the outside.
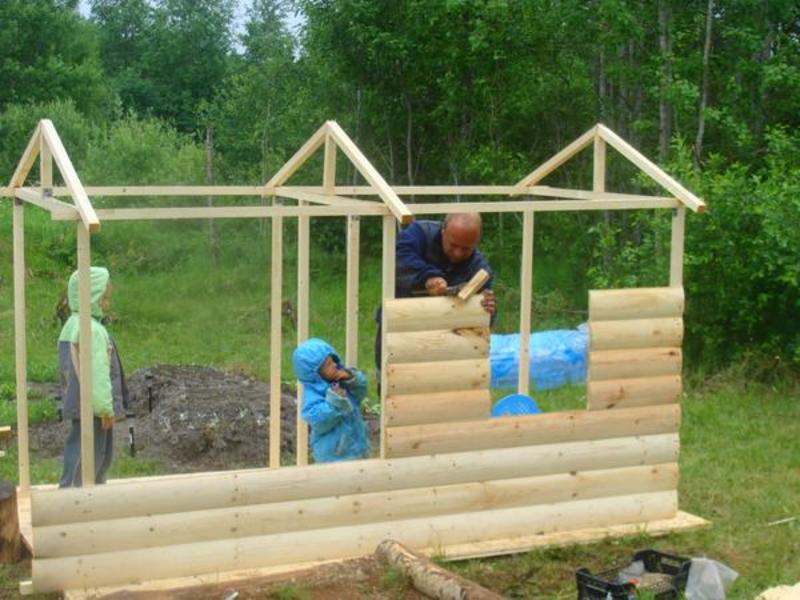
How to build a children's house with your own hands
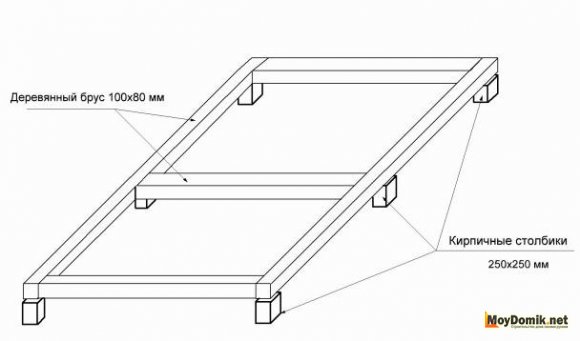
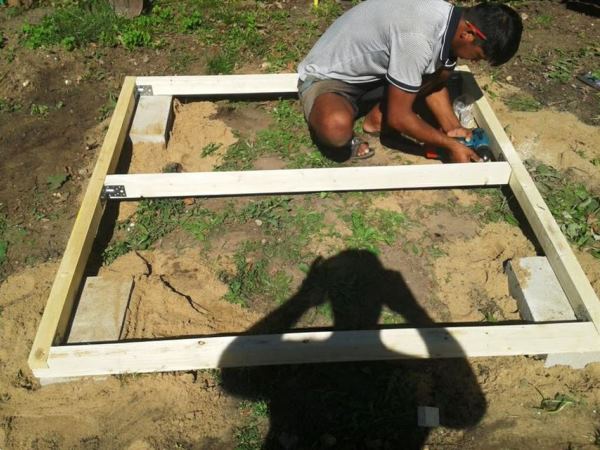
Playhouses for children must be placed on the foundation.
If you have free time and a little extra money, we would advise you to dig small trenches and fill in the rubble under the support bars with a section of 100 * 100. We did not backfill, but simply leveled and compacted the topsoil.
Choose a place where the children's playhouse will be located. You need to place it so that it does not interfere, and there is enough space around it.
Cut the bars 100 * 100 mm of the desired length. Measure the distance between the two end posts of the plank panels. In our case, the distance was 1400 mm, so we cut the support bars to exactly this length.

It is necessary to place the support bars so that during assembly they are exactly under the racks of the plank panels. Take bar 50 75 mm, 2400 mm long and attach to one panel, mark the location of the racks on the beam. Focusing on these marks, you will then be able to correctly decompose the logs from the beam 100 100 mm.
Look at the construction site and determine the lowest point, it will become the base. Level the soil to one level, tamp it down and lay one support bar with a section of 100 * 100 mm (we will consider it the front one). Then repeat the operation with the rear support bar. Check that both beams are level. After that, you can lay the two central beams.

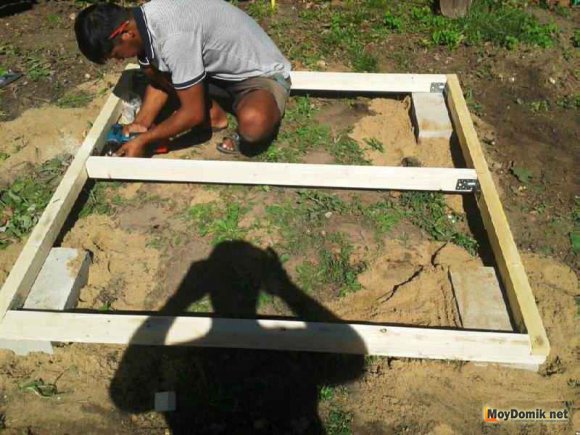
The support bars must be fastened together. To do this, place two pressed beams with a section of 50 * 100 and a length of 2400 mm across them so that they pass between the racks of the plank panel that will become the floor. Fasten all foundation beams with screws. Fill the voids between the lags with soil. Make sure that 25-50 mm of the support bars are above the ground. This allows air to ventilate under the floor and keeps children's playhouses from rotting.
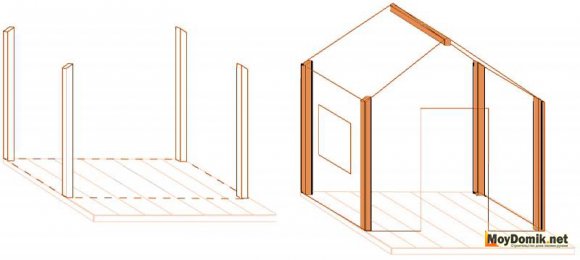
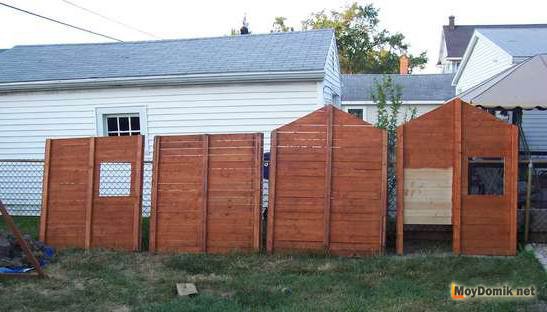
Cut plank panels. Choose the nicest panel, it will go to the floor.

Lay the panel horizontally so that it does not touch the ground. To do this, under it, you can put trimming timber.

Make sure that the panel posts are on top and that the pieces of timber are located under the panel between the end posts. By using circular saw make a cut along the two extreme racks.
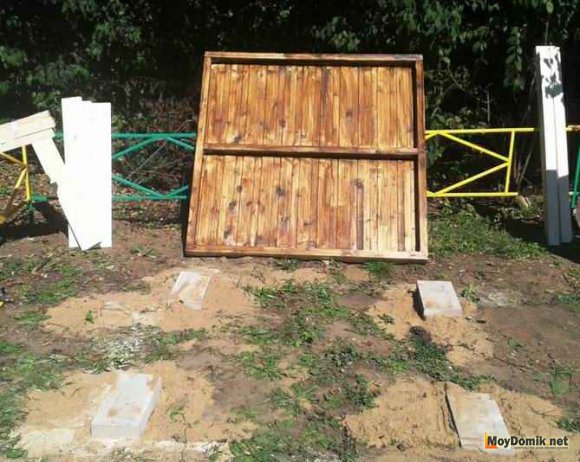
Lay the deck over the foundation, but don't fix it yet. Lay the panel so that its edges coincide with the support bars.
Adjust the front and back panel under the dimensions of the flooring. The height of the panels should be 1800 mm (the size is not critical, it can vary depending on the height of your panels).
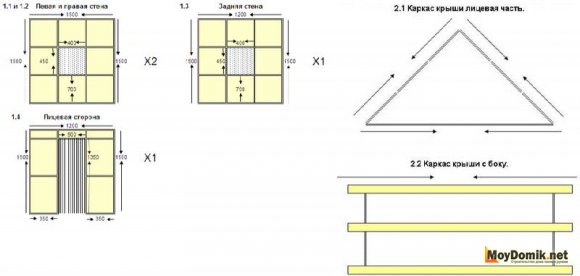
The cut lines are easiest to mark with a bevel. At this stage, be sure to leave some room for the width of the front and rear panels so that they can overlap the side pillars. To ensure overlap, from the outer edges of the outer posts, you need to measure one more thickness of the posts (in our case, it is 20 mm). Mark the border with a bevel and saw the panel from the inside.

Mark the top center point of the front and back panels. Mark the side faces at a height of 1500 mm. Draw two lines through these points and cut the panel along.

Cut out the side panels. Mark the height of the side panels so that it corresponds to the height of the lower points of the front and rear panels (in our case it is 1500 mm). Apply the markup with a padding. The margin for the width of the side panels should be greater than the front and rear. They are needed in order to close the corners. In our case, the reserves amounted to 55 mm. Beat off the lines by marking the width of the side panels (don't forget about allowances). Again, cut the panel from the inside.
Cut the panels for the roof. Making the roof is the most difficult and time-consuming part of the project. You will have to unscrew all the posts of the last panel and re-attach them in certain places. On the front panel, measure the length of the line connecting the center top point with the side one slightly lower. Based on this distance, determine where the roof panel posts should be. The post running along the ridge should be at a distance of 50 mm from the center line. This is done so that during installation the two racks do not overlap one another. For the manufacture of additional racks (if necessary), use bars with a section of 50 * 75 mm. When laying the crossbeams, make sure that they are perpendicular to the top of the roof, try to align them with the bottom edge of the panel.

Irregularities along the ridge will be hidden by the ridge. Remove and rearrange one strut at a time to keep the panel as rigid as possible. Once all studs are in position, locate and mark the center of the roof panel with a chisel. Cut the panel into two equal halves.
Mark and cut windows and doors.
Now you need to decide on the location of windows and doors.

We settled on a door size of 600*1200mm as it fits perfectly between the panel posts. First cut out the window, do not cut the door to the end, as in this case the loose panel will lose its rigidity.
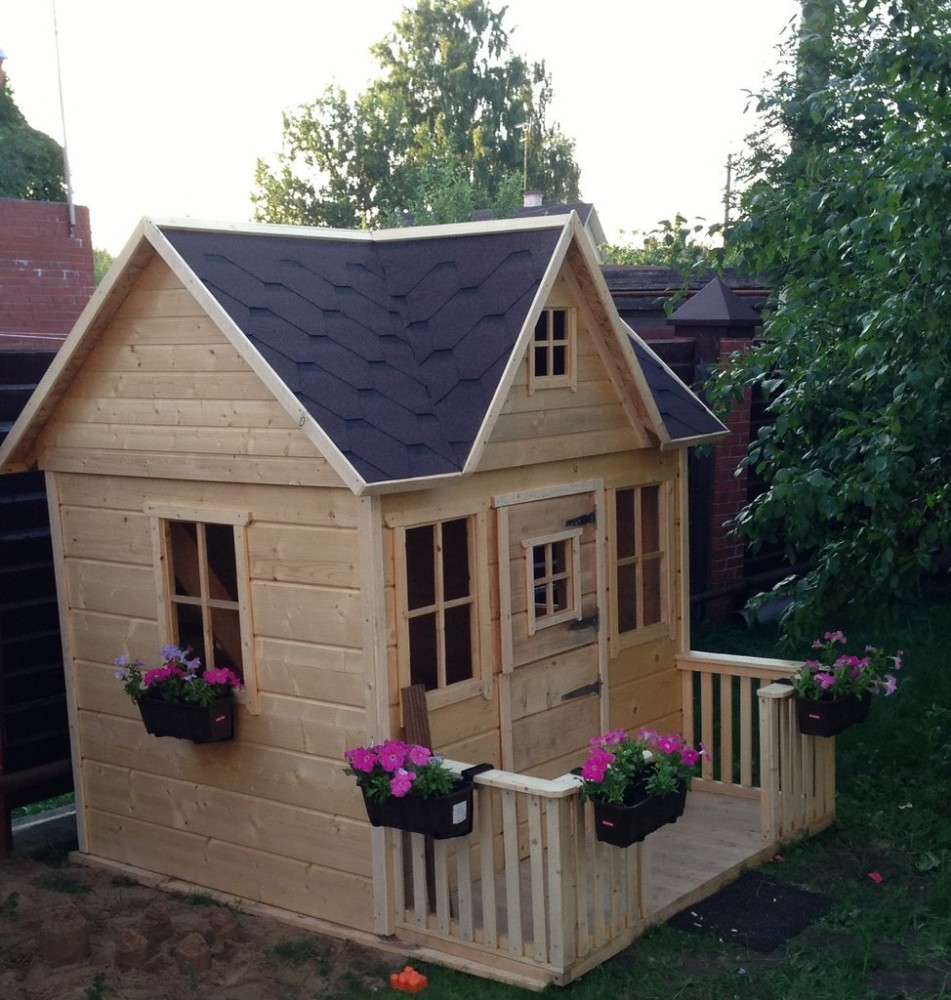
Cover everything with stain.
So, the main parts are prepared, now you need to cover them with stain and varnish.

If at this stage everything is done correctly, you can be sure that the house will last long enough. Do not forget to varnish the outer and inner surfaces of all panels and the floor.
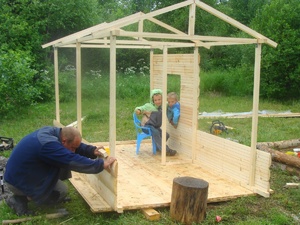
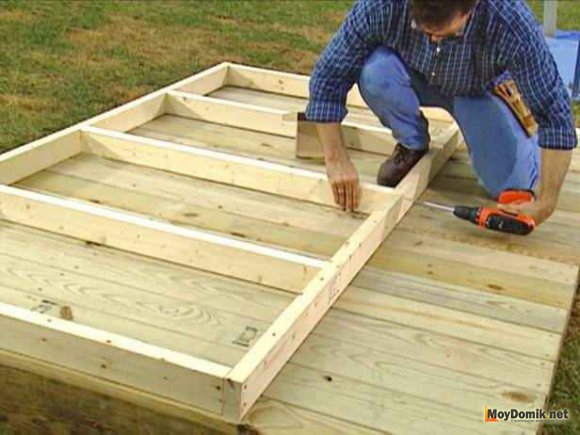
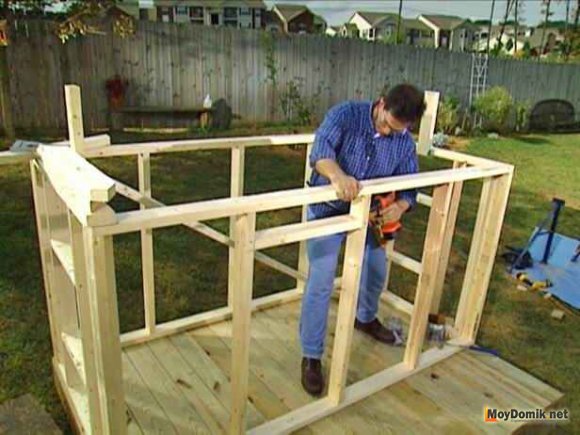
Fix the flooring and attach the walls. Screw in the 75mm wood screws so that they go through the legs of the bottom panel and lock into the support bars.
Screw a 50 * 100 mm board to the side of the base so that it protrudes beyond the edge to which the first wall will adjoin.

Set the wall in the desired position and screw the free end of the board fixed to the base to it. Make sure that the first wall becomes perfectly even, because the rest of the walls will subsequently align with it. Screw the wall to the floor with 75mm wood screws. Screw them into the bottom of the wall so that they fit through the studs and lock into the support rails. The task will be simplified if you pre-drill pilot holes.
Now place and fix the side wall on the side of the wooden brace that supports the first one.

Completely cut out the doorway and attach the front panel.
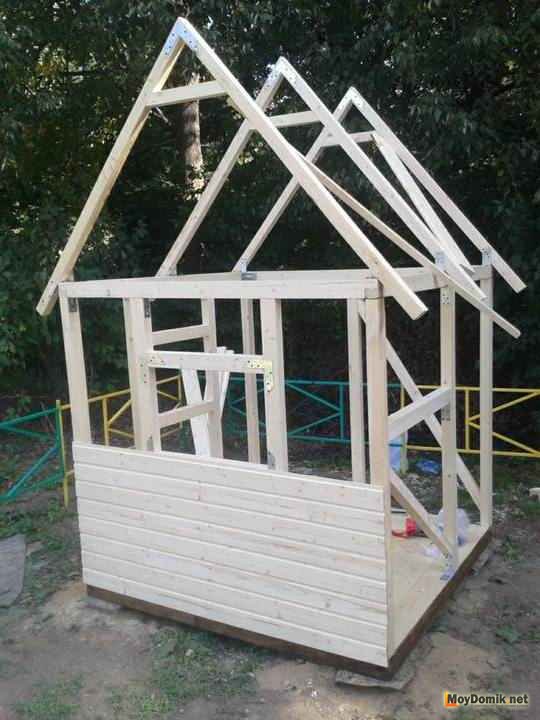
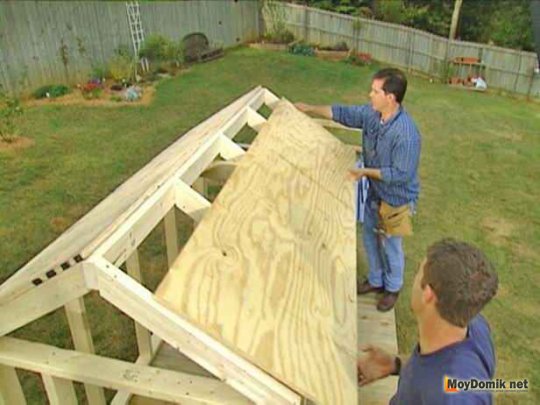
Install the roof.
Lift the first panel and lay it on top of the house. As you climb up, be sure to grab a drill/driver and a handful of screws.

Screw in the 75mm screws until they pierce the top panel skin and lock into the front and rear wall studs.

Make a door. We do not give sizes, as they will be different for each individual house. Your task is to measure the opening and independently determine the size and design of the door.

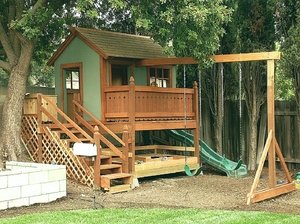
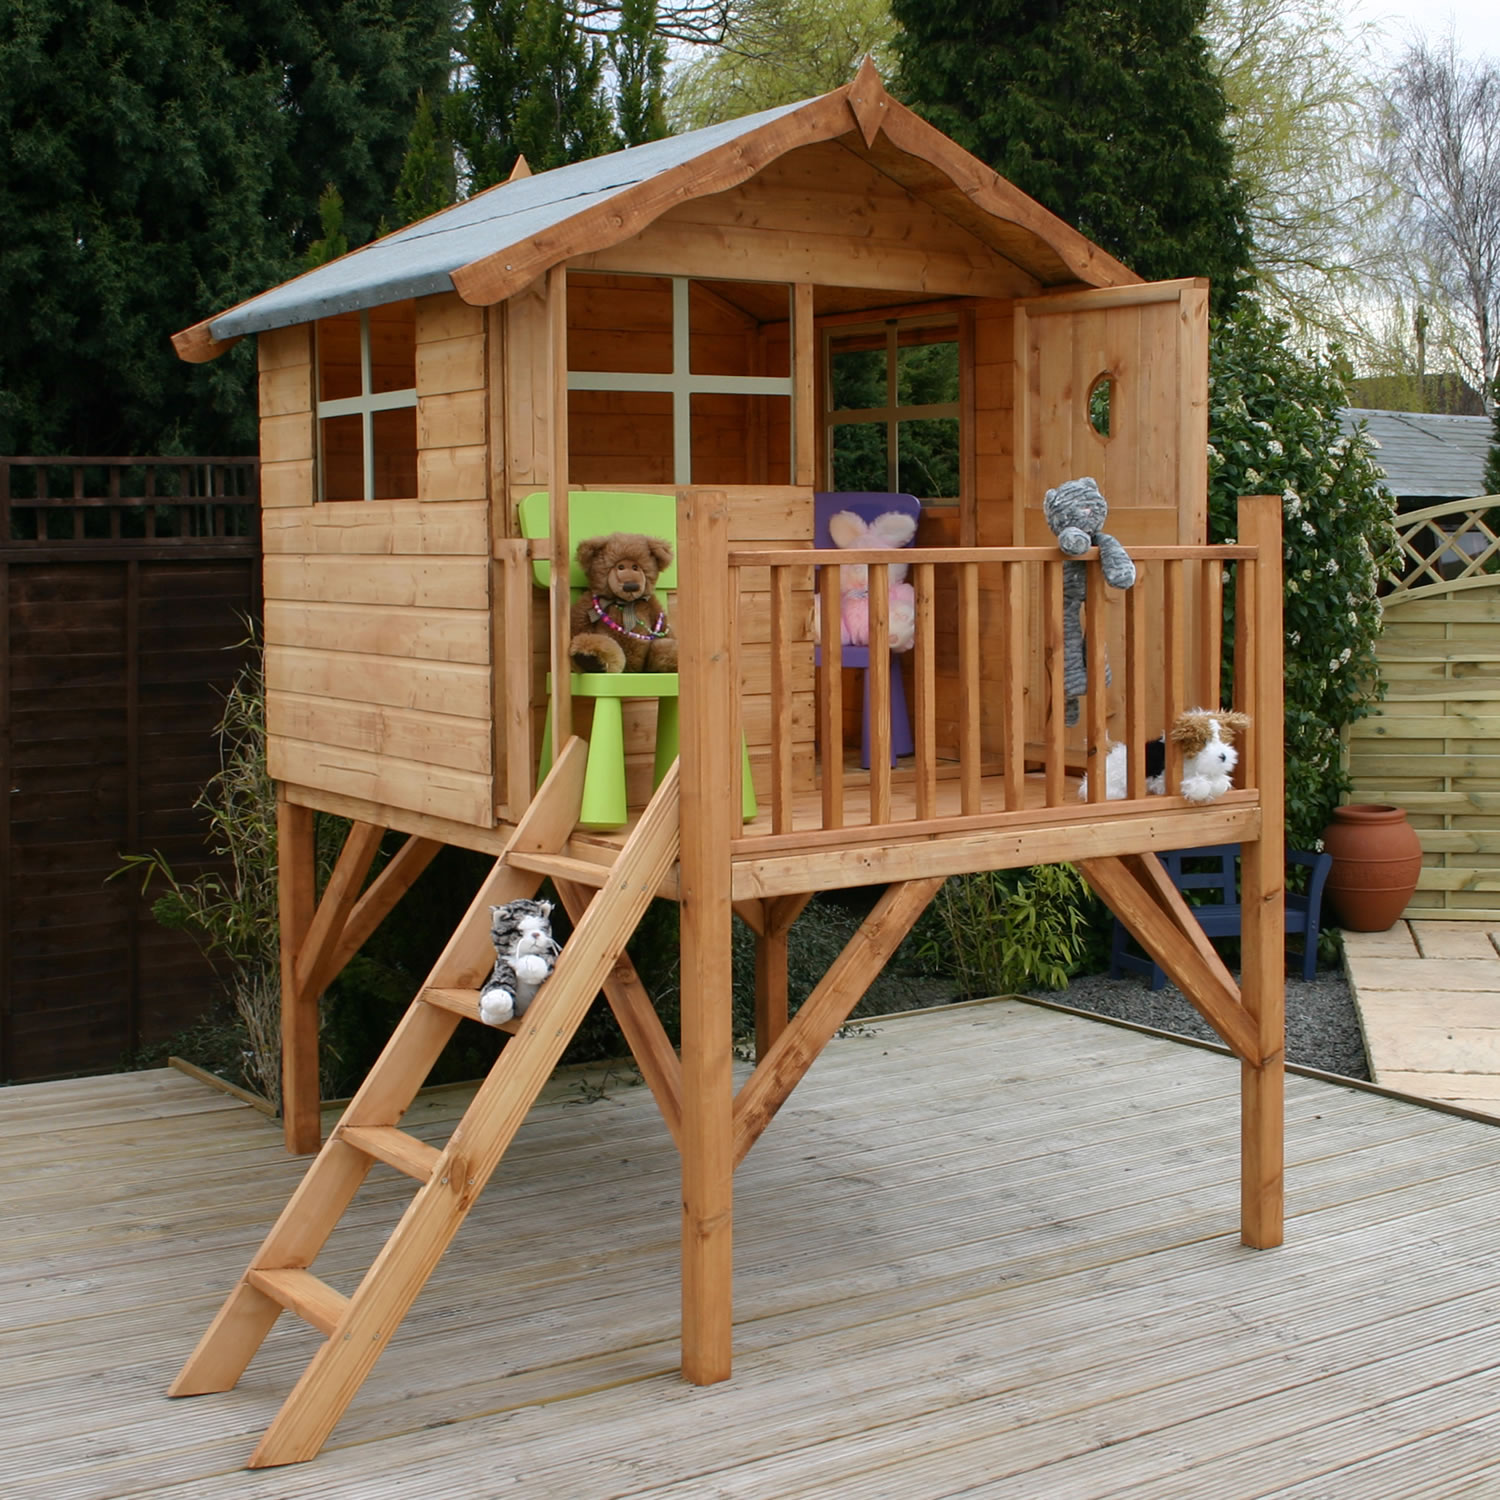
Build a porch.

On the porch of the playhouse there will be racks and railings that will serve as a support for the protruding part of the roof.

At this stage, you will also have to spend a lot of time and effort, but thanks to the porch, the house will become really cozy.
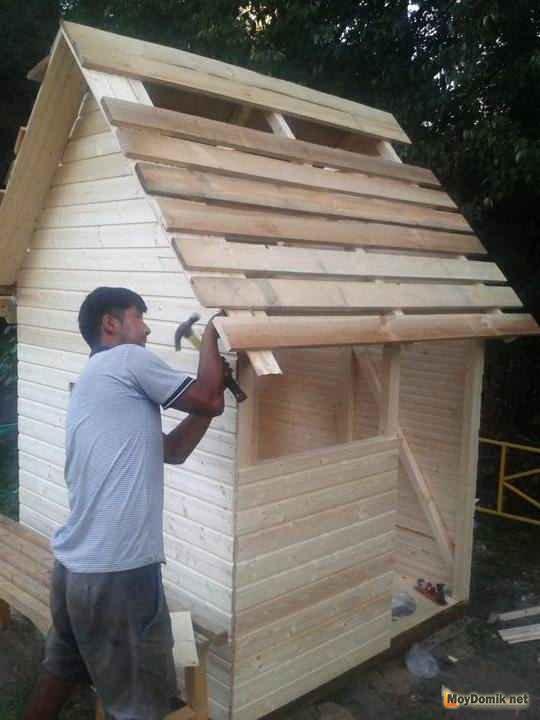
Cover the roof. Now you need to close the gap between the two roof panels.

Fix a piece of wood in the middle of the gap between the panels. Attach the same bars to the tops of the front and back walls. The top edges of all three beams should be on the same line and level with the crest of the roof. Now you need to make a skate. To do this, take two boards and cut along one of their long sides at the right angle so that the boards fixed over the gap come together closely.
Now just screw the boards into place. Cut the roofing into strips of the desired length (you can leave a small allowance). First fix the bottom strips by nailing them to the planks of the roof panels at a distance of about 200 mm from the bottom edge. Try to align the strips along the front edge of the roof. It's okay if there are excess roofing felts behind the house. Then lay the center strip of tar paper and nail it about 50mm from the crest and 100mm from the bottom edges.

Wrinkles may form on the roofing sheet, but the stripes will straighten out if they lie in the sun for several days.
Make the shutters.
Shutters are not only decorative. They also hide the uneven and sharp sidewalls of the windows. Each shutter consists of two planks 600 mm long and two about 200 mm long. Before installation, do not forget to cover the shutters with stain.

Using a clamp, fix the first long plank along the border of the window. Make sure that the plank protrudes from the top and bottom edges of the opening by the same distance. Now enter the house and drill pilot holes for attaching the shutter boards. If this is not done, then when screwing in the screws, the boards may crack. From the inside, screw the screws into the guide holes, securing the first board of the shutters. Repeat the same with the next plank. On top of each shutter, place two small planks that perform only a decorative function. These boards can be screwed with screws outside. Pre-drill pilot holes.
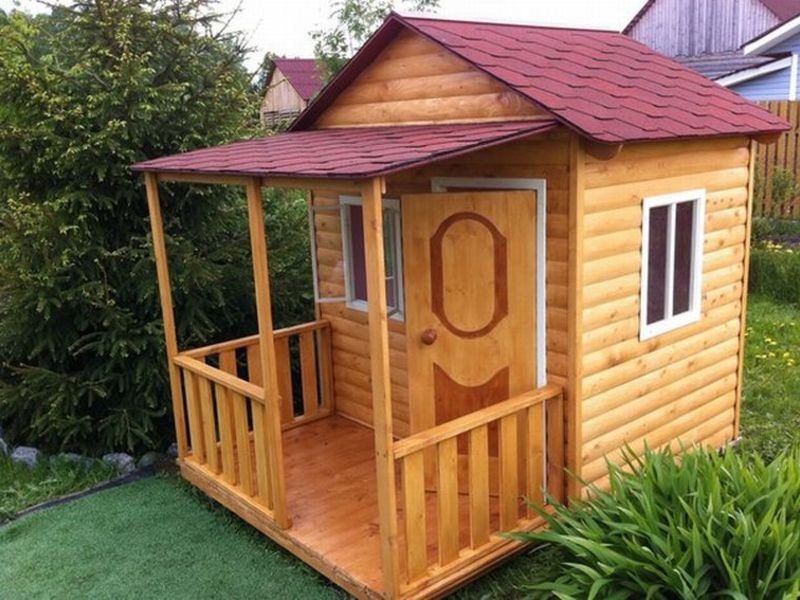
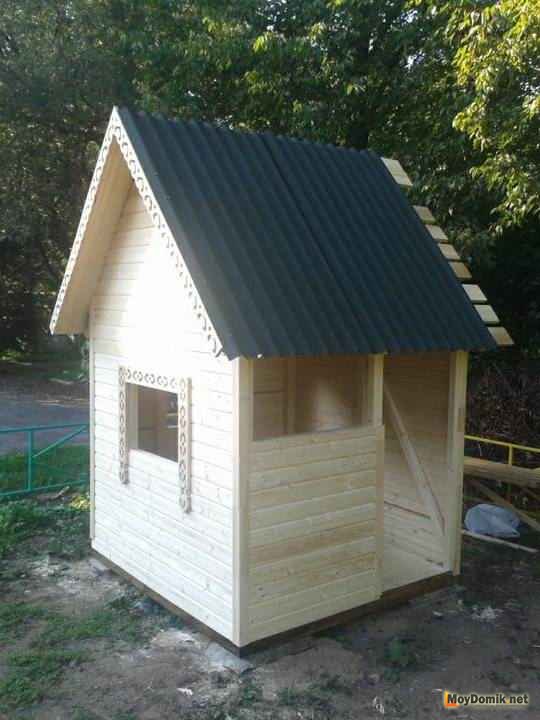
The house is ready. Children will be happy with such a “refuge”, and many adults will gladly climb inside to remember their childhood, so happy and so carefree.
It's no secret that babies don't need much to be happy. The flight of their childhood imagination makes it possible to turn any household item into spaceship or a car, so it is easy to imagine the delight of a child who has received a wooden playhouse built in the country.
The best choice would be children's house specially designed for a boy or girl. Owning such a dwelling of his own, a child with great desire will leave the city, knowing that a cozy corner awaits him at the dacha. In addition, this will help parents to take up dacha farming, without being distracted by the unbearable behavior of a bored child.
Nowadays, you can easily buy a ready-made house by contacting a company that builds compact wooden houses. Specialists will be happy not only to select the design, but will be engaged in the delivery and assembly of the house. These products are usually good quality, but the cost of work sometimes scares off buyers.
On the other hand, wooden house It will be much cheaper if you build it yourself. What is needed in order to build a children's house in the country? In this case, the purchase of consumables and essential tool. Spending two days off, with your own hands it is quite possible to build a small house for your favorite offspring.
Do-it-yourself house for children: the advantages of wooden houses
The procedure for building a children's house in the country with their own hands
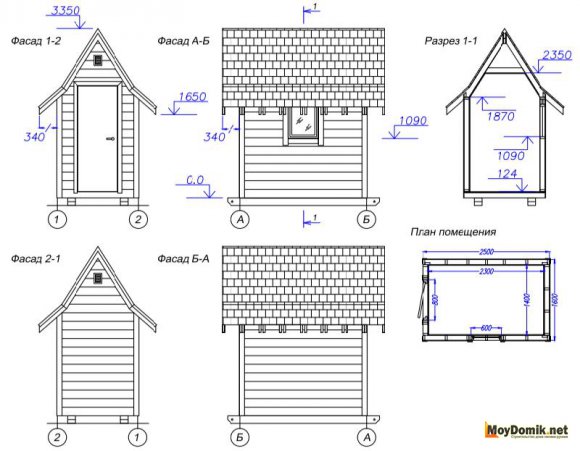
First of all, you need to clarify what plan the future house will be, decide on his appearance . For this purpose, a schematic drawing is first sketched out, which allows you to determine the type of building.
Characteristics of a child country house, which must be determined before the start of construction work:
Development of a plan for a children's playhouse made of wood
Initially, a detailed construction plan is required, as well as sketches and drawings. It is important to take into account the specifics of the future structure:
- The distance between the floor and the ceiling should be at least one and a half meters. However, it is undesirable to make the room too high.
- It would be the right decision to install at least two windows. Firstly, such a measure will provide sufficient lighting in the room of the house. Secondly, you need to remember about the safety of children, who need constant supervision. Children can be monitored through the windows.
- The door is recommended to be made to the level of the ceiling. So the child will definitely not get a bump on his forehead, besides, it is possible that adults will someday have to visit the baby.
- In order to avoid unnecessary injury, all walls on the inside and outside must be smooth.
- It is better to make a sloping roof, because a flat one can attract children, and sooner or later they will perch on the roof, which will create a traumatic situation.
Tools and materials for construction
Before you start building a small country house for children, you need purchase the following tools:
List of materials that will be required for the construction process:
- Wooden beam for frame house. Builders recommend using a beam with a cross section of 50X50.
- Sheathing lumber. You should choose plywood, the thickness of which does not exceed 10 mm. Oriented strand boards are also used. They are cheaper than plywood, but more durable. Everything is at the discretion of the owners.
- Roofing material.
- Bricks.
- Glass for window frames. It should be borne in mind that glass is not safe for a child, therefore, if there is a desire to increase the access of light to the house, then it is better to install plastic windows.
How to make a children's house: construction technology
Foundation and floor
 By analogy with the construction of large houses, children's play houses start building from laying the foundation. As a base, you can use earth, gravel, cement or crushed stone.
Exist different variants suitable for laying wooden boards. Some remove the top layer of soil, cover it with rubble from above, level the site, and then lay support bars on the site. It can be done differently: each corner of the building must be paved on a special concrete block, and the supports are placed on a sand cushion. Thus, the corners of the building will be placed at a depth of up to half a meter. The earth from the recesses must be removed, and a mixture of sand and gravel is poured into them. Then the holes are carefully compacted.
Blocks are installed on the prepared places, which should be on the same level. So that the frame is not crooked, you should use building level.
Without a waterproofing layer, the house will not be able to stand for many years. Most often, roofing material or modern bitumen-polymer mastic acts as an insulator. Some prefer natural ventilation. In this case, a small house is built on metal rods or brick pillars no more than 20 cm high.
Walls
 Having dealt with the foundation and floor, you can proceed to the installation of walls. To make walls, it is necessary to construct a frame from beams, which in the next steps are connected to thin sheathing boards or shields. Don't forget doors and windows. The first step should be to install a beam in each corner, the section of which, as a rule, is 50X50, and length - three meters. The product is cut into three equal parts or in half. Then the bars are attached under the door and window frames.
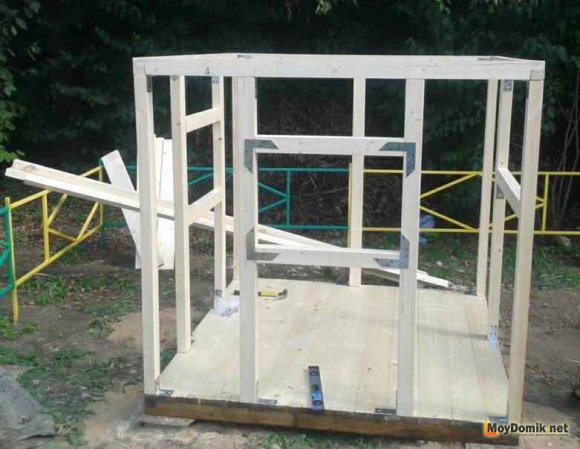
To fix the main bar, it is nailed to the floor with nails. The main thing is that then these nails can be easily pulled out. This measure is explained by the fact that ensuring a strong connection of building units is possible only with the help of special mounting corners, which are installed later.
Between the rafters, auxiliary struts are installed without fail, which act as fasteners. Keep in mind that the bars are connected from above by a frame that acts as the basis for roofing. After the base for the walls is prepared, the nails are pulled out, and in their place install metal brackets. The playhouse will stand firmly and will not fall apart only when all corners and joints are fastened with corner fasteners.
Bars installed in a horizontal plane mark window openings and a door. Their height is calculated in advance. Calculations are based on the width of the cladding board. Such dimensions should be laid down so that during sheathing work there is no need to cut the boards according to their width or hide half the frame. In short, you need to figure out how many solid boards can fit into the remaining lower and upper opening. At this level, horizontal braces should be fixed.
Roof
The roof of a small do-it-yourself playhouse can be high and sloping. The design of the roof depends on personal preference. Classic performance requires the following algorithm of actions:
Sheathing and decoration of the house
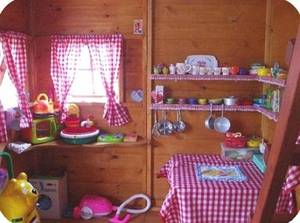
 The final stage of construction includes the sheathing and design of the structure. To create walls, lining, shields or wooden boards are used. Lining will allow reduce upholstery time, since there is no need to fit elements that fit together without problems. Since the task was to make a children's house, it would not be superfluous to decorate it with colorful drawings. Children themselves can be involved in the creative process. Windows can be decorated carved platbands, which are bought separately, or are made by hand.
Inside small house they make a bench and a table, but, of course, these are not the only interior items that can decorate a room. A small porch will give the house a more noble look.
The main thing is that the constructed play structure does not pose a danger to the health of the child. We are talking about the proper fastening of the elements of a wooden structure. It is important that children do not get hurt or scratched during outdoor games. Boards must be carefully cut, and apply protective layer some kind of paint.
Self-tapping screws, nails and metal staples should not stick out and stick out, they are closed with special plugs.
Do-it-yourself children's house
![]()
Let's talk secrets...
Have you ever experienced joint pain? And you know firsthand what it is:
- inability to move comfortably and easily;
- pain during or after exercise;
- discomfort when going up and down stairs;
- inflammation in the joints, swelling;
- unpleasant crunch, clicking not of their own free will;
- causeless and unbearable aching pain in the joints ...
Please answer the question: are you satisfied with this? Can such pain be endured? How much money have you already "leaked" for ineffective treatment? Time to end this! Do you agree? Today we are publishing an exclusive interview with Professor Dikul, in which the doctor revealed the secrets of getting rid of joint pain, treating arthritis and arthrosis.
Attention, only TODAY!
Monday, September 07, 2015 20:16 + to quote padHow to build a children's wooden house in the country and on a tree
As children, each of us tried to build a separate housing for ourselves - a toy house.
A shaky structure made of a box, cardboard or branches in the form of a hut bore the proud name of a house and seemed to be the best.
Having matured, we think about creating a more durable house for children.
Most often, a children's playhouse is built from wood. The choice of material for the house is due to rational considerations - wood is an environmentally friendly and durable material. Small house, made from coniferous wood, will have a positive effect on the health of the child. In addition, it will enable the child to feel independent. Having built a full-fledged developing house for the baby, you will provide him with his own play area, where he can play in it in any weather.
For parents, the main thing is that it is safe, inexpensive and fits into the general style of a summer cottage or country plot. Another advantage of the house is that it can be used as an outbuilding, so to speak, a beautiful shed for storing garden tools, unnecessary things or firewood.
How to make a children's house out of wood
As part of this article, step-by-step instructions will be described on how to build a children's wooden house with your own hands.
1. Ideas for a children's house
First, think about how the house will look like, what type, type and dimensions will be. To do this, you need to define:
- Type of. Open or closed;
- Dimensions. Occupied area and height;
- Place of installation / location. A house installed on the ground and on a tree have a different principle of constructive device;
- The material from which the building will be made;
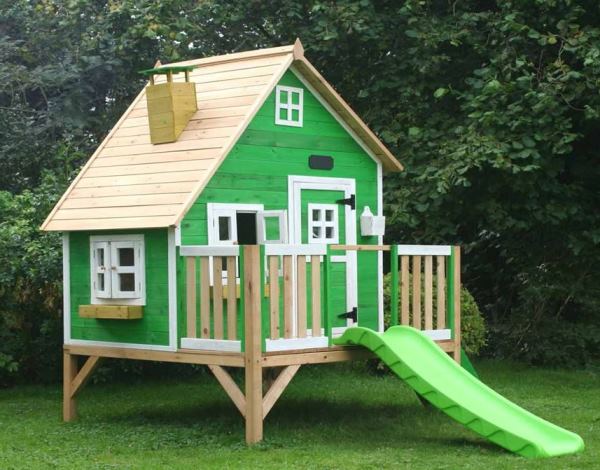
- Availability of windows, doors and material for them;
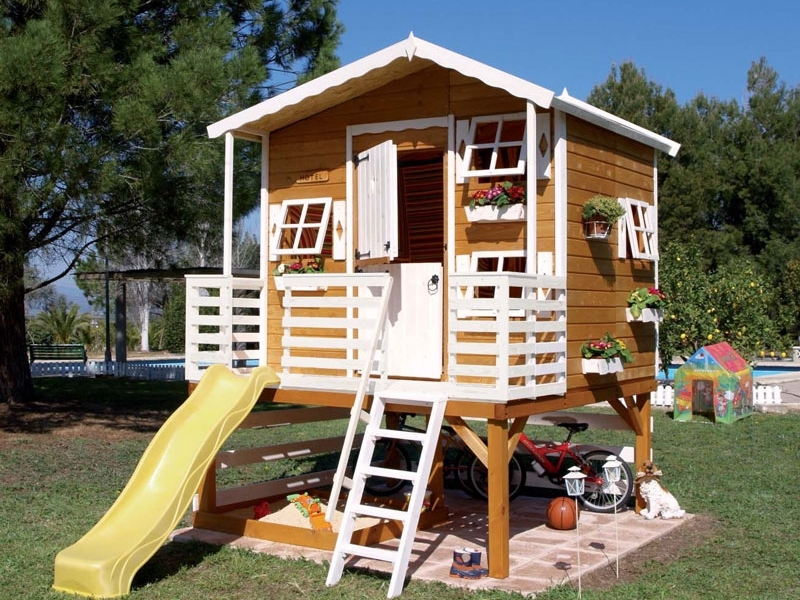
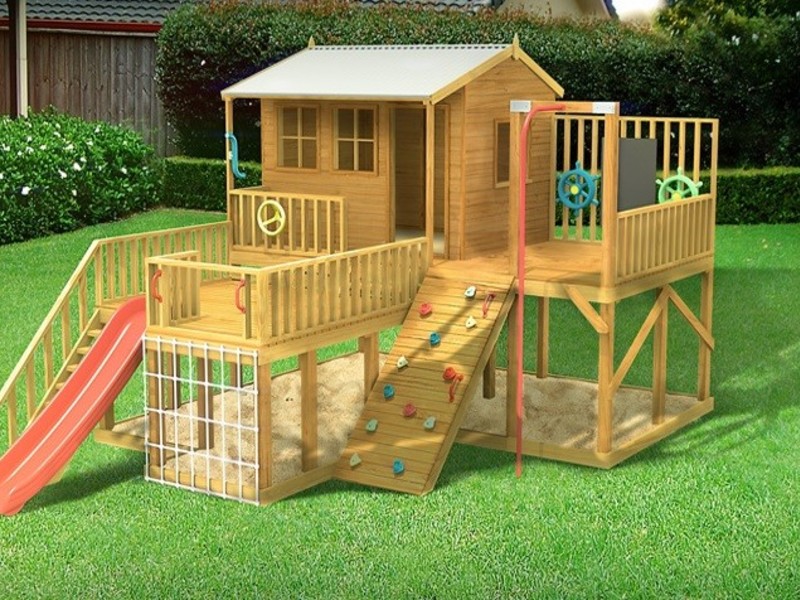
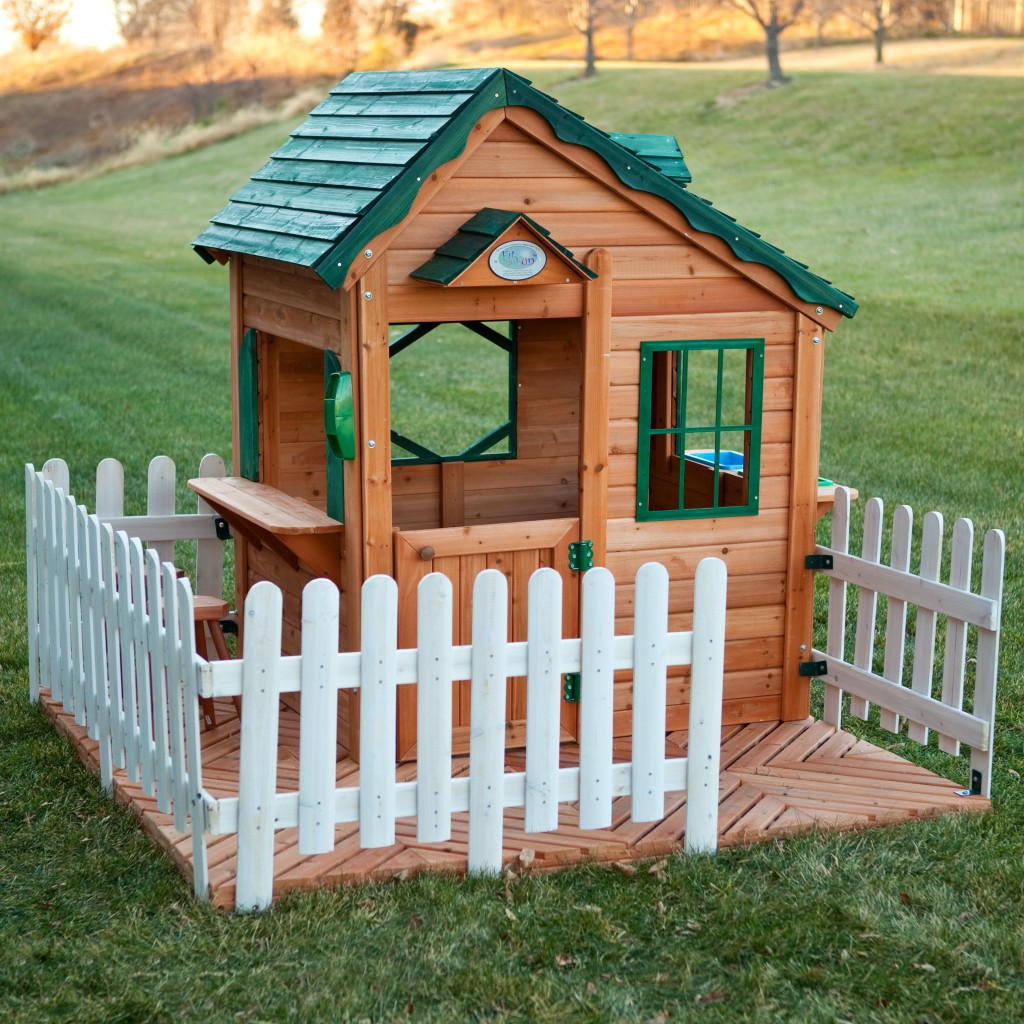
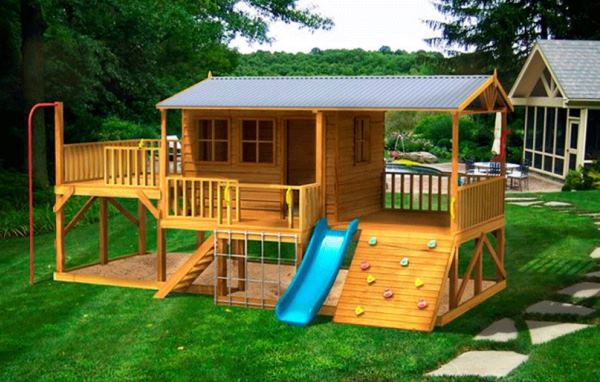
- The presence of additional components - extensions, a fence (fencing), a terrace, a slide, a sandbox, a swing, a ladder.
- The presence of interior decoration.
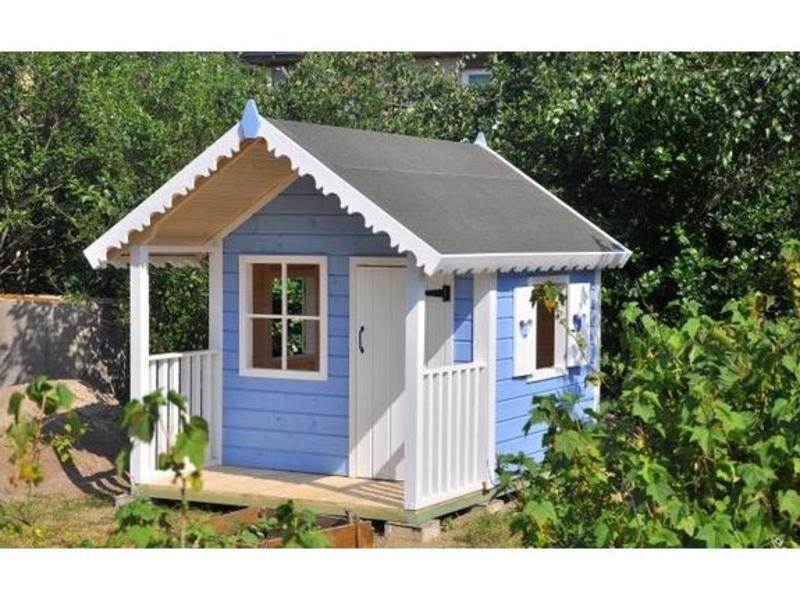
Pictures of a house for children
When developing a plan for a house, it is worth considering the following:
- mobility or stationarity. Both the size of the house and the technology of its construction will depend on this;
- At least two windows are required. First, it's lighting. Secondly, the hut must be clearly visible for control;
- the height of windows from the floor should be 500-600 mm;
- door height. At 200-300 mm. taller than a child. But it is better to make them to the ceiling, because sooner or later you will be invited to the house;
- walls. Should be smooth to avoid injury;
- roof. In no case should it be flat. In order not to attract the child to climb on it.
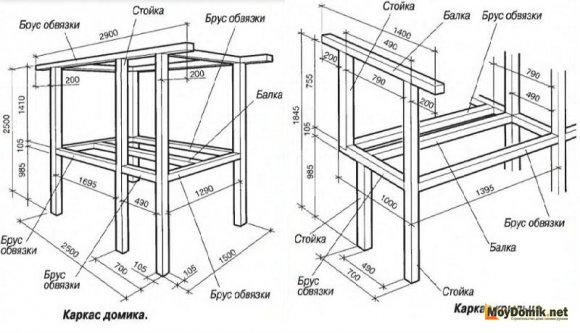
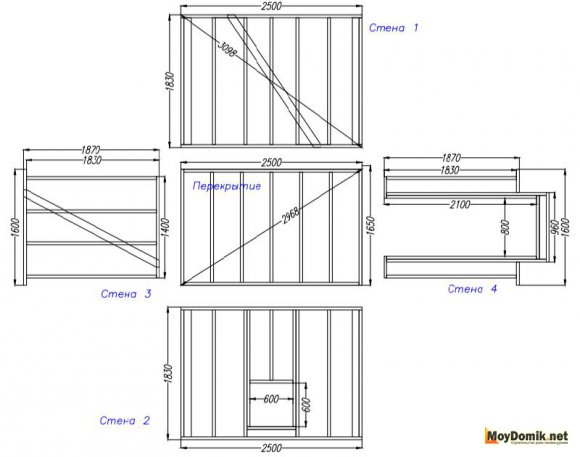
You can sketch your own sketch or use ready-made drawings. The schematic drawings below show projects of children's houses that you can build with your own hands.
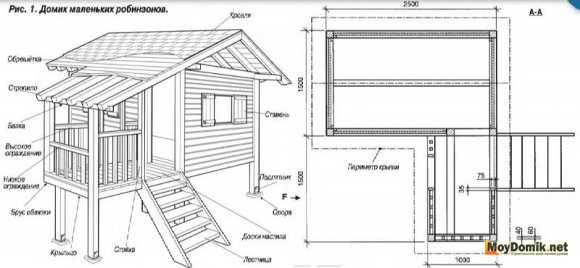
The scheme of the children's house with all the indicated dimensions will help to properly prepare materials for construction.
3. Tool and material for manufacturing
Tool:
- hacksaw;
- plane;
- roulette;
- chisel;
- metal corner;
- building level;
- drill;
- screwdriver or hammer and nails;
- sandpaper (for sanding wood);
- brushes and paint for painting the house or any finishing material such as lining or siding.
Material:
- beam for the manufacture of the frame. Recommended section 50x50;
- lumber for sheathing. Boards or timber will create a beautiful house;
- plywood (thickness not less than 8 mm) or OSB for sheathing. Cheaper, but also less durable material that requires additional processing;
- roofing material;
- brick;
- glass for windows (if necessary and only for children over 7 years old, and even then in doubt - it is better to exclude any presence of glass).
4. Building a wooden children's house with your own hands
4.1 Foundation
Of course, a strong foundation for a children's playhouse made of wood should not be poured. But here to take out the soil with a depth of 80-100 mm. and lay out a brick over the entire area of \u200b\u200bthe building does not fit. So the hut will last much longer.
As an option it can be used terrace board. But its acquisition is very costly.
The most budgetary and fastest option is to make a foundation of several bricks and a timber strapping installed on it. This approach to the foundation device is usually used in greenhouses.
4.2 Floor for the house
It is better to equip the floor according to all the rules of the genre. Namely, lay the logs and stuff the floorboard on them. Or lay OSB or plywood in two layers, so that the next layer overlaps the seams of the previous one.
4.2 The walls and frame of the children's house
Holes are dug in the corners of the foundation for the installation of timber. This is a wall support. Before placing the timber in the ground, it must be processed. Additionally, a bar is also installed in the places where windows and doors are installed. For rigidity, the frame bars can be fastened together with a metal corner. Next, the frame is sewn up with boards or plywood.
A wooden children's house, the drawing of which is given below, can only be built with the installation of supports.
For an ordinary house, there is an easier option - knock down the shields from the boards. And fill a bar along their perimeter. Then knock down wooden shields among themselves.
The material was prepared for the site www.moydomik.net
4.3 Roof for a children's house
The roof device begins with the manufacture of gables. For them, the same timber is used as for the frame. Two triangles are installed on opposite walls. If necessary, several more are installed between them.
A beam is stuffed between them. One or more depends on what the roof will be covered with. Next, we fill the boards on the gables and cover it roofing material. For example, ondulin or shingles (you can just sew it up with a board or even make a thatched roof).
Or we knock them into a shield, which will then be attached to the gables.
The bottom line is the difference in ease of use. One slope or two, the main thing is that the roof is not used by the child as a playground. If the boards fit well, it is enough to treat them with an antiseptic and paint.
5. Finishing a children's house made of wood
In order to please you with a wooden house for children made with your own hands, you need to take care of protecting the wood for as long as possible. To do this, it must be treated with solutions against bugs and decay. And then open with stain, varnish or paint.
Install benches inside the house or make a table and chairs of appropriate sizes.
6. Baby house safety
Separately, I want to focus on how to make the house safe. For this you need:
- choose a flat area for the installation of the house. Or a reliable tree;
- check the quality of wood processing. Mechanical to prevent splinters from entering. And antiseptic - wood should be environmentally friendly;
- screw the screws correctly;
- for roofing it is better to use soft materials or polycarbonate. Because, for example, metal tiles have sharp edges and can cause injury.
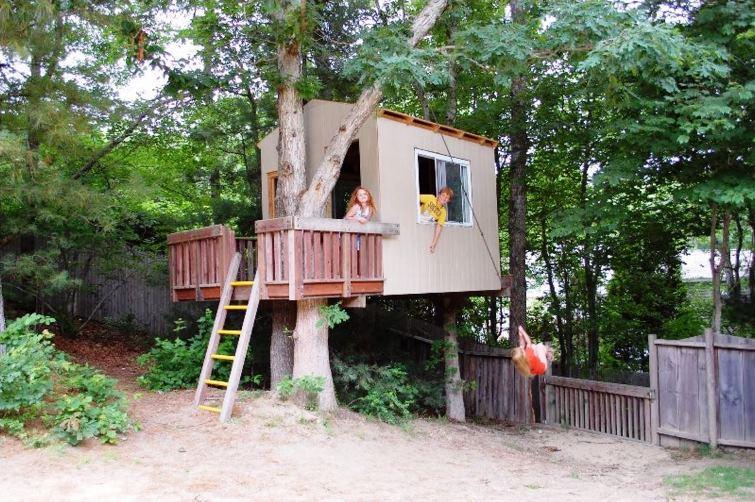
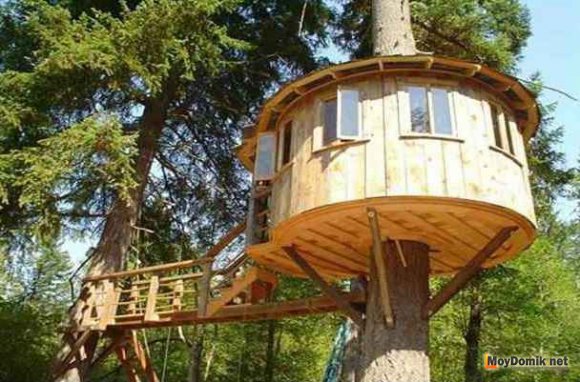
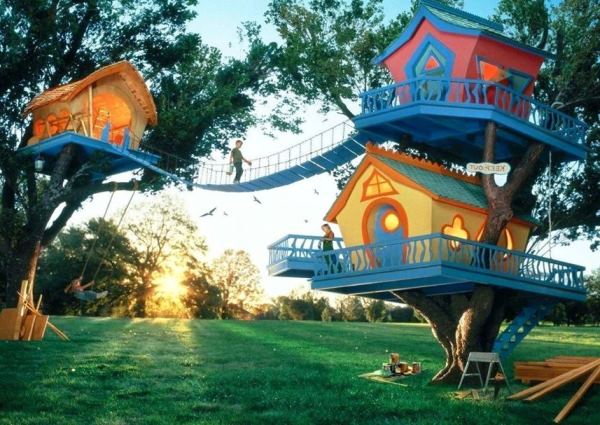
Tree house
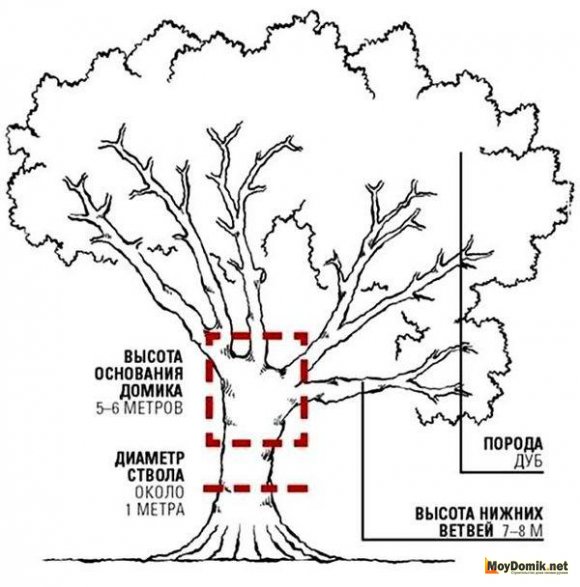
If you have already grown from a small children's house on the ground, then it's time to move higher, for example, to the crown of a tree (canopy, uvei, i.e. the upper / middle branched part of the tree). In addition, we will describe how to make a tree house for children with your own hands.
1. Tree selection. Pay attention to the crown of the tree, the trunk, the location of the branches, the age of the tree and its size. Coniferous trees are not very suitable for this kind of construction, since the needles let in little light. In addition, it is important to remember that as it grows, the tree will change its shape. Therefore, build on the lower branches or try to take this fact into account.
3. Drawings of a tree house for children will help you develop your project and imagine what the finished product will look like.
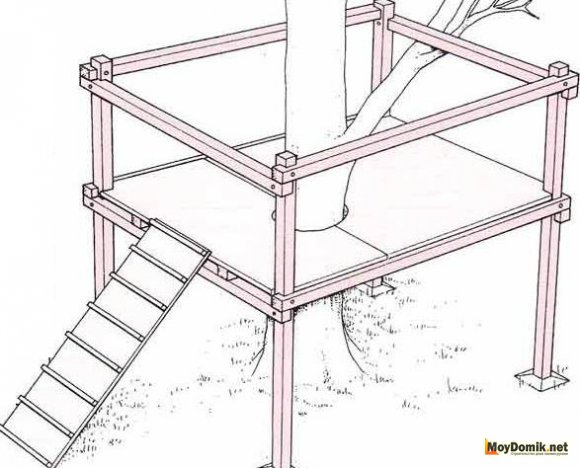
4. All work on the construction of the walls and roof of the house is best done on the ground. But, the device of the floor - supports, belongs to the category of high-altitude work.
To make a floor in a house on branches, you need to install a platform that will be the basis of the whole structure. It can be supported by additional supports placed on the ground, or by supports placed on the trunk of a tree.
Craft - a house with your own hands - will delight any child. It will take only a couple of days to work, and as a material, you can use plywood, OSB, pallets or ordinary boards.Details step by step instructions and drawings will help to understand the process even to a person far from construction.
Material selection
A developing house can be made with a wide variety of materials, and it is better to make the final choice yourself, having studied the advantages and disadvantages of each of them.
The most commonly used budget options:
- plywood
You can also build a house from OSB, wooden boards or chipboard.
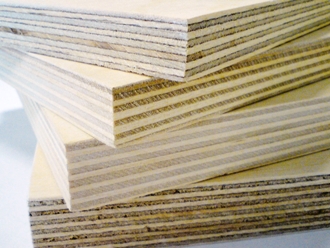
Plywood - optimal choice, because:
- it is durable, and after treatment with special impregnations it is able to withstand adverse environmental influences (precipitation, temperature changes, insects)
- available - a do-it-yourself plywood house will cost less than one made from many other materials
- looks aesthetically pleasing
- has low thermal conductivity, thanks to which the child will be warm and cozy in the garden house
In addition, working with plywood is simple: it can be sawn, drilled, painted without effort.
The only drawback is the toxicity of the glue used to join the veneer layers together. When buying, you need to study the characteristics of the product: plywood should be labeled E0 - this material contains a minimum amount of formaldehyde, and the product is considered environmentally friendly.
pallets

A house made of pallets can become a favorite place for a child to play, but you need to be careful when choosing the material.
Can not use:
- pallets that bear the IPPC marking - for their processing, harmful chemicals are used that provoke the development of various diseases;
- used pallets in the markets - after long-term operation in the open air, wooden structures that have not been treated with protective equipment may become fragile, and the building will soon become unusable;
- pallets painted in bright colors - it is impossible to vouch for the quality and safety of the paint, and it is better not to risk the health of the child.
Do-it-yourself children's wooden house should be built using high-quality material without visible damage: cracks, traces of decay, mold or paint residue.
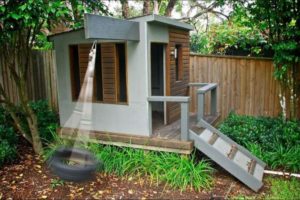
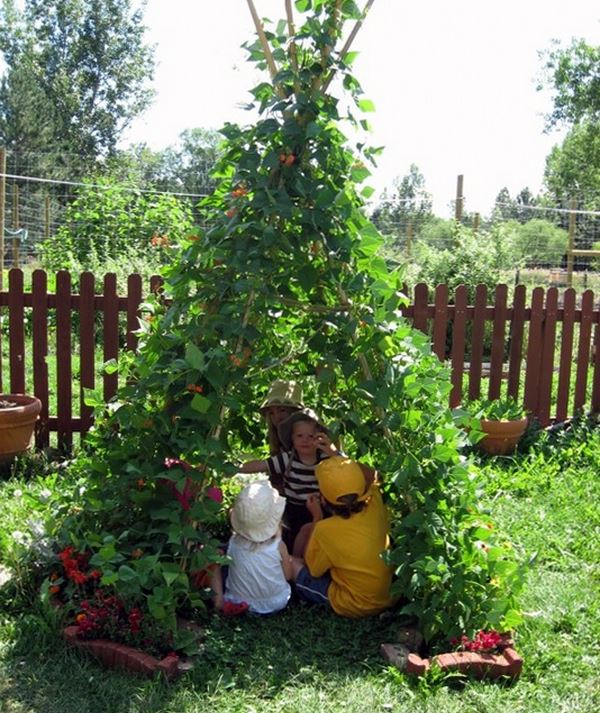
In the warm season, children especially like to spend time outside. In order for the younger members of the family to be close to the house, it is best to organize a play area for them in the backyard.
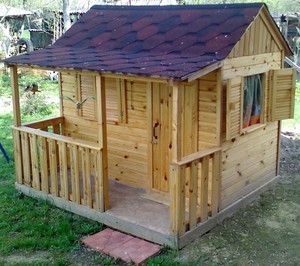
Small-sized houses, placed on trees or just on the ground in the garden, turn into a favorite place for children to play. The main thing is to create a comfortable environment in the playing area.
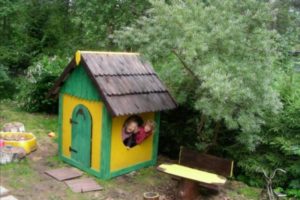
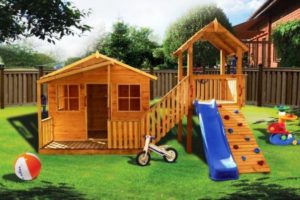
There are many options for organizing such zones, and from this article you will learn about the most original ideas building houses for children suburban area with your own hands.
Photo examples will show you how such play buildings and zones look like, and you can decide on the design. After you get acquainted with interesting ideas, you will surely want to please your child and his friends with such a convenient place to play.
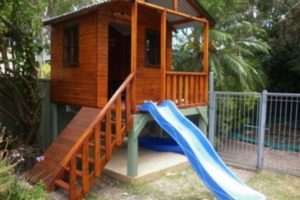
 Do-it-yourself children's house in the country, photo
 Popular Ideas
Before you start creating a children's playhouse on your own plot, you need to choose the concept of a mini-building. First of all, consider the purpose of the building: will it be an exclusively play area or a comfortable place for a good rest with comfortable furnishings?
Depending on the desired result, choose the best option for creating a house for children in the garden. Among the most popular ideas are:
Explore other options for playhouses: such buildings can vary both in design and configuration, dimensions, materials used and design features.
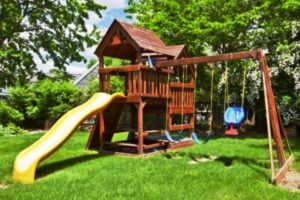
House for children in the country, photo Decor methods
Having decided on the design features, you need to decide what the dimensions of the children's house will be. If you are unable to select large area under the organization of the play area, make the building small in size, freeing it from unnecessary internal elements so that children can move freely and not be injured.
If the summer cottage is large, build a spacious house. Its interior space can be divided into several zones. A large children's company can play in such a house.
An important parameter is the height of the building, because staying in the house should be comfortable for both small children and taller and older children. The higher you make the structure, the better.
It's a good idea to create areas where you can climb walls by laying mats on the floor to keep the kids safe. If the building is planned to be built of wood, it is better to discuss its parameters with professionals.
You also need to choose a suitable project for a country house designed for children to spend time outdoors: the building can be either open or closed. Open adjustments are combined with a play outdoor area; they are usually equipped with walls on one or two or three sides.
Closed buildings are designed from walls on all sides. They may have windows and even small balconies, there are also completely isolated structures.
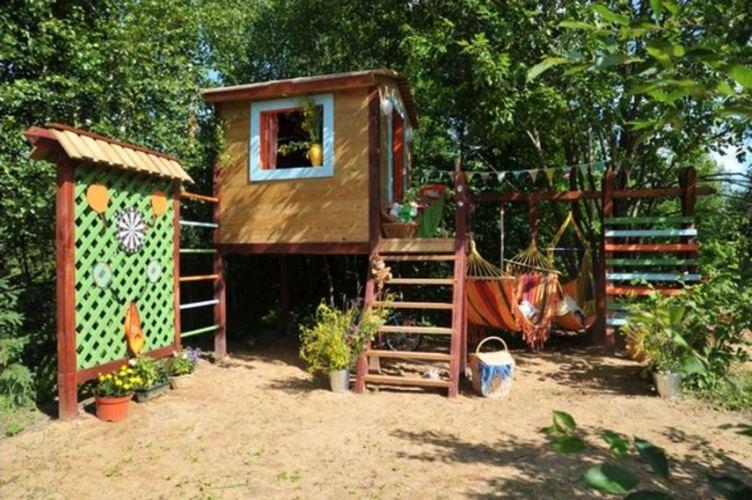
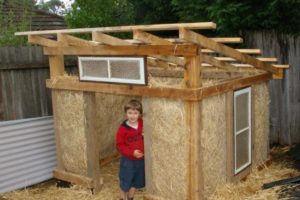
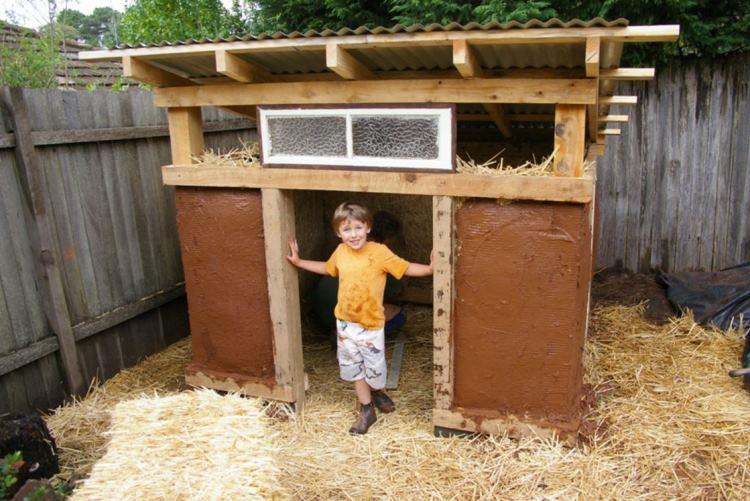
 Do-it-yourself children's house for a summer residence: photos and ideas from improvised means
 Recommendation: the best solution is to make a children's house with at least two windows. The presence of window openings will provide good lighting inside the house during the daytime and will give adults the opportunity to look after the children.
A self-designed children's house in a summer cottage can be both stationary and mobile. The mobile structure can be moved to different areas on the site, taking into account the existing conditions or guided by the possibility of observing children's games, for example, from a country cottage.
Windows are best made 60 centimeters high, and doorways are about 25 centimeters taller than the height of the children. The height of the doorways can reach the ceiling, so that not only children, but also adults can enter the house.
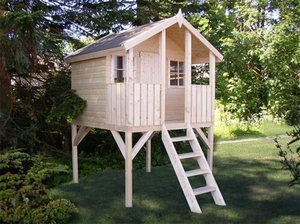
If you are building garden house placed on a tree, you need to decide where exactly it is best to construct it. It is necessary to take into account the characteristics of the growth of branches, the size of the tree and its age.
You should not build a house for children on coniferous trees: their branches practically do not let light rays through. It is best to design a house in the lower part of the crown, in which case the height of the building from the earth's surface will increase simultaneously with the growth of the tree.
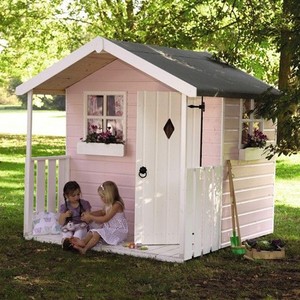
You should also decide in advance how you will decorate the house. For example, you can decorate it with children's drawings if the building is located on the ground. Or paint the facade and walls from the inside in different colors. Involve the children in the choice of colors.
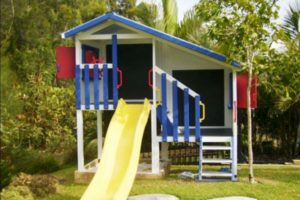
 How to decorate a children's house in the country, photo
 Material selection
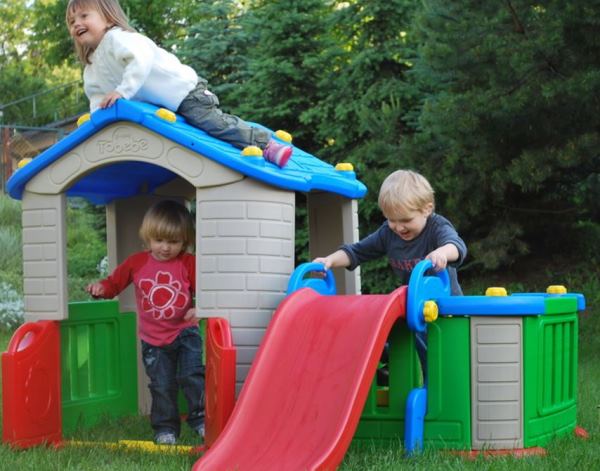
Simply and for a short time plastic children's houses are being designed, if you use finished projects. Such structures are hygienic and practically exclude the possibility of children getting injured. Plastic structures are lightweight, they can be mounted on any site. Another advantage of such mini-houses is the abundance of color schemes.
If you do not have the opportunity to build such a house yourself, buy a ready-made model of a plastic building. There are several options to choose from.
 Children's house in the country, photo
 A playhouse for kids can also be constructed from plywood sheets. Plywood is a budget material, it weighs little and is easy to install. Plywood sheets are used to create simple and small-sized children's houses, where you can make windows of the desired shape, and paint the walls beautifully.
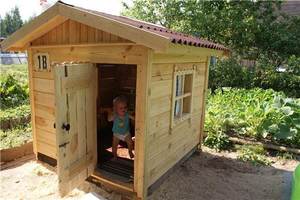
But the most popular option is wood structures. Such houses are environmentally friendly and will naturally blend into the countryside landscape. In addition, wood undergoes visual transformations. It is also worth noting such advantages of wooden buildings as strength, durability and safety of operation.
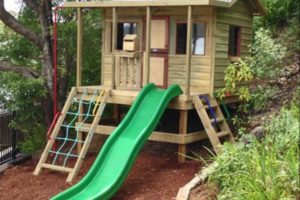
 Children's houses for summer cottages made of wood, photo
 In addition, how to design a house for children in the garden, you also need to take into account the features of decorating wooden buildings if you choose this material:
- the walls inside and out must be sanded so that they become even and the children are not injured;
- the roof should not be designed even, otherwise small fidgets will climb on it;
- so that the building does not collapse ahead of time, treat it with protective compounds;
- even simple wallpapers are suitable for decorating walls in a wooden house.
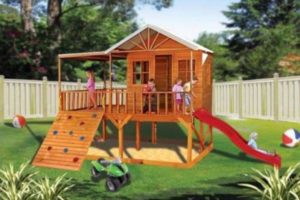
Children's wooden houses for the garden and other structures of this type can be supplemented with other elements, such as swings, fences or sandboxes. These details will make this area more diverse and interesting.
If you are going to equip a place for children's leisure for a limited period, you can buy an inflatable model.
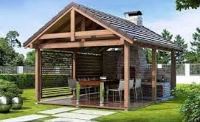
Equipping a recreation area in the country or on the site in front of the house, think about the installation: we have collected the best ideas for gazebos with barbecues, a barbecue and a stove for a good outdoor recreation.
The main methods for making a decorative lattice for a gazebo with your own hands are described in.
The traditional building
How to build a play house? Consider the features of building a house for children measuring 160 x 160 x 140 cm. The height of the building will be 90 cm.To create a frame you will need:
- 4 foundation modules sized 20x20x40;
- 20 reliable corners for fasteners measuring 70x50;
- 22 corners measuring 90x40;
- 11 elements of connection of an angular form with a size of 145x35;
- 11 bars with parameters 60x40x3 cm;
- 4 boards hollow inside with parameters 135x28x6 cm.
For the walls you will need the following materials:
- 4 packs of 10 wagons measuring 12.5x90x3 cm;
- 2.7 liters of paint (pine shade) and 0.9 liters of paint (walnut color);
- 2 curly architraves measuring 90 x 1.8 meters;
- figured front dimensions 90 x 3 meters;
- 4 corners measuring 60 x 60;
- flat figure 20.5 m;
- 2 wooden shields measuring 140x20x1.8 for window sills.
You will also need 5 bars (50x50x3 cm), 0.17 cu. boards (25x130), 5 onduline sheets, 3 ridge onduline sheets, 6 beam holders, 2.1 m each. These materials are needed to create the roof of the building.
On a note! The board must be cut.
Screws should be used to connect materials. In addition to the materials listed, you will need roofing material. The cost of purchasing the raw materials and materials necessary for the design of the children's house will amount to approximately 17 thousand rubles. The amount is not so small, but if you want to please your child, you will have to spend money.
We begin the process of self-construction of a cute house for children.
Scheme of work and step by step instructions:
The wooden house for children is ready for use.
There are other ways to independently build houses for children to play on the site or in the garden. You can think over the features of such buildings yourself, but when building, do not forget about the safety and stability of the structure.
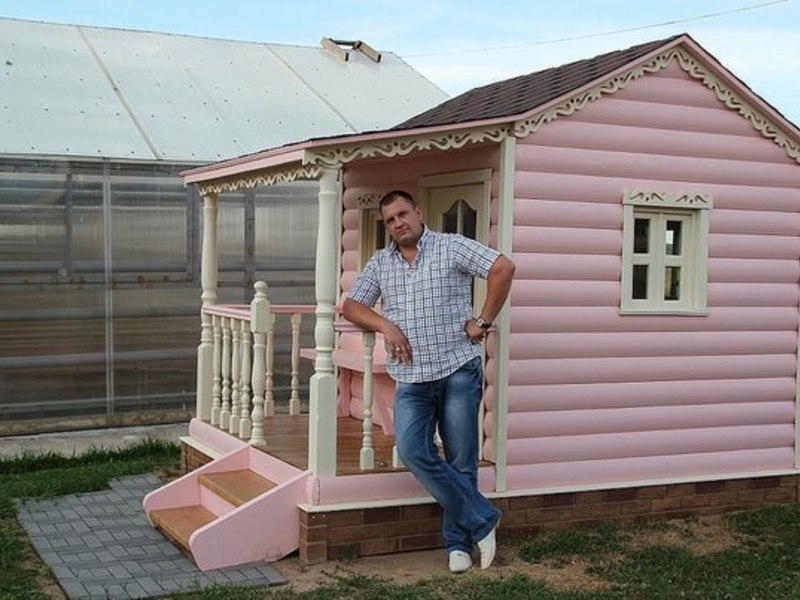
In a safe and beautiful house, children will be able to play throughout the summer and in subsequent warm seasons.
Houses designed with their own hands will not only delight the kids, but also turn into a highlight landscape design your site. Such buildings have an aesthetic appearance and organically fit into the natural landscape.
Read about how to equip in the country: the main varieties of such buildings, photos with examples of successful forged arbors.
Installation methods and options curb tape for the lawn are described.
Video
You can learn how to build a beautiful children's house in a summer cottage from improvised means from this video:
Photo gallery with examples of children's garden houses