
seams brickwork can be embroidered directly during the construction of the wall or after its construction. With simultaneous jointing, the solution introduced into them with excess is cut off with a trowel flush with the masonry. When the solution begins to set, it is smoothed out with a piece of rubber hose and jointing and pressed about 2 mm into the seam. At the same time, it is simultaneously compacted and given a slightly concave shape.
If you need to do the jointing on the old masonry, and such seams, as a rule, already look unattractive, the seams are first cleaned by gouging them to a depth of 15-20 mm. A chisel or other metal objects are not suitable for this - they can accidentally damage the masonry, especially from rough. It is better to take a piece of hardwood lath hewn into a cone. If this tool does not give the desired result, you can still turn to the chisel, however, they should work carefully.
Cleaning and wetting masonry
Having cleaned the seams to the required depth, they begin to clean the facade, removing traces of mortar and dust from it with a brush with a hard bristle. A high pressure jet cleaner can be used to remove stubborn dirt particles.
Before proceeding with the jointing, the masonry must be moistened with water, otherwise the fresh mortar will not get proper adhesion to the dried old mortar and masonry bricks. It is not recommended to perform this work on a hot sunny day. In conditions of settled heat, the object of work can be shaded. Naturally, the seams should not be embroidered even in rainy weather.
Preparation of grouting solution
Mortars for grouting joints in masonry are in the form of a dry mixture, which only needs to be mixed in water in the appropriate proportion (the ratio of components is usually given on the package).
There are also ready-made solutions on sale, with which you can embroider the seams both between the bricks of the facing masonry, and between the tiles of the floor covering or wall cladding. In the last two cases, the solution is made with the addition of a large amount of water. The mortar for grouting on masonry should have a consistency from loose, earthy-wet to weakly plastic.
With a large amount of work to prepare the mortar, you can use a concrete mixer and mix the mortar yourself, which is sometimes cheaper than buying a ready-made dry mix. But in this case, it is necessary to clearly maintain the ratio of the components of the solution.
Description of the process of jointing brickwork
1. When jointing joints on a previously erected masonry, a solution is carefully selected from them to a depth of 15-20 mm, also cleaning their side surfaces. A tool for clearing seams is a piece of hardwood lath hewn into a cone or a thin chisel.
2. Traces of the old solution and dust are removed with a stiff brush.
![]()
3. Dirt particles that cannot be removed with a brush are washed off with a special high-pressure apparatus, keeping it at some distance from the masonry.

4. When jointing the seams in the upper part of the masonry, self-made scaffolds are used.

5. The solution is prepared from a ready-made dry mixture mixed with water. The components of the solution are mixed with the help of a "fun" fixed in an electric drill.

6. The solution, brought to an earthy-moist consistency, can be used immediately.

7. In addition to the tin falcon, on which I put) the solution, two jointing is required for work; one, longer one - for jointing horizontal seams.

8. Another - for vertical seams. The solution is pressed deep into the seam with the help of jointing, and does not smooth it from the outside.

9. Formation of a vertical seam.

10. Before filling the joints with mortar, the corresponding section of the wall is moistened with water. Excess solution is removed with a hand brush.

11. With the simultaneous maintenance of masonry and jointing, the solution is injected into the seams in excess. Its excess is removed with a trowel flush with the masonry. The required shape of the seam is given with a piece of rubber hose.

12. Or a suitable piece of wood of the appropriate shape, such as a brush handle.
Beautifully executed brickwork is distinguished by an impeccable line of seams. The strict geometry of the jointing of the seams can be confidently called the final chord of the construction of the masonry. However, it is necessary to make the jointing according to the rules, clearly and smoothly leading a special knife. How is it recommended to do the embroidery so that the hand does not tremble?
Features of brickwork
Bricklaying during the construction of partitions and walls of the house is performed according to a certain scheme - dressing. Bandaging allows you to build a wall with a uniformly distributed load over the entire surface.
At the end of the process of erecting brickwork, it is supposed to produce jointing. The following factors influence the final result of the construction of brickwork:
• dimensions and color of bricks
• seam configuration, finish and color
• high-quality alignment of a masonry seam.
High-quality alignment and sealing of the seam is a must. For finishing works masonry joints use the following techniques:
• sealing and plastering.
When sealing a masonry joint, molded or plastered joints can have triangular, rounded and rectangular profiles. The type of profile depends on the depth of the knife for jointing into the seam and its angle of inclination during operation.
![]()
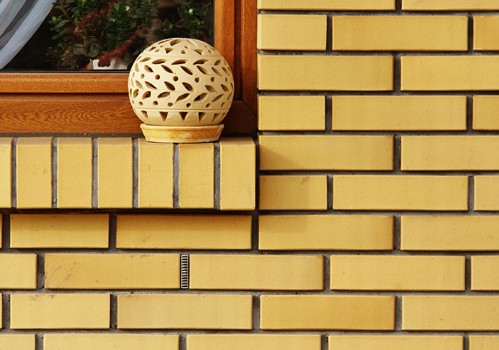
Recall that according to SNiP, the size of brickwork seams is: for a vertical seam 8-15 mm, for a horizontal one - 10-15 mm.
Types of jointing brickwork
There are the following types of masonry jointing:
• flush (rectangular undercut)
• rectangular recessed
• concave semicircular
• bevelled.
![]()
Flush jointing is the most used type of joint sealing. The technology consists of filling the seam with mortar, then cutting off the excess using special knife and subsequent processing of the seam with a brush with a long hard bristle. Flush jointing is distinguished by an outwardly clear seam line. The depth of the seam reaches 5 mm.
![]()
Rectangular recessed jointing is used when creating decorative finishes masonry. Technologically, jointing involves the initial removal of the mortar from the joints, and then the subsequent filling with a new mortar (depth up to 6 mm) and sealing with the help of a rounded end of the dowel.
Concave semi-circular jointing has a characteristic profile, which is created using a semi-circular knife when cutting off excess mortar from the seam. The seam has a depth of 4-6 mm.
The beveled view of the jointing is based on the specific position of the jointing knife, directed at an acute angle when cutting the mortar. For these purposes, a sharply sharpened knife is used, which allows the tool to be lowered into the suture material to a depth of 4 mm.
Naturally, stitching can only be done using a special tool.
What tool is used for stitching
The hand tool for stitching is a trowel with a long handle. Trowels for brickwork joints can have a flat, semicircular outer and inner working part with a width of 8 to 12 mm.
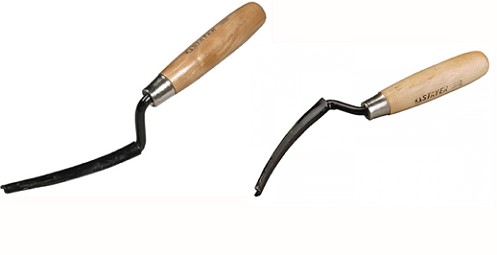
The end of the trowel knife forms the profile of the seam on the masonry. The tool for jointing the seam is made of steel.
Solution for stitching
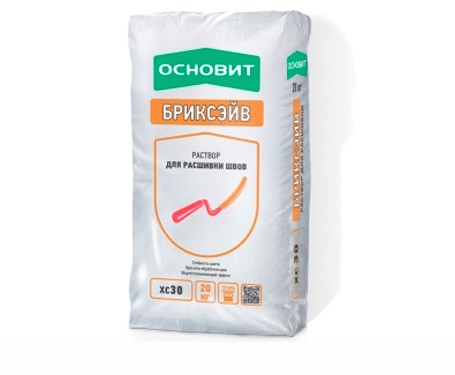
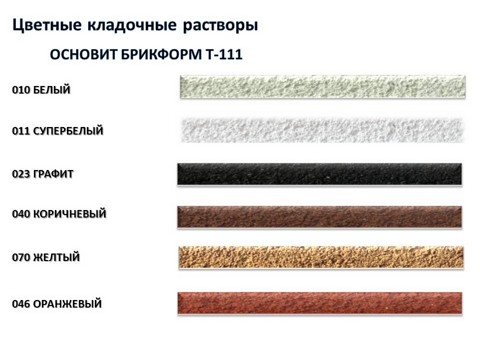
Stitching solution, e.g. OSNOVIT BRIKFORM T , designed for brickwork with medium water absorption.
For jointing, a ready-made masonry mortar is used, which has the consistency of damp earth. The composition of the cement-lime mixture solution: 1 part - cement, 1 part - lime, 10 parts - fine-grained sand.
The selected granulometric composition of the mixture of the solution allows you to easily and quickly grout the joints, and the strength of the solution (more than 15 MPa) ensures the durability of the seam. In addition, the composition of the mortar prevents the appearance of efflorescence on the surface of the brickwork, ensuring the durability of the suture material.
Application of the solution for jointing on the work surface is carried out in a dry way. Therefore, it is not difficult to make a seam jointing with your own hands.
colored grouts for grouting
Colored suture solutions, for example weber ZK557 , used for decorative purposes for ceramic, silicate masonry, clinker bricks and blocks. The material has the same qualities as the basic jointing mortar.
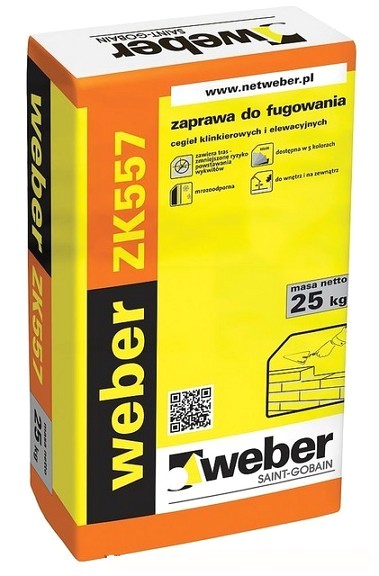
Long-term chromaticity of the seam is supported by colored pigments of inorganic origin, which are part of the mixture. Naturally, a colored joint can decorate any properly executed brickwork surface.
How to do your own seam stitching
It is important to remember that the process of jointing brick joints and jointing stone joints requires strict adherence to the sequence of processing. Initially, all vertical and then horizontal seams are processed. To create an even seam, corners are initially built to track the thickness of the seam. Then the thread is pulled for each masonry row. Recall that the thickness of the seams horizontally is 12 mm, and vertically 10 mm.
Jointing must be done according to a certain technology. These are the main technological steps:
• preparation of brickwork
• preparation of working solution
• jointing a seam using a tool.
Before applying the masonry mortar, the working surface is abundantly moistened with water, and after applying the jointing material, the seams are cleaned with a stiff brush.
Get the stitching right brick seam this video will help.
Jointing in brickwork gives the structure an aesthetically designed look. Therefore, this process should not be left for later, but the work should be done immediately. There is a special technology that needs to be followed. Depending on personal preferences, a different form of embroidery is made. How to do the jointing of brickwork? You will find the answer to this question in this article.
In what cases does it apply
After the erection of a brick structure, vertical or horizontal rows of bricks are interconnected with a prepared mortar. Excess cement-sand mixture that protrudes to the outside is removed. After that, it is necessary to process the seams. This treatment is called stitching. This procedure is used to:
- give beautiful decoration brickwork.
- Protect from moisture, which increases tightness.
- Ensure the strength of the structure.
- Increase the durability of the structure.
Based on this, you should not refuse to open the seams and postpone this task for the future. Naturally, in some cases, the jointing is done on brickwork, which was laid several years ago. But after all, during this time, the seams have already managed to absorb enough moisture to reduce the performance of the brickwork.
Required Tool
After the construction of a brick structure, a certain time is expected until it completely shrinks. After that, all the tools that are useful for stitching are prepared:
- Construction mixer.
- Perforator.
- Brush.
- Stitching.
- Trowel.
Building mixer used for quick mixing of the solution. If not, then you can do all the work manually. When choosing brushes you need to pay attention to the quality of its pile. It must be tough enough. The brush removes excess mortar that protrudes beyond the seam. A trowel is useful for removing excess mortar.
Jointing is a special tool that has a different edge shape. Due to this, the seam can be given a different look.
Types of stitching
The stitching tool gives the seams a clear pattern. The size of its edge can be of several types:
- Recessed rectangular shape.
- Convex oval.
- Rectangular undercut with bricks.
- Concave oval.
- Triangular concave.
- Triangular convex.
- Single cut concave.
Recessed Rectangular Shape provides for the removal of the solution from the seams to a depth of 6 mm. After that, they are filled with a new mixture and smoothed out with a rectangular trowel. If the brick structure is subject to high humidity, then it is better to refuse this type of jointing.
Rectangular stitching is also used to make a seam in pruning with two bricks. To do this, the solution is simply carefully removed from the seam, without deepening.
concave oval is made by extracting excess mortar from the seam, followed by filling it with a new mixture and processing with a special jointing. convex oval made with the same technology.
Triangular and single-cut jointing differ from the previous ones in that they make a cut on the solution at an acute angle.

Necessary materials
From the materials you will need a special solution, which is sold at any building materials store. When choosing it, it is necessary to take into account the quality and Additional features. The latter include the presence of plasticizers and salt additives in the composition.
Solutions are mainly offered, which are based on:
- Cement.
- Clay.
- Lime.
Can be applied sand-cement mixtures who do their job well enough. However, such a solution will not have the required plasticity index. Therefore, plasticizers are added to special mixtures. And when added to the composition of various additives, the resistance of the mixture to negative environmental influences increases significantly.
Surface preparation
First of all, work begins with the preparation of the surface of the brickwork. It must be borne in mind that vertical seams must first be processed. Work with horizontal is carried out in the second turn.
Use a hard-bristled brush to clean and prepare the surface. The cement mortar is cleaned of various coarse contaminants. Modern technologies provide the possibility of using a special apparatus that helps to get rid of the smallest particles of debris. Its work is based on the principle of high pressure and helps to remove particles that are invisible to the eye.
After cleaning from debris, it is necessary to carry out the procedure for wetting the seams.
To do this, use a bucket of water and a roller. It is necessary to moisten only the area that is planned to be processed in the near future.
The next step is to prepare the solution. It must be mixed immediately before grouting. After all, the solution dries within 2 hours.
Stitching solution and its preparation
Different grouts differ in their structure, viscosity, density and purpose.
For independent mixing of the solution, it is necessary to take cement (grade M300), sand and plasticizer (for example, lime) in proportions of 1: 6: 0.7. From such components, you can make a solution of the M50 brand, which is suitable for climates with high humidity.
For the convenience of mixing the solution, you can use a bucket that measures required amount components. Therefore, 1 bucket of cement, 6 buckets of sand and 1 incomplete bucket of slaked lime are taken. All this is combined in one large container. Water is gradually added to the mixture in small quantities. Liquids in such solutions should be no more than 15%. All components are mixed with a construction mixer until smooth.
It is better to knead the solution in small portions, because after hardening it becomes unusable.
When performing work in the winter, it is recommended to add special antifreeze additives to the solution. Due to this, the mixture acquires maximum strength even when solidified in frosty weather.
All kinds of dyes give an unusual design to grout for joints. Designers recommend making the color of the seams contrasting with the brickwork. When applying such a solution, it will be a little darker, and after drying it will become lighter. It is necessary to ensure that the grout does not remain on the bricks after hardening, otherwise it will be difficult to get rid of it.

Step-by-step instruction
For proper stitching, the following steps must be followed:
- Remove excess mortar from the seam.
- Apply pre-prepared grouting solution.
- Remove excess mortar with a trowel.
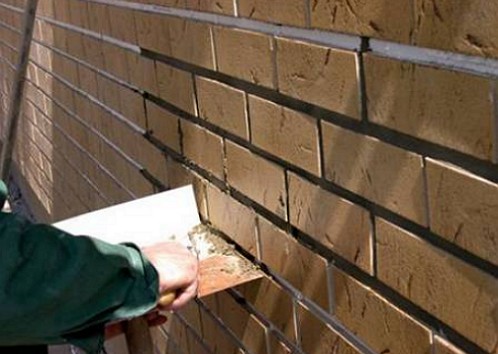
- Make stitching.
After removing a small amount of cement mortar (to a depth of not more than 6 mm), a jointing mixture is applied. It should be applied with a little excess. Then a trowel is taken and the excess mixture is removed. After that, the most crucial moment comes: It is necessary to carry out the jointing along the vertical seams. The work is carried out quickly with the indentation of the tool into the seams.
Indentation helps to get rid of the formed air under the solution. If you do not get rid of it, then the strength characteristics of the brickwork will decrease and it may crumble in the future.
After processing the vertical seams, you can proceed to the horizontal seams. For these purposes, it is convenient to use a long stitching.
To get the desired shape of the seam, you can use improvised means:
- A wooden stick with a sharpened end will help you make a seam with bevelled edges.
- A plastic tube is suitable for creating a concave seam.
- A wooden plank will help make a recessed rectangular shape.
After giving the desired shape, the brickwork can be left to dry.
High temperature will contribute to the intensive drying of the mixture. In addition, the mixed solution will need to be prepared more often. And on a rainy day, the mixture can absorb excess moisture.
To confidently process the seams of brickwork with your own hands, you can watch a video instruction that contains a step-by-step jointing of the seams.
Also, to give an aesthetic appearance to the masonry, you can paint it. How to paint a brick wall read in this article
Professionals with extensive experience in construction suggest a few tips that will help you avoid common mistakes when grouting joints in brickwork:
- A high-quality solution using plasticizers significantly extends the life of the building.
- First of all, you need to process vertical seams, and then horizontal ones.
- It is important to correctly select the color of the grout if you intend to add a color additive to the solution. It is necessary to correctly combine the color of the brick and the seam. For a test, you can first grout in a small area in order to remove the solution in time.
- If it rains during work, it is better to stop work and cover the treated areas with plastic wrap.
- After jointing, you must immediately clean the brick from the solution. For this, water and a clean rag will do. If the solution hardens, it will be difficult to get rid of it. In addition, the brick itself may be damaged.

Such recommendations will help to cope with the jointing of brickwork without any problems. This protects the structure from the destruction of the seams in the future, the formation of cracks in them. Strong wind and moisture will no longer destroy the structure.
When building a brick building with your own hands, experts recommend not to forget about some points. The main ones are aesthetic appearance buildings and weather protection. Finishing the building includes certain types of work. One of the most acceptable is the jointing of brickwork.
Standard brickwork has seams located horizontally and vertically. Technological process grouting is the filling of joints with mortar, which is designed to bind the bricks together. After dressing, the mortar that protruded beyond the boundaries of the brickwork was removed. After that, proceed to the embroidery of the seams with your own hands.
The process of jointing is the grouting work that is performed in order to increase the tightness of the brickwork.
Grouting allows you to decorate the facades of the building, as well as the surface of the walls after such procedures becomes resistant to the aggressive action of the environment. As a result of this, it is safe to say that grouting brickwork increases the life of the building.
Before starting work on jointing, you need to get acquainted with the basic methods of sealing seams. Often you can find the following types of stitching:

When making the jointing, it is necessary to adhere to the recommended sequence of work. First of all, seams that are located vertically should be processed, and then horizontal ones.
According to the norms specified in the SNIP, the thickness of the horizontal seam should be 10-15 mm, and the vertical one - 8-15 mm. In order to save money, it is allowed to make thin seams, the thickness of which may be lower than the norm recommended by SNIP. Also, the value of these indicators may vary depending on climatic conditions.
- It is not necessary to produce jointing on hot days, as the solution quickly hardens. This is a violation of the technological process.
- It is not advisable to do the jointing during rain, as the solution absorbs excess moisture.
- It is recommended to knead the solution in small portions using an electric concrete mixer.
- It is impossible to apply a liquid or dried grout mixture to the expansion joint. This may compromise its integrity.
The purpose of the stitching
The grout is designed to:
- improve the appearance of the building. This kind decorative design buildings well masks the difference in color shades, which are obtained due to the fact that the solution is kneaded in stages over several days;
- protect the cement base from destruction. This will significantly increase the life of the structure and postpone the overhaul. The main reason for the destruction of the cement base is the ingress of moisture;
- increase the thermal insulation properties of brickwork, which will keep the heat indoors in winter. To do this, it is necessary to carry out all the work with your own hands in accordance with the rules and regulations.
Application features

The basic rule is as follows: the surface of the walls that will be finished in advance cannot be plastered. This is due to the fact that the grout acts as a kind of finishing material, which must be applied to a separate part of the wall.
Most often, grout is used for exterior finishing work.
Apply this method for interior decoration It is possible in those cases when it is necessary to give the surface a certain color.
It is possible to produce bricklaying at any stage of the construction of the building. The most suitable for these works is the stage of building walls, since it is easier to remove excess mortar.
When jointing the brickwork of an old building, it is necessary to remove the old mortar to a depth of 10–15 mm.
To increase the strength of the structure, it is necessary to use the dressing of the seams of the brickwork at the stage of building the building. Ligation is a laying of bricks with a certain offset.
For work it is necessary to use only well-sharpened construction tools. This is done in order not to damage the building materials.
Grout technology
The technological process can be conditionally divided into the following stages:
- Works on the preparation of brickwork. At this stage, the surface of the walls is cleaned from dirt and dust. Further, with the help of a brush with a hard bristle, a final cleaning is carried out. After that, the surface to be treated is first moistened with water.
- Solution preparation. An important condition is that the solution must be of a homogeneous consistency without lumps.
- Make stitching. To do this, it is necessary to make a recess in the old solution by 10–15 mm. Use a hard-bristled brush for a final cleaning. After that, you can apply the solution.
- Using jointing, it is necessary to press the solution into vertically located seams. This technique will get rid of excess air.
- Finish the horizontal gaps using a long joint. In the process of this work, the solution is evenly distributed throughout the seam.
- Give the newly laid mortar a shape. To do this, you can use improvised materials, such as a plastic tube, rubber hose, a wooden plank or a sharpened wooden peg.
Jointing between bricks will allow you to compact the mortar that has not yet set.
A clear pattern and the density of the seam are the two main tasks that the jointing of brickwork solves. At the same time, the seams can take on a variety of shapes: concave or convex, oblique trimming, triangular, etc. all this is done using the jointing tool
When is stitching done?
If the brick walls being erected are not supposed to be plastered or clad in the future, then in this case it is necessary to think about grouting the masonry joints. For this purpose, already during construction work, a homogeneous brick (by color and shape) without flaws should be selected.
The seams in the masonry must be of the same thickness in all planes. True, some craftsmen, for the sake of beauty, make horizontal seams thicker than vertical ones.
On average, the thickness of the horizontal masonry seam is 12-15 mm, and the vertical one is 8-15 mm.
Jointing during construction work
Jointing is done both directly during the laying of bricks, and after the construction of the building.
Jointing during construction work is done after several rows of bricks have been laid and on a slightly set viscous mortar. As a jointing tool, you can use a 15-cm piece of ordinary rubber hose cut along the length - it will be possible to make a convex or concave jointing with it.
The step by step process is as follows:
- a brick is placed on the generously laid mortar, and the entire mortar that comes out from the outside is cut flush with a trowel, i.e. flush with masonry.
- The solution is allowed to set a little, but not completely dry.
- with a piece of rubber hose or jointing, the seam is smoothed, compacted and, if we are talking about deep jointing, it is pressed 2 mm deep into the seam.
If you do the jointing after the completion of the construction work on the laying of bricks, then in this case the bricklayer must leave free space during the laying of the bricks for subsequent filling with jointing mortar.
By the way, a few words about the mortar itself: for jointing it is not necessary to use the same mortar on which the bricks are placed. The fact is that the jointing solves mainly aesthetic problems and does not affect the strength of the walls being built. Therefore, the solution may be different. To make a mortar, three main components are needed in the following proportion: cement and lime - one part each; granular building sand - six parts. The humidity of the solution should not exceed 15%.
All these ingredients are mixed with an ordinary drill with a paddle paddle attached to it. Suitable for use, the consistency of the solution should be plastic and thickish.
Mounting false ceiling from plasterboard - for the construction of a plasterboard ceiling.
Jointing old masonry

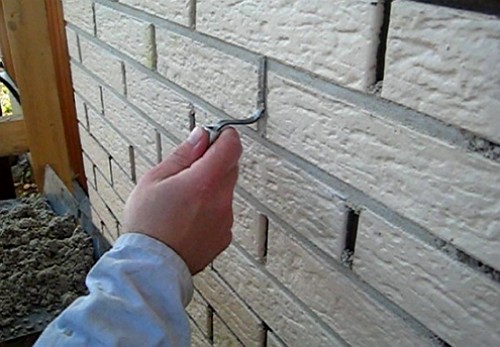
A lot of tools can be used as a jointing tool, even an ordinary bent narrow aluminum plate.
Over time, the seams of the brickwork begin to crack and crumble, exposing the joints, where both moisture and wind now penetrate, making the rooms more damp and cold. You can correct the situation by grouting the seams in the brickwork.
At the first stage, preparatory work is carried out:
- The seams of the old masonry are cleaned of dirt and chips of old cement 15-20 mm deep. As tools, a wooden lath, a chisel and a hammer are used.
- Using a stiff brush, the masonry is cleaned of dust and remnants of the old mortar. What does not lend itself to a brush is washed off with a high-pressure jet from a special apparatus, which must be kept at some distance from brick wall.
- The solution prepared for jointing (see above for proportions) is applied to the plaster falcon, and with the help of vertical jointing, the solution is pressed into the vertical joint. At the same time, the master holds the plaster falcon from below in order to avoid spreading the mortar over the surface of the bricks - because of this, stains remain on them. It should be noted that at this stage two jointing will be needed: one for the vertical seam and the other, longer, for the horizontal.
- After the solution applied to the seams sets to a plastic state, proceeds to create the shape of the seam.
- Before starting the mortar into the masonry joints, the working section of the wall must be moistened with water so that the dry brick does not absorb moisture from the cement and does not become damp.
- The remains of the applied mortar are removed from the masonry using a conventional hand brush.
And 4 others reference Information in length, width and height, as well as a capacity of 1 m 3.
Summing up
Summing up the material, at the end I would like to note a few more important nuances that you need to know when stitching:
- Stitching should be done on a cloudy day without rain.
- Stitching should begin with vertical seams.
- Jointing allows you to increase the heat and sound insulation qualities of a brick wall, and also protects the seams from the penetration of moisture into them.
- A brick wall for jointing loses to a plastered wall in terms of thermal insulation, but wins in terms of durability and ease of use.
- The stitching tool can be made from improvised means - even from an ordinary old knife, thoroughly heated with a burner and then curved into the required shape.


