
For several years now, LED ceiling lighting has been an integral attribute of almost every repair. Many do not dare to do this work on their own, considering it very difficult. But is it really so? In this article, we will help you make your own LED ceiling lighting.
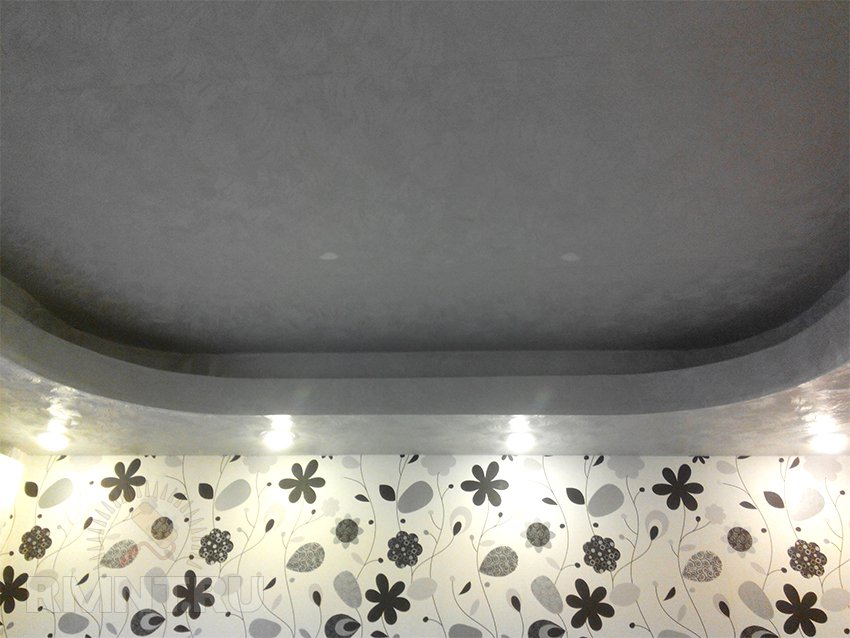
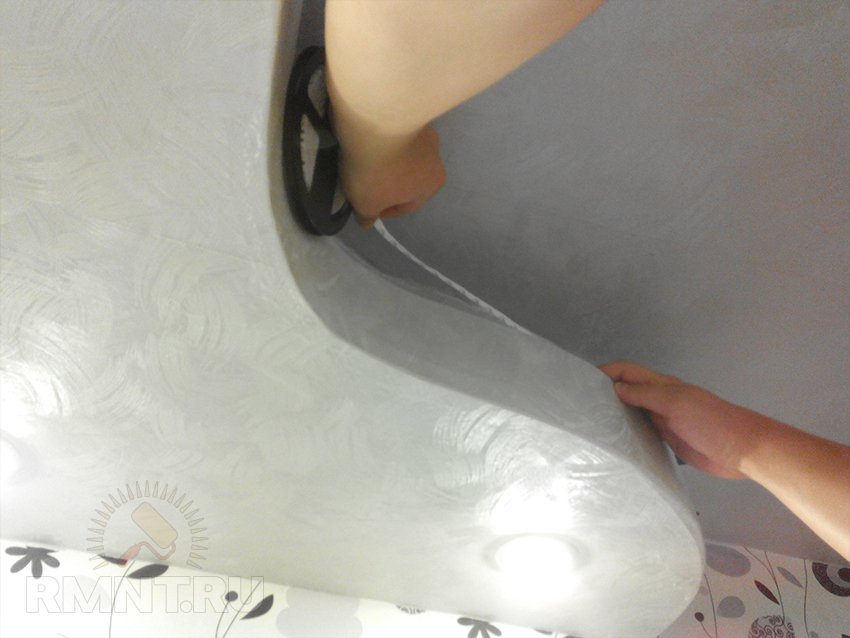
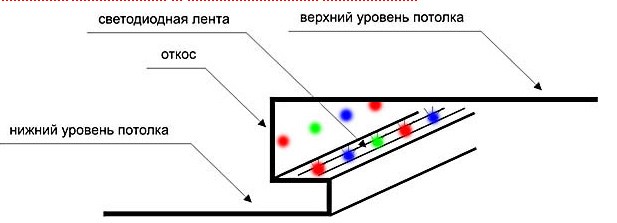
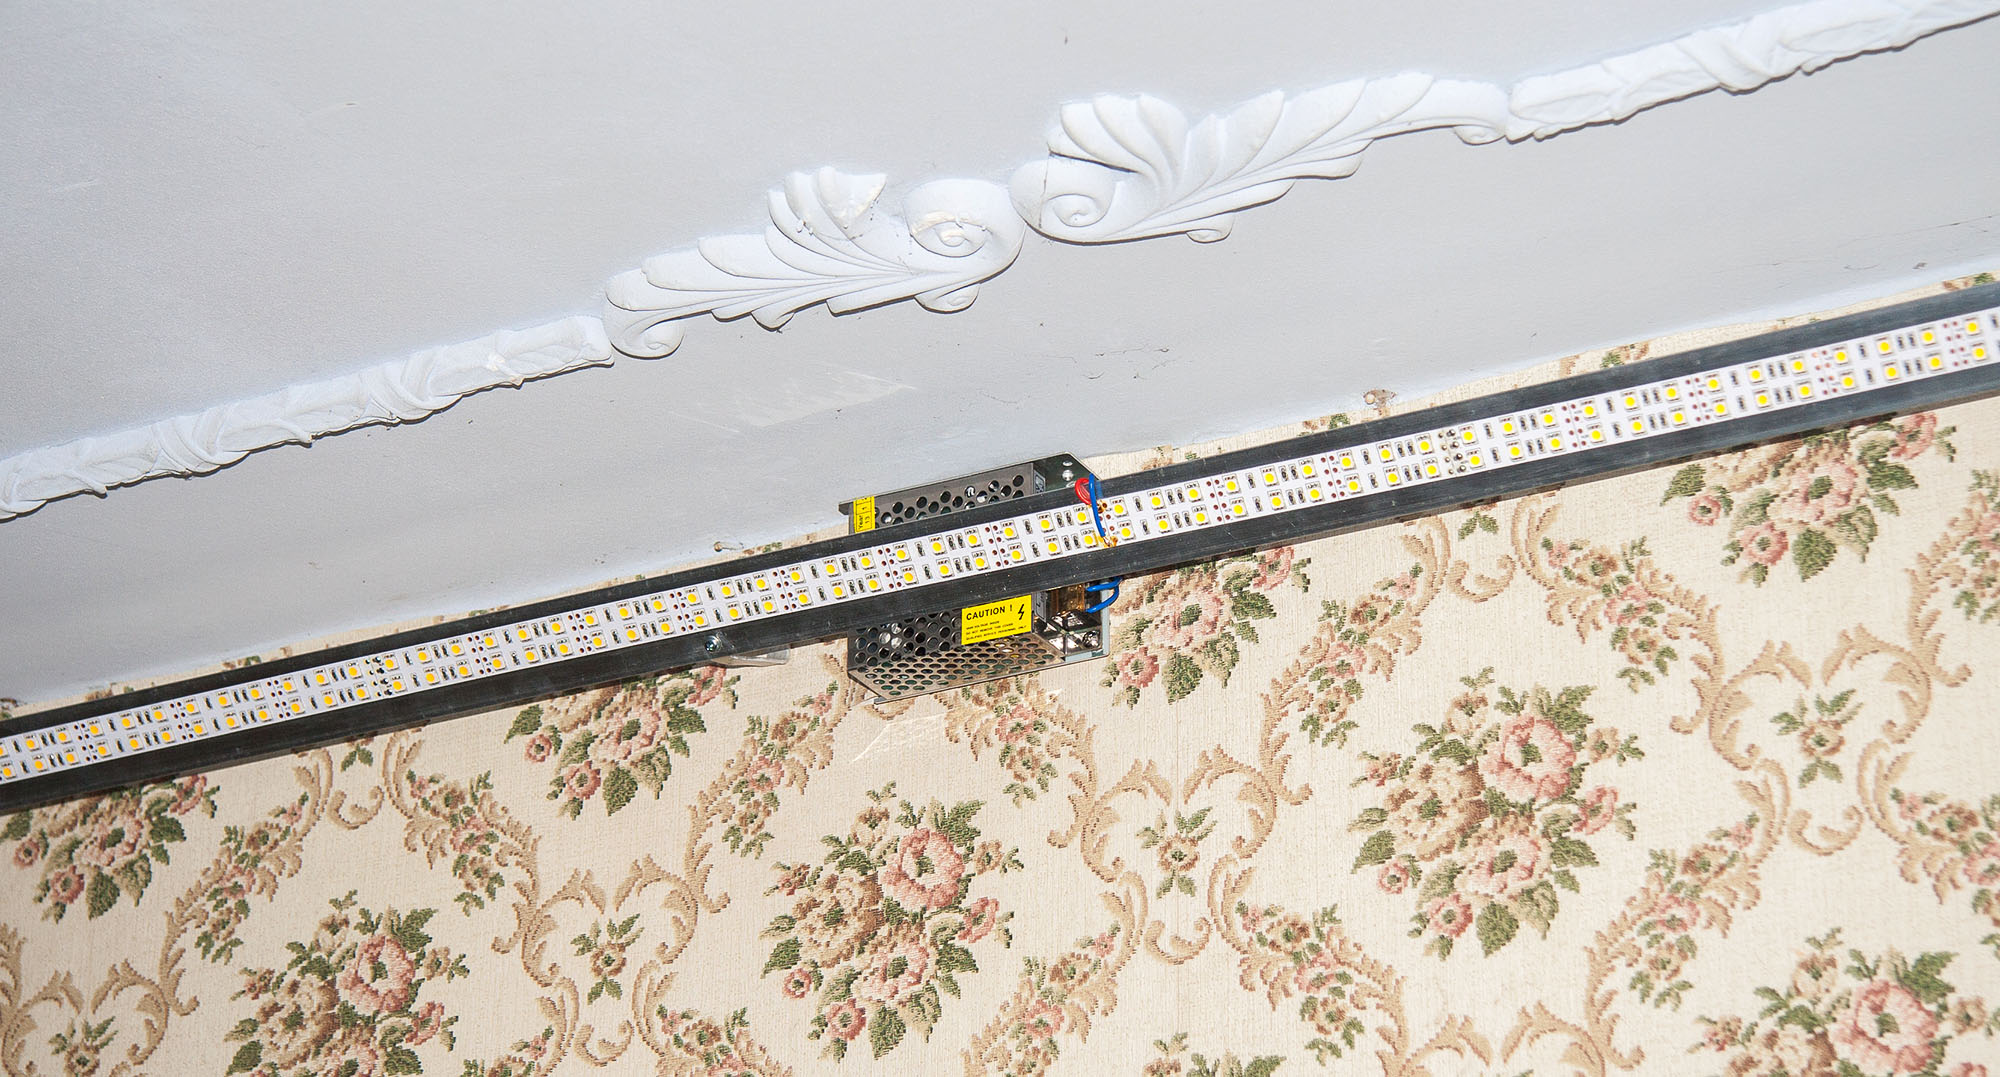
So, let's begin. We have just finished renovating one of the rooms. The ceiling cornice has a complex shape.
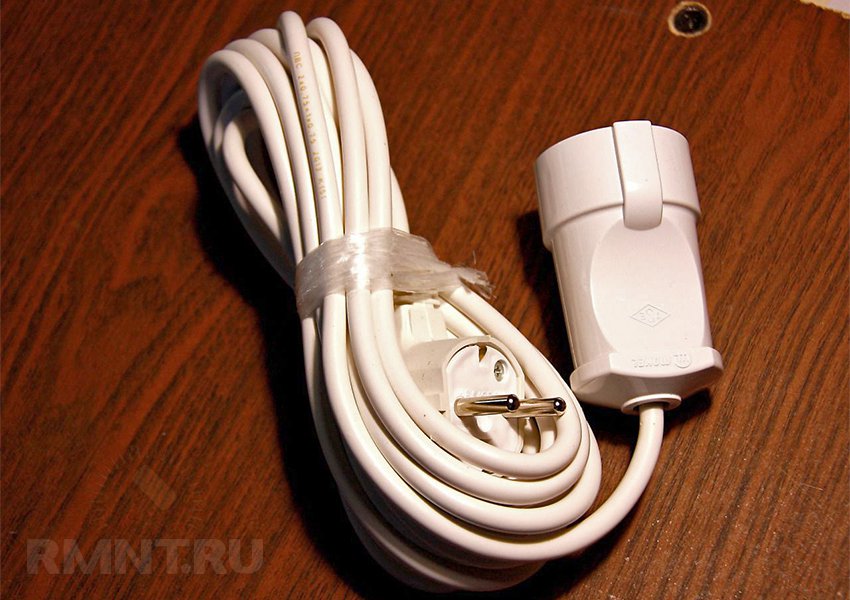
Important! Specialists in LED lighting strongly recommend bringing a socket into the drywall box of the eaves, into which the power supply or transformer will be connected in the future.
We decided to follow the advice and first brought out such a socket into the drywall box of the eaves.
Necessary materials and tools for our work
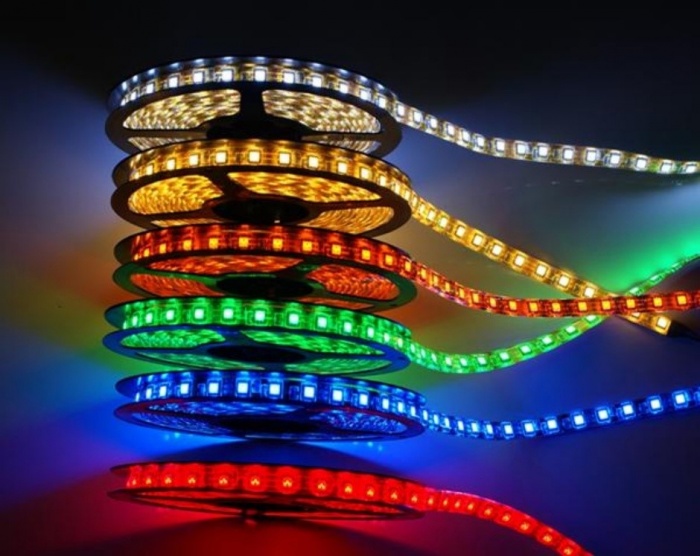
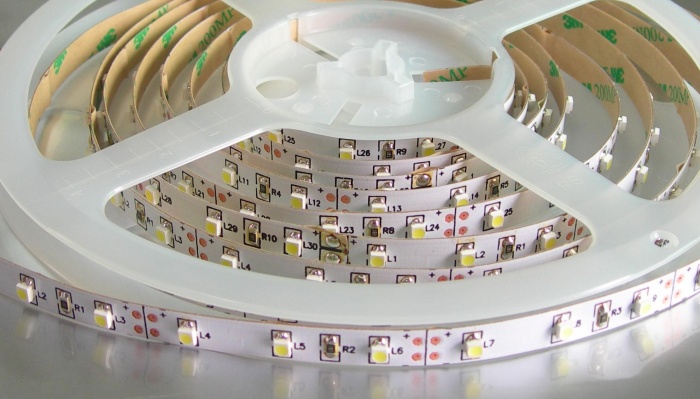
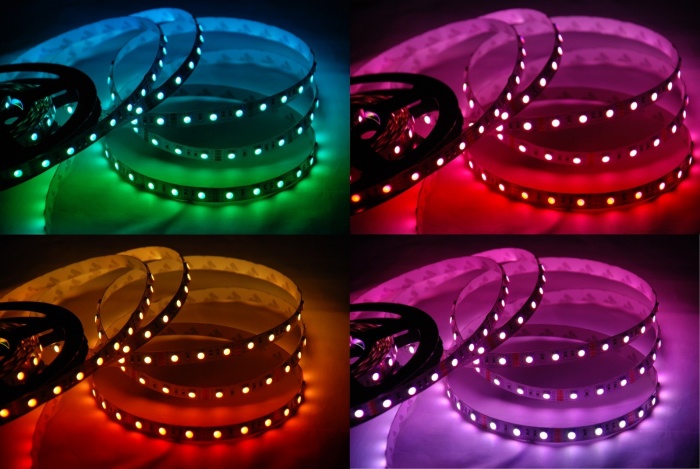
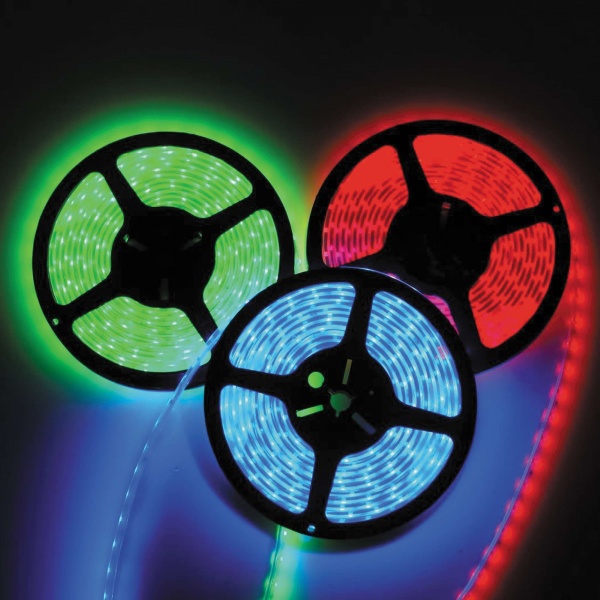
RGB LED Strip
Ceiling lighting experts note that LED strips have a number of advantages over neon tubes:
- LED strips do not get very hot, unlike neon counterparts.
- LED strips are much more durable than neon tubes.
- Neon can only shine in one color, while LEDs can change color (you need to use RGB tape to change the color).
- Neon tube is several times more expensive than LED strips.
There are many LED strips different options, but experts recommend using SMD3528 or SMD5050 LED strips. SMD3528 tapes are less bright than SMD5050, but cost almost three times cheaper.
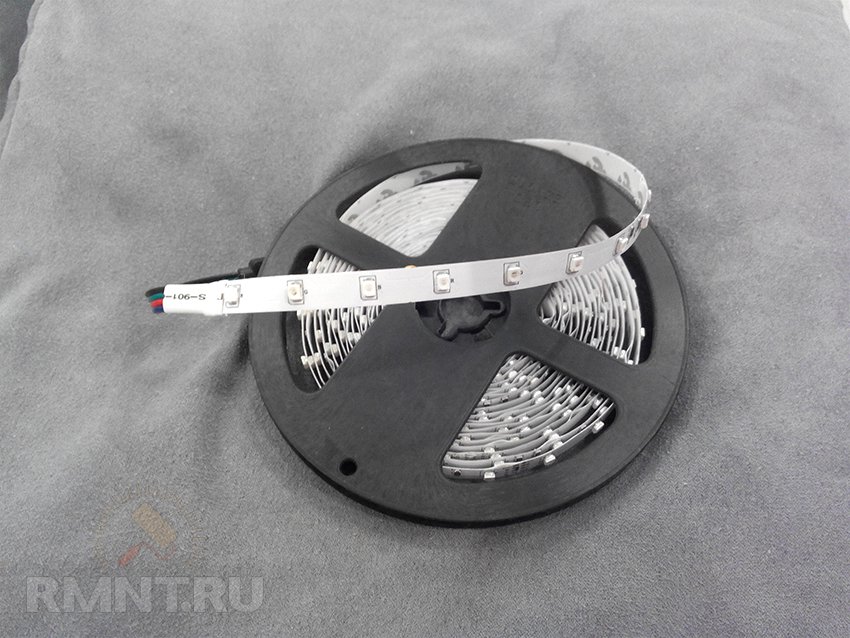
This work uses SMD3528 tape.
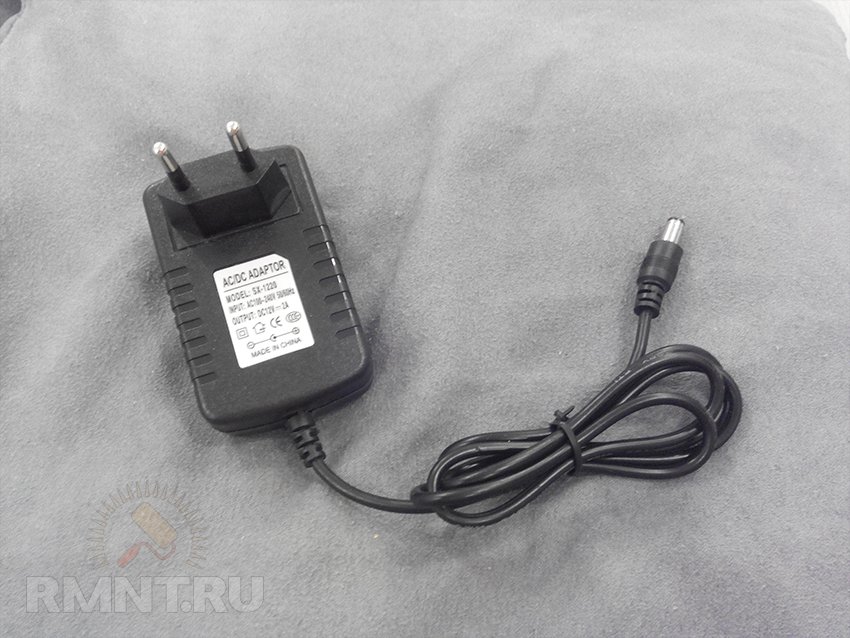
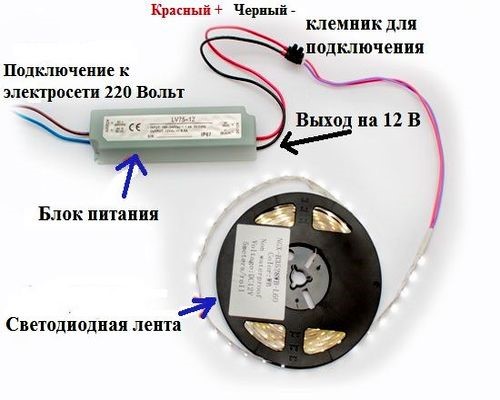
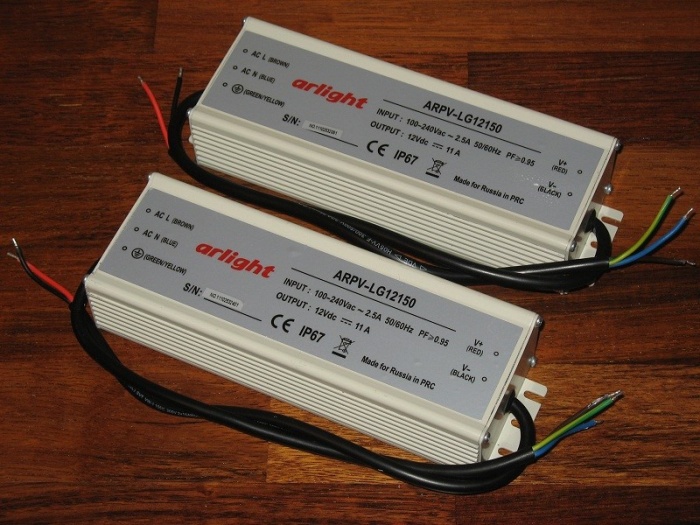
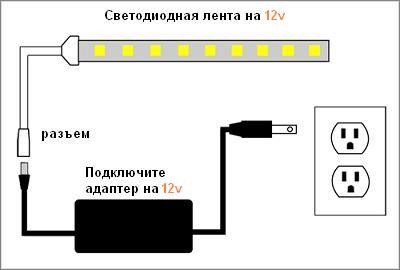
Power Supply
The power supply must be selected directly for the type of tape and operating current. The operating current of the SMD3528 tape is 0.4 A per meter. If your tape is no longer than 2 meters, then a 12-volt power supply with a current of 1 A is enough. If your tape is 5 meters long, then a power supply of at least 2 A is required.
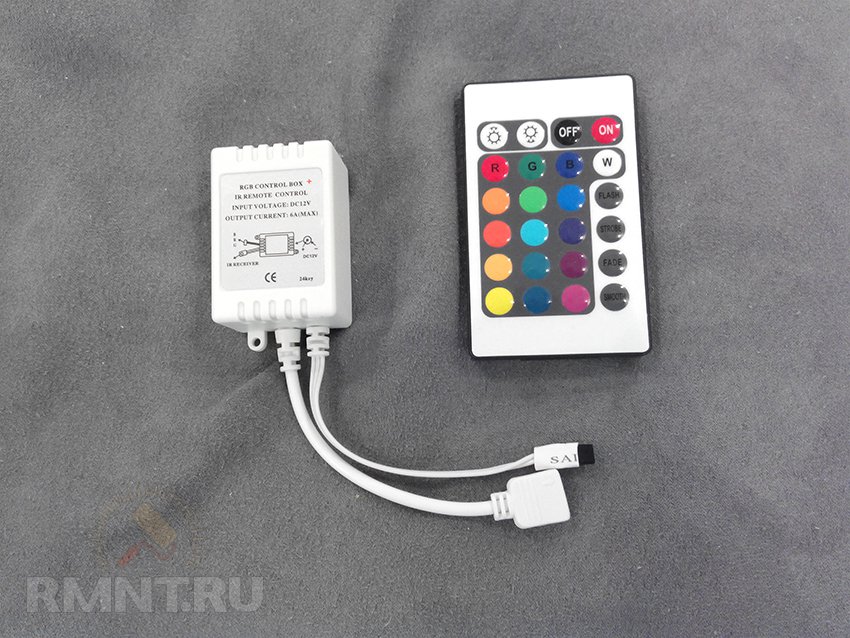
Controller
If you want to make the LED ceiling lighting in one color, then you will not need a controller. In our case, the LED ceiling lighting will be multi-color and multi-mode. A big plus of most controllers is the presence of a remote control.
Getting Started
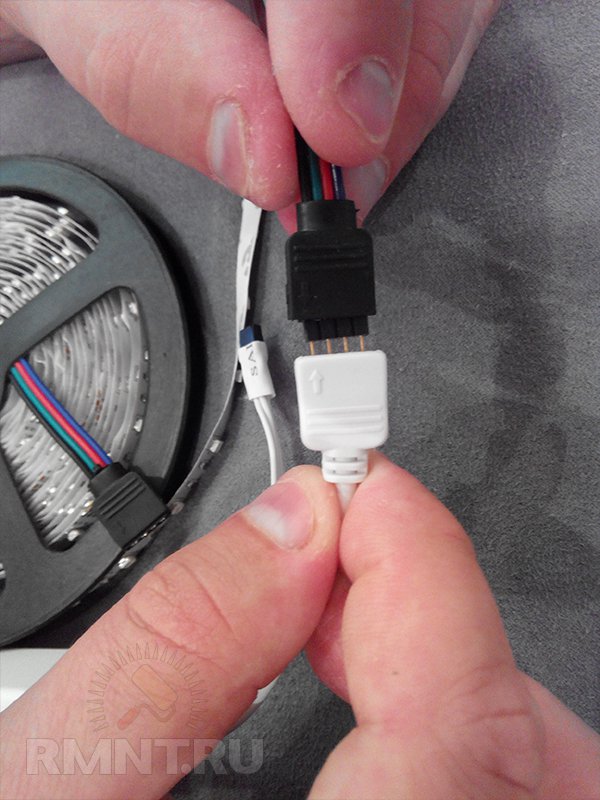
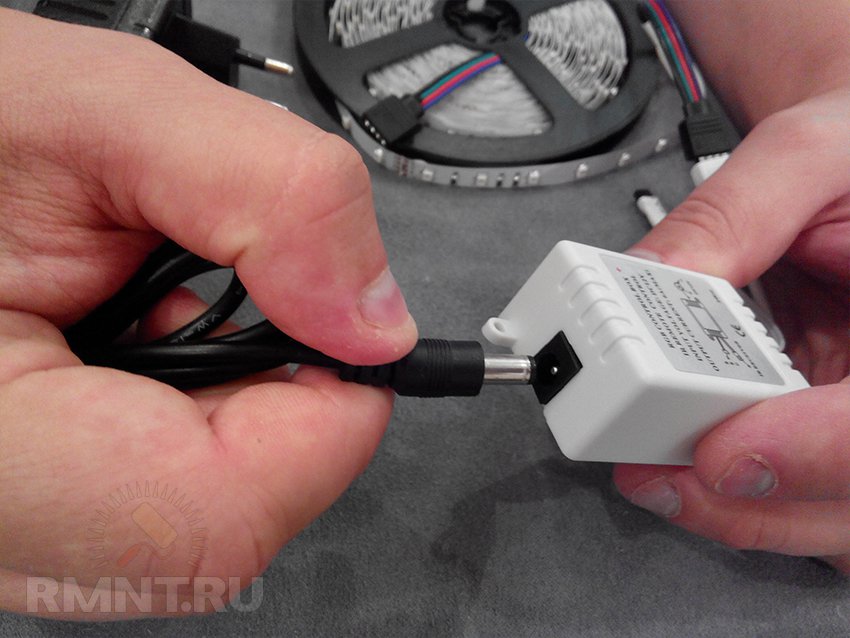
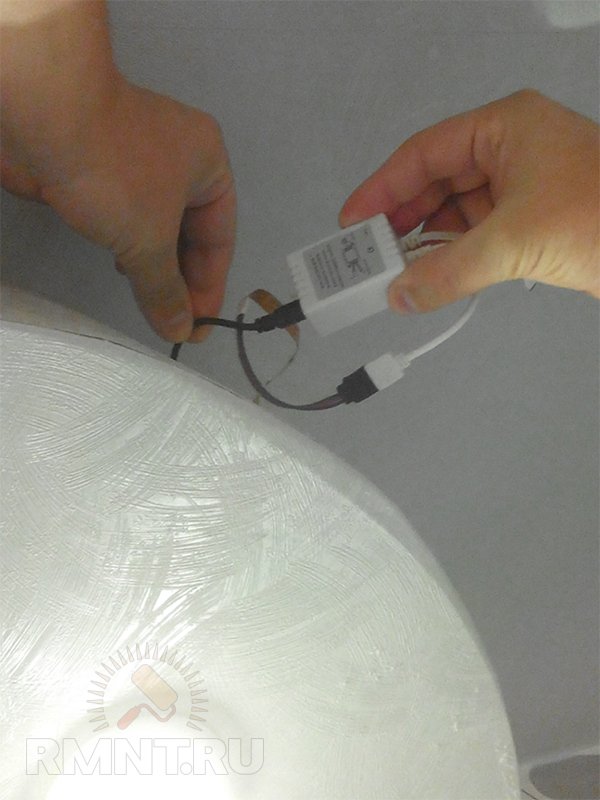
We are trying to collect a "working sample". To do this, we connect in one circuit: a power supply, a controller and an LED strip. It's easy to do. You just need to connect all the plugs together.
We connect the controller and the tape.
We connect the power supply and the controller.
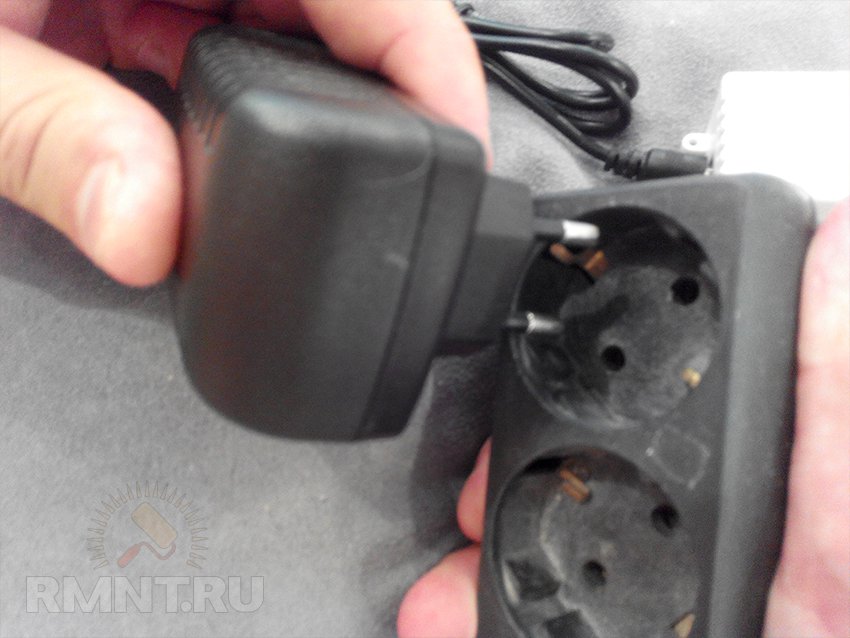
We turn on the power supply to the socket.
We make sure that the whole circuit works.

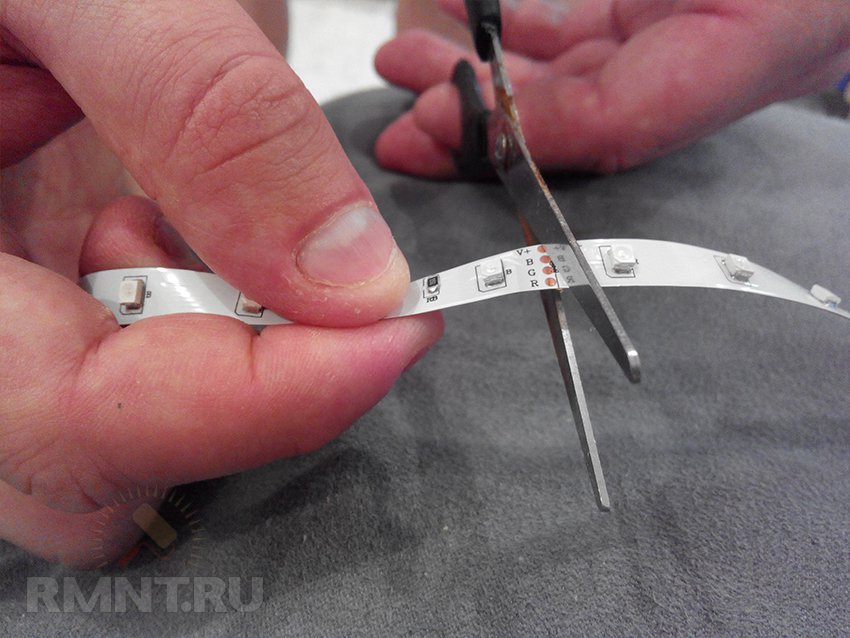
Cut off the length of tape you need.
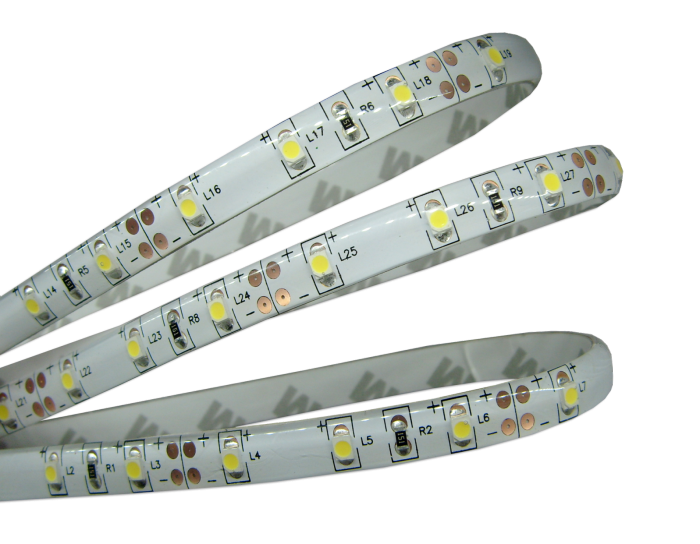
Since the LED strip on the reverse side has an adhesive base on which it will be glued to the cornice, the base must be cleaned of dust.
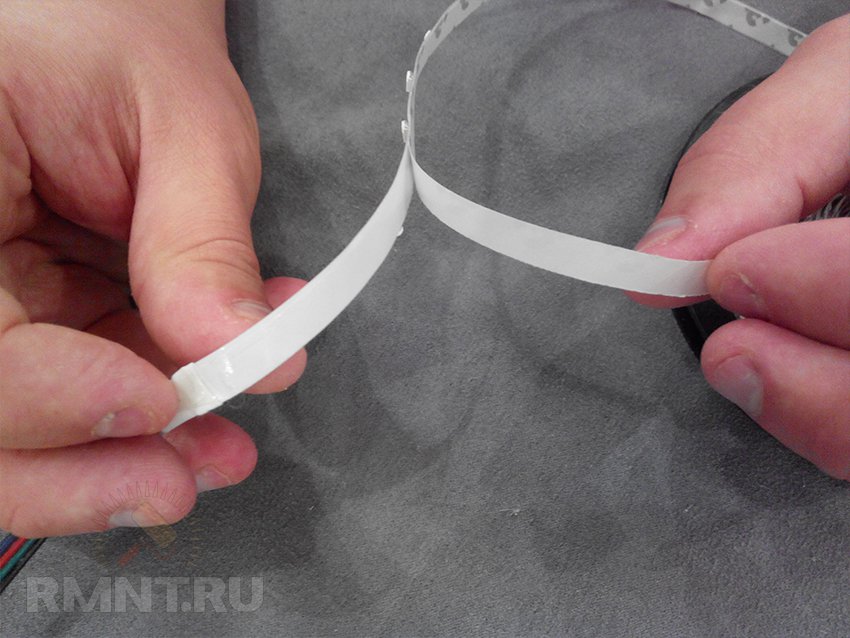
Remove the protective film from led strip.
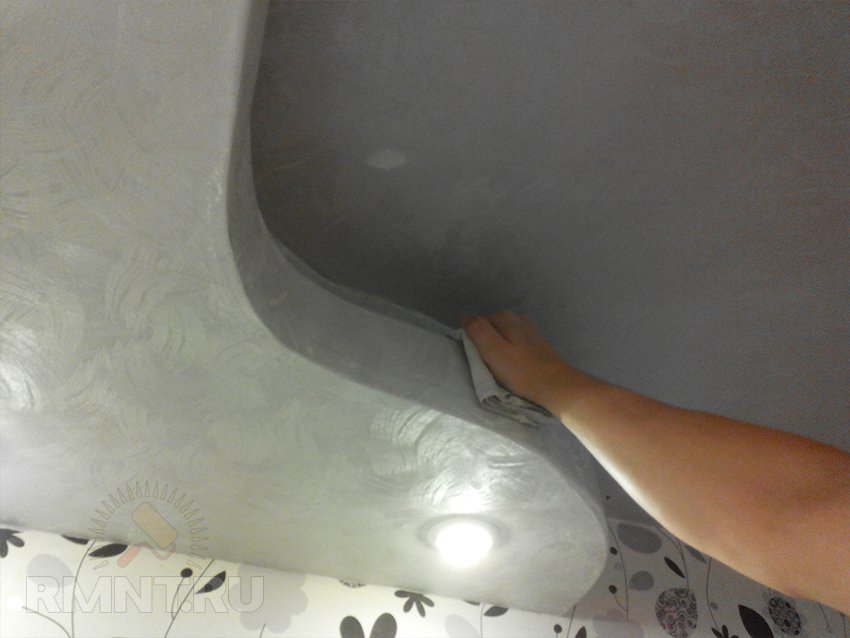
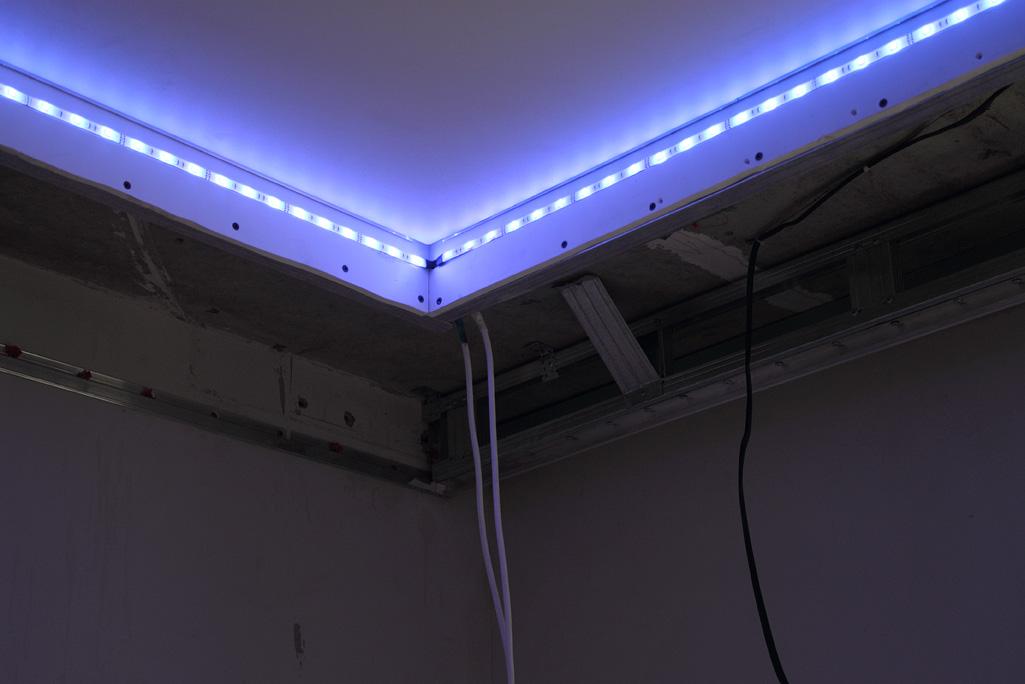
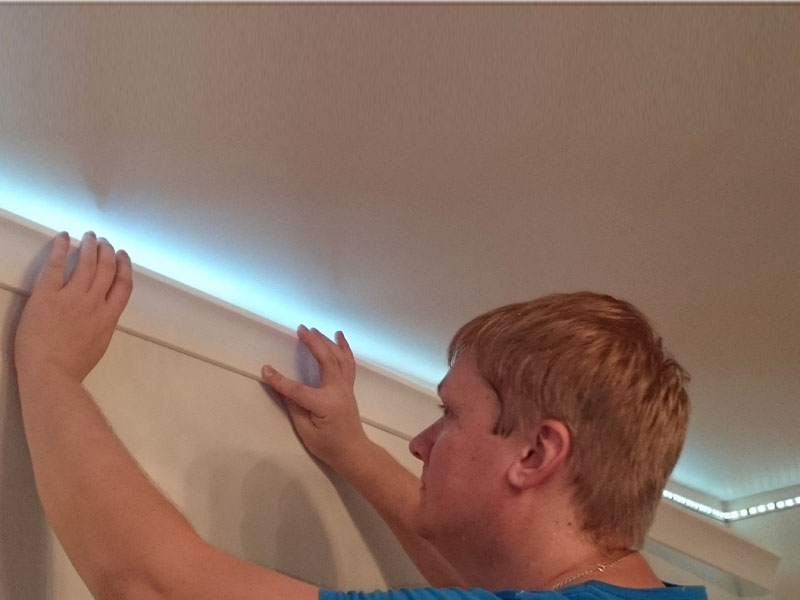
After that, you can proceed with the installation of the LED strip on the edge of the drywall cornice.
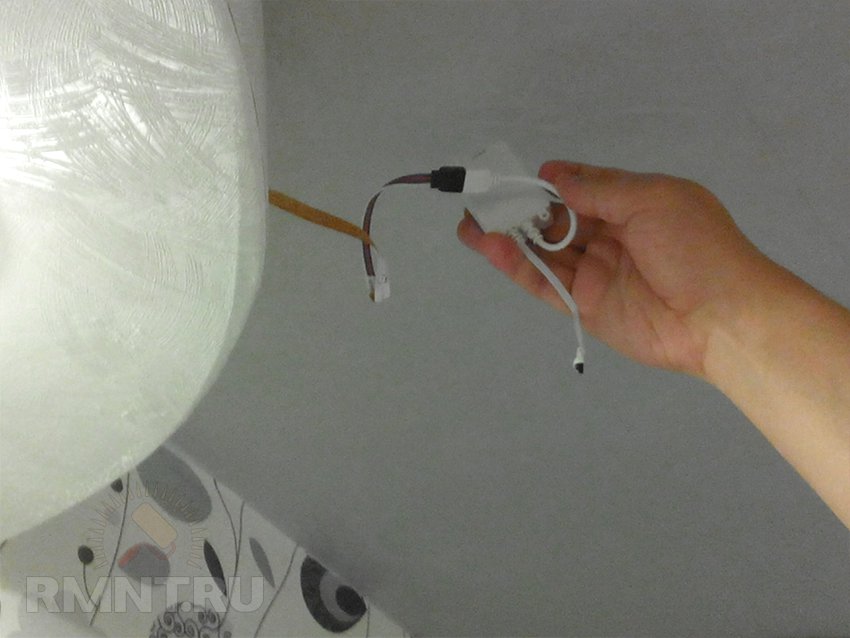
And connect the power supply to the controller.
It's time to plug the power supply into the outlet and bring the controller's IR signal receiver for the remote control to a place that is invisible to the eyes, but at the same time in direct line of sight of the control panel.
Turn on the backlight using the remote control. To do this, press the ON button on the remote control and make sure that everything works.
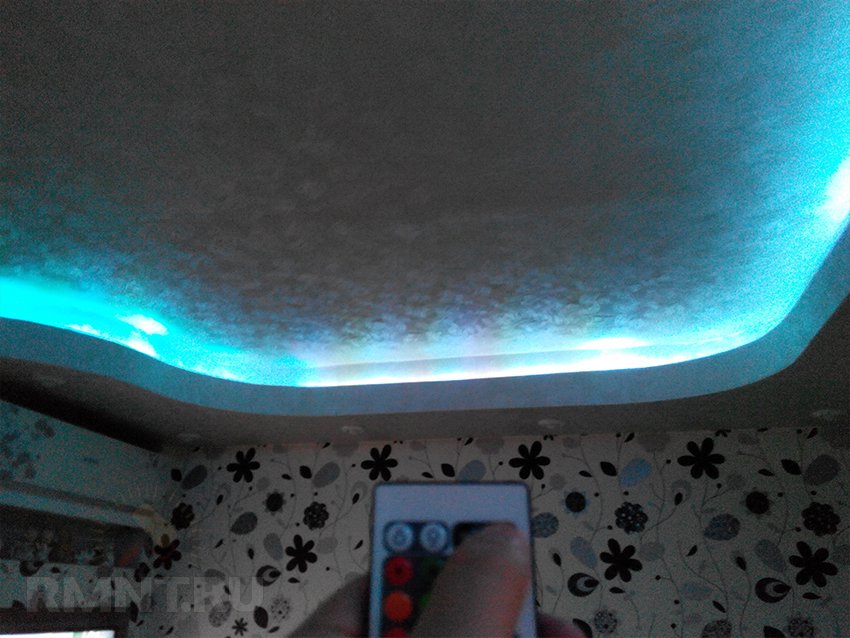
You can change the backlight color using the remote control. To do this, just press the button of the color that we want to turn on. Check the operation of the backlight in several modes.
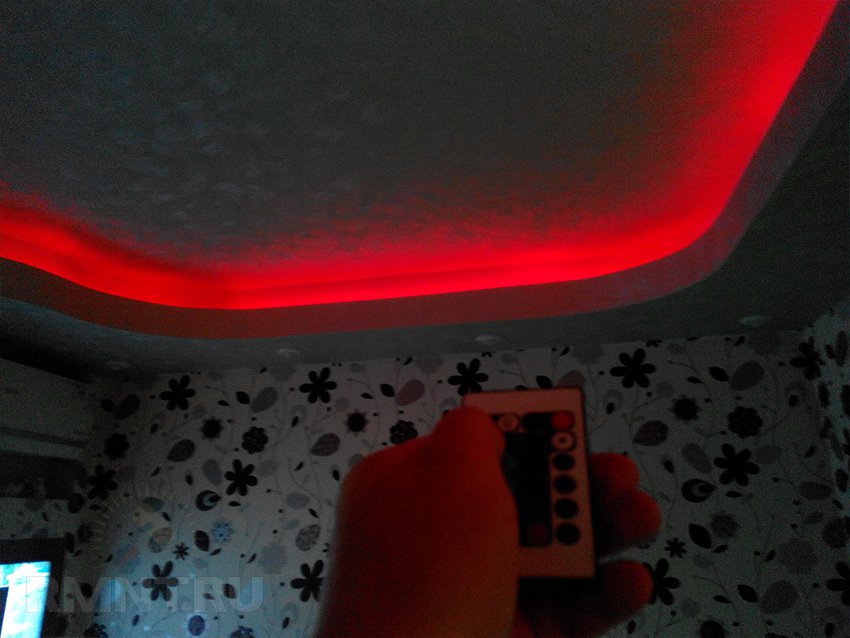
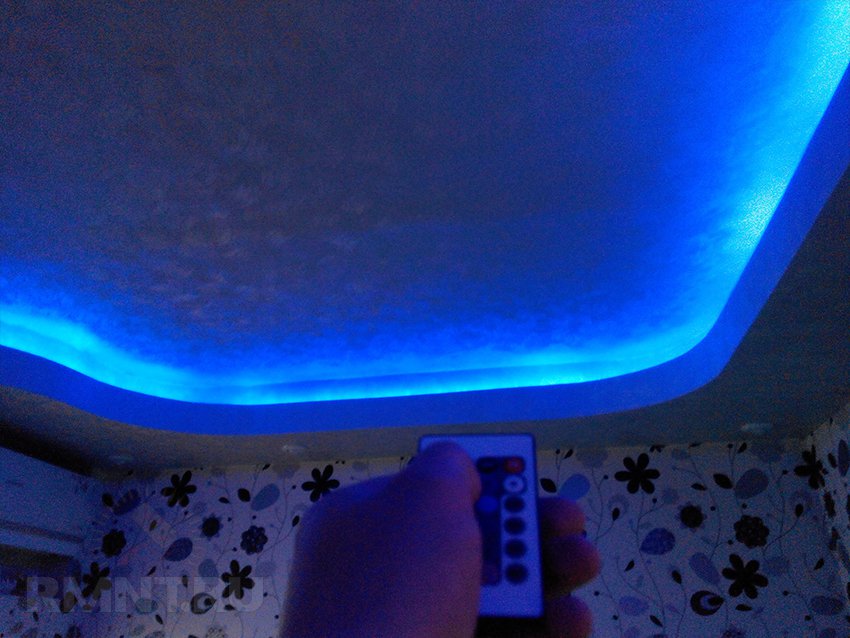
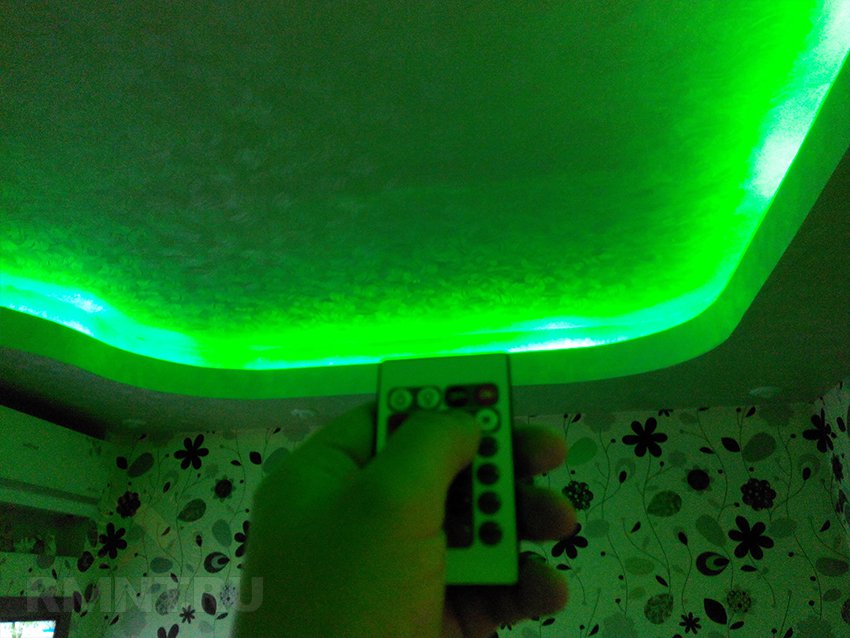
In addition to color, using the remote control, you can control various modes of the backlight.
Now you know how to make LED ceiling lighting with your own hands.
The cost of the kit: a power supply, five meters of LED strip and a controller will cost you from 1,000 to 2,000 rubles, depending on the manufacturer and the store where you can purchase this kit.
With the advent of LEDs, back in the seventies, LED ceiling lighting began to gain more and more popularity. And if earlier radio amateurs experimented with a sharp spectrum of conventional LEDs, where the choice of color was small, now, with the advent of more advanced LEDs, softer spectra, the scope for creativity has expanded significantly.
Now LED strips and special controllers are widely available, as well as power supplies for every taste, for any required power. Today you can smoothly adjust the brightness and color, create light scenarios. In principle, any person more or less versed in technology is able to design and install LED lighting for a stretch or false ceiling.
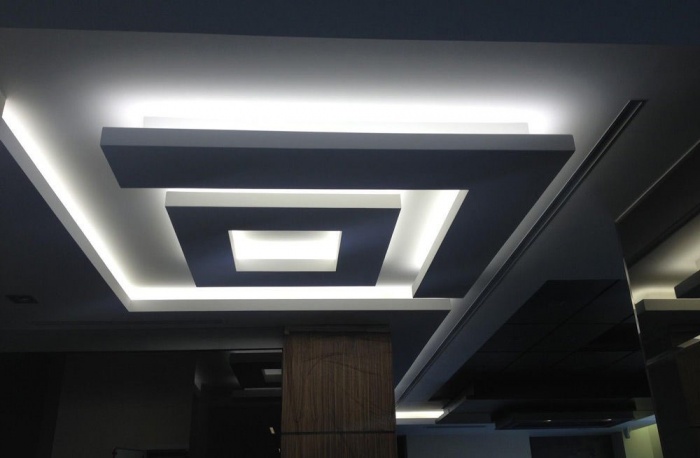
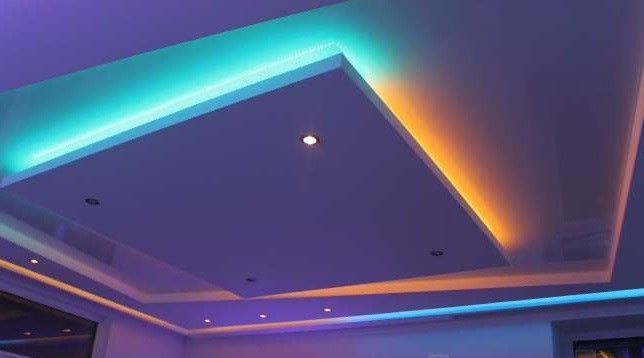
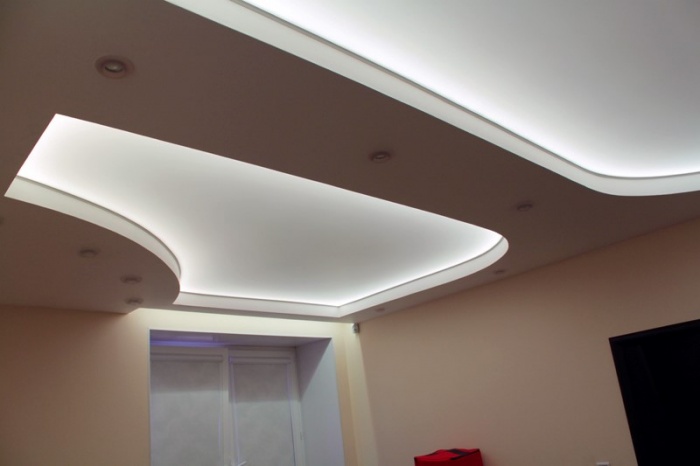
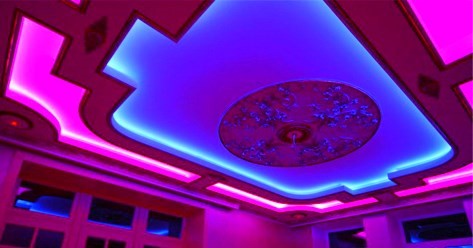
Most often, one of four popular options is implemented: contour diffused lighting, directional lighting, figured lighting or a starry sky - spot lighting.
With contour lighting, the LEDs are placed on a shelf, from where they shine on the ceiling from the bottom up, while on the ceiling the effect of a continuous light strip along the contour is obtained. With directional lighting, the LEDs are mounted on a slope, and the light spreads in scattered beams along the ceiling. For spot lighting, LEDs are mounted on the ceiling so that they shine vertically downwards, like stars in the sky. With curly illumination, the LEDs are located in the shades.
Contour lighting is easiest to make using LED strip. To do this, they come up with a design, choose a suitable tape, select a power supply, a controller, mount the tape, make a connection, and the backlight is ready.
Usually choose a full color RGB LED strip with a controller. It is possible in principle to use several single-color ribbons, but consider whether this makes sense if it is cheaper to buy a controller and a three-color ribbon, and adjust the color of the backlight to your heart's content. Single-colored ribbons are more suitable for window dressing, while multi-colored ribbons are better for the home.
LED strips come with different emitter densities, that is, with a different number of LEDs per meter of strip. For contour lighting, it is better to choose 60 or 120 LEDs per meter, and for directional lighting, 30 or 60 are enough.
If you want combined lighting, both contour and directional, you can immediately install a pair of ribbons on a slope and on a shelf, for example, on a slope, a pair of ribbons with 30 and 60 LEDs per meter, and on a shelf - two with a density of emitters of 60 and 120.
By connecting four power supplies and controllers, you can customize a variety of lighting effects by adjusting the ribbons individually and collectively, combining colors, intensity, smooth flickering, etc., depending on the capabilities of the controller.
LED strips also vary in power. The documentation for the tape indicates the power of the tape meter, and you can choose. For directional lighting, 5 watts per meter is enough, for contour lighting - 8 watts per meter. For contour illumination, to form the effect of a light strip, more power is needed, up to 25 watts per meter, if there are two tapes, and for a directed one, 12 watts per meter is enough - also for a couple of tapes.
If you install tapes in pairs, then the brightness can be adjusted by turning on the tapes individually, choosing one of the two, or together, and this way you will be able to save on the controller. This solution is applicable for both contour and directional illumination.
https://www.youtube.com/channel/UCXd71u0w04qcwk32c8kY2BA/videos
Based on the length of the backlight strip, the total power is calculated. After measuring the length, determine how many meters of tape you need to purchase, calculate the power by multiplying the footage by the power of one meter of tape. For the received power, a power supply and a controller are selected for each backlight strip. The voltage of the power supply and the voltage with which the controller can be controlled must correspond to: 5, 12 or 24 volts.
When installing LED strips for contour or directional lighting, there will be no difficulties if everything is done correctly and in order. The LED strip has a sticky coating on the reverse side under the protective film, which, when glued simply to drywall, will peel off over time. For this reason, first, a PVC corner is screwed to the drywall in the niche with small self-tapping screws, on which the LED strip is then glued.
Another reason why a PVC corner is needed is that if the stretch ceiling lighting needs to be repaired, the corner can be easily removed and then installed in its original place. If the tape is firmly glued to the surface of the ceiling itself, then how can it be glued again then?
It is necessary to solder the wires to the tape as carefully as possible, using low-melting solder of the POS-61 type, since the LEDs and the base of the tape do not tolerate prolonged overheating. You need to solder quickly and at the same time carefully. This is best done, of course, by an experienced craftsman, or a person who regularly deals with soldering electronic components.
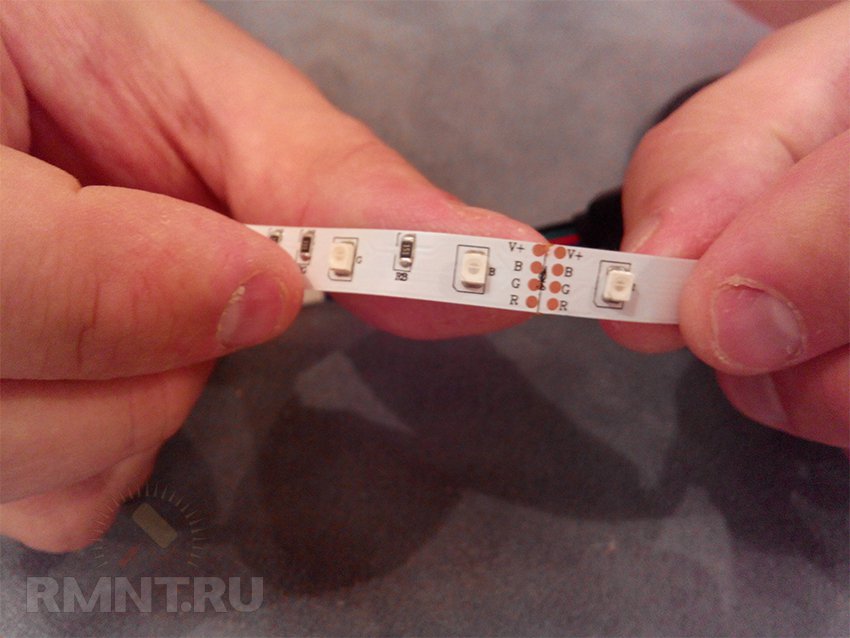
You should not mount tapes in pieces more than 3 meters, this is due to the current limitation of the tracks. It is best to divide the tape into sections of 2-3 meters each, and connect each to the controller with individual conductors, observing the polarity in accordance with the markings on the tape. If the tape needs to be cut, then it should be cut exactly along the cutting lines that are indicated on the tape. When cutting, the edges of the tape can be cut not according to the markup, but exactly in the middle between adjacent diodes.
Spot lighting such as "starry sky" will require a special approach. Here we need separate LEDs, which will also be powered by the power supply, and if desired, through the controller. The power supply must be 5 volts. If one LED is rated for a power of 0.1 W, then this is 10 LEDs per 1 watt of power supply power or 100 LEDs per 10 watts. Usually 20 LEDs are enough to create a medium-sized starry sky.
A controller interrupter for 4 to 8 sections of LEDs will not hurt, it will add extra realism to your starry sky: the stars will be able to blink at a given frequency.
During the soldering process, strictly observe the polarity, it is easy to determine - the positive lead of the LED is longer than the negative lead, and there is a key on the plus side. After soldering, protect each leg with an insulating tube to prevent short circuits between the legs.
SUBSCRIBE to OUR youtube channel Econet.ru, which allows you to watch online, free video about healing, rejuvenation of a person ..
Put LIKE, share with FRIENDS!
https://www.youtube.com/channel/UCXd71u0w04qcwk32c8kY2BA/videos
It is easier to equip a stretch ceiling: LEDs are glued to the base ceiling on silicone, then they are directed as needed. Drywall is more difficult. Here you will need an additional plate, which will need to be cut exactly under the ceiling niche, holes for the LEDs will already be drilled in it, and closed on the front side with a translucent plate, which can be corrugated for a better effect.
Then mount the electrical wiring and then install the structure in the ceiling niche. This requires special skill. On a translucent plate, you can stick a picture of the real sky, and position the LEDs in the same way as real stars in the sky, then you can even find the Big Dipper on your ceiling.
For curly lighting, you will need a false ceiling, in which you will need to drill large holes for small shades, in which the LEDs will be located. A popular solution is when there are several LEDs in the ceiling, each of which shines in its own direction, creating the effect of rays along the ceiling. In general, it all depends on your taste and imagination.
When setting up the controller, remember that the blinking should not be sharp and random in frequency, for example, it is unacceptable if the blinking occurs once every two seconds, 2 times per second or 7 times per second, as this is very dangerous for nervous system. It is best if the blinking is smooth, almost iridescent, and not sharp, for this you need a controller for the power supply, and not just an interrupter like an LED flashlight.
Colors also matter. Light green light will relax you, yellow-orange, like a regular light bulb, will be neutral, blue will give a calming effect, set you up for reflection, blue will rather alert you. Avoid yellow-blue, this combination is annoying. Red is suitable for the matrimonial bedroom.
A person with the skills of a home master can easily cope with the installation of LED ceiling lighting. LED strips will greatly facilitate the installation process, open up opportunities for creating an interesting design. published
Bulky old-fashioned chandeliers have long gone out of fashion and have remained only in specific interiors, where they play a role not only lighting device but also a decorative element. More popular today is hidden or spot lighting, which does not create intrusive light and does not strain your eyesight. This effect is achieved with the help of small lamps or a strip of LEDs.
It is LEDs that are most often used by designers to create a certain atmosphere in a room, and for “uninitiated” people this seems very difficult and almost impossible. In fact, do-it-yourself diode ceiling lighting is a completely simple matter and does not require any specific knowledge, it is enough to know a few subtleties and avoid mistakes during installation, which we will talk about a little later.
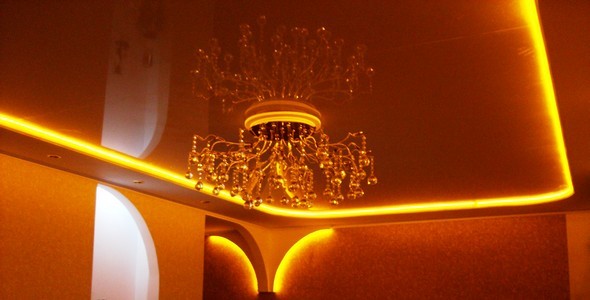
A particularly common misconception is that stretch ceiling with diode backlighting can only be matte, as bulbs are reflected in the glossy surface and the effect of hidden lighting disappears. In fact, this is not so, simply, the decision to install the backlight must be made before the ceiling is mounted.
Specialists will take this wish into account and install an inconspicuous reflective rim around the perimeter of the room, it is into it that the tape will be mounted, and the light, refracting from the walls, will be reflected in the ceiling in an even spectrum without visible points.
Suspended ceiling with LED lighting
![]()
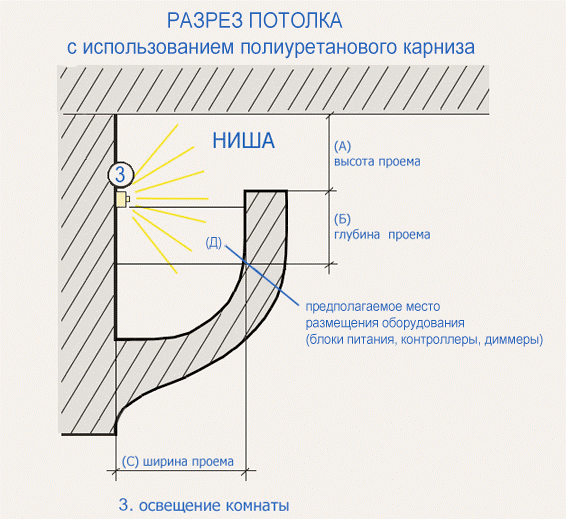
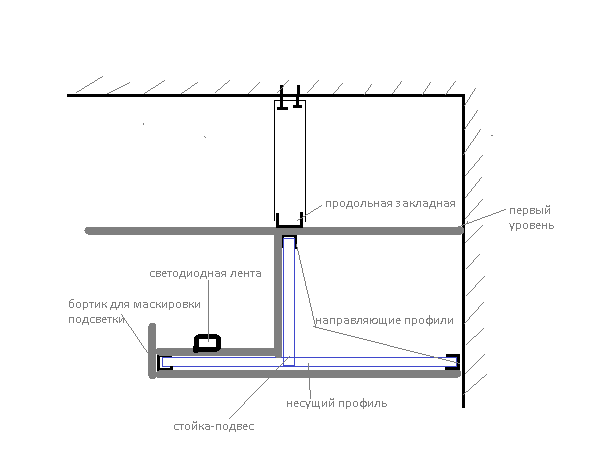
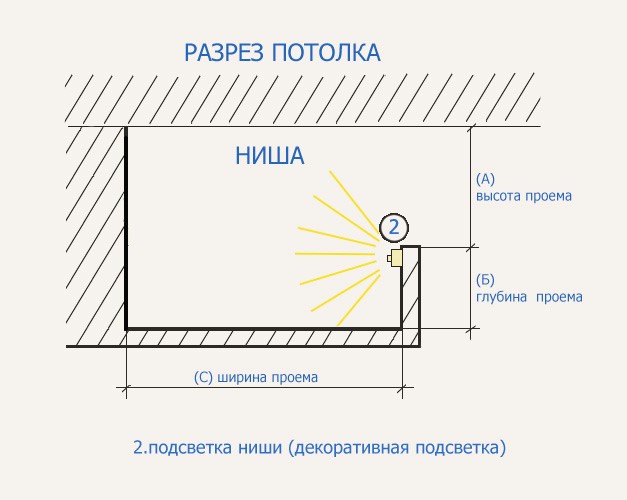
Plasterboard ceiling with LED lighting, should also have some design features. As a rule, the tape is mounted in a specially made niche, which can run both along the outer perimeter of the ceiling and along the inner one. It all depends on the design of the room and on what goals the backlight pursues, because, depending on the location of the tape, it can serve as the main source of light or simply emphasize the necessary local areas.

It is local zones that often become difficult when mounting LEDs on the ceiling. For a harmonious combination with other light sources in the room, you need to correctly calculate the power and brightness of the tape, and also bring it to a separate switch that will work independently of the main source.
To visually imagine how the process of manufacturing a structure for LEDs takes place, and how such a backlight will look like in the end, you can watch the video
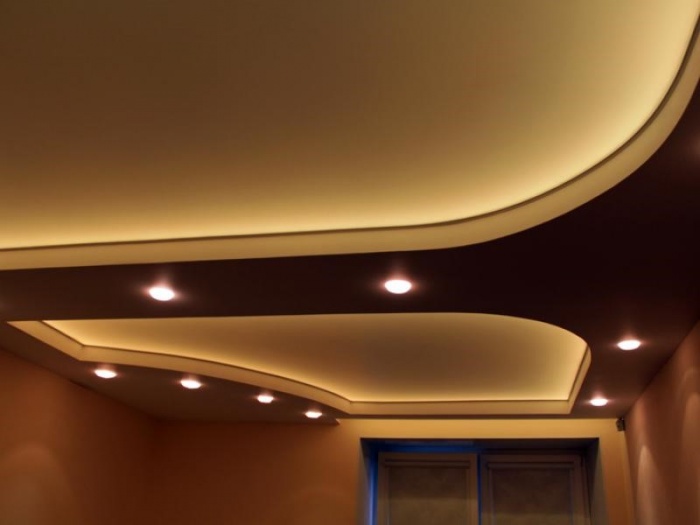
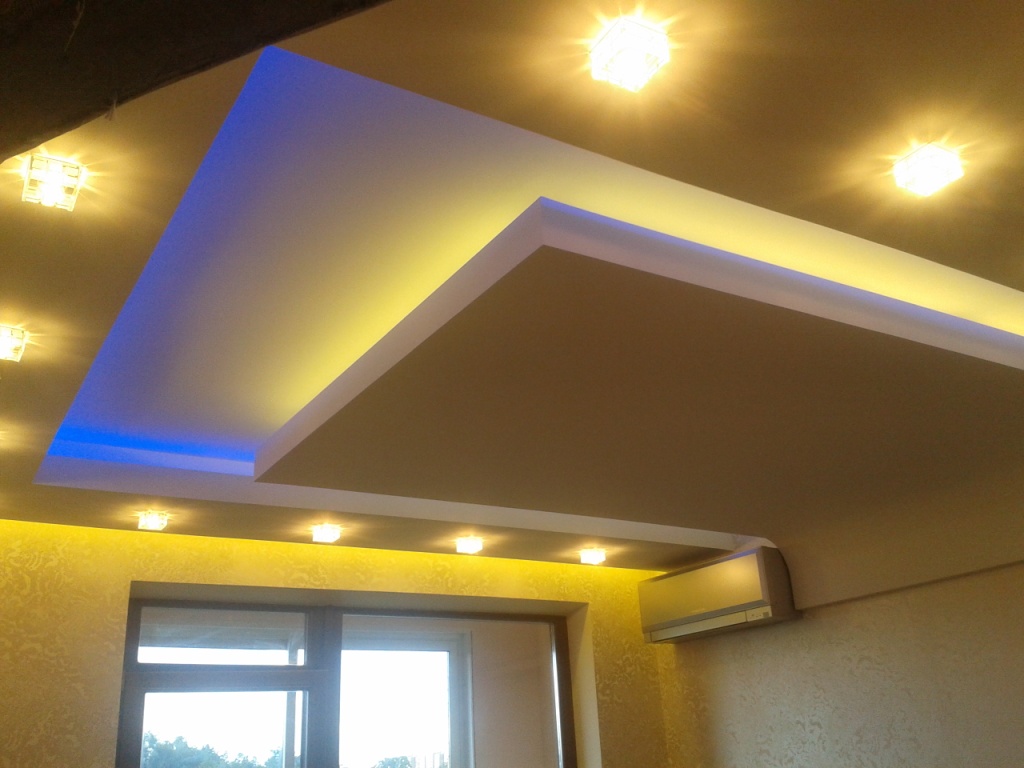
Combined ceiling of several levels
Complex ceiling structures most often use hidden lighting. Firstly, it is easier to organize special niches on them that will not be conspicuous, and secondly, two-level ceiling with LED backlighting can accentuate the brightest areas and leave less significant areas in the shadows. This applies not only to the ceiling itself, but also to everything that is under it.
The appearance of LED strips in the construction market has greatly expanded the possibilities for designers when developing new concepts. But experts who have been working with diodes for a long time know all their subtleties and what to look for when choosing. It is much more difficult for a person who has not previously encountered such work. Therefore, you need to take a closer look at the LED strip and figure out what to pay attention to in order to get competent and unobtrusive lighting in your home.
How to choose the right LED strip
Before proceeding to the choice, you need to figure out what an LED strip is and how different models differ from each other.
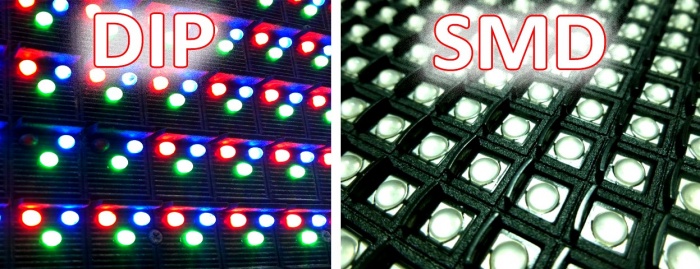
So, the tape is a flexible board with diode crystals, which may differ in the type of elements:
- DIP tape consists of convex light bulbs. Due to their rather large size, such tapes are most often used for street lighting or in rooms with a large area.
- SMD tape is small crystals connected in parallel. They create soft lighting and when used on the ceiling merge into a single luminous composition. It is SMD tapes that are used in hidden lighting, and it is about them that we will discuss further.
Marking
The marking of the LED strip consists of letters, in our case SMD, and four numbers that indicate the size of the crystals and, accordingly, the power of the strip itself.
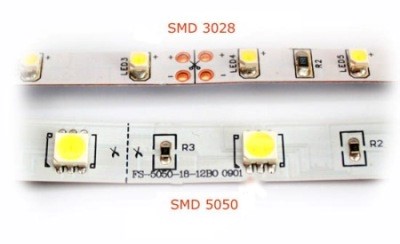
For example, the numbers in the 5050 marking mean that each crystal is 5.0 by 5.0 mm in size. In addition to size, the tape indicates the power of the glow of each individual diode, it is expressed in kelvins and can be from 2500 to 10000. The brightness of the glow is selected individually based on the characteristic features of the ceiling and its height, but as an example, you can imagine plasterboard ceiling with matte white paint, here it is calculated from 2000 k, per one meter of ceiling height.
Power Supply
LEDs operate on 12 or 24 volts, which means they need a transformer, which is selected separately for each type of backlight. That is, depending on the length of the tape and its brightness, the power of the power supply will also be calculated. In fact, there is nothing complicated here, the table below will help you navigate and understand how the indicators are calculated.
|
The size of an individual crystal. |
Power per meter of tape. To |
Required transformer power. Tue |
It is also necessary to take into account the power reserve, which is conditionally represented as 1.25.
For example, the height of our ceiling is 3 meters, which means we need 6000 k, and the crystal size was chosen 3528, according to the table it turns out that one linear meter of such a tape will have a power of 9.6 watts, but we need, for example, 5 meters of tape. So, we multiply 9.6 by 5 and multiply by the power margin of 1.25, it turns out that we need a transformer with a value of - 60.
As you can see, there is nothing complicated, the main thing is to save the table presented above and focus on it when choosing.
Moisture resistance
Another very important indicator, especially if you plan to illuminate the ceiling in a room with difficult conditions, such as a bathroom or kitchen.
According to moisture resistance, LED strips are divided into three categories:
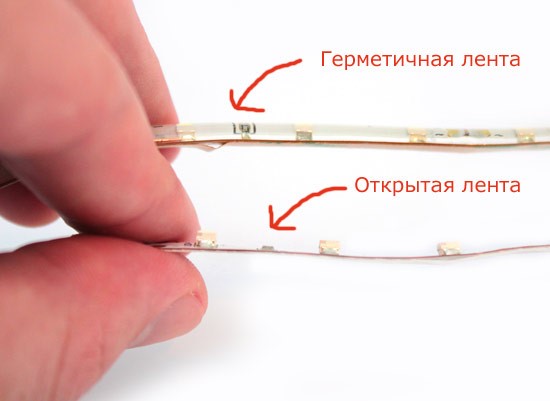
- IP68 is a completely silicone-embedded tape that is absolutely not afraid of moisture and can be used even under water.
- IP65 - LEDs are covered with silicone. Ideal for illuminating the ceiling in the bathroom.
- IP33 - tape without additional protection, and can only be used on ceilings in rooms where there is no high humidity.
Installation of LED strip on the ceiling
The LED strip has an adhesive base, so there will be no problems with its installation, but before that it is necessary to make all the connections.
First of all, you need to determine what the total length of the backlight will be. LED strips are sold in coils of five meters, so if the required length is longer, several segments are connected. Here you can not do without a soldering iron and at least elementary skills.
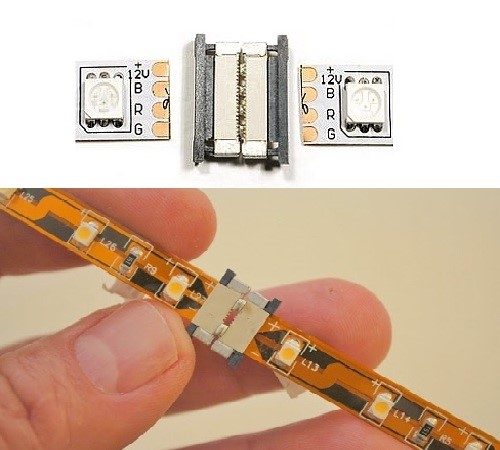
To connect two tapes, you need a "terminal", in which soldering is performed.
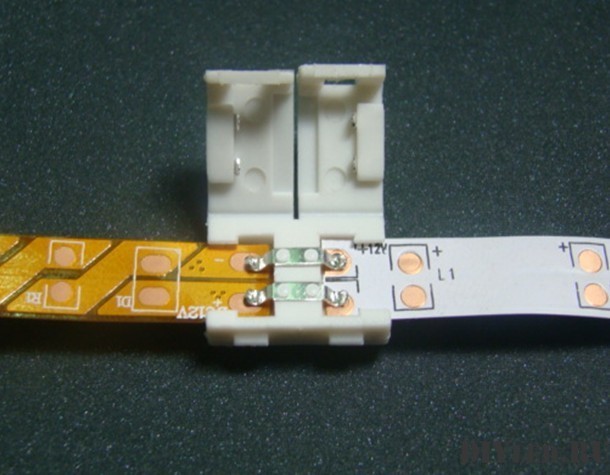
Important ! The power of the soldering iron should not be higher than 25 watts, as the LEDs are very sensitive to high temperatures, and in case of overheating, you will have to throw out a whole meter of tape.
When the tape is ready, I begin its installation on the ceiling, or rather in the prepared niche. First, you need to install the power supply, as a rule, they put it in a corner and mask the power wire into the wall or under some decorative elements. Next, the protective strip is removed and the tape is glued in the right place. The main thing is to remove the film in stages, that is, every half a meter. As soon as one section is pasted, it is removed further and the next one is glued.
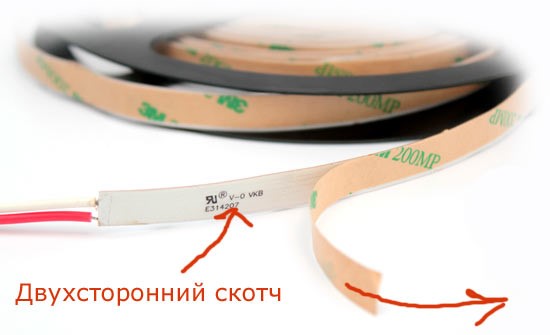
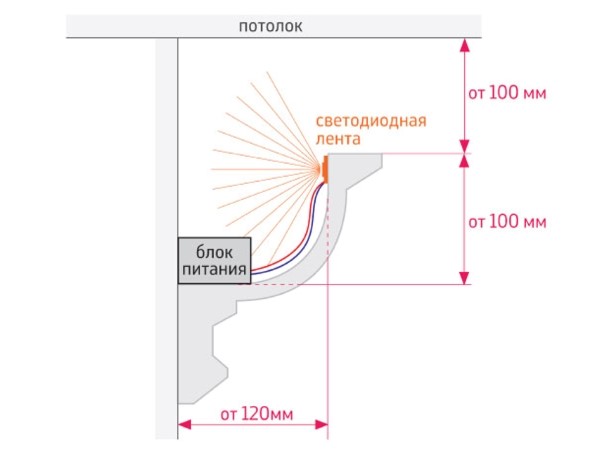
Some difficulty may arise with suspended ceilings where the LED strip needs to be glued to the drywall. The fact is that the adhesive on the tape does not work well on paper or painted surfaces, therefore, as a rule, a thin strip of plastic is placed at the place of gluing. It can also be a decorative corner or molding made of polyurethane, with which the glue interacts well.
Installation of lighting for the ceiling is ready, you can turn it on and enjoy the pleasant soft light of the diodes.
As you can see, there is nothing complicated in organizing ceiling lighting on your own, the main thing is to calculate and think everything over correctly. No need to rush to buy. An error in the calculations will lead to complete disappointment from the result. You will have to do everything again, and these are additional costs, both financial and physical.
How fast is technology progressing in modern world. Until recently, words made my soul feel good, but my wallet was empty. Now, at a time when all kinds of companies are represented on the Russian market and the competition is very high, they have become more accessible. Therefore, designers offer different solutions, including lighting the stretch ceiling with LED strip from the inside.
What are the types of lighting stretch ceilings
Depending on the height of the room and the ability to bite off 10 cm from the height of the room, you can make several highlights for them.
Some types of lighting that will provide good, but not sufficient lighting:
- LED strip around the perimeter;
- with a box of plasterboard around the perimeter with backlight;
- LED strip under the stretch ceiling - simple shapes;
- with lighting in accordance with the overall design.
When installing any of the structures, the question arises of changing the lighting, or rather the LED strips inside the ceiling.
But the manufacturers of the tapes themselves promise uninterrupted operation of their lighting equipment for ten years.
During this period, even something can happen to the ceiling, so installing LED strips under the entire installation is safe and long-lasting.
But if there are concerns about the durability of LED strips inside the ceiling, then it is possible to place them around the perimeter, hiding them in a drywall box or just below the stretch ceiling, covered with a special plinth.
LED strip in a stretch ceiling - beauty is inside
A stretch ceiling with LED strips inside is also chosen by young people in children's rooms.
The advantages of such lighting are much greater than the minuses:
- LED strips consume much less electricity than conventional fluorescent lamps;
- It's lighting ready for years serve without changing lamps;
- Allow you to create unimaginable and unforgettable interiors;
- Lighting can serve as a night light;
- Has the ability to set the intensity of the backlight;
- LED strips can be white or multi-colored.
The only disadvantages can be attributed to the fact that the same picture of the ceiling can get bored for such a long period.
Young people prefer to make unthinkable lights in their room or create light music for home discos and parties.
In the children's room, such lighting is indispensable. Many babies are afraid to go to bed without light, but turning on a dotted night light or leaving an overhead daylight is very expensive. LED strips under can be made in the form of a map or arrange the strips in the form of your favorite hero. The baby will sleep peacefully and energy savings will be visible already in the first month.
Stretch ceilings with perimeter lighting - installation options
Creating a calm mood gives soft lighting around the perimeter of the stretch ceiling. In the evening, you want to relax not only yourself, but also your eyes, for this reason, installing LED strips around the perimeter is the best lighting option. Such light does not bother, will never go out of fashion, ribbons are easy to change.
The principle of installation is to install LED strips on the wall, just below the ceiling itself. Whatever the structure is visible, it is covered with a special ceiling plinth. It can be done, the perimeter of which will be made of plasterboard and the tape will be hidden in it. In this case, you should not make a ceiling, since the entire ribbon will be reflected in gloss, as in a mirror. Such a picture will greatly spoil the interior and become the worst project in the house.
It is important to know that LEDs do not provide full lighting and a chandelier is also necessary in the room.
The option with lighting around the perimeter of the stretch ceiling is good for a living room or dining room. In the evening, when you want to relax and watch a video or TV, you can turn off the main light, leaving only the LEDs around the perimeter of the room. Such lighting is necessary, since oculists do not recommend watching TV without any light, and with full daylight, using a chandelier, your eyes do not rest.
In addition, the intensity of LED lighting can be reduced and create a comfortable environment for yourself.
Installation of LED strip under a stretch ceiling
Of course, not everyone will be able to install, but making an unforgettable light pattern is available to many. Since the ceiling is mounted, being fixed only to the guides along the perimeter of the room, the space between them, or rather the whole one, is a field for activity and a blank sheet of paper.
To make an exclusive light drawing, first of all, you need to draw the location of the tapes on the ceiling. Depending on the selected pattern and the color of the ceiling material itself, choose LED strips. These can be white or colored LEDs.
According to your own drawing, you need to measure the footage of the tape itself, add a little for unexpected changes or additions and purchase material, namely the LED strip itself, connectors for connecting individual parts of the tape, wires for connecting to the room's power system and a relay for changing color intensity.
How to attach the tape:
- Since the tape has an adhesive base, it can be easily attached to the ceiling, the only problem is that the ceiling must be fully prepared for this action. Namely, the surface must be degreased, primed, sanded and puttied.
- The adhesive layer adheres very well, and for this reason it is necessary to work slowly with great precision and care.
- You can cut the tape only in specially marked places, and connect it using special connectors. Strong bends also affect the life of the LEDs, creating a pattern, it is worth considering this fact.
- After full gluing and connection of all components located on the ceiling, it is necessary to connect the lighting to the general network. But do not think that the wires from the tape can simply be plugged into a common network or outlet. This is done through a special converter called a power supply.
- For tapes of different lengths, there are their own power supplies and their power must be calculated depending on the length of the tapes and their number. Depending on the energy consumption of the LED strip, which is written in the certificate, as well as in the instructions, which are issued even when buying one meter.
The power consumption is indicated per meter of length, so when installing it is necessary to multiply the length of the line by the power of one meter.
Installation of LED strip in a stretch ceiling (video)
After seeing the result, it is worth choosing the closest power supply to it. After studying the connection instructions and, finally, connecting the entire drawing to a common network, check the operation of the lighting. After complete assembly, mount the stretch ceiling and enjoy the results.


