
Few people decide to build a full-fledged bathroom in the country, most often they are limited to amenities in the yard. The main thing is not to drip on the head. But even from an ordinary rural toilet, you can make a comfortable restroom, if you build it not “by eye”, but according to a pre-designed project.
In fact, the drawing of a country toilet does not have to be done independently, you can use ready-made solutions. Decide on key features toilet, such as the materials used and the presence of a pit, and then choose the model of the toilet that you like.
A country toilet is not such a simple design as many novice builders tend to think. There are a number of features that are important to consider when developing a project and building drawings.
According to new sanitary standards, a country toilet with a sealed pit should not be located closer than 5 m from a residential building and 15 m from a well or well
Toilet rules:
- Consider the dimensions of the interior of the restroom. The minimum allowable area is 1 x 1 m. If you save money and make the booth smaller, it will be inconvenient to use it.
- There is also a height restriction. It is undesirable to build a toilet less than 2 m in height. To enter it, bent over, will get bored very soon.
- When constructing a shed roof, the back wall is designed slightly lower than the front. This is done to form a roof slope and rainwater runoff behind the building.
- If you do not plan to install electric lighting, make sure that daylight enters your toilet even when the door is closed. If you don't want to mess around with windows, cut at least a small hole in the top of the door.
- Country toilet - the building is poorly ventilated. To fix this, a ventilation pipe is run along the back wall.
- So that it is not stuffy in the country toilet in the summer, place it in a shady place.
- Another tip for choosing a construction site: avoid the proximity of a septic tank or cesspool to water intake sources, wells, wells. This is done for sanitary and hygienic reasons.
With or without a pit - choose the type of project
To design a drawing, you need to decide on the type of toilet. It can be a toilet with or without a cesspool. In addition, a cesspool can be used for the benefit of the economy and produce compost in it. A building with a sealed container instead of a cesspool would be appropriate in a site where groundwater is too close to the surface of the earth.
Classic country toilet with a cesspool
The most common and familiar design of a simple toilet for a summer residence is a model with a cesspool. The principle of this design is elementary: all wastes fall into deep hole, which is located directly under the toilet booth. If the cesspool is full, a sewer is called, which pumps out all the sewage, and the toilet can be used further.

This scheme of a country toilet is time-tested. Its main advantage is that the pit does not need to be serviced for quite a long time. If the toilet is used only during the summer season, you may not even need to call a sewer at all
Since the shower in the country is as necessary as the restroom, some are trying to combine these two projects into one. If you build an outdoor shower in one part of the site, and a toilet house in the other, you will have to work pretty hard with a shovel, because a pit is needed in both cases.
By combining convenience, you can significantly reduce the labor costs for earthworks and the amount of materials needed.
Powder closet or country toilet without a pit
An easy way to make a drawing of a toilet for a summer cottage is to design it according to the powder closet principle. This type of toilet does not imply the presence of a cesspool; all waste enters the tank directly under the toilet seat. It can be a plastic or metal tank or bucket.
Since the main problem of such toilets is an unpleasant smell, sewage is sprinkled (powdered) with absorbent substances that protect the restroom from the appearance of a specific "ambre".

In toilets of this type, there are always two containers: for collecting waste and for storing powder. Containers need to be cleaned regularly
Wood ash, peat, sawdust, sand are used as an adsorbent. By and large, powder closet with peat is a home-made variation of ready-made dry closets of industrial production, which use the same peat as a filler.
Outhouse for the benefit of business - we produce fertilizers
Another option, ideal for a summer cottage, is a toilet that produces compost. As you know, compost is an excellent organic fertilizer for plants. Natural fertilizer will never be superfluous, and special technology allows you to produce it at an accelerated pace from virtually nothing.

In order for the compost to be saturated with oxygen, it must be loosened regularly. For this, a special lever for manual mixing is provided.
The toilet is equipped with a compost pit. It is better if there are two of them, so it will be possible to use each of them in turn while the compost matures. The pits are designed in such a way that you can easily extract the finished fertilizer. Such additional functionality will appeal to those who are worried about the environment.
What we will work with - the choice of building materials
When the decision on the type of toilet construction has been made, the material to be used in the construction must be selected. The choice of building material matters even at the stage of drawing development. Most often used:
- wood;
- brick;
- metal.
These are the usual materials for a summer resident, which almost everyone knows how to handle.
Simple wooden toilet - fast and reliable
When it comes to cottage construction, first of all, all kinds of buildings made of wood are presented. Boards and timber from inexpensive, but strong enough and durable coniferous woods are easy to get, and complex equipment is not required for work. In extreme cases, you can work with wood even without the use of power tools.

Depending on how you decorate your toilet, completely different latrines can be built from one drawing. One of the options is wall decor with a block house or clapboard
If you want to make the toilet not only practical and functional, but also a full-fledged decorative element in your country house, try building it from a log house. It will take much longer to tinker, but the result is worth it.
A country toilet is not the most favorable environment. The tree can rot and collapse if it is not treated with special means. Impregnation with an antiseptic is a prerequisite for the construction of a lumber latrine.
Capital option - brick toilet
The advantages of brick buildings over wooden ones are known to everyone from the fairy tale about the three little pigs. In addition to strength, a brick toilet has a low thermal conductivity, which is important if you go to the country in the cold season. A brick country toilet looks like a house with a single or gable roof. Windows can be designed.

It is not necessary to use an ordinary brick. More modern block materials such as foam concrete, cinder block, aerated concrete will be an excellent alternative
The project of such a toilet includes not only a drawing of the above-ground part of the toilet, but also the foundation. In this case, it will not be possible to do without a foundation, since the own weight of a brick building is quite large. Without support, the soil will soon compact and sag, which will cause cracks in the walls of the toilet.
An amateur option - a metal toilet
Metal is a material with a high coefficient of thermal conductivity. In a toilet made of metal sheets, it will be unbearably hot in summer and very cold in winter. Without the use of heat-insulating materials, an iron toilet in a country house can only be a temporary project - until the main toilet is built.

Most often, corrugated sheets sewn onto a metal profile frame are used. In this embodiment, a profiled metal sheet is used. Roof made of polycarbonate on a metal frame
To achieve the tightness of the joints of such a thin and flexible material difficult. There will be cracks in the corners through which the house will blow the wind, which also does not add comfort.
If apply modern technologies and use as wall materials sandwich panels, you can get a completely comfortable restroom. Styrofoam or mineral wool is installed as a heater.
Ready-made drawings of a country toilet made of wood
When you have decided on the material for the above-ground part of the toilet house, you need to develop drawings to find out how much material is needed. It is important to detail all the elements so as not to miss anything important. In order not to reinvent the wheel, you can find a ready-made drawing. The most commonly used models of houses for the restroom:
- hut;
- teremok;
- birdhouse.
The scheme for building a wooden toilet in the country is selected based on practical considerations.
Hut: diagram with dimensions and description
The country hut toilet is a compact and economical project. All structural elements have a simple geometric shape, which speeds up the construction process and simplifies the drawing.

Buildings may differ in size, materials used, design complexity and design solution, but general principle design remains unchanged
Start with the facade and back wall of the restroom. They make a frame in the shape of a triangle with several stiffening ribs in height. The length of the transverse beam is 150 cm, the width of the vertical posts is 15 cm, the step between the intermediate posts is 30-40 cm. The height of the corner posts is 177 cm, the intermediate posts are 287 cm.

The rear wall is shown on the left, the front wall is shown on the right, with an opening for the door. The same elements are depicted in the corners in a spatial form.
The drawing of the front wall is different in that the vertical racks are located at a greater distance from each other. This is due to the need to install front door. The distance between the posts will depend on the design of the door. Usually, an opening 70 cm wide is suitable. At the top of the opening, a ceiling is installed at a height of 2 m 15 cm. The remaining geometric dimensions of the frame itself coincide with the dimensions in the rear wall drawing.

A drawing of the frame of a country toilet of the "hut" type. From a rectangular beam or from a cut board of sufficient thickness, it is possible to construct a sufficiently strong one-piece structure.
The walls are connected by longitudinal beams, each 122 cm long. Another transverse beam 150 cm long is placed in the middle. The project of the main supporting structure is ready.
Proceed to the device of the pedestal. Its height is chosen in accordance with the wishes of the summer resident. The average size, suitable in most cases, is 50 cm. Install 2 half-meter vertical posts at the level of the vertical intermediate posts of the rear wall. Connect the vertical elements with crossbars. Their size is also 50 cm.

Here is such a neat house-toilet if you stick to this project. Above the door there is a hole for ventilation.
These sizes are suitable for the toilet medium size. It is worth noting that the useful height of the interior is 2.15 m. In this case, the total height of the building will be 3.5 m. This is due to the fact that the roof slopes are connected at a very sharp angle. At a height of 2.15 m, the ceiling is sewn up, so it will be warmer and more comfortable in the restroom.
Toilet-birdhouse: finished drawing with a cut table
A more complex architectural form is a country birdhouse toilet. This option is the most common. The drawings show that the side walls are in the form of rectangular trapezoids, and the back and front parts are rectangles.

Unlike the "hut", such a restroom is much more comfortable and spacious. More material will be required than for the previous option
So that the tree does not get wet and does not deteriorate from constant contact with the ground, it is recommended to make the toilet a little elevated.
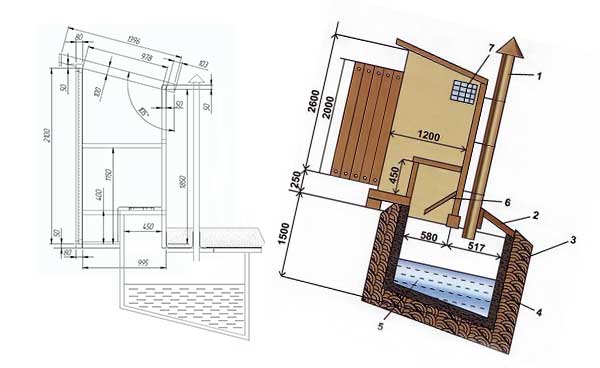
Special skids are installed for the base, about 12-15 cm high. The drawing shows that the back wall is shorter than the front. At the back, the height of the latrine is 2.08 m, and at the front - 2.78 m. Thus, with a building length of 1.72 m, the roof slope will be about 22 degrees. The width of the "birdhouse" built according to this drawing will be 1.45 m.

Design solution with insulation:

The drawing also takes into account the possibility of additional insulation of the roof with foam. In this case, another tier of rafters is designed 20 cm below the main
Each wall is designed and manufactured separately, and then they are connected together to form a spatial model of the restroom. Each of the walls is shown in detail on separate sheets of the drawing. A very important nuance - the author provided a plan for cutting boards. This addition greatly simplifies construction.
![]()
On the drawing of the facade there is a project of the front door in two versions: when finishing the toilet with siding or a block house
Particular attention to the dimensions of individual elements:

Some of the boards are sawn with an allowance of 50 mm, the rest - with an allowance of 100 mm. Bevel 15 degrees, the edge board is adjusted already in place
Opposite wall without window:

The left wall is designed similarly to the right, but it does not have a window, so the drawing becomes even simpler and clearer.
In addition to the walls, you need to take care of the overlap. In this case, only one overlap is used - at the bottom of the toilet. The drawing shows the frame of this element and the table for cutting boards. In addition, a cutting plan for a standard OSB sheet is provided, with which the floor can be sewn.

The timber treated with an antiseptic is collected with nails or studs. In the latter case, you need to pre-drill holes for fasteners
You need to think about insulation:

The bottom floor is also insulated with foam sheets. The author of the project proposes to lay 2 layers of expanded polystyrene, 50 cm thick, and then sew up the heat-insulating layer with OSB sheet

Building a toilet out of wood involves a certain percentage of error in size. To achieve an accurate connection of the rafters with the support beams, the cuts in them are made already in place.
The table of materials helps to make an estimate.

The table of materials includes even such trifles as door hinges or plugs. It shows that for glazing you need to purchase a window block 600 x 600 mm
The table of materials shows that the country toilet according to the project will be finished with siding on the outside. Roof covering is at the discretion of the customer. Often used slate or corrugated board, as well as roofing material or tiles.
Designing a brick toilet with drawings
The foundation for a brick toilet can be a reinforced concrete curb recessed into the ground, or concrete blocks located at the corners of the structure. A standard small cabin with a wall area within 8 squares will require about 300 bricks to build. The calculation is approximate and very exaggerated, but this information is enough for a general understanding of the process.

The sequence of actions when laying the bonder and spoon rows brickwork. The walls of the toilet must be strong, because the building will be used for more than one year
For such a volume of masonry, it is necessary to design about 60 kg of cement for the preparation of the mortar. The dimensions of a brick country toilet can be taken from the drawing of the birdhouse toilet. If the wooden walls are made separately, then the country brick toilet is laid out in order around the entire perimeter.
Cement mortar takes time to cure. If you lay out all the rows of masonry at a time, the lower ones will have a large load, under the influence of which the unset mortar will simply squeeze out of all the seams. To prevent this from happening, laying is carried out in several stages. Optimally - 4-5 rows per day. Construction will be delayed, but the result will be much better.
The openings must be displayed on the drawing in advance so that during the masonry process they are not distracted by unnecessary calculations and fitting
The roof can be shed, as in the case of a wooden country birdhouse-latrine, or gable. Depending on this, the layout of the rafter mesh changes. The toilet is covered with the same slate, corrugated board or other coating materials.
Video for clarity: how to draw a drawing of a toilet
How to make a project of a wooden country toilet in SketchUp:
The development of a project and drawings of a country toilet is not an easy task, despite the modest size of the building. Follow the instructions above, and building a country toilet of any complexity will seem easier than a steamed turnip. The main thing is to approach work with responsibility and a share of healthy enthusiasm.
What design can be called the main one in the country? The house itself? On the one hand, yes, but there is a design without which comfortable living in the country is simply impossible. What is this about? You probably already guessed that this is a toilet. And if it is simply not on your site, then now is the time to think about how to build it. In fact, there is nothing complicated in this work, since the toilet itself consists of a pit, a foundation and a structure from above. You just need to decide what exactly this design will be. There are different variations of the building. We will consider the most popular of them, and also focus on building a toilet in the country with our own hands.
In this article, you will see drawings, as well as instructions for creating a fairly simple design. This will help you realize such an idea in your country house. You will also learn the advantages of building a hut-type structure.
Options for building a toilet in the country
In order for you to have an overall picture of the toilets for summer cottages, we recommend that you familiarize yourself with the designs that you can create with your own hands. There are many construction methods, they entirely depend on the construction itself. Here is a list of the most popular toilet options for summer cottages:
- Powder closet.
- Classic pit toilet.
- Dry closet and chemical toilet.
- Backlash closet.
What is each of them? The simplest and most common is the simple pit toilet. It is ideal for cottages, as the device will require a little money, material and the design itself is simple. It is only necessary to dig a cesspool, strengthen it and build a superstructure. An example of such a toilet is visible in the photo.

As for backlash closets, they have an airtight pit where waste gets into. The tank itself can be different, differ in design and size, and is located away from the structure. Disposal of waste from it is quite simple, as with a cesspool. You need to hire a sewer machine that pumps everything from the inside. An alternative is to do it yourself. In the photo you will see this type of construction.

Powder closet is a kind of container that is located directly under the saddle. No cesspool is needed, and the tank itself is quite small. It also needs to be cleaned as it fills up. A feature is that after use, additional means of disposal are applied. We are talking about powdering sewage with peat. This option for giving can be called one of the cheapest, only the cleansing process itself causes trouble. Powder closet in the photo.

Ideal in terms of cleanliness, convenience and creation is a chemical or dry closet. All that is required is to buy it and install it in its place. The advantage of such structures is that it does not need to be cleaned. And no bad smell comes out. The thing is that waste is broken down by special bacteria. The only downside is the price. But, if you can afford it, then it is better to stop at this option.

But what if you have a limited budget and you can not afford such "benefits of civilization"? You can create a toilet with your own hands. Ideal in this regard is a toilet with a cesspool. As for the superstructure, the toilet hut looks pretty good. Why is he so good? Let's find out.
Why the toilet hut
To begin with, we want to explain why we are considering a country toilet such as a hut. The thing is that such an unusual design has some advantages over its traditional "competitors". Let's see the positives:


As you can see, we counted as many as 7 advantages that the hut toilet has. They are talking in the direction of really doing the construction of just such a structure. However, it was not without its downsides. Almost half of them
- it's all about appearance. Although it is original, it is not always practical. The design may be radically different from other buildings on the site, not fitting into the landscape;
- since the shape is triangular, the usable space is lost with height;
- if you do not have materials of the required length (which is rather rather big), then it will be more difficult to build a toilet in the country.
You have all the data to compare all the pros and cons. This will help you decide whether to build such toilets on the site. If yes, then let's consider a drawing of a hut-type country toilet and the technology for its creation.
Selection of a place for the construction of a toilet hut
The construction of any building begins with the choice of a suitable place. For the toilet, this is even more important. No wonder there are different norms and rules, the observance of which is not just a formality, but a guarantee of your comfortable stay. One of the main rules is to create conditions in which the contact of waste with groundwater will be minimal.

But, these are not all the requirements that require your attention. let's consider full list criteria so that your structure is erected correctly in all respects:
- If there is a water area nearby (river, lake, well), then the distance allowed for the construction of a toilet is at least 30 m. In the event that the location of the reservoir is lower than the future place for the toilet, it is recommended to change the location or build below the water source .
- If there is a basement, cellar or other similar structures on the site, a distance of 15 m must be maintained.
- As for residential buildings, the optimal distance is considered to be a footage of 8 m.
- If you have pets in the country, then you need to retreat from their “settlements” from 5 m.
- Garden, flower beds, beds and other plantings, which can often be found on suburban area, also do not like such a neighborhood. The minimum distance of the toilet from them is 1 m.
- And finally, consider the direction of the wind in your area. This is important so that you do not cause discomfort to your neighbors and do not listen to complaints from them. It is not recommended to build a toilet hut close to the fence.

Note! Before starting the construction of the toilet, it is important to find out the location of the groundwater. It is allowed to build a building if the water level is 2.5 m underground or more. Otherwise, you will have to replace the cesspool with a septic tank, backlash closet or powder closet.
If these rules and recommendations are taken into account, then in ecological terms, the constructed structure will not affect the external environment in any way. Everyone will be happy - and you, and plants, and neighbors, and even pets. Did you find the right place? Then we begin the construction of the toilet hut.
Stage 1 - we make a cesspool and the foundation of a hut toilet
The basis of the "cabinet for reflection" is a cesspool. It is she who will take the main “blow”. The frequency of cleaning also depends on its size. Cleaning is recommended not to fill the pit to the brim, but when the amount of sewage in the toilet has reached 70%.
In fact, such work can not be called difficult. It is labor intensive and takes some time. You can do it yourself using a shovel, or you can hire heavy equipment. But, for a small country house your own efforts will suffice. The recommended dimensions of the pit are 2x2x2 m. Make a markup on the territory and start digging the ground. Use a tape measure and a plumb line, control the size and evenness of the pit.

When the pit is ready, it is better to strengthen its walls. They will become our foundation, on which the ground hut will rely. Strengthening occurs due to boards, concrete rings or bricks. Boards before work must be impregnated with an antiseptic.

Advice! When arranging the bottom, you can make it at an angle to the back of the structure. Then the contents will fall towards the hatch, designed to clean the pit. Do not forget that you need to make a hole for the toilet, ventilation and waste pumping.
Stage 2 - toilet add-on
From land works, we smoothly move on to the process of building the frame itself. Country toilet hut drawings dimensions will be provided. After all, half of all success depends on them. The superstructure itself can be of several types: a hut, a hut, a birdhouse or a house. In our case, this is the first option. In the photo you can see exactly how such a design is made.

Thanks to the drawings, you will not make mistakes. Next, take care of the availability of suitable material. The raw material for the construction will be wood, namely boards. They are easy to work with and practical. In working with him you can not do without:
- saws;
- planer;
- tape measure and pencil;
- nails and a hammer (an alternative is self-tapping screws and a screwdriver).

Here step-by-step instruction creating a frame from above:

And to protect your wooden fortress, the finished structure must be treated with an antiseptic. You can even buy a special wood paint for outdoor use and make the toilet hut even prettier.
That's all. Construction completed. The structure is ready for operation. You can be the first to use it in action. Watch a video on how to create a design with your own hands.
Conclusion
The first step is to dig a cesspool. With it, the foundation for the country toilet is also being built. To do this, you need to dig holes on the sides of the pit and fill them with a layer of sand 10 cm thick. After that, you need to install concrete blocks there, if they are not there, then you can use the sidewalk curb, as an analogue. The holes must be at least 1 meter apart, and be at an equal distance, forming a clear square. Two layers of roofing material are laid out on each of the blocks. On this, the foundation for the toilet in the country house with your own hands can be considered ready.
The floor frame is made of edged boards, and the floor itself is made of floorboards that are laid on the frame. When the design is ready, it should be painted over with an antiseptic. The flooring is placed on the roofing material.
The back and front walls of the structure are knocked together separately.
Many installation operations are carried out on site, so you should stock up on a flat area or clear an area on the ground.
After creating the walls, they need to be sheathed with clapboard inside. After that, they need to be placed exactly on the floor and secured with technological boards. After that, a crate board is sewn, which after that also needs to be sheathed with glassine.

The roof is knocked together from wide boards, about 1 meter long, 1.7-1.8 meters long. The manufactured product is mounted directly on the front and rear walls of the structure. After installation, the roof must be covered with galvanized corrugated sheet, which are attached to it with self-tapping screws. After these operations, a skate is installed, which is also fastened with self-tapping screws. Hinges, a hook or bolt, a handle, a turntable and other important elements are attached to the door block. The opening itself is made using a platband. In the floor you need to make a hole located above the cesspool.
The project of a country toilet, quite simple and traditional for most people, provides for a cesspool and a small one installed above it. wooden house. Of course, there are many options for building a country toilet, each of which has its own advantages:
- Peat toilet. Peat or sawdust acts as a heater, thanks to which waste is converted into fertilizer. Dry, clean and eco-friendly.
- Compost toilet. An option, due to its monumentality, more suitable for country house than cottages.
 Compost toilet for a summer residence
 - Dry closet. Compact and lightweight version manufactured by many manufacturers. They have containers for water and waste. A good replacement for a home toilet. Due to the use of chemicals, composting is not possible as the end result is chemical waste.
The traditional wooden country toilet is a free-standing building with a cesspool underneath. it is laid out from well rings or bricks, in some cases automobile tires or a plastic barrel without a bottom are used.
 Ordinary wooden toilet
 Construction of a country toilet
Despite the fact that not much time and effort is needed to build a toilet, all work must be carried out in full accordance with the required technology. Before starting construction, you should carefully consider the design of the structure, create a sketch, estimate future costs and choose the most convenient place for its installation.
The dimensions of a country toilet are usually as follows: the height of the back wall is 1.9 m, the front wall is 2.1 m, the length is 1.3 m, the width is 1.1 m.
 Drawing of a country toilet with dimensions
 The standard project of a country toilet provides for the presence of a septic tank (pit), sheathing, frame, seat with a hole, window, door, floor, interior decoration and roofs.
 Scheme of the simplest country toilet
 The construction of a toilet for a summer residence can be conditionally divided into several stages:
- Construction of a septic tank.
- Creation of a framework from a bar.
- Sheathing the frame with boards with further flooring.
- Cutting a hole in the seat.
- Preparing the base for installing the cabin in the pit.
- Cabin installation.
- Roof arrangement.
- Door installation.
- Carrying out exterior and interior decoration.
Read also
Children's sandboxes for giving
Once you have decided on the place where the country toilet will be installed, you can begin to equip the cesspool. In this case, many summer residents use the following method: when a pre-dug hole for a country toilet is filled, a new one is dug out, after which the toilet is transferred to a new place. The filled pit must be thoroughly disinfected and buried.
 Construction of a pit for a country toilet
 The issue of arranging a septic tank can be approached even more seriously if you dig a hole 1.5 meters deep and arrange drainage from crushed stone with a thickness of 15-20 cm at its bottom. In this situation, it is desirable to use special reagents for dry closets, which contribute to the splitting of solid masses, due to which the liquid goes into the ground through the drainage.
After the arrangement of the pit is completed, the manufacture of the frame can begin. For such purposes, as a rule, timber 100x100 is used. Here you will need an exact scheme of the country toilet and the building level. The frame is the basis of the toilet, so its choice should be approached very carefully.
 Toilet frame for garden plot
 The roof beams and the seat must be mounted during the assembly of the frame itself.


