
In the design of any interior important point is the correct placement of accents. This ratio is achieved by using various items and accessories. But to place them you have to use various elements furniture, fasteners, especially when it comes to walls. One of best solutions in this case, there are wooden shelves, which even an inexperienced home craftsman is quite capable of making. About what they are, how they are combined with the interior, what is necessary to create a holistic composition will be discussed further.
Types of shelves
From the point of view of the furniture industry, technology in general, shelves are a product that is designed to accommodate, store items and interior accessories. Most often it does not have front, and sometimes rear, side wooden walls. It is made from a variety of materials, including scrap materials. But since the subject of the article covers traditional wooden shelves on the wall, we will consider their classification in terms of form, method of fastening:
According to the method of fastening, all such wooden products can be divided into two large groups:
- Wall . As the name suggests, the shelves are attached directly to the surface of the wall or to the ceiling using special elements and fittings. All three classes mentioned earlier may belong to this group;
- Floor. Such wooden furniture elements usually have fitting legs. Installed on the floor close to the wall. This category includes only classic or corner shelves due to their design features.
In addition, if elements that restrict free access to contents are used in the manufacture of wooden compositions, then all shelves can be divided into open and closed. In the latter case, for example, glass or polymer doors for shelves can be used.
Possible mounting options
Whether floor standing or classic wall shelf, you can install and fix it in place in different ways:
In general, if we analyze these options, they can be divided into open and hidden. The choice in favor of one or another is argued by the interior design of the room.
Required Tools
Making wooden shelves with your own hands is not as difficult as it might seem at first glance. You should not treat this event as a simple scratching of the back of the head. A little ingenuity is needed here, but without tools, it will not help to materialize ideas. To create shelves most often come in handy:
- Hardware. Depending on how complex the wooden structures will be, you may need self-tapping screws, screws, nails and, of course, dowels for wall mounting;
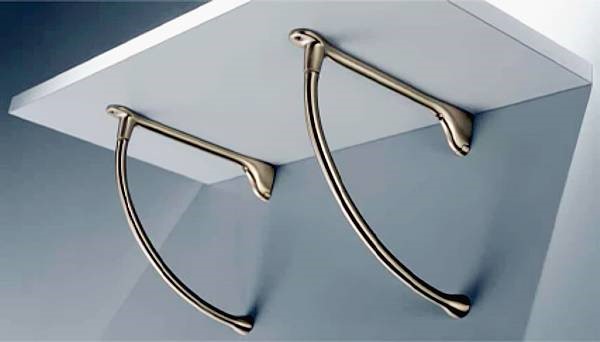
- Accessories. In fact, this is nothing more than fasteners, due to which the shelves will be hung on the wall or installed on the floor (hinges, brackets, shelf holders, cables, racks);
- Consumable. These are wooden boards - the main part of any shelf;
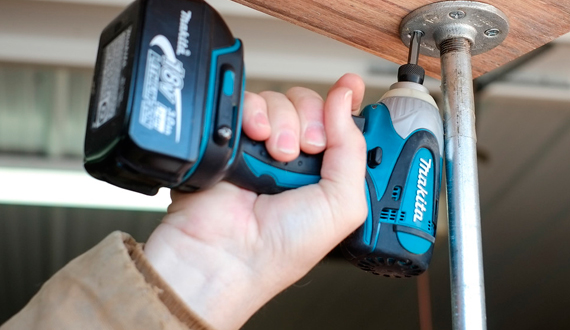
- Tool for working with hardware. Here you can use a manual (screwdrivers), an automated tool (drills, screwdrivers), to which you will have to pick up drills, heads (bits) for wooden surfaces in the kit;
- Cutting tool. Here, again, you can use manual (saws, hacksaws, abrasives) and battery options (jigsaws, milling cutters, grinders);
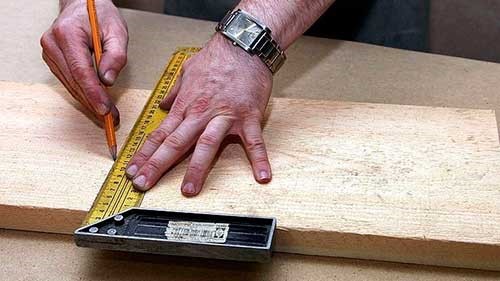
- Measuring and auxiliary tool. The rule “measure twice, cut once” applies here in full. For this, tape measures, rulers, squares, levels, clamps, construction pencils are most often used.

When the tools and materials are collected, it's time to start the process of making shelves.
Preparation for work
it First stage, which includes the selection and primary processing of wooden blanks for shelves. Selected boards, usually pine or spruce, should be as perfectly level as possible. They should be free of cracks, voids, knotty, focal mold lesions and other defects that may affect the integrity of the future shelf.
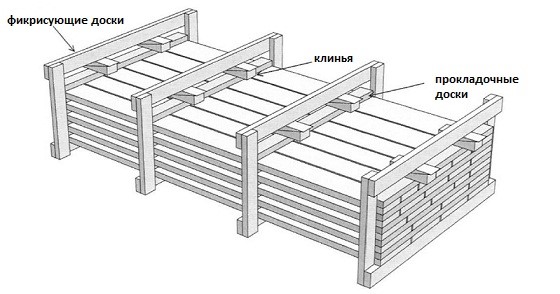
Humidity should also be kept to a minimum. Otherwise, the board will continue to dry out already in the finished structure, which will affect the shape, structure, strength. The drying process is more efficient if wooden blanks are stacked with intermediate layers.
Boards for shelves that are selected for work are pre-sanded. It is carried out in stages, using different abrasives. As a rule, the initial processing occurs with sandpaper No. 40. If the roughness is insufficient, smaller sizes No. 80 ... 120 are used.
Important ! This operation simultaneously allows you to determine the degree of moisture content of the board: the faster the sandpaper clogs, the higher the water content in the wood.
If small and medium defects are found during the sanding process, they can be repaired with a special putty for wooden surfaces.
Markup and processing
Polished blanks for shelves are marked with measuring tool. Initially, dimensional parts are cut in accordance with the drawings. It is best to use electric jigsaws for this purpose, since the cut surface is even and smooth.
After that, the marking and processing of places for future fasteners takes place. To do this, you will need to use a drill or screwdriver with the appropriate set of drills. You may have to use a milling cutter or a specific cutting tool for this, but it all depends on what method of fastening, the type of the shelf composition itself.
The choice of dimensions is determined by the functions of the shelf and the dimensions of the items and accessories placed on it. The thickness of each board is selected taking into account the expected load. For example, a wooden shoe rack is one of the most popular furniture items in the hallway of any house or apartment. Usually this is a multi-tiered structure, the dimensions of which are selected according to the following principle:
- Depth - taking into account the maximum length of the shoes that will stand on the shelf, and the allowance (on average from 25 to 30 cm);
- Height - in this case, it means the vertical distance between adjacent shelves, which, taking into account the allowance, should reflect the height of the shoes used (usually about 20 ... 25 cm);
- Width - the size of the board is determined taking into account the free placement of several pairs of shoes next to each other, or rather, the width of a single pair. Usually the size of the shelf is tied to the standard furniture (600, 800, 1000, etc.).

After all wooden parts are cut to size, and their geometry is brought to the appropriate drawings or designer's idea, the shelves should be treated with protective and coloring compounds.
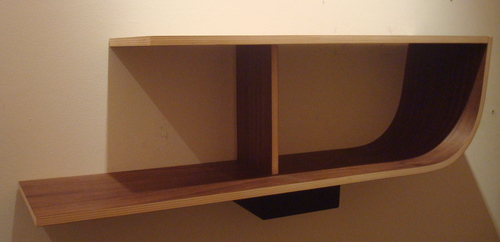
Assembly features on a kitchen example
As in the previous sections, it must be noted that the process of assembling finished products depends on what design, fastening is chosen and what is the purpose of the shelf in general. Based on the operating conditions, wooden kitchen shelves are usually used to place various utensils and containers with products, usually bulk products, on them. In the example, consider a simple L-shaped shelf, which will simultaneously serve as a stand for cans and a "hanger" for mugs.
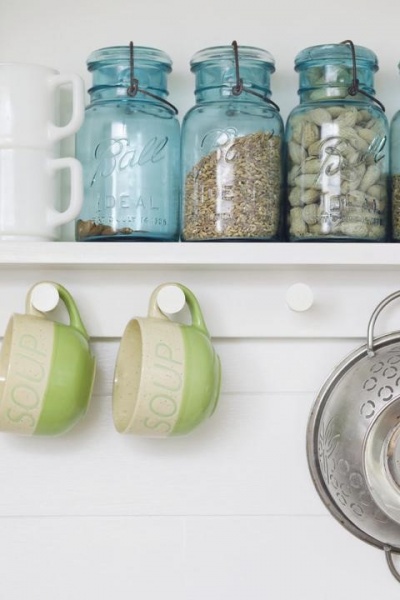
It is obvious that the whole structure consists of two wooden boards: jars with products will be placed on the horizontal one, and loops for hanging mugs and mounting holes will be provided on the vertical one. Dimensions are selected in the first case, taking into account the diameter of the cans and their total weight, and in the second, based on the size of the mugs' eyes.

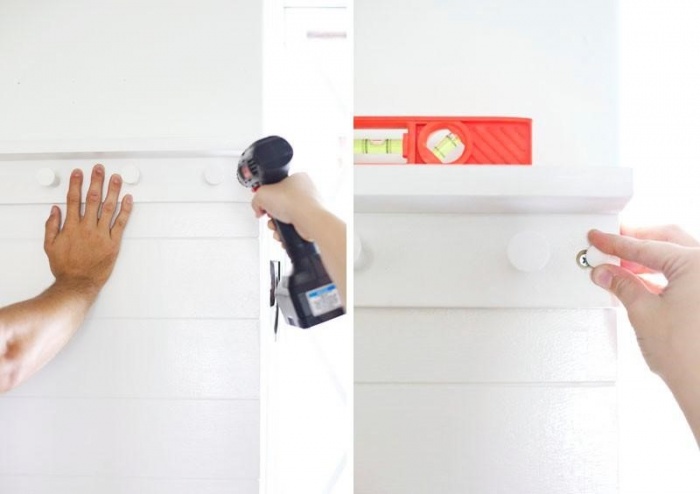
After cutting to size, holes are drilled in the vertical plank for pegs and for connection to a horizontal shelf (you will have to use a special corner jig). After that, both boards are interconnected with screws.
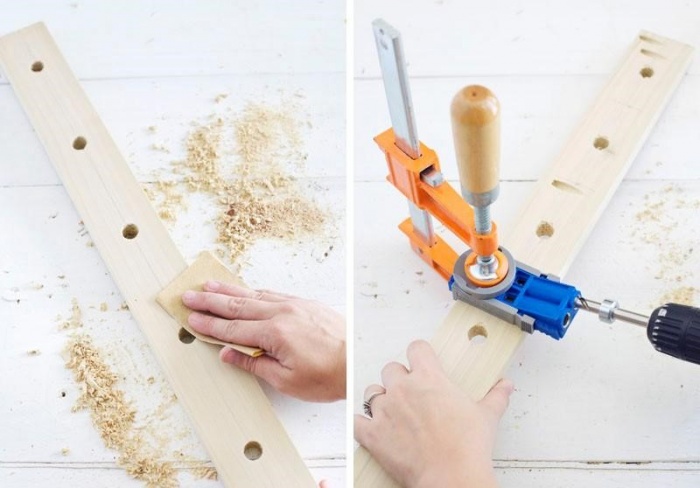
Prepared wooden pegs are hammered into the holes. Glue (PVA) is preliminarily applied inside. With it, decorative circular limiters are attached. They can be screwed on with screws, but in this case you will have to use a decorative cap.
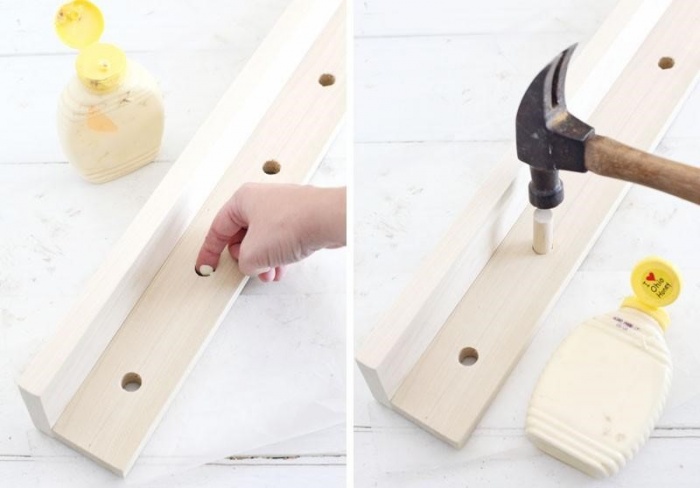
The finished shelf is varnished or enameled and, after drying, screwed to the wall with dowels. In this case, its horizontal position is necessarily controlled.
A wooden shelf for a fireplace is also made in a similar way, but its role is more decorative - ennoblement of the upper part of the stove.
In this article, I would like to talk in detail about how to properly assemble this design and in what ways it can be done at all. But, first of all, you should understand whether it is possible to use plywood sheets to assemble shelves. How expedient is the use of plywood in the manufacture of shelves?
In its meaning, the material is veneer layers pressed together. Initially, the material can be obtained from birch or coniferous wood. In other words, plywood sheets are of pretty good quality to make shelves from. But in this case, you should definitely pay attention to some factors.
The material can be made from not one, but several types of plywood. Their types range from the first to the fourth. The higher the number, the worse the plywood will be.
Sheets also differ in impregnation. Its marking can tell what kind of glue was used to glue the veneer. And already on the basis of this, the properties of the sheets are also determined. They can be resistant to fire, not be afraid of moisture, or, on the contrary, deteriorate from its action.
Differences may also lie in the type of processing, for example, it happens. In this case, it is polished in production on one or both sides, or left without processing at all. For the manufacture of shelves, of course, products marked Sh2 are best suited, which means that grinding was carried out on both sides.

In general, make do-it-yourself plywood shelf quite possible and even reasonable. This is because the material has high strength and is made of eco-friendly material, and it also has a nice appearance.
In addition, it happens that has a glossy surface. You should first think, maybe you will like this type of product more, because the shelves will look varnished, but you won’t have to do this work yourself. Although plain plywood will also look great, this should not be forgotten either.
So, we figured out the features of the material, now we should go directly to how to make a plywood shelf on our own?
How to assemble shelves from plywood?
Before doing anything at all, you should decide what tools and materials will be required for the job.
In order for the work to proceed with maximum comfort and speed, in addition to the plywood itself, you will need:
Electric jigsaw, puncher, drill and screwdriver;
Self-tapping screws and dowels of various sizes;
A bar with dimensions of 50x50 for the construction of a standing support, a strong thick rope can also be suitable (what exactly to purchase depends on the type of assembly chosen);
Roulette and pencil;
Level;
Hammer and drills;
Corners for furniture made of metal, which will hold the shelf.
If you have everything necessary materials then you can get to work.
Shelves made of plywood on a rope
 This method relies on fixing the finished structure on a rope. The whole point of this idea is that at the end you will get a very interesting design with an attractive appearance, in which the racks are made "under the rope".
Here it is necessary to take into account the fact that it will not work to hang absolutely all the shelves on a rope, since in this case they will simply begin to stagger at the slightest touch.
How to implement this technology?
With an electric jigsaw, the shelves themselves should be cut into rectangular sheets with certain dimensions.
A few corners are attached to the back of the shelves, they will be located near the wall and help fix the structure. Thanks to this, it will be possible to get rid of the precariousness of the shelves.
FROM outside holes to be drilled into the rectangle. They should have a diameter, like the existing rope.
Next, you should calculate how much distance between the shelves is required. Based on the data obtained, horizontal stripes should be drawn on the wall, which should be guided when fixing the plywood.
Then you need to attach the shelves to the wall at the corners.
On the ceiling with a perforator on a hook, you need to hang a rope. Its location should be exactly above the holes prepared in advance in plywood.
The rope should be threaded into the holes on each of the shelves, and small knots should be made under the corners of the plywood that will not allow the tree to go down below the required level. Probably, it is not worth explaining that threading the rope and making knots should be from the bottom up.
After carrying out all the necessary manipulations, the structure can be considered complete, since the prepared plywood rectangles are already attached to the wall and “caught” by knots. If you do not plan to paint the finished structure, then you can already start using it.
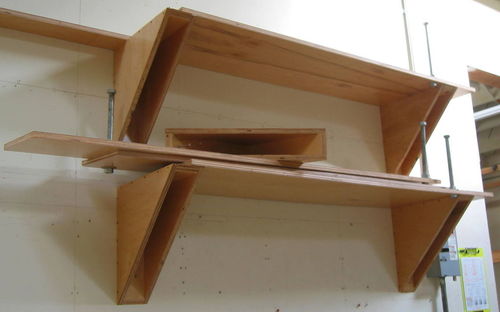
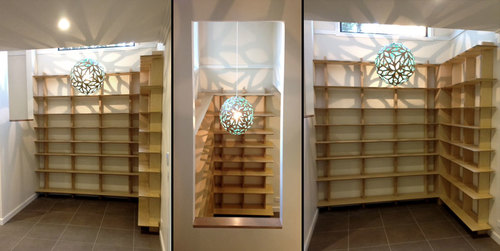
Through plywood shelves
The second method is to mount on a beam.

It will look the same as through shelves (that is, they do not have closed walls on the sides), but they will be assembled a little differently.
To get started, cut the plywood of the required size.
Now you should determine the depth of the proposed shelf and only then fix the timber vertically from the floor to the ceiling.
Next, you should calculate the desired distance that will need to be done between the shelves. For example, each plank will be located half a meter from the previous one. It is necessary to "lower" the first point from the ceiling and put it on one rack. Now, with the help of the level, the points are transferred to another bar and walls.
Then, in the downward direction, markup should be continued. On these places the corners of the shelves will be located.
Based on the markings, furniture corners should be fixed to the timber and the wall.
Plywood is placed on the corners, and with the help of short self-tapping screws, the wood is fixed.
That's basically it. A rack with shelves made of wood can be considered ready!
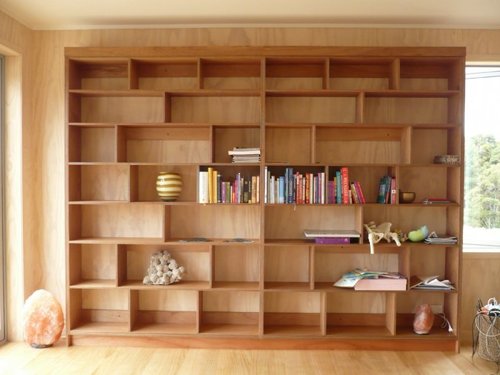
Shelves made of plywood with closed walls
The last method is that plywood shelf will be with walls closed on the sides.

What exactly are closed walls for? In general, they are great for storing books, and for the stability of some items. If you just want to place a vase or, for example, a souvenir on such a shelf, then you should not do a closed structure, since an open shelf will look much more beautiful.
How to do the job right?
First, a wooden frame is made. To do this, measure the distance from the floor to the ceiling and cut off four bars of the required length.
Now two of them should be attached to the wall vertically. They should be at a distance equal to the width of the shelves.
Then the required depth is determined and a pair of marks are placed on the floor, which determine the position of the outer corners. Using a plumb line, marks are transferred to the ceiling.
About half a meter should be retreated from the ceiling and put a point on one beam. Further, using the level, the remaining marks are transferred to other racks. In these places will have the corners of the uppermost shelf.
In exactly the same way, the level of the remaining shelves is determined, and the corners are screwed to the racks. Next, they should put the shelves and fix them. And the side walls are sheathed with plywood or boards.
Here is such a simple and not very tricky technology.
These are the three main methods used to make shelves. It is up to you to choose which one to use, but each of them is unique in its own way.
In conclusion, I would like to say that we have discussed the main methods for manufacturing various do-it-yourself plywood shelves, and what points should be taken into account in such work. Using these tips, you are guaranteed to be able to make really strong and beautiful shelves yourself.
Unusual plywood shelf design. No glue, nails or other fixing materials are needed to assemble it. The assembly of the shelf into working condition is carried out only due to the grooves made in the design of the shelf itself. Therefore, it is perfect for those who like to move often, or simply as a seasonal shelf that can be quickly obtained, assembled and used, and then just as easy to disassemble and store in the pantry.
Materials and tools:
- plywood sheet 6 mm thick
-laser machine
-file
-lacquer and paint
- a few bolts and nuts.
- metal fasteners
Description of the manufacture of easily collapsible plywood shelves:
Step one. Design choice.
The author needed shelves for use in the place of his temporary residence. Therefore, the shelves had to be fairly cheap and easy to assemble and disassemble. Therefore, 6 mm plywood was chosen as the main material.
After defining the material, a small sketch was made in the CorelDraw program.
(downloads: 65)
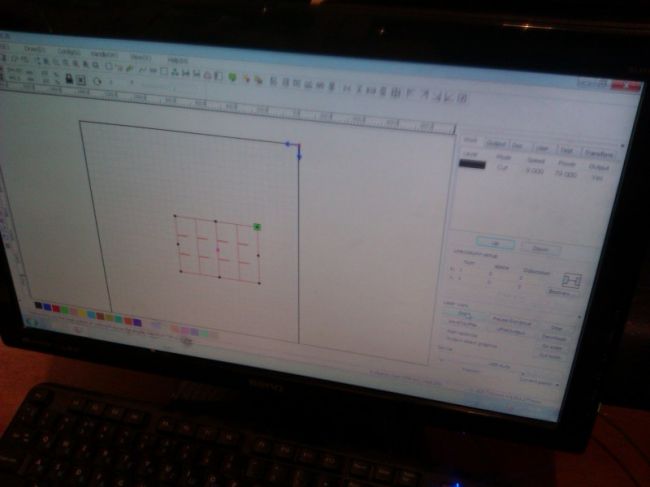
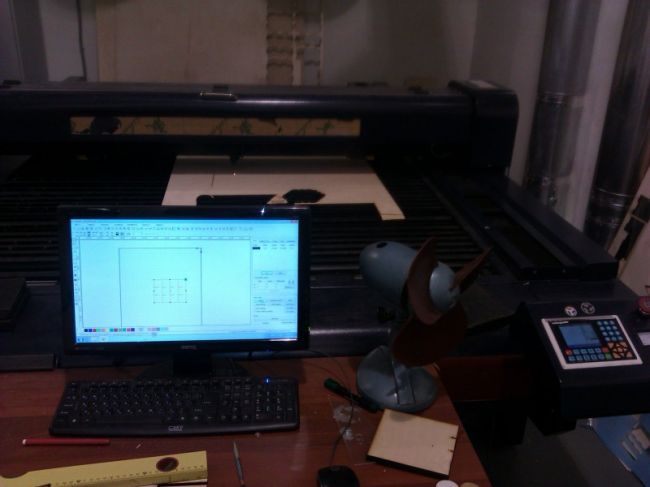
Step two. Cutting details.
After creating a circuit for a laser machine. Plywood was laid in it and parts were cut. In principle, the design of the shelf is quite simple and can be cut just as well with a conventional saw or electric jigsaw, so the presence of a laser cutting machine is not at all necessary when assembling a shelf of a similar design.

Step three. External processing of the product.
After the necessary details were received, the author began to process them. To give a more pleasant look to the product, its parts were varnished. After that, the grooves for joining the shelves were additionally processed with a file, as there were problems with the assembly.

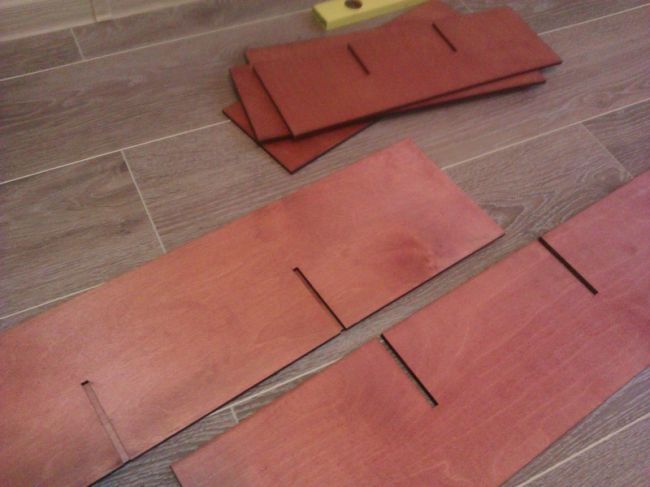
Step four. Shelf assembly.
After the file solved the problems of joining the grooves, the author proceeded to assemble the shelf. It did not require any glue or nails. The whole structure is assembled and held by its own weight through the grooves made, while being quite reliable and stable.
The only fasteners that the author needed were a few metal corners and bolts with nuts in order to secure the shelf to the wall.
As a result, we got such shelves. Simplicity of design, lack of fasteners, resulting in easy assembly and disassembly, and all this for minimum price equal to several sheets of plywood.

Plywood is awesome building material, which is actively used in the decoration of interior decoration of premises for various purposes. But besides this, it has found its application in the furniture industry. But we will not talk about factory-made interior items. Let's talk about how to make plywood shelves for different needs with your own hands using a jigsaw and without extra material costs.
Can I do everything myself?
Store-bought furniture can be quite expensive. However, if you make plywood shelves yourself, you can save a lot. In addition, such a product will contain your warmth, have exactly the parameters you would like, and will be done on time.

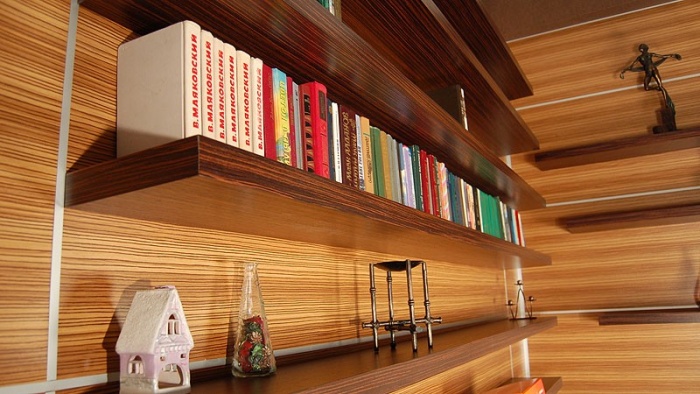
If you think that working with plywood is very difficult, you are in vain thinking in this way. In fact, it is worth putting a little effort and diligence, and the original wall or corner piece of furniture self-manufacturing decorate your home. See what a similar kitchen product looks like self made on the next photo.
Which plywood to choose
Pay attention to the fact that the thickness of the plywood for the shelves can be different, since during the production of sheet material of this type, a different number of layers of veneer can be glued together. The thicker the material, the stronger it is. Therefore, experts and experienced craftsmen recommend refusing to purchase three-layer sheets.
It is better to buy sheets consisting of five layers of veneer. They will cost more than three-layer ones, but any savings in this case are not desirable, otherwise you may encounter a lot of problems and negative consequences during the operation of the product.
What shelf can be made
Yes, whatever. The main thing is to find suitable drawings on the Internet or create them yourself.
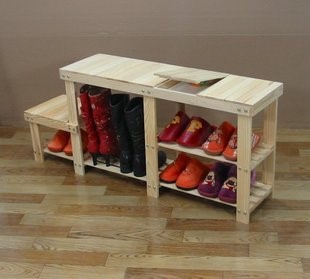
If you want, you can make an original shelf for shoes with a jigsaw and install it in the corridor, at the entrance to the house.
You can make hinged corner shelves for icons in the corner of the room, open to the kitchen or carved to look like flowers. You can build a wall-mounted bookcase for various decorative accessories or for icons, or you can create a bookshelf, as in the next photo.
List of required tools and fixtures
What do you need to have in your arsenal to create a do-it-yourself plywood shoe rack? For this you will need to have:
- the sheet material itself;
- cardboard or paper;
- stationery scissors or a knife;
- ordinary thin tape;
- a jigsaw for cutting out parts, and in the case of a complex design, a milling machine;
- a simple pencil or crayon;
- roulette;
- a hammer and nails of small caliber or a drill with screws;
- water-based paint or wood varnish;
- drawings of the future product (you can create it yourself or find a ready-made version on the Internet);
- if it provides for a sketch and various decorative embellishments.
If you have stocked up with a standard set for working with plywood sheets. Then you need to pay attention to the following picture. Before you are drawings of a plywood shelf in the photo. They will be needed in the process.
Preparatory work
A do-it-yourself plywood bookshelf is an exciting adventure and an interesting activity.
To begin with, determine exactly what size the finished corner or wall structure should have. That is, answer yourself the question of what its width, length and depth will be.
Another important parameter is the main purpose of the product. It will have a direct impact on the design features of the piece of furniture. Think about what kind of shelf you want to make: a bookshelf, for shoes and a different look. It will be angular or standard, wall-mounted or floor-mounted. The following photo shows several options for similar pieces of plywood furniture.


Next, decide how the future plywood flower shelf should be decorated. It can be painted, glued with sticky wallpaper, varnished and the like. Maybe you want to purchase not simple plywood sheets, but laminated ones. Such material looks as if it has already been varnished. However, you do not have to complete this step of the work. The assembled product will already have a finished look.
So, if the main parameters are determined, you can proceed to the direct execution of the work.
Main stages of work
Here is an example of making a plywood bookshelf with closed side walls. This is a very functional piece of furniture that can be found in almost every home.
We carry out the following work:
- We cut out the shelves from plywood according to the drawings. To do this, transfer the drawings to cardboard, cut out the resulting parts with scissors and fix them on plywood. With the help of a jigsaw, accurate sawing of parts is carried out, taking into account centimeter allowances;
- When the main parts of the shelves are cut out of plywood, you need to build a wooden frame: for this, you should measure the height of the ceilings and cut off four pieces of timber of the resulting length. These bars are fixed vertically on the wall with a horizontal step equal to the length of future shelves;
- Now you need to determine the depth of the rack and put two marks on the ceiling surface. These points will display the outer corners of the future product. Using a plumb line, transfer the marks to the floor;
- Next, install the outer racks of the structure: fix the bar vertically between the ceiling and floor surfaces. At the same time, the marked points should remain the main reference point;
- Step back from the ceiling by half a meter and put a point on one bar, and transfer to the rest of such points using the rule with the level. This is necessary to mark the corners of the top shelf. Also determine the level of the remaining shelves, and then screw the metal corners to the racks;
- Place and securely fix plywood shelves on the corners. Sew up the sides of the structure with plywood.
Carefully watch the video presented at the end of the article to understand how to make a shelf out of plywood on your own.
A wooden shelf is a piece of furniture that is present in almost every apartment. Such a device is simple and practical, it provides convenient storage lots of things. Ready-made shelves can be purchased at any furniture store, but it is much more profitable to make them yourself. The most popular materials for making shelves are wood, plywood, chipboard..
Advantages and disadvantages of wood products
Why are wooden shelves in constant demand? There are several reasons for this popularity. Wood structures:
- Differ in environmental friendliness, safety in use. Wood breathes, does not emit harmful substances into the environment.
- Refresh the atmosphere in the room and bring it closer to nature, harmoniously fit into almost any interior. Wooden furniture is a classic that is always relevant.
- They collect dust much less than products made from other materials (but in order to provide wood with protection from dust, it must be treated with varnishes and special means).
- Characterized by ease of manufacture. The tree is easily processed, so even a novice furniture master can work with it with his own hands. For the manufacture of furniture from this material, a minimum set of tools is required.
But for all its advantages, the tree has a number of disadvantages. So, the noble varieties of this material are quite expensive, the production of wooden shelves generates a lot of waste (chips, dust), and poorly processed wood can leave splinters on human skin.
Determination of the allowable load on the structure
If you decide to make original wooden shelves with your own hands, then you will need to decide on the maximum allowable load on them.
This load depends on several factors:
- The thickness of the boards used to make the structure. The more items on the shelf, the thicker the wood should be. In addition, it is recommended to opt for boards without knots, they are distinguished by the highest possible strength.
- Method of attaching the product to the wall. You can fix the structure with the help of special ears, bars or metal brackets. The last option is the most reliable.
- The number of fasteners on one shelf. This parameter is important for long structures on which conservation will be stored. They must carry a lot of weight. So, a product 3 meters long should be equipped with 5 mounts located at a distance of 50 cm from each other.
simple book storage furniture
The easiest way is to make ordinary shelves for books yourself, even a person who has never made furniture can cope with this task. For work, you will need a board 15-20 mm thick and about 200 mm wide, self-tapping screws or furniture confirmations, as well as tools - a jigsaw, a grinder, a drill.

First you need to divide the board into 4 fragments: 2 long ones (for example, 800 mm each), 2 short ones (about 300 mm). The blanks must be processed with a grinder with a grinding nozzle and sandpaper with a grain of 120-180, and then with a grain of 240 and above, after processing the wood should become perfectly smooth.
Then it is necessary to cover the parts with varnish and let them dry completely, after which we connect 4 elements with our own hands so that we get a box. At the next stage, holes are formed with a drill into which confirmations are screwed. The shelf is almost ready, it remains to install the mounting ears and hang the product on the wall.
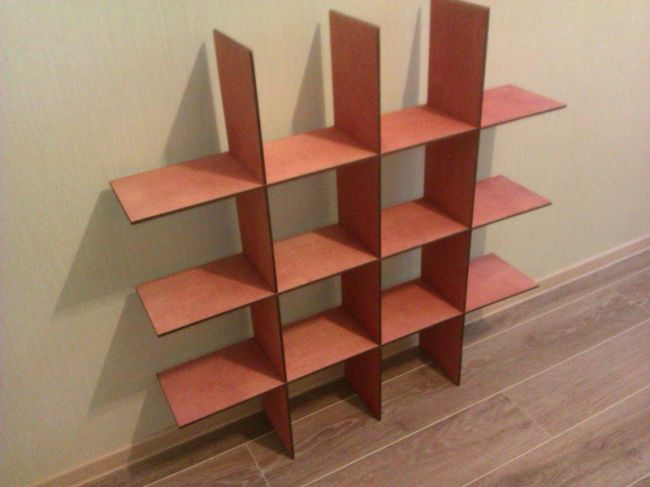
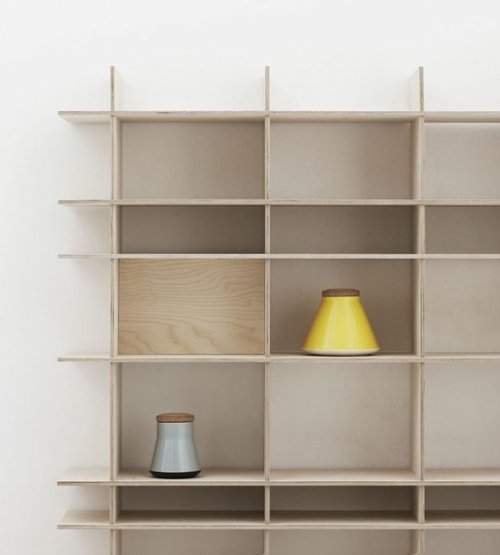
Creative Solution: Honeycomb Design
Shelves in the form of honeycombs are unusual, very interesting solution, such a product will perfectly complement modern interior. And most importantly - such a design is not at all difficult to do with your own hands.
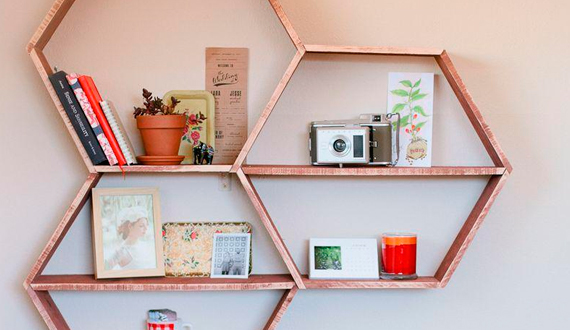
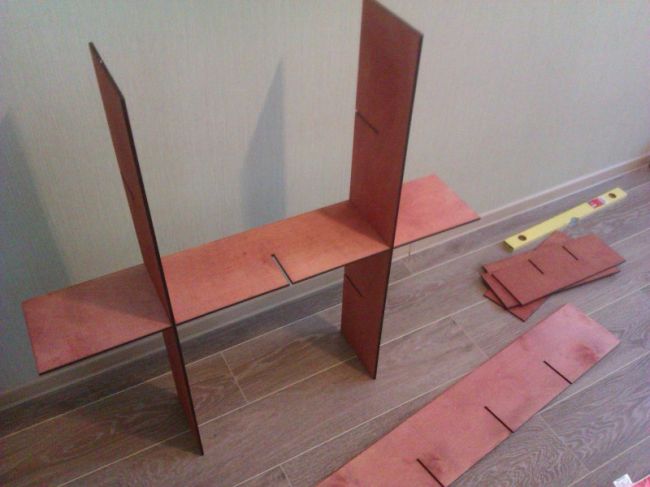
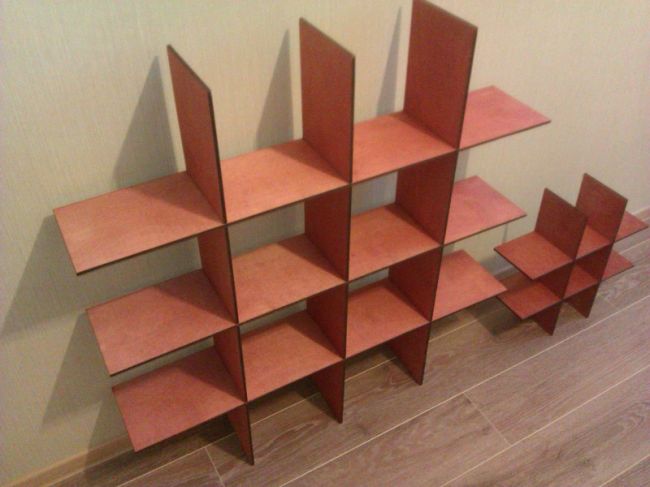
The master needs, first of all, to prepare the boards. Their number depends on the desire of the customer. To make a composition of 3 honeycombs, you will need 15 planks. At their edges, you need to make saw cuts at an angle of 30 degrees. The most convenient way to do this work is with a miter saw. As a result, each detail takes the form of a trapezoid.
Then you need to assemble the honeycombs with your own hands, fastening the workpieces with wood glue. After this, the joints must be strengthened by drilling holes in them with a drill and screwing screws into them - 1 or 2 on each side. Finished shelves need to be sanded and varnished, providing the product with a presentable look. At the last stage of work, it remains to fix the structure on the wall with brackets and screws.

Shelving unit in modern style
Industrial style is now very popular due to its functionality, minimalism. You can bring industrial chic to the house by making a shelf on pipes. To make it yourself, you will need wood and metal pipes.
Give wood products interesting texture, a magnificent shine can be achieved by coating them with a special oil or wax, and then with a water-based polyurethane varnish.

When the boards are completely dry, they need to be laid upside down, on each of them (except the top) install round flanges about 2 cm from each edge. Accordingly, 2 flanges will be placed on each board. Then the locations of the flanges are marked with a pencil, a hole is drilled through the center of each mark.
Then each flange is placed on top of the hole, attached to the surface. A galvanized pipe of a suitable length (usually about 30-40 cm) is inserted into the hole with its own hands, equipped with threads at both ends. Then the pipe is tightened in the flange with a wrench, a coupling is installed in the upper part of the pipe.
When all the parts are prepared, flanges are screwed to the tops of the pipes (above the couplings) and fixed to the shelves located above. Finished shelves can be made mobile by installing wheels on the bottom board. The product is ready for use.
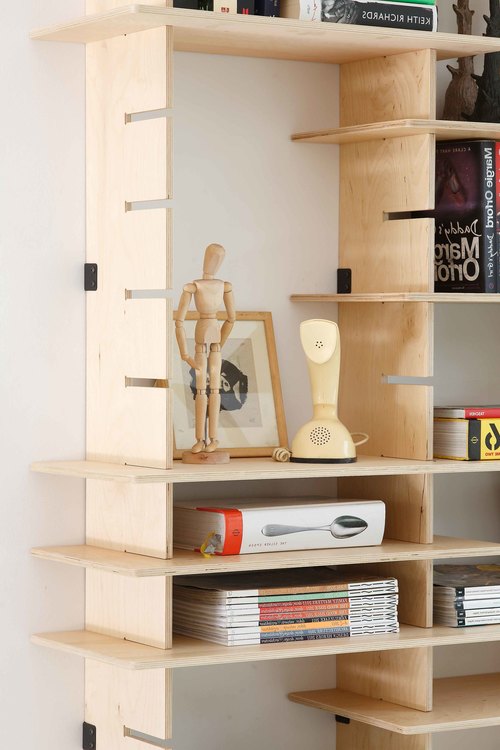
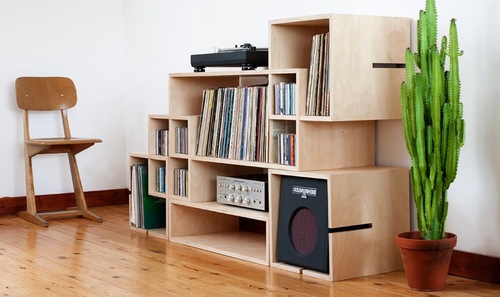
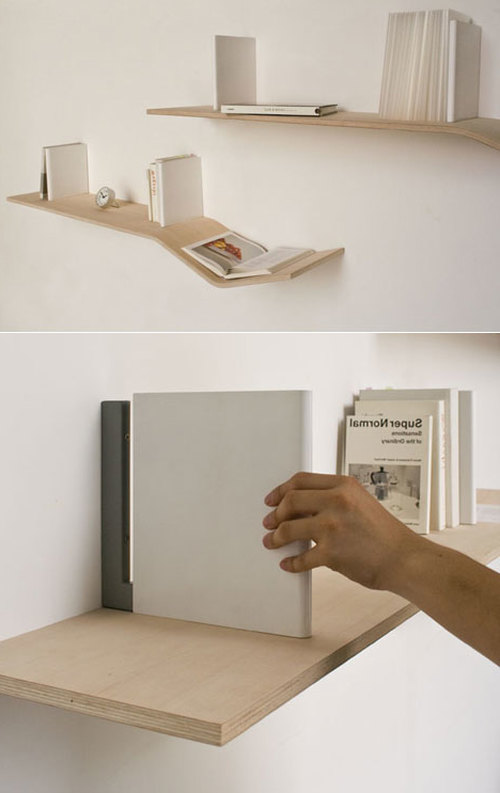
Convenient design for displaying photos and CDs
Making a compact shelf for storing photos, albums and record collections with your own hands is not at all difficult. This design consists of several rails connected to each other with a rope.

A bar is attached to each rail, which does not allow photos and books to slide off the shelves. First you need to determine the width of the structure, and then cut the rack blanks with your own hands and sand them. Then you need to nail or glue the strips to the rails. Nail heads can be hidden under a layer of special putty.
At the next stage, in each plank, you need to retreat 2 cm from each edge and drill holes in these places, the diameter of which is slightly larger than the thickness of the rope.
A rope is stretched from each end of the lower shelf and tightened at the end into a knot. Then, on each of the ropes, the distance to the second shelf is measured and a knot is tied.
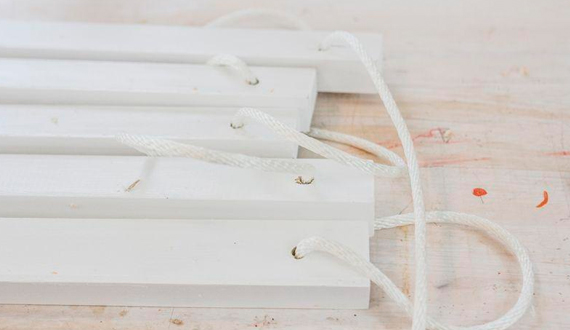
After that, a shelf is put on, the same steps are repeated for the remaining shelves. Then the free ends of the ropes are tied to special hooks or screws screwed at a suitable height. Now it remains to arrange books and CDs on the shelves.
Whatnot from construction pallets
One of the fashion trends in the field of interior design is the desire to replace elegant pieces of furniture with more rough, “close to nature”. Some of these items can be made independently. For example, assemble shelves from wooden construction pallets.
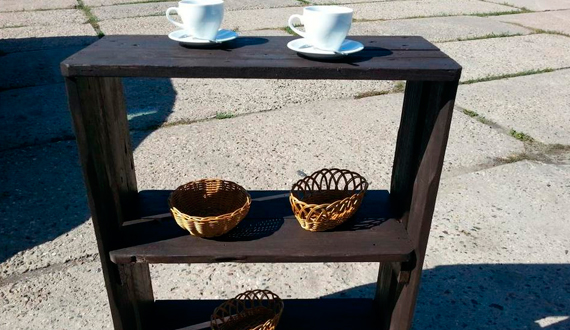
To do this, disassemble two pallets and cut 4 boards 640x145 mm in size from the resulting elements, two boards of the following dimensions: 840x145, 680x145, 290x145, 840x100, 640x100 and 290x50 and 4 checkers 145x100 mm.
First, the base is mounted. Checkers are attached to the edges of two boards 640x100. On top of them, perpendicular to the boards, boards 290x145 are attached, connecting the bases with checkers into a single structure. At the next stage, two boards (840x100 and 840x145) on each side are attached vertically to the ends of the structure using self-tapping screws.
To complete the assembly of the whatnot box, you need to attach two 680x145 boards to its upper part. Then the lower shelf is mounted, for this purpose two boards 640x145 are attached to the base.
To install the remaining shelves, the installation of support strips 290x50 is required, which are mounted at a suitable height. The remaining boards 640x145 are attached to the installed planks with self-tapping screws from the ends. This rack is great for storing shoes.
Original children's book stand in the shape of a horse
The kid can be pleased with a cheerful bookshelf in the shape of a horse. To do this, you need a horse template, which you can make yourself or with the help of special computer programs.
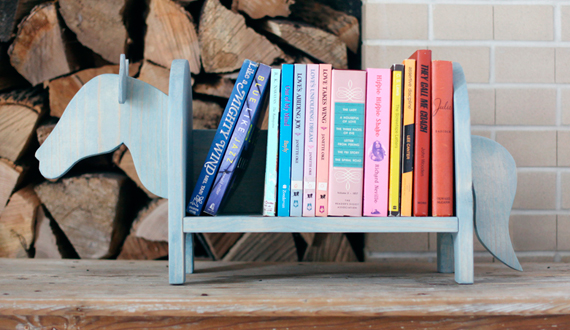
The template is printed, after which the stencil is cut out. It is superimposed on prepared boards and outlined along the contour. Then you need to cut out the details. Straight cuts are made with a saw, and curly cuts with an electric jigsaw.
After that, the blanks must be cleaned with sandpaper. Then the sidewalls of the structure are attached to the base and back wall of the product using furniture screws. At the final stage of work, the head and tail are glued to the horse.
Then the product is again processed with sandpaper and painted. After a few hours, the shelf is ready for use.


