
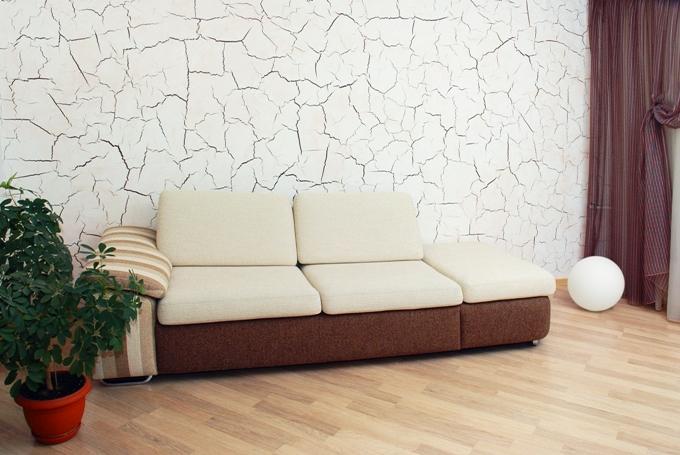
Construction technologies in last years received active development, and today a lot of manufacturers offer an extensive range of materials for every taste. In particular, a wide variety of materials for wall decoration appeared. Each homeowner can choose wallpaper products, paint, as well as decorative plaster that creates a relief effect. It is the latter version of wall cladding that will be discussed in this article.
Such facing material contains in its composition granules of mineral origin, which create the effect of relief. The size of these components can vary, due to which they determine the structure of the surface of the wall after the application of the material. Also, in the production of this coating, a dye of a certain type can be used. It allows you to make the toning deeper and more intense, and contributes to the creation of visual effects.
Types of material by chemical composition
This material is usually divided into types according to several criteria. In terms of fillers and chemical composition This coverage is divided into the following types:
- Mineral plaster is a facing coating that is made on the basis of cement and lime. It has the form of a dry mixture, which must be mixed in water before use until the desired consistency is obtained. The composition of this type of plaster may include marble chips. The volume of the relief will depend on the size of these inclusions. mineral material has universal properties and is suitable for both interior decoration premises and decoration outside facade.
- The silicone coating is distinguished by the properties of elasticity and sufficient vapor permeability. The main advantage of such a coating is ease of care. If the facade of the room is lined with a silicone coating, then light rain is enough to clean it so that the surface returns to its original state. Despite the high cost of production, it was this condition that caused the silicone type of plaster to be chosen mainly for the exterior decoration of buildings.
- Polymer or acrylic coating - is a water-dispersion mixture, which is completely ready for the application process. As part of such a coating there is a certain filler: it can be glass chips, ash waste, marble. Polymer plaster is resistant to various atmospheric phenomena, but has a low vapor barrier coefficient. Therefore, it is not recommended to decorate the facades of the premises.
- Silicate plaster - is a mineral substance, which uses liquid potassium glass. It serves as an astringent component of the solution. This type of finishing material is characterized by high vapor permeability, so it is best suited for finishing any type of room.

Types of plaster according to the structure of the picture
According to the structure of the formed image, the following types of decorative coating can be distinguished:
- grooved plaster (Rillen structure);
- uniformly rough (Edel structure);
- modeling arbitrary coverage (Roll structure).

Types of plaster according to the method of relief formation
Depending on the final image, relief plaster may vary into the following groups:
- Venetian plaster - this coating creates the effect of marble walls. It consists of slaked lime, water emulsion and natural marble flour. To decorate the room with this material, it is necessary to level the walls to an impeccable condition. This is a prerequisite for the use of "Venetian" plaster. Also, the material meets environmental parameters and has the properties of water resistance, fire safety, and does not carry foreign odors.
- Textured coating is the most common material for interior decoration, because it makes it possible to get the desired pattern without much effort. For this purpose, special tools are used that are always at hand. For example, it can be a washcloth, a cloth, a film of polyethylene composition and other items that need to be attached to the wall, having previously given a crumpled state. This creates relief on the surface.
- Flock type plaster comes on the market in the form of glue and a container with a variety of colored inclusions. Using this coating, you can get the appearance of a mosaic crumb. Finishing the walls with this plaster involves initially applying glue, and then throwing decorative crumbs so that it sticks to the surface. After the glue dries, a protective composition should be applied to the surface.
- Structural plaster coating is a granular mass of a heterogeneous nature with the presence of granules. Relief plaster, the photo of which is decorated with design publications, can be used for both external and internal cladding. In the case of designing the interior surfaces of the room, it is recommended to apply the coating exclusively on water based. This is due to the fact that the material is environmentally friendly, reliable and easy to apply.
- Glazing material will create an aesthetic and neat relief of the walls. With it, you can achieve the visual effect of the "antique" coating. Such decorative plaster embossed can be used for interior decoration of walls, as well as for exterior decoration of facades. The glazing coating does not emit toxic substances, is resistant to various mechanical influences and is fireproof.
Advantages and disadvantages of decorative coating
This coating has a number of impressive advantages, among which are the following:
- Ease of use. On the packaging of the material of any brand, as a rule, the method of using the plaster is indicated. Such a coating is quite easily applied to the walls with a roller or spatula.
- Do-it-yourself embossed plaster will help hide any imperfections in the walls. Making a choice in favor of a decorative relief coating, you can easily hide the uneven bumpy surface of the wall.
- This coating is a good insulation. But to achieve the desired effect of insulation, the wall must be carefully primed before applying the plaster.
- Decorative plaster favorably differs from other materials in appearance. It looks original, refined and exclusive.
- Relief wall plaster will fit into any interior without any problems.
- This decorative material is environmentally friendly. Relief plaster does not contain harmful toxic substances.
- This material is quite durable.
- Relief plaster does not absorb odors, is resistant to temperature changes and mechanical stress.
If we talk about the shortcomings of this material, we can only highlight the high cost of production. However, given the durability of such a coating, its natural composition and high aesthetic appeal, you can safely make your choice in the direction of a relief coating.

Method of applying plaster
Decorating the interior of your home with embossed plaster is not difficult, since you do not need to have a special tool or have special skills to implement your plan. Let us consider in more detail the process of decorating walls with such material.
Tools for work
To work with this material, you must prepare the following:
- spatulas of different sizes;
- metal ironing board;
- grater;
- angle spatula;
- sponge for applying the finish coat;
- rollers.

Ways to perform textured coating
First of all, consider the variations of how you can achieve aesthetic relief when applying plaster. This action can be performed in several ways:
- by the most in a simple way drawing will be done with a roller. For this, a roller is used, on which there is a certain relief.
- Another way to design a relief is to use a comb or a special spatula.
- Also, the pattern can be applied to the coating using a different stencil.
You can do the wall decoration in the room on your own. To do this, you just need to study in detail the instructions for the compositions and familiarize yourself with the rules for performing work and use the simplest household items - various fabrics, washcloths, brushes, etc. 
Step by step instructions for applying plaster
- At the first stage of work, the old coating, as well as dirt and dust, should be removed from the surface.
- Existing defects must be removed from the wall with putty.
- The next step is to apply a primer. At the same time, keep in mind that for each specific type of surface, you need to use a primer that has an appropriate binder in its composition. So if the walls have a concrete base, you should use a mineral-based material, and if the wall is brick - an acrylic agent.
- Apply the primer with a roller. The layer of applied primer should be 2 mm.
- Then start applying base plaster. Using a trowel or spatula, spread a layer of mortar, which should hide existing surface defects.
- Let the material dry for 24 hours.
- Then cover the surface of the wall with seamless plaster so that there are no cracks, depressions, and various slopes.
- The next stage of work will be laying a decorative plaster coating. Here you can be creative and independently determine the number of layers of material and application technique. The easiest way would be to cover with a ready-made solution, which acquires a unique look due to the content of special fractions in the composition.
- After completing these works, leave the walls to dry for another 24 hours. If time permits, let dry for 48 hours.
- Next, polish and paint the surface. Wax or polish can be used to achieve a glossy effect. Or change the color of the surface using the appropriate paint.
- The plastering process is completed.

The technique for applying decorative embossed plaster on the video is shown below:
Relief plaster for wall decoration has been used for many years, while the technology is constantly being changed. It is worth noting that main feature such decoration is that it is unrealistic to reproduce two identical patterns. Therefore, it gives individuality to the interior. The application of decorative coatings is considered a real art, especially when it comes to a kind of panel. This process is carried out by experienced professionals. But at the same time, it is quite possible to perform such work on your own. It is enough to get acquainted with the technology, select the necessary materials and allocate a little time.
Features of the technological process

To achieve the desired result, all work must be performed in a strictly defined order, which is prescribed by technology.
- Choosing the right pattern for the style of the room. It is best to print the sample in several copies so that the sheets are always at hand. This will allow you to accurately reproduce what you intended.
- Surface preparation. The process is quite laborious, since it is required to completely remove the previous finish.
- Removing dust and dirt with a broom, rags and water.
- Padding. Modern primer solutions are also used as an antiseptic that will protect against fungus and insects.
- Application of the starting layer of plaster. He is the basis.
- Re-priming the surface after complete drying of the starting layer.
- Formation of a relief by a finishing layer.
- At the last stage, the completely dried wall is covered with paint. If there are excesses and drips, it is best to remove them immediately with a damp foam sponge.
The algorithm of work is quite simple, so you should not take risks and deviate from the described process. Otherwise, it will negatively affect the final result. In the process of creating the desired relief, there is no need to rush, as this may take more than one day.

Each drawing involves the use of certain items and technologies.
Tools and accessories

To know how to make a three-dimensional drawing, you should pick up certain tools and fixtures, processing the wall with them, you can get the original texture. So, in addition to traditional items for finishing, in the process of creating a relief, you may need the following elements:
- the sponge will give "bubble" or serve as the main tool for staining;
- a roller with a special nozzle is used to obtain a textured print on a wet layer;
- rollers to create a grass pattern or the formation of horizontal chaotic and even stripes;
- a plastic bag, a rubber glove or a simple brush will also come in handy when creating a volumetric effect.
Almost any object that has textured shapes will come in handy. It is they who, during processing, will leave a characteristic imprint on wet plaster. For example, if you want to imitate leather on the wall, then you need to use a roller with a special nozzle. Many interesting drawings can be obtained by working with a simple spatula. In this case, it is worth choosing several options for the tool with different widths.
Experts and psychologists say that embossed plaster provides endless possibilities for the manifestation of fantasy. That's why creative people they are very fond of doing this process on their own in order to develop their talent and abilities. And parents involve their children in the work so that they can also contribute to the renovation of the house, especially when it comes to the children's room.
Apply a small amount of finishing compound to the wall and experiment with a variety of objects.
Necessary materials

In addition to the fact that the appropriate tools are selected before work is carried out, it is also important to take care of the purchase of all necessary materials. In order not to miss anything, it is enough to follow the compiled list.
Leveling mixes. With their help, it will be possible to eliminate the existing defects on the wall. The store has the following:
- gypsum base (used only if the finish will be made of the same material);
- cement base (to save money, you can make the mixture yourself in a simple proportion: 3 parts of sand and 1 part of cement);
- clay (despite its ecological and plastic properties, this technology is rarely used in modern construction).
Finishing mixes. Manufacturers produce a wide range of products designed to form a decorative relief. To do right choice, you should carefully study the packaging, as manufacturers indicate what type of textures this or that composition is intended for. It is worth noting that mixtures are quite often heterogeneous, since different sets and proportions of components are included in their manufacture.
Primers. Here is where to roam. To date, you can find formulations that are produced in two forms: liquid and pasty. Experts recommend treating the walls with antiseptic compounds with deep penetration before applying the starting layer.

Paints. Pay attention to water-based coloring compositions, water-dispersion and emulsion. The color is selected individually. For original solutions, it is best to buy special dyes and a white base in order to independently set the desired shade.
Varnish. If you cover the painted wall with varnish, you can extend the operational life of the decorative finish.
In some cases, masking tape will be appropriate in the work, which will not allow the dye to get to a certain area.
For painting relief plaster, water-dispersion paints are best suited.
Progress

To make a quality finish, you should familiarize yourself with all the details of each stage that are provided in this process.
Surface preparation
A very important condition for any finish is not only the cleanliness and dryness of the walls, but also the absence of any defects. That is why the surface must be treated as follows before plastering:
- removal of old coatings;
- the old coating must be completely removed, and if the layer is strong, then shallow notches are made on it with an ax, chisel or puncher with a lance for better grip;
- dust removal;
- applying a deep penetration primer (it is better to repeat for reliability).

Only after complete drying, you can proceed to the next step.
In most cases, a complete cleaning of the treated area from the old finish to the base is required.
Base
To get a flat and smooth surface, plastering of the walls is performed. The solution is kneaded using a construction mixer, if there is none, then you can use an electric drill with a special nozzle. Do not make a large batch, as many solutions set quickly enough.

The finished solution is thrown with a trowel or applied with a spatula to the wall, depending on the desired thickness. For convenience, you can use construction beacons that will allow you to complete the process more accurately and smoothly. The solution is rubbed with a grater in a counterclockwise circular motion. After drying, the surface is primed again.
The thickness of the starting layer of plaster depends on the evenness of the walls and the presence of defects.

The most interesting part is the creation of the planned relief on the wall. As mentioned above, here you will need to show your imagination and use a variety of items that you have at home. It is very important to pay attention to the solution - it must be homogeneous. Except in those cases where it is required to use a heterogeneous composition.
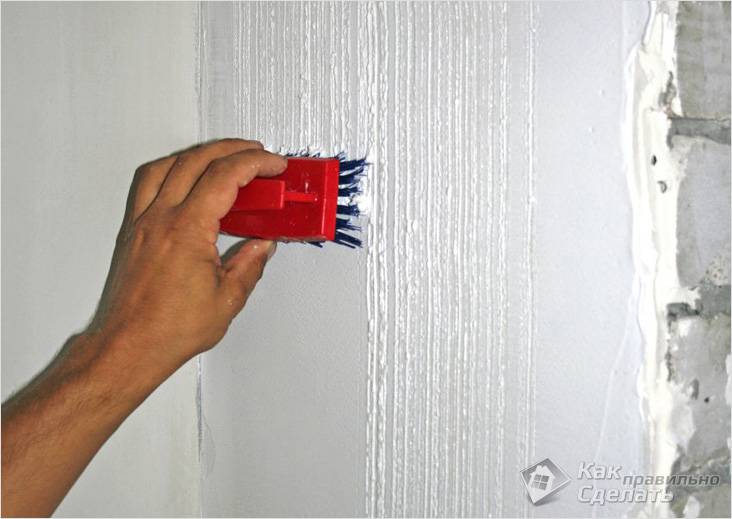
It will be interesting to look at the pattern performed by an ordinary metal mesh for washing dishes.
![]()


Paint application
Upon completion of the plastering and finishing works, painting is carried out. There are only two options:
- Monochromatic coloring. Paint of a certain shade is acquired and staining is carried out.
- Self-acquisition of shade. The basis is white paint, in which pigments can be added. Professionals recommend pouring paint into several containers and adding different amounts of color. As a result, a more voluminous picture will appear on the wall.

Coloring can be carried out using different means, depending on the created relief (its depth):
- roller;
- brush;
- spray.
Artists often paint relief plaster with brushes to get the desired picture or a whole wall panel.

Please note that when dry, the color of the painted surface will be a couple of tones lighter than applied.
The final touch in the creation of relief plaster will be the application of a protective coating. These funds can also be found at a hardware store. In addition to protection, they will help give the wall a certain shade:
- pearl;
- golden;
- silver, etc.
Using the finishing method described above, you can transform the interior of the room and decorate the walls in an original way.
Video
It looks interesting on the wall bas-relief of gypsum putty:
look following instruction for applying structural plaster. It's really simple:
Relief plaster is a finishing material widely used today for the implementation of arbitrarily bold design projects. Due to the unique composition, which includes special additives and binders, the coating can be presented in different configurations - these include a natural stone, cork, orange peel, and wood. Applying such plaster on your own allows you to show your creative abilities. You will be able to create a variety of relief outlines and color shades, as well as patterns.
Relief plaster today is presented for sale in a wide range. It may differ in structure, relief, as well as the quality of auxiliary additives. Other parameters can also be included here. However, the main classification is the division into bases and binders. This parameter is a priority, because the choice of finishing mixture is made relative to it. And even if you strictly follow the recommendations for applying plaster, there is a chance of obtaining an unsatisfactory result. This can happen when the master has chosen a solution that does not match the structural features of the wall. Blisters, cracks, as well as delamination and deterioration in the characteristics of materials can be identified as possible defects in the violation of technology. For example, if you choose relief plaster for a wall of aerated concrete, which is highly porous, then a prerequisite for the composition used is high vapor permeability. Otherwise, moisture will accumulate and destroy the coating, as well as the structure of the wall. This indicates the need for a competent selection of a solution that will match the base.

Relief plaster "Breeze" can be represented by a mineral base. The starting material is a dry mixture of cement, which is the main binder. Among the ingredients there are other auxiliary components that give relief and elasticity. Such plaster should be used in tandem with mineral surfaces. Textured plaster "Kadoro" can also be silicate, where liquid special glass acts as a binding base. This composition is characterized by high vapor permeability and is universal, as it is used for almost any surface. Among its additional characteristics, resistance to various kinds of influences can be distinguished. This is reflected in the price as well. You can buy this material in the form of a composition that is ready for application to the surface.
When to choose silicone plaster

Textured plaster "Celestia" can also be composed of a silicone base, it provides reliable adhesion, which is guaranteed by the presence of synthetic resins. Working with such a composition is quite simple, since the material is plastic. Among other things, the silicone mixture is suitable for mineral and other types of building structures. Plaster is used not only for internal surfaces indoors, but also for facades.
When to choose acrylic plaster

The composition of the plaster may suggest the presence of acrylic. This material has a consistency that is ready for finishing work. The coating is combined with the bases of the mineral content, which is concrete. Other types of grounds can also be included here. The binding component is the Described compositions have textural features, recommendations for use, as a rule, are reflected on the packaging. Among other things, the consumer can obtain additional information from the consultant.
A variety of relief plaster coatings

Internal plaster, like external plaster, is divided into three main types, namely, a flat surface using stains and colored pigments, a textured composition using arbitrary application techniques, as well as a textured mixture with a finished drawing.
Preparation for work

It is necessary to take into account the moment that the textured composition is prone to the accumulation of moisture and dust, which is why it is recommended to use smooth reliefs in the kitchen. For the same reason, due to the high humidity in the bathroom, it is necessary to reliably and efficiently protect the surface using varnishes. Any textured mixture should be applied to the prepared surface. The wall should be leveled and coated with a primer. The latter is best chosen with deep penetration characteristics and dry the wall after using it. Some types of plasters allow you to ignore wall irregularities, but impressive differences in irregularities and levels must be eliminated in advance.
Instrument preparation

If you will be plastering the walls in relief, then it will be important to prepare the tools: a set of spatulas, an angled spatula, a trowel, a grater, a plumb line, a level and a rule. When choosing spatulas, it is necessary to be guided by several sizes, one of the tools should have dimensions of 30 centimeters, while the second should be 10 centimeters.
Carrying out basic work
Relief decorative plaster must be applied according to a certain technology, which involves the distribution of the solution along the wall or part of the surface with the necessary layer. To do this, use a trowel. Special accuracy at this stage should not be observed, the main thing at the same time is the uniformity of thickness with a small error. The desired layer thickness is selected taking into account the desired result. Considering the height of the drawing, it is necessary to leave 1.5 millimeters thick under it. In order for you to understand how to apply plaster, it is best to experiment on a small area, you can use a piece of drywall for this. This will allow you to choose the required initial layer thickness and application technology.
If you purchased a ready-made composition, you must remember that it involves slow drying, this is to call the master to get more time to form the drawing and uniform distribution. If you are using a traditional cement-gypsum or sand-cement mortar, it is best to decide in advance on your actions and distribute the surface on the site, which you will do gradually.
Invoice formation
The application of relief plaster involves giving the surface a texture. Depending on what result you want to get, you should choose a tool, as well as application technology. To obtain a certain texture, you can use rollers, ready-made stamps, brushes and spatulas. Quite often, craftsmen use hair rollers, after which a finished surface with a unique pattern is obtained. As an alternative, one can carry out finished surface spatula, smoothing the plaster. Another option is the use of rollers, on the surface of which an ornament or pattern is applied. In this case, it is necessary to draw over the surface once along the entire length, or act with multidirectional strokes, which will allow you to get a fragmented ornament. If the plaster is applied with a roller, it will be possible to achieve a reduction in material consumption.
Using alternative options for terrain formation
Textured plaster can be applied, as mentioned above, with ready-made stamps. These are blanks of huge sizes, on the working basis of which there is an ornament or pattern. In the process of work, you should regularly clean the stamp from the mixture, wetting it with water. Quite often, complete with such a tool, there is a soft rubber version, which allows you to bring the pattern to hard-to-reach parts of the walls.
If you use a simple spatula, then finishing can turn the wall into an artist's canvas. The simplest option is to form a relief using the texture of a wild stone. You can deepen the spatula into the layer, getting the desired pattern. The same applies to clear instruments with teeth. It will be possible to do the derivation of the ornament on your own, but the result will be as effective as possible.
Decorating: the final stage
As soon as it is possible to give the texture of the surface of the plaster layer, measures can be taken to protect the wall and further design it. The master will have to make a primer, after which it is allowed to apply several layers of paint. The entire surface is painted with a color of a darker shade, while a long-haired roller should be used, it is sometimes replaced with a brush. Once the first coat is dry, you can use a short haired roller or tool with a flat rubber surface to apply a lighter color to the surface. This way you will give the color of the protruding part of the texture. If painting is not intended, which is true when using colored plaster, which contains pigments, the surface should still be coated protective layer. For this, colorless varnish is most often used.
The use of special formulations
The cost of plaster can be equal to 1100 rubles per 8 kilograms. It can be used with a variety of fillers that allow you to create the desired pattern. Thus, to form the “bark beetle” surface, polymer granules or granite chips are added to the ingredients. Such a composition is initially applied with a trowel to the entire surface, and then left until it sets. After that, it is necessary to go over the surface with a grater, which will stretch the crumbs and granules through the solution, forming specific grooves. You can also use the usual version, in which the grater is held horizontally or vertically. In this case, the furrows will be located in parallel. You can guide the grater along the path of a circle, which allows you to achieve a more unique and interesting pattern. The addition can be not just hard, but also soft granules that are filled with paint. In this case, the same application method can be used, which will differ from the previous one in that the granules will be crushed and the surface will be painted in different colors. The basis of the plaster may have more liquid solutions, which will form the effect of smudges. A thicker composition allows you to form a high pattern. But it should be remembered that the deeper the drawing, the faster it will accumulate dust.
Conclusion
Standardly finished plasters are white, however, varnish and colored pigments can be used to give a certain shade to the surface. If plasters of different colors are available, then surfaces with different compositions can be obtained. Moreover, even a novice master who does not have sufficient experience in carrying out such work can achieve such unusual results. It will be enough just to practice before applying the mixture to the wall. You can use drywall, which will allow you to gain experience and eliminate mistakes when working on the walls of any room in your home.
The active development of building technologies has contributed to an increase in the range of finishing materials that can give life to any idea that the designer has caught fire. Relief plaster has gained wide popularity among them. It helps everyone on its basis to make a unique surface that looks like a work of art from the outside.
What it is?
Relief decorative plaster is a finishing material for finishing planes. It is based on a binder, to which auxiliary additives are added: various resins, stone chips, lime, mineral components. It is their quantity and composition that determine the texture and appearance future relief plaster.
The use of relief plaster of this type helps to create patterns that resemble wood, granite, orange peel, plants, as well as a surface in the style of a bark beetle (imitation of a wall eaten by insects). It can be an abstract pattern or a finished painting. In this way, it is possible to process the areas that are inside, as well as external facades. Do not be afraid of all these patterns and abstractions, do-it-yourself embossed plaster is applied, it will turn out like any master. It just needs a little research. Such activity can be attributed to art, as well as.
And most importantly, you can decorate the walls or ceilings in the apartment with the help of embossed plaster with your own hands, without resorting to the services of craftsmen. To do this, it is enough to study some of the nuances associated with the composition of working solutions, as well as how to work with it correctly.
It makes sense to practice in small areas where you can make such a plaster. If you do not master the application skill well, then small defects will be visible on the finish coat.
Differences in chemical composition.

The basis of the material are different substances, so such relief plaster is made up of components that give it special properties:
- silicone. It is mainly used for exterior decoration of facades. Such plaster is quite elastic, it passes steam well. The main advantage is easy care. The cover is easy to clean and outdoor decoration a little rain is enough to restore the walls to their original appearance. However given type solutions are expensive;
- mineral. It is a lining, the basis of which is lime or cement, sometimes with the addition of marble chips (the greater its concentration, the more noticeable the relief). It is sold in dry form, therefore, before use, the composition must be brought to the optimum consistency by diluting it with water. The mixture is universal. Therefore, it can be used both in the interior and for the facade of the building.
- polymer (). This bas-relief plaster is completely ready to be applied to the base with your own hands. The filler in the composition is fly ash, glass or marble chips. The composition does not pass steam well, therefore it is used for indoor processing. But it also behaves well outside, withstanding the effects of the atmosphere;
- silicate. It is a mineral substance with an astringent component in the form of potassium liquid glass. Such relief plaster is optimal for processing and creating any surface.
The difference between mixtures according to the texture of the final drawing.
Do-it-yourself stucco relief paintings differ in texture and pattern. There are several coverage options, here are the most popular ones:

- marble effect - such plaster is also called "Venetian". The solution is made on the basis of natural marble flour with the addition of an aqueous emulsion and lime (slaked). The main condition for application is a perfectly smooth wall. Distinctive characteristics: waterproof, no unpleasant odor, fire resistance;
- flock coating is an adhesive with the addition of colored inclusions. The final pattern looks like a mosaic crumb. The application technology is quite original: first, the wall is smeared with an adhesive, and then multi-colored crumbs are thrown on top;
- textured surface - is used most often, because it does not require special skills. This method involves applying the composition using special tools (for example, a relief roller with a pattern intended for plaster) or improvised means such as plastic film, washcloths, spatula. You can even form a pattern with your hands;
- structural ornament, formed from a heterogeneous mass with granular inclusions in the form of granules. Often used for cladding part of a building, both inside and outside. Due to the fact that it is based on an aqueous solvent, it is environmentally friendly.
- glazing, with the help of which the effect of "old" walls is achieved. This mixture does not contain toxins, differing in resistance to external influences.
Advantages and disadvantages.

Relief plaster has a number of advantages. Here are the most significant of them:
- warming effect. To achieve it, you need to pre-treat the wall with a primer (before applying plaster);
- the ability to mask any irregularities and tuberosity on the base of the walls;
- easy operation. detailed instructions on the use of any type of plaster is indicated on the production packaging. Usually relief plaster is applied with your own hands and without difficulty, the main thing is to use the simplest tool (roller, spatula). In addition, it can be used to process almost any coating;
- a wide range of plaster allows you to choose the necessary product that suits the overall design of the room;
- ecological purity. Almost all solutions for embossed decorative plaster do not contain toxins, there are no harmful substances;
- aesthetic appearance. This cladding material looks quite original and elegant;
- resistance to external mechanical influences, changing weather conditions;
- protection against the absorption of foreign odors;
- ease of maintenance. If the walls are dirty, they can simply be washed with running water;
- durability.
The only drawback that it has is far from being a budget price. However, taking into account all the listed advantages, its acquisition is a very profitable investment, which will definitely pay off with many years of service.
Relief decorative plaster is applied quite simply, but still requires certain skills, basic knowledge of repair work and strict adherence to process technology. Therefore, before proceeding to action, you need to realistically assess the possibilities.
The first step is to check the availability of all the tools, without which the embossed plaster is not applied with your own hands. This must be done in advance so as not to be distracted by searches in the future. So, you will need:
- spatulas of different widths;
- trowel (it is better if it is metal);
- spatula for processing corners;
- grater;
- sponge (if applied with it);
- embossed roller designed for plaster;
- a container for preparing a solution (if a ready-made solution is not used).
To proceed directly to plastering, you must first prepare the area to be treated. To do this, the remains of the old coating are removed from the walls, simultaneously cleaning off dust, dirt, mold (if any). When the old layer of plaster holds tightly, it can not be removed. If there are obvious defects, they are leveled with putty and sanded after drying. It is also recommended to tap the walls to check for voids. To avoid contamination, the floor covering is protected with a film.
The application cannot be started without pre-treatment of the surfaces with a primer, which is applied in a thin layer (up to 2 mm) using a conventional roller.
Before that, you must definitely find out what the surface of the wall consists of. For example, a mineral-based primer is suitable for concrete treatment, but for brickwork- acrylic solution. If knowledge is not enough to choose, you can always seek advice from the seller in the hardware store.
How to properly apply relief plaster.
Do-it-yourself relief plaster is covered on the base, in two ways - using a ready-made decorative composition or with independent formation of the finishing pattern (improvisation with texture and shades). Let's consider both of them.
Finished plaster. Work algorithm:
- applying the first layer, which acts as a leveling base. If after preliminary preparation there are still small defects, then they are removed at this stage. With special care, the seams between the plates, corners, bumps and drops should be processed. All actions are performed using a spatula of the required length. The result of this stage is a perfectly flat surface (without depressions, seams, punctures and cracks);
- applying bas-relief plaster with your own hands. Now you can get creative with the process and choose the number of layers and the technique of laying the finished mixture (based on personal preferences). Another option is to strictly follow the instructions on the packaging of the material. In any case, the solution will acquire an original pattern due to the special composition;
- finishing. Includes polishing and staining (if necessary). You can proceed to this stage only after the material has completely hardened, it usually takes about a day (on the packaging of mixtures, manufacturers indicate exact time for which it dries up). To polish the surface to a glossy sheen, wax is most often used, as well as other means. Surface painting is not always required, since many finished plaster mixes already contain dyes. If the base is colorless, then the necessary shade of paint is selected and applied in a thin, even layer.
Relief plaster with a structure that is done independently. Work tips:
- preparatory processes and laying stages are carried out according to the same algorithm as with finished plaster;
- if it is supposed to apply a combined composition of different shades and textures, then each of its layers is prepared and tinted immediately before application, as the process progresses;
- each subsequent layer of material is laid only after the previous one has completely dried. This rule is especially true for relief paintings made of plaster, formed by one's own hands, since it will prevent mixing colors and smearing the pattern;
- it must be taken into account that the shade obtained during the preparation of the composition, after application and drying, will become 2-3 tones lighter;
- as already mentioned, to apply the finished solution to the wall, you can use any improvised object such as washcloths, brushes, crumpled cellophane, fingers - the options are limited only by your own imagination. If you want a clearer ornament, it is better to use a special roller or stencil;
- relief plaster is formed no later than half an hour after application, since subsequently it will begin to harden and finally lose its plasticity;
- the instrumentation must be perfectly clean. This will help to avoid violation of pattern lines and the appearance of blotches of extraneous color.
It is worth deciding in advance on the number of layers and application technique. If this is done during the application process, various transitions and inhomogeneities will be visible.
Creation of relief paintings and decorative panels from plaster.

Do-it-yourself embossed stucco paintings will become a worthy decoration of even the most sophisticated premises, not to mention ordinary apartments. Usually such masterpieces are created using stencils.
The technology of surface preparation and decorative mixture is carried out according to the same algorithm as described in the previous paragraphs. Below are step-by-step actions with a stencil aimed at ensuring that ordinary plaster turned into a piece of art on the wall:
- creating a stencil. It is usually made of paper or other dense sheet material. The thicker the stencil, the more visible the relief in the picture will turn out;
- using glue or double-sided adhesive tape, the stencil is fixed on the surface to be decorated;
- plaster is applied over the stencil. To give the picture a more natural and natural look, it is permissible to draw some elements by hand;
- the stencil is pulled out of the wall at the moment when the solution has already set, but has not yet dried completely. If it is useful in the future, it must be thoroughly cleaned of the solution and dried;
- if the layer is completely dry, then it's time to start painting the picture in accordance with the original idea.
Conclusions.
It turns out that embossed decorative plaster is quite a feasible task for every creative (and not so) person. Of course, you can involve in this process masters who will do all the stages of work much faster and better.
As you know, textured walls look much more attractive than flat surfaces and can give the interior originality and originality. Many developers mistakenly believe that only professionals can do this type of work, and their installation is costly.
In fact, your desire and compliance with all technology requirements are enough to fulfill decorative trim, the price of which will be quite democratic.
How to properly decorate
So, the first thing to remember is that the final result directly depends on the choice of quality materials and the thoroughness of the preparation. Therefore, each stage requires attention and careful execution.
Choice of materials and tools
First you need to decide on the texture that will be on your wall, the appearance of the result of the work depends on it. The time has long passed when you had to prepare the solution yourself - from clay or lime.
Now it is much easier to buy a mixture that you just need to dilute with water, or you can take a solution ready for use, although its cost will be higher.
Among the most common and popular options are the following:
- Cement-based mixtures are indispensable when used outside buildings, as well as in corridors, bathrooms and shower rooms and all other rooms with high humidity.
- Gypsum-based compositions are distinguished by a more uniform structure due to the fine grain size of the components. In addition, they are easy to apply and dry fairly quickly.
- Acrylic compositions are quite reliable and durable, while the color gamut is very wide, so you can easily choose the shade you need.
- Silicone not so long ago, this is the most high-tech and reliable type of all listed. The composition has the highest properties of strength and elasticity and is not affected by moisture, fungi and mold, but its cost cannot be called budget.

In addition to the main component, other materials will be needed:
- Ordinary plaster to create a base coat and level the base - doing this with a decorative composition is too expensive, and using this option you can save a lot of money.
- Deep penetration primer - you should choose a quality one, because it is responsible for the adhesion of the solution to the wall. You can use mixtures with the addition of quartz particles such as "Concrete-contact" and others.
- If you need to finish the outer corners, do not forget about the putty corners - with their help, the geometry of these difficult areas will be perfect.
- If the relief of the surfaces is uneven and serious leveling is required, plaster beacons will be needed, it is better to take the 6 mm high option.

From the tool you will need the following:
- Plastering rule and semi-terrier for wall leveling work. These devices are needed for basic alignment.
- Wide and for applying mortar and texture. For many options, additional devices will be needed: sponges, structural rollers, brushes, graters and much more - even a piece of polyethylene can make an original structure.
- For bas-relief plaster you will need stencils.

- A container for mixing the solution or a drill with a mixer (if the solution is ready, then this item can be omitted).
Foundation preparation
The surface before applying the leveling layer must be subjected to the following work:
- If on the remnants of the old coating, they should be removed. If the surface is painted and it is not possible to remove the layer, the walls must be processed with a chisel - make a lot of notches, this will significantly improve adhesion.

- Next, the surface is cleaned of dust and dirt, it should be done before starting work so that the wall does not become dirty again.
- Priming is carried out with a roller and a brush, do not leave uncovered areas, but smudges should also not form.
- As noted above, if the wall is flat, the installation of beacons is not required, but if it has many irregularities or significant drops, this element should be used. Beacons are set using a long level. They are fixed with the same plaster solution.
- When the composition hardens on the lighthouses, you can start decorating the walls. For this, a solution is prepared and thrown onto the wall with a trowel or a special bucket. After applying a sufficient amount, the solution is pulled together with the help of a rule.
Important!
After hardening, we get a perfectly flat surface.
It is best to prime it again, after drying it is completely ready for the final stage.
Applying the final layer
Do-it-yourself embossed plaster is applied as follows:
- First, the composition is prepared, its quantity should be such that you have time to use it up before the start of solidification.
- The application is made with a wide spatula, while the thickness of the layer depends on the texture you have chosen.
- After application, the surface is treated in a way that will provide the desired texture.
- Further, if necessary, painting is carried out. The final step can be considered the application of a protective layer that will protect and strengthen the surface.
If you like embossed bas-relief plaster, making it yourself is also quite simple:
- First of all, a special mounting adhesive is applied to the site, which is distributed vertically with a brush.
- Next, a mixture is applied to the surface in a chaotic manner to create a texture, this layer must also dry.
- The next step is drawing a picture, for this the stencil is attached to the wall with masking tape. Then a thick layer of adhesive is applied. When it hardens a little, the stencil is removed, it is important to prevent solidification, then it will be very difficult to remove the pattern.
- The surface can be toned, add interesting shades and accents.
Important!
Remember that if you cover raised fragments matte paint, they will become more voluminous.

Conclusion
As you can see, the work in appearance is much more difficult than in the process of implementation. The video in this article will tell you some Interesting Facts relating to this topic.


