
Sloped roofs are among the most popular and most effective roof structures. The construction and arrangement of such a roof requires the contractor to have certain skills to perform the necessary calculations and related activities.
However, having understood the main provisions of the manual, it will be possible to cope with the arrangement of such a roof structure on its own without the involvement of third-party specialists, which will significantly save money.
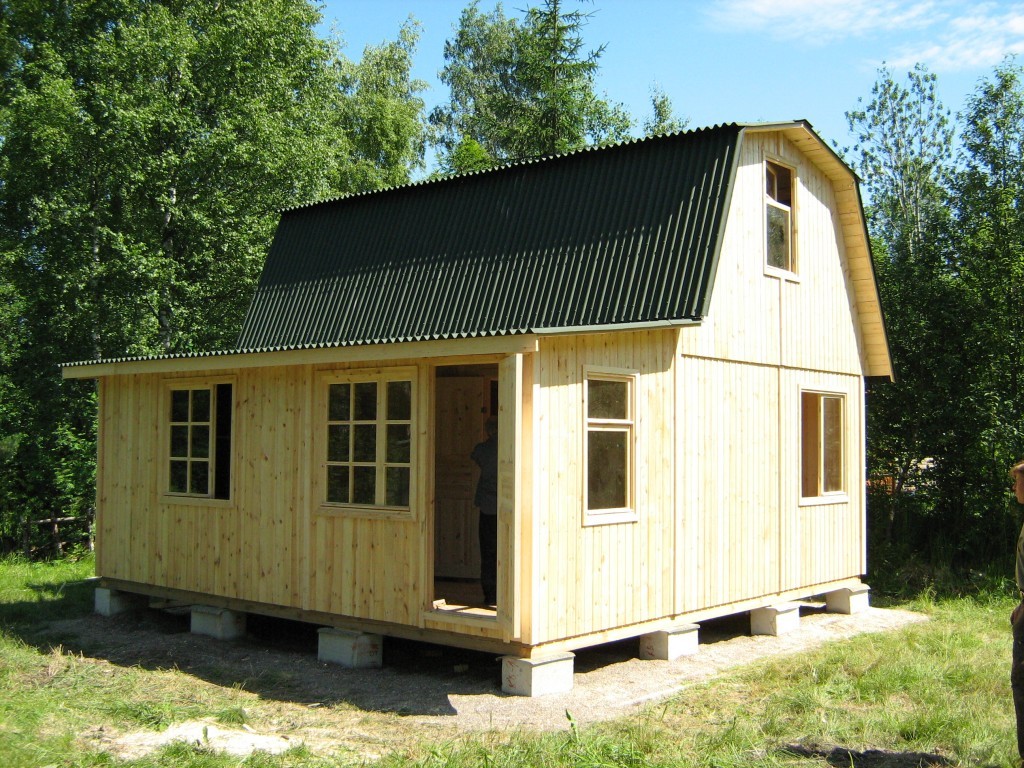
A sloping roof is perfect for those situations where the arrangement of a residential attic is planned. In this case, the roof space will have fairly high ceilings.
It is somewhat more difficult to build a sloping roof than an ordinary one- or two-slope structure, but, as you already know, there are no impossible tasks.
Broken roofs look best on buildings that have a square shape. If your house is narrow and long, there will be practically no benefit from the attic, and therefore from the roof structure in question.

Any roof structures, and the broken line is no exception, are calculated in two stages. When performing the first calculation, the required amount of finishing material is set, and the second calculation is designed to establish the bearing capacity of the rafters.
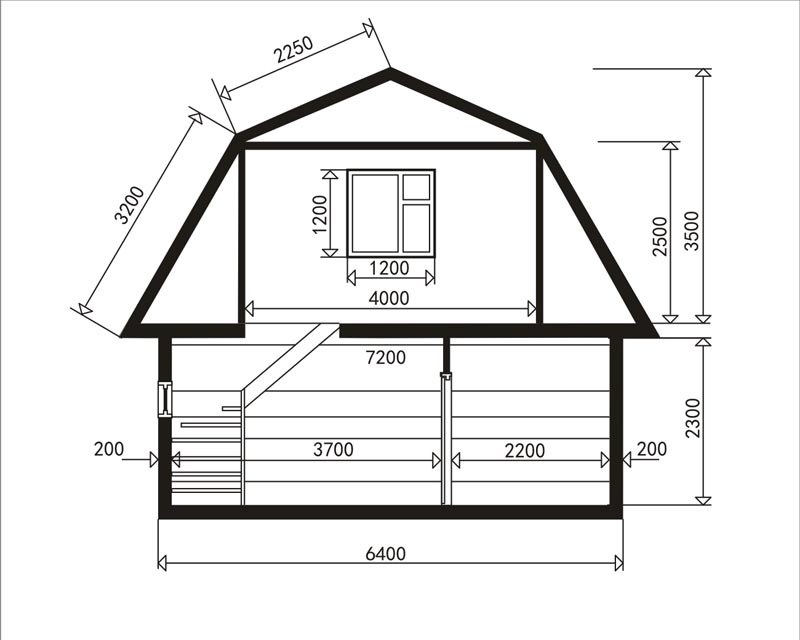
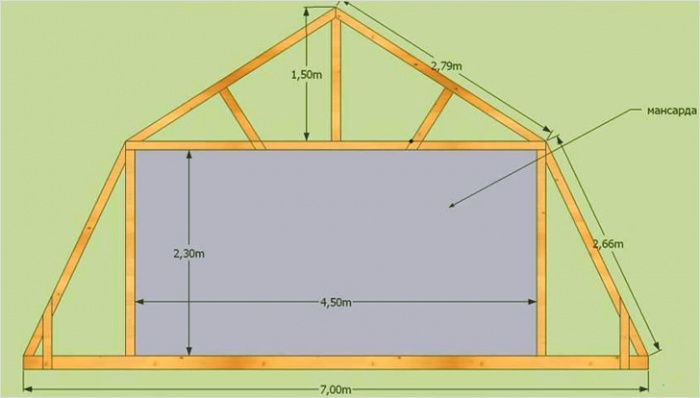
Drawing - Dimensions mansard roof
The first calculation is performed using the values of the geometric dimensions of the roofing system. The calculation of the bearing capacity of the rafter system is somewhat more complicated. When performing it, the following indicators must be taken into account:
Having received all the above data, you can calculate the rafter system using the appropriate formulas, or special programs which is easier, faster and more convenient.
According to the results of the calculations, you will determine whether the sections of structural elements are specifically suitable for your roof structure. If necessary, the characteristics of the crate and rafter legs can be changed. You can also replace the roofing material.
For maximum convenience, create a three-dimensional model of the future broken roof structure with the parameters you have chosen. Special programs will help you with this.
What is the roof made of?
After completing all the calculations and preparing the necessary project documentation, you will know what the section of the elements should be truss system roofs, which crate is best to equip and which roofing material is suitable specifically for your case.
Go get the necessary supplies.
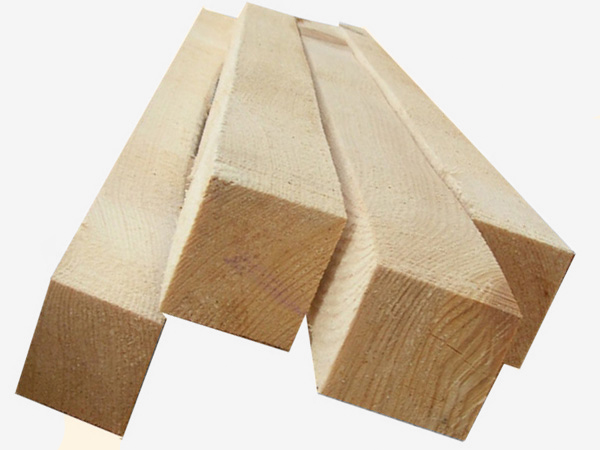
First of all, buy a beam for arranging the Mauerlat, as well as beams or boards for mounting the batten and an edged board for the rafter system. Also, rafters can be made from timber.
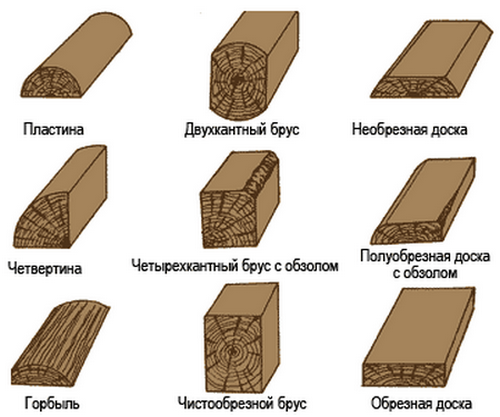
Pine wood is ideal. It is important that the moisture content of the material does not exceed 20-22%. The material should not have large knots. Traces of damage by bugs and bluish spots should also be absent.
Consider the fact that the strength, reliability and durability of a broken roof structure directly depends on the quality of wood.
Before using the purchased material for its intended purpose, be sure to treat it with an antiseptic preparation. Special tools will protect the material from decay. Also, periodic treatment with antiseptics will need to be carried out during the entire period of use of the roof structure.
In addition to antiseptics, all wood must be treated with flame retardants - these are special fire-fighting agents.
Process the material outdoors or in a well-ventilated area. Be sure to wear protective gloves and a respirator. The mentioned means are applied in a double layer. For application, it is most convenient to use a sprayer, ordinary brushes are also suitable.

After applying the impregnations, let them dry completely, and only then proceed to the other planned activities.
Also, for arranging a broken roof structure, you will need fasteners - self-tapping screws, plates, bolts, etc.


Additionally, purchase suitable materials for waterproofing, insulation and vapor barrier of the structure, as well as finishing roofing material.
Roof erection procedure
The arrangement of the considered structure is carried out in a few simple steps.
First step
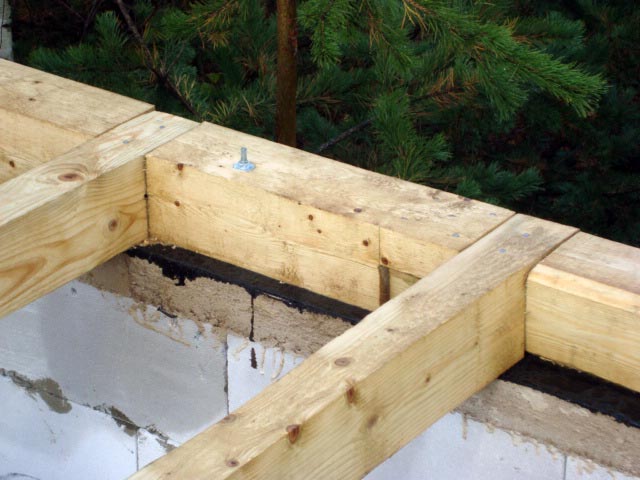
Fasten the Mauerlat to the top strapping beam.

Second step
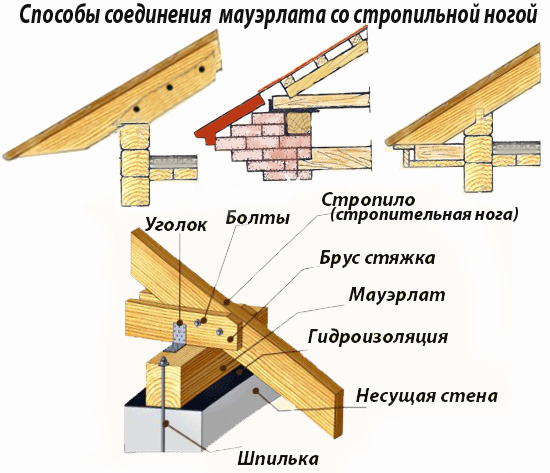
Install the rafter legs according to your design drawings. Pre-cut the templates for connecting the truss elements with the support beam (Mauerlat).
Third step
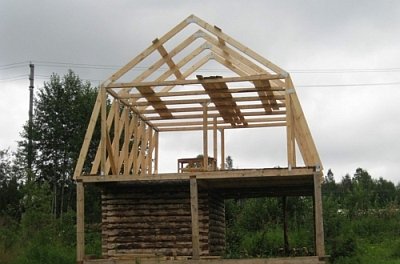
Set up vertical racks and fix them on the floor beams. They will take on the function of the frame of the walls of the future roofing space.
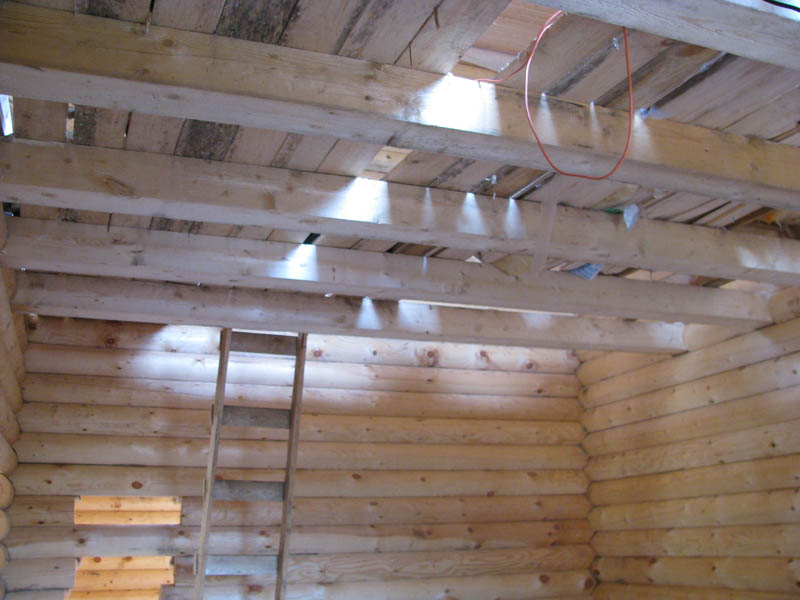
At the top, tie the racks with girders. These elements will simultaneously take over the functions of puffs for the upper truss elements and ceiling beams for attic room.

Perform further work according to the requirements of your project. At the same time, be sure to keep in mind that the rafters, due to which a sheer roofing bevel is formed and the upper rafter legs with a Mauerlat are tightened, must be layered. The upper rafters in the construction of such a roof will be of the hanging type.
For additional rigidity of the hanging rafter legs, provide fixation on the pasterns. They must be connected to puffs that act as ceiling beams of the attic floor.
If necessary, install spacers and struts. All listed structural fasteners should be initially marked on your roof drawings.
On the extreme rafters placed at the ends of the house, install additional frames to accommodate gables, doorways and double-glazed windows.
Insulation work and finishing
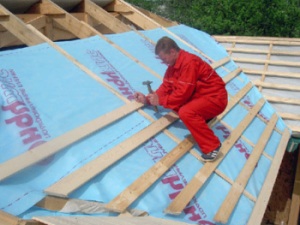
In conclusion, it remains to lay the necessary insulating materials. First, fix the vapor barrier film along the frame of the roof structure, laying it along the rafter legs and fixing it with a stapler. Fasten the film with an overlap, without excessive sagging.
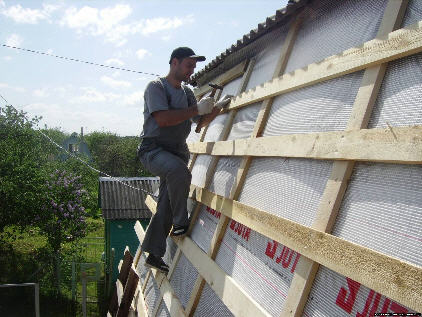
Mount the crate from the timber. Select the step of the crate individually in accordance with the features of the chosen finishing coating. In some situations, a metal profile is used to equip the crate, but the option using a wooden beam is the most common.
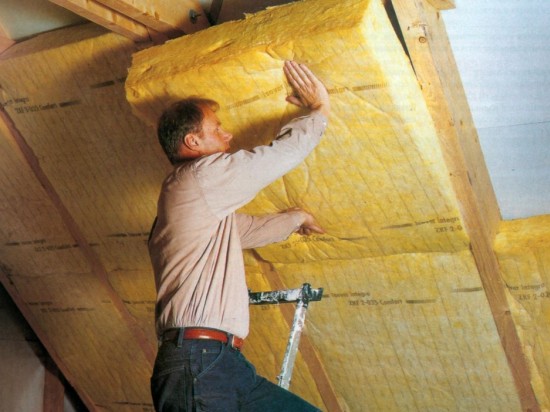
Lay heat-insulating material (preferably mineral wool) between the rafters. Place the heater in the spacer. From the side of the attic room, additionally fix the insulation with a crate. In the future, the finishing internal coating will be fixed to it.
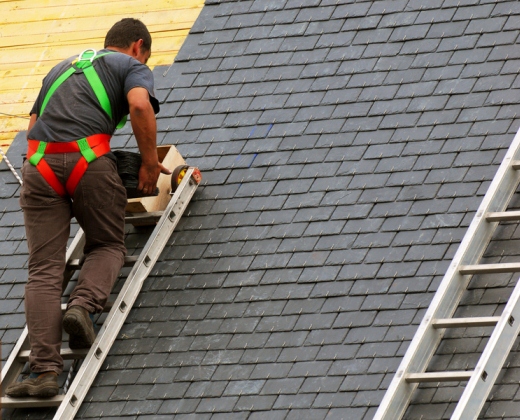
Lay waterproofing material. The principles of laying and fastening are the same as in the case of a vapor barrier membrane. Proceed to laying the finishing material on top of the equipped moisture insulation. The slopes of the design under consideration are based on a broken profile, so the finish coating should be started from the bottom.
At the joints of the roof slopes, lay the top row of finishing material so that it overlaps the lower tier and creates a kind of visor above it.
Roofing on mansard roof
In conclusion, it is necessary to install various additional elements of the roof structure, such as gutters, fences, etc.
The finished broken roof structure, created on its own, is in no way inferior to similar buildings equipped with the involvement of professionals.
Successful work!
Video - Do-it-yourself sloping roof
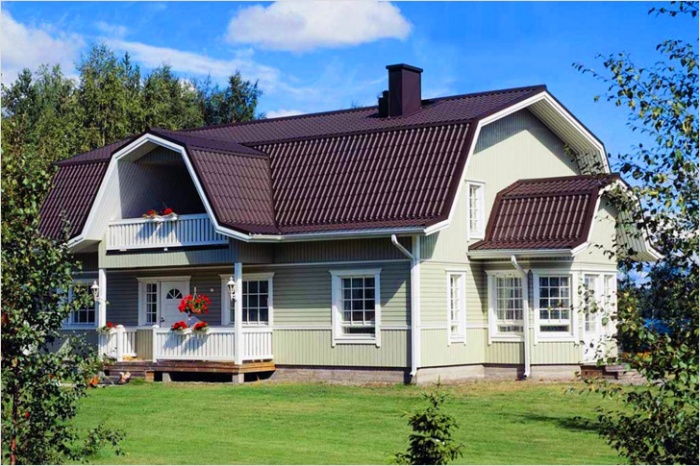
Broken, or mansard, roofs are quite complex in design, but nevertheless they are very popular with homeowners. The main reason why such roofs are erected is the maximum use of the under-roof space. Spacious attic space and original appearance- Definite benefits to take advantage of.
Material for the truss system
The main component of the roof frame is wood. For the device of the truss system, coniferous wood is usually used, with a small number of defects. Pine, spruce, fir are the best options. Larch is optimally suited for the arrangement of beds and Mauerlats.
The wood must be dry (but not overdried), well processed and even (this is an important condition for the installation of the truss system). You will need several cubic meters of timber.
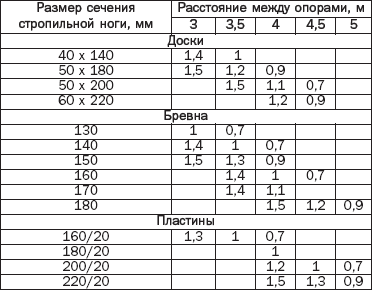
A thick square or rectangular beam, with a section of at least 20 cm, is used as a Mauerlat. Beds can also be made from timber, but a sanded carriage will also work. The rafter legs are made of a rectangular beam with a thickness of 50 to 100 mm and a height of 150 mm. Sheathing, depending on the coating you choose, can be made from edged boards (at least an inch thick) or from bars 40x40 (40x60) mm.
It will not be possible to save money on a sloping roof - more wood is needed for such structures, and besides, they are heavier. This must be taken into account when building a house.
You will also need a variety of hardware - brackets, staples, studs, nails and screws. The number of fasteners depends on the size of the frame.
And, of course, it will be necessary to purchase the filling for the "roofing pie" - - and waterproofing materials,.
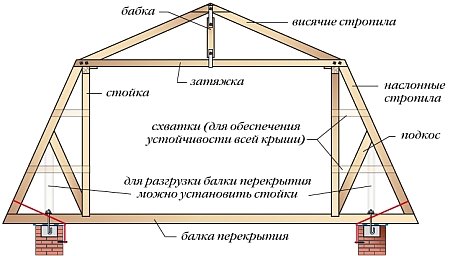
The device and the main nodes of the truss system
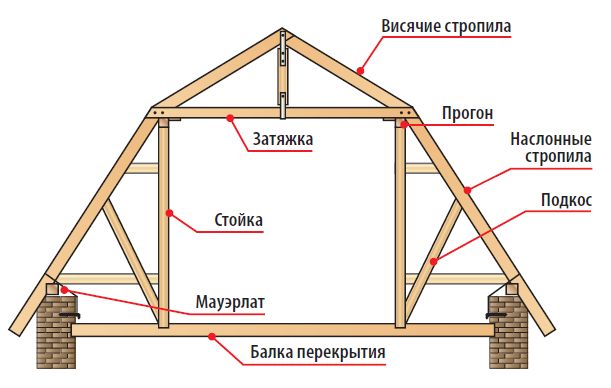
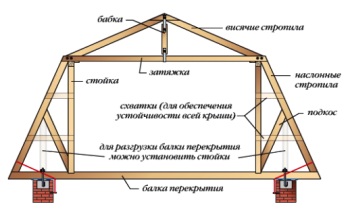
Sloped roofs can be both single-pitched and four-pitched, but the most common type is gable. broken roof. The rafter system of such a roof (as, in fact, of all others) consists of the following elements:
- Rafter(or rafter legs). The main element of the frame, which determines the rigidity and strength of the structure, as well as the angle of inclination of the slopes.
- Run. The supporting element connecting the rafters.
- Mauerlat. A kind of foundation of the truss system, which evenly distributes the load on the walls of the building. Rafters are installed on it.
- crate. basis for finishing roofing material, significantly reinforcing and strengthening the frame.
- Skate. The upper junction of two slopes, the place of their connection.
- Struts and racks. Spacer elements designed to strengthen the rafters. Attached to bed.
- Sill. Massive beam, based on the front walls and ceiling. It is laid parallel to the ridge and serves as an additional support for the rafter system.
- puff. A connecting element that fixes the rafter legs.
- Eaves- the lower part of the slope, protruding beyond the walls. It is designed to prevent precipitation from falling on the walls.
- Filly. Additional pieces of timber, extending the rafter legs, if they are not enough to make an overhang of the desired size.
Rafter system and beams
The design of the mansard roof includes two types of rafters: layered and hanging.
This is the rafters of the lower roof slope. They are installed at an acute angle (from 60 degrees), their lower part is firmly fixed on the Mauerlat, and the upper part on the central run (or on vertical racks). To strengthen the structure, a jumper (crossbar) is mounted in the upper part, located parallel to the run and connecting the rafters to each other.
The upper slope is more gentle, it is formed by the lower part of which lies on the central run, and the upper one is connected to the ridge.
If the lower slope is very steep, the rafters are attached to the floor beams, which in this case are installed with a 40-50 cm outlet for bearing walls. With such a system, it is also possible to install a Mauerlat, but not on the walls, but on the edge of the floor beams.
Calculation of roofing material
All calculations must begin with the calculation total area roofs. The design is quite simple and it will not be difficult to do this. Then it is worth calculating separately the area of \u200b\u200beach slope, and the area of multi-level sections - this will make it possible (if you have already decided on the choice of roofing material and know its working dimensions) to calculate the amount of waste.
The calculation of fasteners is a rather painstaking task, you should remember:
- For one sq. m. metal tiles need 8 self-tapping screws
- For one sq. m. roll insulation needs 4 staples for a stapler.
- 6 nails or self-tapping screws per sq. m. Lathing and counter-lattices.
The number of brackets, brackets and threaded connections depends on the number of rafter legs and the design of the truss system.
It is better to entrust the calculation of the truss system itself to specialists, many factors must be taken into account - the specific gravity of lumber, the amount of precipitation, the angle of inclination of the slopes, the total load on the bearing walls, etc.
Naturally, you will have to decide what material to sheathe the attic and calculate its amount.
The device of a broken gable roof
The device of the attic truss system
Tool required for the job:
- A set of carpentry tools (hammer, hand saw, ax, chisel).
- Plumb and building level.
- Marker or pencil.
- Metal square.
- Roulette mechanical.
- Cord.
- Electric drill and drills.
- Screwdriver with nozzles.
- stapler.
- Painting knife.
- Spanners.
- Electric or chainsaw (as an option, a hand-held electric circular saw).
Before proceeding directly to the installation, it is imperative to complete a working drawing of the roof, detailed, with all dimensions.
It is advisable to treat the timber with a special impregnation that protects against decay the day before the start of work. It is possible to process the wooden elements of the roof after installation, but on the ground it is much more convenient and, therefore, faster.
General scheme for the construction and erection of a sloping roof
If necessary, install a power plate around the entire perimeter of the walls. Houses built of wood already have a Mauerlat - this is the top crown. In brick or block buildings, studs or anchors are pre-mounted in the upper rows of masonry to which the timber is attached.
Lay it flush with inside walls, under the Mauerlat it is imperative to put waterproofing - waterproofing or ordinary. Mounting holes can be marked on the spot. Ideally, this roof element should lie horizontally (“in level”).
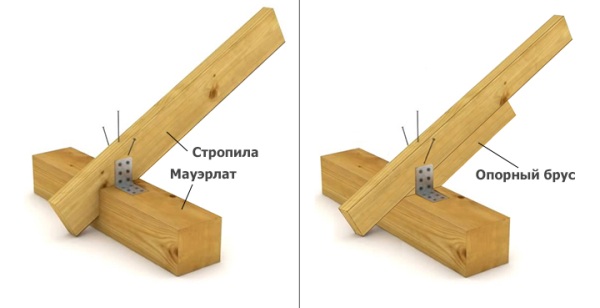
Fastening rafters to Mauerlat
floor beams, depending on the design, it can be laid in the openings left in the masonry before the Mauerlat is installed, or it can be mounted on the Mauerlat. The distance between them, depending on their thickness and the size of the roof, varies from 50 to 100 cm. The lower (ceiling) side of the beams is perfectly aligned with a cord stretched between the extreme beams. On top of the beams, a solid flooring is made of boards.
Then lay the beds (if provided structurally) under the central runs, parallel to the supporting walls and fasten them.
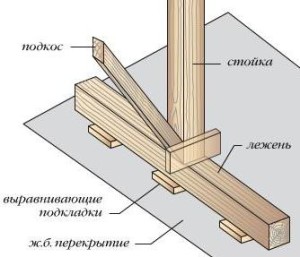
The next stage of installation is the installation of racks. The beam is cut to the size indicated in the drawings. The rack bar usually has a section of 100x150 mm. Racks are aligned vertically with a level or plumb line and temporarily fixed with jibs. The lower part of the rack is installed on the bed in the marked places or attached to the floor beams (for each beam). The result is two parallel rows of racks of the same height.
Central purlins are mounted on racks, fixed with metal corners or nails. On top of the runs, a crossbar of 50x200 cm is installed, down with the narrow side. The crossbars are grabbed with boards in two or three places, these are temporary fasteners to obtain a rigid structure. In fact, it turns out the contour of the future attic - the racks will be the basis of its walls.
After the truss system is assembled, the racks are additionally fastened with struts.
Further installation can be carried out in two ways:
- One of them is to collect the upper ones on the ground and install them on the runs one by one. This method requires great precision and professional skills.
- It is easier to start installing rafters directly on the roof.
First of all, the layered lower rafters are installed, they are temporarily fixed, leveled and fixed thoroughly. On the lower part of the rafter legs, a tie-in is made so that the rafter rests on the Mauerlat or cut it at the right angle and join it with the floor beams. Rigidly fix the rafters with brackets and brackets.
To install the upper hanging rafters, you need to determine the center of the roof. Temporary racks are placed on the front Mauerlats, a board is fixed between them (temporary upper run) and a template is cut out.
After making sure that it fits everywhere, rafters are cut out on it. Install the extreme truss trusses on the runs and fasten them. The remaining rafters are exposed along the stretched cord. Then the entire truss system is thoroughly fixed and the frame of the roof windows (if they are planned) is set up. Then you can proceed to the device "roofing cake" and battens.
You will learn more about the technology for installing rafters for a sloping roof from the video.
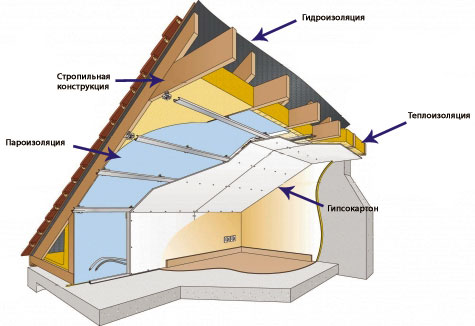
roofing cake
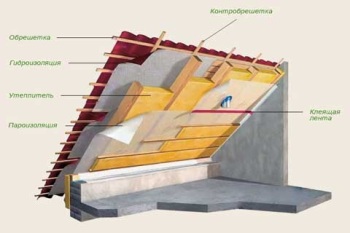
Insulated roof structure.
The roofing pie consists of a vapor barrier layer, ventilation gaps, insulation, a waterproofing layer, battens, counter battens and roofing.
Spread on the inside of the rafters and. The overlap is about 15 cm, the joints are glued. Then, insulation is tightly laid between the rafters, if necessary in two layers. Between the insulation and the vapor barrier there must be a free space for air circulation, at least 40 mm.
The same gap should be left between the insulation and the waterproofing layer, which is laid on the outer side of the rafters, with an overlap, and fixed with a stapler.
Then a wooden lath is nailed to each rafter - a counter-lattice. A crate is attached to it, perpendicular to the rafters. It serves as the basis for the finishing roofing.
Skylights
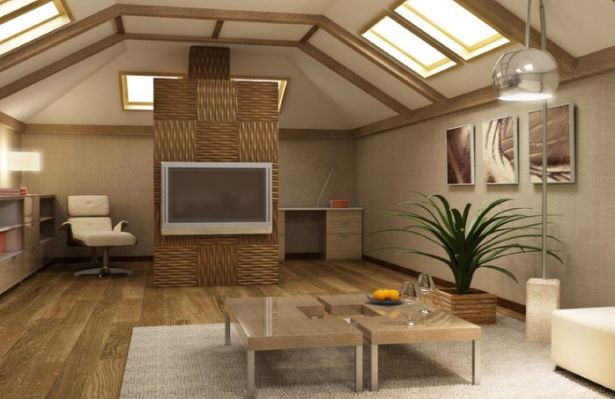
- This is practically the second floor of your house. If you will actively exploit it, you need to install windows at least on the gables in order to provide natural light during the day.
A window built into the roof is good design decision, although it requires an additional frame, but it gives the roof a spectacular appearance. In addition, it is a natural ventilation outlet. There is a large selection of such products on the roofing materials market; finding a suitable window is not difficult.
Broken gable roof - the most effective method get the maximum usable area. Following the installation technology, you can create another residential floor with your own hands. Another advantage of this type of roofing is the ability to make your home warmer.
-
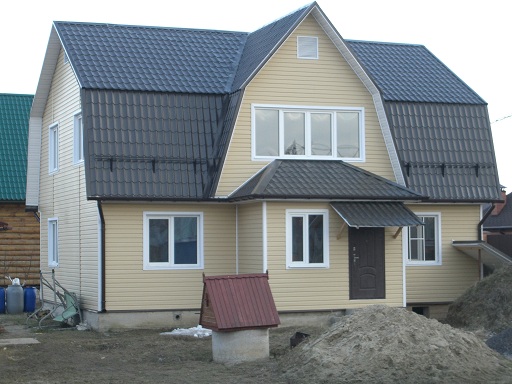
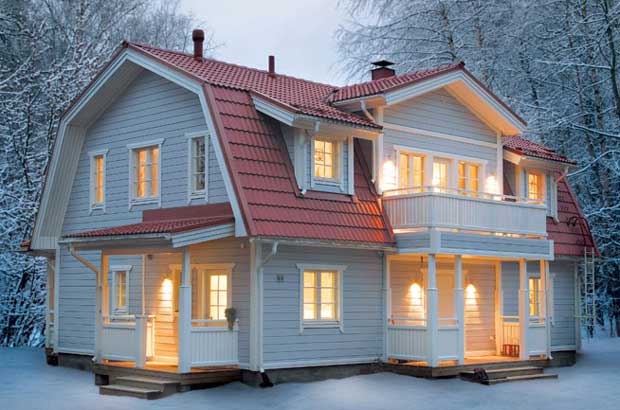
The roof, which until recently performed mainly only a protective function, today has become an object that also provides additional space, which can become a full-fledged living space for a person. The best option for these purposes is a broken gable roof.
A gable sloping roof with an attic differs from the usual kinks in its slopes. The planes of the two rectangles, bending in the center, form an edge at the junction, so the resulting visual geometry will be broken.
The architectural design of a sloping roof is considered quite expensive, since its implementation requires a rather large amount of such building material, how:
- high quality softwood,
- high-quality insulation, insulation and
- decorative and finishing building material.
However, its popularity is constantly growing. This is understandable, because the configuration of such a roof allows you to significantly expand the area of \u200b\u200bthe structure in width, without changing the height, which makes it possible to equip an attic under it.
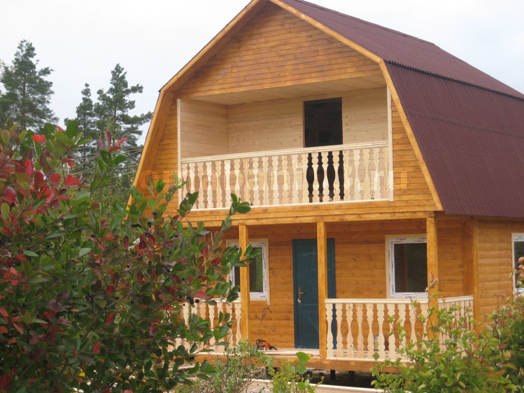
In addition, a gable sloping roof allows you to install windows in the slopes, which allows you to really save on electricity. Undoubtedly, this is another advantage. Moreover, they allow you to get aesthetic solutions for the building, say, a balcony that fits perfectly into the end of the building.
How to build a mansard sloping roof
The construction of a house with a sloping roof, like any other, begins with drawing up (manually or on a computer) drawings and a plan for its construction. When making drawings, be sure to observe the scale. At this stage of work, the slope angles of the slopes, the height of the structure and the location (as well as the dimensions) of the attic window openings should already be determined.
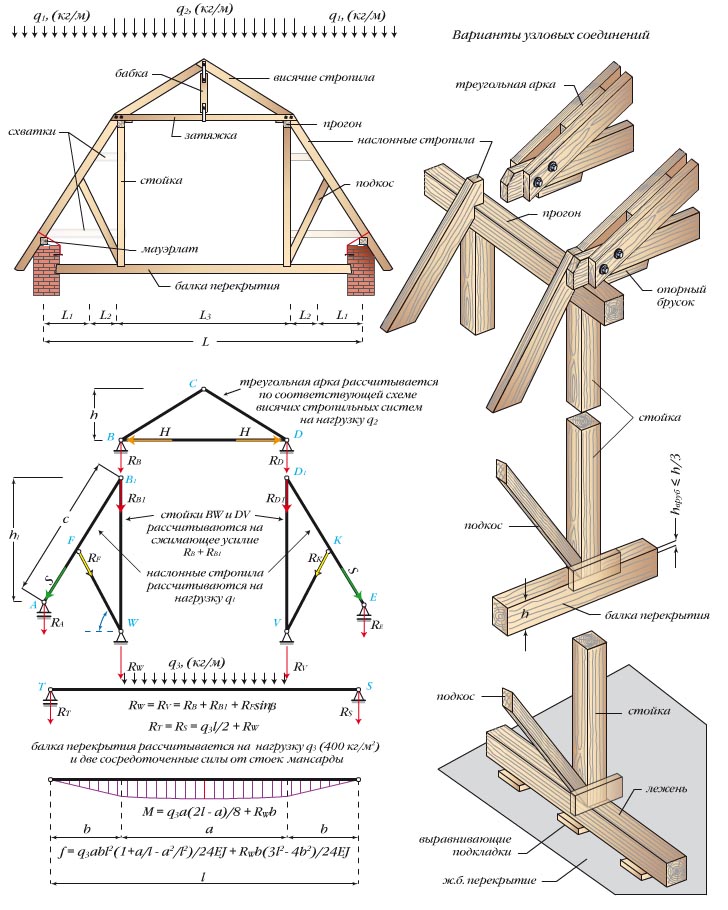
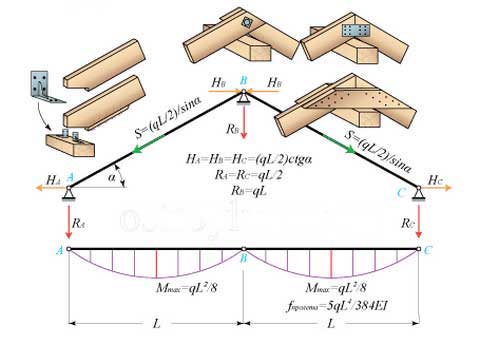
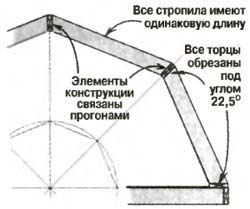
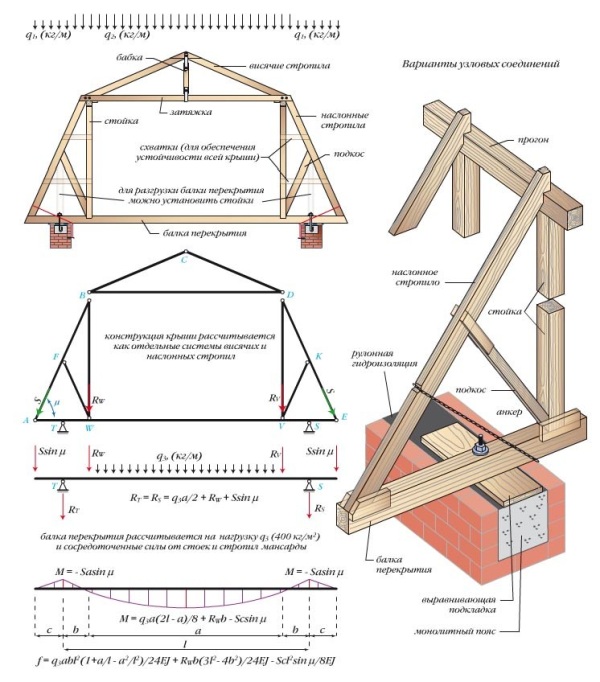
The principle of construction is to combine hanging and layered rafters into a single structure, which forms a supporting structure. The slope of the sloping roof at the bottom of the slope is greater than at the top. The design in this case becomes more complicated to the farm, that is, two short rafters with racks and stretch marks are involved in the formation of the slope at the fracture site. The slope of the upper part is 25-30°, and in the lower part - 65-80°. The lower belt of the resulting truss will become the basis for the attic floor.
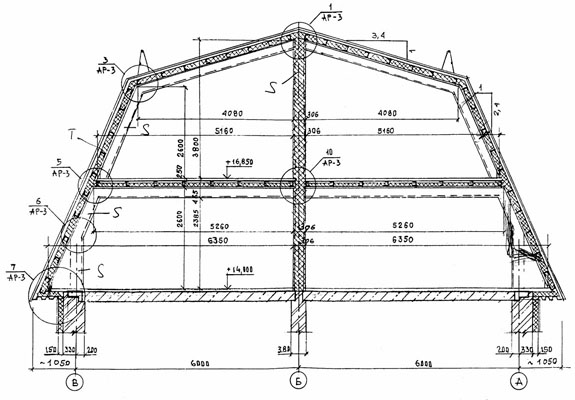
The drawing of the foot and roof of the future house looks like the following.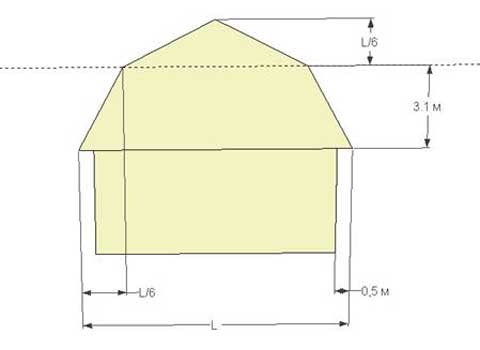
With the specified height (3.1 m) of the location of the break, the final height of the attic ceilings is 2.5 m. This value and the angles of inclination, respectively, 60 ° and 30 ° are recommended, but they can be changed.
After calculating the strength of the truss system, they proceed directly to the installation of the mansard roof.
When constructing a sloping roof, including a truss system, it is better to use light building materials. This is important not only to simplify the construction process, but also to ensure maximum safety of the residential attic floor.
Mauerlat installation
Mauerlat distributes the load transmitted by the rafters to the upper part of the walls and ties the roof of the house to them. The support beam in the case of the construction of a mansard gable roof is attached to the slope of the rafters on both sides. First, it is required to carry out waterproofing work, for example, with the help of roofing felt or other similar material.
The installation of the Mauerlat is most often carried out by pouring monolithic concrete and fastening the studs through the timber to the wall. Their step is calculated in such a way that the studs are between the rafters. In this case, in the Mauerlat beam, you can get the minimum number of closely spaced tie-ins, which will provide it with the highest density.
The holes for the studs are drilled exactly to their size. After installation, washers are placed under the bottom and tightened with nuts. If the house is newly built, the studs can be pre-installed in the masonry.
When constructing a new roof on an old house, the floor beams, when viewed from above, may not form a strict rectangle. It's OK! But for the convenience of carrying out further work, it will be necessary to slightly correct the position of the racks in order to ensure the strict parallelism of the sides of the resulting rectangle.
Rack installation
In two lines, first, extreme racks are set (beam 150 * 100 mm), after which intermediate beams (150 * 50 mm) and fixed with temporary struts. Racks are selected with a height of 10-15 cm more than the required finishing height of future attic ceilings.
Crossbars are installed and fixed on the runs laid on the racks. Moreover, a temporary backup is installed under each of them.
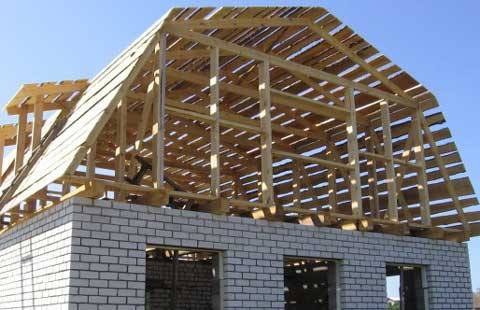
Installation of the truss system
Mounting a sloping roof at the top is a rather laborious process, so the finished trusses are assembled on the ground, then they are raised and fixed. To do this, on the roof you need to connect the bars. After completing all the measurements, outline the cutouts for installation and perform the necessary fastenings.
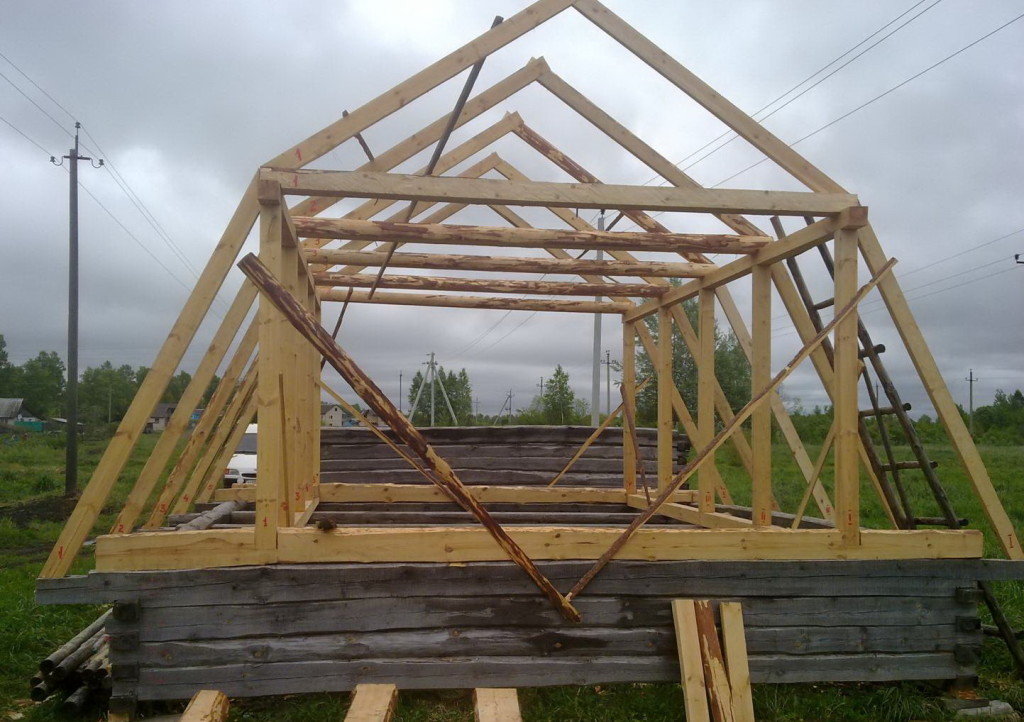
When the first two of the trusses are already assembled, they are installed along the edges and fixed. On their upper point (ridge) they pull the level. It is with his help that the rest of the farms are established.
Having fully installed all the trusses, they are fastened together, thereby giving the structure greater rigidity. For this, crossbars are used, which will later serve as the basis for the attic ceiling.
If on attic floor windows are planned for houses with a sloping roof, corresponding openings are made in the truss system. For windows with removal or vertical installation, an additional rafter system is set up.
The result should be something like this design.
Lathing installation
Depending on the future roofing material, the type of lathing may differ:
In conclusion, the installation of roofing material is carried out.
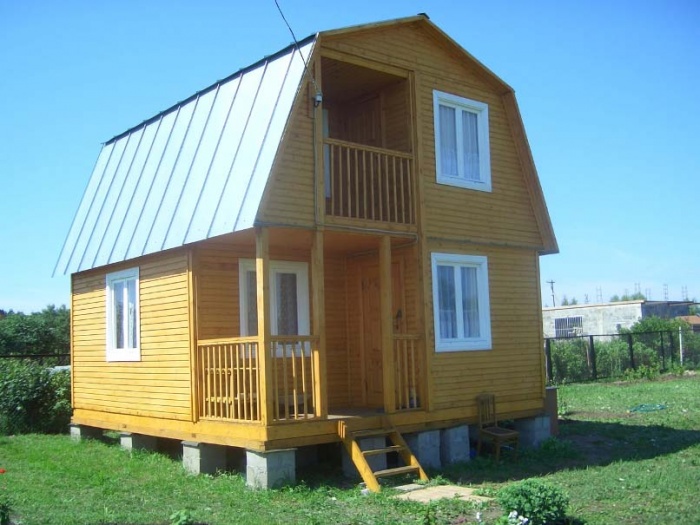
The main reason for the rather widespread use of a sloping roof is that a conventional gable roof forms relatively little free space, which in most cases is not enough for use as a living space. At the same time, when erecting a sloping roof during the construction of a private house, it is possible to build a full-fledged attic. At the same time, do not forget that the sloping roof looks extremely attractive, giving residential building aesthetic and solid appearance.
Sloped roof features
The design of a broken roof is a variation of the usual gable roof, with a small addition - there is a break on each slope. In fact, this turns the roof into a hipped one. The main purpose of such a change is to increase the under-roof space. Usually an attic is equipped there, which is almost a full-fledged residential floor.
The construction of a sloping roof is somewhat more complicated than a conventional gable roof, but does not differ much from the construction of a hip roof. Basic design feature The roof under consideration is the presence of two types of rafters:
- Lower (layered). They in most cases have a large angle, the value of which is equal to or greater than 60 degrees;
- Upper (hanging). The angle of their location is sharper, usually it does not differ much from 30 degrees.
The sloping roof is most often used in private housing construction. Therefore, its width rarely exceeds 5-6 meters. This is due to a much more complex design of the truss system with a larger width, which complicates the work, increases their cost, making this design solution economically unfeasible.
It should also be taken into account that the construction of a broken roof contains not only rafters, but some additional and auxiliary elements in the form of racks, struts, puffs, etc. Their dimensions are determined when calculating the truss system. It is because of their presence that the truss system is somewhat more complicated than that used with a gable construction.
It should not be forgotten that an important advantage of a sloping roof is that it gives the appearance of the building a certain solidity, and it simply looks much more attractive than the usual gable roof. It is this combination of the high functionality of the building, expressed in the possibility of equipping the attic, and an extremely attractive and aesthetic appearance that largely explains the reason for the popularity of the structure in question, despite its relative complexity.
Calculation of the dimensions of the roof
The calculation of the dimensions of a sloping roof can conditionally be divided into two parts.
Calculation of the roof coverage area
This part is the most simple and uncomplicated. To calculate the area, it is enough just to make its plan with the application of all sizes. In this case, the scheme will be a set of simple figures - in most cases, quadrangles, in especially complex design solutions - and triangles. It is not difficult to calculate the areas of these figures, as well as add them up to get the total coverage area.
But even these procedures can be performed using numerous calculators, which greatly facilitate the implementation of the second part of the calculations.
Calculation of the dimensions of the elements and details of the truss system
The calculation of the dimensions of the rafter system for a sloping roof is much more difficult, including due to the fact that it contains many connecting rather complicated nodes. But without their correct calculation and implementation, a long and reliable roof operation is impossible. The size of the truss system is influenced by many factors:
- the weight constituent parts roofing cake:
- battens and counter battens;
- completed waterproofing and vapor barrier;
- thermal insulation material;
- directly the weight of the roofing;
- geometric dimensions of the main elements of the roof:
- the span from the overhang of the eaves to the ridge of the roof;
- the angle of the upper and lower rafters;
- the selected step of the crate and rafters;
- operational loads (weight of people repairing and maintaining the roof, engineering and maintenance devices, fences, aerators, skylights, etc.)
Based on the list of factors listed above that affect the size of the required truss system, it becomes clear that its calculation is not a simple operation. That is why a large number of auxiliary online calculators have been developed, with the help of which it is quite easy to perform all the calculations.
Calculators will perfectly cope with the calculation of the total area of roofing, as well as required amount material for hydro - and vapor barrier.
To calculate the truss system, it is necessary to enter the relevant data into the calculator, which should characterize each of the above influencing factors.
wind load
Approximate wind load is easily determined from the corresponding map for each region.
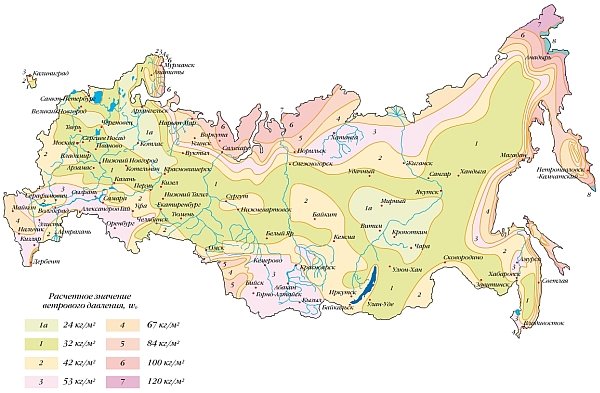
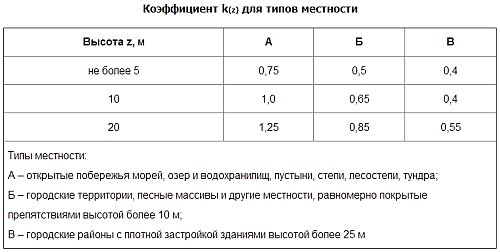
The resulting value of the wind load must be corrected depending on the coefficient that takes into account the height of the building being erected and the type of area where the construction site is located.
Snow load
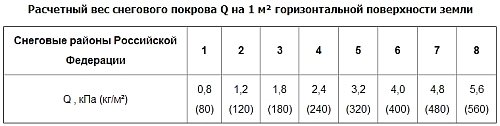
The amount of snow load that can affect the roof is taken from the corresponding map containing the relevant data for the regions of Russia.
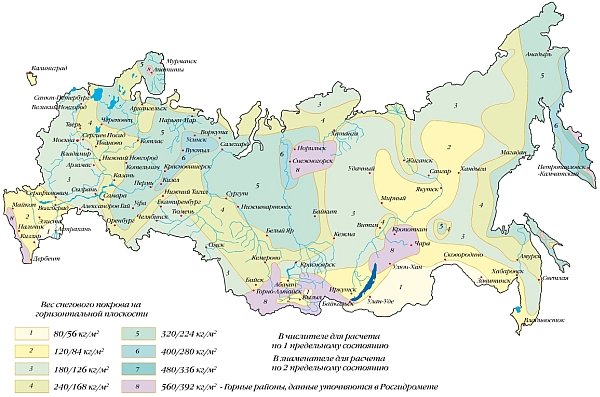
Based on the area determined on the map, you can find out the amount of snow load required for the calculation.
Load from roof structures
Most calculators independently calculate this parameter, it is enough to simply indicate the materials used and the main geometric dimensions of the roof being designed, namely: the pitch of the rafters and battens, the angles of the slopes, the distance from the ridge to the overhang, as well as the material of the roof covering. The program will perform all other calculations offline.
After entering all the necessary information into the program, the calculator will give out all the necessary dimensions of the elements and parts of the truss system, as well as the area of the roof covering and the necessary vapor and waterproofing materials.
It remains only to competently translate the calculation of the rafters and the coverage area into a specific design of a broken roof.

Conclusion
The device of a sloping roof on a private house is a more complex constructive and technological solution than the construction of a conventional gable roof. However, with the correct calculation of structures and competent performance of work, a broken roof allows you to get a full residential attic, as well as an extremely attractive and aesthetic appearance of the building.


