
When planning a balcony renovation, many are faced with the difficult problem of choosing decorative finishing materials. At the initial stage, the question is usually formulated as follows: "Wood or plastic?". Wood, of course, is natural and environmentally friendly, but nevertheless, plastic panels for a balcony remain the most popular material. And they are presented on the market in such a huge range that it is very difficult for an inexperienced buyer to make a choice.
Let's try to figure out what plastic panels for finishing a balcony are in general, how they differ from each other and what advantages and disadvantages they have.
What is good and bad plastic
First of all, we note that the popularity of plastic did not appear from scratch. So, plastic panels for the balcony:
- durable (warranty period - 10-30 years);
- durable, resistant to mechanical stress due to stiffening ribs;
- moisture resistant;
- do not emit any toxic and harmful substances;
- not afraid of frost, do not fade in the sun;
- do not support combustion, fireproof;
- easy to install (even a beginner can handle it);
- antistatic, do not attract dust and dirt;
- do not require special care (wash with plain water or wipe with a damp cloth);
- have many color shades and imitations for natural materials;
- cheap.
There are only two significant drawbacks to plastic panels, and it is they who sometimes scare away buyers. This is the unnaturalness of the material and the specific smell of plastic, which is sometimes felt after installing the panels.
For residential premises, this, of course, can be a serious argument against the use of plastic. But when finishing a balcony, these shortcomings do not matter. The smell will disappear without a trace in a few days, and natural wooden lining, after being treated with all kinds of impregnations and varnishes, will differ little in terms of environmental friendliness from harmless plastic.
Besides , PVC panels for the balcony, although durable, but up to brick wall they are far away. Strong impacts and sharp objects can damage them. And if you come across low-quality plastic, then with sudden temperature changes it can be deformed.
Types of plastic panels
Balcony panels differ in four positions: size, manufacturing method, method of connecting panels to each other and type of coating. Let's see what they are.
The size
There are three types of balcony plastic:
Wall panels
- wall (sheet) panels and plates. Width - from 25 cm to 2.44 m, length - from 2.5 to 6 m. Used for sheathing any horizontal and vertical surfaces. For decorative finishes balconies and loggias are most often used planks 25-40 cm wide;
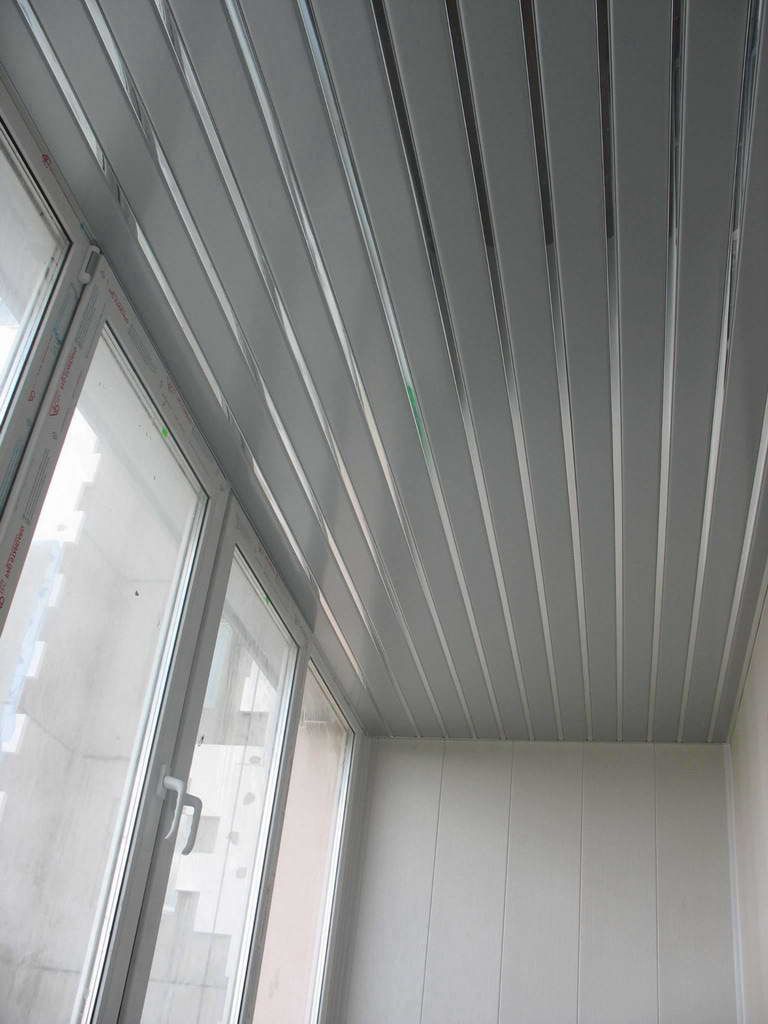
- lining. Type-setting rails 10-20 cm wide and up to 6 m long. They are used both for balcony walls and for ceilings. They are connected to each other according to the "protrusion-groove" principle. To make the walls appear higher, the lining is mounted vertically;
- tile. Square shape with a side of 30 cm to 1 m. It is mainly used for the ceiling, but some also use it for walls. It turns out unusual and original design, especially if you arrange the tiles in a checkerboard pattern or build a mosaic.
Connection method
According to the method of docking, PVC balcony panels are suture and seamless. Each method is good in its own way. Plastic lining for a balcony makes the wall embossed and gives seams that visually lengthen the room. When using wall panels for a balcony, a beautiful, even, seamless surface is obtained.
Preparation method
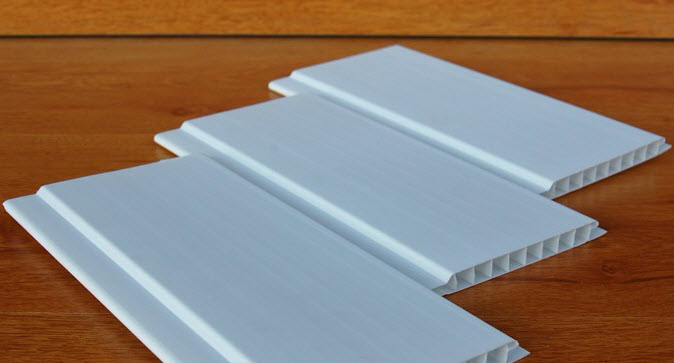
Wall panels for finishing the balcony are made either by the usual pressing and stamping method, or in the form of sandwich panels.
Ordinary balcony wall panels are made from polyvinyl chloride (PVC) - a synthetic polymer consisting of 57% rock salt and 43% petroleum products, including various stabilizing and strengthening additives, as well as pigment dyes. The finished product is light, high-quality, environmentally friendly, durable, beautiful and cheap.
Balcony sandwich panels are a new modern finishing material consisting of two PVC sheets, between which a heater is laid (usually expanded polystyrene or mineral wool). Sandwich panels are double-sided, that is, with two front sides, and one-sided.
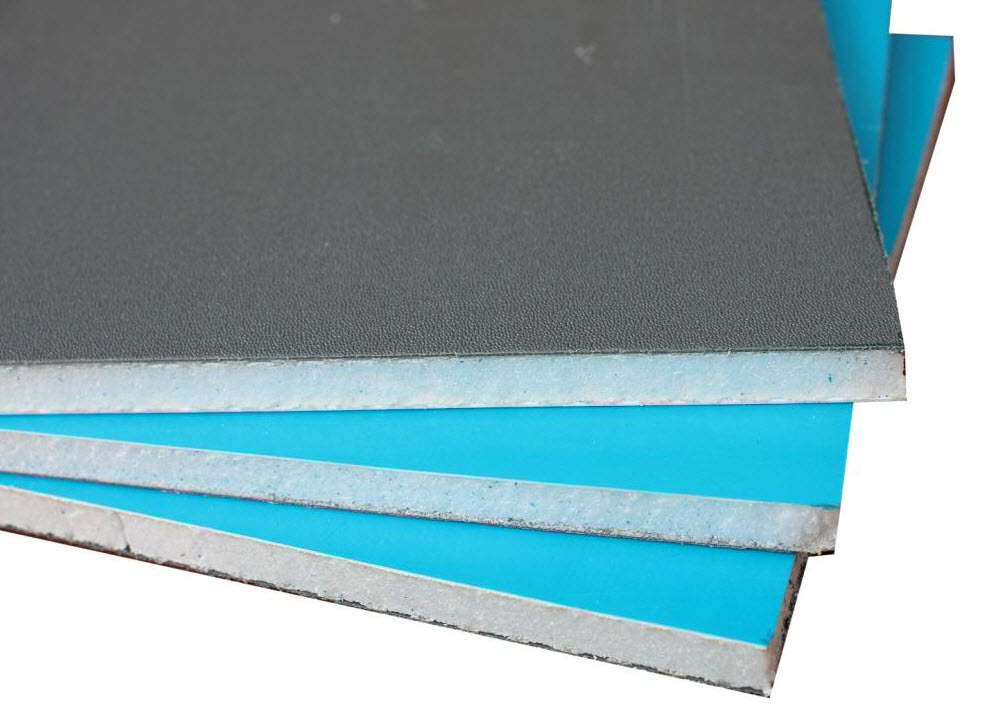
Sandwich panels
Bilateral panels are usually used for mounting all kinds of partitions, and one-sided - for walls and slopes. Their front side is made of more durable plastic which gives the panel additional strength. The usual thickness of the "sandwich" is 10, 24 and 32 mm.
The main advantage of sandwich panels is that they do not need additional vapor and waterproofing. In addition, they have the main positive properties of plastic (moisture resistance, light resistance, durability, etc.). A balcony made of sandwich panels will be seamless, cozy, and most importantly - warm.
In addition to high cost, sandwich panels have only one drawback: due to large sizes sheet (1.5x3 m) with their installation will have to tinker. You need to carefully make calculations in order to cut off the desired piece and not make a mistake. Such panels are attached to nails, screws or special glue.
Coating type
The coating of plastic panels also varies. So, in the market of building materials you can find three types:

Laminated panels
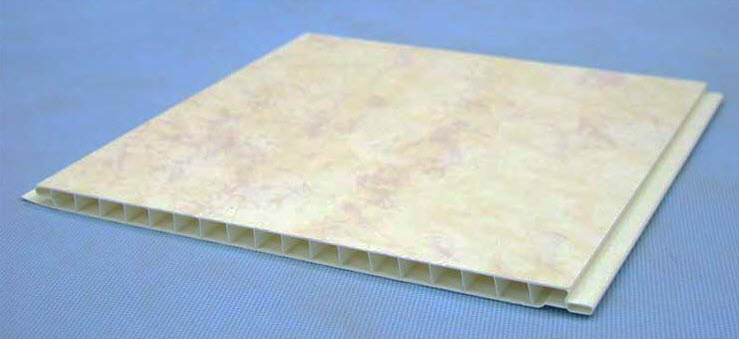
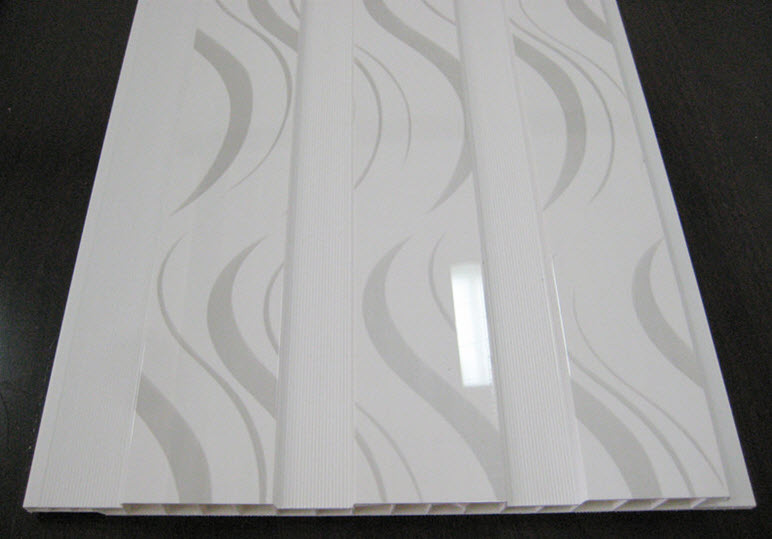
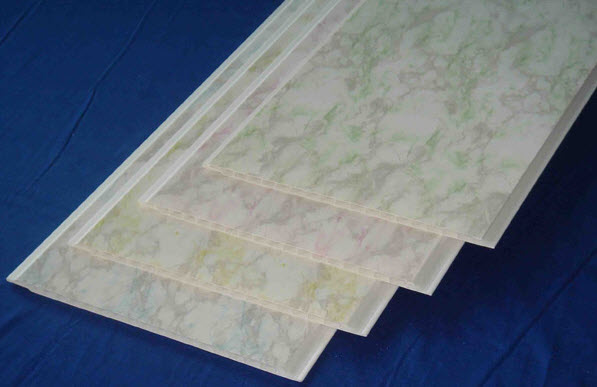
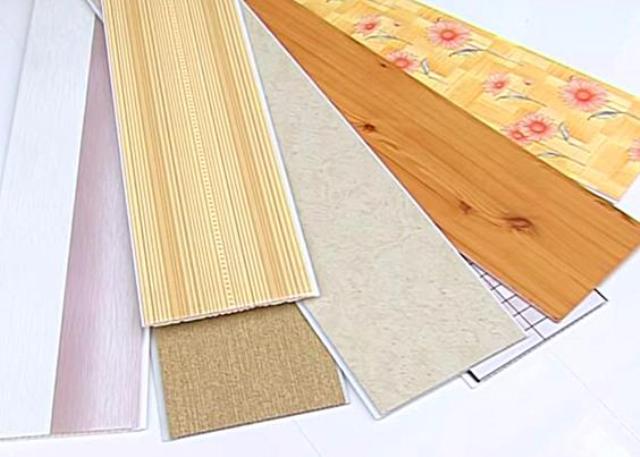
- laminated panels. A special PVC film is glued to the surface of the plastic. It can be either plain color or textured - wood, metal, leather, marble, bamboo, etc. Laminated PVC panels for the balcony are antistatic, less dirty, durable enough. And thanks to the successful combination of price and quality, they are the most popular;
thermal printed panels
- PVC panels with thermal printing. The drawing is transferred to plastic using a special thermal film. This method allows you to make any pattern on the panels, even a photograph of the customer. In this case, all colors are brighter and more saturated. A lacquer coating is applied on top, which provides additional protection for the pattern from chemical and mechanical damage, and at the same time gives it shine;
Offset printed panels
- offset printed plastic panels. The desired pattern is printed on the panels with a typographic form, after which it is varnished. Images can be very diverse, but the most common ones look like natural stone (marble, onyx, basalt, malachite, etc.).
As you can see, you can choose the material for every taste and color. The main thing is to decide on the design.
Good luck with your repair!
PVC panels are very popular today and are used for interior and exterior decoration. They are practical and economical, have an attractive appearance and can decorate yours beyond recognition.
Advantages of finishing the balcony with PVC panels
Since the panels have the property of reflecting light, the space on the balcony always has uniform illumination. Plastic panels are durable, resistant to moisture and corrosion, condensation does not accumulate on them, they do not absorb odors at all, and they are easy to clean.
The interior decoration of the PVC balcony does not require much effort, installation is quick and easy. The panels do not fade when exposed to ultraviolet light, so that the color remains the same after many years.
PVC panels are fireproof because they are made of self-extinguishing material. They are light in weight, and it will not be difficult to bring them from the store to the installation site. When finishing the balcony ceiling with PVC panels, their weight also plays a decisive role.
Plastic panels are environmentally friendly, harmless to health, because they are made from the same materials that are used for food packaging.
Varieties of PVC panels for the balcony
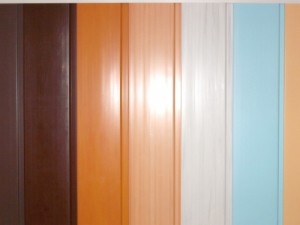
They differ primarily in color. They can be plain or imitate the textures of various natural materials - wood, stone, basalt, etc.
Panels can be suture and seamless, matte and glossy, plain and patterned. Seamless plastic is very good in its strength and visually attractive characteristics.
In addition, it can be both type-setting slatted panels, and sheet material, as well as material that imitates tiles. Type-setting panels are universal, as they are suitable for finishing walls and ceilings. Sheet panels resemble plywood with an ornament applied to the surface.
PVC panels for the balcony today are the most popular material for finishing the interior surfaces of glazed premises. PVC material is often referred to simply as plastic. The abbreviation PVC stands for a complex chemical polymer compound called polyvinyl chloride.
Products made from this material have a lot of positive qualities. PVC is not electrified, has sufficient strength, is easy to process, can have any colored surface and causes a pleasant aesthetic perception of the appearance. It is very convenient to finish the internal surfaces of glazed balconies and loggias with plastic panels.
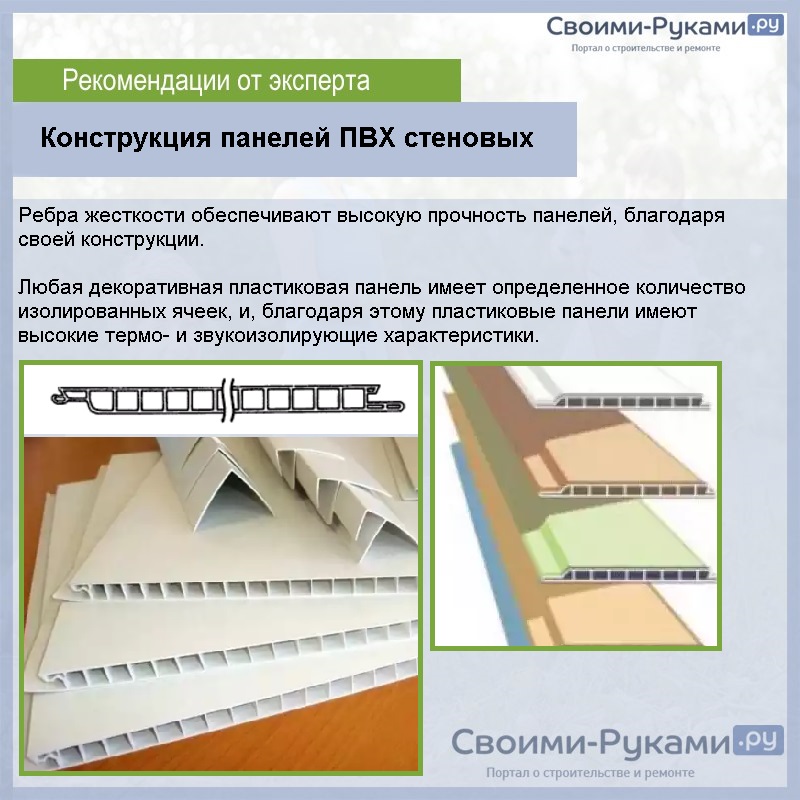
PVC panel structure
The plastic panel is a kind of sandwich. Stiffening ribs are placed between the front panel and the back surface.
Thanks to this structure, PVC panels can withstand minor loads, while maintaining the integrity of their surface.
Panel dimensions
Panels are made in lengths from 2.5 to 6 meters. For finishing balconies, plastic is usually purchased 2.5 meters long. If the height of the balcony or loggia is 3 meters, then it is advisable to buy six-meter panels and cut them in half.
For wall surfaces of complex configuration, panels 10 cm wide are used. Usually, panels of the same width - 25 cm are purchased for wall and ceiling cladding. large areas walls.
Types of PVC panel coatings
 Three types of technology for applying images and patterns to the surface of panels are known:
- offset printing;
- laminated film;
Each method of printing on the front surface of the PVC panel is attractive in its own way.
thermal printing
A special thermal film with a certain heating is applied to the front of the plastic. Then the surface of the panel is covered with a layer of varnish. The shiny surface creates a three-dimensional perception of the applied pattern.
Offset printing
 An example of thermal printing on a PVC panel
 The drawing is applied to the panel in a typographical way. This method allows you to get the best images. natural stones: onyx, marble, malachite, basalt and granite.
Photographs are good. Panels with offset printing are varnished in the same way as in the previous form.
Laminated film
A film with a finished pattern is glued onto plastic. The surface of the laminated film does not need to be varnished. The simplicity of the laminated coating technology significantly reduces the cost of PVC panels.
A variety of types of laminate flooring allows you to choose panels that mimic the structure of materials such as wood, stone, bamboo and leather. Finishing a balcony with plastic of this type is especially popular among the population.
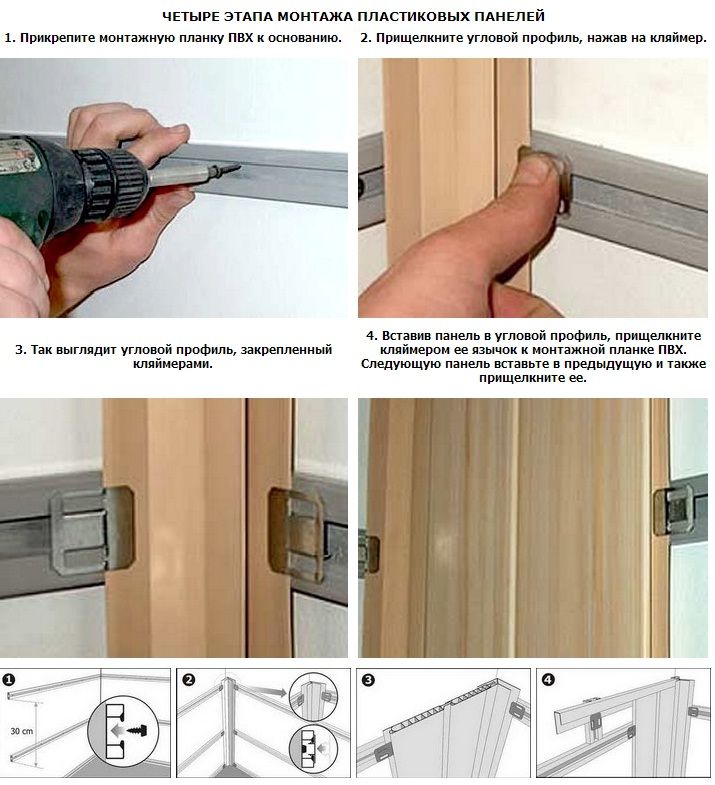
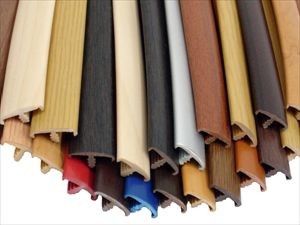
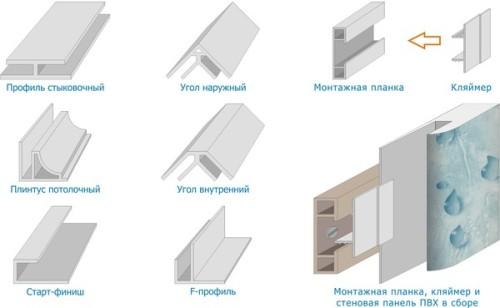 A set of fittings for mounting PVC panels
 Mounting profiles
Mounting kits are purchased with PVC panels. plastic profiles:
- end profile.
- Connecting profile.
- Inner corner.
- outer corner.
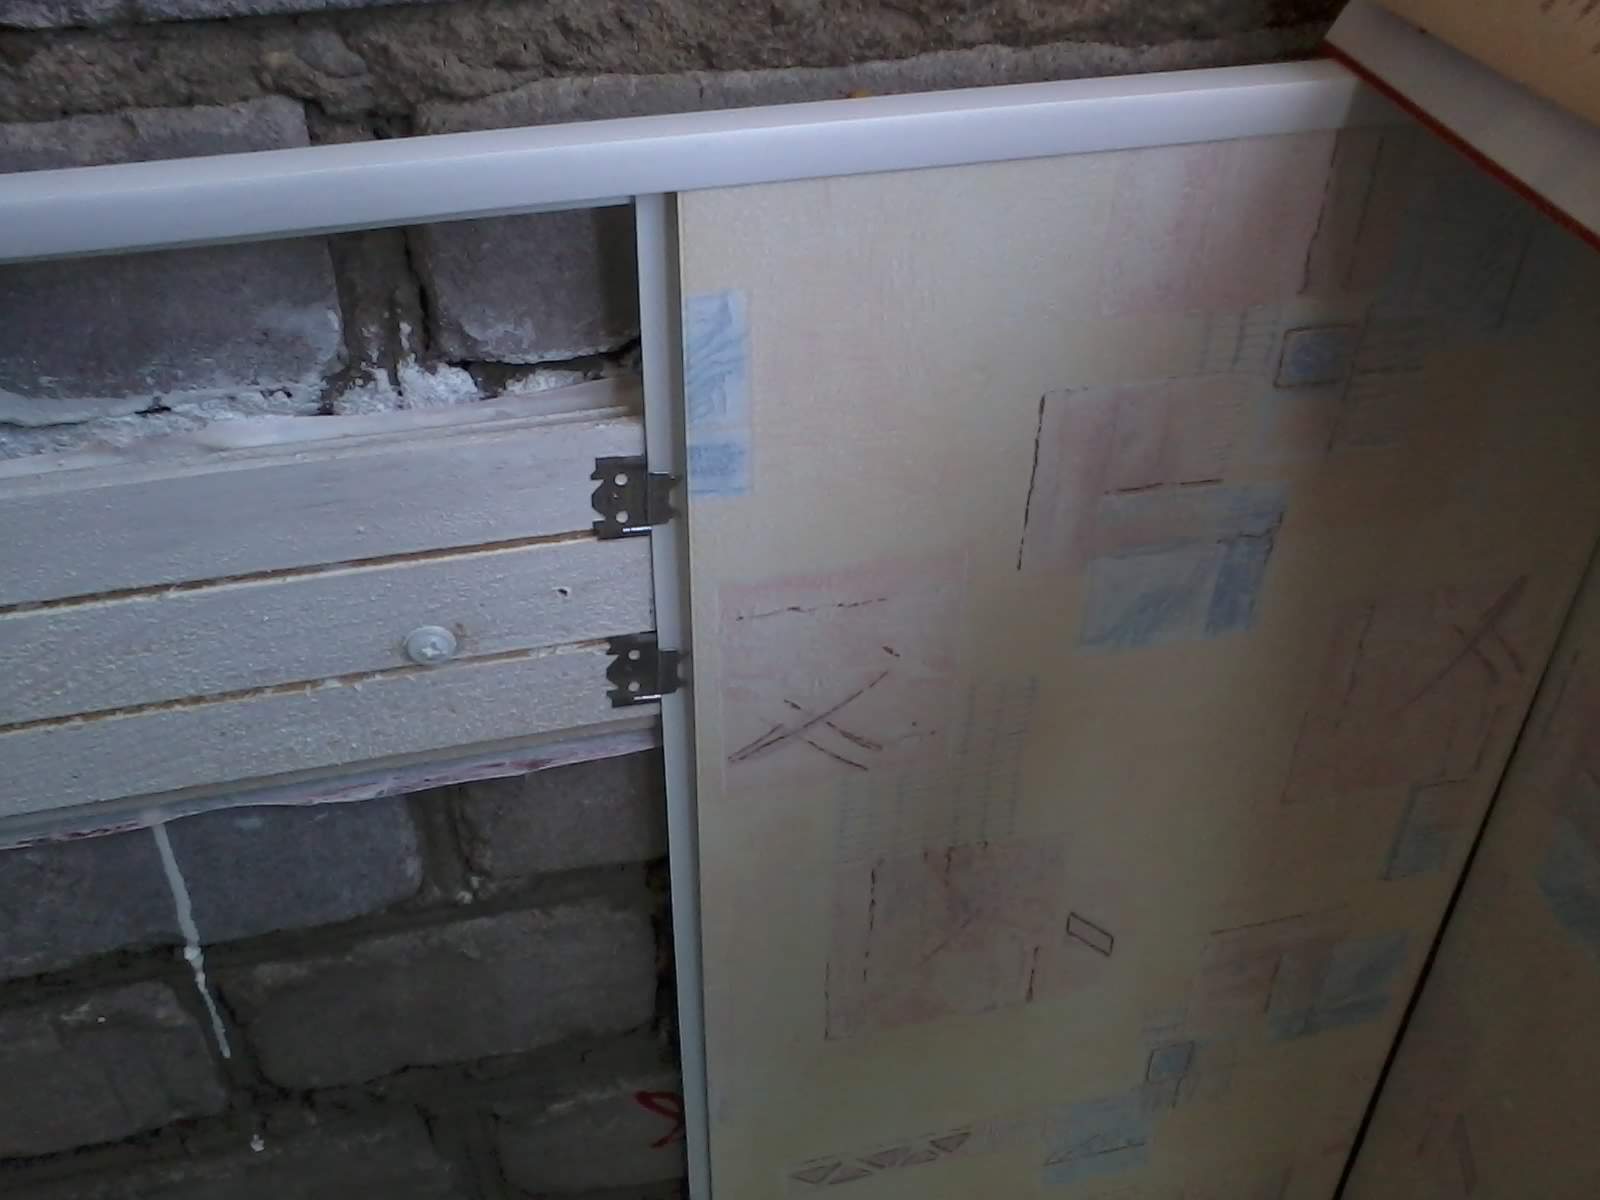
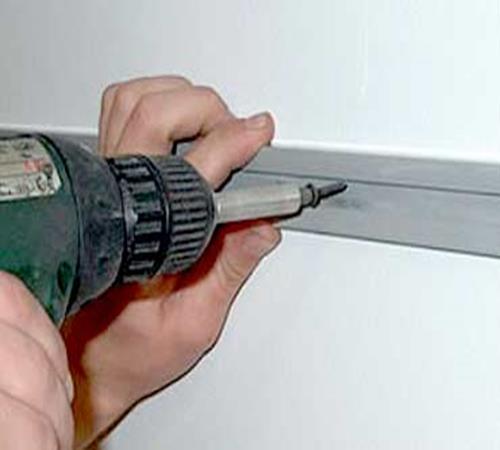 Upon completion of installation metal frame walls on the balcony (we will discuss this in detail below) in places adjacent to the ceiling, in the corners of external and internal, on window and door slopes, plastic mounting profiles are installed.
All profiles have a wider part of one of the sides.
This is made for hidden fastening with self-tapping screws to a metal frame.
How much and which mounting profile is needed for cladding plastic panels on the balcony, determined in advance. PVC panels are completed with a mounting profile to match the color of the entire plastic.
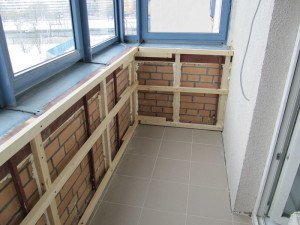
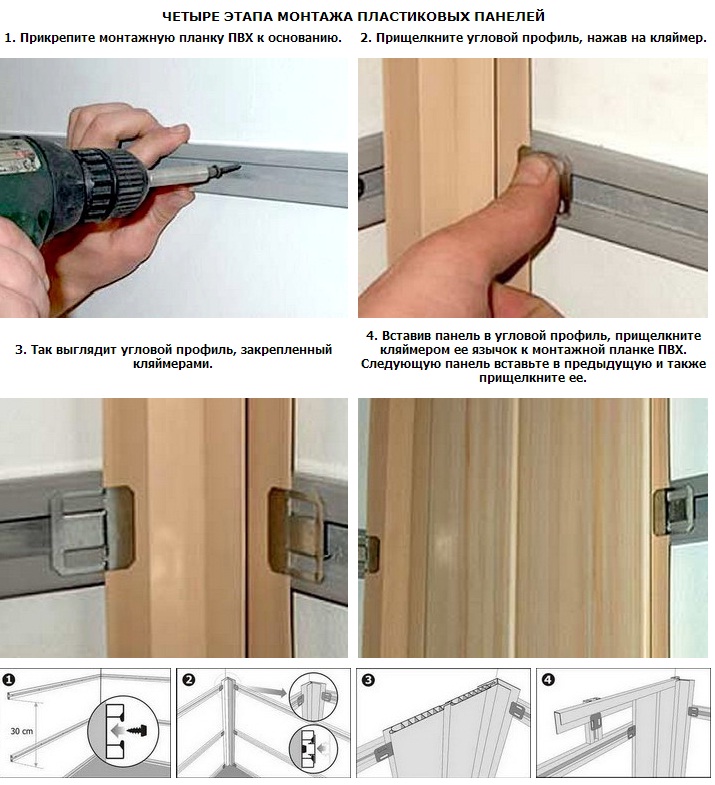
Technology for installing a frame for cladding with plastic panels
 Before installing the frame, you need to prepare essential tool: screwdriver, puncher, screwdriver set, hammer, hacksaw and pliers.
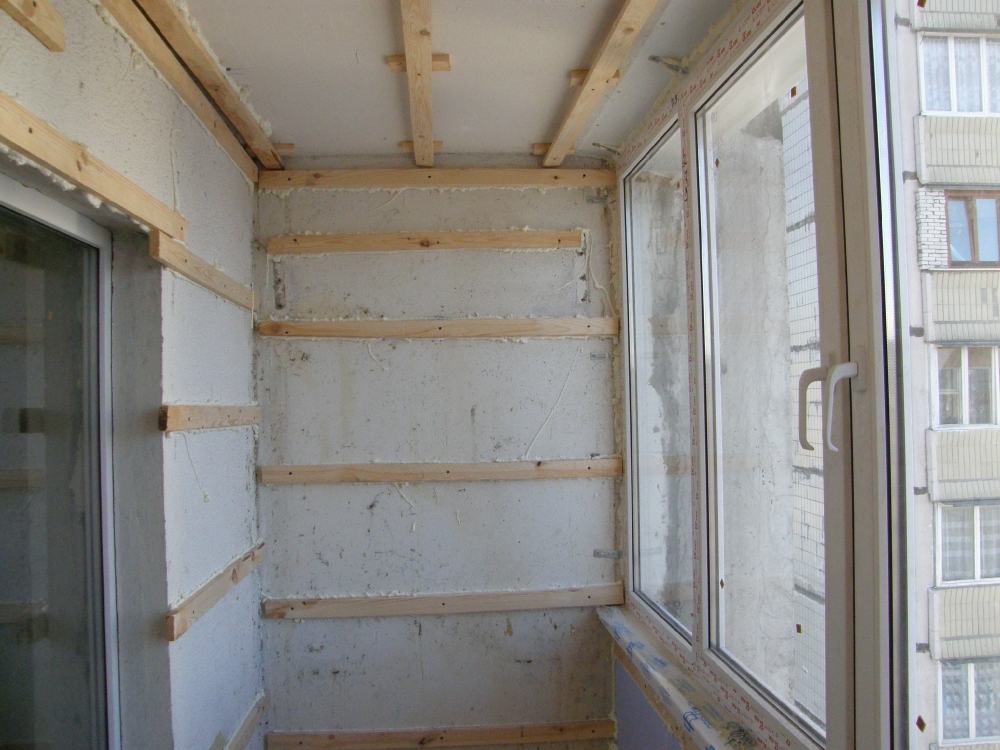
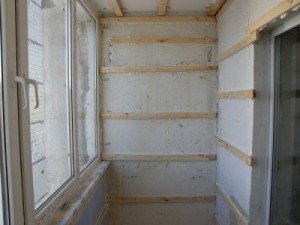
The frame for facing the glazed rooms of balconies and loggias is made of two materials: from wooden beams and a metal profile.
Wooden crate
Installing wooden beams and slats on the walls and ceiling of the balcony is a rather difficult operation. But the advantage is that such a frame itself is a heat-insulating material.
The wooden crate together with the laid insulation eliminates the appearance of cold bridges between the walls and the cladding.
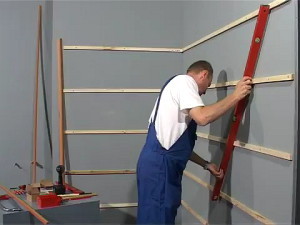
 The crate is mounted using mounting plates
 The installation of the bars is carried out using mounting plates. The plates are fastened with screws to the timber.
Then the second end of the plate is attached to the wall with dowels. Reiki and walls are drilled with a perforator.
Dowels are hammered into the holes obtained. Thus, the crate is installed both on the walls and on the ceiling.
Working with a wooden frame is time-consuming and requires special care and skills in such a matter.
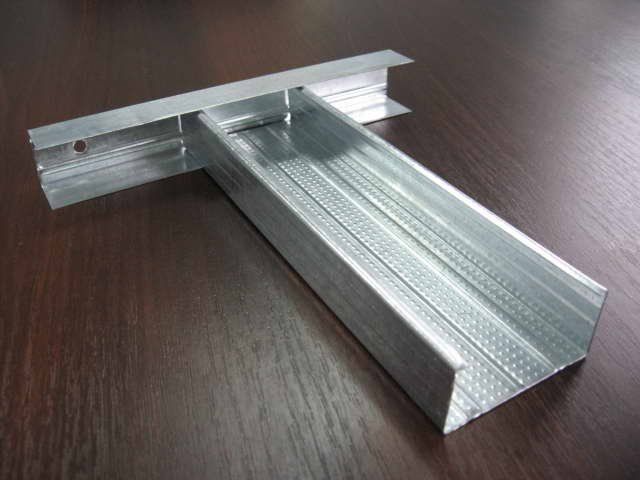
Metal profile frame
AT recent times people prefer to install a frame for facing loggias and balconies from a metal profile. A metal profile, mounting elements and hardware allow you to perform high-quality surface cladding of any configuration. For information on how to install the crate, see this video:
 First, wide profile racks are installed in the corners of the room and in the places of window and door openings. Horizontal frame ties are installed from a narrow profile.
For fastening the metal elements of the frame to the walls and between themselves, mounting plates, self-tapping screws and dowel-nails are used.
 Mount the ceiling frame separately from the walls
 In areas with a harsh climate, a metal profile on walls and ceilings can become a cold bridge. Then in winter, according to the frost that appears on the balcony lining, you can determine the location of the details of the metal frame.
Of course, this cannot be allowed. There can be only one way out of this situation. The frame must be mounted separately from the walls.
A free-standing frame will significantly reduce the internal volume of a glazed room. But the insulation placed between the frame and the walls will reliably keep the heat on the balcony and loggia.
frame false ceiling is formed in such a way that the crate "hangs" on the mounting plates. But along the entire perimeter, the ceiling frame is fixed with dowels to the walls of the loggia or balcony.
After the frame of the walls and ceiling is fully assembled, holes are drilled in the walls for sockets and switches. The boxes are installed in the seats and electric wires are pulled to them. For more information on how to drill holes for sockets, see this video:
Insulation is laid and fixed between the frame elements. It can be urethane foam, mineral wool or other heat-insulating material.
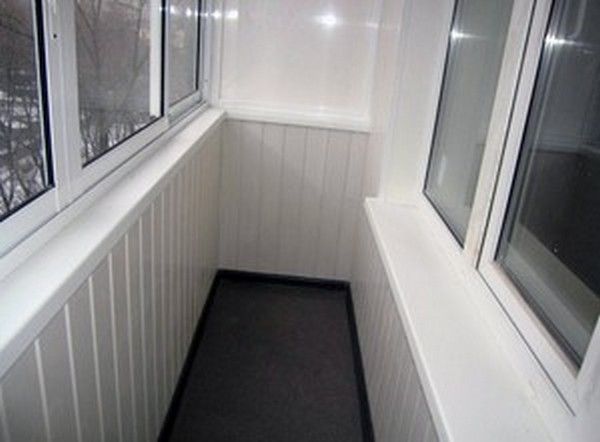
Facing the walls of the balcony with plastic
When the frame and fittings are installed, electric wires are stretched and connected, insulation is laid, mounting plastic profiles are fixed, and the walls are faced with PVC panels.
 Scheme of installation of plastic panels
 Plastic panels are butted together. The strip on one side has a thin protruding part - a feather. A groove is arranged on the other side of the strip. Connecting the panels end-to-end, they get an almost seamless solid surface.
Some PVC types panels have an elongated feather. By connecting strips of plastic, small seams are obtained. Such gaps in the surface of the cladding visually increase the height of the walls and at the same time create an original relief surface.
Consider the installation of wall cladding in stages:
PVC paneling of the suspended ceiling frame
 Installation of panels on the ceiling starts from the side of the window
 The installation of panels on the balcony ceiling begins from the side of the external front glazing. Why do you need to do this? When finishing any surface with plastic, the last strip has to be cut along. Therefore, the last strip of ceiling lining will practically be hardly noticeable, since it will be located above the entrance to the balcony. A glance from the room at the ceiling of the balcony will not notice any disproportion in the width of the plastic strips.
 Don't forget to drill holes in the ceiling for lights.
 Fasten the panels to the ceiling frame with self-tapping screws through the pen. Then the places where the suspended ceiling adjoins the walls and windows are covered with a plastic cornice.
At locations spotlights holes are cut out in the panels, the ends of the wires are brought out through them. Fixtures are connected to the ends of the wires, which are then inserted into the holes in the cladding. Thanks to the spring stops, the luminaires are firmly held in the ceiling cladding. For more information on how to fix plastic panels to the ceiling, see this video:
Only after connecting the entire circuit, the entire lighting and power supply system is connected to the electrical network of the apartment.
Maintenance of pvc balcony cladding
 Plastic panels on the balcony are easy to clean with soapy water or shampoo. Washing powder can damage the lacquered surface of the plastic, which will lead to the loss of the beautiful appearance of the cladding.
In the event of mechanical damage, the PVC strip can be easily replaced with a new piece of plastic. To do this, you need to have one or two PVC strips in stock.
Installing plastic on the balcony as a cladding is beneficial and aesthetically beautiful.
I recently met a former classmate who told me about a surprise for his wife on March 8: he was going to update the balcony with his own hands. I remembered what kind of work it cost him to put together a stool at school labor lessons. Now I encountered difficulties in the installation of plastic panels, I asked for advice.
I gave advice, and decided to fix them in the article, as they can be useful to many. Learn from this article about the important nuances of installing plastic panels.
Finishing balconies and loggias with plastic panels
Finishing the balcony - the process is only at first glance very simple. In fact, it requires certain knowledge, skills and right choice materials. Ordinary wallpapers intended for interior spaces, like painting, will not work.
On the balcony, adverse external factors are much more pronounced than in the rooms. Here, the walls are exposed to temperature changes, often there is increased humidity, an increased risk of mold, fungus, and the spread of harmful microorganisms.
Any cosmetic repair will not stand under such pressure. Therefore, we recommend that you pay more attention to the finish and the choice of materials for it. We propose to consider the option of using plastic laminated panels from well-known manufacturers "Vek" and "Vivipan" for sheathing.
laminated or regular
If you decide to use plastic panels for cladding a balcony or loggia, you will certainly have a choice between conventional and laminated materials.
There is a significant difference between these types of panels. They are created according to different technologies, and appearance surfaces are very different. But the view of the balcony should arouse the admiration of people who see it from the outside, and, well, a little envy of the neighbors.
The popularity of this cladding material is due to its availability and excellent aesthetics.
Advantages of finishing the loggia with plastic panels
Plastic has a number of advantages. This material is very easy to care for, it is practical and light.
Here are the main advantages of cladding loggias and other premises with plastic panels:
- durability. PVC has high performance, such repairs will ensure trouble-free use of the premises for many years. According to the characteristics, the material approaches the laminate. Over time, scratches and cracks that are almost imperceptible to the naked eye due to mechanical stress may appear on PVC;
- aesthetics. Plastic can be of any color or shade, it is given all sorts of textures. Such panels can be used in any style of interior, and they will be in harmony with the whole environment. Experimenters can implement any design solutions, turning a boring and little-used loggia into a full-fledged living space with a luxurious design. The variety offered by modern manufacturers will satisfy the taste of any customer;
- environmental friendliness. The material is absolutely safe, there are no toxic components in it, it is not for nothing that such a sheathing is recommended for use in medical and even children's institutions. The special polyurethane adhesive used during the installation process is also harmless;
- ease of installation. Standard sizes the panels are 2700x250x90 cm. In the process of finishing, you just need to attach individual elements to the crate using a molding. This design is completely devoid of cracks and gaps and looks solid.
- resistance to adverse conditions. By choosing such a finish, you do not have to worry that the panels will acquire an unpleasant shade when burned out under the influence of sunlight. Laminated panels retain their appearance under ultraviolet light, under the influence of temperature and humidity changes;
- affordable price. Plastic panels are available to almost everyone, and this is one of the main factors in their popularity;
- versatility. Panels can be installed on any wall material, they look equally advantageous on concrete, brick or even plywood surfaces.
If you decide to change the loggia or balcony with laminated plastic panels, you are provided with high-quality repairs with solid material, and the result will last for decades.
In this case, the process will not hit the wallet hard, but high quality panels confirmed by many users. We strive to meet the needs of our customers in convenience and comfort and are very pleased with the words of gratitude and smiles of satisfied customers.
Finishing loggias and balconies allows you to get additional space with minimal investment, which can be used on a par with the interior. It is necessary to take into account the special microclimate of the loggia when choosing materials and finishing technologies, because what is used in living rooms will not work here. Consider the features of loggias and balconies, so that later you can only rejoice decisions and their results.
How to decorate a loggia or balcony from the inside? Let's deal with this. The presented photos, videos and descriptions will help you understand the whole technology from start to finish. Consider the materials with which it is desirable to sheathe the premises, depending on the conditions of their use. Let's evaluate the physical, chemical and aesthetic characteristics of the most common materials for balcony cladding: MDF, PVC, lining, stone, plasterboard, textured plaster.
An example of finishing a balcony with clapboard, see the video:
How to prepare a loggia for decoration
In order to qualitatively finish the room, you need to properly prepare it for this process. First you need to reinforce the parapet, repair any cracks, remove all things, debris, dirt.
Explore concrete surfaces, the broken pieces must be beaten off with a hammer and removed, metal parts treated with a special composition for protection against corrosion. If there is a fungus, it can be removed by burning with a blowtorch and treating the affected areas with copper sulphate.
To seal the cracks, a sand-cement mortar is used, to reinforce the parapet - metal corners. If you have chosen cold glazing, you need to make a frame, welded or knocked down from bars.
For warm glazing, it is necessary to overlay the parapet with cellular concrete, treat all surfaces with a special composition for waterproofing, insulate the surfaces, lay a vapor barrier and fill the crate on top of all these layers.
How to choose materials
When choosing materials, you need to build on what functions this room will subsequently perform.
If you do not use glazing, but just want to decorate a loggia or balcony, you need to turn to frost-resistant materials. It can be plastic with the appropriate characteristics, blockhouse or lining, plaster or paint for exterior surfaces, siding, fake diamond, corrugated board.
For glazed and insulated unheated loggias, special materials are recommended for cold rooms. They must withstand a wide range of temperatures and sudden changes, not be afraid of ultraviolet radiation. For an insulated heated room, you can use any materials that suit your design. Usually give preference to lining, drywall, plastic panels.
It is very important to make the walls practical and attractive, especially if you plan to equip a real room in the loggia.
In any loggia, you can use a combination of brick, stone and decorative plaster- a technique common in Provence and Loft styles.
But such a finish is not the most affordable, certain skills are required for work, therefore, in most cases, it will not be possible to do such repairs with your own hands.
The use of drywall sheets for sheathing is very popular, but only at first glance, such a solution looks cheap and profitable. It will be necessary to putty the formed seams, treat the surfaces with adhesive compounds and finish the finish. At the last stage, you can use a variety of design solutions, here the limit is set only by your imagination. You can stick wallpaper, cork or rattan canvas, lay tiles, combine different finishes on one surface, even decorate the wall with artistic painting. Typically, this method of decoration is used if you want to add a useful living space of the loggia to the rest of the apartment or create a separate room from it.
crate
Regardless of which material is chosen for the sheathing, it is necessary to create a gap under it to ventilate the thermal insulation. The crate also makes the installation process faster and more convenient. It can be constructed from galvanized metal profiles or wooden bars.
When choosing for finishing a vertical blockhouse or lining, a horizontally directed crate is installed and vice versa.
 Lathing bars are laid under any finishing materials:
- from above, at the end of the sheathing;
- from below, where the floor joins the wall;
- in the corners;
- under windows;
- framing the doorway.
The middle bars are placed in increments of 40 to 100 cm, rigidity is provided by additional elements installed perpendicular to the main guides.
Do not use wooden crate in unheated rooms. The bars absorb moisture and dry out depending on external conditions. As a result, they can quickly deform, and after them, the entire skin.
Dowels are used to fasten the elements of the crate, the plastic socket should be 1-2 sizes smaller than the self-tapping screw to ensure strength. Wooden surfaces are carefully treated with an antiseptic composition and fire-resistant impregnation. The level needs to check the correctness of the planes to ensure the exact geometry of the entire skin.
In houses of the P-44t series, fire hatches are installed on the loggias, which are closed with metal covers. This makes it more difficult to install the crate. In some cases, this shield can be cut off, but often the elements of the fence are held on such a cover. You just have to bypass the hatch. On the loggias-"boats" there is a concrete pillar in the corner, which is usually hidden from view in the built-in closet.
Methods for joining panels when finishing a loggia in a video:
Finish options
The microclimate of the room and the design chosen for it are objective circumstances, but other factors must be taken into account to finish the loggia or balcony from the inside. In particular, the available budget and specific aesthetic preferences. Materials differ in their characteristics, each has strengths and weaknesses. Consider in detail the popular finishing solutions.
clapboard
A very common option. It can be plastic or wood, although both materials are practically indistinguishable in appearance and both can be used in design. Both wood and plastic are well suited for finishing warm and cold loggias, respectively, in this case the only question is price and technology.
Eurolining is equipped with shunted locks and 8 mm grooves for connecting individual elements to each other. Such a system provides easy installation and guarantees the preservation of the integrity of the skin even when the wood is dry and wet.
On the reverse side of the lining there are special grooves for ventilation of the material in order to avoid the accumulation of condensate: it flows down these grooves and is removed from under the skin. This ensures that the material is protected from excess moisture. The front side is made with different decorative solutions: rounded, even, with a notch, with a chamfer.
Natural wooden lining has the most important property - it "breathes", which is very important in conditions of high humidity.
Wood provides additional natural ventilation creating a comfortable microclimate. Wooden paneling will fit into any interior design and style, natural wood texture becomes a decoration in itself without additional procedures. If you want to enhance the decorative component, after sanding the wood, you can paint it with enamel in any color, use a stain for tinting, apply oil, brush for a brighter manifestation of the texture, and patinate. From above, it is desirable to cover such a surface with a primer and varnish.
Among the disadvantages of natural wooden lining is susceptibility to biological damage. That is, fungus and mold spread easily on it. In addition, wood is a fire hazard. To smooth out these shortcomings, you need to resort to additional work. The surfaces of the loggia, the lining itself and the crate under it are carefully waterproofed, impregnated with antiseptic compounds in 2-3 layers, treated with special refractory impregnations, and wooden elements are putty on top with PVA putty. In difficult climates, it is recommended to use larch for sheathing. It is advisable to use pine lining only if the loggia is glazed.
 PVC lining is not so demanding, and its appearance is no different from wood. Plastic is not subject to decay, harmful microorganisms do not develop on it, when using such lining, you will not need to resort to additional processing and finishing. The texture of PVC is similar to natural wood. But plastic is deprived of the ability to "breathe", therefore the insulation must be covered with a good vapor barrier membrane.
PVC lining is also sensitive to major temperature fluctuations. p and deformed under the influence of ultraviolet solar radiation. For this reason, in hot regions and on south-facing loggias, it will be necessary to supplement such a finish with mandatory glazing and blackout curtains.
For lining walls with clapboard, you do not need to have special skills, the installation is very simple and can be done by one person who is able to properly handle the simplest tools.
For finishing, it is advisable to resort to a wooden crate or use special guides with grooves. Sheathing elements are mounted on self-tapping screws or kleimers. Guides and clamps make installation even faster and easier, but this method will require additional financial investments.
If you want to make a beautiful ornament from a rail, sew up the sheathing with OSB sheets or plywood, so it will be more convenient to stuff the lining. Be sure to treat the surfaces with all the necessary protective compounds. Such sheathing will provide additional sound and heat insulation. The technology is based on the tenon-groove system, which is used to install the lining. The spikes are fastened with self-tapping screws to the crate, while the carnation is clamped with a clamp or mounted to the rail at an angle. At horizontal planking work is performed in the direction from the bottom up, with a vertical one - from the corner of the end wall to the window, after which long walls are sheathed.
After cutting the rail to size, it is applied to the attachment point, leveled with a level and only then fixed. In order for the lining to fall into place, you can knock through the board. So with the help of the tenon-groove system, the rail is attached to the rail to the end of the surface.
In the process of wall cladding with natural wood, in order to avoid deformation due to moisture, a centimeter gap is left between the floor and the cladding and between the ceiling and the cladding.
When choosing original version sheathing, you can draw an ornament on the plywood of the crate and cut the lining according to the scheme. The upholstery of the drawings is carried out from the center of the loggia to the corners.
After wall cladding, if provided by the designer's idea, you can hem the ceiling. Only after that the ceiling cornice and the floor plinth are installed. Before finishing, the lining is polished. PVC lining does not need additional processing.
The technology of wall decoration with PVC panels on the loggia in the video:
PVC panels
PVC panels for the most budgetary repairs are practically no alternative. The material has dimensions convenient for sheathing, almost no debris and waste is formed during the installation process. The panels are coated with melamine resins to protect the plastic from chemical and thermal influences. FROM inside to protect against mechanical impact, partitions are made that perform the function of stiffeners. This design additionally protects the room from outside noise and retains heat.
There are special types of PVC panels recommended for interior decoration in harsh climates., such material can withstand 40-degree frosts without any problems. Plastic does not allow moisture to pass through, it does not need to be additionally lined, it is very easy to care for it. To clean matte surfaces, it is permissible to use abrasives, glossy ones are washed with soapy water.
An unlimited choice of colors and textures, patterns and ornaments make such panels versatile in use in the most different styles interior. But, like any plastic product, PVC panels are afraid of exposure to direct sunlight under which they lose color. To avoid this, it is recommended to protect the surfaces by hanging blackout curtains on the windows.
The decoration of the loggias with plastic panels is carried out in the same directions as the clapboard, from the bottom up in the horizontal direction, from the corners of the end wall to the window.
There are 2 technologies for installing wall panels.
In the first case, installation is carried out similarly to clapboard cladding., with the exception of a steel profile in the corner - this is where the first panel is inserted. The penultimate and last element are set at the same time. The finishing profile is closely attached to the window, the last panel is cut 1-3 mm less than this size. Next, the grooves are filled with silicone, the panels are folded into a “house”, the cut edge of the last die is inserted into the profile and the panels are straightened by pressing.
 The second method is recommended for vertical finishing wall panels in the case of floor and ceiling cladding. Before proceeding with wall cladding, you need to install a special plinth with a groove from below and above. When cutting panels, you need to make elements smaller by 2-3 mm. The top edge is inserted into the groove, after which the panel needs to be slightly bent to insert the other edge into the bottom groove, after which the panel is straightened until it clicks.
After installing all the elements, strips are used to close the corners and joints.
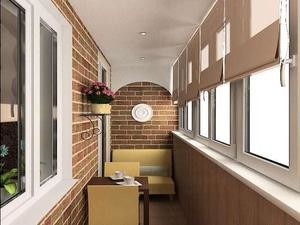
When finishing balconies and loggias, as can be seen in the presented photos, you can use a wide variety of various finishing materials. We have reviewed the most popular ones here. We found out what you need to build on when choosing a skin.
For a high-quality result, it is necessary to approach the sheathing comprehensively, and then the wall surfaces will delight you with their properties and appearance for a very long time.
How to panel a balcony
Apartment owners often neglect the issue of finishing, trying to save more, because the balcony is not so often used as a full-fledged living space. But it is not at all necessary to spend heavily on the purchase of materials, such as ceramic tile or lining. To change the decor of the room, increase its thermal insulation, it is enough to use inexpensive PVC panels that will last no less. Consider the advantages of plastic panels for sheathing loggias and installation technologies for such surfaces.
Panel selection
Why are plastic panels so popular for balcony cladding?
 This is due to a number of their advantages:
- PVC is not afraid of moisture, such panels allow air to pass through and are not subject to putrefactive formations;
- are not afraid of external weather conditions, perfectly withstand heat and cold, do not warp from frost and do not fade from the sun;
- the material provides the room with good heat and sound insulation;
- surface is not static- it does not collect dust;
- they are very easy to care for: even a simple sponge without detergents is enough to remove dirt;
- in the presence of metal-plastic windows, plastic panels will perfectly fit into a single picture with them;
- a variety of colors, the ability to imitate various natural materials, the availability of glossy, matte, laminated, metallized options on the market makes it possible to realize the most elaborate design fantasies.
When choosing PVC panels for sheathing, the following nuances should be considered:
- manufacturers offer plastic panels both narrow (25 cm) and wide (38 cm). The latter are better suited for a balcony. The length of the panels is 2.7 and 3 m;
- the more stiffeners in the panels, the stronger the structure will be;
- pay attention to the wrong side of the panels. It must be uniform in color, unacceptable inclusions unforeseen by the color;
- on the front side, the presence of even micro-blemishes is unacceptable, it must be perfect. There cannot be a blurry pattern, no waves should be present and stiffeners should not be visible, there cannot be incompletely painted areas;
- when buying, try to dock the two panels. When you hear a characteristic click, see if a gap has formed between the elements - it should not exist;
- do not take defective material, even for the purpose of saving, there should not be a hint of chips and holes on the surface;
- prepare a number of tools for work: a drill, a hammer, a level, a puncher, a tape measure, a saw, metal shears.
About the intricacies of the process of covering the balcony with plastic panels in the video:
Balcony glazing
Before proceeding with the sheathing itself, it is necessary to carry out preparatory work.
It is they who are decisive for the result. Proper preparation allows you to radically change the temperature regime of the balcony, from outdoor to indoor. And on the loggia it will be comfortable even in the winter season: when it is -20 outside, the air temperature in the room will not drop below +17 degrees.
The preparatory stage involves glazing the balcony, insulating the walls and sealing the joints. For glazing, we recommend using PVC-U double-glazed windows without ventilation slots. It is necessary to leave several double-glazed windows open, preferably in pairs in the corners (usually 2-4 double-glazed windows). The rest of the windows are deaf. Drainage profiles are installed.
Balcony insulation
Instructions for the phased insulation of the balcony:
- the cracks on the outside must be carefully sealed, turning the balcony into a blind box. For sealing use silicone, cement mortar, construction foam;
- the first insulation layer is mounted from foam. It fits between the bars. If the apartment is on top floor or when working on an open balcony, it is necessary to insulate the ceiling. To do this, a CD profile is hung on it after 50-70 cm. It will become a crate for subsequent sheathing. Wooden slats are not suitable for this task, since the wood is highly deformed under the influence of moisture and the entire finish will suffer if it leaks. Next, the foam is placed in the space between the parts of the profile; silicone can be used for gluing;
- The next step is the most labor intensive. This is the arrangement of the crate. It is necessary to drill holes in the parapet to install the CD profile. Threads are cut in the holes (M3 is suitable) for installing the elements of the crate. Fastening is carried out with screws. It is not recommended to use dowels, because after a few years they will weaken, begin to hang out and the whole finish will suffer. Styrofoam is again laid between the profile sheets. If necessary, electrical wiring is laid at this stage.
 Installing a profile
For sheathing, several types of profiles are used:
- straight;
- dihedral for simple corners;
- trihedral for triple internal corners;
- outer corners for finishing the opening of the window overlooking the balcony.
Learn more about profile elements:
- straight U-profile attached to the crate through a wider sidewall;
- simple angle consists of two straight profiles connected at right angles. This angle is placed on the corners, you can also use two straight boxes;
- triple angle is established on external and internal trihedral corners. It consists of three profiles connected at right angles. If you are used to working with a chair, you can do without such an angle.
The profile on the crate is fastened with self-tapping screws with extended caps (“pancakes”), which are installed using a drill. Guides should not only be in the corners, but also be used to frame the balcony window and door. Make sure that the profile does not crack during the installation process.
Panel mounting
The next stage is the direct installation of plastic panels.
 We begin to sheathe a solid surface on which there are no openings:
- work is carried out from the corner of the balcony to the center. Cladding panel cut to the proper size and inserted into the groove of the box from below. At the same time, hold the upper part with your hand; to install it in the upper groove, the panel is slightly bent. If the panel does not want to straighten up in its place, you can lightly slap it with the palm of your hand. Fix the position of the panel with a press washer. On a 2.5-meter panel, you will need to use 2-3 fasteners. After installation, check the position of the panel with a level and make sure that it is absolutely level;
- the second panel is installed on the first one through the tenon-groove system. Connect the first and second panels in this way, when the fasteners fit exactly into place, a characteristic click will be heard. In the same way, all panels are installed up to the penultimate one;
- installation of the last board performed so that a small empty space is formed in the profile. We drip a few drops of silicone into the finishing box and insert the last panel into it until it stops;
- now it's up to the penultimate board. It is placed with an overthrust on the previous one, at the same time the last panel is pulled out of the profile, so that it sits in the penultimate groove.
Making openings
Sheathing of openings is a stage that must be approached very responsibly. First you need to sheathe the remaining surfaces with solid boards. The area remaining under and above the opening is sheathed at the very end. The last board is measured before cutting, while controlling the tight joining of the remaining panels with each other: the tongues over the entire area should be tightly driven into the grooves.
In case of formation of cracks during the installation process, they should be covered with PVC plinth, fixed with mounting glue.
To exchange the air of the balcony with the living quarters below balcony door holes are made with a diameter of 15-20 mm in several rows. They can be masked with a decorative grille.
The air flow will be provided by a regular window on the balcony window, and in the summer you can open all the windows.
How to decorate a balcony with plastic panels
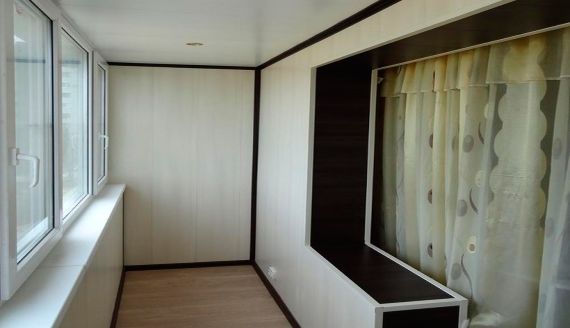
Today, people use all sorts of decorative options finishing the balcony to decorate the space and join this room to the general style of the interior of the apartment. Most often, plastic panels are used for such decoration. Such a balcony is pleasing to the eye, you want to be on it. Finishing is carried out after the exterior decoration and glazing of the balcony.
The advantages of plastic panels that made this material the most popular:
- ease of installation. There is no need to pre-align the walls and ceiling;
- easy surface care, which can be cleaned with a sponge and ordinary detergents;
- a wide range of all kinds of plastic panels on the market;
- environmental friendliness and fire safety of the material;
- durability- such panels can serve well up to 30 years.
The optimal solution for finishing the balcony - modern PVC panels made from special polymer raw materials. Such products are durable, moisture resistant, resistant to temperature extremes and other weather and climatic influences.
Due to the presence of an air cavity from the inside, PVC panels provide good sound insulation in the room.
The width of the panels on the market is 250, 300 and 500 mm, the length is 2.6, 2.95, 5.9 m. When using the panels, a flat and smooth surface is created. If you want to get decorative joints, you can sheathe the balcony with clapboard.
The basis for fastening PVC panels is a metal frame made of profiles on self-tapping screws. If necessary, it is insulated with foam, polystyrene. If you want to finish the balcony with your own hands, instead of a metal one, you can use a wooden crate made of bars. It is easier to mount and fits perfectly under plastic panels. It is recommended to use 10x30 mm rails. The panels are easily attached to the crate using metal staples or a construction stapler.
Panel colors are practically unlimited. But since finishing is carried out for many years in advance, we do not recommend that you resort to too colorful and bright panels which may become boring later. It is better to use PVC sheets with beautiful patterns for decoration.
To visually add height to the balcony, the panels can be laid in a vertical direction, but such a solution will visually reduce the width of the space accordingly. When laying panels horizontally, the effect will be the opposite.
There is another option for laying - diagonally. It is quite difficult to install the panels in this way, so if you do not have the appropriate skills, you will either have to abandon this method, or call for help from the masters.
The most common method is the vertical installation of panels on a wooden frame. In this case, the lathing bars should be laid in a horizontal direction, the step between the bars is from 500 mm. The elements of the crate are fastened to screws or self-tapping screws, connected both to the wall and to each other. Fasteners must be at the same level so that the panels subsequently fit evenly. The lower bar of the crate is at a height of 50 mm from the floor, the upper one is directly at the level of the ceiling. Separate slats are used to design the door and window opening.
Panel mounting
When finishing a balcony and a loggia with your own hands, the best option would be PVC panels 100/200 mm wide and 10 mm thick. Such products are suitable for rooms with any glazing.
 Finishing the balcony with PVC panels in the vertical direction starts from the corners. First of all, a molding is placed into which the first panel is inserted with a narrow shelf. A wide mounting shelf is attached to the crate with self-tapping screws or staples. The first strip is laid strictly vertically, this moment must be carefully monitored, since the rest of the elements will be oriented along the first strip.
From time to time you need to control the position of the panels using a level trying to avoid distortion. The second panel is inserted into the groove of the first, the opposite side is attached to the crate. So the panels are installed one by one to the end of the wall. At the end corner, the last board with a thin shelf is inserted into the groove of the penultimate one, wide - into the corner.
If the whole panel does not fit at the end of the plane, you need to measure the distance from the corner of the molding to the penultimate panel. 1.5 cm is subtracted from this value and the desired size is transferred to the panel. Having cut it, you should carefully, helping yourself with a screwdriver, insert the board into its place. At the very end of the finish, cuts and other not-so-attractive elements are covered with plastic moldings made of the same material as the panels themselves.
For finishing balconies and loggias, natural wooden lining can be used. It is eco-friendly, practical and durable material.
The ceiling of the room is finished in the same order, the same panels are used for sheathing. A ceiling plinth is mounted around the perimeter at the very end.
So, very budget, very easily and quickly, you can sheathe a balcony, turning it into a full-fledged living space or simply improving functionality. In the same way, the balcony is finished with clapboard.
The choice of finishing material depends only on you and the characteristics that are important to you.
If it is very important to fit into a small budget, PVC panels are perfect for you, which you can install yourself,
Even after decades, such a balcony will remain representative, beautiful, because such a sheathing is very practical and durable.
See the video for how to install plastic panels:
A wide selection of the most modern finishing materials makes it possible for each consumer to purchase the best option for himself in all respects. This must be done consciously, clearly presenting the advantages and disadvantages of each of them. In this article, we will talk about only one material - PVC plastic panels for balconies.
In areas with an unfavorable climate, the importance of balconies cladding with simultaneous insulation increases significantly, and the requirements for the quality of panels also increase. Depending on the wishes and architectural features of the building, balconies can be upholstered only from the outside, only from the inside, or from both sides. At the same time, glazing is installed on the balconies first. A balcony converted in this way can easily be attached to living quarters, thereby increasing the useful area of \u200b\u200bthe kitchen, hall or bedroom, depending on which room it adjoins.
- Internal lining. All construction work is carried out from the inside, external surfaces remain intact. Not a very popular method, the appearance of such a design leaves much to be desired. It is used only in cases where insulation is not done.
- Outer skin. This method can be found more often, but among young developers this option is not considered acceptable. It is also used only when arranging a cold balcony. If from the outside the balcony is ennobled, then from the inside, few people are satisfied with its appearance.
- Complex upholstery. Materials are fixed both from the outside and from the inside of the structure. The most popular method at present allows you to create warm rooms, significantly improves the microclimate on the balcony. It is possible to make a warm floor on it, install furniture, eliminate the wall between it and the adjacent living space.
Plastic panels for the balcony are produced by numerous companies, there is still no single common standard. Each is guided by its own specifications, best suited to the capabilities of the available equipment. Most often, the length is 2.7 meters, the thickness is 10 mm, but these dimensions can vary widely. The color, texture of the front layer, the type of castle, etc., for the most part, are not regulated.
First of all, you need to pay attention to the maximum and minimum operating temperatures, resistance to hard ultraviolet radiation, thickness and type of castle. These are the physical characteristics of the materials. As for design indicators, there is no universal recommendation here. Professionals advise to take into account the interior of the premises and the appearance of the facade of the building. Select material in such a way that it organically fits into existing design solutions. By color solutions the product range includes more than 180 types.
What to look for when choosing?
Advantages and disadvantages of PVC panels
If the manufacturer is conscientious, the material is of high quality, the equipment is modern, and the manufacturing technology is not violated, then PVC panels have much more advantages than disadvantages.
Weaknesses: insufficient physical strength, flammability, in terms of safety it is difficult to attribute to completely environmentally friendly materials.
The technology of cladding balconies with PVC panels
The dimensions, material of manufacture and appearance of the texture should be selected depending on the place of use, interior design and financial capabilities. After a decision has been made on the types of panels and the method of finishing, you can proceed to the direct execution of work.
Step 1. Checking the condition of the parapet and the bearing reinforced concrete slab.
Most of the old balconies have metal parapets; for many years of operation, the bearing indicators of metal structures have lost their original characteristics. They need to be removed completely or overhauled. The best option is to put a foam block fence instead of a metal parapet.
But the decision should be made on the spot by a professional master after evaluating many factors and taking into account the wishes of the owners. We recommend, if possible, to install foam blocks, they have low thermal conductivity, but the strength is sufficient to withstand the installation of glazing. In addition, it is very easy to attach PVC panels to them for finishing.
Step 2 Counting the number required material, measurement of surfaces, selection of the method of fastening panels.
What are the methods of fixing the panels?
Depending on the chosen method of fixation, purchase materials and additional elements. As an example, a lightweight option for finishing a balcony with PVC panels will be considered - along the parapet.
Step 3 Preparation of the metal frame. To do this, metal strips are welded to the parapet at certain distances, the strips are about 10 cm long, 2–3 cm wide, and ≈ 2–3 mm thick. The strips are installed on both sides of the parapet, while taking into account the thickness of the insulation. For most cases, a thickness of 10 cm is sufficient, this will have a positive effect on heat saving and not reduce usable area balcony.
Step 4 Holes Ø 5–6 mm must be drilled in metal strips to fix the rails. The rails are fastened with bolts, the nut must be tightened until the bolt head is completely sunk into the tree. If there is a desire, then a large diameter hole can be drilled under the head, the depth of the hole is equal to the thickness of the head.
Important. The slats must first be installed on the outside of the parapet, then a plastic film for waterproofing should be attached with a stapler, a heater should be installed, and only after that the slats should be installed from the inside.
As a heater, it is better to take foam plates of the appropriate thickness. They have high rates of heat saving, at the cost of the most affordable. And the amount of chemical compounds released into the air is not of great importance for balconies.
Step 5 Cut PVC panels to size, prepare end and corner strips. These additional elements must be purchased at the same time as the panels. Keep in mind that during cutting, the dimensions should only go minus (no more than 0.5 cm), but not plus.
If there is a desire or this is required by the technology for mounting large PVC panels, then instead of rails to metal strips, moisture-resistant plywood or OSB boards should be fixed. In the future, the fastening of the finishing skin is carried out using liquid glue.
Step 6. Work should start from one of the corners of the balcony and then move in a circle. Very carefully fix the first panel, carefully check its position with a level. If there is not enough experience, then it is recommended to check the correct spatial position of the plates after two or three rows.
PVC panels - trim strips (moldings)
Practical advice. If it is found that the plate is not in a vertical position, then the error should be corrected gradually. Move each next plate no more than one millimeter, otherwise the marriage will become noticeable. The casing is fixed with a stapler, the length of the staples is not more than 6 mm.
Carefully finish the installation sites of windows and doors, remember that the ends of the sheathing must necessarily have a stop, and not hang freely in the air.
PVC panels can be fixed with a stapler
Step 7 In the same way, sheathe the outer surfaces of the parapet. Pay attention to the tightness of the individual panels in the locks, do not allow gaps. For sheathing external surfaces, you need to purchase only materials that are resistant to UV rays. If you do not adhere to this rule, then after 2–3 years the outer skin will lose its plasticity and will crack at the slightest load.
Step 8 The ceiling is finished according to the same algorithm, if desired, insulation can be made.
Video - Types of plastic panels


